MachPower SM-DLCB-006 User manual

USER MANUAL
SMART DOOR LOCK
MANUALE D'USO
SMART DOOR LOCK
MANUAL DEL USUARIO
SMART DOOR LOCK
SM-DLCB-006
EN
ITA
ES

1. Technical Specifications
2. Product Description
3. Installation instructions
4. Settings
5. Reset to factory settings
6. Language settings
7. Open the door
8. Door opening event log
9. Low battery alarm
10. Incorrect entry of the opening code
11. The key light is off
4
4
5
6
9
9
10
10
10
10
11
ENG
3
INDEX

Door types
Door thickness
Door thickness
Power supply
Operating current
Operating current
1. Smart DoorLock SM-DLCB-006
2. Emergency micro magnetic induction keys
3. Tools for installation
Armored doors, wooden doors, glass
doors
40mm / 100mm
15kv
3.6V - 5V
<135mA: Standby <10uA
- 20 ° C / 70 ° C
2. PRODUCT DESCRIPTION
1. TECHNICAL SPECIFICATIONS
4

3. INSTALLATION INSTRUCTIONS
3.4 Install the lock
Screw in the lock screws.
3.5 After installing the knob
1. Pull the knob backwards and using
the supplied tool, tighten the screws.
2. Use the rear knob to make sure you
have installed the cylinder correctly.
Check that the cylinder opens correctly.
3.1 Remove the original lock cylinder
Unscrew the screws and remove the
cylinder of the original mechanical lock.
Install the lock cylinder and secure the
front, rear and side panels.
3.2 Remove the cylinder of the smart
lock and knob
Remove the smart lock cylinder and
knob.
3.3 Installing the smart lock cylinder
Install the smart lock cylinder on the
front panel. Adjust the position to match
the screw holes.
ENG
5

3.6 Battery Installation
1. Remove the front knob cover and
unscrew the battery compartment cover
using the supplied tool.
2. Insert 3 AAA size batteries into the
battery compartment. Pay attention to
the direction of the positive and nega-
tive poles. The end of the spring is the
negative pole.
3. After inserting the batteries, close the
battery compartment and the knob
cover.
3.7 Test after installation
1. Verify that the lock is securely installed
on the door. Check that the rear knob
opens the door in the correct way.
2. After connecting the power supply,
the motor reverses. It will be possible to
turn the knob minimally. Enter the initial
password to open normally.
3.8 Use of emergency keys
1. Open the front knob cover.
2. Insert the emergency key and turn
the key 30 degrees clockwise. The front
knob cannot rotate.
3. Turn the front knob to open the door.
Before following the instructions below, check that the blueto-
oth of the mobile phone is active, and that the phone and the
port are close, we recommend a maximum distance of 5 meters.
4. SETTINGS
6

ENG
1. Connect the APP
Download the Tuya App from the store, depending on the
smartphone.
Open and follow the registration commands. Click on “+” located
at the top right of the homepage.
1.1 Manual Add
Click on “Protection sensor” --- “BLE lock”, confirm the guided
item, on the left. Press any key to activate the keyboard of the de-
vice, press “<” to activate the bluetooth of the device. Wait a few
seconds and the device name will appear, then click connect.
1.2 Automatic search
Click on “automatic search” at the top, to make sure the lock
is powered correctly, press any button to activate the device
keyboard, press “<” to activate the device’s bluetooth. Wait a few
seconds and the device name will appear, then click connect.
2. Fingerprint configuration
2.1 Add fingerprint
Click on the device name from the home page, enter the confi-
guration screen, and click “Settings-fingerprint management-top
right corner + number-add fingerprint”, select the user, click
“Start scan “, enter 4 fingerprints according to the command,
after entering successfully will show” Fingerprint Name “, enter
the name and add correctly.
2.2 Remove fingerprint
Click the device from the home, enter the management screen,
click “Fingerprint Management”, click the icon to the right of the
fingerprint to delete.
7

3. Password configuration
3.1 Add Password
After clicking on the device name, enter the configuration
screen, click on “Settings, password management - add the
password in the upper right corner + Nu.”, Select the user, enter
the password and the nickname as per commands shown on
the page, the password must be between 6 and 0 characters in
length, click save to complete the procedure.
3.2 Delete Password
After clicking on the device name, enter the management
screen, click “Password Management”, click the icon to the right
of the fingerprint to delete.
4. User configuration
In the configuration screen it is possible to choose between two
different types of users:
1. Relatives
Users already present in the “Family” group in the application,
new users who are added to the “family” group will also be auto-
matically added to the lock group. Note: it is possible to delete
a user from the “family” group only through the management
page of “family” users.
2. Other Users
They are users present only in the lock group, not in the “family”
group. Adding and deleting these users will have no effect on
the “family” group
4.1 User Management - Other User Management
4.1.1 Period of validity
The administrator can decide the other users, choosing whether
8

Open the application, click on the device, enter the manage-
ment screen and click on “Language Settings” to select the
language.
Click on the device from the home screen, enter the device
management screen, click on the icon at the top right, enter the
device, go down to find factory reset, and click on it.
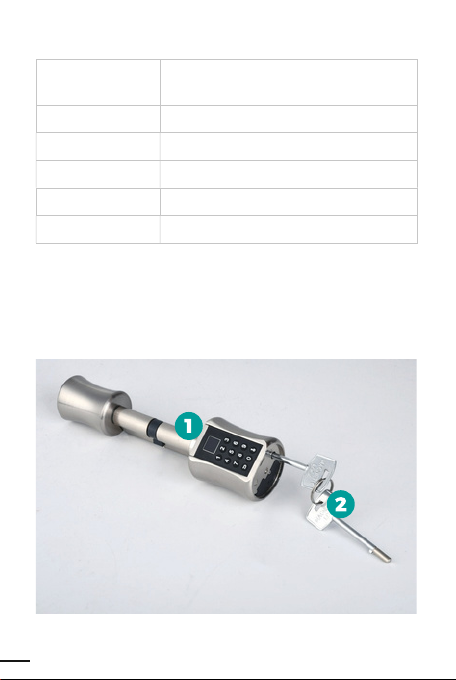
5.1 It is possible to restore the factory settings when both the
smartphone and the lock are connected via Bluetooth. All
methods of opening the door will be cleared, and the lock will
be reset to factory settings. After about 3 minutes, users will be
able to re-add the lock on the application.
5.2 If the smartphone is not connected to the lock via bluetooth,
the lock is reset to the factory setting. The way the door is ope-
ned on the door lock remains unaffected
ENG
to set as a permanent user or set a start and end time for using
the lock.
4.1.2 Open the door
The administrator can determine the type of permission that
each member can obtain to open the door; if the administrator
decides to block the door opening, no user will be able to open
the door via the application, the door must be opened manually.
4.1.3 After adding a new user
The administrator can associate the new user with the use of the
application through the “Share” operation. At the end of the time
set for sharing, the user will no longer be able to use the device.
6. LANGUAGE SETTINGS
5. RESET TO FACTORY SETTINGS
9

7. OPEN THE DOOR
Door opening event log
Voice Prompt 3.6v: Replace the batteries if the battery level is
low.
Open the application, select the device, move left to the
“Dynamic Password” screen, click “Get”, to generate a dynamic
password, valid for 5 minutes after it has been generated, Enter
the 8 digits + “ ”, to open the lock.
Entering the wrong fingerprint 5 times consecutively (3 times the
wrong password). The device will lock up and cannot be used for
the next 3 minutes.
Press any key to activate the keypad on the knob, enter the pas-
sword and click on “ ” the lock will open and the light will be
blue, at the end of the time for opening the door, the lock will will
close and the blue light will go out.
Place the fingerprint, the lock will open and the light will be blue,
at the end of the time for opening the door, the lock will close and
the blue light will go out.
Open the application, select the device, enter the device manage-
ment page, click “Smartphone Opening - OK” to open the lock.
9. LOW BATTERY ALARM
8. DOOR OPENING EVENT LOG
10. INCORRECT ENTRY OF THE OPENING CODE
10

After pressing a button, the light will stay on for 10 seconds, at
the end of which in case of inactivity, it will turn off automati-
cally, press the back button to turn the light back on.
11. THE KEY LIGHT IS OFF
ENG
11

1. Specifiche Tecniche
2. Descrizione del prodotto
3. Istruzioni per l’installazione
4. Impostazioni
5. Ripristino delle impostazione di fabbrica
6. Impostazioni Lingua
7. Aprire la porta
8. Registro eventi apertura porta
9. Allarme batteria scarica
10. Inserimento errato del codice di apertura
11. La luce dei tasti è spenta
14
14
15
17
20
20
20
21
21
21
21
ITA
13
INDICE

Tipi di porta
Spessore porte
Protezione elettrostatica
Alimentazione
Corrente di esercizio
Temperatura Operativa
1. Smart DoorLock SM-DLCB-006
2. Chiavi di emergenza a microinduzione magnetica
3. Utensili per l’installazione
Porte blindate, porte in legno,
porte in vetro
40mm / 100mm
15kv
3.6V - 5V
<135mA: Standby <10uA
- 20 ° C / 70 ° C
1 SPECIFICHE TECNICHE
2. DESCRIZIONE DEL PRODOTTO
14

3.1 Rimuovere il cilindro della serratura
originale
Svitare le viti e rimuovere il cilindro della
serratura meccanica originale. Installare
il cilindro della serratura e fissare i pan-
nelli anteriore, posteriore e laterali.
3.2 Rimuovere il cilindro della serratura
intelligente e del pomello.
Rimuovere il cilindro della serratura
intelligente e del pomello.
3.3 Installazione del cilindro della
serratura intelligente
Installare il cilindro della serratura intelli-
gente sul pannello anteriore. Aggiustare
la posizione in modo da far combaciare i
buchi per le viti.
3.4 Installare la serratura
Avvitare le viti della serratura.
ITA
3. ISTRUZIONI PER L’INSTALLAZIONE
15

3.5 Dopo l’installazione del pomello
1. Tirare il pomello all’indietro e utiliz-
zando lo strumento uscito in dotazione
avvitare le viti.
2.Usare il pomello posteriore per assicu-
rarsi di aver installato correttamente il
cilindro. Controllare che il cilindro si apra
correttamente.
3.6 Installazione delle batterie
1. Rimuovere il coperchio del pomello
anteriore e svitare il coperchio del
vano batterie usando lo strumento in
dotazione.
2.Inserire 3 batterie di tipo AAA nel vano
batterie. Prestare attenzione alla direzio-
ne dei poli positivi e negativi. L’estremità
della molla è il polo negativo.
3.Dopo aver inserito le batterie richiu-
dere il vano batterie e il coperchio del
pomello.
3.7 Test dopo l’installazione
1. Verificare che la serratura sia installata
saldamente alla porta. Controllare che
il pomello posteriore apra la porta in
maniere corretta.
2.Dopo aver collegato l’alimentazione, il
motore si inverte. Sarà possibile girare il
pomello minimamente. Inserire la pas-
sword iniziale per aprire normalmente.
16

3.8 Uso delle chiavi di emergenza
1. Aprire il coperchio del pomello
anteriore.
2.Inseire la chiave di emergenza e girare
la chiave di 30 gradi in senso orario. Il
pomello anteriore non può ruotare.
3. Girare il pomello anteriore per aprire
la porta.
ITA
Prima di seguire le seguenti istruzioni verificare che il bluetooth
del telefono cellulare sia attivo, e che il telefono e la porta siano
vicini, consigliamo una distanza massima di 5 metri.
1. Collegare l’APP
Scaricare l’App Tuya dallo store, a seconda dello smartphone.
Aprire e seguire i comandi per la registrazione. Cliccare su “+”
posizionato in alto a destra della homepage.
1.1 Aggiunta manuale
Fare click su “Sensore di protezione” --- “ Serratura BLE” , confer-
mare la voce guidata, sulla sinistra. Premere un qualsiasi tasto
per attivare la tastiera del dispositivo, premere ”<” per attivare il
bluetooth del dispositivo. Attendere qualche secondo e compa-
rirà il nome del dispositivo, quindi fare clic su connetti.
1.2 Ricerca automatica
Fare clic su “ricerca automatica” in alto, per assicurarsi che la ser-
ratura sia alimentata correttamente, preme un qualsiasi pulsante
per attivare la tastiera del dispositivo, premere ”<” per attivare il
bluetooth del dispositivo. Attendere qualche secondo e compa-
rirà il nome del dispositivo, quindi fare clic su connetti.
4. IMPOSTAZIONI
17

2. Configurazione impronta digitale
2.1 Aggiungere impronta digitale
Fare clic sul nome del dispositivo dalla home, entrare nella
schermata di configurazione, e fare clic su “Impostazioni-gestio-
ne delle impronte digitali-angolo in alto a destra + numero-ag-
giungere impronta digitale”, selezionare l’utente, fare clic su
“Inizia scansione”, inserire 4 impronte digitali in base al comando,
dopo aver inserito con successo comparirà “Denominazione
impronta digitale”, inserire il nome e aggiungere correttamente.
2.2 Rimuovere impronta digitale
Fare clic sul dispositivo dalla home, accedere alla schermata di
gestione, fare clic su “Gestione impronte digitali”, fare clic sull’ico-
na a destra dell’impronta digitale per eliminare.
3. Configurazione Password
3.1 Aggiungere Password
Dopo aver cliccato sul nome del dispositivo, entrare nella
schermata di configurazione, cliccare su “ Impostazioni, gestione
password – aggiungere la password nell’angolo in alto a destra
+ Nu.”, seleziona l’utente, inserire password e il nickname cosi
come da comandi mostrati nella pagina, la password deve avere
una lunghezza compresa tra 6 e 0 caratteri, fare clic su salva per
completare la procedura.
3.2 Eliminare Password
Dopo aver cliccato sul nome del dispositivo, accedere alla
schermata di gestione, fare clic su “Gestione password”, fare clic
sull’icona a destra dell’impronta digitale per eliminare.
4. Configurazione Utenti
Nella schermata di configurazione è possibile scegliere tra due
tipi di utenti differenti:
18

4.1.3 Dopo aver aggiunto un nuovo utente
L’amministratore può associare il nuovo utente all’utilizzo
dell’applicazione tramite l’operazione “Condividi”. Al termine
del tempo impostato per la condivisione, l’utente non potrà più
utilizzare il dispositivo.
ITA
1. Familiari
Sono utenti già presenti nel gruppo “Familiari” nell’applicazione,
i nuovi utenti che vengono inseriti nel gruppo “familiari” saranno
aggiunti automaticamente anche nel gruppo della serratura.
Nota: è possibile eliminare un utente dal gruppo “familiari” sola-
mente tramite la pagine di gestione degli utenti “familiari”.
2. Altri Utenti
Sono utenti presenti solo nel gruppo della serratura, non nel
gruppo “familiari”. Aggiungendo e eliminando questi utenti non
comporterò nessun effetto sul gruppo “familiari”
4.1 Gestione Utenti – Gestione Altri utenti
4.1.1 Periodo di validità
L’amministratore può decidere gli altri utenti, scegliendo se im-
postare come utente permanente o impostare un orario di inizio
e fine utilizzo della serratura.
4.1.2 Aprire la porta
L’amministratore può determinare il tipo di permesso che ogni
membro può ottenere per aprire la porta; se l’amministratore
decide di bloccare l’apertura della porta, nessun utente potrà
aprire la porta tramite l’applicazione, bisognerà aprire la porta
manualmente.
19

Aprire l’applicazione, fare clic sul dispositivo, entrare nella
schermata di gestione e fare clic su “Impostazioni Lingua” per
selezionare la lingua.
Premere un tasto qualsiasi per attivare la tastiera sul pomello,
inserire la password e fare clic su “ ” la serratura si aprirà e la
luce sarà blu, al termine del tempo per l’apertura della porta, la
serratura si chiuderà e la luce blu si spegnerà.
Poggiare l’impronta digitale, la serratura si aprirà e la luce sarà
blu, al termine del tempo per l’apertura della porta, la serratura si
chiuderà e la luce blu si spegnerà.
Aprire l’applicazione, selezionare il dispositivo, entrare nella pagina
per la gestione del dispositivo, fare clic su “Apertura Smartphone –
OK”, per aprire la serratura.
Fare clic sul dispositivo dalla home, entrare nella schermata di
gestione dispositivo, fare clic sull’icone in alto a destra, entrare nel
dispositivo, scendere fino a trovare reset di fabbrica, e cliccarci
sopra.
5.1 E’ possibile ripristinare le impostazioni di fabbrica quando sia lo
smartphone che la serratura sono connessi tramite Bluetooth. Tutti
i metodi di apertura della porta saranno cancellati, e la serratura
sarà riporta alle impostazioni di fabbrica. Dopo circa 3 minuti gli
utenti potranno ri-aggiungere la serratura sull’applicazione.
5.2 Se lo smartphone non è collegato alla serratura tramite blue-
tooth, la serratura viene ripristinata all’impostazione di fabbrica. Il
modo in cui la porta viene aperta sulla serratura della porta rimane
inalterata.
7. APRIRE LA PORTA
6. IMPOSTAZIONI LINGUA
5. RIPRISTINO DELLE IMPOSTAZIONE DI FABBRICA
20

ITA
Aprire l’applicazione, selezionare il dispositivo, spostare a sinistra
per la schermata “Password dinamica”, fare clic su “Ottieni”, per ge-
nera una password dinamica, con validità di 5 minuti dopo che è
stata generata, Digitare le 8 cifre + “ ”, per aprire la serratura.
Comando vocale 3.6v: Sostituire le batterie, se il livello delle
batterie è basso.
Aprire l’applicazione, selezionare il dispositivo per entrare nella
pagine di gestione, fare clic su “Registro apertura porta” per
visualizzare il registro delle aperture della porta.
Dopo aver premuto un tasto, la luce rimarrà accesa per 10 secon-
di, al termine dei quali in caso di inattività, si spegnerà automati-
camente, premere il tasto indietro per riaccendere la luce.
Inserendo per 5 volte consecutive l’impronta digitale sbagliata (
3 volte la password sbagliata). Il dispositivo andrà in blocco e non
potrà essere utilizzato per i successivi 3 minuti.
11. LA LUCE DEI TASTI È SPENTA
9. ALLARME BATTERIA SCARICA
8. REGISTRO EVENTI APERTURA PORTA
10. INSERIMENTO ERRATO DEL CODICE DI APERTURA
21

1. Especificaciones técnicas
2. Descripción del producto
3. Instrucciones de instalación
4. Configuraciones
5. Restablecer la configuración de fábrica
6. Configuración de idioma
7. Abra la puerta
8. Registro de eventos de apertura de puertas
9. Alarma de batería baja
10. Entrada incorrecta del código de apertura
11. La luz de la tecla está apagada
24
24
25
27
30
30
30
31
31
31
31
ES
23
ÍNDICE
Table of contents
Languages:
Other MachPower Door Lock manuals
Popular Door Lock manuals by other brands

uhlmann & zacher
uhlmann & zacher CX2172 Operating and assembly manual

Assa Abloy
Assa Abloy HES 8000 Series Installation instruction

Hissmekano
Hissmekano LI-25-H Installation instruction

Assa Abloy
Assa Abloy Yale Essential Series user guide

Schlage
Schlage Encode SMART WIFI LEVER quick start guide

Hard Head
Hard Head 018964 manual