Magnasonic FS50 User manual

FS50 User Manual v2.1
All-In-One 22MP Film Scanner
Thank you for your purchase of this Magnasonic product.
Please read this user manual carefully before using product
to ensure proper use. Keep this manual in a safe place
for future reference.
magnasonic.com/support
We reserve the right to change models, congurations, or specication without notice or liability. Product may not
be exactly as shown. © MAGNASONIC®, MAGNASONIC®, the MAGNASONIC® marks may be registered. All other
trademarks are property of their respective owners

Important Safety Instructions
Safety Alerts
If any of the following conditions are present, stop using
immediately, unplug the power cord, and refer to a qualied service
professional for servicing:
A. If there is any smoke or unusual smell while using.
B. If the product has been exposed to rain, water, or other liquids.
C. If the product does not operate normally by following the
operating instructions.
D. If the product exhibits a distinct change in performance.
E. If the product has been dropped or damaged in any way.
Best Practices for Safe Use
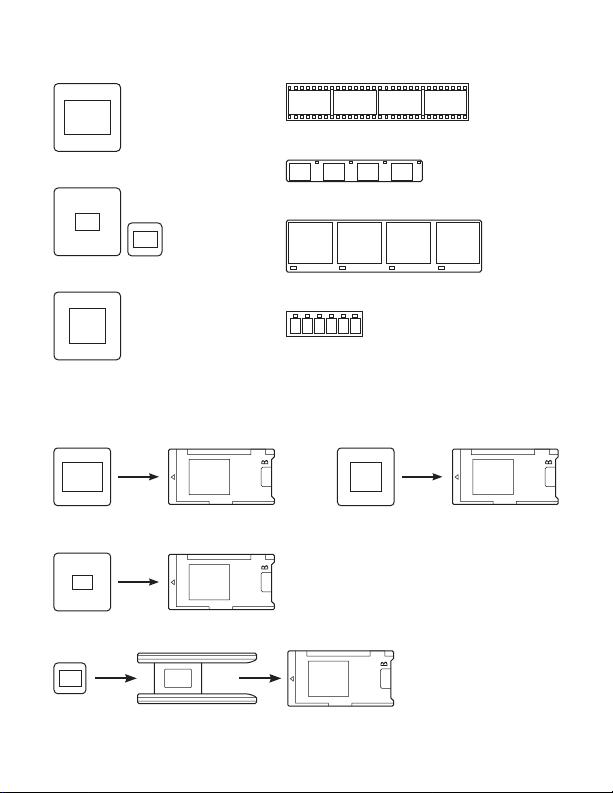
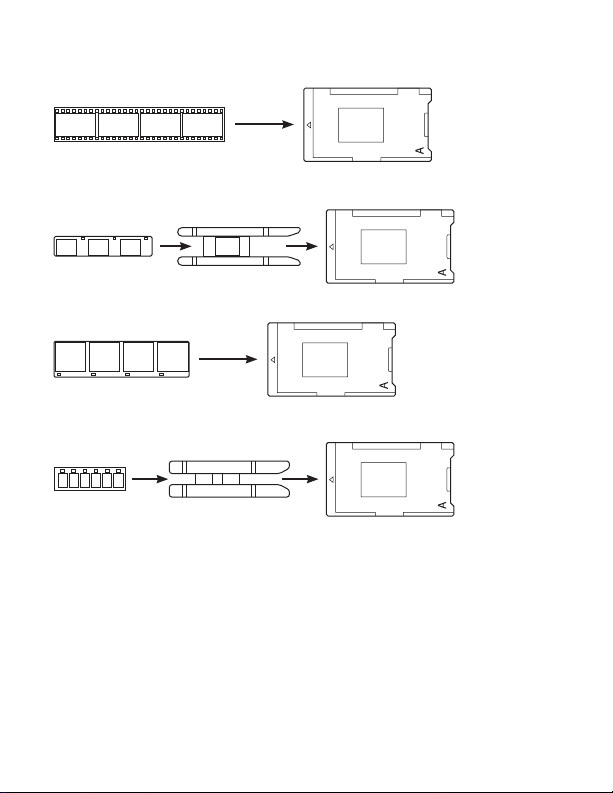
1. Only use lms of standard size.
2. Only use attachments/accessories specied by the manufacturer.
3. Unwind and straighten the USB cord before use.
4. Check that the power voltage stated on the rating label
corresponds to your local electricity supply.
5. Unplug the power adapter from the wall when the product is
unused for a long period of time and during thunderstorms.
6. Do not use this product near water.
7. Do not immerse this product, the power cord, or any accessories
in water or any other liquid.
8. Do not block any ventilation openings. Install in accordance to
the manufacturer’s instructions.
9. Do not place this product near any heat sources such as radiators,
heat registers, stoves, or other apparatus (including ampliers)
that produce heat.

10. Do not attempt to service or disassemble this product yourself as
opening or removing covers may expose you to dangerous
voltages or other hazards.
Maintenance
1. Please make sure the scanner is clean before using.
2. Do not use liquid cleaners.
3. Clean outside of the product only with a dry cloth.
4. Do not clean the inside of this product with anything except for
the included cleaning brush.
5 To clean with the included cleaning brush, insert the soft end
of the brush into the lm/slide holder slot. Carefully push the
brush around inside to get rid of any dust or debris that may be
on the lens.
3

Since 1954, Magnasonic has been a leader in developing
innovative and unique products. We are dedicated to
empowering people using six key fundamentals: superior
quality, performance, simplicity, style, value and a fanatical
obsession with outstanding customer service. At Magnasonic,
our mission is a simple one – create people-driven products
that make life’s daily adventures easier and more fun. We
believe everyday experiences should be extraordinary.
Thank you for your purchase of this Magnasonic® product.
We hope you enjoy your experience.
Questions?
Give us a chance to help, we’re just a click away.
Don’t forget to register your product with us!
Magnasonic.com/registration
Magnasonic.com/resources
Magnasonic.com/videos
Magnasonic.com/support
Magnasonic.com/contact
4

Table Of Contents
What’s Included. . . . . . . . . . . . . . . . . . . . . . . . . . . . . . . . . . . . . . . . . . . . . . . . . 6
Product Information . . . . . . . . . . . . . . . . . . . . . . . . . . . . . . . . . . . . . . . . . . . . 7
Operating Instructions . . . . . . . . . . . . . . . . . . . . . . . . . . . . . . . . . . . . . . . . . . 8
Powering on Your Film Scanner. . . . . . . . . . . . . . . . . . . . . . . . . . . . . 8
Changing the Language. . . . . . . . . . . . . . . . . . . . . . . . . . . . . . . . . . . . 8
Prepping Your Film/Slides . . . . . . . . . . . . . . . . . . . . . . . . . . . . . . . . . . 8
Preparing the Film Scanner . . . . . . . . . . . . . . . . . . . . . . . . . . . . . . . . 11
Cleaning and Care. . . . . . . . . . . . . . . . . . . . . . . . . . . . . . . . . . . . . . . . . 11
Using an SD Card. . . . . . . . . . . . . . . . . . . . . . . . . . . . . . . . . . . . . . . . . . 12
Formatting Your SD Card . . . . . . . . . . . . . . . . . . . . . . . . . . . . . . . . . . 12
Scanning Your Images. . . . . . . . . . . . . . . . . . . . . . . . . . . . . . . . . . . . . 12
Viewing Your Scanned Images. . . . . . . . . . . . . . . . . . . . . . . . . . . . . 13
Transferring Images To Your Computer . . . . . . . . . . . . . . . . . . . . 14
Watching Saved Images From a TV Screen . . . . . . . . . . . . . . . . . 14
FAQ/Troubleshooting . . . . . . . . . . . . . . . . . . . . . . . . . . . . . . . . . . . . . . . . . . 15
Specications. . . . . . . . . . . . . . . . . . . . . . . . . . . . . . . . . . . . . . . . . . . . . . . . . . 17
FCC Information . . . . . . . . . . . . . . . . . . . . . . . . . . . . . . . . . . . . . . . . . . . . . . . 18
Magnasonic® Warranty . . . . . . . . . . . . . . . . . . . . . . . . . . . . . . . . . . . . . . . . . 18
5

What’s Included
Film Scanner USB Cable TV Out CablePower Adapter
110 Negative Insert Super 8 Insert110 Slide Insert
User Manual Slide AdapterNegative Adapter
Cleaning Brush
6

Product Information
Power Button
Back/Mirror
Button
OK Button
Forward/Flip
Button
Film/Slide
Adapter Slot
LCD Screen
Scan/Menu
Button
Front
SD Card Slot
USB/Power Port TV Out
Back
7

Operating Instructions
1. Connect the USB cable to the USB port on the lm scanner.
2. Connect the other end of the USB cable into the included USB
wall adapter. Plug the wall adapter into a power outlet.
3. Press and hold the Power button on the scanner to turn it on.
NOTE: The FS50 will automatically shut o after 10 minutes of inactivity.
Powering on Your Film Scanner
1. On the Main Menu, go to LANGUAGE and press OK.
2. You may now select the language of your choice by using the
< and > buttons to scroll between the available selections.
• English • Italiano
• Espanol • Japanese
• Francais • Simplied Chinese
• Deutsch • Traditional Chinese
3. Press the OK button to select the language.
Changing the Language
Prepping Your Film/Slides
1. Open the appropriate slide/lm adapter and insert your
slide/lm. Each adapter is labelled to identify it. If you are not
certain of your slide/lm type refer to the images below.
2. Ensure the slide/lm is facing the correct way and is not bent.
3. Close the slide or lm adapter and press the edges so that it
locks into place.
IMPORTANT: Ensure your slides/lm are clean and free of dirt
or debris
8

Slide Types
110 Slide
35mm Slide (135)
126 Slide
2x2
1x1
Film Types
135 Negative (35mm)
110 Negative
126 Negative
Super 8
Slide Adapters
126 Slide
Slide Adapters
35mm Slide (135)
110 Slide
110 Slide
2x2
1x1
9

Negative Adapters
135 Negative (35mm)
110 Negative
126 Negative
Super 8
10

Preparing the Film Scanner
1. Press and hold the Power button on the scanner to turn it on.
2. Insert the prepared lm or slide adapter into the slot on the
right side of the lm scanner.
3. In the Main Menu use the arrow keys to highlight the
FILM TYPE option and press the OK button to select it.
4. Use the > arrow key to cycle through Negatives, Slides, or
B&W. Press the OK button to select it.
5. The next screen will show the dierent sizes of your selection.
Use the > arrow key to select the correct size and press the
OK button.
IMPORTANT: The quality of the original slide/lm will impact the
quality of the scanned image.
Cleaning and Care
Use the included cleaning brush to ensure there is no dust or debris
on the lens. Insert the soft end of the brush, face down, into the
lm/slide holder slot. Carefully push the brush around inside to get
rid of any dust or debris that may be on the lens.
11

NOTE:This scanner has 128MB of built-in memory for saving scanned
images. This lm scanner will also accept SD, SDHC, and SDHX cards with
a maximum of 128GB for extra memory. If you are using a 128GB SD card,
it may need to be formatted before using for the rst time. Please see
below for formatting instructions.
Using an SD Card
1. Insert the SD card, label down, into the SD card slot located at
the back of the lm scanner. The SD card will click in if inserted
properly.
2. Remove the SD card by pressing on it until it clicks and pops
out, then remove it from the slot.
1. In the Main Menu, go to FORMAT. Press the OK button.
2. When prompted if you would like to format the SD, use the
< button to choose “Yes”. Press the OK button to begin
formatting the SD card.
Formatting Your SD Card
WARNING:Formatting your SD card will delete all les stored on the
SD card. Download your les from your SD card to your computer
before formatting.
Scanning Your Images
1. Press the SCAN button to select Capture mode and press OK.
2. You should now see your lm or slide image on the screen
and the corresponding lm/slide type is listed at the lower
left corner.
NOTE:Image on screen does not reect scanned image quality.
3. To adjust Brightness or Color, press the OK button. Use the
left/right arrows to move between Brightness (EV), Red (R),
Green (G), or Blue (B). Press the OK button to adjust them
individually.
4. Once all settings are correct, press the SCAN button to return.
12

5. You can also mirror or ip your image before scanning by
pressing the < or > buttons.
< – Mirror
> – Flip
6. Once ready, press the SCAN button and press OK to capture
and save your image to the internal memory or SD card if one
is inserted. The FS50 cannot scan directly to a computer.
7. If you have multiple slides/negatives you can push/pull them
through the adapter without removing it. See image below for
reference.
NOTE:
When inserting lm/negative strips use caution to ensure
they are not bent or damaged.
8. You can press the MENU button twice to return back to the
Main Menu when your scanning is done.
Viewing Your Scanned Images
1. To view your saved images, go to GALLERY and press the OK
button.
2. Your images will play automatically in Slideshow mode.
3. To manually review your saved images and stop Slideshow
mode, press the OK button.
13

4. Use the left and right buttons to scroll through each saved
image.
5. Press the OK button again to open the Gallery options. You can
choose to either go back to Slideshow mode, delete the image,
or return to the Main Menu.
Transferring Images to Your Computer
1. Ensure your computer is powered on.
2. Connect the lm scanner to your computer via the included
USB cable.
3. Power on the lm scanner.
4. In the lm scanner menu, select USB MSDC.
5. A new folder will appear on your computer. Your saved images
can be found here. You can now move these images from your
scanner directly onto your computer.
Watching Saved Images from a TV Screen
1. Turn on the lm scanner.
2. Connect the included TV Out cable to the TV Out port on the
back of the lm scanner.
3. Connect the other end of the cable into the Video input on
your TV.
NOTE:
When you connect the lm scanner to your TV,
the scanner’s LCD screen will turn o automatically.
4. Ensure that your TV is set to the proper input/video source.
5. You should now see the lm scanner’s screen on your
TV screen.
IMPORTANT: The FS50 cannot scan directly to a computer. Scanning must
be completed on the FS50.
14

Issue Solution
How can I get the best
quality scan possible?
Ensure the film/slides are clean and that
you clean the inside of the scanner with
the included cleaning brush immediately
before scanning. See pg. 11 for instructions
on how to use the cleaning brush.
How should I prepare
the film/slides to
ensure the best
possible scan?
The film/slide should be free of any
dust/fingerprints. This can be done with
an appropriate cleaning cloth.
I’ve noticed a consistent
spot on every slide
I have scanned. Is
something wrong
with my scanner?
There is likely a small amount of dust
inside your unit. Use the included
cleaning brush to ensure there is no
foreign debris. See pg. 11 for instructions
on how to use the cleaning brush.
Do I need a computer
to begin scanning?
Everything is plug-and-play right out of
the box. You can save images to an SD
card (up to 128GB) or the scanner’s
internal memory (128MB). You can then
export to a computer at a time that is
more convenient.
What file format are
the images saved as?
The files are automatically saved in JPG
format.
FAQ / Troubleshooting
The scanner screen is
black but it has power.
Ensure the TV Out cable is not connected
to the back of the lm scanner.
15

Issue Solution
I cannot see all my
images on the
computer.
If an SD Card is inserted your computer
will only see images saved on the SD
Card. The SD Card must be removed to
see images saved on the internal
storage.
TV Out image is not
showing on my TV.
The FS50 uses NTSC for it’s video output
format. If your TV requires a PAL signal,
disconnect the TV Out cable, go to TV
Out in the Main Menu and select PAL.
Where can I recycle
my old slides,
negatives, lm?
Older lm and photos can contain
chemicals that make them dicult to
recycle. For proper recycling/disposal
information please consult with your
local recycling company.
My slides/negatives
scanned images have
faded colors.
Over time slides and negatives can
degrade and the colors fade. Ensure
your slides/negatives are clean and use
the color adjustment options when
scanning.
The colors in my
scanned images are
reversed/negative.
Change the lm type in the menu to
Negative to scan properly.
Can I use this to scan
raw film or do I need
to develop the
negatives first?
The scanner will work for developed
film only.
16

Focus Range Fixed Focus
Exposure Control Automatic / Manual (-2.0 EV~ +2.0EV)
White Balance Automatic
Display 2.4" Color TFT LCD
Specications
Scan Quality 3200 dpi & 4000 dpi (interpolation)
Resolution 14 Megapixels / 22 Megapixels
(interpolation)
Picture Aspect Ratio 3:2
Scan Speed 3-5 seconds
Scan Method Single Image Scanning
Film Type Slide: 135, 110, 126
Negatives: 35mm, 110, 126, Super 8
Light Source LED Back Light
File Format JPEG/Still Image
Image Playback Single
TV Out Type NTSC/PAL
Built-in Memory 128MB
External Memory Card SD card up to 128GB
Power Supply DC 5V (USB Adapter)
Dimensions
4.0 x 3.4 x 3.4 inches (101.6 x 86.4 x 86.4mm)
Weight 0.66 lbs (0.30kg)
Product Certifications FCC, RoHS, CE, UL/CUL
17

Thank you for choosing Magnasonic. We guarantee your investment
in our products is a solid one! Extensive thought, research, planning,
and design goes into every product we make. High quality
components combined with precision manufacturing allows us to
maintain the highest possible production standards.
Magnasonic® Warranty
FCC Information
This equipment has been tested and found to comply
with the limits for a Class B digital device, pursuant to part
15 of the FCC Rules. These limits are designed to provide
reasonable protection against harmful interference in a
residential installation. This equipment generates, uses and can
radiate radio frequency energy and, if not installed and used in
accordance with the instructions, may cause harmful interference to
radio communications. However, there is no guarantee that
interference will not occur in a particular installation. If this
equipment does cause harmful interference to radio or television
reception, which can be determined by turning the equipment o
and on, the user is encouraged to try to correct the interference by
one or more of the following measures:
• Reorient or relocate the receiving antenna.
• Increase the separation between the equipment and receiver
• Connect the equipment into an outlet on a circuit dierent from
that to which the receiver is connected.
• Consult the dealer or an experienced radio/TV technician for help.
NOTE: This unit may contain a microcomputer for signal processing
and control function. In very rare situations, severe interference,
noise from an external source, or static electricity may cause it to
lockup. In the unlikely event that this should happen, turn o the
unit, wait at least ve seconds, and then turn it back on again.
18

All items are guaranteed against defects in materials and
craftsmanship. Magnasonic products come with a complete one
year parts and labour warranty. Proof of purchase from an
authorized Magnasonic dealer is required when seeking warranty
assistance.
Magnasonic has outstanding quality control, if something should go
wrong with any of our products, we will repair it free of charge! If the
product cannot be repaired, we will replace the product. If the
product has been discontinued, we will replace the product with
either the newest version of said product or current equivalent.
Replacement parts furnished in connection with this warranty shall
be warranted to a period equal to the unexpired portion of the
original product warranty.
Thank you for choosing Magnasonic. We guarantee your investment
in our products is a solid one! Extensive thought, research, planning,
and design goes into every product we make. High quality
components combined with precision manufacturing allows us to
maintain the highest possible production standards. All items are
guaranteed against defects in materials and craftsmanship.
Magnasonic products come with a complete one year parts and
labour warranty. Proof of purchase from an authorized Magnasonic
dealer is required when seeking warranty assistance.
Magnasonic has outstanding quality control, if something should go
wrong with any of our products, we will repair it free of charge! If the
product cannot be repaired, we will replace the product. If the
product has been discontinued, we will replace the product with
either the newest version of said product or current equivalent.
Replacement parts furnished in connection with this warranty shall
be warranted to a period equal to the unexpired portion of the
original product warranty.
19

This warranty shall not apply to:
A. Any defects caused or repairs required as a result of abusive
operation, negligence, accident, improper installation or
inappropriate use as outlined in the owner’s manual.
B. Any Magnasonic product tampered with, modied, adjusted or
repaired by any party other than Magnasonic.
C. Any cosmetic damage to the surface or exterior that has been
defaced or caused by normal wear and tear.
D. Any damage caused by external or environmental conditions,
including but not limited to transmission line/power line voltage
or liquid spillage.
E. Any product received without appropriate model, serial number,
and CSA/cUL/cULus/cETL/cETLus markings.
F. Any products used for rental or commercial purposes.
G. Any installation, setup and/or programming charges.
H. Defect or damage as a result of connecting a product to an
outlet with the incorrect voltage. Voltage converters must
be used where applicable.
If in any situation your purchase displays a manufacturer’s defect
during the warranty period and does not function correctly,
Magnasonic will repair your product and cover all parts, labour, and
return costs upon delivery of the Magnasonic product together with
proof of purchase.
Products returned to Magnasonic for warranty service must be
shipped prepaid (paid by customer). Products must be shipped in
the original shipping container or its equivalent; in any case the risk
of loss or damage in transit is to be borne by you.
We believe everyday experiences should be extraordinary. We
pledge to work with you in resolving any issue that occurs with your
product. If you are in need of assistance do not hesitate to visit our
support page at www.magnasonic.com/support/
Other manuals for FS50
3
Table of contents
Other Magnasonic Scanner manuals

Magnasonic
Magnasonic FS50 User manual

Magnasonic
Magnasonic FS70 User manual

Magnasonic
Magnasonic FS50 User manual

Magnasonic
Magnasonic FS51 User manual

Magnasonic
Magnasonic FS60 User manual

Magnasonic
Magnasonic FS71 User manual

Magnasonic
Magnasonic FS81 User manual

Magnasonic
Magnasonic FS50 User manual

Magnasonic
Magnasonic FS52 User manual