16 17
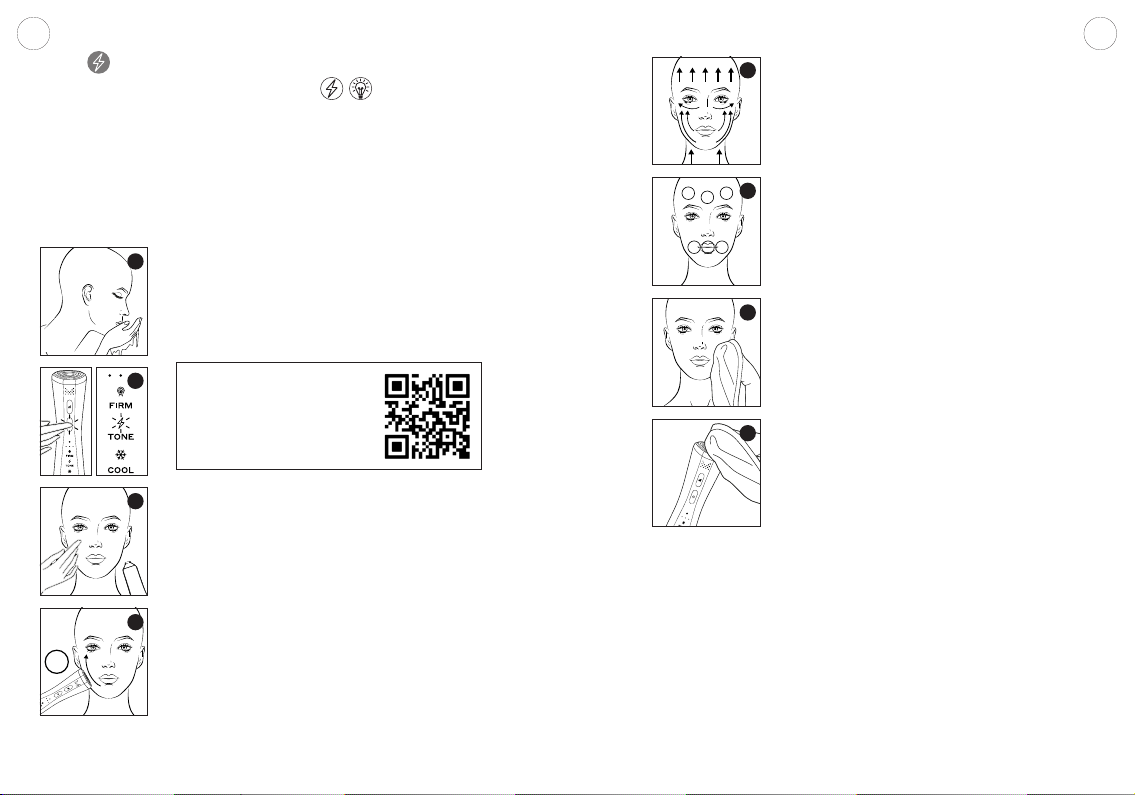
1. Before you begin, make sure your skin is fully cleansed
- free of makeup, surface oils and daily grime (A).
(Men should shave before treatment as facial hair can
interfere with conductivity).
IMPORTANT: Any cream, lotion, self-tan, or other oil-based
products on the skin can block the radiofrequency.
J
x3
K
L
TONE
MICROCURRENT + RED LED LIGHT THERAPY
Lift, tone and contour with microcurrent. Small pulses of electricity stimulate facial
muscles, strengthening + toning them.
In TONE Mode, DO NOT use FaceRocket®over the eyes (the circular muscle within
the orbital rim), on or around the thyroid glands (midline of the neck, in-front of and
either side of the wind-pipe) on the temples (above the ear), breasts or groin area.
Make sure you have read and understood all WARNINGS before you begin.
TONE Mode can be used daily. For best results, use 2-3 times a week.
2. Press and hold the power button to turn on FaceRocket®.
Press the power button again to select TONE Mode (J).
FaceRocket®in TONE mode will start at Level 1
Microcurrent intensity. Always start at Level 1 and work
your way up after a few treatments. Press the Level button to
increase the intensity.
3. Apply a generous layer of Superconductive Gel to your skin
(C). You can apply to the whole face or section by section,
and re-apply throughout the treatment as necessary.
IMPORTANT: You must use a Superconductive Gel to help the
microcurrent reach below the skin’s surface. Without it, the
treatment will not work.
We recommend a full double cleanse;
try our WipeOut Amazing Microfibre
Cleansing Cloths to get rid of makeup
and surface dirt, then supercharge
your second cleanse with one of our
award-winning cleansing brushes!
A
C
F
H
I
4. Starting at the chin, place the head of FaceRocket®flush
to your skin and gently glide along the jaw, up to your
ear (K), until you hear a beep. Repeat this section of
your face 2 more times. So you’re doing 3 x 'repetitions'
in total.
5. Using this same technique move on to the next section of
your face and continue to work around your face (F):
• Corner of mouth to ear.
• Under eye/cheekbone to ear (Do NOT use on the eye
lid / delicate eye area).
• Forehead.
• Under chin.
Apply more gel as necessary.
6. Once you have completed your whole face, you can
go back and work on any specific problem areas such
as lips, smile lines or frown lines (L). To do this, hold
FaceRocket®in one place for up to 15 seconds (3 x 5
second beeps).
7. When you're done, remove any excess gel with a clean,
damp cloth (H) and complete your skincare routine as
normal.
8. Wipe clean the head of your FaceRocket®using a damp
cloth (I). Do NOT rinse with water.
EN EN