Makita PDC1200 User manual

EN Portable Power Pack INSTRUCTION MANUAL 10
PTBR Adaptador de Baterias Tipo Mochila MANUAL DE INSTRUÇÕES 18
FR Support d’alimentation portable MANUEL D’INSTRUCTIONS 27
DE Rückentragbare Akku-Bank BETRIEBSANLEITUNG 36
IT Gruppo di alimentazione portatile ISTRUZIONI PER L’USO 45
NL Draagbare voedingseenheid GEBRUIKSAANWIJZING 54
ES Unidad Portátil de Alimentación Eléctrica MANUAL DE INSTRUCCIONES 63
PT Adaptador de Baterias Tipo Mochila MANUAL DE INSTRUÇÕES 72
DA Bærbar strømforsyning BRUGSANVISNING 80
EL 88
TR KULLANMA KILAVUZU 97
SV Bärbart strömpaket BRUKSANVISNING 105
NO Bærbar lader BRUKSANVISNING 112
FI Kannettava tehoyksikkö KÄYTTÖOHJE 120
LV LIETOŠANAS INSTRUKCIJA 127
LT NAUDOJIMO INSTRUKCIJA 135
ET Portatiivne akukomplekt KASUTUSJUHEND 143
PL 150
HU Hordozható tápegység HASZNÁLATI KÉZIKÖNYV 159
SK NÁVOD NA OBSLUHU 168
CS NÁVOD K OBSLUZE 176
SL Prenosna polnilna enota NAVODILA ZA UPORABO 184
SQ Paketë elektrike portative MANUALI I PËRDORIMIT 192
BG 200
HR 210
218
SR 227
RO Bloc de alimentare portabil 235
UK 244
RU 253
KK 262
ZHCN 便携电源装置 使用说明书 271
ZHTW 背負式電池包 使用說明書 280
KO 배부식 내장형 배터리 취급 설명서 289
ID Paket Daya Portabel PETUNJUK PENGGUNAAN 296
MS Pek Kuasa Mudah Alih MANUAL ARAHAN 304
VI 312
TH 320
FA 335
AR 341
PDC1200

12
5
4
6
7
8
5
5
15
14
9
10
12
3
18
13
11
17
16
Fig.1
1
Fig.2
2

3 2
1
Fig.3
1
3
2
Fig.4
1
2
Fig.5
12
Fig.6
3

1
Fig.7
2
1
Fig.8
12 3
Fig.9
1
Fig.10
1
Fig.11
1
Fig.12
1
Fig.13
4

1
Fig.14
1
Fig.15
1
Fig.16
1
Fig.17
1
2
Fig.18
12
3
Fig.19
5

1
Fig.20
1
Fig.21
1
Fig.22
1
Fig.23
Fig.24
Fig.25
1
Fig.26
6

1
Fig.27
1
Fig.28
Fig.29
2
1
Fig.30
2
1
Fig.31
7

2
1
Fig.32
2
1
Fig.33
1
2
Fig.34
1
Fig.35
1
Fig.36
8

9
1
2
Fig.37
1
Fig.38

10 ENGLISH
ENGLISH (Original instructions)
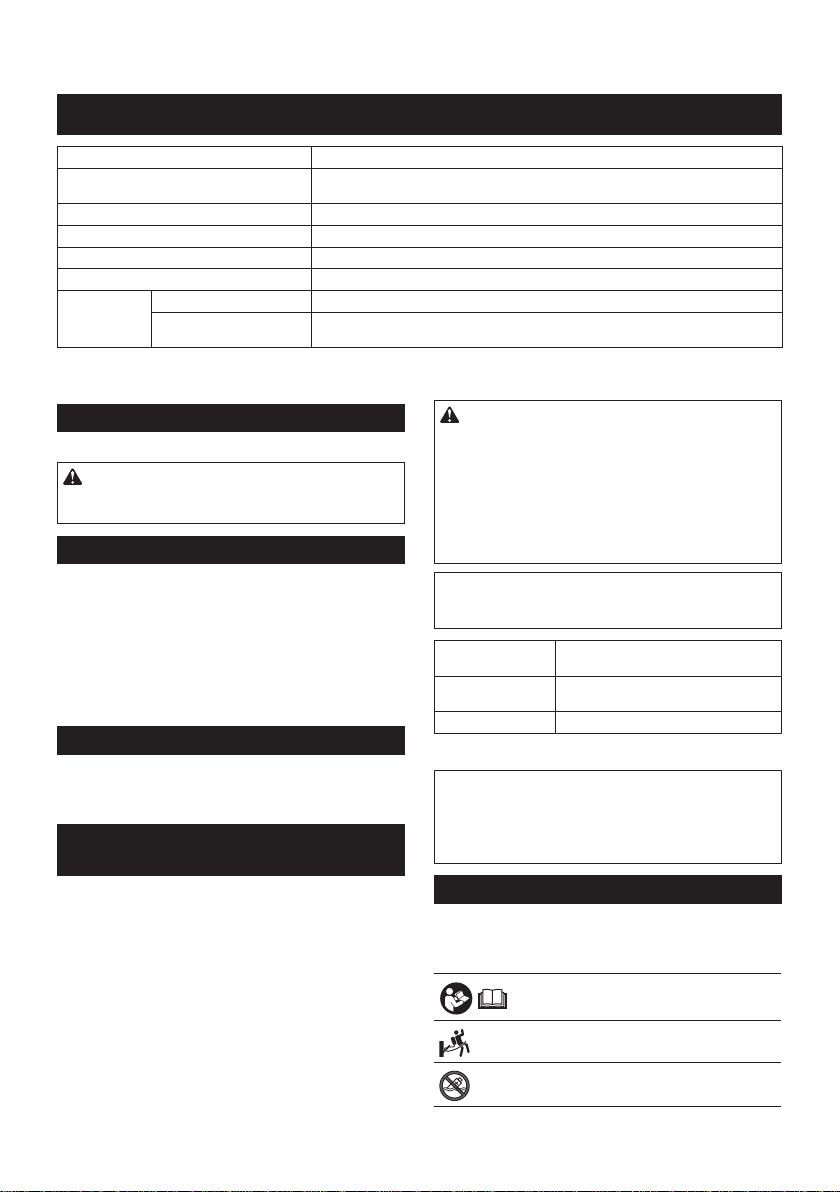
SPECIFICATIONS
Model: PDC1200
Dimensions
(L x W x H)
369 mm x 261 mm x 139 mm *1
Rated voltage D.C. 36 V - 40 V max
Battery capacity 33.5 Ah
Battery type Rechargeable Lithium-ion
Charging time 360 minutes
Net weight Battery 8.8 kg *1
Shoulder harness
assembly
1.6 kg *2
*1. Without shoulder harness assembly, adapters, and charger.
*2. Without adapter pocket
Applicable charger
• DC4001
WARNING: Only use the charger listed above.
Use of any other chargers may cause injury and/or
Intended use
The portable power pack is suitable for long working
hours, since it enables the battery and the tool or
machine to be separated.
This unit can be used with the following tools or
machines.
• 36 V (18 V x 2) battery-powered tool or machine
• Battery-powered tool or machine (direct connec-
tion to portable power pack)
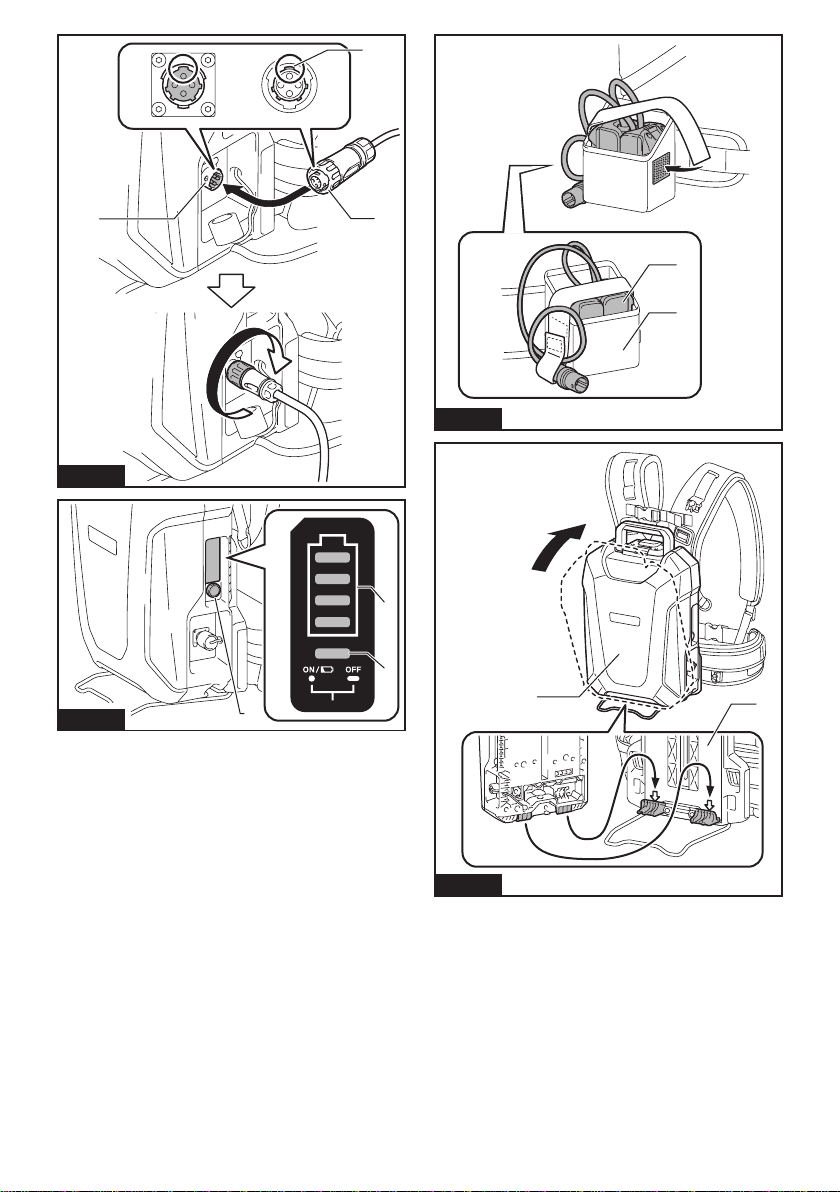
About this instruction manual
The term “unit” in this instruction manual refers to por-
table power pack. The portable power pack consists of
the battery and shoulder harness assembly.
Compatible tool or machine
category
• Cordless Chain Saw *1, Cordless Pole Saw,
Cordless Blower, Cordless Grass Trimmer,
Cordless Multi Function Power Head, Cordless
Hedge Trimmer, Cordless Angle Grinder, Cordless
Rotary Hammer *2
*1. Except for top handle chain saw (DUC252 /
DUC302 / DUC352 / DUC256 / DUC306 /
DUC356 / DUC406 / DUC256C)
*2. Except for DHR280 / DHR281 / DHR282 /
DHR283
The compatible category of tool or machine is subject
to change without notice. Refer to the latest instruction
manual for the information on the compatible category
of tool or machine.
WARNING: Never use this unit with tools or
machines categorized below. Using this unit with
non-compatible tools or machines may cause per-
sonal injury or malfunction.
• Cordless Garden Sprayer, Battery Powered
Pruning Shears, Battery Powered Wheelbarrow,
Motor-Assisted Bicycle, Cordless Backpack
Vacuum Cleaner, Robotic Cleaner, Cordless
Fan Jacket, Cordless Heated Jacket
NOTICE: If you use the nylon cord when you use
the unit with the following models, be sure to use
the tool in the following combination:
Model DUR364L / DUR365U / DUR366L /
DUR368A / DUR368L / DUX60
Cutting tool and
cutting diameter
Nylon cutting head with cutting diameter
of 350 mm
Nylon cord diameter 2.0 mm
*. The nylon cutting head is not available depending on the region
of your residence.
NOTE:
For DUB362
In a high temperature environment, the machine may
stop during operation due to the protection system of
the machine.
Symbols
The followings show the symbols which may be used
for the equipment. Be sure that you understand their
meaning before use.
Read instruction manual.
To reduce the risk of injury, keep the cord
away from obstacles.
Do not expose battery to water or rain.

11 ENGLISH
Do not short-circuit the battery.
Li-ion
Only for EU countries
Do not dispose of electric equipment or
battery pack together with household
waste material! In observance of the
European Directives, on Waste Electric
and Electronic Equipment and Batteries
and Accumulators and Waste Batteries and
Accumulators and their implementation
in accordance with national laws, electric
equipment and batteries and battery
pack(s) that have reached the end of
their life must be collected separately and
returned to an environmentally compatible
recycling facility.
SAFETY WARNINGS
Portable power pack safety
warnings
1. Be sure to read the instruction manual of the
tool or machine before use.
2. Do not pick up or carry this unit by holding
only the cord. Do not pull the cord while you
are wearing or using this unit.
3. Before wearing the unit, remove the socket
from the tool or machine.
4. When you leave the tool or machine, be sure to
remove the socket from the tool or machine, or
remove the unit from your body.
5. Be careful not to trip over the cord during
operation.
6. Do not use this unit on an unstable surface, or
unstable high places.
7. During operation, keep the cord away from
obstacles. The cord caught by obstacles may
8. Do not insert the adapters into the charger.
9. Inspect the unit including cords and harness
before use. If they are damaged, ask your local
Makita Authorized Service Center for repair.
10. When attaching the cord to the cord holder, be
sure to attach it slowly and securely.
11. Always make sure that the tool or machine is
attempting to perform inspection or mainte-
nance of the tool or machine.
12. When using this unit with a tool equipped with
a blade, be sure to keep the cord away from
the blade.
13. When wearing the unit, do not put on anything,
such as safety harness or shoulder belt, which
may interfere the emergency detachment func-
tion of the unit.
14. Do not use this unit while you are climbing up
in a tree.
15. Do not use this unit when you are wearing
16. Do not expose this unit to sparks.
17. When using this unit without wearing it or
installing the unit to the tool or machine, be
sure to lay down the unit.
18. Do not disassemble, repair, or modify the unit.
19. Be careful not to entangle the harness or belt
by the tool or machine.
20. When using the unit, be careful not to cut the
cords with the tool or machine.
21. When you stand the unit upright using the
battery stand, be sure to place the unit on the
22.
water away from the plug of the unit.
23. Do not use the tool or machine near high-volt-
age power lines.
24. Use the charger dedicated to the unit only. Do
not use other chargers.
25. Do not damage the case of the battery or place
anything on the unit.
26. Do not step on the unit or sit on the unit.
27. Do not carry the unit by holding the battery
28. Store the unit indoors.
29.
and battery stand.
30. Do not hang anything from the battery stand.
Important safety instructions for
battery
1. Before using battery, read all instructions and
cautionary markings on (1) battery charger, (2)
battery, and (3) product using battery.
2. Do not disassemble battery.
3. If operating time has become excessively
shorter, stop operating immediately. It may
result in a risk of overheating, possible burns
and even an explosion.
4. If electrolyte gets into your eyes, rinse them
out with clear water and seek medical atten-
tion right away. It may result in loss of your
eyesight.
5. Do not short the battery:
(1) Do not touch the terminals with any con-
ductive material.
(2) Avoid storing battery in a container with
etc.
(3) Do not expose battery to water or rain.
A battery short can cause a large current
breakdown.
6. Do not store and use the tool/machine and
battery in locations where the temperature
may reach or exceed 50 °C (122 °F).
7. Do not incinerate the battery even if it is
severely damaged or is completely worn out.
8. Be careful not to drop or strike battery.
9. Do not use a damaged battery.

12 ENGLISH
10.
to the Dangerous Goods Legislation require-
ments.
For commercial transports e.g. by third parties,
forwarding agents, special requirement on pack-
aging and labeling must be observed.
For preparation of the item being shipped, consult-
ing an expert for hazardous material is required.
Please also observe possibly more detailed
national regulations.
battery in such a manner that it cannot move
around in the packaging.
11. When disposing the battery, remove it from the
tool and dispose of it in a safe place. Follow
your local regulations relating to disposal of
battery.
12. Use the battery only with the products speci-
Installing the battery to non-com-
explosion, or leak of electrolyte.
13. If the tool/machine is not used for a long
period of time, the battery must be removed
from the tool.
14. Keep the battery away from children.
SAVE THESE INSTRUCTIONS.
CAUTION: Only use genuine Makita batteries.
Use of non-genuine Makita batteries, or batteries that
have been altered, may result in the battery bursting
also void the Makita warranty for the Makita tool and
charger.
Tips for maintaining maximum
battery life
1. Charge the battery before completely dis-
charged. Always stop tool/machine operation
and charge the battery when you notice less
tool power.
2. Never recharge a fully charged battery.
Overcharging shortens the battery service life.
3. Charge the battery with room temperature at
10 °C - 40 °C (50 °F - 104 °F). Let a hot battery
cool down before charging it.
4. Charge the battery if you do not use it for a
long period (more than six months).
PARTS DESCRIPTION
Fig.1
1Base plate 2Battery 3Handle 4Lock button
5Cord holder 6Adapter pocket 7Power button 8Plug of battery
9Adapters for 36 V
(18 V x 2)
10 Plug of adapter 11 Power plug of battery
charger
12 Battery charger
13 Socket of battery
charger
14 Waist belt 15 Socket 16 Width adjustment belt
17 Shoulder harness
assembly
18 Battery stand ----
FUNCTIONAL
DESCRIPTION
CAUTION: Always be sure that the unit is
-
tion on the unit.
Charging the unit
CAUTION: After charging is complete, be
sure to remove the power plug of the battery
charger from the AC voltage source, and remove
the socket of the battery charger and attach the
cap of the battery.
NOTICE: The battery charger is intended for
charging MAKITA portable power pack only. Never
use it for other purposes or for other manufactur-
er's batteries.
NOTICE: When the battery charger is connected
to the unit, the tool or machine does not start. In
this case, remove the battery charger from the
unit.
NOTICE: If the temperature of the battery
becomes low or high during charging, the
charging may stop. In this case, wait until the bat-
tery becomes ordinary temperature by warming
up or cooling down the battery, and then restart
the charging.
1. Remove the cap of the battery by turning it.
Fig.2: 1. Cap
2. Align the protrusion on the socket of the battery
charger with the counterpart on the plug of the unit, and
then attach the socket to the plug by turning the socket.
Fig.3: 1. Protrusion 2. Socket 3. Plug

13 ENGLISH
3. Plug the power plug of the battery charger into the
proper AC voltage source.
4. After the charging is complete, remove the socket
of the battery charger, and then attach the cap of the
battery.
During charging, the main power lamp lights up in red
and the indicator lamps indicate the remaining battery
capacity. When the charging is complete, the main
Main
power
lamp
Indicator lamps Remaining
capacity
Lighted Blinking
Charging
(75% to
100%)
Charging
(50% to
75%)
Charging
(25% to
50%)
Charging
(0% to
25%)
Power button and battery indicator
CAUTION: Make sure that the tool or machine
Otherwise,
the tool or machine may start suddenly and cause an
injury.
NOTE: If you turn on the tool or machine right after
you turn on the unit, the tool or machine may not start.
In this case, restart the tool or machine again.
Fig.4: 1. Power button 2. Indicator lamp 3. Main
power lamp
To turn the power on, press the power button. The main
press the power button for a few seconds.
NOTE: If the unit and connected tool or machine are
left unattended for 8 hours, the unit automatically
The main power lamp blinks in green under the follow-
ing conditions:
• The plug of the adapter or power tool/machine is
not connected to the socket of the unit.
In this case, connect the plug of the adapter or
power tool/machine to the socket of the unit.
• The battery is empty.
In this case, charge the unit.
• The battery is overheated or the temperature of
the unit is low.
In this case, cool down the unit, or warm up the
unit.
If the main power lamp blinks in red and green alter-
If the main power lamp keeps blinking in red and green
alternately after turning the power on, ask your local
Makita Authorized Service Center for repair.
Indicating the remaining battery
capacity
Press the power button on the unit to indicate the
remaining battery capacity. The indicator lamps light up
for approximately 5 seconds.
Indicator lamps Remaining
capacity
Lighted Blinking
75% to 100%
50% to 75%
25% to 50%
0% to 25%
Charge the
battery.
The battery
may have
malfunctioned.
NOTE: Depending on the conditions of use and the
from the actual capacity.
NOTE: If the tool or machine has indicator lamps for
remaining battery capacity, do not refer to the indica-
tor lamps of the tool or machine but to the indicator
lamps of this unit.
NOTE: If the multiple indicator lamps blink, the bat-
tery is overheated. In this case, cool down the battery.
Tool/Machine/Battery protection
system
The tool or machine is equipped with a tool or machine
and battery protection system. This system automat-
machine and battery life. The tool or machine will auto-
matically stop during operation if the tool, machine, or
battery is placed under one of the following conditions:
Overload protection
When the tool, machine, or battery is operated in a
manner that causes it to draw an abnormally high
current, the tool or machine automatically stops. In
application that caused the tool or machine to become
overloaded. Then turn the tool or machine on to restart.
Overheat protection
When the tool, machine, or battery is overheated, the
tool or machine automatically stops. In this case, let the
tool or machine and battery cool before turning the tool
or machine on again.

14 ENGLISH
Overdischarge protection
When the battery capacity is not enough, the tool or
machine stops automatically and an indicator lamp
blinks when you press the power button. In this case,
remove the battery from the tool or machine and charge
the battery.
Using the adapter pocket
CAUTION: Do not use this unit with the cord
adapter pocket.
You can put the adapters into the adapter pocket as
Fig.5: 1. Adapter 2. Adapter pocket
ASSEMBLY
CAUTION: Always be sure that the unit is
unit.
Assembling the unit
1. Attach the battery to the base plate of the shoulder
Fig.6: 1. Battery 2. Base plate
CAUTION: Make sure that the battery is
Otherwise, the
battery may fall when you wear the unit or use the
unit, and cause an injury. If you can see the red indi-
completely.
Fig.7: 1. Red indicator
CAUTION: -
gers or thumbs between the battery and the base
plate when attaching the battery.
CAUTION: When removing the battery, press
Before removing the battery, set the waist belt to
the lowest position.
Fig.8: 1. Handle 2. Lock button
2. Adjust the position of the waist belt. Pull up the
height adjustment lever, then adjust the position of the
waist belt by sliding the base plate, and then return the
lever.
Fig.9: 1. Height adjustment lever 2. Base plate
3. Waist belt
CAUTION:
waist belt, be sure to lay down the unit so that the
NOTICE:
When tightening the nut, do not tighten it excessively.
Otherwise, the height adjustment lever will not move.
Fig.10: 1. Nut
NOTE:
the stand slightly so that the stand does not touch the
ground, and then slide the base plate.
3. Attach the adapter pocket to the waist belt with the
Fig.11: 1. Adapter pocket
NOTE: The adapter pocket can be attached on either
left or right side of the waist belt.
4. Adjust the width of the shoulder harness using the
width adjustment belt.
Fig.12: 1. Width adjustment belt
5. Put on the unit, then lock the buckle of the waist
belt, and then adjust the length of the waist belt.
Fig.13: 1. Buckle
NOTE:
Fig.14: 1. Belt
6. Adjust the length of the shoulder harness.
Fig.15: 1. Shoulder harness
NOTE:
Fig.16: 1. Belt
CAUTION: When setting down the unit, place
unit does not fall.
When setting down the unit, unlock the buckle of the
waist belt, and then set down the unit slowly.
Fig.17: 1. Buckle
OPERATION
CAUTION: When wearing the unit, be sure
to put shoulder harness on your both shoulders.
Otherwise, the unit may fall when you wear the unit or
use the unit, and cause an injury.
CAUTION: When wearing the unit, be sure to
wear the unit on your back. Otherwise, the unit may
fall during operation and cause an injury.
CAUTION:
machine before turning on the unit, or connecting
the plug of the adapter or power tool/machine
to the socket of the battery. Otherwise, the tool or
machine may start suddenly and cause an injury.
NOTE: The adapter for 18 V is not available for this
unit.

15 ENGLISH
Connecting the unit to the tool or
machine
1. Remove the battery from the base plate of the
shoulder harness assembly.
2. Pull out the cord from either left or right side of the
battery. When pulling out the cord, be sure to set the
Fig.18: 1. Cord 2. Holder
3. Attach the battery to the base plate of the shoulder
harness assembly.
4. Put on the unit.
5. Insert the plug of the adapter or power tool/
machine into the socket of the battery all the way so that
the arrow mark on the plug is aligned with that on the
socket.
Fig.19: 1. Plug 2. Socket 3. Arrow mark
NOTICE: When disconnecting the plug and
socket, do not hold the cords but hold the plug
and socket. Otherwise, the cords may be damaged
and cause a malfunction of the unit.
NOTE: The plug and socket are disconnected if a
certain load is applied.
6. Install the adapters to the tool or machine in the
same way as the battery cartridge.
Fig.20: 1. Adapter
NOTICE: For 36 V (18 V x 2) battery-powered tool
or machine, use the adapters for 36 V (18 V x 2).
For direct connection type tool or machine, no
adapter is required.
NOTICE: When installing adapters to the tool or
machine, be sure to install the adapter equipped
If you install the adapters incorrectly, the adapter
equipped with 2 cords cannot be inserted all the
way. In this case, do not insert the adapter forci-
bly. Otherwise, the tool or machine may be damaged.
Fig.21: 1. Adapter with 2 cords
Fig.22: 1. Adapter with 2 cords
NOTE: The direction of the cord of the adapter can be
changed in the range of approximately 180 degrees.
7. Press the power button to turn the power on. To
seconds.
Fig.23: 1. Power button
Using the cord holders
CAUTION: Attach only the cord of the battery
to the cord holders. Do not attach the cord of the
adapters or power tool/machine to the cord hold-
ers. Attaching the cord of the adapters or power tool/
machine may invite accident and cause an injury.
Fig.24
Fig.25
You can attach the cord of the battery to the cord hold-
Fig.26: 1. Cord holder
You can also attach the cord using only the cord holder
Fig.27: 1. Cord holder
The cord holders can be attached on either left or right
side of the shoulder harness and waist belt.
Fig.28: 1. Part to be attached the cord holder
CAUTION: Be sure to attach the cord to the
shoulder harness on the left side only or right
side only so that the cord does not cross the
shoulder harness.
Fig.29
Using the hanging band
Optional accessory
You can use the hanging band for cordless grass trim-
mer with this unit.
Attaching the hanging band
1. Attach the hooks of the hanging band to the rings
of the shoulder harness or waist belt as shown in the
method appropriate for your usage.
Fig.30: 1. Ring 2. Hook
Fig.31: 1. Ring 2. Hook
Fig.32: 1. Ring 2. Hook
Fig.33: 1. Ring 2. Hook
NOTE: If the tool is bike handle type, attach the band
so that the band passes through inside of the waist
Fig.34: 1. Waist belt 2. Band
2. Attach the hook to the tool.
Fig.35: 1. Hook
Detaching the tool
Push the levers on the buckle to unlock the buckle.
Fig.36: 1. Lever
NOTE: The buckle is not equipped depending on the
type of band.
Emergency detachment
1. Push the levers on the buckle of the waist belt to
unlock the buckle.
Fig.37: 1. Buckle 2. Lever
2.
and the unit.
Fig.38: 1. Shoulder harness

16 ENGLISH
MAINTENANCE
CAUTION: Always be sure that the unit is
-
tion or maintenance.
NOTICE: Never use gasoline, benzine, thinner,
alcohol or the like. Discoloration, deformation or
cracks may result.
To maintain product SAFETY and RELIABILITY,
repairs, any other maintenance or adjustment should
be performed by Makita Authorized or Factory Service
Centers, always using Makita replacement parts.
TROUBLESHOOTING
do not attempt to dismantle the tool, machine, or unit. Instead, ask Makita Authorized Service Centers, always using
Makita replacement parts for repairs.
State of abnormality Main power lamp Cause Remedy
The tool or machine does not
start.
-The charger is connected to
the unit.
Remove the charger from
the unit.
The lamp lights up in green. The adapters are not installed
to the tool or machine.
Install the adapters to the tool
or machine.
Check that the adapters are
installed securely.
The tool or machine, or the
cords of the adapters are
overheated.
Cool down the tool or machine,
and the unit.
The tool or machine, or the unit
is broken.
Ask Makita Authorized Service
Centers for repair.
The lamp blinks in green. The plug of the adapter or
power tool/machine and the
socket of the battery are not
connected.
Connect the plug and the
socket.
Check that the plug and socket
are connected securely.
The unit is overheated, or the
temperature of the unit is low.
Cool down the unit, or warm up
the unit.
The remaining battery capacity
is not enough.
Charge the battery.
The lamp blinks in red and
green alternately.
The unit has detected an
abnormality.
back on.
The tool or machine, or the unit
is broken.
Ask Makita Authorized Service
Centers for repair.
The lamp does not light up. The unit is not turned on. Turn on the unit.
The remaining battery capacity
is not enough.
Charge the battery.
The unit is broken. Ask Makita Authorized Service
Centers for repair.
Charging does not start when
the charger is connected.
The lamp blinks in red. The unit is overheated, or the
temperature of the unit is low.
Cool down the unit, or warm up
the unit.
The lamp blinks in red and
green alternately.
The unit or charger has
detected an abnormality.
Remove the socket of the bat-
tery charger, and then connect
it again.
The unit or charger is broken. Ask Makita Authorized Service
Centers for repair.
The lamp does not light up. The charger is not connected to
the proper AC voltage source.
Connect the charger to the
proper AC voltage source.
The socket of the charger is not
connected properly.
Connect the socket of the
charger properly.
The power cord of the charger
is not connected to the charger
properly.
Connect the power cord to the
charger properly.
The unit or charger is broken. Ask Makita Authorized Service
Centers for repair.

17 ENGLISH
OPTIONAL
ACCESSORIES
CAUTION: These accessories or attachments
are recommended for use with your Makita tool
The use of any other
accessories or attachments might present a risk of
injury to persons. Only use accessory or attachment
for its stated purpose.
If you need any assistance for more details regard-
ing these accessories, ask your local Makita Service
Center.
• Makita genuine charger
NOTE: Some items in the list may be included in the
tool package as standard accessories. They may

18 PORTUGUÊS DO BRASIL
ESPECIFICAÇÕES
Modelo: PDC1200
Dimensões
(C x L x A)
369 mm x 261 mm x 139 mm *1
Tensão nominal 36 VCC - 40 VCC máx.
Capacidade da bateria 33,5 Ah
Tipo de bateria Recarregável, de íons de lítio
Duração do carregamento 360 minutos
Peso líquido Bateria 8,8 kg *1
Conjunto da correia de
ombro
1,6 kg *2
*1. Sem o conjunto da correia de ombro, adaptadores e o carregador.
*2. Sem o bolso dos adaptadores
Carregador aplicável
• DC4001
AVISO: Use somente o carregador listado
acima. O uso de outros carregadores pode provocar
ferimentos e/ou incêndios.
O adaptador de baterias tipo mochila é apropriado para
períodos prolongados de trabalho, pois ele permite que
Esta unidade pode ser utilizada com as ferramentas ou
máquinas a seguir.
• Ferramenta ou máquina acionada por baterias de
36 V (2 x 18 V)
• Ferramenta ou máquina acionada por baterias
(conexão direta ao adaptador de baterias tipo
mochila)
O termo “unidade” neste manual de instruções se refere
ao adaptador de baterias tipo mochila. O adaptador de
baterias tipo mochila consiste na bateria e no conjunto
da correia de ombro.
Categoria de máquinas ou
• Motosserra a Bateria *1, Podador de altura,
Soprador a Bateria, TESOURA PARA GRAMA
A BATERIA, FERRAMENTA MULTIFUNCIONAL
A BATERIA, Aparador De Cerca Viva a Bateria,
Esmerilhadeira Angular a Bateria e Martelete
Rotativo a Bateria *2
*1. Exceto para motosserra com punho supe-
rior (DUC252 / DUC302 / DUC352 / DUC256 /
DUC306 / DUC356 / DUC406 / DUC256C)
*2. Exceto para os modelos DHR280 / DHR281 /
DHR282 / DHR283
A categoria compatível da ferramenta ou máquina está
sujeita a mudança sem aviso prévio. Consulte também
o manual de instruções mais recente para obter infor-
mações sobre a categoria compatível da ferramenta ou
máquina.
AVISO: Nunca use esta unidade com ferra-
mentas ou máquinas categorizadas abaixo. O uso
desta unidade com ferramentas ou máquinas não
compatíveis poderá causar ferimentos pessoais ou
defeitos de funcionamento.
• Pulverizador a bateria, Tesoura de jardim a
bateria, Carrinho de mão a bateria, Bicicleta da
a bateria, Aspirador costal a bateria, Aspirador
de pó robotizado, Jaqueta ventilada a bateria e
Jaqueta térmica a bateria
OBSERVAÇÃO:
quando a unidade for usada com os modelos a
Modelo DUR364L / DUR365U / DUR366L /
DUR368A / DUR368L / DUX60
Ferramenta de corte
e diâmetro de corte
Cabeçote de corte de náilon, com
diâmetro do corte de 350 mm
náilon
2,0 mm
*. O cabeçote de corte de náilon pode não estar disponível na
região da sua residência.
NOTA:
Para o modelo DUB362
Em um ambiente de alta temperatura, a operação da
máquina poderá ser interrompida por seu sistema de
proteção.

19 PORTUGUÊS DO BRASIL
Os símbolos mostrados a seguir podem ser usados
Leia o manual de instruções.
Para reduzir o risco de ferimentos, mante-
nha o cabo afastado de obstáculos.
Não exponha a bateria à água ou chuva.
Não jogue a bateria no fogo.
Não coloque a bateria em curto-circuito.
Li-ion
Apenas para países da UE
Não jogue equipamentos elétricos ou
baterias no lixo doméstico! De acordo com
as Diretivas Europeias sobre Disposição
de Equipamentos Elétricos e Eletrônicos,
Baterias e Acumuladores e Disposição de
Baterias e Acumuladores, e sua aplicação
conforme as leis nacionais, equipamentos
elétricos e baterias descartados devem ser
recolhidos em separado e encaminhados
a uma instalação de reciclagem ecologica-
mente compatível.
AVISOS DE SEGURANÇA
de baterias tipo mochila
1.
ferramenta ou máquina antes do uso.
2. -
enquanto estiver com a unidade colocada no
corpo ou se a estiver usando.
3. Antes de colocar a unidade no corpo, retire o
soquete da ferramenta ou máquina.
4. Ao se afastar da ferramenta ou máquina, certi-
retire a unidade do corpo.
5.
6. -
vel ou em locais altos instáveis.
7. -
em obstáculos, poderá provocar ferimentos
sérios.
8.
9. Inspecione a unidade, antes de usar, incluindo
-
dos, solicite reparos ao centro de assistência
técnica autorizado Makita local.
10. Quando conectar o cabo ao suporte do cabo,
11. Antes de realizar qualquer trabalho de ins-
soquete foi removido.
12. Quando usar esta unidade com uma ferra-
de manter o cabo afastado da lâmina.
13.
nada que possa interferir com a funcionali-
dade de desengate de emergência da unidade,
ombro.
14.
15.
a bateria.
16.
17. Quando usar esta unidade sem colocá-la
no corpo, ou para instalá-la na ferramenta
horizontalmente.
18.
unidade.
19. Tome cuidado para que a correia ou o cinto
20. Quando usar a unidade, tome cuidado para
máquina.
21.
22.
como aparas metálicas e água, afastados do
plugue da unidade.
23.
24. Use somente o carregador dedicado à uni-
25.
coloque nada sobre a unidade.
26.
27.
largura.
28. Guarde a unidade em áreas internas.
29.
e o suporte da bateria.
30.
importantes da bateria
1. Antes de utilizar a bateria, leia todas as instru-
de bateria, da (2) bateria e do (3) produto que
estiver usando a bateria.
2.

20 PORTUGUÊS DO BRASIL
3. -
vamente mais curto, pare imediatamente a
4. Caso caia eletrólitos em seus olhos, lave-os
com água limpa e procure assistência de um
médico imediatamente. Esse acidente pode
5.
(1)
material condutor.
(2)
moedas, etc.
(3)
Um curto-circuito na bateria pode causar
sobrecarga de corrente, aquecimento exces-
6.
a bateria em locais onde a temperatura possa
atingir ou ultrapassar 50 °C.
7.
A bateria pode explodir no fogo.
8.
dar pancadas na bateria.
9.
10.
produtos perigosos.
Para transportes comerciais, por exemplo por
terceiros e agentes de embarque, os requisitos
especiais referentes a embalagem e rotulação
devem ser obedecidos.
Para a preparação do item sendo expedido, é
necessário consultar um especialista em materiais
perigosos. Considere também que as regulamen-
tações nacionais podem ser mais detalhadas e
devem ser obedecidas.
a bateria de maneira que não se mova dentro da
embalagem.
11. Quando descartar a bateria, retire-a da ferra-
menta e descarte-a em um local seguro. Siga
-
carte de baterias.
12. Use a bateria somente com os produtos espe-
A instalação da bateria
em produtos não compatíveis poderá resultar em
incêndio, aquecimento excessivo, explosão ou
vazamento de eletrólito.
13. A bateria deverá ser retirada da ferramenta/
14. Mantenha a bateria fora do alcance de
GUARDE ESTAS INSTRUÇÕES.
PRECAUÇÃO: Use somente baterias Makita
originais. O uso de baterias Makita não originais ou
baterias que foram alteradas pode causar a explo-
são da bateria e resultar em incêndio, ferimentos às
pessoas na área e danos aos equipamentos. O uso
de baterias não originais cancela a garantia Makita
tanto para a ferramenta quanto para o carregador da
bateria.
Dicas para manter a vida útil
máxima da bateria
1. -
mente descarregada. Interrompa sempre a
a bateria quando notar perda de potência.
2. Nunca recarregue uma bateria com carga
completa. O carregamento excessivo diminui a
vida útil da bateria.
3. Recarregue a bateria a uma temperatura
ambiente entre 10 °C e 40 °C. Deixe a bateria
esfriar antes de recarregá-la.
4.
seis meses).
DESCRIÇÃO DAS PEÇAS
Fig.1
1Placa-base 2Bateria 3Alça 4Botão de travamento
5Suporte do cabo 6Bolso dos adaptadores 7Botão liga/desliga 8Plugue da bateria
9Adaptadores para 36 V
(2 x 18 V)
10 Plugue do adaptador 11 Plugue de alimentação
do carregador de bateria
12 Carregador de bateria
13 Soquete do carregador
de bateria
14 Cinto 15 Soquete 16 Correia de ajuste da
largura
17 Conjunto da correia de
ombro
18 Suporte da bateria ----
Other manuals for PDC1200
4
Table of contents
Languages:
Other Makita Power Pack manuals

Makita
Makita PDC01 User manual

Makita
Makita PDC1500 User manual

Makita
Makita PDC1200 User manual

Makita
Makita PDC1200 User manual

Makita
Makita PDC1500 User manual

Makita
Makita PDC1200 User manual

Makita
Makita PDC01 User manual

Makita
Makita PDC01Z User manual

Makita
Makita PDC01 User manual

Makita
Makita PDC1200 User manual
Popular Power Pack manuals by other brands

H3 Group
H3 Group LCPSD-HV / EMPHV-SD Series installation instructions

Malibu Boats
Malibu Boats ML200RT instructions

Socket
Socket Mobile Power Pack quick start guide

Anchor Systems
Anchor Systems 46913 Operating instructions and technical information

Philips
Philips SCE4420/10 user manual

Goodsmann
Goodsmann 9920-0300-01 user manual