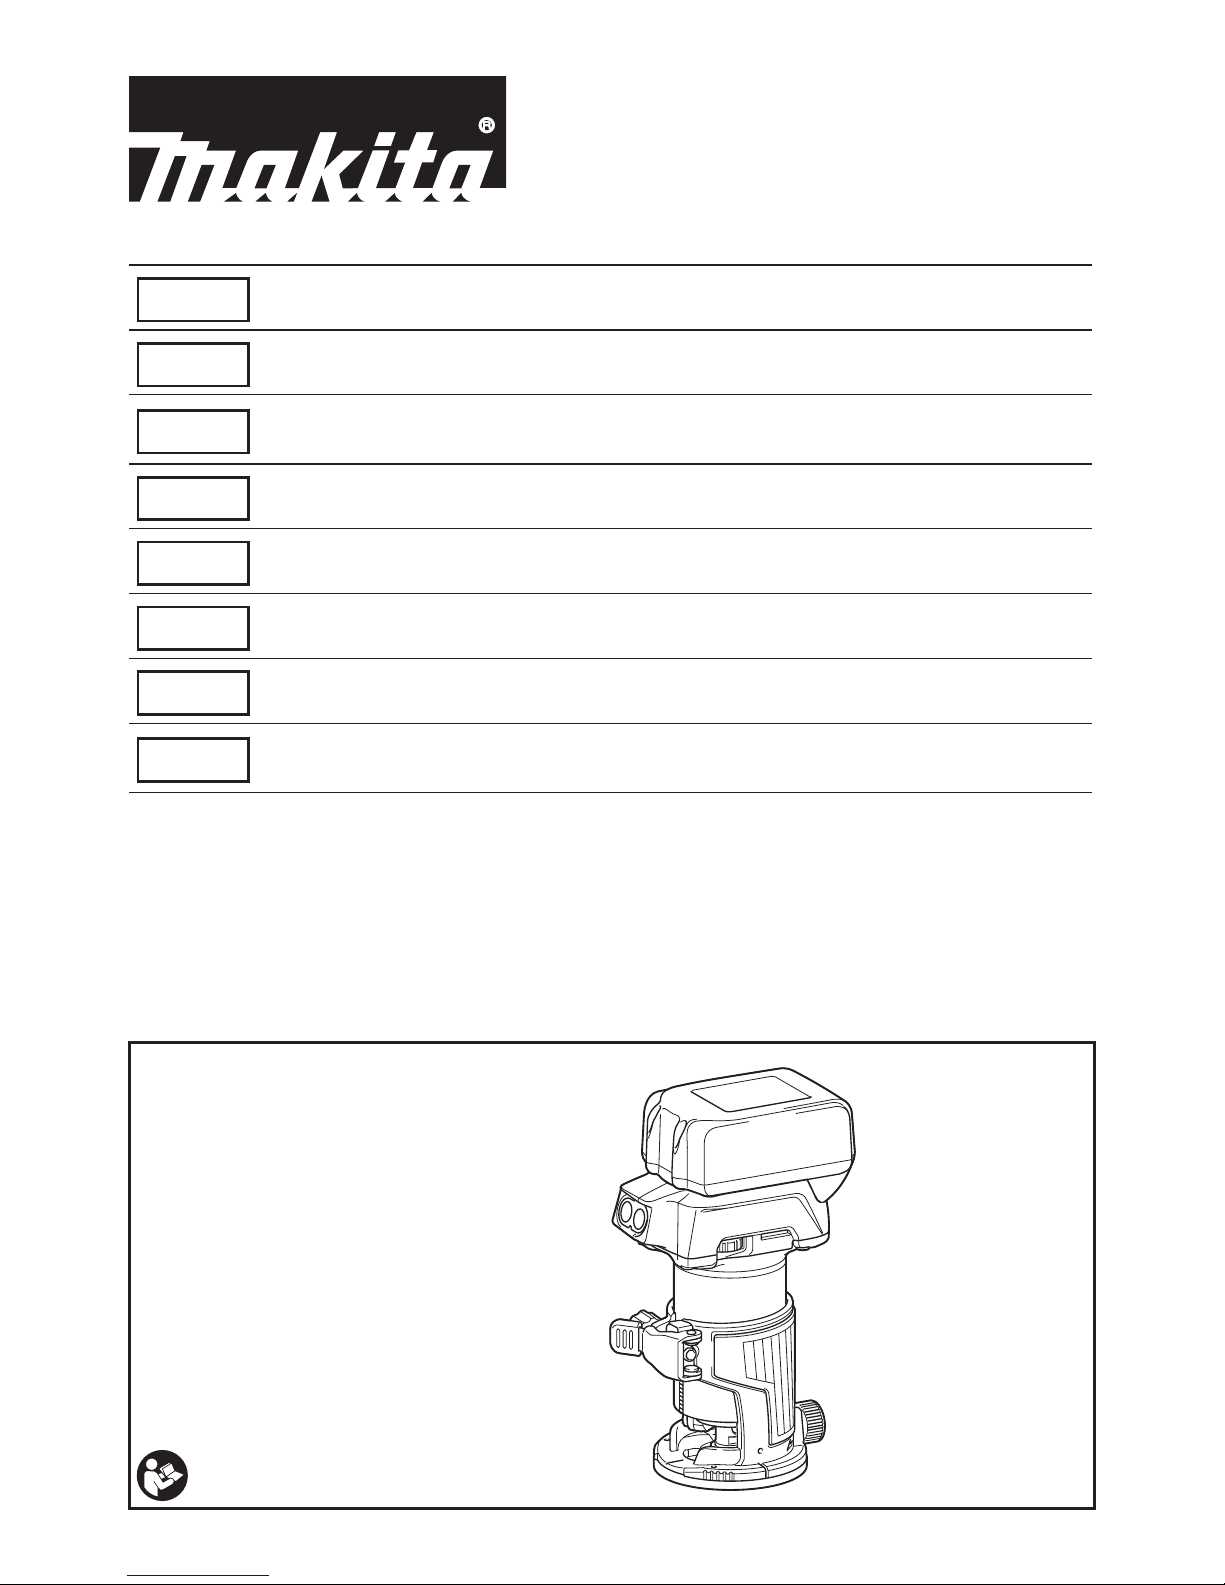
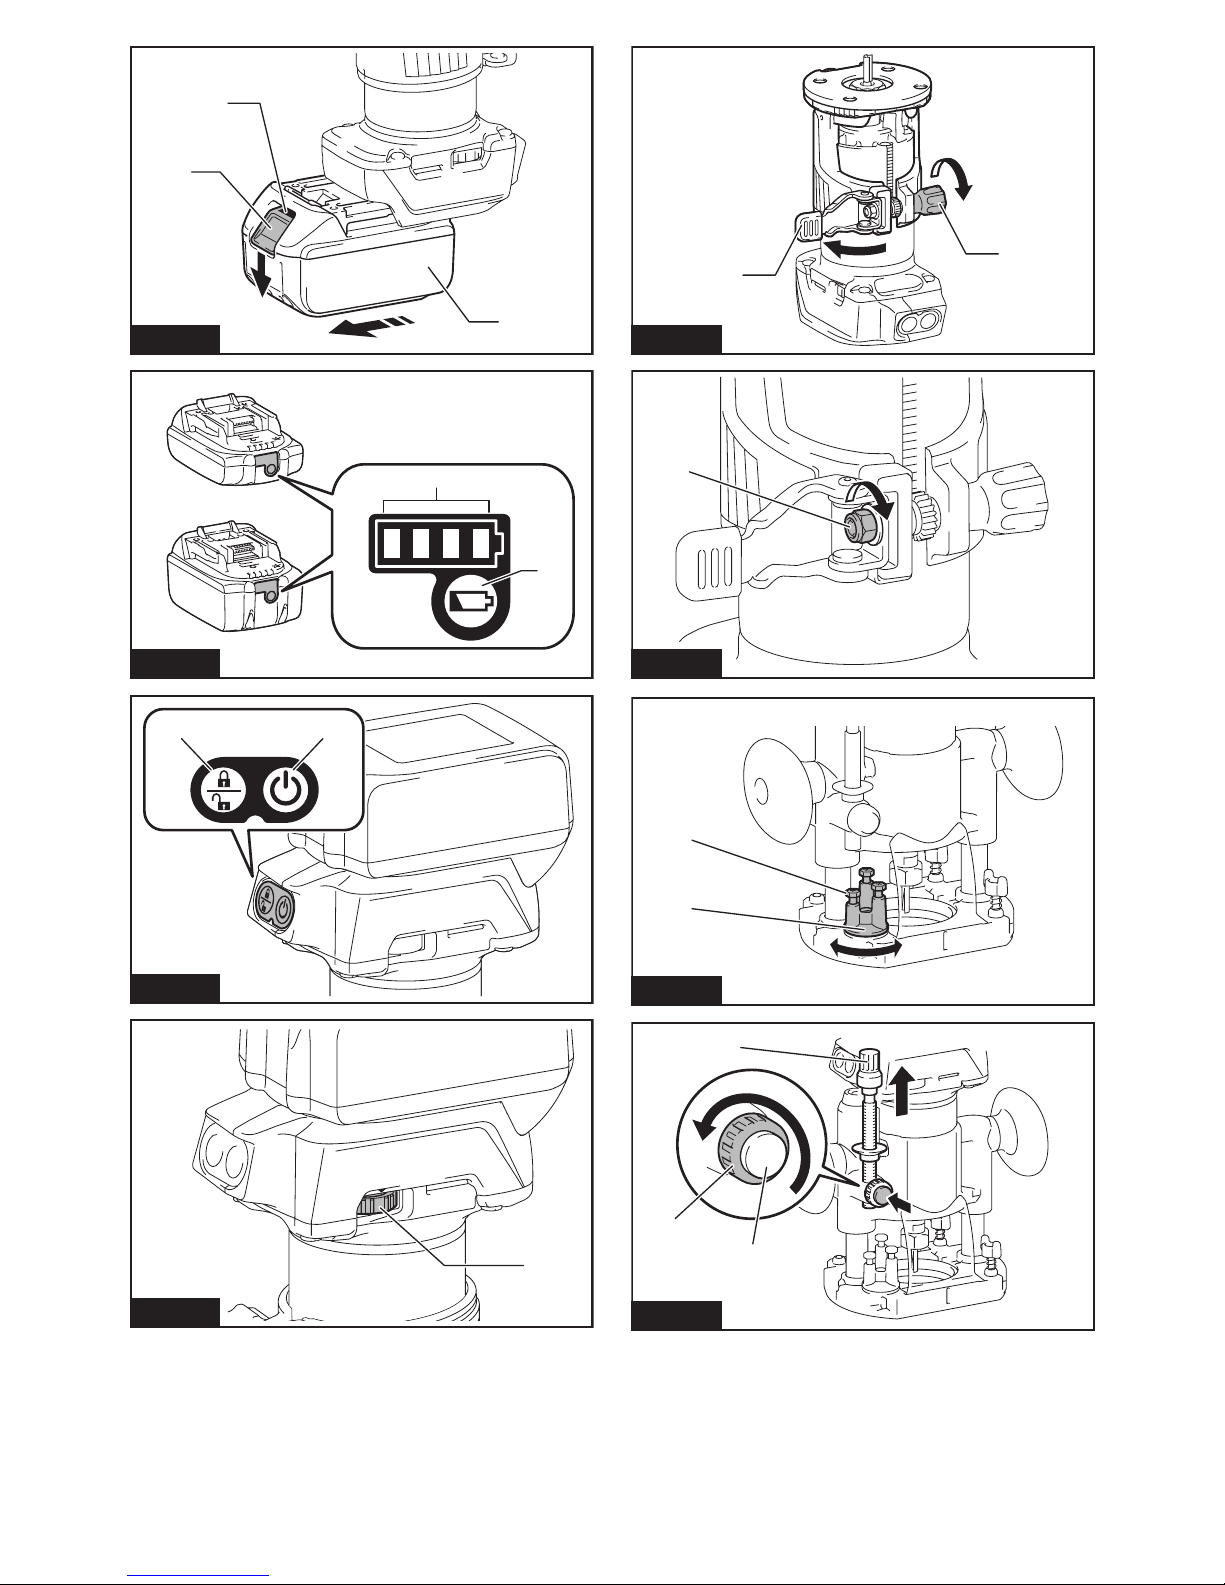
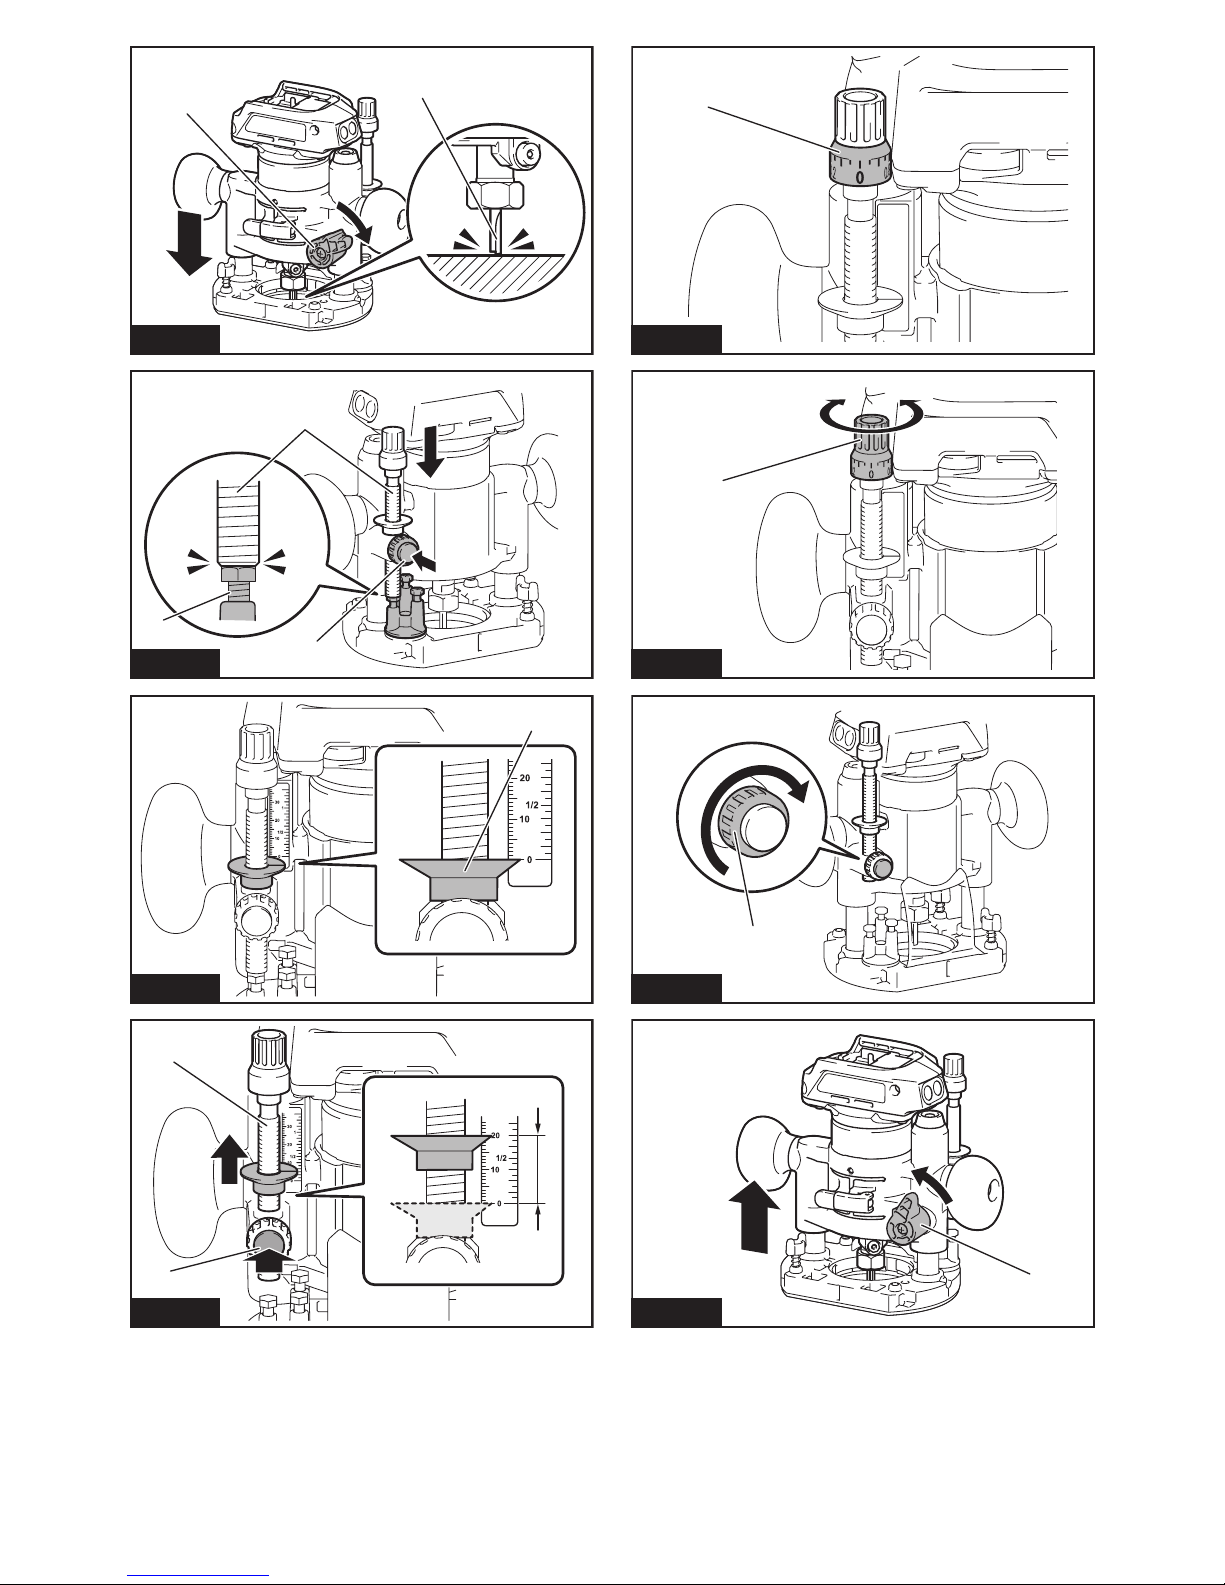
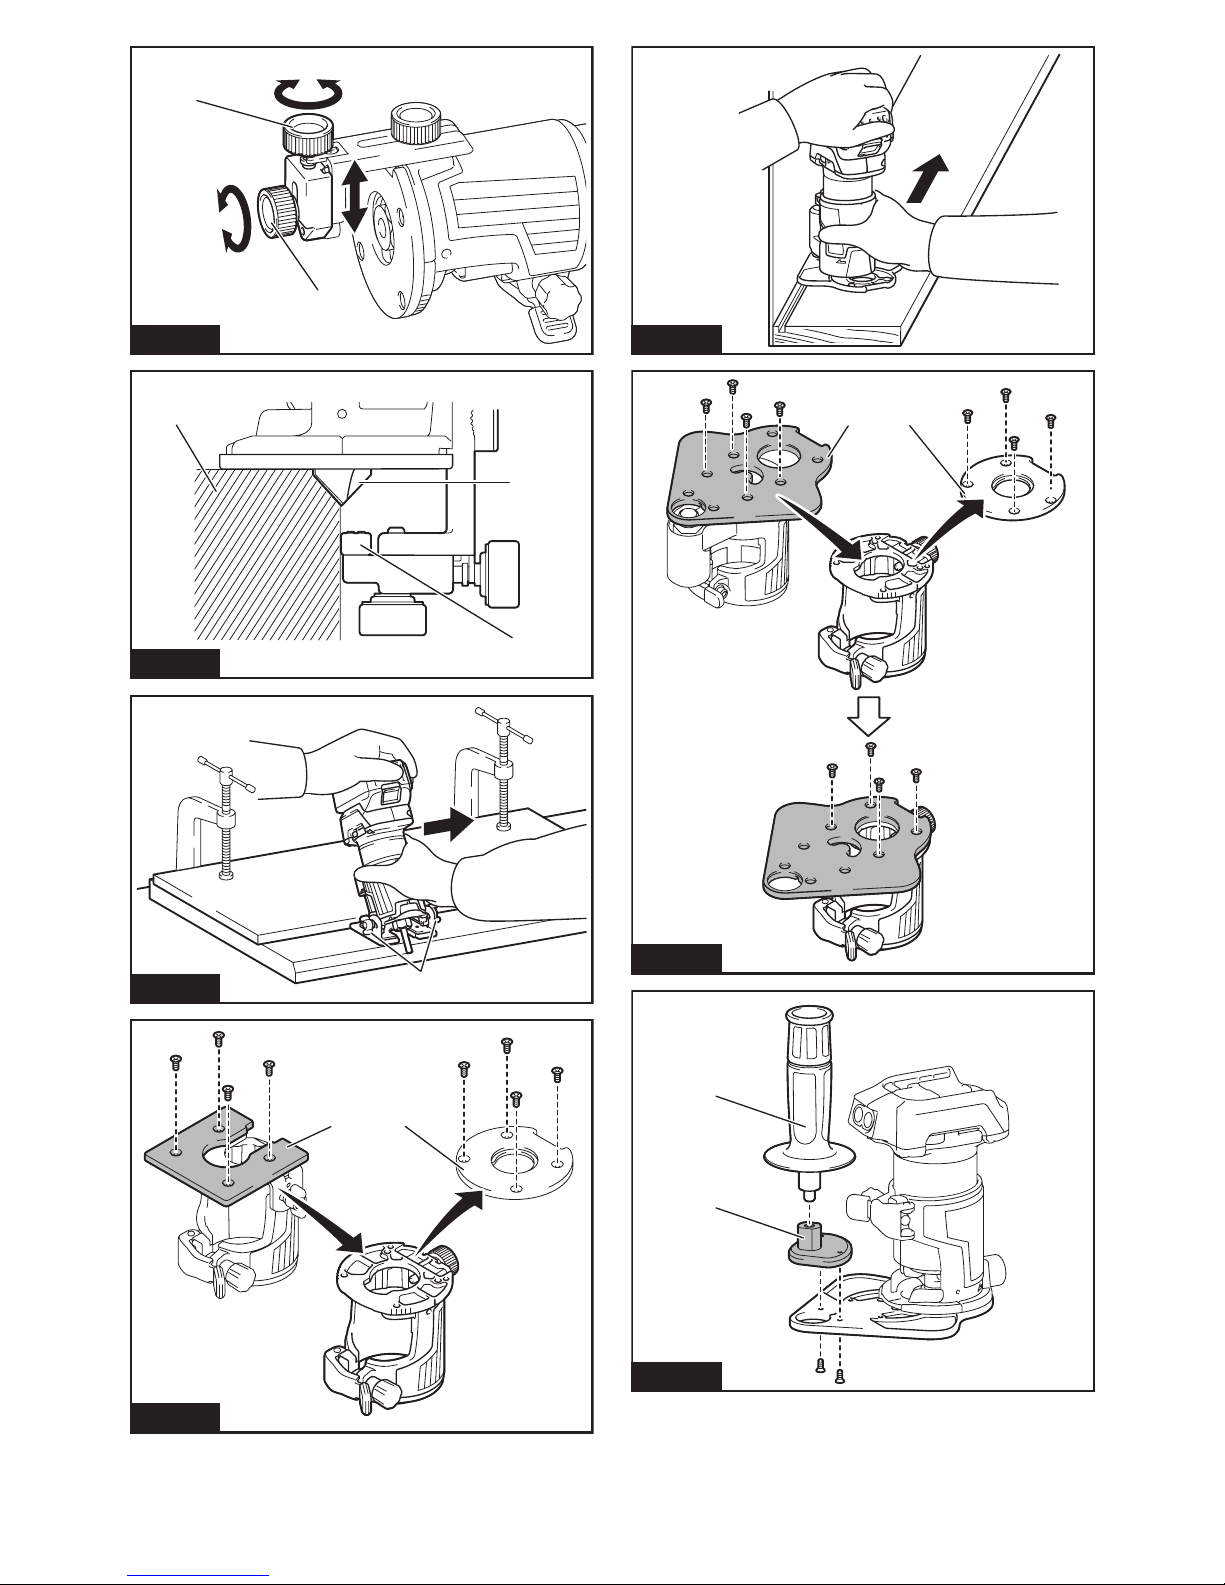
Makita DRT50 User manual

DRT50
EN Cordless Trimmer INSTRUCTION MANUAL 13
SV Batteridriven kantfräs BRUKSANVISNING 22
NO Batteridrevet
tilskjæringsmaskin BRUKSANVISNING 31
FI Akkukäyttöinen jyrsin KÄYTTÖOHJE 40
LV Bezvadu apgriezējmašīna LIETOŠANAS INSTRUKCIJA 49
LT Belaidė freza NAUDOJIMO INSTRUKCIJA 58
ET Akuga servamismasin KASUTUSJUHEND 67
RU Аккумуляторный Триммер РУКОВОДСТВО ПО
ЭКСПЛУАТАЦИИ 76

1
2
3
Fig.1
1
2
Fig.2
21
Fig.3
1
Fig.4
2
1
Fig.5
1
Fig.6
1
2
Fig.7
2
3
1
Fig.8
2

12
Fig.9
2
3
1
Fig.10
1
Fig.11
1
2
Fig.12
1
Fig.13
1
Fig.14
1
Fig.15
1
Fig.16
3

12
3
4
5
Fig.17
12
3
1
4
Fig.18
1
Fig.19
1
Fig.20
1
Fig.21
12
Fig.22
Fig.23
4

1
Fig.24
1
2
3
Fig.25
1
2
Fig.26
1
2
3
Fig.27
1
Fig.28
1
Fig.29
2
1
Fig.30
5

1
Fig.31
1
Fig.32
1
2
3
Fig.33
1
2
3
Fig.34
2
1
Fig.35
1
Fig.36
1
2
Fig.37
1
2
3
Fig.38
6

Fig.39
Fig.40
1
3
2
Fig.41
2
1
Fig.42
1
Fig.43
1
Fig.44
Fig.45
A
Fig.46
7

1
Fig.47
1
Fig.48
2
1
Fig.49
1
2
Fig.50
Fig.51
12
3
4
Fig.52
Fig.53
1
Fig.54
8

1
2
Fig.55
1
2
3
Fig.56
1
Fig.57
12
Fig.58
Fig.59
12
Fig.60
2
1
Fig.61
9

1
2
Fig.62
1
23
4
Fig.63
1
Fig.64
Fig.65
1
2
Fig.66
Fig.67
Fig.68
A
Fig.69
10

12
3
Fig.70
D
A
L1
L2
Fig.71
D
A
L1
L2
R
Fig.72
D
A
L1
L2
θ
Fig.73
D
A
L1
L2 L3
Fig.74
D
A
L1
L2
L3
L4
Fig.75
D
A1
A2
L1
L2
L3
R
Fig.76
11

D
A
θ
L1
L2
L3
Fig.77
D
A
L1
L2
R
Fig.78
D
A
L1
L2
Fig.79
D
A1
A2
L1
L2
L3
R
Fig.80
D
A1
A2
L1
L2
θ
Fig.81
D
A1
A2
A3
L1
L2
L3
R
Fig.82
D
A1
A2
A3
A4
L1
L2
L3
R
Fig.83
D
A1
A2
L1
L2
L3
R1
R2
Fig.84
12

13 ENGLISH
ENGLISH (Original instructions)
SPECIFICATIONS
Model: DRT50
Collet chuck capacity 6 mm, 8 mm, 1/4", or 3/8"
No load speed 10,000 - 30,000 min-1
Overall length 226 mm
Rated voltage D.C. 18 V
Standard battery cartridge BL1815N / BL1820 / BL1820B / BL1830 / BL1830B / BL1840 /
BL1840B / BL1850 / BL1850B / BL1860B
Net weight 1.8 - 2.1 kg
• Duetoourcontinuingprogramofresearchanddevelopment,thespecicationshereinaresubjecttochange
without notice.
• Specicationsandbatterycartridgemaydifferfromcountrytocountry.
• Theweightmaydifferdependingontheattachment(s),includingthebatterycartridge.Thelightestandheavi-
estcombination,accordingtoEPTA-Procedure01/2014,areshowninthetable.
Intended use
Thetoolisintendedforushtrimmingandprolingof
wood, plastic and similar materials.
Noise
ThetypicalA-weightednoiseleveldeterminedaccord-
ing to EN60745:
Soundpressurelevel(LpA):78dB(A)
Uncertainty(K):3dB(A)
WARNING: Wear ear protection.
Vibration
Thevibrationtotalvalue(tri-axialvectorsum)deter-
mined according to EN60745:
Work mode: rotation without load
Vibrationemission(ah):2.5m/s2or less
Uncertainty(K):1.5m/s2
Work mode: cutting grooves in MDF
Vibrationemission(ah):4.5m/s2
Uncertainty(K):1.5m/s2
NOTE:
Thedeclaredvibrationemissionvaluehasbeen
measured in accordance with the standard test method
andmaybeusedforcomparingonetoolwithanother.
NOTE:
Thedeclaredvibrationemissionvaluemay
alsobeusedinapreliminaryassessmentofexposure.
WARNING:Thevibrationemissionduringactual
useofthepowertoolcandifferfromthedeclared
emission value depending on the ways in which the
tool is used.
WARNING:Besuretoidentifysafetymeasures
to protect the operator that are based on an estima-
tionofexposureintheactualconditionsofuse(taking
accountofallpartsoftheoperatingcyclesuchas
thetimeswhenthetoolisswitchedoffandwhenitis
runningidleinadditiontothetriggertime).
EC Declaration of Conformity
For European countries only
TheECdeclarationofconformityisincludedasAnnexA
to this instruction manual.
SAFETY WARNINGS
General power tool safety warnings
WARNING: Read all safety warnings, instruc-
tions, illustrations and specications provided
with this power tool.Failuretofollowallinstructions
listedbelowmayresultinelectricshock,reand/or
seriousinjury.
Save all warnings and instruc-
tions for future reference.
Theterm"powertool"inthewarningsreferstoyour
mains-operated(corded)powertoolorbattery-operated
(cordless)powertool.
Cordless trimmer safety warnings
1.
Hold power tool by insulated gripping surfaces,
because the cutter may contact hidden wiring.
Cuttinga"live"wiremaymakeexposedmetalparts
ofthepowertool"live"andshocktheoperator.
2.
Use clamps or another practical way to secure
and support the workpiece to a stable platform.
Holding the work by your hand or against the body
leavesitunstableandmayleadtolossofcontrol.
3. Wear hearing protection during extended
period of operation.
4. Handle the trimmer bits very carefully.
5. Check the trimmer bit carefully for cracks or
damage before operation. Replace cracked or
damaged bit immediately.

14 ENGLISH
6. Avoid cutting nails. Inspect for and remove all
nails from the workpiece before operation.
7. Hold the tool rmly.
8. Keep hands away from rotating parts.
9. Make sure the trimmer bit is not contacting the
workpiece before the switch is turned on.
10. Before using the tool on an actual workpiece,
let it run for a while. Watch for vibration or
wobbling that could indicate improperly
installed bit.
11. Be careful of the trimmer bit rotating direction
and the feed direction.
12. Do not leave the tool running. Operate the tool
only when hand-held.
13. Always switch off and wait for the trimmer bit
to come to a complete stop before removing
the tool from workpiece.
14. Do not touch the trimmer bit immediately after
operation; it may be extremely hot and could
burn your skin.
15. Do not smear the tool base carelessly with
thinner, gasoline, oil or the like. They may
cause cracks in the tool base.
16. Use trimmer bits of the correct shank diameter
suitable for the speed of the tool.
17. Some material contains chemicals which may
be toxic. Take caution to prevent dust inhala-
tion and skin contact. Follow material supplier
safety data.
18. Always use the correct dust mask/respirator
for the material and application you are work-
ing with.
SAVE THESE INSTRUCTIONS.
WARNING: DO NOT let comfort or familiarity
with product (gained from repeated use) replace
strict adherence to safety rules for the subject
product. MISUSE or failure to follow the safety
rules stated in this instruction manual may cause
serious personal injury.
Important safety instructions for
battery cartridge
1. Before using battery cartridge, read all instruc-
tions and cautionary markings on (1) battery
charger, (2) battery, and (3) product using
battery.
2. Do not disassemble battery cartridge.
3. If operating time has become excessively
shorter, stop operating immediately. It may
result in a risk of overheating, possible burns
and even an explosion.
4. If electrolyte gets into your eyes, rinse them
out with clear water and seek medical atten-
tion right away. It may result in loss of your
eyesight.
5. Do not short the battery cartridge:
(1) Do not touch the terminals with any con-
ductive material.
(2) Avoid storing battery cartridge in a con-
tainer with other metal objects such as
nails, coins, etc.
(3) Do not expose battery cartridge to water
or rain.
A battery short can cause a large current
ow, overheating, possible burns and even a
breakdown.
6. Do not store the tool and battery cartridge in
locations where the temperature may reach or
exceed 50 °C (122 °F).
7. Do not incinerate the battery cartridge even if
it is severely damaged or is completely worn
out. The battery cartridge can explode in a re.
8. Be careful not to drop or strike battery.
9. Do not use a damaged battery.
10. The contained lithium-ion batteries are subject
to the Dangerous Goods Legislation require-
ments.
For commercial transports e.g. by third parties,
forwardingagents,specialrequirementonpack-
aging and labeling must be observed.
Forpreparationoftheitembeingshipped,consult-
inganexpertforhazardousmaterialisrequired.
Please also observe possibly more detailed
national regulations.
Tapeormaskoffopencontactsandpackupthe
battery in such a manner that it cannot move
around in the packaging.
11. Follow your local regulations relating to dis-
posal of battery.
12. Use the batteries only with the products
specied by Makita. Installing the batteries to
non-compliantproductsmayresultinare,exces-
siveheat,explosion,orleakofelectrolyte.
SAVE THESE INSTRUCTIONS.
CAUTION: Only use genuine Makita batteries.
Useofnon-genuineMakitabatteries,orbatteriesthat
have been altered, may result in the battery bursting
causingres,personalinjuryanddamage.Itwill
alsovoidtheMakitawarrantyfortheMakitatooland
charger.
Tips for maintaining maximum
battery life
1. Charge the battery cartridge before completely
discharged. Always stop tool operation and
charge the battery cartridge when you notice
less tool power.
2. Never recharge a fully charged battery car-
tridge. Overcharging shortens the battery
service life.
3. Charge the battery cartridge with room tem-
perature at 10 °C - 40 °C (50 °F - 104 °F). Let
a hot battery cartridge cool down before
charging it.
4. Charge the battery cartridge if you do not use
it for a long period (more than six months).

15 ENGLISH
FUNCTIONAL DESCRIPTION
CAUTION: Always be sure that the tool is
switched off and the battery cartridge is removed
before adjusting or checking function on the tool.
Installing or removing battery cartridge
CAUTION: Always switch off the tool before
installing or removing of the battery cartridge.
CAUTION: Hold the tool and the battery car-
tridge rmly when installing or removing battery
cartridge. Failure to hold the tool and the battery
cartridgermlymaycausethemtoslipoffyourhands
and result in damage to the tool and battery cartridge
andapersonalinjury.
►Fig.1: 1. Red indicator 2. Button 3. Battery cartridge
Toremovethebatterycartridge,slideitfromthetool
whileslidingthebuttononthefrontofthecartridge.
Toinstallthebatterycartridge,alignthetongueonthe
battery cartridge with the groove in the housing and slip
it into place. Insert it all the way until it locks in place
withalittleclick.Ifyoucanseetheredindicatoronthe
uppersideofthebutton,itisnotlockedcompletely.
CAUTION: Always install the battery cartridge
fully until the red indicator cannot be seen.Ifnot,
itmayaccidentallyfalloutofthetool,causinginjuryto
you or someone around you.
CAUTION: Do not install the battery cartridge
forcibly.Ifthecartridgedoesnotslideineasily,itis
not being inserted correctly.
Indicating the remaining battery capacity
Only for battery cartridges with the indicator
►Fig.2: 1. Indicator lamps 2. Check button
Press the check button on the battery cartridge to indi-
catetheremainingbatterycapacity.Theindicatorlamps
lightupforafewseconds.
Indicator lamps Remaining
capacity
Lighted Off Blinking
75% to 100%
50% to 75%
25% to 50%
0% to 25%
Charge the
battery.
Thebattery
may have
malfunctioned.
NOTE:Dependingontheconditionsofuseandthe
ambienttemperature,theindicationmaydifferslightly
fromtheactualcapacity.
Tool / battery protection system
Thetoolisequippedwithatool/batteryprotectionsys-
tem.Thissystemautomaticallycutsoffpowertothe
motortoextendtoolandbatterylife.Thetoolwillauto-
maticallystopduringoperationifthetoolorbatteryis
placedunderoneofthefollowingconditions:
Overload protection
When the battery is operated in a manner that causes
it to draw an abnormally high current, the tool automat-
ically stops without any indication. In this situation, turn
thetooloffandstoptheapplicationthatcausedthetool
tobecomeoverloaded.Thenturnthetoolontorestart.
Overheat protection
When the tool or battery is overheated, the tool stops
automatically and the lamp blinks. In this case, let the
toolandbatterycoolbeforeturningthetoolonagain.
Overdischarge protection
When the battery capacity is not enough, the tool stops
automatically.Inthiscase,removethebatteryfromthe
tool and charge the battery.
Switch action
Toturnonthetool,pressthelock/unlockbutton.The
toolturnsintothestandbymode.Tostartthetool,press
thestart/stopbuttoninthestandbymode.Tostopthe
tool,pressthestart/stopbuttonagain.Thetoolturns
intothestandbymode.Toturnoffthetool,pressthe
lock/unlock button in the standby mode.
►Fig.3: 1. Lock/unlock button 2. Start/stop button
NOTE:Ifthetoolisleftfor10secondswithoutany
operation in the standby mode, the tool automatically
turnsoffandthelampgoesoff.
NOTE:Youcanalsostopandturnoffthetoolby
pressing the lock/unlock button while the tool is
operating.
Lighting up the front lamp
CAUTION: Do not look in the light or see the
source of light directly.
Toturnonthelamp,pressthelock/unlockbutton.To
turnoffthelamp,pressthelock/unlockbuttonagain.
NOTICE: When the tool is overheated, the lamp
ickers. Cool down the tool fully before operating
the tool again.
NOTE:Useadryclothtowipethedirtoffthelensof
thelamp.Becarefulnottoscratchthelensoflamp,or
it may lower the illumination.

16 ENGLISH
Speed adjusting dial
Therotationspeedofthetoolcanbechangedbyturn-
ingthespeedadjustingdial.Thetablebelowshows
the number on the dial and the corresponding rotation
speed.
►Fig.4: 1.Speedadjustingdial
Number Speed
110,000 min-1
215,000 min-1
320,000 min-1
425,000 min-1
530,000 min-1
NOTICE: If the tool is operated continuously at
low speed for a long time, the motor will get over-
loaded, resulting in tool malfunction.
NOTICE: When changing the speed dial from "5"
to "1", turn the dial counterclockwise. Do not turn
the dial clockwise forcibly.
Electronic function
Thetoolisequippedwiththeelectronicfunctionsfor
easy operation.
• Constantspeedcontrol
Thespeedcontrolfunctionprovidestheconstant
rotationspeedregardlessofloadconditions.
• Softstart
Thesoft-startfunctionminimizesstart-upshock,
and makes the tool start smoothly.
Adjusting cutting depth
Toadjustthecuttingdepth,openthelocklever,then
movethetoolbaseupordownbyturningtheadjusting
screw.Aftertheadjustment,closethelockleverrmly.
►Fig.5: 1. Lock lever 2.Adjustingscrew
NOTICE: If the tool is not secured after closing
the lock lever, tighten the hex nut, and then close
the lock lever.
►Fig.6: 1.Hexnut
Adjusting cutting depth with the
plunge base
Optional accessory
1. Placethetoolontheatsurface.
2. Select the stopper screw by rotating the stopper
base.
►Fig.7: 1. Stopper screw 2. Stopper base
3. Loosenthestopperpolexingnut,thenpullupthe
stopperpolewhilepressingthefeedbutton.
►Fig.8: 1. Stopper pole 2.Fixingnut3. Feed button
4. Pushdownthetooluntilthetipofthetrimmerbit
touchestheatsurface,andthenturnthexingleverto
secure the tool.
►Fig.9: 1.Fixinglever2.Trimmerbit
5. Press down the stopper pole while pressing the
feedbuttonuntilitcontactsthestopperscrew.
►Fig.10: 1. Stopper pole 2. Stopper screw 3. Feed
button
6. Slide the depth pointer so that the pointer indi-
cates "0" on the scale.
►Fig.11: 1. Depth pointer
7. Adjustthecuttingdepthbypullingupthestopper
polewhilepressingthefeedbutton.
►Fig.12: 1. Stopper pole 2. Feed button
8. Toperformneadjustmentofthecuttingdepth,
turn the dial on the stopper pole so that it indicates "0".
►Fig.13: 1. Dial
9. Turntheheadofthestopperpoletoobtainthe
desireddepth.Toincreasethedepth,turnthehead
counterclockwise.Todecreasethedepth,turnthehead
clockwise.
►Fig.14: 1.Headofthestopperpole
10. Tightenthestopperpolexingnut.
►Fig.15: 1.Fixingnut
11. Releasethexinglever.
►Fig.16: 1.Fixinglever
ASSEMBLY
CAUTION: Always be sure that the tool is
switched off and the battery cartridge is removed
before carrying out any work on the tool.
Installing or removing trimmer bit
NOTICE: Do not tighten the collet nut without
inserting the bit.Thecolletconemaybreak.
Insert the trimmer bit all the way into the collet cone.
Presstheshaftlockandtightenthecolletnutwiththe
wrench or tighten the collet nut securely with the two
wrenches.Toremovethebit,followtheinstallation
procedure in reverse.
►Fig.17: 1.Shaftlock2. Loosen 3.Tighten
4. Wrench 5. Collet nut
►Fig.18: 1. Wrench 2. Loosen 3.Tighten4. Collet nut
NOTE:Theshaftlockmaynotreturntotheoriginal
position when you tighten the collet nut at the instal-
lationofthetrimmerbit.Theshaftlockreturnstothe
original position when you start the tool.
►Fig.19: 1.Shaftlock
Installing or removing the trimmer
base
1. Openthelockleverofthetrimmerbase,then
insert the tool into the trimmer base aligning the groove
on the tool with the protrusion on the trimmer base.
►Fig.20: 1. Lock lever

17 ENGLISH
NOTE:Youcanusethetrimmerbase(resin)asan
optionalaccessoryasshowninthegure.When
usingthetrimmerbase(resin),loosenortightenthe
thumbnutinsteadofopeningorclosingthelocklever.
►Fig.21: 1.Thumbnut
2. Close the lock lever.
3. Attachthedustnozzletothetrimmerbase,and
then tighten the thumb screw.
►Fig.22: 1.Dustnozzle2.Thumbscrew
►Fig.23
Toremovethebase,followtheinstallationprocedure
in reverse.
CAUTION: When using the tool with the trim-
mer base, be sure to install the dust nozzle on the
trimmer base.
Installing or removing the tilt base
Optional accessory
1. Openthelockleverofthetiltbase,theninsertthe
tool into the tilt base aligning the groove on the tool with
the protrusion on the tilt base.
►Fig.24: 1. Lock lever
2. Close the lock lever.
Toremovethebase,followtheinstallationprocedure
in reverse.
Installing or removing the offset
base
Optional accessory
1. Presstheshaftlock,thenloosenthecolletnut.
►Fig.25: 1. Collet nut 2.Shaftlock3. Wrench
2. Remove the collet nut and the collet cone.
►Fig.26: 1. Collet nut 2. Collet cone
3. Installthepulleyonthetoolbypressingtheshaft
lock and tightening the pulley with the wrench.
►Fig.27: 1. Wrench 2. Pulley 3.Shaftlock
4. Loosen the screws on the base plate, and then
remove the base plate.
►Fig.28: 1. Base plate
5. Openthelockleveroftheoffsetbase,theninsert
thetoolintotheoffsetbase.
►Fig.29: 1. Lock lever
6. Mount the belt to the pulley by rotating the belt
manually.
►Fig.30: 1. Pulley 2. Belt
7. Close the lock lever.
►Fig.31: 1. Lock lever
8. Attachthebaseplatebytighteningthescrews.
►Fig.32: 1. Base plate
9. Insert the collet cone and the trimmer bit into the
offsetbase,andthentightenthecolletnut.
►Fig.33: 1.Trimmerbit2. Collet nut 3. Collet cone
10. Insertthehexwrenchintotheholeoftheoffset
base, and then tighten the collet nut with the wrench.
►Fig.34: 1. Collet nut 2. Wrench 3.Hexwrench
Toremovethebase,followtheinstallationprocedure
in reverse.
NOTE: You can also mount the belt to the pulley with-
outremovingthebaseplateasshowninthegure.
►Fig.35: 1. Pulley 2. Belt
Installing or removing the plunge
base
Optional accessory
1. Openthelockleveroftheplungebase,theninsert
the tool into the plunge base all the way aligning the
groove on the tool with the protrusion on the plunge
base.
►Fig.36: 1. Lock lever
2. Close the lock lever.
Toremovethebase,followtheinstallationprocedure
in reverse.
Installing or removing the parallel
ruler on the plunge base
Optional accessory
Insert the guide bars into the holes in the plunge base,
andthentightenthewingbolts.Toremovetheruler,
followtheinstallationprocedureinreverse.
►Fig.37: 1. Wing bolt 2. Guide bar
Installing or removing the dust
nozzle on the plunge base
Insertthedustnozzleintotheplungebasesothatthe
protrusiononthedustnozzletsinthenotchinthe
plunge base, and then tighten the thumb screw on the
dustnozzle.Toremovethenozzle,followtheinstalla-
tion procedure in reverse.
►Fig.38: 1. Protrusion 2.Dustnozzle3.Thumb
screw
►Fig.39
OPERATION
Using the tool with the trimmer base
Set the tool base on the workpiece without the trimmer
bitmakinganycontact.Turnthetoolonandwaituntil
thebitattainsfullspeed.Movethetoolforwardover
theworkpiecesurface.Keepthetoolbaseushwhile
moving the tool.
When cutting the edge, be sure to keep the workpiece
surfaceontheleftsideofthetrimmerbitinthefeed
direction.
►Fig.40

18 ENGLISH
NOTE:Beforecuttingontheactualworkpiece,itis
recommendedtomakeasamplecut.Theproperfeed
speeddependsonthetrimmerbitsize,thekindof
workpiece,anddepthofcut.Movingthetoolforward
toofastmaycauseapoorqualityofcut,ordamage
tothebitormotor.Movingthetoolforwardtooslowly
mayburnandmarthecuttingsurface.
When using the trimmer shoe, the straight guide, or the
trimmer guide, be sure to keep it on the right side in the
feeddirection.Thiswillhelptokeepitushwiththeside
oftheworkpiece.
►Fig.41: 1.Trimmerbit2. Workpiece 3. Straight
guide
NOTICE: Since excessive cutting may cause
overload of the motor or difculty in controlling
the tool, the depth of cut should not be more than
3 mm at a pass when cutting grooves. When you
wish to cut grooves more than 3 mm deep, make
several passes with progressively deeper bit settings.
Using the straight guide
Optional accessory
1. Assemblethestraightguidewiththeboltandthe
wing nut.
►Fig.42: 1. Bolt 2. Wing nut
2. Attachthestraightguidetothetrimmerbasewith
the clamp screw.
►Fig.43: 1. Clamp screw
3. Loosen the wing nut on the straight guide and
adjustthedistancebetweenthebitandthestraight
guide.Atthedesireddistance,tightenthewingnut.
►Fig.44: 1. Wing nut
4. Movethetoolwiththestraightguideushwiththe
sideoftheworkpiece.
►Fig.45
Ifthedistance(A)betweenthesideoftheworkpiece
andthecuttingpositionistoowideforthestraight
guide,orifthesideoftheworkpieceisnotstraight,the
straight guide cannot be used.
Inthiscase,rmlyclampastraightboardtothework-
piece and use it as a guide against the trimmer base.
Feedthetoolinthedirectionofthearrow.
►Fig.46
Using the straight guide for circular
work
For circular work, assemble the straight guide as shown
inthegures.Theminimumandmaximumradiusof
circlestobecut(distancebetweenthecenterofcircle
andthecenterofbit)areasfollows:
• Minimum:70mm
• Maximum:221mm
For cutting circles between 70 mm and 121 mm in
radius.
►Fig.47: 1. Center hole
For cutting circles between 121 mm and 221 mm in
radius.
►Fig.48: 1. Center hole
NOTE: Circles between 172 mm and 186 mm in
radius cannot be cut using this guide.
Alignthecenterholeinthestraightguidewiththecen-
terofthecircletobecut.Driveanaillessthan6mm
in diameter into the center hole to secure the straight
guide. Pivot the tool around the nail in the clockwise
direction.
►Fig.49: 1. Nail 2. Center hole
Using the templet guide
Optional accessory
Thetempletguideallowsforrepetitivecutwithtemplet
patterns by using a templet.
1. Loosen the screws on the base plate, and then
removethebaseplatefromthetrimmerbase.
2. Place the templet guide on the base, and then
attach the base plate by tightening the screws.
►Fig.50: 1. Base plate 2.Templetguide
3. Place the tool on the templet and move the tool
withthetempletguideslidingalongthesideofthe
templet.
►Fig.51
NOTE:Theactualcutsizeontheworkpieceisslightly
differentfromthetemplet.Thedifferenceisthedis-
tance(X)betweenthetrimmerbitandtheoutsideof
thetempletguide.Thedistance(X)canbecalculated
byusingthefollowingequation:
Distance(X)=(outsidediameteroftempletguide-
trimmerbitdiameter)/2
►Fig.52: 1.Trimmerbit2.Templetguide3. Distance
(X)4.Outsidediameteroftempletguide
Using the trimmer guide
Optional accessory
Thetrimmerguideallowsfortrimmingthecurvedside
likeveneersforfurniturebymovingtheguideroller
alongthesideoftheworkpiece.
►Fig.53
1. Loosen the clamp screw, then install the trimmer
guide on the trimmer base, and then tighten the clamp
screw.
►Fig.54: 1. Clamp screw
2. Loosentheclampscrewandadjustthedistance
between the trimmer bit and the trimmer guide by turn-
ingtheadjustingscrew(1mmperturn).Atthedesired
distance, tighten the clamp screw to secure the trimmer
guide.
►Fig.55: 1.Adjustingscrew2. Clamp screw
3. Move the tool with the guide roller riding the side
oftheworkpiece.
►Fig.56: 1. Workpiece 2. Bit 3. Guide roller

19 ENGLISH
Using the tool with the tilt base
Thetiltbaseisconvenientforchamfering.Loosenthe
wing screws, then tilt the tool at the desired angle, and
then tighten the wing screws.
Firmly clamp a straight board to the workpiece and use
it as a guide against the tilt base. Feed the tool in the
directionofthearrow.
►Fig.57: 1. Wing screw
Using the tilt base plate with the
trimmer base
Tousethetrimmerbasewithasquarebaseplate,
removethebaseplatefromthetiltbase,andthen
attach it to the trimmer base.
►Fig.58: 1.Tiltbaseplate2.Trimmerbaseplate
Using the tool with the offset base
Theoffsetbaseisconvenientforworkinatightarea
such as a corner.
►Fig.59
Using the trimmer base with the
offset base plate and grip
Theoffsetbaseplatecanalsobeusedwithatrimmer
baseandagripattachment(optionalaccessory)for
more stability.
1. Loosen the screws on the base plate, then remove
thebaseplatefromtheoffsetbase.
►Fig.60: 1.Offsetbaseplate2.Trimmerbaseplate
2. Attachtheoffsetbaseplatetothetrimmerbaseby
tightening the screws.
3. Attachthegripattachmentandthebartypegripto
theoffsetbaseplatebytighteningthescrews.
►Fig.61: 1. Bar type grip 2. Grip attachment
Theknobtypegripremovedfromtheplungebasecan
beinstalledontheoffsetbaseinsteadofthebartype
grip.
►Fig.62: 1. Screw 2.Knobtypegrip
Using the tool with the plunge base
Alwaysholdthegripsrmlywithbothhandsduring
operation. Operate the tool in the same way as the
trimmer base.
Using the straight guide
Optional accessory
1. Install the straight guide to the guide holder by
tightening the wing nut. Insert the guide holder into the
holes in the plunge base, and then tighten the wing
bolts.
►Fig.63: 1. Wing bolt 2. Guide holder 3. Wing nut
4. Straight guide
2. Loosen the wing nut on the straight guide and
adjustthedistancebetweenthebitandthestraight
guide.Atthedesireddistance,tightenthewingnut.
►Fig.64: 1. Wing nut
3. Operate the tool in the same way as the straight
guideforthetrimmerbase.
►Fig.65
Using the templet guide
Optional accessory
1. Loosen the screws on the base and remove them.
Place the templet guide on the base, and then tighten
the screws.
►Fig.66: 1. Screw 2.Templetguide
2. Operate the tool in the same way as the templet
guideforthetrimmerbase.
►Fig.67
Using the parallel ruler
Theparallelruleriseffectivelyusedforstraightcuts
whenchamferingorgrooving.Adjustthedistance
betweenthebitandtheparallelruler.Atthedesired
distance, tighten the wing bolts to secure the parallel
ruler. When cutting, move the tool with the parallel ruler
ushwiththesideoftheworkpiece.
►Fig.68
Ifthedistance(A)betweenthesideoftheworkpiece
andthecuttingpositionistoowidefortheparallelruler,
orifthesideoftheworkpieceisnotstraight,theparallel
ruler cannot be used.
Inthiscase,rmlyclampastraightboardtothework-
piece and use it as a guide against the plunge base.
Feedthetoolinthedirectionofthearrow.
►Fig.69
Changing knob type grip to bar type
grip
Toinstallthebartypegripontheplungebase,loosen
thescrewoftheknobtypegrip,thenremovetheknob
type grip, and then install the bar type grip by tightening
it.
►Fig.70: 1.Knobtypegrip2. Screw 3. Bar type grip
MAINTENANCE
CAUTION: Always be sure that the tool is
switched off and the battery cartridge is removed
before attempting to perform inspection or
maintenance.
NOTICE: Never use gasoline, benzine, thinner,
alcohol or the like. Discoloration, deformation or
cracks may result.
TomaintainproductSAFETYandRELIABILITY,
repairs,anyothermaintenanceoradjustmentshould
beperformedbyMakitaAuthorizedorFactoryService
Centers, always using Makita replacement parts.

20 ENGLISH
OPTIONAL
ACCESSORIES
CAUTION: These accessories or attachments
are recommended for use with your Makita tool
specied in this manual.Theuseofanyother
accessoriesorattachmentsmightpresentariskof
injurytopersons.Onlyuseaccessoryorattachment
foritsstatedpurpose.
Ifyouneedanyassistanceformoredetailsregard-
ing these accessories, ask your local Makita Service
Center.
• Straightandgrooveformingbits
• Edgeformingbits
• Laminatetrimmingbits
• Straightguideassembly
• Trimmerguideassembly
• Trimmerbaseassembly
• Trimmerbaseassembly(resin)
• Tiltbaseassembly
• Plungebaseassembly
• Offsetbaseassembly
• Gripattachment
• Templetguide
• Colletcone6mm
• Colletcone6.35mm(1/4")
• Colletcone8mm
• Colletcone9.53mm(3/8")
• Wrench13
• Wrench22
• Makitagenuinebatteryandcharger
NOTE: Some items in the list may be included in the
toolpackageasstandardaccessories.Theymay
differfromcountrytocountry.
Trimmer bits
Straight bit
►Fig.71
DAL1 L2
20 620 50 15
20E 1/4"
8 8 8 60 25
8 6 50 18
8E 1/4"
6 6 6 50 18
6E 1/4"
Unit: mm
"U" Grooving bit
►Fig.72
DAL1 L2 R
6 6 6 50 18 3
6E 1/4"
Unit: mm
"V" Grooving bit
►Fig.73
DAL1 L2 θ
1/4" 20 50 15 90°
Unit: mm
Drill point ush trimming bit
►Fig.74
DAL1 L2 L3
888 60 20 35
6 6 6 18 28
6E 1/4"
Unit: mm
Drill point double ush trimming bit
►Fig.75
DAL1 L2 L3 L4
88880 95 20 25
6 6 6 70 40 12 14
6E 1/4"
Unit: mm
Corner rounding bit
►Fig.76
DA1 A2 L1 L2 L3 R
8R 625 948 13 5 8
8RE 1/4"
4R 620 845 10 4 4
4RE 1/4"
Unit: mm
Chamfering bit
►Fig.77
DAL1 L2 L3 θ
623 46 11 630°
620 50 13 545°
620 49 14 260°
Unit: mm
Cove beading bit
►Fig.78
DAL1 L2 R
620 43 8 4
625 48 13 8
Unit: mm
Ball bearing ush trimming bit
►Fig.79
DAL1 L2
610 50 20
1/4"
Unit: mm
Other manuals for DRT50
11
Table of contents
Languages:
Other Makita Trimmer manuals

Makita
Makita DUR181RF User manual

Makita
Makita RT0700C User manual

Makita
Makita DUR365U User manual

Makita
Makita UR100D User manual

Makita
Makita EBH341U User guide

Makita
Makita DUH501 User manual

Makita
Makita UH4570 User manual

Makita
Makita DUH751 User manual

Makita
Makita MUH355 User manual

Makita
Makita DUR189Z1 User manual

Makita
Makita DUR365U User manual

Makita
Makita UR002G User manual

Makita
Makita DUR184LRT User manual

Makita
Makita rt0700c User manual

Makita
Makita DUH507 User manual

Makita
Makita LXHU02Z User manual

Makita
Makita DUH501 User manual

Makita
Makita DUR364L User manual

Makita
Makita UH200DZ User manual

Makita
Makita EM4351UH User guide