Makita 191D73-9 User manual

EN Cyclone Attachment INSTRUCTION MANUAL 4
PTBR
Coletor com sistema ciclônico MANUAL DE INSTRUÇÕES 7
FR Collecteur Cyclone MANUEL D’INSTRUCTIONS 10
DE Zyklonabscheider-Vorsatz BETRIEBSANLEITUNG 13
IT Accessorio ciclonico ISTRUZIONI PER L’USO 16
NL Cycloon-hulpstuk GEBRUIKSAANWIJZING 19
ES Colector Ciclónico MANUAL DE INSTRUCCIONES 22
PT
Coletor Com Sistema Ciclônico
MANUAL DE INSTRUÇÕES 25
DA Cyklontilbehør INSTRUKTIONSVEJLEDNING 28
EL Προσάρτημα κυκλώνα ΕΓΧΕΙΡΙΔΙΟ ΟΔΗΓΙΩΝ 31
TR Siklon Parça KULLANIM KILAVUZU 34
SV Cyklontillbehör BRUKSANVISNING 37
NO Sentrifugetilbehør BRUKSANVISNING 40
FI Syklonilisälaite KÄYTTÖOHJE 43
LV Putekļu savācējs NORĀDĪJUMU ROKASGRĀMATA 46
LT Cikloninis papildomas įtaisas NAUDOTOJO VADOVAS 49
ET Lisaseadise Cyclone KASUTUSJUHEND 52
PL Przystawka Cyklon INSTRUKCJA OBSŁUGI 55
HU Kiegészítő ciklonszűrő HASZNÁLATI ÚTMUTATÓ 58
SK Cyklónový nadstavec NÁVOD NA POUŽÍVANIE 61
CS Nástavec k vysavači
s cyklonovým vysáváním NÁVOD K OBSLUZE 64
SL Ciklonski priključek NAVODILA ZA UPORABO 67
SQ Aksesori ciklon MANUALI I UDHËZIMEVE 70
BG Приставка с циклон-филтър
РЪКОВОДСТВО ЗА ЕКСПЛОАТАЦИЯ
73
HR Ciklonski nastavak PRIRUČNIK S UPUTAMA 76
MK Додаток Циклон УПАТСТВО ЗА РАБОТА 79
SR Додатак за циклонско
усисавање УПУТСТВО 82
RO Accesoriu tip ciclon MANUAL DE INSTRUCȚIUNI 85
UK Циклонна насадка ІНСТРУКЦІЯ З ЕКСПЛУАТАЦІЇ 88
RU Циклонный фильтр
ИНСТРУКЦИЯ ПО ЭКСПЛУАТАЦИИ
91
KK 94
ZHCN
气旋组件 使用说明书 97
ZHTW
外掛式旋風集塵桶 使用說明書 100
KO 싸이클론 어태이치먼트 취급 설명서 103
ID Perangkat Tambahan Cyclone BUKU PANDUAN 106
VI 109
TH 112
FA 117
AR 120

2
3
1
2
1
2
3
1
42
1
2 3
1
2
4

3
1
2
5
1
23
6

4
Compatible models Makita cordless cleaners*
Dust collection capacity 400 mL (0.11 gal.)
Weight 0.35 kg (0.77 lbs)
3
Using the cleaner with the cyclone attachment installed reduces the amount of dust that
enters the dust bag or paper dust pack, which helps to prevent the suction force from
weakening. In addition, cleaning after use is also simple.
Be sure to thoroughly read and understand this instruction manual and the instruction
manual of the cordless cleaner to which the cyclone attachment will be installed before
use. Keep this instruction manual in a safe place for quick access whenever needed.
• If the battery cartridge is left inserted, the cleaner may start unexpectedly and result in injury.
• Continued use in the clogged condition may result in heating or smoke.
• Doing so may cause the mesh lter to become clogged.
1. Straight pipe 2. Cyclone attachment 3. Cleaner
1. Install the cyclone attachment to the suction inlet of the cleaner.
2. Use this attachment with the straight pipe installed.

5
• Using the cleaner without the dust bag or paper dust pack installed may result in a motor
malfunction.
• Continued use will result in weakened suction force.
• When dust has accumulated up to the full line of the dust case, follow the procedure
below and dispose of the dust.
1. Hold the dust case rmly, press and hold the two buttons, and remove the dust case.
1. Full line 2. Dust case 3. Button (2 locations) 4. Mesh lter
2. Dispose of the dust inside the dust case and remove any dust and powder adhered
to the surface of the mesh lter.
3. Install the dust case.
• Insert the dust case all the way until the two buttons lock with a “click.”
1. Dust case 2. Button (2 locations)

6
• When the dust case becomes dirty or the mesh lter is clogged, remove and wash
them with water.
(Refer to “Disposing of dust” for the removal procedure.)
• Dry the parts thoroughly before reinstallation and use.
1. Dust case 2. Mesh lter
When the mesh lter gets dirty badly, clean it in the following procedures.
1. Turn the mesh lter counterclockwise and remove it while the hooks are unlocked.
1. Mesh lter 2. Hook
2. Remove the dust on the mesh lter and then wash it with water. After that, dry it
thoroughly.
3. Insert the mesh lter into the base while the hooks are aligned with the port. Turn the
mesh lter clockwise until the hooks are locked with a click. Make sure that the mesh
lter is installed securely.
1. Mesh lter 2. Hook 3. Port

7
Modelos compatíveis Aspiradores a bateria Makita*
Capacidade de coleta de pó 400 mL
Peso 0,35 kg
3
Usar o aspirador com o coletor com sistema ciclônico instalado reduz a quantidade de poeira
que entra no saco de pó ou no saco de papel, o que ajuda a prevenir o enfraquecimento da
potência de sucção. Além disso, a limpeza depois do uso também é simples.
Antes de usar, certique-se de ler e compreender completamente este manual de
instruções e o manual de instruções do aspirador de pó a bateria no qual o coletor com
sistema ciclônico será instalado. Mantenha este manual de instruções em um local
seguro para poder consultá-lo rapidamente quando necessário.
• Se a bateria permanecer inserida, o aspirador poderá começar a funcionar inesperadamente
e provocar ferimentos.
• O uso prolongado com uma obstrução pode resultar no aquecimento ou emissão de fumaça.
• Fazer isso poderá causar a obstrução do ltro de malha.
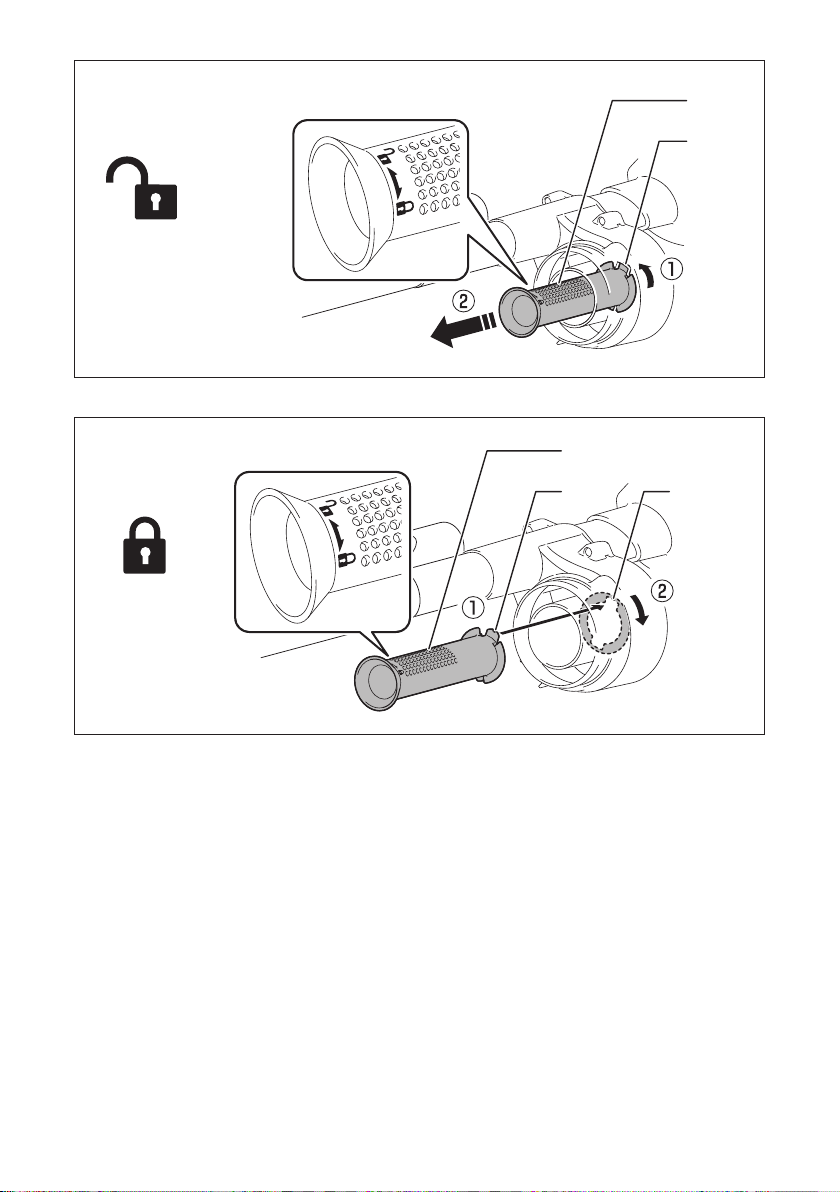
1. Tubo reto 2. Coletor com sistema ciclônico 3. Aspirador
1. Instale o coletor com sistema ciclônico na entrada de sucção do aspirador.
2. Use este acessório com o tubo reto instalado.

8
• Usar o aspirador sem o saco de pó ou o saco de papel instalado pode resultar no mau
funcionamento do motor.
• O uso prolongado resultará no enfraquecimento da potência de sucção.
• Quando o acúmulo de pó atingir a linha de enchimento completo do compartimento
de pó, siga o procedimento abaixo para descartar o pó.
1. Segure o compartimento de pó com rmeza, pressione e mantenha pressionado os
dois botões e retire o compartimento de pó.
1. Linha de enchimento completo 2. Compartimento de pó
3. Botão (2 locais) 4. Filtro de malha
2. Descarte o pó que estiver no interior do compartimento de pó e retire todo pó ou
poeira que estiver aderido à superfície do ltro de malha.
3. Instale o compartimento de pó.
• Insira o compartimento de pó completamente, até os dois botões travarem com um
clique.
1. Compartimento de pó 2. Botão (2 locais)

9
• Se o compartimento de pó estiver sujo ou se o ltro de malha estiver obstruído,
remova-os e lave-os com água.
(Consulte a instrução “Descarte do pó” para vericar o procedimento de remoção.)
• Seque bem os componentes antes de reinstalar e usar.
1. Compartimento de pó 2. Filtro de malha
Se o ltro de malha car muito sujo, limpe-o de acordo com o procedimento a seguir.
1. Gire o ltro de malha no sentido anti-horário e remova-o quando os ganchos
destravarem.
1. Filtro de malha 2. Gancho
2. Remova o pó do ltro de malha e lave-o com água. Seque-o bem em seguida.
3. Insira o ltro de malha na base com os ganchos alinhados à abertura. Gire o ltro de
malha no sentido horário até os ganchos travarem com um clique. Certique-se de
que o ltro de malha está instalado com rmeza.
1. Filtro de malha 2. Gancho 3. Abertura

10
Modèles compatibles Aspirateurs sans l Makita*
Capacité de collecte des poussières 400 mL
Poids 0,35 kg
3
L’utilisation de l’aspirateur avec le collecteur cyclone installé réduit la quantité de
poussière qui pénètre dans le sac à poussière ou le sac papier à poussière, ce qui
permet d’éviter que la puissance d’aspiration faiblisse. De plus, le nettoyage après
utilisation est également simple.
Avant utilisation, veillez à lire attentivement et comprendre ce manuel d’instructions et le
manuel d’instructions de l’aspirateur sans l auquel sera rattaché le collecteur cyclone.
Conservez ce manuel d’instructions en lieu sûr pour pouvoir y accéder rapidement au
besoin.
• Si la batterie est insérée, un démarrage intempestif de l’aspirateur susceptible de provoquer
des blessures est possible.
• L’utilisation continue dans cet état peut provoquer une émission de chaleur ou de fumée.
• Le ltre à maille pourrait se boucher.

11
1. Tuyau droit 2. Collecteur cyclone 3. Aspirateur
1. Fixez le collecteur cyclone sur l’entrée d’aspiration de l’aspirateur.
2. Utilisez cet accessoire avec le tuyau droit installé.
• Si vous utilisez l’aspirateur sans sac à poussière ou sac papier à poussière installé, un
dysfonctionnement du moteur peut se produire.
• Si vous continuez à utiliser l’aspirateur dans cet état, la puissance d’aspiration sera affaiblie.
• Lorsque la poussière s’est accumulée jusqu’à la ligne plein du logement à poussières,
procédez comme indiqué ci-dessous et jetez la poussière.
1. Tenez fermement le logement à poussières, maintenez enfoncés les deux boutons
et retirez le logement à poussières.
1. Ligne plein 2. Logement à poussières 3. Bouton (2 emplacements)
4. Filtre à maille
2. Jetez la poussière à l’intérieur du logement à poussières et retirez la poussière ou la
poudre collée à la surface du ltre à maille.
3. Mettez en place le logement à poussières.
• Insérez le logement à poussières à fond jusqu’à ce que les deux boutons se
verrouillent en place avec un déclic.
1. Logement à poussières 2. Bouton (2 emplacements)

12
• Lorsque le logement à poussières est sale ou que le ltre à maille est bouché,
retirez-les et lavez-les à l’eau.
(Consultez « Mise au rebut des poussières » pour la procédure de retrait.)
• Séchez soigneusement les pièces avant de les remettre en place et d’utiliser
l’aspirateur.
1. Logement à poussières 2. Filtre à maille
Lorsque le ltre à maille est très sale, nettoyez-le en procédant comme suit.
1. Tournez le ltre à maille dans le sens inverse des aiguilles d’une montre et retirez-le
alors que les crochets sont déverrouillés.
1. Filtre à maille 2. Crochet
2. Retirez la poussière sur le ltre à maille, puis lavez-le à l’eau. Ensuite, séchez-le
soigneusement.
3. Insérez le ltre à maille dans la base avec les crochets alignés sur l’orice. Tournez
le ltre à maille dans le sens des aiguilles d’une montre jusqu’à ce que les crochets
se verrouillent en place avec un déclic. Assurez-vous que le ltre à maille est
solidement installé.
1. Filtre à maille 2. Crochet 3. Orice

13
Kompatible Modelle Makita Akku-Staubsauger*
Staubsammelvermögen 400 mL
Gewicht 0,35 kg
3
Wird der Staubsauger mit installiertem Zyklonabscheider-Vorsatz verwendet, so wird
die Staubmenge, die in den Staubsack oder die Papierstaubpackung gelangt, reduziert,
was dazu beiträgt, eine Abschwächung der Saugkraft zu verhindern. Außerdem wird die
Reinigung nach dem Gebrauch ebenfalls vereinfacht.
Lesen Sie vor Gebrauch unbedingt die vorliegende Betriebsanleitung und die
Betriebsanleitung des Akku-Staubsaugers, an den der Zyklonabscheider-Vorsatz
installiert werden soll, gründlich durch, um sich mit ihnen vertraut zu machen. Bewahren
Sie diese Betriebsanleitung an einem sicheren Ort auf, damit Sie bei Bedarf jederzeit
schnell darauf zugreifen können.
• Wird der Akku eingesetzt gelassen, kann der Staubsauger unerwartet anlaufen, was zu
Verletzungen führen kann.
• Fortgesetzter Gebrauch im verstopften Zustand kann zu Erhitzung oder Rauchbildung
führen.
• Anderenfalls kann der Netzlter verstopft werden.

14
1. Gerades Rohr 2. Zyklonabscheider-Vorsatz 3. Staubsauger
1. Installieren Sie den Zyklonabscheider-Vorsatz am Saugeinlass des Staubsaugers.
2. Benutzen Sie diesen Vorsatz mit installiertem geraden Rohr.
• Wird der Staubsauger ohne den Staubsack oder die Papierstaubpackung benutzt, kann es zu
einer Funktionsstörung des Motors kommen.
• Fortgesetzter Gebrauch führt zu einer Abschwächung der Saugkraft.
• Wenn Staub sich bis zur Voll-Linie des Staubsammelbehälters angesammelt hat,
entsorgen Sie den Staub nach dem folgenden Verfahren.
1. Halten Sie den Staubsammelbehälter mit festem Griff, während Sie die zwei Knöpfe
gedrückt halten, und entfernen Sie den Staubsammelbehälter.
1. Voll-Linie 2. Staubsammelbehälter 3. Knopf (2 Stellen) 4. Netzlter
2. Entsorgen Sie den Staub im Staubsammelbehälter, und entfernen Sie jeglichen an
der Oberäche des Netzlters haftenden Staub und Pulver.
3. Installieren Sie den Staubsammelbehälter.
• Führen Sie den Staubsammelbehälter vollständig ein, bis die zwei Knöpfe mit einem
Klicken einrasten.
1. Staubsammelbehälter 2. Knopf (2 Stellen)

15
• Wenn der Staubsammelbehälter schmutzig wird oder der Netzlter verstopft ist,
entfernen Sie die Teile, und waschen Sie sie mit Wasser.
(Angaben zum Demontageverfahren nden Sie unter „Entsorgen von Staub“.)
• Lassen Sie die Teile gründlich trocknen, bevor Sie sie wieder installieren und
benutzen.
1. Staubsammelbehälter 2. Netzlter
Wenn der Netzlter stark verschmutzt wird, reinigen Sie ihn nach den folgenden
Verfahren.
1. Drehen Sie den Netzlter entgegen dem Uhrzeigersinn, und entfernen Sie ihn bei
entriegelten Haken.
1. Netzlter 2. Haken
2. Entfernen Sie den Staub am Netzlter, und waschen Sie ihn dann mit Wasser.
Lassen Sie ihn danach gründlich trocknen.
3. Führen Sie den Netzlter in die Basis ein, während die Haken auf den Anschluss
ausgerichtet sind. Drehen Sie den Netzlter im Uhrzeigersinn, bis die Haken mit
einem Klicken einrasten. Vergewissern Sie sich, dass der Netzlter sicher installiert
ist.
1. Netzlter 2. Haken 3. Anschluss

16
Modelli compatibili Aspiratori a batteria Makita*
Capacità di raccolta polveri 400 mL
Peso 0,35 kg
*
3
L’utilizzo dell’aspiratore con l’accessorio ciclonico installato riduce la quantità di polveri
che entrano nel sacchetto polveri o nel pacchetto polveri in carta, il che contribuisce a
evitare l’indebolimento della forza di aspirazione. Inoltre, la pulizia dopo l’uso è semplice.
Prima dell’uso, accertarsi di leggere e comprendere a fondo le presenti istruzioni per
l’uso e le istruzioni per l’uso dell’aspiratore a batteria su cui verrà installato l’accessorio
ciclonico. Conservare le presenti istruzioni per l’uso in un luogo sicuro per potervi
accedere rapidamente, laddove sia necessario.
• Qualora la cartuccia della batteria venga lasciata inserita, l’aspiratore potrebbe avviarsi
improvvisamente e causare lesioni personali.
• Qualora si continui l’utilizzo in una condizione di ostruzione, si potrebbe causare un
innalzamento della temperatura o l’emissione di fumo.
• In caso contrario, si potrebbe causare l’ostruzione del ltro a rete.

17
1. Tubo diritto 2. Accessorio ciclonico 3. Aspiratore
1. Installare l’accessorio ciclonico sulla presa di aspirazione dell’aspiratore.
2. Utilizzare questo accessorio con il tubo diritto installato.
• L’utilizzo dell’aspiratore senza il sacchetto polveri o il pacchetto polveri in carta installato
potrebbe risultare in un malfunzionamento del motore.
• Qualora si continui l’utilizzo, si potrebbe causare un indebolimento della forza di aspirazione.
• Quando le polveri si sono accumulate no alla linea di massimo riempimento del
contenitore polveri, attenersi alla procedura seguente e smaltire le polveri.
1. Mantenere saldamente il contenitore polveri, tenere premuti i due pulsanti, quindi
rimuovere il contenitore polveri.
1. Linea di massimo riempimento 2. Contenitore polveri
3. Pulsante (in 2 ubicazioni) 4. Filtro a rete
2. Smaltire le polveri all’interno del contenitore polveri e rimuovere eventuali polveri
attaccate alla supercie del ltro a rete.
3. Installare il contenitore polveri.
• Inserire a fondo il contenitore polveri no a quando i due pulsanti si bloccano con
uno scatto.
1. Contenitore polveri 2. Pulsante (in 2 ubicazioni)

18
• Quando il contenitore polveri si sporca o il ltro a rete è intasato, rimuoverli e lavarli
con acqua.
(Per la procedura di rimozione, vedere “Smaltimento delle polveri.”)
• Far asciugare completamente i componenti, prima di reinstallarli e utilizzarli.
1. Contenitore polveri 2. Filtro a rete
Quando il ltro a rete diventa estremamente sporco, pulirlo attenendosi alle procedure
seguenti.
1. Ruotare il ltro a rete in senso antiorario e rimuoverlo mentre i ganci sono sbloccati.
1. Filtro a rete 2. Gancio
2. Rimuovere le polveri sul ltro a rete, quindi lavarlo con acqua. Dopodiché, farlo
asciugare completamente.
3. Inserire il ltro a rete sulla base mentre i ganci sono allineati con l’apertura. Ruotare
il ltro a rete in senso orario no a quando i ganci si bloccano con uno scatto.
Accertarsi che il ltro a rete sia installato saldamente.
1. Filtro a rete 2. Gancio 3. Apertura

19
Compatibele modellen Snoerloze stofzuigers van Makita*
Stofopvangcapaciteit 400 ml
Gewicht 0,35 kg
3
Als de stofzuiger wordt gebruikt terwijl het cycloon-hulpstuk is aangebracht, wordt de
hoeveelheid stof die in de stoffen stofzak of de papieren stofzak terecht komt verminderd,
waardoor wordt voorkomen dat de zuigkracht afneemt. Bovendien is het na gebruik
eenvoudig te reinigen.
Verzeker u ervan vóór gebruik deze gebruiksaanwijzing en de gebruiksaanwijzing van
de snoerloze stofzuiger waarop het cycloon-hulpstuk wordt aangebracht aandachtig te
lezen en goed te begrijpen. Bewaar deze gebruiksaanwijzing op een veilige plaats waar
deze indien nodig snel toegankelijk is.
• Als de accu erin blijft zitten, kan de stofzuiger onverwacht starten en letsel veroorzaken.
• Als u het blijft gebruiken in verstopte toestand, kan dat leiden tot oververhitting en rook.
• Als u dit doet, kan het gaaslter verstopt raken.
1. Rechte buis 2. Cycloon-hulpstuk 3. Stofzuiger
1. Breng het cycloon-hulpstuk aan op de aanzuigopening van de stofzuiger.
2. Gebruik dit hulpstuk terwijl de rechte buis is aangebracht.

20
• Als de stofzuiger wordt gebruikt zonder dat een stoffen stofzak of een papieren stofzak is
aangebracht, kan dat leiden tot een motorstoring.
• Als u hem blijft gebruiken, zal de zuigkracht afnemen.
• Wanneer het stof zich heeft opgehoopt tot aan de maximumlijn op de
stofopvangeenheid, volgt u de onderstaande procedure en gooit u het stof weg.
1. Houd de stofopvangeenheid stevig vast, druk de twee knoppen in en verwijder de
stofopvangeenheid.
1. Maximumlijn 2. Stofopvangeenheid 3. Knop (2 plaatsen) 4. Gaaslter
2. Gooi het stof in de stofopvangeenheid weg en verwijder al het stof en poeder dat aan
het oppervlak van het gaaslter kleeft.
3. Breng de stofopvangeenheid aan.
• Steek de stofopvangeenheid er helemaal op totdat de twee knoppen met een “klik”
worden vergrendeld.
1. Stofopvangeenheid 2. Knop (2 plaatsen)
This manual suits for next models
1
Table of contents
Languages:
Other Makita Vacuum Cleaner manuals

Makita
Makita DVC750L User manual

Makita
Makita VC009G User manual

Makita
Makita DCL286FZB User manual

Makita
Makita VC009G User manual

Makita
Makita DVC350 User manual

Makita
Makita DVC660 User manual

Makita
Makita DVC265 User manual

Makita
Makita DVC350 User manual

Makita
Makita DVC865LZX2 User manual

Makita
Makita LXLC01 User manual

Makita
Makita DVC153L User manual

Makita
Makita DCL286F User manual

Makita
Makita DVC155L User manual

Makita
Makita VC1310L User manual

Makita
Makita XLC08 User manual

Makita
Makita DVC261ZX8 User manual

Makita
Makita VC008G User manual

Makita
Makita CL106FD User manual

Makita
Makita DCL181FZW User manual

Makita
Makita CL106FD User manual