Malem MO4 User manual

Malem
Ultimate MO4(8) and Deluxe MO24
Body Worn Bedwetting Alarm
Manual
HSE Enuresis Clinics

2 | P a g e
Adapted by Nick van der Spek
Version 1.2
15/05/2018

3 | P a g e
Malem Bedwetting alarm
Parents
We have put together information to help you in getting your child dry at night. Most children will
become dry however some may continue to have this problem. It is important that you follow the
instructions from your practitioner.
An alarm system is designed to assist in the training of children who are incontinent of urine while
asleep. “Alarms cure by speeding up the natural process”, as it says in the Malem Enuresis Alarm
Instruction Booklet. There are several types of alarms available from Malem. We have chosen the
Ultimate alarm or the Deluxe with 8 sounds and vibration for you and this alarm system consists of
a special urine sensor clip (Easy-Clip®) which is attached to the child’s underwear and is connected
to the body worn alarm unit via a wire. The sensor triggers the alarm upon sensing urine.
General Product Details
Product information: Malem Ultimate MO4(8):
-Introduction: For the alarm to be successful, Malem strongly recommends:
oThe child is 100% motivated and wants to be dry.
oThe child understands that wakening up to the alarms is the treatment.
oParents must initially help the child to wake up when they hear the alarm as all children,
including dry ones, sleep soundly while at home.
oThe children should drink as much as they like.
oParents must not “lift” the child to empty the bladder while asleep.
oNo nappies or pull-up.
oParents must praise and support the child.

4 | P a g e
-The Easy-Clip is the sensor of the alarm unit and consists of the sensor, the sensor wire and the
plug:
oTo connect: Insert the plug into the alarm socket making sure the Easy-Clip sensor lever is
lifted up, otherwise the alarm will start sounding. Do not unplug the wire from the alarm
unit unless for cleaning or replacement, otherwise this part will break.
oTo use, lift sensor clip lever, attach sensor to the outside of close fitting underwear, at the
location most likely to get wet first, by inserting material inside the sensor jaws at the front
and closing the lever. Dispose of insulating tag if present. Lowering the lever without any
dry material in the jaws will trigger the alarm and prevent the alarm from resetting. Lift the
lever and press the reset button. DO NOT force the lever in the wrong direction.
oTo clean the sensor: The construction of the Easy Clip doesn’t allow it to be taken apart.
After wetting, the clip can be cleaned by rinsing under the tap and dried with a piece of
kitchen towel and then is immediately ready for re-use. Intermittently clean with soapy
water or a mild detergent and an old tooth brush and rinse to remove any “fluff” material
from the jaws of the Easy-Clip to prevent the alarm from being reset.
See video page 16
.
oThe wire between the sensor and the plug and alarm unit is 79 cm long and is an
important part of the whole alarm unit. The wire is sufficiently flexible to be comfortable in
use but sufficiently robust to ensure long life. It will not however tolerate abuse, being
bitten or chewed. DO NOT USDE THE WIRE TO PULL THE SENSOR OUT OF THE
UNDERWEAR –ALWAYS UNDO THE CLIP. Do not unplug the sensor from the body worn
alarm.
-The alarm unit contains the alarm's electronics, chip, buzzer, battery, settings panel and LED.
oConnection: The alarm unit is connected to the child pyjama top with the pyjama top
gripper on the alarm. Secure it on the pyjama top or night dress, close to the shoulder or in
the breast pocket if available. Thread the cord inside top as shown below. For small

5 | P a g e
children, loop and tie the cord/wire to shorten length. Attach alarm to material before
wearing garment is preferable. For vibration alarms, attach on the inside of close fitting top
close to the collar bone. A common reason for the alarm not sounding is disconnection or
dislodgment of the alarm from the sensor or wire. The lever to close the grippers on the
alarm has to be pushed UP to close the grippers. FORCEFULLY PUSHING IT DOWN WARDS
WILL BREAK THE PLASTIC LEVER.
oThere is no On/Off switch that could allow the alarm to be switched off and ignored.
The reset button will stop the alarm from sounding only if the Easy-Clip lever is LIFTED
OPEN and REMOVED from the underwear. It is intentional that one of the sounds of the
Eight Tone alarm MO4 (8) does not stop immediately upon pressing the reset button.
oCleaning alarm unit: Wipe clean alarm and safety pin/clip using mild detergent or skin
disinfectant. Use damp cloth and dry thoroughly. NEVER IMMERSE IN WATER.
oBatteries: The alarm's NON-rechargeable batteries are two triple A (AAA) type alkaline
batteries. In normal use it needs to be replaced every four weeks. Maximum continuous
operating time is about 10 hours. Batteries should be replaced by adults. Please see more
detailed instructions on page 14 and watch the video. To change the batteries, remove the
battery cover by twisting a slotted screwdriver in the space at the top of the cover. The
battery cover needs to be opened carefully with a pushing and sliding movement,
otherwise the small plastic clip that keeps it closed breaks. Take special care to observe the
correct polarity when replacing the batteries. Make sure the batteries are not loose within
the compartment and the contacts are clean. Do not mix old and new batteries. Important:
Remove batteries and clean sensor if the alarm is not going to be used for some time.
oChoice setting: To change setting combination, remove battery cover and slide lever
inside battery compartment:
-Position 1 = Sound only;
-Position 2 = Sound and Vibration;
-Position 3 = Vibration only. See image below.
-The MO24 has the option to record a message if the alarm sound is not tolerated.

6 | P a g e
oDisclaimer: Malem alarms are designed as a helpful and versatile aid. It is not intended to
replace human care or supervision and the manufacturer, Malem Medical, is not responsible
for any consequences resulting from the use, misuse of failure of this device.
oElectrical safety: Designed to meet all Department of Health and British Standard BS5724
Part 1, RE1004/03 and IEC performance, construction and safety requirements. Maximum
current across the sensor is less than 10uA. BSI certificate No: 115627. BSI EMC test
certificate No: EZ00505. Electrical Safety Symbol Type BF. CE Marked.
-Alternative alarms to the M04(8) body worn alarm in certain circumstances:
oMalem Deluxe Alarm (MO24). A similar alarm as the MO4 but with the option to use a
recorded message to wake instead of the buzzer.

7 | P a g e
oA bed alarm (MO6), with the alarm on the bedside locker and a mat in the bed, suitable for
the children who can’t tolerate the body worn type or those sensitive to the sound of the
buzzer and a message can be recorded instead to wake the child.
oA remote alarm (MO25) with a sensor in the underwear and a wireless blue tooth
connection to a smart phone.
oAn extension buzzer is available. It has a long (15 m) cable with a buzzer and/or vibrator at
the end to alert the carer (by sound or vibrating) that the child’s alarm has been triggered.
Method of Use
The person's bed is made up as usual with water proof sheets between the mattress and the
sheet. The sensor wire with a “telephone” type plug connects the sensor to the alarm unit at its
base. Don’t remove this plug unless for cleaning or replacement purposes.
Once the sensor is plugged in the alarm with the metal claws open (or closed but isolated with
cloth), the alarm is on stand-by; as soon as the claws make electrical contact or the cloth gets
wet, the alarm sounds and vibrates. The alarm has a number of settings, but preferably it is set at
producing 8 different sounds and has both the sound and the vibration on. If it requires a different
setting discuss this with your medical professional.
When the person urinates onto the underpants near the sensor, the flow of urine completes the
circuit between the metal claws of the Easy-Clip. This wet condition instantly triggers the alarm's
buzzer and switches on its LED to light up the control panel. The wakened person has to open the

8 | P a g e
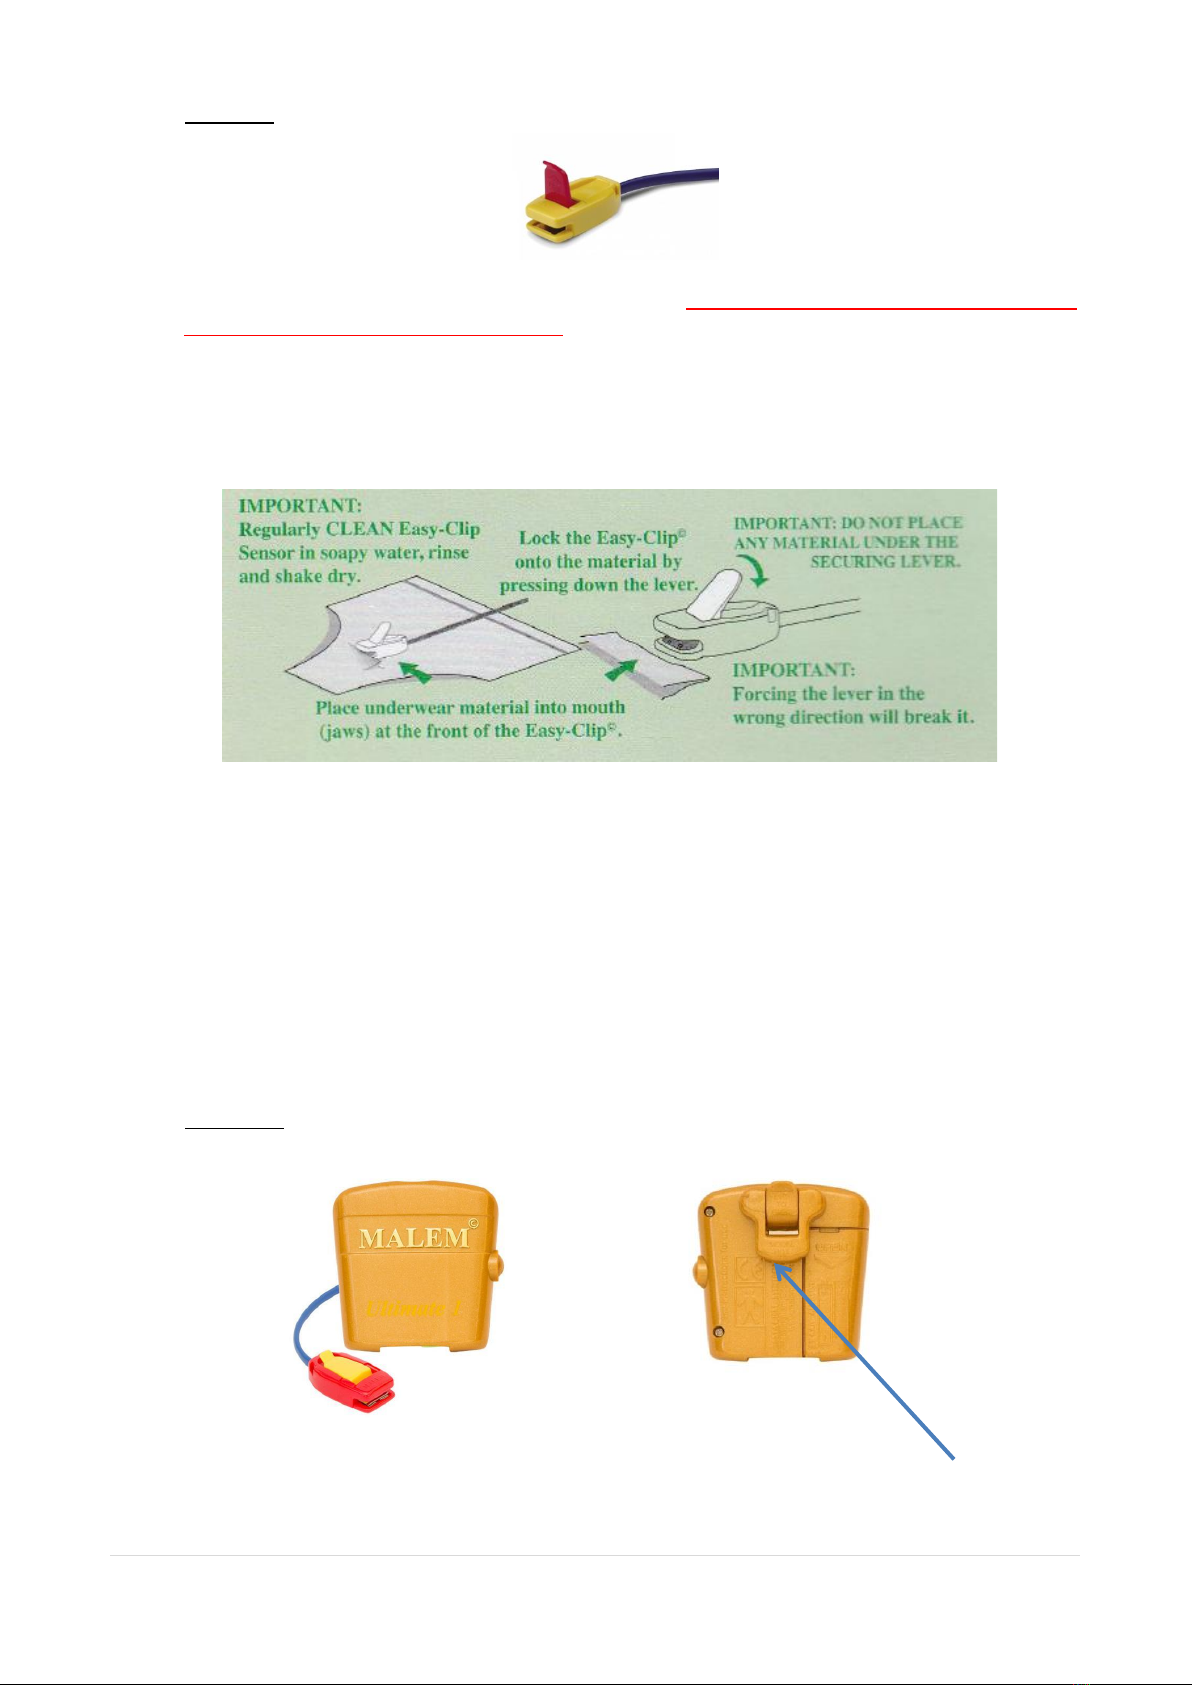
claws first by lifting the lever of the sensor before pressing the reset button on the side of the
alarm to silence the alarm. If the claws are not opened and the circuit remains closed, the alarm
will go from one sound to another but won’t be turned off when the reset button is pushed.
So, upon wakening up to the alarm, the child tries to stop any more urine from being released
from the bladder and gets out of the bed immediately. They remove the Easy-Clip sensor by lifting
the lever and keep the lever up. Do NOT unplug the cable from the body of the alarm. Stop the
sound or vibrating by pressing the small reset button, use the toilet to complete empty the
bladder, clip the sensor to a dry pair of pants as before. Always test the alarm by closing the Easy-
Clip lever before use.
Parental help in wakening up children when the alarm sounds is reassuring and helpful especially
during the first few nights.
What Parents Need To Know
What is bed wetting?
Bed wetting, also referred to as
Enuresis
is a common issue in many Irish households which
affects children of all ages. This problem entails children who lack night-time bladder control, at an
age which control is expected (between the ages of 5-18). Between 10-20% of children around
the age of five-years-old wet the bed at night.
Bed wetting has a range of known causes including: (
See Three Systems diagram in your booklet
)
Difficulty in arousing from sleep in response to a full bladder (arousal problem)
A breakdown in the communication between the brain and bladder (overactive bladder)
Producing more urine at night than the bladder can store (nocturnal polyuria)
A family history of bed wetting (genetic cause)
A child’s bladder is much different to that of an adult’s. A child has much less control over their
bladder, and this can be frustrating for both parents and children. It is important that parents
understand that children, mostly under the age of 6, have limited control over their bladder, and
cannot begin a stream of urine unless their bladders are full. As children get older, they are
normally expected to grow out of this problem; however this isn’t always the case.
What you can do as a parent?
There are various actions which parents can take to help their child through, and overcome the
problem of bed wetting, which include:
Reassure your child that bedwetting is normal and will stop in time
Explain the reasons why they are wetting the bed
Give your child as much encouragement, especially after accidents
Keep a dairy to monitor and record progress
Reward improvement for declining frequency of wetting
Establish a routine of taking your child to the toilet before bedtime
Avoid criticising or punishing your child as bed wetting is an unconscious problem
Implementing these factors with your children can help them better understand that they aren’t
alone and it is a common issue. It is important to discuss the factors of bed wetting, as it can
cause a child to loose self-esteem, or lack confidence.
What sort of treatment is available?
Malem Medical has developed a device which has been proven to have a high success rate with
helping to treat bedwetting in children, based on the
bell-and-pad
treatment, which is developed
from a concept of a physiological link between the act of bed wetting, and an alarm system which
triggers as a response to wetting.

9 | P a g e
Practitioners across the world have used this effective treatment for many years, and it is the
benchmarked technique due to its high level of success. Practitioners will coach the children and
support the parents throughout the program to ensure the most successful outcome, and to
minimize the chances of relapse.
Why use a Malem Alarm?
The Malem Medical product has as alarm control unit and this is attached to an Easy-Clip sensor.
The sensor is situated near where the first urine is produced. The sensor is clipped on the outside
of the child’s underpants. It has been designed so that the urine goes into the cloth of the pants
and a minimum of urine will set off the alarm once it hits the sensors in the easy clip. Also see
https://malemmedical.com
The alarm has been designed to ring at a high frequency tone, which will help arouse the sleep
child once the sensor has been wet, simultaneously a light in the alarm will switch on, to help the
child to locate the alarm in the dark. The aim is to get the child awake as soon as possible, get out
of the bed and get them to switch the alarm off and finish urinating in the toilet. There are 8
different sounds to reduce the child getting used to the same sound. It can be fixed at one sound
if required or a message recorded. Please ask your practitioner.
What is dry for a child?
It takes a number of steps to achieve dryness - initial assessment, use of body worn alarm
and then over learning to prevent relapse.
Children may become dry within 6-8 weeks.
It is important that prior to treatment that children have a medical check up to ensure that
they have no other medical condition.
In summary the Malem Ultimate Alarm has
Loud high pitched buzzer to arouse the child and LED to show where the alarm is to press the
re-set button.
Durable Easy-Clip sensor that will be in contact with the urine to trigger the alarm.
You can assess progress, as you will see the size of the wet patches on the bed getting
smaller, the alarm being triggered later or see the estimated time how long it takes before the
child turns off the alarm to get shorter. Use the Dry Nights Record for this.
The child has a normal sleep routine and they are free to roll around in the bed with the alarm
system.
The simple operation of the alarm is easy for the child to switch off.

10 | P a g e
10 Activities Which Increase the Chance of Success with Malem Alarm
1.
Do a dummy run with the child
Testing the alarm with the child, closing the Easy-Clip manually to close the circuit teaches the
child that they will not be electrocuted. Rehearse the procedure of wakening and actions again
and again. See the guidelines’ sheet with the “Magic Three”
2.
Let the child do all the work
The parent should supervise; help the child WAKE to the alarm. Only the child should switch off
the alarm. (Motivated child important)
3.
Keep a diary each day ‐make a record of the wakening and dryness of the bed.
This
will help show the progress the child is making. Use the Dry Night Records provided.
4.
Don’t restrict fluids
A constipated child though lack of fluids can hinder the learning process. Having hard poo in the
bowel can push up against the bladder subjecting it to unnecessary pressure and may increase
bedwetting.
5.
Empty bladder before bed
Have usual night‐time drink then go to the toilet before bed. See the Three T’s.
6.
Secure the sensor
Wear close fitting underpants and pyjama bottoms to bed so the sensor is between the
underpants and the pyjamas bottoms. The alarm should sound as soon as possible after the
child begins to wet and if disconnected the alarm won’t sound.
7.
Secure the alarm
Place the alarm on the child’s chest on the tight fitting pyjama top, preferably in a breast pocket
if available with the wire under the top.
8.
Test the alarm nightly
Get the child to test the alarm every night and run through in their mind or out loud what they
will do when the alarm sounds at night.
9.
Overlearning
If dry for 14 nights in a row, allow the child to have a big glass of water to drink before going
bed. This further challenges the bladder and makes wetting more likely giving the alarm more of
a chance to have an effect. It tests whether the brain and bladder have learnt to hold on or to
wake up the child to go to the washroom.
10.
Praise and encouragement
A positive attitude on the part of the therapist, parent and child is vital.
Preparation for the Bedwetter
1. The Alarm should be fully charged by the parent with fresh batteries.
2. At least 1 mattress protector is needed.
3. Easy Clip sensor placed correctly on the front of the under pants.
4. Alarm placed safely on the child’s pyjama top. (They must be awake to switch it off)
5. A clean piece of kitchen towel to dry the sensor after use.
6. In the morning make sure sensor is cleaned by rinsing and dried and aired before using it again.
7. FINALLY if the child is afraid of the dark have adequate lighting all the way to the toilet and if it’s
cold have adequate heating so they won’t be discouraged from getting up.

11 | P a g e
For the practitioner
A good practitioner will help coach you and your child in helping them become dry.
MO4 Model
The MO4 model is a reliable model but they won’t last for more than 6 months even if well cared
for. The most common malfunctions and causes are:
-Corrosion of the electronics inside by dropping the alarm in the toilet or immerge it otherwise.
-Breaking of the plastic clip of the telephone connector because it has been removed frequently.
Leave the plug of the sensor wire connected to the alarm.
-Breaking of the level to close the gripper, because the lever is moved in the wrong direction
when closing the gripper.
-Breaking of the small plastic clip to keep the battery cover closed because of forceful opening of
the battery cover.
-The easy clip itself rarely breaks unless used for a long time.
-The buzzer and vibrator rarely malfunction, unless the alarm unit is immersed in water.
MO24 Model
-This body worn alarm is similar as the MO4 in functionality.
-Has the option to record a message.
-Has 2 AA batteries.
-Is slightly larger than the MO4.
Servicing
Practitioners will need to sanitize and clean alarm and easy clip sensor between each client that is
seen. The alarm will last between 2 to 3 clients and may last longer if it is regularly cleaned and
maintained and the levers and covers operated gently and the alarm is not immersed in the toilet
or other fluid. There is wear and tear over time so it is important to inspect for any malfunction,
and test the electrical operations. Once malfunctioning, Malem will not repair the unit and has to
be replaced.
Sensor Cleaning and Sanitizing
Many organisations will require protocols for cleaning and products to help with the cleaning:
1. Select cleaner such as Dettol of Flash liquid and mix as per instructions in warm or cold water.
2. Submerge sensor while disconnected from the alarm (ensure alarm terminals are not
submerged) in the detergent.
3. Using a soft tooth brush, scrub each gripper removing all traces of lint, especially at the end of
the gripper.
4. Remove from solution and rinse well with water
5. Hang over clothes rack to air dry, wire side up, indoors. Prolonged exposure to intense
detergents or heat could damage the plastic or copper griper.
6. When completely dry, store the Easy-Clip sensor system and Alarm securely.

12 | P a g e
Servicing and Maintenance
Parents weekly service
The parents have two main roles when it comes to servicing and maintaining the Malem MO4
alarm system.
Replacing the alarm’s battery: Once every 4 week or when the sound is starting to slightly
fade, the alarm’s battery is required to be replaced. Ensuring the battery cover is opened
carefully.
Inspection: An inspection of the unit reset button, battery cover and Easy Clip sensor and its
plug-in into the alarm unit is mandatory. Also an inspection of the functionality of buzzing is
required but is done during the dry runs every evening.
Cleaning the sensor: A moderate level of sanitation of the sensor is mandatory to ensure
hygienic equipment, and also to avoid developing malfunctioning.
Practitioners Inspections and Servicing
Practitioners are required to conduct various inspections which include:
Inspection of the alarm control unit: A thorough inspection of the unit is needed to be
carried out to determine if the unit has been either damaged or tampered with. A damaged
unit is most commonly caused from being dropped or has fallen. Obvious signs of damage
may include missing cap of the battery or even broken or bent leavers.
Inspection of the batteries: A thorough inspection of the battery cover and the batteries,
including the position of the battery, as well as its lint are needed. If needed a new alarm is
required.
Inspecting the Easy Clip: An inspection of the sensor requires specific focus on the
workings of the closing of the gripper, as fractured grippers (electrodes) may cause the alarm
to fail or give false alarms.
Sanitizing and cleaning the sensor: Mixtures of mild domestic disinfectants, such as
Dettol or mild detergents like Flash liquid are commonly used. During sanitation, it is
important to avoid wetting the electrical cables and the alarm unit. It is recommended that
the sensor be cleaned and dried and the alarm is wiped with cleansing wipes between each
client.
Manufacturer’s Repairs and Upgrades
Malem recommends that alarms not to be returned to them for inspection and maintenance as the
components are not for replacement. Malfunctioning due to broken parts usually requires
replacement of the whole unit. Easy-Clip sensors are available separately.

13 | P a g e
Solutions to problems:
Problem: When demonstrating the equipment the alarm fails to sound
Solution: - The alarm may not be connected to the sensor properly. Check that the “telephone”
jack is pushed into the socket.
-The wet patch may not be large enough. It must connect the two claws to complete
the circuit.
-The batteries maybe flat. Usually the alarm buzzer sounds faint and the light flickers
if this is the case. Replace the battery, ensuring the correct polarity.
-Make sure:
The ejector ribbon lint has not slipped between batteries.
The battery contacts are clean and free from deposits.
The batteries are not loose and make good contact.
-With the batteries out, check that the switch inside is put in the position required.
-Ensure the alarm has not been flooded.
Problem: The alarm buzzes intermittently
Solution: - The sensor is faulty.
-Loose or flat batteries.
-Damaged wire.
Problem: The child wets but the alarm does not go off
Solution: Test the equipment using the salt solution or tap water.
If the alarm fails to sound do the following:
-The batteries maybe flat. Usually the alarm buzzer sounds faint and the light
flickers if this is the case, replace the batteries.
-Otherwise, contact the clinic ASAP.
If the alarm sounds, consider the following solutions:
-If the child is not wetting very much the pants might not wet the Easy-Clip
sensor. Try placing the clip nearer where the urine is produced.
-The child may have wriggled and disconnected the sensor. Check for the location
of the wet spot and the sensor. You may have to experiment with a few
positions. Double underpants or a pyjama bottom keeps the sensor better in
place. Sometimes the child disconnects the sensor in their sleep.
Problem: The alarm goes off but the child has not wet the bed.
Solution: - The false alarm maybe due to excessive perspiration or too thin under pants.
Lighter bed-covering and night cloths might help. If the child’s excessive
perspiration is due to high temperature through illness disconnect the alarm till the
child is well.
-Another common cause is residual urine or fluffs on the sensor or pants. Clean and
dry it well.
Problem: The alarm does not waken the child
Solution: - This sometimes happens in the first couple of days. It is essential that you wake the
child and get them to switch off the alarm. Eventually the child will “tune in” and
wake to the alarm herself.
-Place the alarm unit close to the chest or ears whilst gently wakening the child is a
good idea.
-Ensure that they do the 3T’s and the Magic Three and is motivated to become dry.
-Another suggestion is for the parent to sleep in the room for the first week or two,
to be able to waken the child quickly, e.g. with a wet cloth.
Problem: The child hears the alarm, leans over, turns it off and goes back to sleep
Solution: - Once again this is a job for the parent. You must make sure that the child gets out
of the bed and goes to the toilet. Having the alarm in the breast pocket might make
it a bit more difficult to turn it off without getting up. The child has to get out of the
bed and then turn the alarm off, to become dry.

14 | P a g e
Problem: The child seems reluctant to go to the toilet during the night
Solution: - Leaving the toilet light on and giving the child a torch to put under the pillow may
lessen their reluctance. Tell them that you are quite willing to accompany them if
they call out to you. Alternatively your child might prefer a chamber pot in his room.
Problem: The alarm is too loud or vibrates too much for the child
Solution: - Get the child to get used to it during the day time and let them be in charge.
-The alarm can be set in either sound or vibration only or both. Contact your
provider ASAP.
-Have an indirect light in the room at night.
Problem: The alarm does not turn off despite pressing reset button
Solution: - Easy-Clip sensor lever is closed or material wet. Lift lever, remove material and
press the reset button.
-Easy-Clip is dirty and requires cleaning –see above.
-Batteries are nearly exhausted. Please replace batteries.
-Alarm is or has been flooded.
Video Instructions
How to replace the battery
Video on: https://www.youtube.com/watch?v=4keVGWCEua4
Safety Rules:
1. An adult takes responsibility for replacing the batteries.
2. The battery cover is removed with a pushing and sliding movement.
Replacing the batteries:
1. Remove the cover gently. Use a twisting screw driver if required to open it initially.
2. Pull the lint to remove the batteries.

15 | P a g e
3. Replace with two new AAA batteries.
4. The batteries don’t go in the same way. Check Plus and Minus:

16 | P a g e
5. Put them in like this:
6. And put the cover back on.
How to test and set up the Malem alarm
Video on: https://www.youtube.com/watch?v=kUcPlZpaljY
Video on: https://www.youtube.com/watch?v=QTgNdkGhtW8
If the alarm doesn’t sound:
Video on: https://www.youtube.com/watch?v=zvN8cJVVkXo
Video on: https://www.youtube.com/watch?v=wqfjYG_bcvc
How to clean the sensor:
Video on: https://www.youtube.com/watch?v=FuhQPKzx8HY
This manual suits for next models
2
Table of contents
Other Malem Personal Care Product manuals