Malyan S100 User manual

S100 High Resolution Resin 3D Printer
User’s Manual

2
Contents
How this type of printer Works ............................................................................................................. 3
Safety Warnings And Guiding ............................................................................................................... 3
Package Contents ...................................................................................................................................... 4
Product Overview ...................................................................................................................................... 4
Connect ......................................................................................................................................................... 5
Auto Calibration ......................................................................................................................................... 5
Using The Menu System.......................................................................................................................... 5
User Interface .............................................................................................................................................. 6
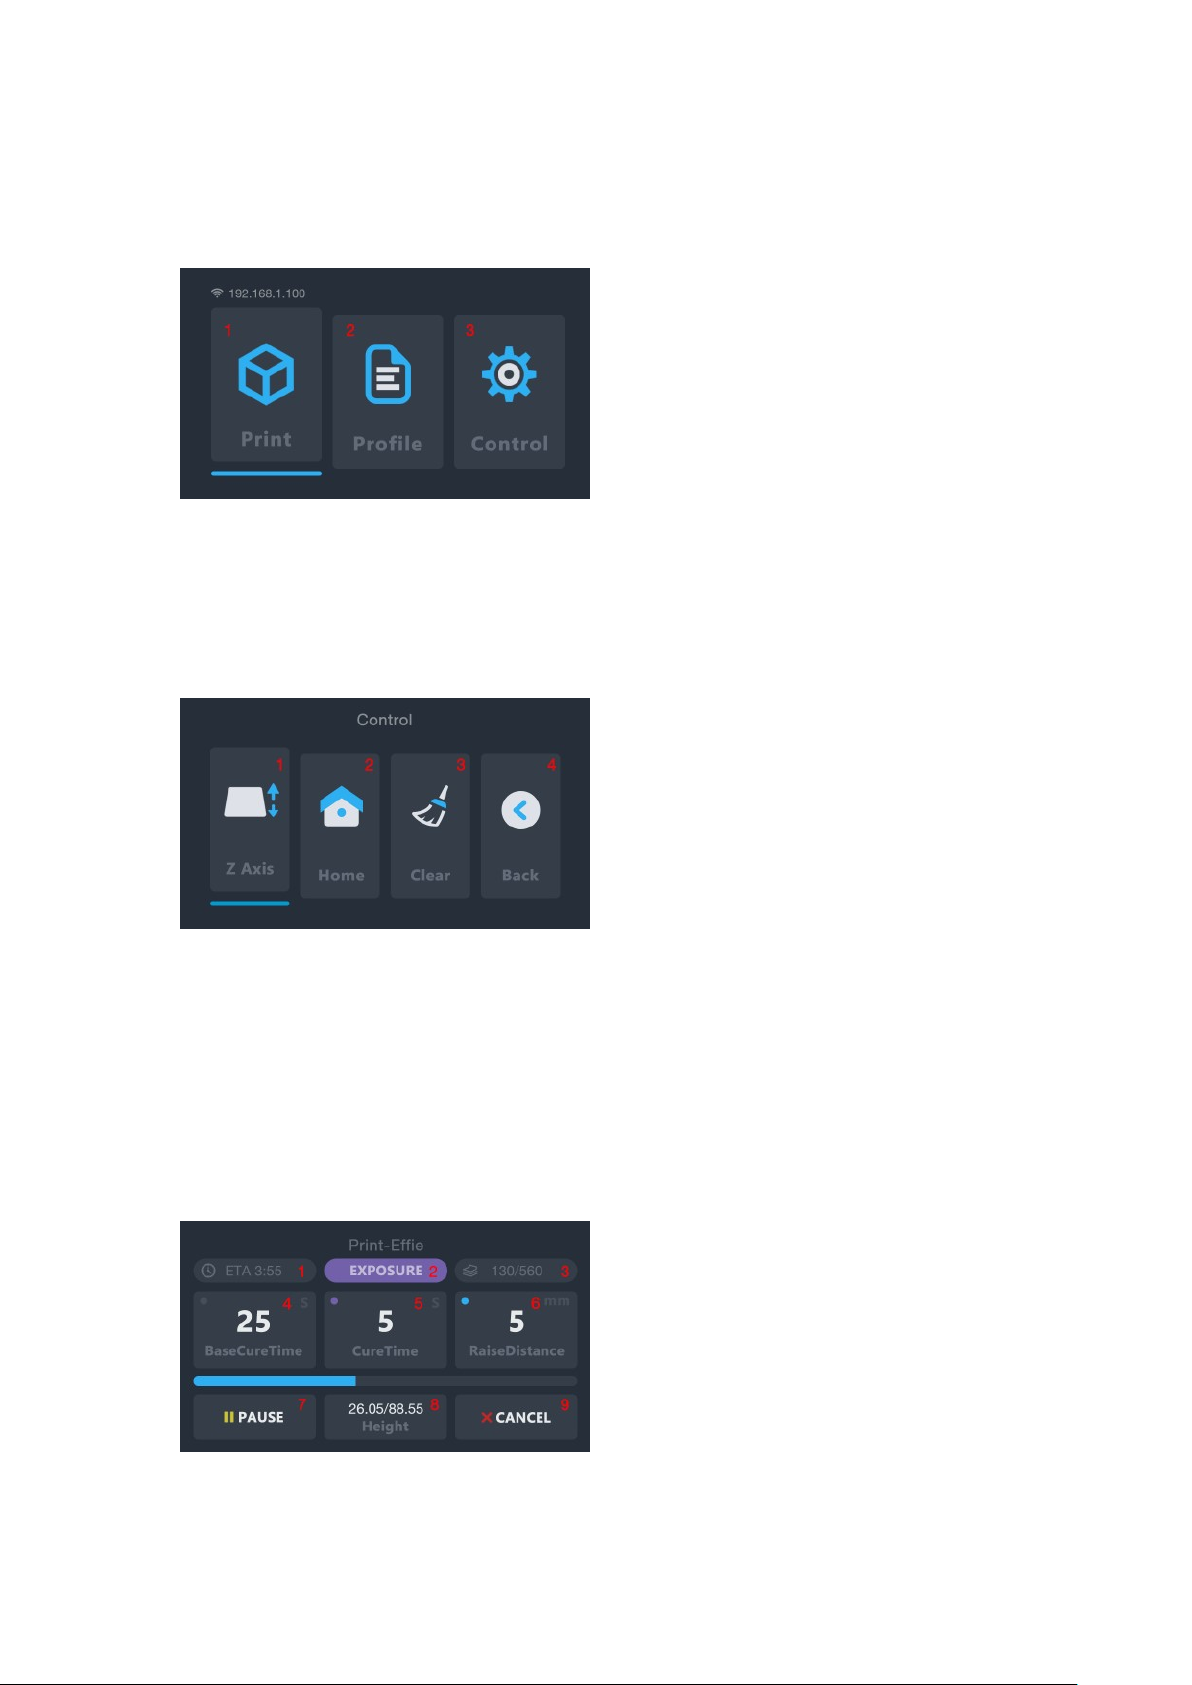
Main Menu .............................................................................................................................................. 6
Control Interface
.................................................................................................................................. 6
Printing Interface
................................................................................................................................. 6
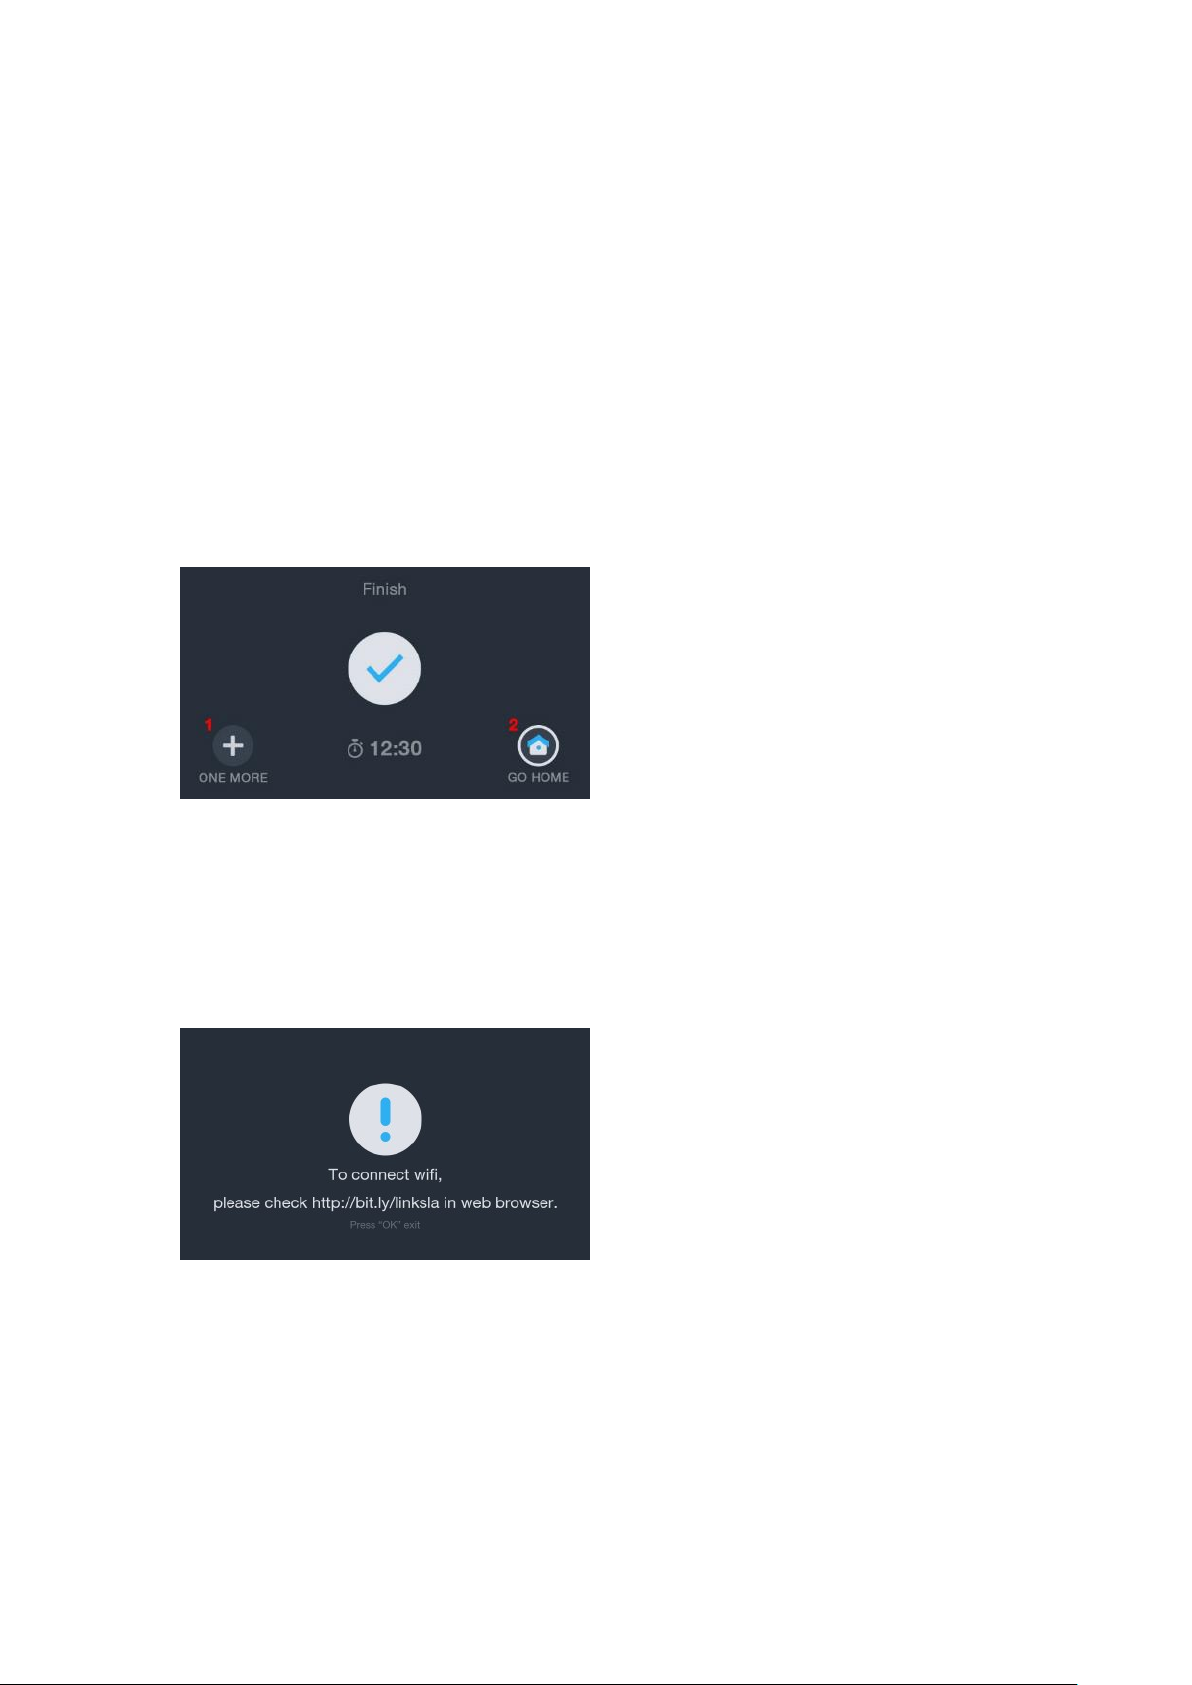
Finish Screen ........................................................................................................................................... 7
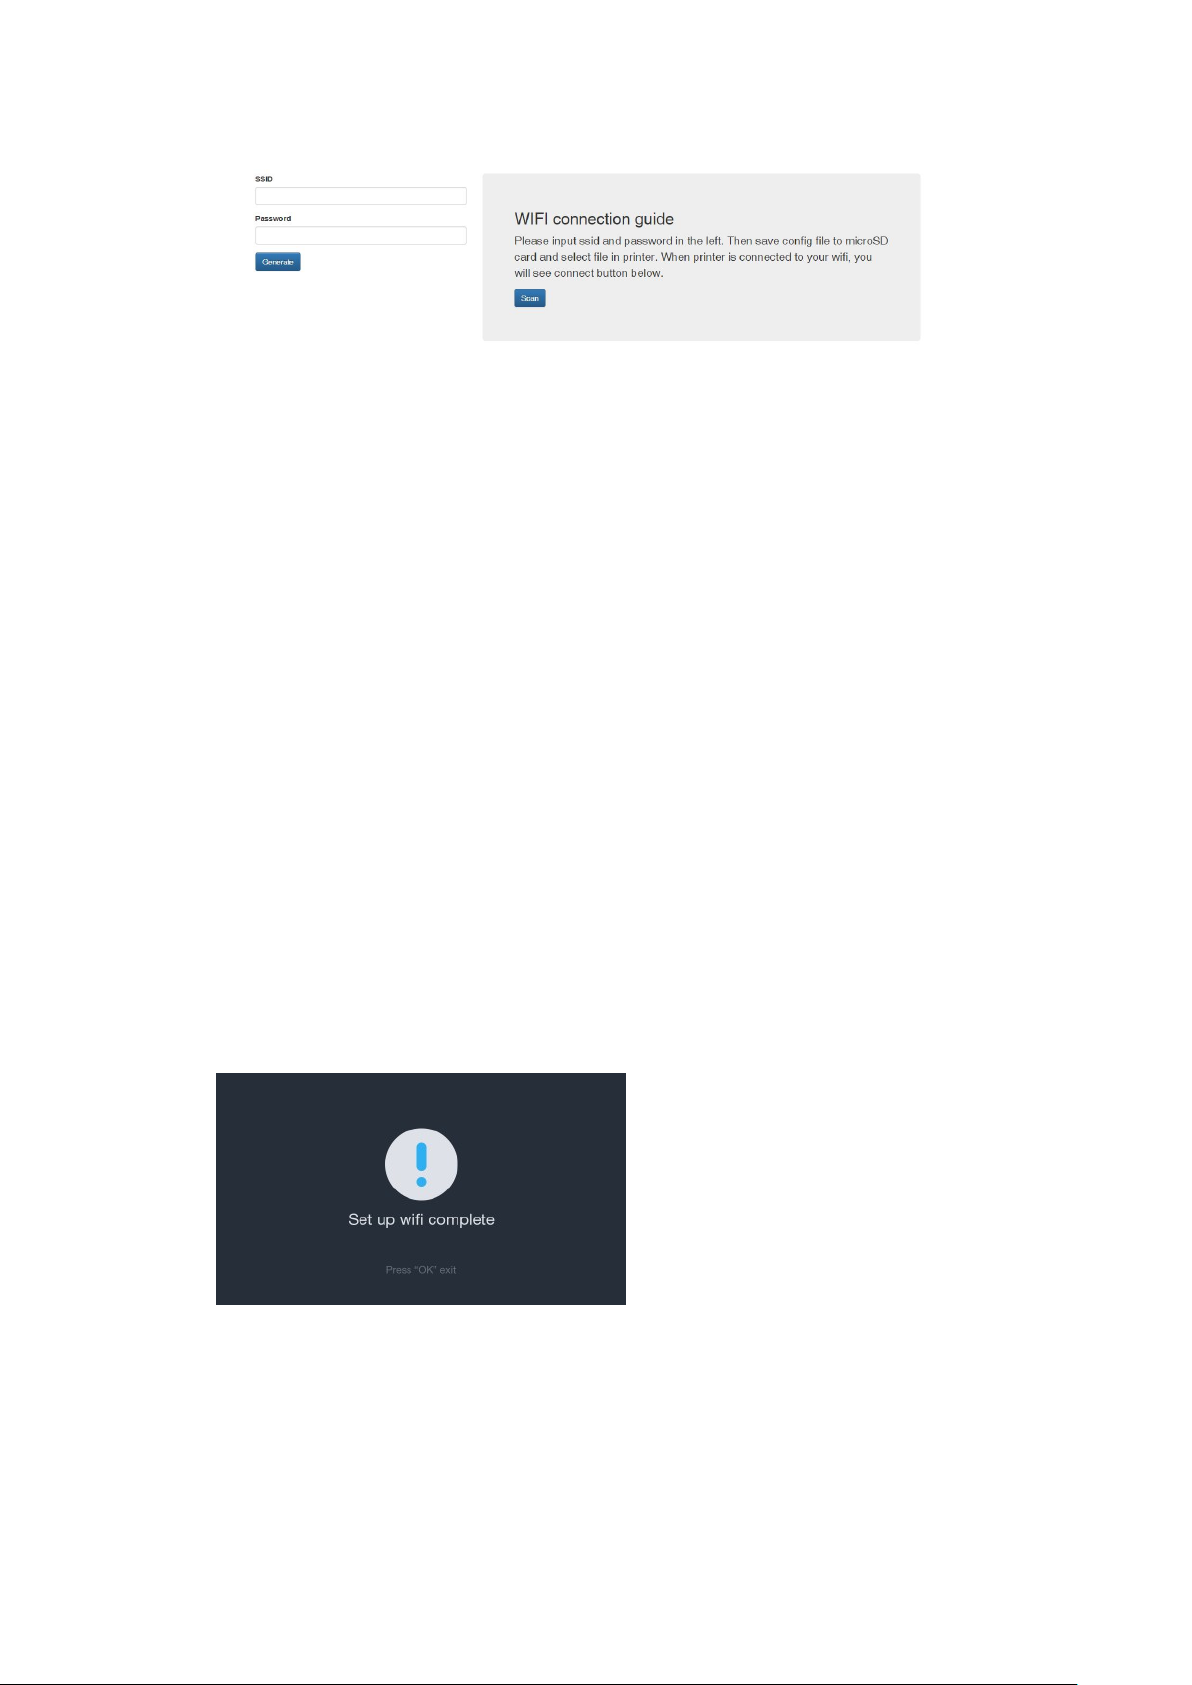
WIFI Setup .................................................................................................................................................... 7
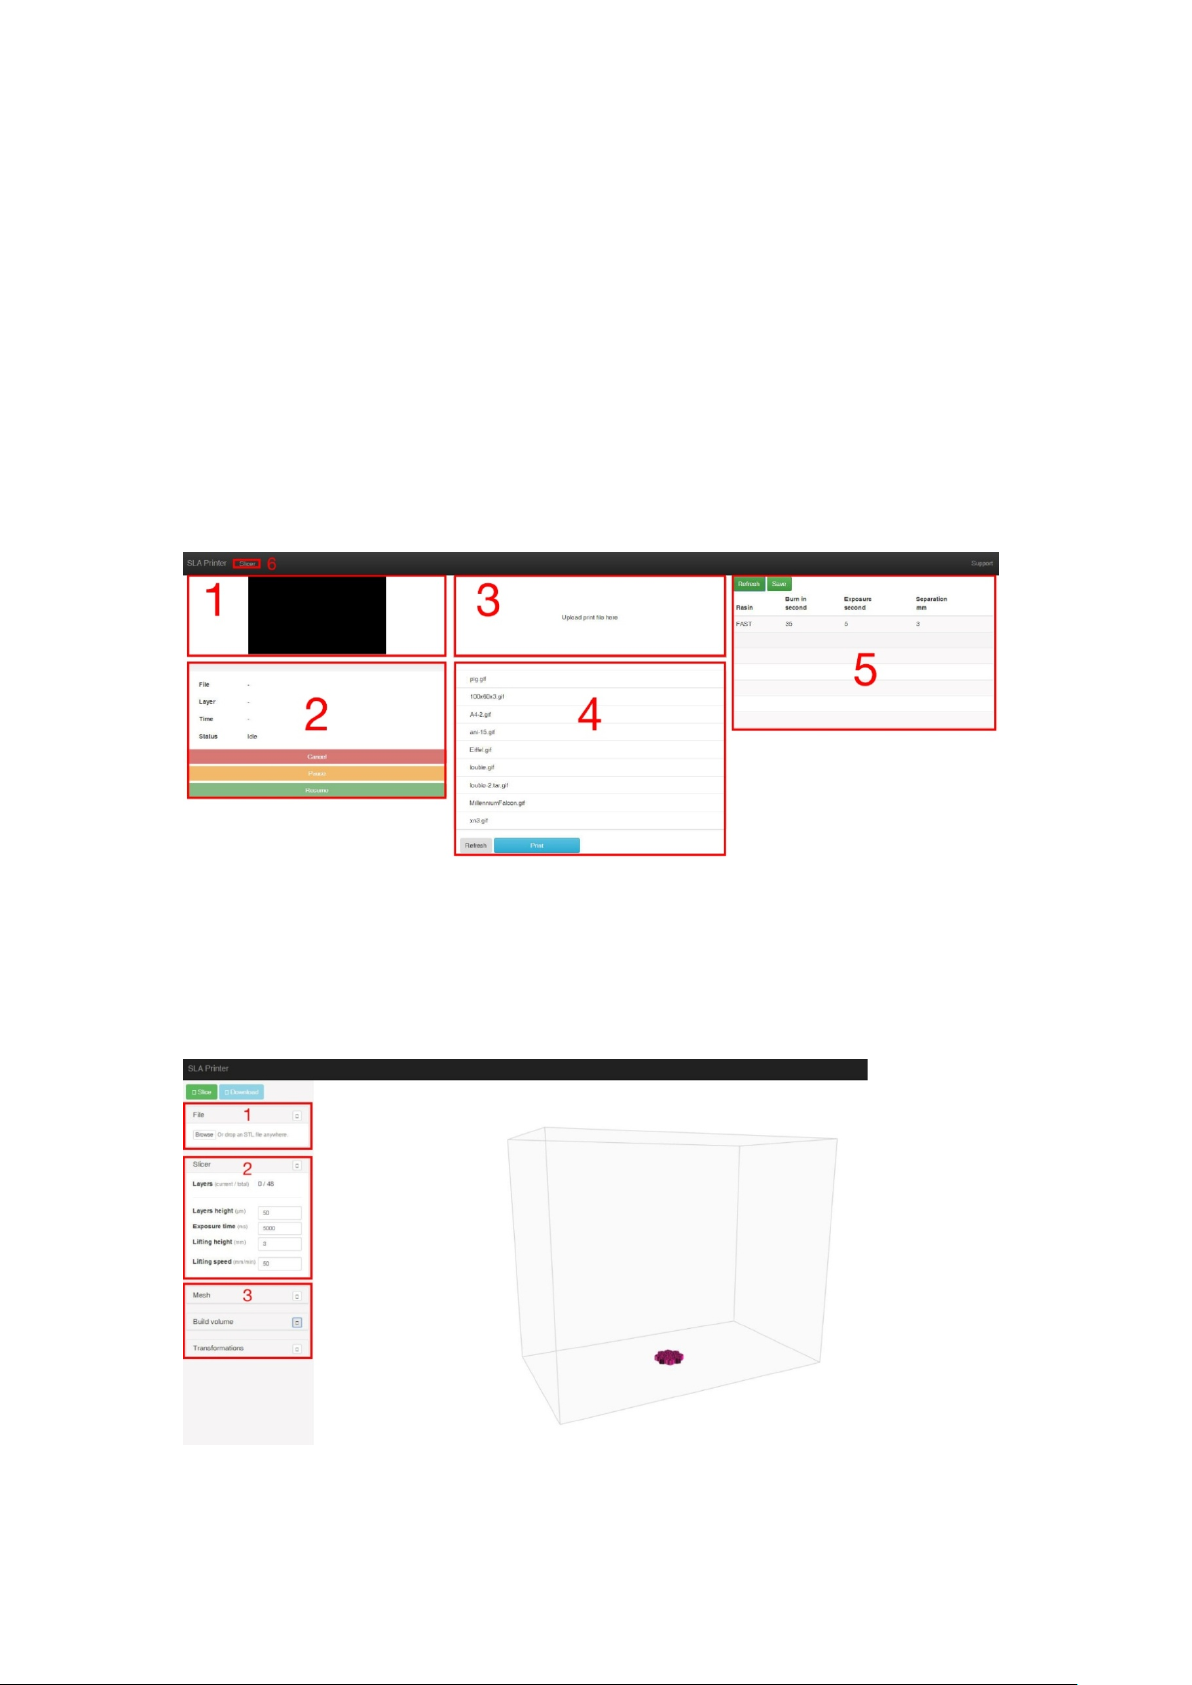
WEB UI........................................................................................................................................................... 9
Troubleshooting ....................................................................................................................................... 11
Model Cleaning ........................................................................................................................................ 12
About Resins ............................................................................................................................................. 13
Resin storage ........................................................................................................................................ 13
Resin operation .................................................................................................................................... 13
Safety and Resin .................................................................................................................................. 13
Transferring Resin to Storage ......................................................................................................... 13
Discarding Resin .................................................................................................................................. 13
Tips ............................................................................................................................................................... 14
WEB Slicer .................................................................................................................................................. 14
Creation Workshop Tutorial ................................................................................................................. 15
Model Slicing Steps ................................................................................................................................. 18
TECHNICAL SUPPORT ............................................................................................................................ 19
REGULATORY COMPLIANCE ............................................................................................................... 19
Notice for FCC ...................................................................................................................................... 19
Notice for Industry Canada.............................................................................................................. 20

3
How this type of printer Works
An LCD based resin printer uses an LCD screen to mask the shape of a layer of your
model one layer at a time while using UV lights to cure the resin. Between layers, the
printer will lift the print and return it one layer higher than previously. This process is
repeated layer by layer to shape the object over time.
Safety Warnings And Guiding
• This 3D Printer includes moving parts that can cause injury. Do not touch the drive
parts during printing in case of your hand is pressed.
• Do not leave the printer alone. Wear gloves when you operating this device.
• Do not expose the printer under the sun or in the rain.
• The suitable ambient temperature is 15°-30°, humidity range is 20%-50%.
• Install the power supply unit before connecting the power cord to the AC outlet.
• Connect the printer to an input electrical network of 110~240V AC, 50/60Hz, with an
operating voltage of 12V.
• Check the circuit before printing, cut off the power supply when it’s emergency,
remember to turn off the printer before unplug the power cord.
• This device is intended for indoor use only.
• Operate the machine in stable and level surface with enough space.
• Set the machine far away from the light, and operate the machine as far as in the
dark.
• When any resin or liquid is found inside of the machine, please clear it immediately.
• Clean your skin immediately if it touches with resin.
• Clean the resin box after printing.
• Keep the printer and all accessories out of reach of children.

4
Package Contents
1 x 3D Printer
1 x Memory Card
1 x Hex Wrench
1 x Sample Resin
1 x Power Adapter
1 x AC Power Cord
Product Overview
1. Acrylic cover
2. Leveling Knob
3. Printing Platform
4. Resin Tank
5. LCD display
6. Control Buttons

Connect
Connect the power supply to this position and
Auto
Calibration
The printer will automatically calibrate the build platform
print. It will calibrate the platform automatically. This function requires the vat to be
free of cured resin particles. Please see the troubleshooting section for more detail.
Using The M
enu
•Pressing the top button
will
•Pressing
the bottom button
•Press the top button to
while editing a value decreases that value.
•
Press the bottom button
•Press the center button
to activate the selected menu item or to save an edited
value.
5
Connect the power supply to this position and
power on the machine.
Calibration
The printer will automatically calibrate the build platform
when homing and starting a
print. It will calibrate the platform automatically. This function requires the vat to be
free of cured resin particles. Please see the troubleshooting section for more detail.
enu
System
will
change the menu choice left and up.
the bottom button
will change the menu choice
right and down.
while editing a value decreases that value.
Press the bottom button
while editing a value increases that value.
to activate the selected menu item or to save an edited
when homing and starting a
print. It will calibrate the platform automatically. This function requires the vat to be
free of cured resin particles. Please see the troubleshooting section for more detail.
right and down.
to activate the selected menu item or to save an edited

6
User Interface
Main Menu
1. Print from SD card.
2. Manage profile file
3. Manual control page.
Control Interface
1. Control the movement of Z axis.
2. Back to the home position.
3. Turn on the UV lamp for 10 seconds. This can be used to clean the resin vat by
curing an entire layer and peeling that layer from the FEP liner.
4. Back to the Main menu.
Printing Interface
1. Estimated printing time remaining

7
2. Printing status
3. Printed layers/Total layers progress
4. Adjust the cure time of the base three layers
5. Adjust the cure time for layers other than the first three base layers
6. Adjust the raise distance
7. Pause the printing
8. Printed height/Total height progress
9. Cancel the print
Finish Screen
1. Print the same model again
2. Back to the main menu
WIFI Setup
1. The below screen will be shown upon powering on your printer.
2. Enter the provided URL into your computer’s browser: http://bit.ly/linksla. While on
the http://bit.ly/linksla web page on your computer’s browser, enter the SSID and
Password for your Wi-Fi network. This will create and download a file which provides
the information for the printer to connect to your Wi-Fi network.

8
3. Copy the generated file onto the SD card that came with your printer. Turn off the
printer, insert the SD card, and turn the power back on. Upon turning the printer back
on, the file will be detected on the SD card and will configure your printer to connect to
the SSID and Password provided in step 2.
Please note, this printer is designed to use a 2.4 GHz network band. Additionally,
please ensure that the printer is placed in a location with a strong Wi-Fi network
signal.
To change the network in the future, repeat step 2.
4. Upon completion, the below screen will display. The file that was loaded onto your
SD card is automatically deleted. If your printer fails to connect to your network:
Verify that the SSID and Password for your Wi-Fi network is accurate and repeat
step 2 forward.
Verify that the printer is in a location with a strong Wi-Fi signal.
Verify that the network you are attempting to connect to is a 2.4 GHz band network,
and not a 5 GHz band.
5. Wi-Fi is not mandatory to use the 3d printer. You are able to transfer files via SD
card.

WEB UI
1. The status of your Wi-
Fi
hand corner. Once the printer is connected to the
address.
To access the Web UI, please enter the IP address into the browser on a computer
connected to the sa
me network.
2. To
prevent others from potentially tampering or controlling your printer remotely,
there is security
verification on the first access of the Web UI. The access code to
connect will be displayed on your printer at this time.
enter the prompt.
3. WEB UI introduction
(1).The exposed image
9
Fi
connection can be seen on the home screen in the top left
hand corner. Once the printer is connected to the
Wi-Fi
network, it will display the IP
To access the Web UI, please enter the IP address into the browser on a computer
me network.
prevent others from potentially tampering or controlling your printer remotely,
verification on the first access of the Web UI. The access code to
connect will be displayed on your printer at this time.
Please enter
the access code
while the print is processing
connection can be seen on the home screen in the top left
network, it will display the IP
To access the Web UI, please enter the IP address into the browser on a computer
prevent others from potentially tampering or controlling your printer remotely,
verification on the first access of the Web UI. The access code to
the access code

10
(2).Printer Management
(3).Upload print file
(4).Select the file and click the "Print" button to start printing.
(5).Profile management
(a).Resin: Name of the profile file
(b).Burn in second: the cure time of the base three layers
(c).Exposure second: the cure time for layers other than the first three base
layers
(d).Separation: the raise distance
(6).WEB Slicer
4. WEB Slicer
(1) Upload print file
(2) Adjust the parameter
(3) Edit the STL file

11
Troubleshooting
1) If the print finishes and there is nothing on the build plate there are 3 potential
reasons:
a) The first layers did not cure enough and the print has fallen off of the build
plate. Increase the base cure time. For Malyan resin, 60 seconds for the base cure
time will work. Other resins may require different amounts of curing time.
b) The platform did not level correctly. Verify that there are no small particles of
previous prints in the resin vat, as this will disrupt the leveling process. Keeping the
resin vat clear of small pieces of cured resin is a necessity.
c) On the Control Interface, run the “clear” function without the resin vat to verify
that the LCD screen on the machine is turning on and off.
2) If the first few layers have adhered, but the remainder of the model is missing:
a) The cure time for your resin is not long enough. The model likely fell into the
vat and it will be necessary to remove it before attempting to print again.
b) You have not supported the piece properly. If the print is held in place by
supports, you may need to add more supports to overcome the weight of the object as
its printing.
*Please note that you must keep the vat clear of particles and partially cured resin.
When this error occurs, it is not uncommon for cured resin to stick to the FEP lining in
the bottom of your vat. Best practice to clearing this type of obstruction:
I) Use the provided hex key to undo the two screws on the left and right hand side of
the resin vat.
II) Remove the resin from the vat into a separate container. We recommend a new,
empty container and strongly against pouring resin from the vat into the original resin
bottle as this can result in small pieces of cured resin to contaminate the otherwise
clean resin.
III) Use a plastic spatula, plastic tweezers, or expired banking card to gently peel the
resin from the FEP lining. Take care, as the FEP lining is thin and can be torn if
approached too aggressively.

12
IV) This moment can be used to clean the resin vat, but it is not necessary. Remove
any remaining pieces of cured resin from the vat, and reinstall it onto the printer.
When printing the first few layers, you can click the "Pause" button to raise the print
platform, so that it will be easy to observe whether the first layer adherence to the
platform. if there is no problem, click the "Continue" button to continue printing, if there
is nothing on the build plate, stop the print and try the previous troubleshooting steps
to prevent wasting time and resin. Be sure to clear the vat of any cured resin before
starting again.
If a part of the model is on the platform and the other part is at the bottom of the vat,
you may need to increase exposure time, or increase the lift height giving the resin
more time to flow.
Model deformation or having no details can be solved by shortening the exposure
time or by adding a solid color paste or reducing the print layer.
Model Cleaning
Once the print is finished, remove the platform and use a metal putty knife or
spatula to remove the print from the platform.
After removing the print from the build platform, use a spare container with
Isopropyl Alcohol to clean the print by submerging in the alcohol and shaking
vigorously for a short period of time. An ultrasonic cleaner can also be used for this
process.
Cleaning time should not be more than 5 minutes. If too long, details on the model
will soften and the model surface will begin to whiten. The smaller details in the final
print, the shorter the cleaning time should be.
Once cleaned, set the print in a sunny location or under UV light. Curing times will
depend on the resin you are using.
During the cleaning process, if you use a soft brush to clean, the surface will be
smoother.

13
About Resins
Resin storage
Resins should be kept in the dark and ventilated place, storage temperature:
20°C-30°C, lower temperature can extend the shelf life, the official resin shelf life is
one year.
Resin operation
When operating, please wear gloves and avoid direct contact as possible. Cured resin
is safe to be handled without gloves. If exposed to skin, wash the exposed location
promptly. Printed models should not be used for food applications.
Safety and Resin
There are many types of resin and many manufacturers on the market. Because of
this, this section is to serve as general best practices to be aware of when working
with resin:
Wear gloves when working with uncured resin.
Keep out of reach of children.
Do not drink or eat the resin.
Safety glasses are recommended (splashing can happen to anybody).
Most manufacturers will have a safety data sheet available, and it is recommended to
research the resin you will be working with.
Transferring Resin to Storage
When you use resin, small bits can be cured unintentionally. For this reason, we do
not recommend mixing resin that has been used back into the original bottle of resin.
Doing so may result in unintended flecks of cured resin which can lead to unintended
print defects. You can filter the resin through a sift or fine mesh to get those bits and
pieces removed.
That being said, we recommend storing resins that have been used into a separate
container. Ideally the container is black, and should have a lid. The container should
be stored in a dark, ventilated place to prevent curing while being stored.
Discarding Resin
Before discarding resin, it should be cured fully. A clear, disposable cup can be very

14
useful to cure unwanted resin prior to throwing it away.
Tips
1. Check the resin box and platform before printing ensure they are clean.
2. After taking out the model, remember to cover the lid to prevent the resin curing.
3. After finish printing, you can keep the resin in other container or in the resin box.
After using, the storage period of resin will be correspondingly shorter, and need to
run out as soon as possible, add fresh resin can effectively improve the shelf life of the
resin.
4. If the print fails, and the model sticks to the bottom of the vat, refer to the print
failure section on how to remove.
WEB Slicer
Pleas click the “Slicer” button to enter the WEB slicer
1.Upload the STL file. You can also drag and drop into the slicer on the Web UI.
2.Adjust the parameter or rotate your STL file by “Build
volume” and “Transformations”
3.Click the “Slice” button to start the slicing.
4. After the slice finished, click the “Download” to save
the GIF file on your computer and copy it onto the SD
card. Insert the SD card into your printer, and then you
can start a print.

15
Creation Workshop Tutorial
Here we introduce the settings and slicing steps.
Run the "Creation Workshop" program in the "Creation Workshop" folder.
Import model (support STL, OBJ format)
Save in the Creation Workshop format
Slice button

16
After importing the model, you can add support as needed.
Click the to open the support option, click where you need to add the
support,then the support can automatically generate.
The other two buttons are (bottom support) and (automatic support).
The thickness of support can be adjusted, the top must not be less than 0.25MM, the
root not less than 0.6MM.
If you model by using PRO/E and CREO, FRONT face is the "bottom" of the model
instead of TOP.
The imported model may differ in size and location from the print area and can be
adjusted by the property bar on the right side of the control center.
Among the above function, "Move (mm)" comes with three small features, you can
easily locate the model quickly.
These three functions are “Fit the base” (hope that you press the button before each
cut, because some models are not fit the base); "XYZ axis absolute in the middle" and
"model in the middle".

17
"Enable Slice Out lines" is the feather value option (set the value, the more the more
smooth), feather rate can reduce the model pixel pattern. The general value of 3 or
more, can effectively alleviate.
"Slice Thickness (mm)" setting range: 0.02-0.1mm.the default is 0.05mm, the smaller
the thickness is, the higher the accuracy will be, and more time the printing will need.
Exposure time can be reduced if the layer thickness is smaller.
“Exposure time (ms)”can be set according to the actual situation. Default 15 seconds,
print smaller and simple structure model can reach up to 3 seconds. If the details of
the print cannot be showed during the printing, then increase the single exposure time.
For some models with holes, the shorter curing time will be better. While for models
with smaller columns, the longer the curing time is, the better effect will be.
“Bottom exposure (ms)” default 60 seconds, when printing smaller and simple
structure model, it just need 5 seconds to stick to the platform in some cases.
Increase the exposure time if the model cannot stick to the platform. The longer the
exposure time is, the more tightly the base will stick.
"Z-axis lift distance (mm)" can beset according to the model size, if the area is too
large but the lifting height is low, the resin cannot be returned to the middle of the
model, resulting in bubble in the middle part, defect or print failure----just raise the

18
height of the Z-axis table.
"Z-axis lift s peed (mm/m)" default setting: 100mm/m, the setting range is
recommended between 50-150mm/m.
"Z-axis retraction s peed (mm/m)" default setting: 100mm/m, the setting range is
recommended between 100-150mm/m.
Note: Remember to click the “Apply Changes” button to take effect after your setting is
completed.
If Print Size has a slight deviation from the actual size, you can change the display
size; correct the print size by adjusting the XY value of the “Build Size (mm)”
Note: Remember to click the “Apply Changes” button to take effect after your setting is
completed.
Model Slicing Steps
1. Import the model that needs to be printed.
2. Edit the model.
3. Save the model.
4. Start slicing.

5.
Copy the CWS file into the SD card or send the file over the network, then you can
print the model you need.
REGULATORY COMPLIANCE
Notice for FCC
This device complies with Part 15 of the FCC rules. Operation is subject to the
following two conditions: (1) this device may not cause harmful interference, and (2)
this device must accept any interference received, including interference
cause undesired operation.
Modifying the equipment without
no longer complying with FCC requirements for Class B digital devices. In that event,
your right to use the equipment may be limited by
required to correct any interference to radio or television communications at your own
expense.
This equipment has been tested and found to comply with the limits for a Class B
digital device, pursuant to Part 15 of the FCC
provide reasonable protection against harmful interference in a residential installation.
This equipment generates uses and can radiate radio frequency energy and, if not
installed and used in accordance with the instru
interference to radio communications. However, there is no guarantee that
interference will not occur in a particular installation. If this equipment does cause
harmful interference to radio or television reception, which can be d
turning the equipment off and on, the user is encouraged to try to correct the
interference by one or more of the following measures:
·
Reorient or relocate the receiving antenna.
·
Increase the separation between the equipment and receiver.
·Co
nnect the equipment into an outlet on a circuit different from that to which the
receiver is connected.
19
Copy the CWS file into the SD card or send the file over the network, then you can
REGULATORY COMPLIANCE
This device complies with Part 15 of the FCC rules. Operation is subject to the
following two conditions: (1) this device may not cause harmful interference, and (2)
this device must accept any interference received, including interference
cause undesired operation.
Modifying the equipment without
Malyan
’s authorization may result in the equipment
no longer complying with FCC requirements for Class B digital devices. In that event,
your right to use the equipment may be limited by
FCC regulations, and you may be
required to correct any interference to radio or television communications at your own
This equipment has been tested and found to comply with the limits for a Class B
digital device, pursuant to Part 15 of the FCC
Rules. These limits are designed to
provide reasonable protection against harmful interference in a residential installation.
This equipment generates uses and can radiate radio frequency energy and, if not
installed and used in accordance with the instru
ctions, may cause harmful
interference to radio communications. However, there is no guarantee that
interference will not occur in a particular installation. If this equipment does cause
harmful interference to radio or television reception, which can be d
etermined by
turning the equipment off and on, the user is encouraged to try to correct the
interference by one or more of the following measures:
Reorient or relocate the receiving antenna.
Increase the separation between the equipment and receiver.
nnect the equipment into an outlet on a circuit different from that to which the
Copy the CWS file into the SD card or send the file over the network, then you can
This device complies with Part 15 of the FCC rules. Operation is subject to the
following two conditions: (1) this device may not cause harmful interference, and (2)
this device must accept any interference received, including interference
that may
’s authorization may result in the equipment
no longer complying with FCC requirements for Class B digital devices. In that event,
FCC regulations, and you may be
required to correct any interference to radio or television communications at your own
This equipment has been tested and found to comply with the limits for a Class B
Rules. These limits are designed to
provide reasonable protection against harmful interference in a residential installation.
This equipment generates uses and can radiate radio frequency energy and, if not
ctions, may cause harmful
interference to radio communications. However, there is no guarantee that
interference will not occur in a particular installation. If this equipment does cause
etermined by
turning the equipment off and on, the user is encouraged to try to correct the
nnect the equipment into an outlet on a circuit different from that to which the

20
·Consult the dealer or an experienced radio/TV technician for help.
Modifying the equipment without Malyan’s authorization may result in the equipment
no longer complying with FCC requirements for Class A digital devices. In that event,
your right to use the equipment may be limited by FCC regulations, and you may be
required to correct any interference to radio or television communications at your own
expense.
The equipment should be installed and operated with minimum distance 20cm
between the radiator & your body.
Notice for Industry Canada
This Class B digital apparatus complies with Canadian ICES-003.
Cet appareil numérique de la classe B est conforme à la norme NMB-003 du Canada.
Table of contents
Other Malyan 3D Printer manuals