Maono AU-AM200 S4 User manual
MAONO AU-AM200 S4
User Manual • Uživatelský manuál •
Užívateľský manuál • Használati utasítás •
Benutzerhandbuch

2
English
3 –26
Čeština
27 –50
Slovenčina
51 –74
Magyar
75 –98
Deutsch
99 –122

3
The product user guide contains product features, how to use, and the operating
procedure. Read the user manual carefully to get the best experience and avoid
unnecessary damage. Keep this manual for future reference. If you have any questions
or comments about the device, please contact the customer line.
✉www.alza.co.uk/kontakt
✆+44 (0)203 514 4411
Importer Alza.cz a.s., Jankovcova 1522/53, Holešovice, 170 00 Praha 7, www.alza.cz
4
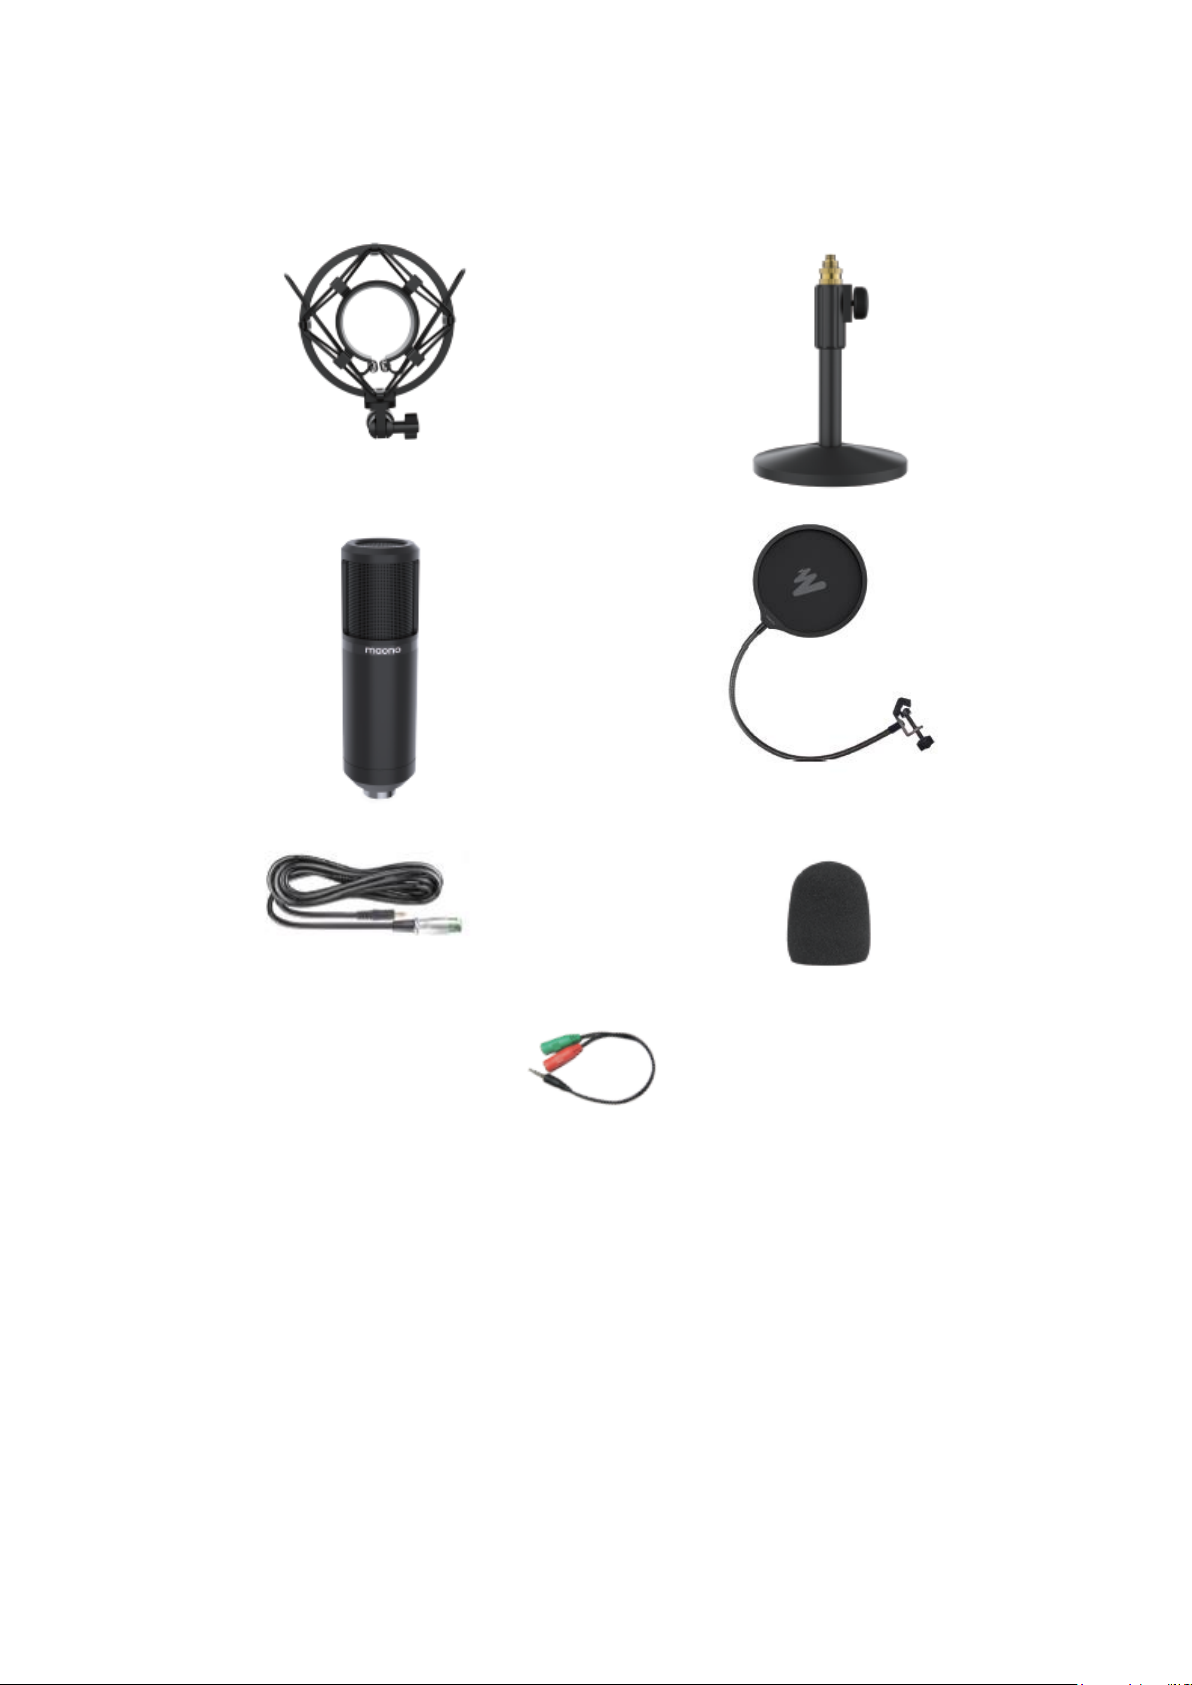
Introduction
Schock Mount
Table Clamp
Microphone
Pop-filter
Audio Cable
Windscreen Cap
Splitter
5
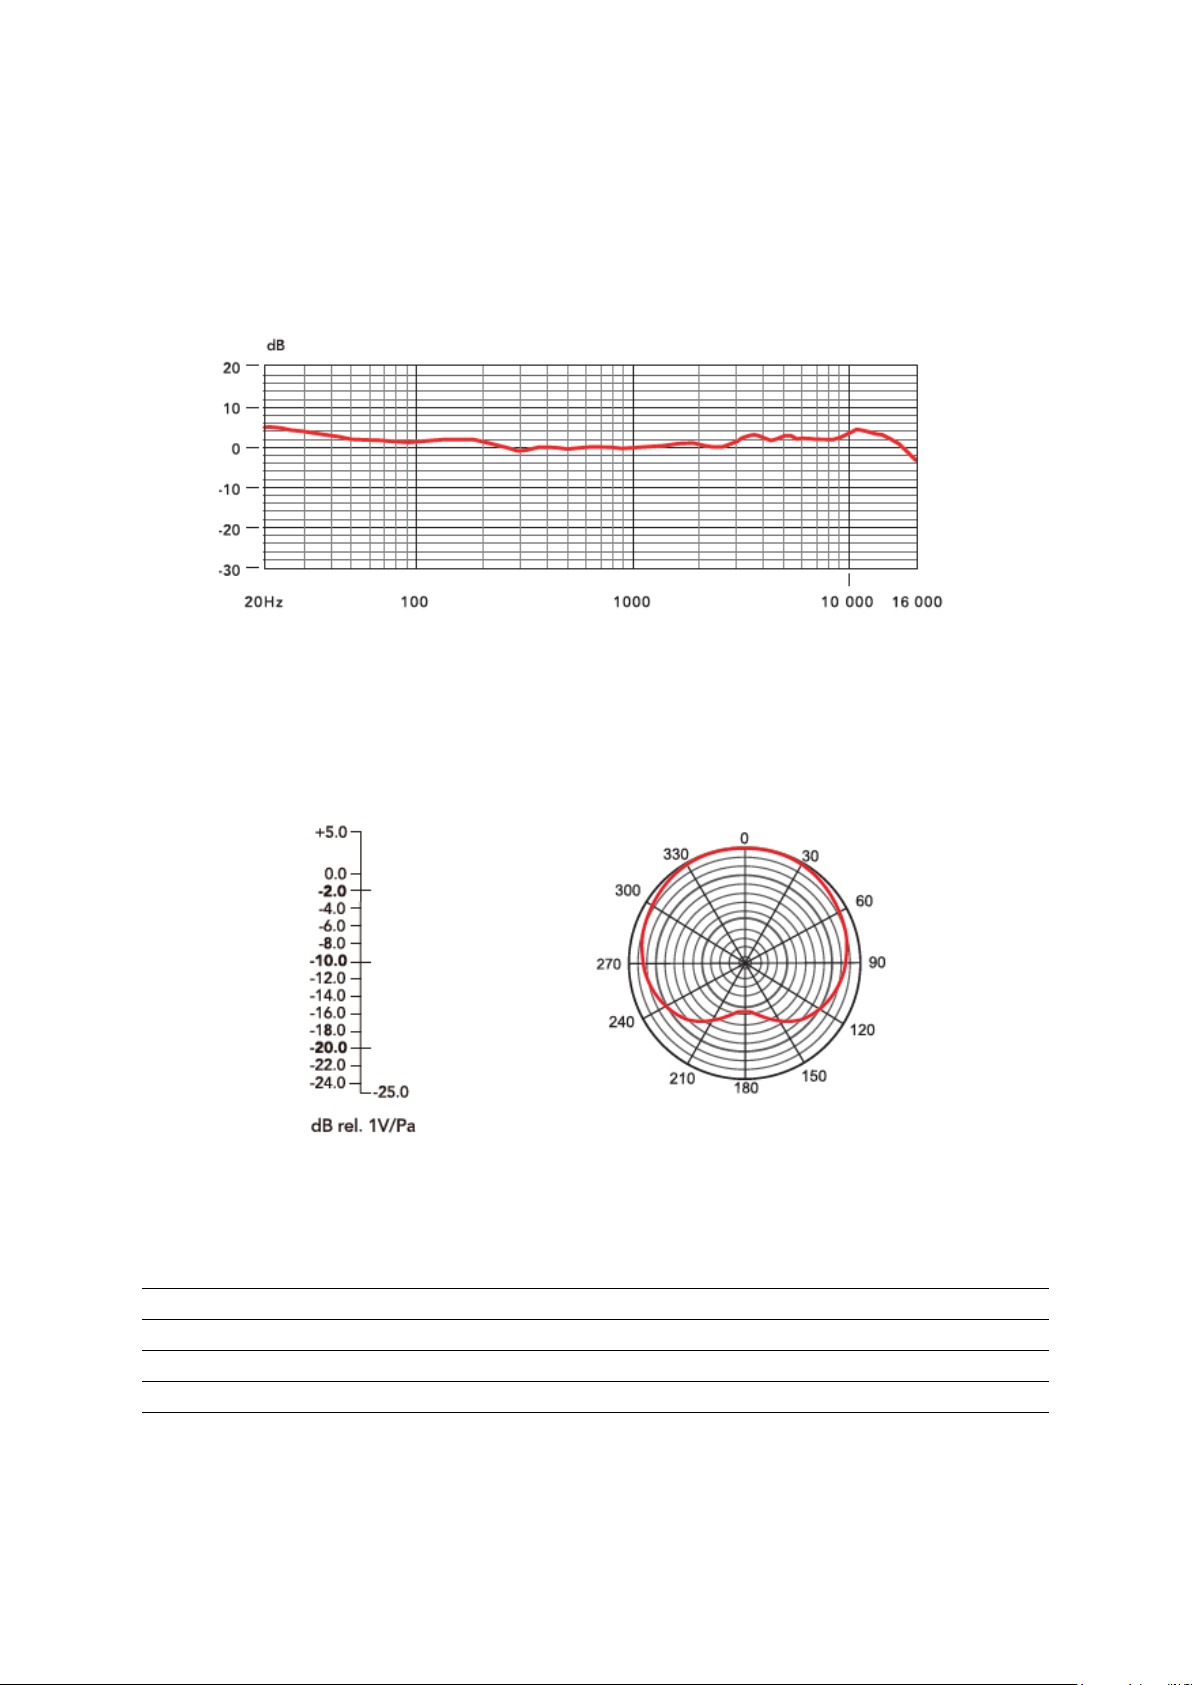
Specification
Frequency Response
Polar Patter
Polar Patter
Cardioid
Frequency Response
20 Hz –20 kHz
Sensitivity
-36 dB ± 3 dB (0dB = 1 V / Pa at 1 kHz
Max. SPL
120 dB
Electrical Current
< 3 mA
Voltage
1,5 ~ 5,1V
At 1 kHz

6
Description
•Use the pop filter accessory when recording to reduce the impact of sound
airflow on the microphone.
•Using the microphone in a humid environment will degrade performance. You
should therefore try to prevent the microphone parts from getting wet. There will
be some amount of moisture in the airflow of people's language and using a "pop
screen" can reduce the risk of moisture.
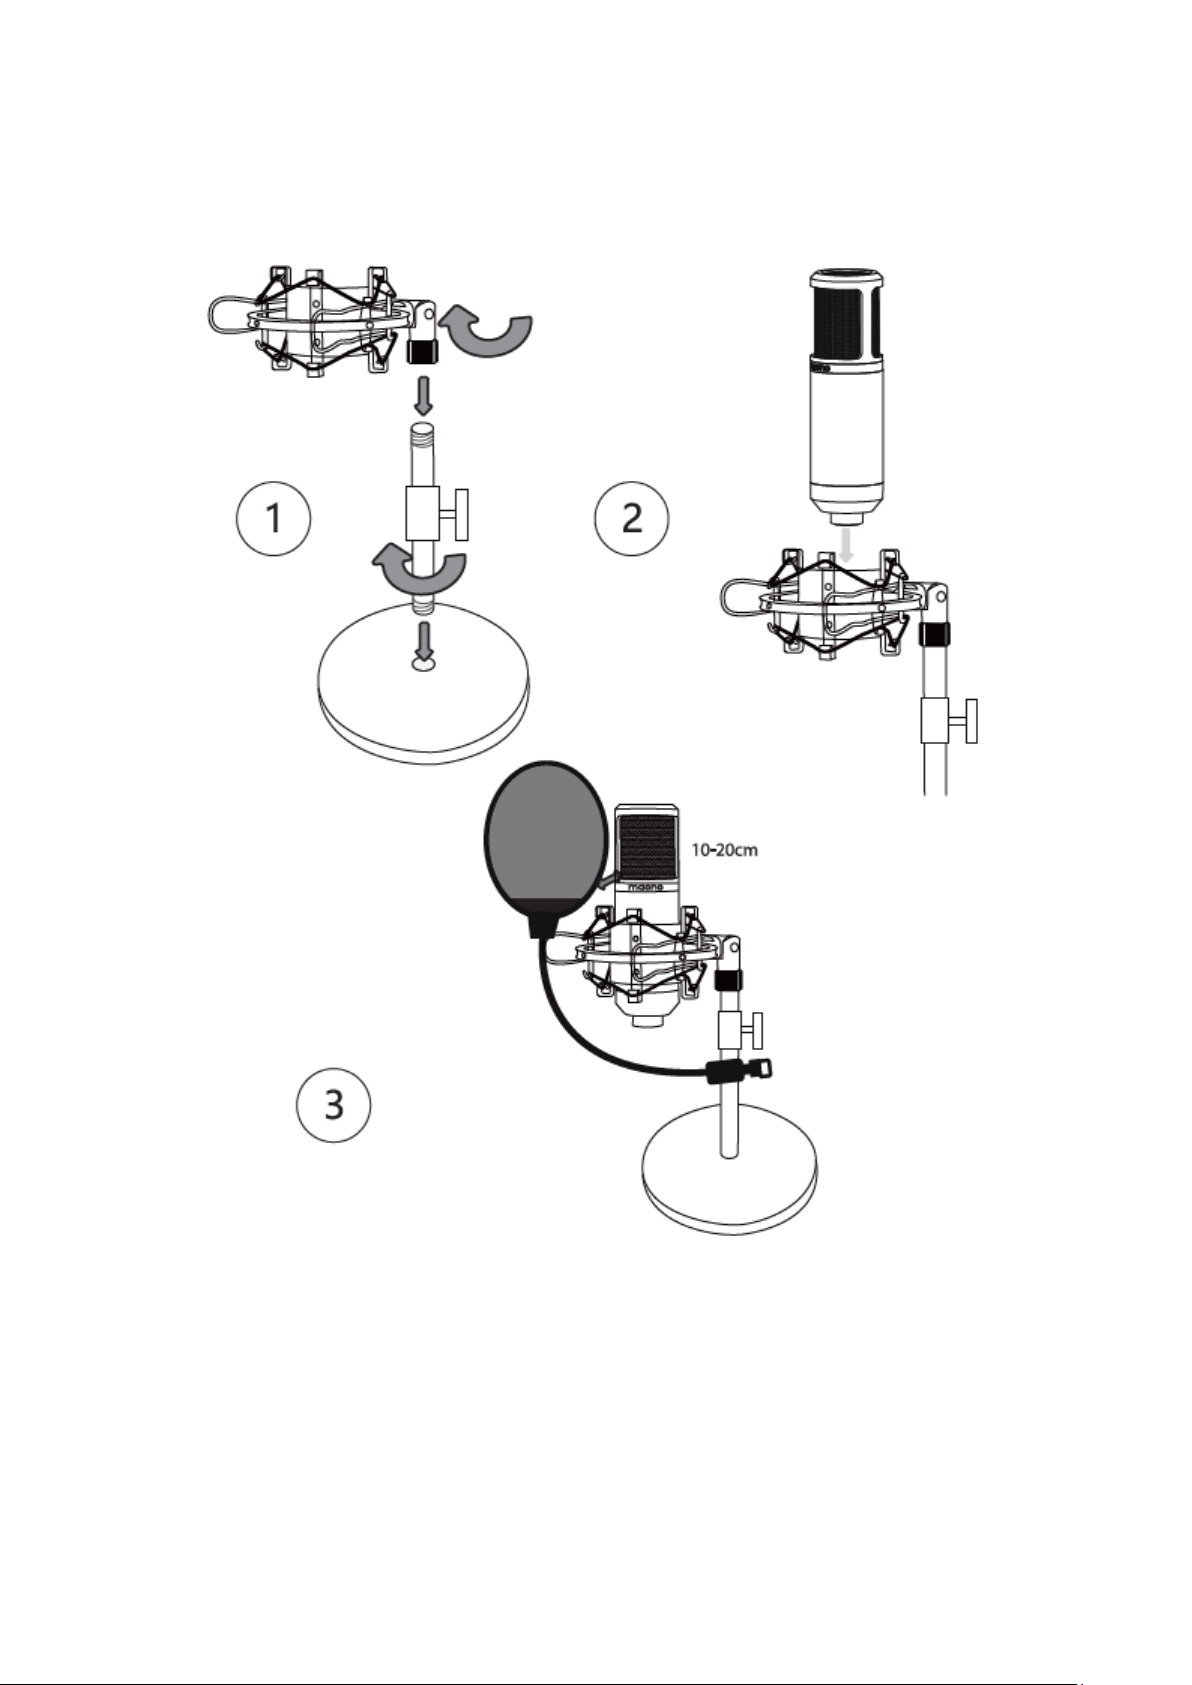
•The placement of the microphone and the sound source has a certain influence
on the sound effect. When using the microphone, make sure that the front of the
microphone (the side with the trademark} faces the sound source, and keep the
distance between the microphone and the sound source 15~ 30cm.
•During use, install the microphone and table stand, shock mount and other
accessories in the package in advance, and set the table stand to the ideal
position for use.
Features
25mm large-plated membrane capsule
Cardioid polar pattern.
High shield metal casing
3.5mm jack for computer
Stable metal desktop stand, Shock mount and audio included.
7
Installation Quick Guide

8
Microphone Position

9
Connect to Use
Use the microphone for laptop and smartphone, which only has microphone and
earphone female jack integrated, needs the "Y adapter" for contact to computer first,
then connect mic plug to female socket of mic of "Y adapter”.
If your computer has the microphone and Audio jack earphone jack separately, please
plug the microphone jack to computer female socket with has mic marked.
Laptop
Smart Phone
Intergrated
Audio Jack
Seperated
Audio Jack
Desktop
TRS (3 Pins)

10
Portable Live Streaming and Podcast Console for
Computer and Smartphone

11
Product Description
Maonocaster AU-AM200 is a comprehensive solution for audio processing that
integrates audio collecting, processing and output controlling. It is compatible with
smartphones, tablets, and computers, including Android, iOS, Window and macOS. It is
plug-and-play with no extra driver required. The built-in DSP digital audio processor
makes it possible to vary your voice and add more sound effect to your podcast with
one single button, which will make your livestream more entertaining.
Product Features
1. Compatible with smartphones, tablets, and computers
2. Intuitive and easy-to-use interface
3. Multiple sound effects
4. Real-time headphone monitoring, simultaneously listening and recording
5. Support two microphone input at the same time
6. Noise & ambient sound cancelling, make your voice pure and clear
7. Side chain function enables it to highlight human voice by automatically lowering the
volume of back background music
8. Separate control of microphone volume and accompaniment volume
9. Independent accompaniment input enables multiple audio input to live room
10. Three-way live broadcast output enables multi-platform live broadcast
11. USB-C interface for power and data
12. Built-in lithium battery provides up to 8 hours of usage, convenient for outdoor live
broadcast

12
Applicable Situation
Live broadcast on mobile phone/tablet/computer Applicable app/software: Tik Tok/SNS
Platform
Accessory List
AM200 Podcast Console
User Manual
USB-A to USB-C Cable
3.5mm TRRS Audio Cable
Data Transmission
USB-C
Frequency Response
20Hz-20kHz
THD
THD<0.5% 1kHz
Headset Output Power
35MW, 32Ω (1KHD+N=1%)
Sample Rate
48kHz/16bit
Wireless Connection
Bluetooth 4.2
Battery Type
Li-Polymer
Battery Capacity
1200mAh
Charge Parameter
5V/1A
Charge Time
Appr. 3h
Battery Life
Appr. 8h (Highest keypads brightness)
Dimension
L24*W14*H4.2CM(button included)
13
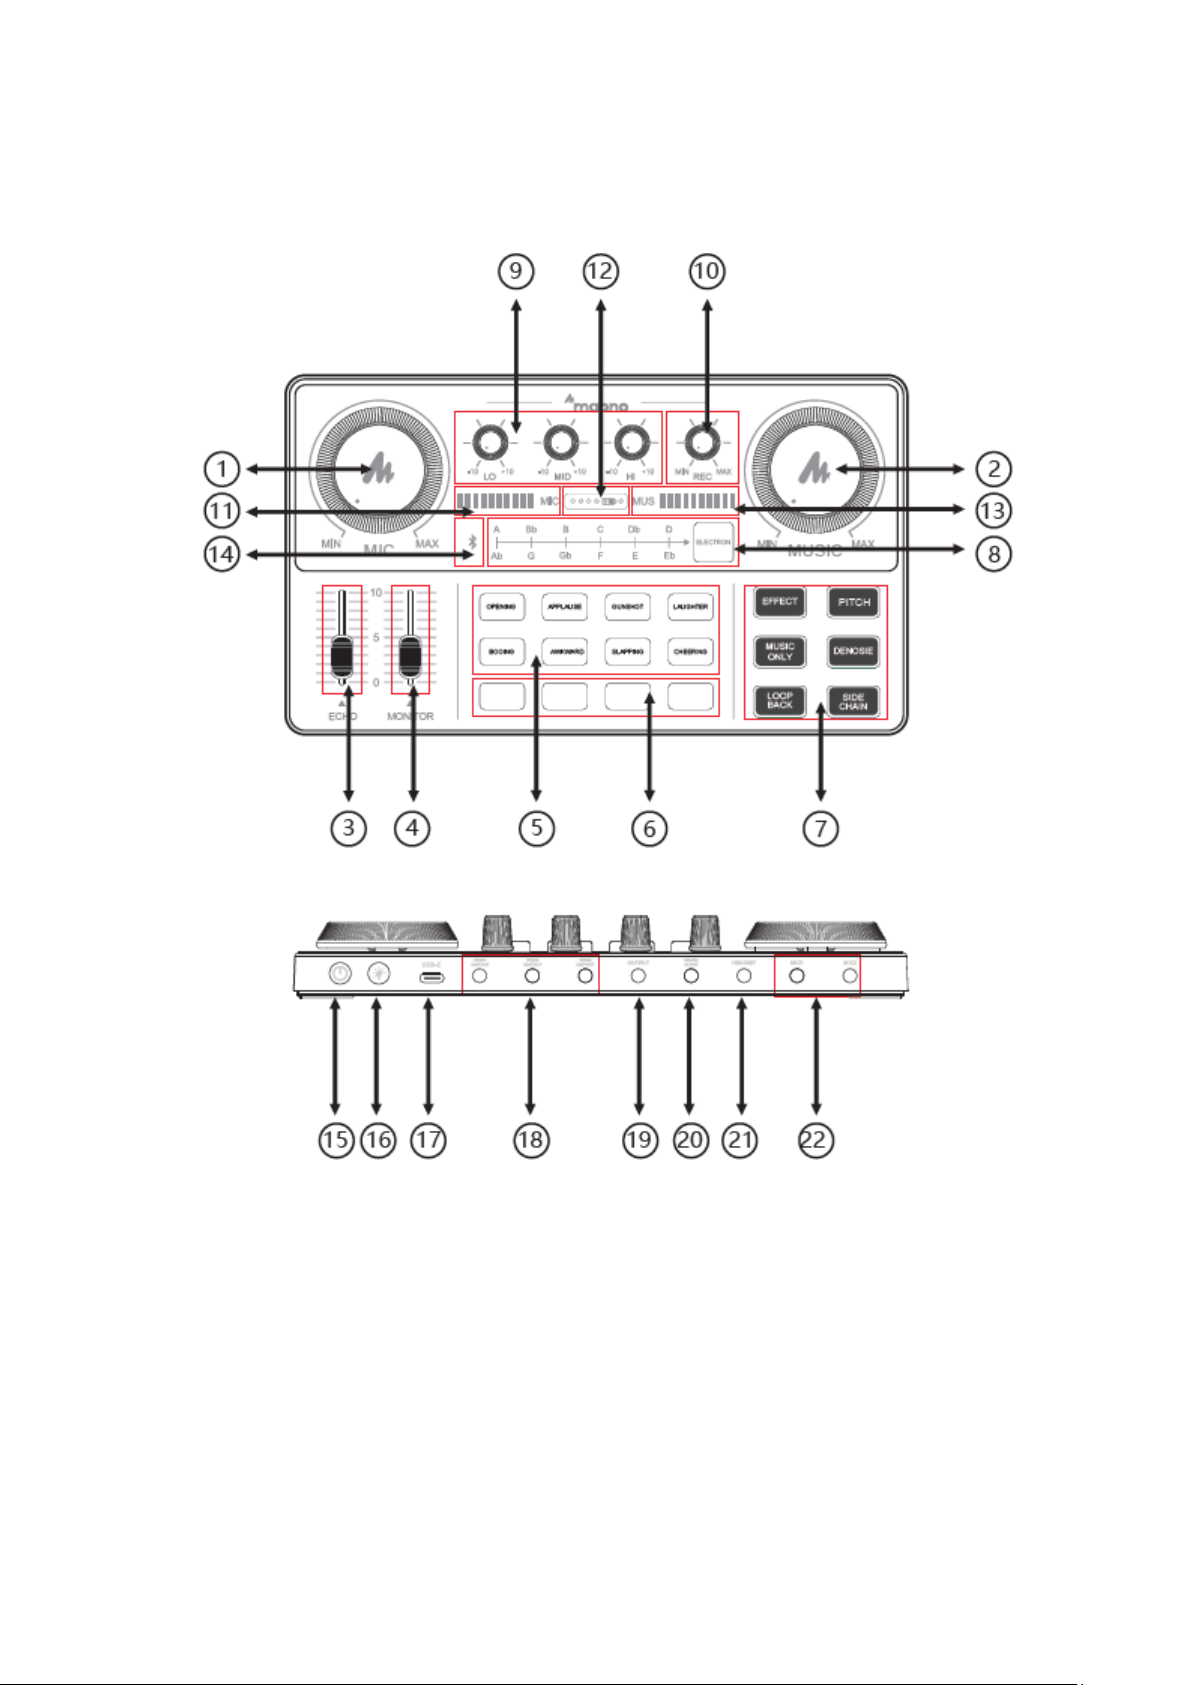
Product Layout

14
1. Microphone volume control
Rotate the control knob clockwise to increase the volume of the microphone.
2. Accompaniment volume control
Rotate the control knob clockwise to adjust the volume of the external accompaniment
music. When in use, you can turn clockwise to increase the volume of accompaniment
music or counter clockwise to decrease the volume of accompaniment music.
3. Reverb effect control
Slide the control fader up to increase the reverb effect and vice versa.
4. Monitor volume control
Push the control fader up to increase the monitoring volume. Please slide the fader
down to the bottom before wearing the headset, and then slowly increase the volume to
avoid damage to your hearing.
5. Default sound effect
This area presents 8 default sound effect buttons, including: opening, applause,
gunshot, laughter, booing, awkward, cheering, slapping. The user can press the
corresponding button to trigger the sound effect. Each sound effect button has an
indicator light which will be always-on when not triggered; after pressing the sound
effect button, the button light flashes until the sound effect ends. And it restores to be
always-on.
You can adjust the volume of pre-set audio effects:To increase the volume. Long press
the "LAUGHTER" button; To decrease the volume-Long press the "OPENING" button.
6. Custom sound effect:
This podcast console provides users with 4 custom sound effects buttons. Users can
record audio clips and import them to the podcast console through a microphone, an
external audio source, or Bluetooth device to use these sound effects in live broadcasts.
6.1 Recording: Turn the product on, connect it with either one of microphone,
external audio input device, Bluetooth device. Turn on the "LOOP BACK" mode.
Hold any custom key until button light flashes to start recording. Audio input will
be recorded and saved. Release the button to end recording.
Note: If you do not release your hand during recording, the recording will stop
automatically when there is not enough space, and the light will automatically
turn off.
6.2 Clear recording: Hold any of the recorded custom sound effect for 2 seconds
to start the clearing process. The button light will be turned on without flashes.
The button light will be turned off when the recording is cleared.
6.3 Play sound effects: short press any recorded custom button to activate sound
effects. It will beep if it is empty and there is no recording. Play sound effects:

15
short press any recorded custom button to activate sound effects. It will beep if it
is empty and there is no recording.
7. Vocal FX
There are six function buttons in this area, which are EFFECT, PITCH, MUSIC ONLY,
DENOISE, LOOP BACK, SIDE CHAIN
7.1 "EFFECT" The button has 4 modes corresponding to different light colours,
including the original sound mode (Pink), professional mode (red), pop mode
(blue), and yelling mode (green).
7.2 " PITCH" button has 4 modes corresponding to different light colours,
including male to female (red), female to male (blue), girlish voice (green), robot
(Pink). "EFFECT" and "PITCH" cannot be triggered at the same time.
7.3 " MUSIC ONLY” mode can remove the human voice in the background music
and keep the accompaniment, to facilitate the user to sing along the music. Press
the button to turn this function on and off, correspondingly button lights on and
off.
7.4 "DENOISE" mode can automatically reduce the ambient sound from the
microphone input. Press the button to turn this function on and off,
correspondingly button lights on and off.
7.5 " LOOP BACK " mode. The user can control whether the background music be
route to the live stream or not when playing the accompaniment from the
computer. If turns on (the lights on), the computer music is input to the live
broadcast room, and vice versa. No matter whether this function is triggered or
not, the computer music can always be heard from monitor headphones output
(please remember to turn it on when broadcasting).
7.6 "SIDE CHAIN" mode, when turning on this mode in the live stream, the
podcast console will automatically lower the volume of the background music,
and highlight the voice of the human, suitable for live chat scenes. The light will
be on when the mode is on, and off when the mode is off.
8. Electronic Music Key Changer
There are 12 keynotes: A, Bb. B.C, Dd. D, Ab. G. Gb. F, E, Eb. Short press the "Electrical
Tone" area to switch to the corresponding electronic tone and long press to close it.
9. Low, Medium and High Key
It is to adjust tune of the microphone to achieve deep bass, smooth midrange, and clear
treble.
10. Recording Volume Control Knob
This knob controls the volume of the sound output to the live broadcast, and the user
can adjust it accordingly.

16
11. Microphone Volume Level Display
Indicate the volume of the microphone.
12. Battery Level Display
4 LED lights on means 100% fully charged, 3 LED lights on means 75%, 2 LED lights 50%,
1 LED 25%; The power indicator LED flashes and red light on when charging.
13. Accompaniment Volume Display
Indicate the volume of the accompaniment.
14. Wireless Bluetooth Accompaniment
The Bluetooth will automatically be on and pairing when turn on the podcast console.
After paired, the accompaniment would be transmitted to the podcast console by
Bluetooth. (The Bluetooth is only for wireless accompaniment playback)
15.Power Switch
Turn on/off the product by long press for 3 seconds.
16. Keypad Brightness Adjustment
The keypad backlight is 6 level adjustable.
17. USB-C Interface
The USB-C interface can be used for charging and data transmission. The product
serves as an external podcast console for the computer while live streaming, recording,
or singing on the computer.
18. POD Output 1, 2, 3
The processed audio can be output to the smartphone, tablet, or other device by
connecting the podcast console to devices through a 3,5mm TRRS cable. The podcast
console provides 3 output interfaces with the same function, which can live stream to
multiple platforms at the same time.
19. Output
To connect audio playback device such as speakers and headphones.
20. Music Input
To connect an external audio source or device to the podcast console via an audio cable
to facilitate background music playback during live streaming or audio production.
21. Headset Interface
It can be connected to a headset with a 3.5mm headphone jack.
22. Microphone interface
It can be connected to a 3.5 mm condenser microphone that does not require external
power supply, such as MAONO A03, PM360, PM325 and other models.

17
Sound Card Connection Guide
Karaoke by Mobile phone
1. Connect the smartphone/headsets/microphone to the podcast console as the picture
shows.
2. Download the karaoke app on smartphone.
3. Turn on the podcast console and select the sound effects needed.
4. Open the app on the smartphone and start to sing.
Note:
Since some smartphones do not have 3.5mm jacks, a USB-C/Lightning to 3.5mm adapter
is required Please purchase the 3.5mm audio adapter from the phone manufacturer.
Audio Cable
Smartphone
Connect to one of the
three POD output
Monitoring headsets
Condenser
microphone

18
Live Streaming on Mobile Phones
1. Connect the mobile phone/headsets/microphone to the podcast console as the
picture shows.
2. Download the steaming app on smartphone.
3. Turn on the podcast console and select the sound effects needed.
4. Open the music app on the mobile phone end and start streaming.
•Since some smartphones do not have 3.5mm jacks, a USB-C/Lightning to 3.5mm
audio adapter is required.
•Please purchase the USB-C/Lightning to 3.5mm audio adapter from the phone
manufacturer.
•The podcast console can support live streaming up to 3 different devices and
take up to two microphones inputs at the same time. You do not have to connect
all output and input devices if not needed.
Smartphone 1
Smartphone 2
Smartphone 3
Phone for accompanimen
Monitoring headset
Broadcast interface
Condenser
Microphone

19
Live Streaming on Computer
1. Connect the accompaniment music (smartphone), headsets, and microphone to the
podcast console as the pictures shows.
2. Connect the computer and the podcast console by USB-C cable. The computer will
automatically recognize the podcast console and select the driver.
3. Enter the sound control panel of Windows and set the podcast console "MAONO AU-
AM200" as the system default playback in "Playback" and "Recording" option.
4. Open the live streaming software on the computer and confirm again in software
settings that "MAONO AU-AM200" is the default audio and playback device.
NOTE:
•You can stream to computer and smartphone at the same time.
•Please activate "LOOP BACK" mode during call-in in live streaming.
•Please adjust settings on the podcast console for each software individually.
Condenser
Microphone
Monitoring headset
Phone for accompaniment
Audio Cable
Audio Cable
USB-C Cable
Computer

20
Charging
1. It can be charged by connecting the podcast console to the computer /power bank
and power adapter via USB-C cable.
2. The "battery indicator" on the podcast console will light up red when charging, and
flash according to the battery level.
3. When the podcast console is connected to the computer, it can be charged while
being used.
NOTE:
•Please charge the podcast console before using for the first time.
•If not used for a long period, please charge the podcast console every 3 months.
•Charging is also possible when the power is off.
•Do not charge for a long time. Please stop charging when the battery is fully
charged to avoid over-charging.
Computer
Powerbank
Power adaptor
Or
Or
Table of contents
Languages:
Other Maono Microphone manuals

Maono
Maono AU-PM320S User manual

Maono
Maono AU-A04TC User manual

Maono
Maono AU-903 User manual

Maono
Maono DGM20 User manual

Maono
Maono DM30 User manual

Maono
Maono AU-WM730 User manual

Maono
Maono AU-WM800 User manual

Maono
Maono AU-PM422 User manual

Maono
Maono AU-AM200-S1 User manual

Maono
Maono AU-C03 User manual

Popular Microphone manuals by other brands


Omnitronic
Omnitronic IM-1000 PRO user manual

Listen Technologies
Listen Technologies LA-261 user manual

Beyerdynamic
Beyerdynamic TG V96 user manual

Sennheiser
Sennheiser COM 1424 Instructions for use
Earthworks Audio
Earthworks Audio ICON manual

AXESS ELECTRONICS
AXESS ELECTRONICS mpwl-1503-bk owner's manual


