manuals.online logo
Brands
  1. Home
  2. •
  3. Brands
  4. •
  5. Marshall Excelsior
  6. •
  7. Control Unit
  8. •
  9. Marshall Excelsior ME980-905 User manual

Marshall Excelsior ME980-905 User manual

This manual suits for next models

1

Other Marshall Excelsior Control Unit manuals

Marshall Excelsior ME990-3F User manual

Marshall Excelsior

Marshall Excelsior ME990-3F User manual

Marshall Excelsior ME904-16 User manual

Marshall Excelsior

Marshall Excelsior ME904-16 User manual

Marshall Excelsior ME990-4F User manual

Marshall Excelsior

Marshall Excelsior ME990-4F User manual

Marshall Excelsior MEGR-198H User manual

Marshall Excelsior

Marshall Excelsior MEGR-198H User manual

Marshall Excelsior ME670DBC User manual

Marshall Excelsior

Marshall Excelsior ME670DBC User manual

Marshall Excelsior Excelerator ME993-16 Owner's manual

Marshall Excelsior

Marshall Excelsior Excelerator ME993-16 Owner's manual

Marshall Excelsior ME980-8 User manual

Marshall Excelsior

Marshall Excelsior ME980-8 User manual

Popular Control Unit manuals by other brands

Seitz 14A80 user manual

Seitz

Seitz 14A80 user manual

Wilo RS485 Installation and operating instructions

Wilo

Wilo RS485 Installation and operating instructions

Becker CentralControl CC41 Commissioning Instruction

Becker

Becker CentralControl CC41 Commissioning Instruction

SICK CDB650 operating instructions

SICK

SICK CDB650 operating instructions

Panduit NetKey NKP5E88M Series installation instructions

Panduit

Panduit NetKey NKP5E88M Series installation instructions

MX Options Concentric Petite Fitting instructions

MX

MX Options Concentric Petite Fitting instructions

Clean Water Systems Fleck 2510 Installation & start?up guide

Clean Water Systems

Clean Water Systems Fleck 2510 Installation & start?up guide

Fairchild FSB44104A user guide

Fairchild

Fairchild FSB44104A user guide

LEGRAND Wattstopper LMIN-104 installation instructions

LEGRAND

LEGRAND Wattstopper LMIN-104 installation instructions

PMK ATT10BNCS instruction manual

PMK

PMK ATT10BNCS instruction manual

Tektronix TDS3FFT user manual

Tektronix

Tektronix TDS3FFT user manual

Woodward easYgen Technical manual

Woodward

Woodward easYgen Technical manual

Balluff BNI EIP-502-105-R015 user guide

Balluff

Balluff BNI EIP-502-105-R015 user guide

NXP Semiconductors TWR-LS1021A Getting started

NXP Semiconductors

NXP Semiconductors TWR-LS1021A Getting started

Advantech PCM-3117 Startup manual

Advantech

Advantech PCM-3117 Startup manual

Danfoss MCO 101 manual

Danfoss

Danfoss MCO 101 manual

Moons' Lin Engineering R701P user manual

Moons'

Moons' Lin Engineering R701P user manual

Aventics RV1 operating instructions

Aventics

Aventics RV1 operating instructions

manuals.online logo
manuals.online logoBrands
  • About & Mission
  • Contact us
  • Privacy Policy
  • Terms and Conditions

Copyright 2025 Manuals.Online. All Rights Reserved.

Installation Instructions
For:ME980-905, ME980-905-25
and ME980-905-50
Marshall Excelsior Company
1506 George Brown Drive Marshall, MI 49068
Phone (269) 789-6700 Fax (269) 781-8340
www.marshallexcelsior.com
The contents of this publication are for informational purposes only. While every effort has been made to ensure accuracy,
these contents are not to be construed as warranties or guarantees, expressed or implied, regarding the products or services
described herein or for their use or applicability. Marshall Excelsior Co. reserves the right to modify or improve the designs
or specifications of such products at any time without notice. The MEC™ logo is the trademark of Marshall Excelsior Co.
Form #921 Rev A
!!!WARNING!!!
READ AND UNDERSTAND ALL INSTRUCTIONS INCLUDED WITH THIS INSTRUCTION
MANUAL. RELIEVE ALL PRESSURE FROM SYSTEM BEFORE SERVICING VALVE
WARNING!
Failure to follow these instructions or to properly
install and maintain this equipment could result in
an explosion and/or fire causing property damage
and personal injury or death.
Marshall Excelsior equipment must be installed,
operated, and maintained in accordance with
federal, state, and local codes and MEC
instructions. The installation in most states must
also comply with NFPA 58 or ANSI K61.1 standards.
Only personnel trained in the proper procedures,
codes, standards, and regulations of the LP-Gas or
anhydrous ammonia industries should install and
service this equipment
Latch End
Remote Release End
Figure 1
Lanyard
ME980C-6, -8
NOT INCLUDED
CABLE RELEASE CONNECTIONS
WARNING!
Remote release cables shall be installed so that
they will close the ME980 valve(s) when pulled
from the farthest remote location. Cable shall
operate smoothly, over pulleys and/or through
conduit. Do not kink cable or run cable around
sharp corners. If installed in conduit, keep water
out of conduit. Frozen water, dirt or dried mud in
the conduit will render the remote release
inoperable.
Remote releases used on ME980 valves shall not:
(a) be made from plastic or fiber rope;
(b) have any kind of fusible link which could melt
and prevent the cable from pulling the ME980
latch.
To provide a remote release, aircraft cable can be
connected to the short looped cable on the valve
and run to the remote release point over pulleys or
through conduit. Adjust the cable so that minimal
pull is required to close the emergency valves.
ME980-906-25 or ME980-906-50
Cable Installation
To connect an ME980 remote release assembly,
which is supplied with either 25' or 50' of cable:
1. Run the inner cable and housing assembly
to the remote release point. Leave enough
slack on each end for a smooth, flowing
path, without sharp bends in the cable,
between the ME980 latch and remote
release handle.
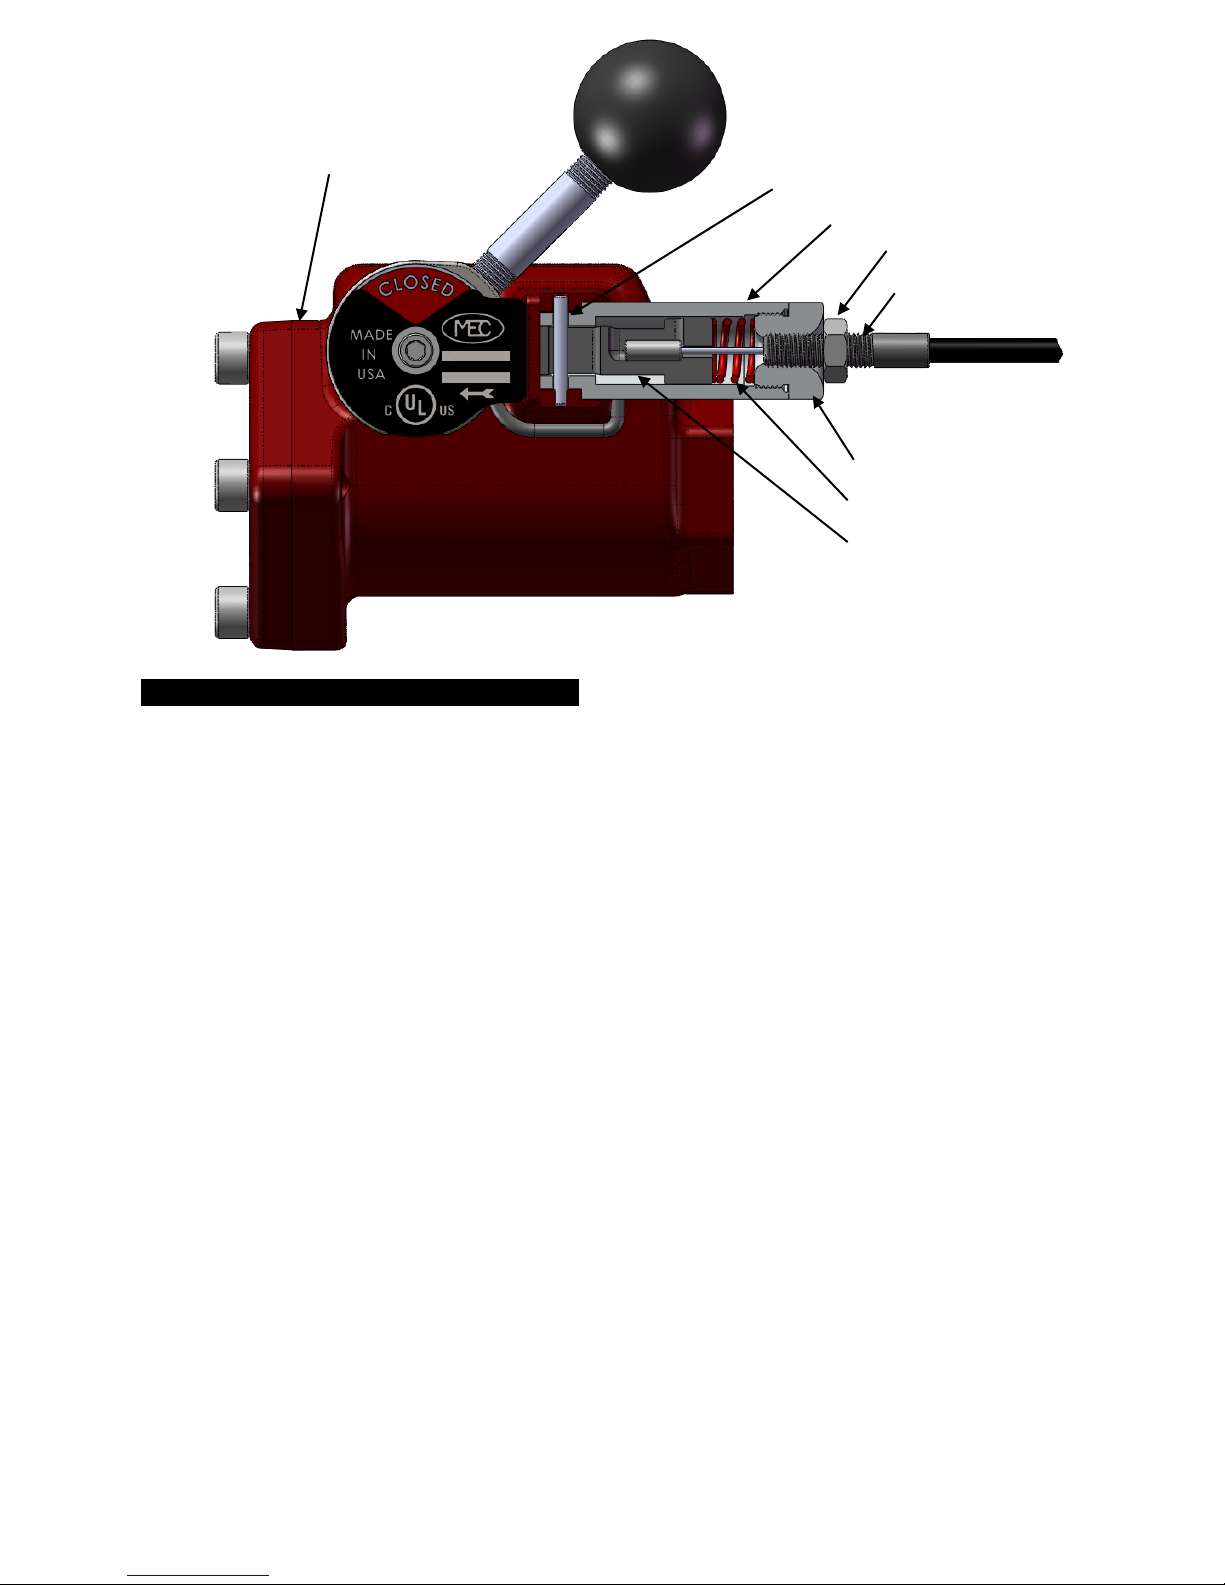
2. If it is necessary to cut the cable to a shorter
length, pull about one foot of inner cable
from the ME980 latch cable end (end with
the 3/16 by 1/2" long cylindrical cast fitting,
(see Figure 1) from the housing.
At the remote release end (other end of
inner cable housing assembly), cut the cable
jacket and inner cable at desired length.
Push the excess inner cable back through
the housing so that the bare cable extends
from the remote release end.
3. Close the ME980 valve
4. Unscrew the cable guide from the latch
body.
5. Remove the latch pin from the valve body
and remove the latch body from the valve
body.
6. Remove the plunger, spring and lanyard
(not shown).
7. Thread the cable guide onto the latch end
cable fitting and tighten the jam nut.
8. Install the spring on the cable and insert the
cable end in the plunger.
Latch Pin
Jam Nut
Cable Fitting
Plunger
Cable Guide
Figure 2
Plunger Spring
Latch Body
Valve Body
Valve Body
9. Install the plunger, spring and guide into
latch body and TIGHTEN SECURELY.
10. Align the slot in the plunger, insert the latch
body into the valve body and pin in place
with latch pin.
11. Mount the remote release bracket to a
suitable stationary support and mount the
remote release to the bracket.
12. At the remote release end, strip 3/4" of
vinyl cover from cable jacket.
13. Insert the inner cable end completely
through the remote release with pull
handle pushed all the way in. Release cable
should extend beyond the pull handle.
14. Pull any slack through the remote release
(with the pull handle pushed all the way in)
and TIGHTEN CABLE SET SCREW SECURELY.
15. Test the remote release and ME980
operation from the most remote location.
Rotate ME980 valve handle to open valve.
Valve must stay open. HANDLE AND VALVE
MUST QUICKLY "SNAP" CLOSED when (a)
the remote release cable is pulled, and (b)
ME980 valve handle is pushed closed from
the open position.
16. Cut-off excess cable from pull handle.
WARNING!
All open ME980 emergency valve(s) attached to the
remote release must properly close when the
release cable is pulled.
Maintenance
WARNING!
Only qualified service personnel should attempt to
repair these valves. Before starting any type of
repair, close off the upstream valves in the system
and remove all pressure from both the inlet and
outlet of the ME980 Emergency Shutoff Valve.
At least once a month, inspect and check the
following:
1. See that the remote release is properly
connected, works freely, and is not
worn. Operate the release to make
certain it closes the valve. If the valve
closes slowly, packing replacement may
be required.
2. Make sure that the lever, latch, and release
are working smoothly. The latch parts and
lever are easily accessible for replacement
or repair by removing the securing bolts.
3. Check for packing and joint leakage.
Remote Release
Release Bracket
Figure 4
Remote Release