Master Forge MFY784BDP User manual

MODEL #MFY784BDP
2-DOOR GAS SMOKER
Français p. XX
Español p. XX
Français p. 27
Español p. 53
ATTACH YOUR RECEIPT HERE
Serial Number Purchase Date
Questions, problems, missing parts? Before returning to your retailer, call our customer
service department at 1-800-963-0211, 8 a.m. - 8 p.m., EST, Monday - Friday.
ANS Z21.89-2013
CSA 1.18-2013
Outdoor Cooking
Specialty Gas
Appliances
Rev. 11/3
Master Forge & M Design® is a registered trademark
of LF, LLC. All rights reserved.
Lowes.com/masterforge
ITEM #0698105
70-10-557
AB15837

2Lowes.com/masterforge
TABLE OF CONTENTS
Safety Information ............................................................................................................... 3
Package Contents............................................................................................................... 6
Hardware Contents.............................................................................................................. 7
Preparation.......................................................................................................................... 7
Assembly Instructions.......................................................................................................... 8
Operating Instructions ....................................................................................................... 13
Care and Maintenance...................................................................................................... 21
Troubleshooting................................................................................................................. 23
Warranty............................................................................................................................ 24
Replacement Parts List ..................................................................................................... 25
Assembler/Installer: This instruction manual contains important information necessary for the
proper assembly and safe use of this appliance. Read and follow all warnings and instructions
before assembling and using this appliance. Leave these instructions with the consumer.
Consumer/User: Follow all warnings and instructions when using this appliance.
Keep these instructions for future reference.
DANGER: Failure to follow these instructions could result in explosion, or burn
hazard which could cause property damage, personal injury or death.
DANGER
If you smell gas:
1. Shut off gas to the appliance.
2. Extinguish open
3. Open lid.
4. If odor continues, keep away from the appliance
and immediately call your gas supplier or your
department.
1. Never operate this appliance unattended.
2. Never operate this appliance within 10 feet (3 m) of any structure, combustible material
or other gas cylinder.
3. Never operate this appliance within 25 feet (7.5 m) of any liquid.
4. Never allow oil or grease to get hotter than 400°F or 200°C. If the temperature exceeds
400°F (200°C) or if oil begins to smoke, immediately turn the burner or gas supply OFF.
5. Heated liquids remain at scalding temperatures long after the cooking process. Never
touch cooking appliance until liquids have cooled to 115°F (45°C) or less.
6. If a should occur, keep away from the appliance and immediately call your
department. Do not attempt to extinguish an oil or grease with water.
DANGER:
Failure to follow these
instructions could result
in explosion, or burn
hazard which could cause
property damage, personal
injury or death.
DANGER

3Lowes.com/masterforge
3
SAFETY INFORMATION
Please read and understand this entire manual before attempting to assemble, operate or install the
product. If you have any questions regarding the product, please call customer service at:
1-800-963-0211, 8 a.m. - 8 p.m., EST, Monday - Friday.
CALIFORNIA PROPOSITION 65
•Fuels used in gas or appliances and the products of combustion of such fuels contain
chemicals known to the state of California to cause cancer, birth defects or other reproductive
harm. This product contains chemicals, including lead and lead compounds, known to the state of
California to cause cancer, birth defects or other reproductive harm. Wash hands after handling.
•DO NOT use this product for anything other than its intended purpose. It is NOT intended for
commercial use. It is NOT intended to be installed or used in or on a recreational vehicle
and/or boat.
• Keep a extinguisher near this product at all times.
• This appliance is for outdoor use only in well-ventilated areas. DO NOT operate it in a building,
garage or any other enclosed area, or under overhead construction.
• A minimum clearance of 36 inches (92 cm) to combustible material is required on the front, sides
and back. It is very important to always maintain proper clearances to combustibles.
•DO NOT obstruct the of combustion air or ventilation air for the appliance.
• When cooking, the smoker must be on a level, stable noncombustible surface in an area clear of
combustible material, including tall or dry grass.
•Care should be taken to protect the fuel supply hose from damage from either pedestrian or
vehicle
•Clean and inspect the hose before each use of the appliance. If there is evidence of abrasion, wear,
cuts or leaks, the hose must be replaced prior to the appliance being used. The replacement hose
assembly shall be that by the manufacturer.
• Before each use, check that no dead leaves or debris are under the appliance.
• Store this appliance in a dry, protected location.
• The use of alcohol, prescription or nonprescription drugs may impair the user’s ability to properly
assemble and safely operate this appliance.
• Allow the smoker to cool to 115°F (45°C) before moving or storing. Use caution when lifting and
moving the appliance to avoid back strain or back injury. DO NOT move the appliance while it
is in use.
• Always hang the regulator on the tank retention wire while not in use or disconnected with the
LP (liquid propane) tank. KEEP the fuel supply hose away from any heated surface(s).
•DO NOT store and use this appliance near gasoline or other combustible liquids or where other
combustible vapors may be present.
•DO NOT use this appliance as a heater.
•DO NOT leave the appliance unattended while in use. Keep children and pets away from the
appliance at all times.

4Lowes.com/masterforge
SAFETY INFORMATION
• If you must dispose of ashes in less time than it takes for the ashes to completely cool down,
remove the ashes from the appliance,keeping them in heavy-duty foil and soaking them completely
with water before disposing of them in a noncombustible container.
• T his appliance will be hot during and after use. Use insulated oven mitts or gloves for protection from
hot surfaces or splatter from cooking liquids.
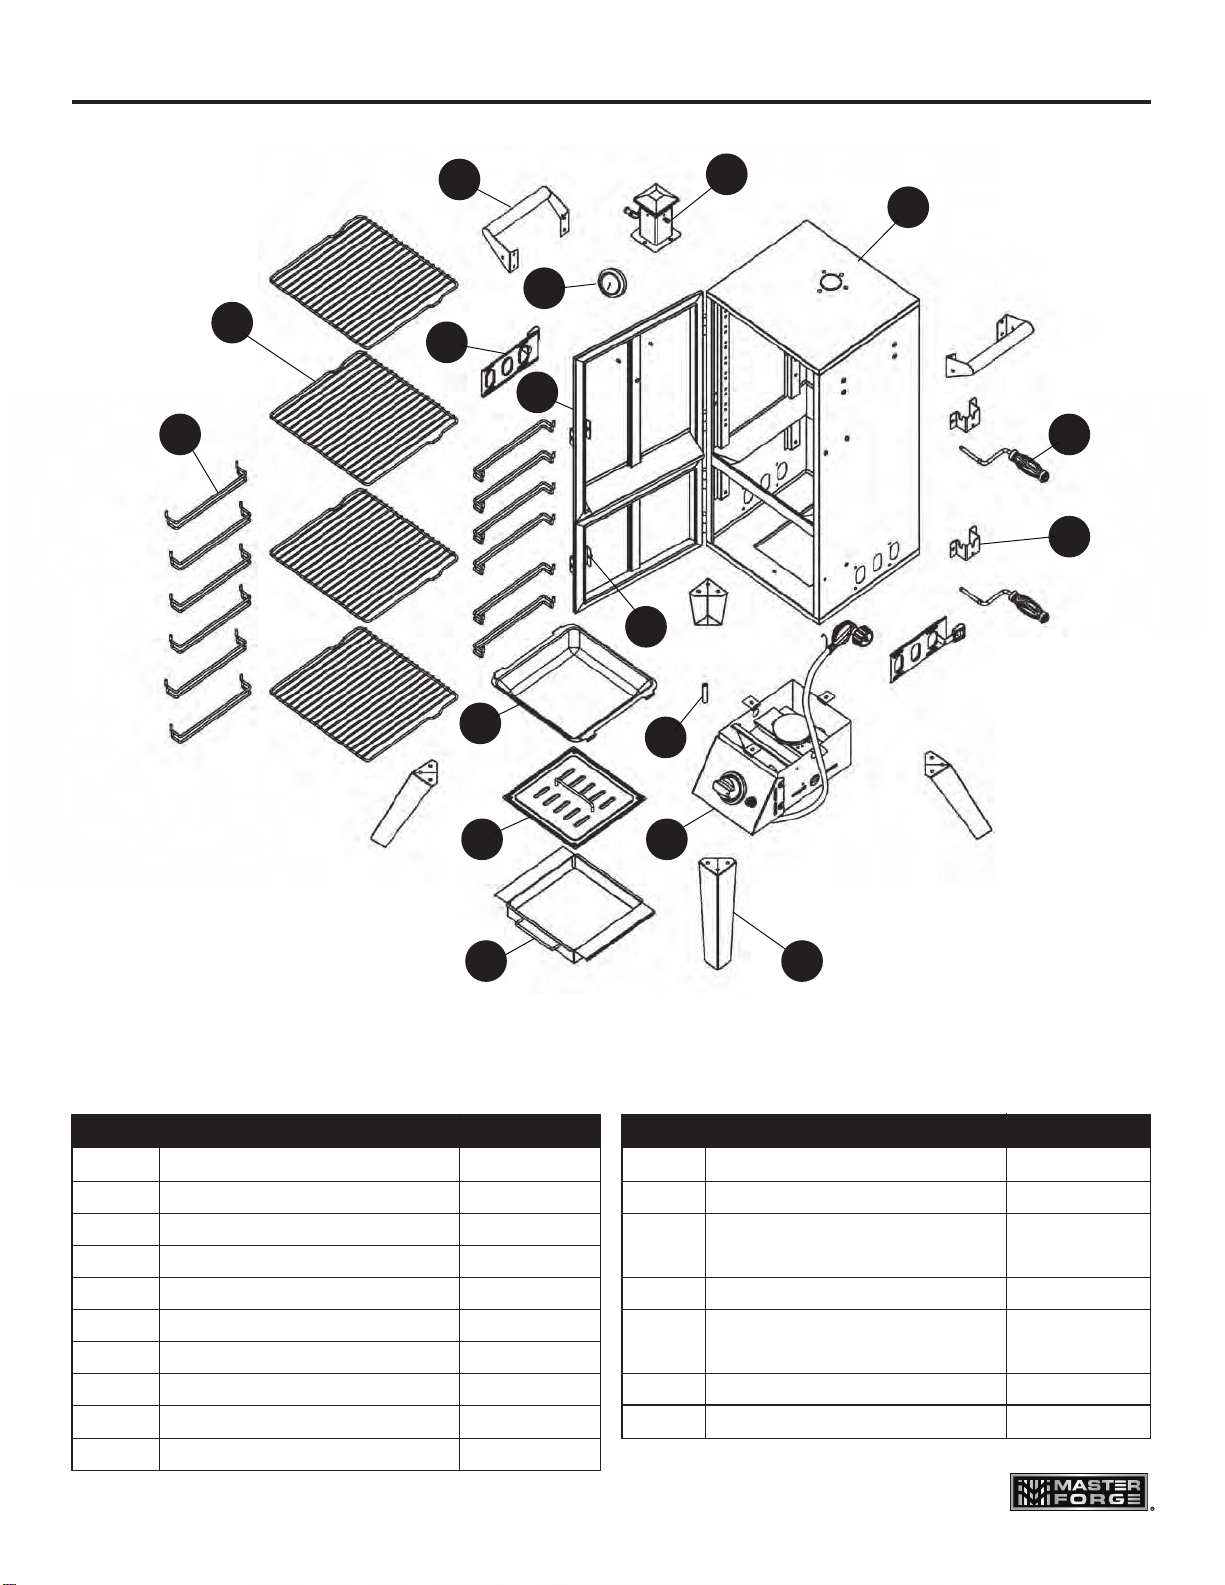
• Make sure that the of the control valve properly mates with the burner mixing tube by
visual observation. Please refer to maintenance section.
• Use caution when opening the door of the smoker while in operation. Keep hands, face and body
safe from hot steam or DO NOT inhale smoke.
• DO NOT wear loose clothing while operating the smoker. Tie back long hair while operating the
smoker. ALWAYS wear shoes that fullycover your feetwhile operating the smoker.
• A llow the smoker and its components to cool completely before conducting any routine cleaning
or maintenance.
• NEVER use glassware,plastic or ceramic cookware on or in your smoker.Use metallic cookware only.
• NEVER operate the smoker withoutwater in the water bowl. NEVER allow the water tocompletely
evaporate.Check the water level atleast every2 hours. Asizzling sound mayindicate a low water
level. Follow instructions in this manual for adding water while operating (see the Operating
Instructions section).
• W hen using wood, add a amount prior to operation to avoid having to add wood
while operating. Adding wood while operating may splash hotwater and cause seriousinjury.
• Use of accessories not intended for this smoker is not recommended and may lead to injury or
property damage.
• An LP cylinder not connected for use should not be stored in the vicinity of the smoker or any other
appliance. DO NOT store spare LP cylinderswithin 10 feet of the smoker.LP cylinders must be stored
outdoors,outofreach of children. DO NOT store LP cylindersin a building,garage or anyother
enclosed area.
• DO NOT store LP gas cylindersinside or on top of the smoker. Improper storage of cylinders could
lead to explosion, and/or personal injury. Cylinders are to be stored outdoors, out of reach of
children and mustnotbe stored in a building,garage or any other enclosed area.
• While the smoker is not in use, the gas must be turned off at the supply cylinder.
• LP gases are heavier than air, tend to pool and collect in low-lying areas, are easily ignited and are
highly Proper care and caution should be employed when dealing with any such fuels.
• The smoker should be turned off and all supply valves (on piping or on fuel cylinders) should be closed
in the event that the odor ofunburned gasisdetected.Do not attempt to use the appliance until any
gas leaks are and/or the source of the unburned gas odor is accounted for.
• DO NOT use the smoker if the burner fails to lightor fails to remain lit. Under such conditions, gas
should be turned offand the fuel cylinder should be disconnected.
• Use in high wind conditions that result in poor burner operation such as blowing out and should
be avoided. If repositioning the appliance doesnotimprove operation under such wind conditions, the
appliance should be turned off.
• Install the smoker with the hose regulator assembly extended the full length of the hose (24 in.
minimum) directly away from the appliance. When so configured, placement results in maximum tank
to smoker distance. When the smoker is operated, the hose/regulator and gas tank should be
perpendicular to wind direction. Placing tank closer than 24 in. to the smoker can overheat the tank
and cause release of propane through relief openings and can result in tank fire or explosion.

MINIMUM 24 IN. (610 MM)
5
SAFETY INFORMATION
• Read and follow all warnings and instructions before assembling and using the appliance.
• Follow all warnings and instructions when using the appliance.
NOTE: The installation must with local codes or, in the absence of local codes, with either
the National Fuel Gas Code, ANSI Z223.1/NFPA 54,Natural Gas and Propane Installation Code,
CSA B149.1,or Propane Storage and Handling Code, B149.2,or the Standard for Recreational
Vehicles, ANSI A 119.2/NFPA 1192,and CSA Z240 RV Series, Recreational Vehicle Code,as
applicable.
WARNING:The hose to tank
attachment creates a potential trip
hazard for user and pedestrians -
use caution. Do not allow or cause
the gas tank or appliance to tip.
Lowes.com/masterforge
(Tank not included)

PACKAGE CONTENTS
PART DESCRIPTION QUANTITY
A Leg 4
B Burner & Control Unit 1
C Wood Chip Box 1
D Wood Chip Box Lid 1
E Water Bowl 1
F Cooking Grate 4
G Door Locking Bracket 2
H Smoke Stack 1
I Smoker Body 1
J Lifting Handle 2
K Side Damper 2
L
Temperature Gauge
1
M Upper Door (Pre-assembled
to Smoker [I]) 1
N “AAA” Battery (1.5 V) 1
O Lower Door (Pre-assembled
to Smoker [I]) 1
P Door Handle (Upper & Lower) 2
Q Cooking Grate Support 12
PART DESCRIPTION QUANTITY
A
B
C
D
E
F
G
HI
L
M
Q
O
J
N
K
P
Lowes.com/masterforge
6

HARDWARE CONTENTS (shown actual size)
M6x12 Screw
Qty. 32
AA BB
Before beginning assembly of product, make sure all parts are present. Compare parts with
package contents list and hardware contents list. If any part is missing or damaged, do not
attempt to assemble the product.
Estimated Assembly Time: 25 minutes
Tools Required for Assembly (not included): Phillips Screwdriver, Wrench, and Pliers.
PREPARATION
M6x12
Shoulder
Screw
Qty. 8
Spring
Clip
Qty. 2
CC DD
M6 Nut
Qty. 8
Lowes.com/masterforge
7

ASSEMBLY INSTRUCTIONS
1. CAUTION: This unit is HEAVY! Do not attempt
this step without assistance!
With the assistance of a helper, turn the smoker
body (I) upside down on a stable, sturdy surface.
Align a leg (A) with the mounting holes on the
bottom of the smoker body and secure together
using 3 M6x12 screws (AA), threading them
through the holes from the outside of the unit.
Repeat for the other three legs. Tighten all screws
using a Phillips screwdriver (not included).
Hardware Used
AA x12
M6x12 Screw
2. Attach the burner and control unit.
Open the lower door of the smoker body (I).
Turn the burner and control unit (B) upside
down and place it on the bottom of the smoker
body (I), making sure the 4 mounting holes on
the burner and control unit (B) are aligned with
the holes on the smoker body (I). Note: The
control knob should be on the same side as the
door. Check that the burner is properly installed
on the orifice before attaching the burner and
control unit (B). Thread four M6x12 screws (AA)
through holes from outside of unit. Securely
tighten the unit to the bottom with a
Phillips screwdriver.
Hardware Used
AA x4
M6x12 Screw
Lowes.com/masterforge
8
2
I
B
I
AA
1AAA

ASSEMBLY INSTRUCTIONS
4. Install the cooking grate supports.
Insert the cooking grate supports (Q) into the
corresponding holes on rack of the shelf inside
the smoker body (I) from the bottom up.
NOTE: There are 8 positions to install the
cooking grate supports. The cooking grate
supports can be installed into positions
according to your needs.
3. Attach the smoke stack.
CAUTION: This unit is HEAVY! Do not
attempt this step without assistance!
Close the two doors. With the assistance of
a helper, stand the unit upright on its legs on
a firm and level surface. Open
the upper door. Position the smoke stack (H)
with control arm to the left as shown.
Attach the smoke stack (H) using four M6x12
screws (AA). Securely tighten with a
Phillips screwdriver.
Hardware Used
AA x4
M6x12 Screw
Lowes.com/masterforge
9
3
H
I
AA
4I
Q
Control Arm

ASSEMBLY INSTRUCTIONS
5. Attach the lifting handles. Insert four M6x12
screws (AA) through the mounting
holes on one of the lifting handles (J) and
into holes on right side of smoker body (I).
Use a Phillips screwdriver to secure the
handles to the smoker body. Repeat on left
side.
Hardware Used
AA x8
M6x12 Screw
6. Attach the side dampers.
Dampers (K) are installed from the inside of
smoker body (I). Thread the damper handle
through the back hole of the side damper slots.
Align the damper (K) with the mounting holes
and insert four M6x12 screws (BB) from the
outside of the smoker body (I). Secure each
screw with an M6 nut (DD) from the inside of
the smoker body (I). Use a Phillips screwdriver
and wrench to tighten the nuts and bolts. Do not
overtighten. Dampers must be able to slide easily
from side-to-side.
Hardware Used
BB x8
M6x12
Shoulder Screw
DD x8
M6 Nut
Lowes.com/masterforge
10
5
I
J
I
BB
K
DD
AA
6

Hardware Used
7. Attach the door locking brackets.
Align the door locking bracket (G) holes with
the holes on the upper right side of the smoker
body (I). Note: Slots on the brackets (G) must
be facing up. Thread two M6x12 screws (AA)
through the holes in the door locking bracket
and into the threaded holes of the smoker body (I).
Tighten the screws using a Phillips screwdriver.
Repeat on lower right side.
9. Install the wood chip box and lid.
Slide the wood chip box (C) onto the lowest
cooking grate supports inside the smoker body
(I) and put the wood chip box lid (D) on top.
AA x4
M6x12 Screw
8. Attach the door handles.
Slide door handle (P) through brackets
in upper door. Using pliers, slide a spring clip
(CC) over the groove in the door handle as
shown. Repeat on bottom door.
Make sure both of the spring clips are securely
attached in the grooves of the handles.
Hardware Used
CC x2
Spring Clip
ASSEMBLY INSTRUCTIONS
Lowes.com/masterforge
11
7I
AA
G
8
CC
M
O
P
9
I
C
D

ASSEMBLY INSTRUCTIONS
10. Install the water bowl.
Slide the water bowl (E) onto the cooking grate
supports inside the smoker body above the
wood chip box as shown.
11. Install the cooking grates.
Slide the 4 cooking grates (F) onto the top
cooking grate supports inside the smoker
body (I).
12. Mount the temperature gauge assembly.
Insert the probe of the temperature
gauge (L) through the middle hole of the upper
smoker door from the outside. Secure
with pre-assembled nut from inside
panel using wrench.
Lowes.com/masterforge
12
12
L
10
I
E
11
I
F

ASSEMBLY INSTRUCTIONS
CONNECTING THE LP TANK
WARNING! ALL INSTRUCTIONSAND SAFEGUARDS ON THIS PAGE MUST BE FOLLOWED
TO PREVENT FIRE, DAMAGE AND/OR INJURY.
1. The knob on the LP tank must be closed. Make sure that the knob is turned clockwise
to a full stop. The cylinder supply system must be arranged for vapor withdrawal.
2. Check that the control knob on the control unit is turned off.
3. Remove the protective cap from the LP tank valve and coupling nut.
4. Hold the regulator in one hand and insert the nipple into the valve outlet. Be sure the nipple
is centered in the valve outlet. The coupling connects to the large outside threads on the
valve outlet. Use care – do not cross thread the connection.
5. Hand tighten the coupling clockwise until it comes to a full stop. Firmly tighten by hand only.
Do not use tools.
Straight
CAUTION: In the connection
process, make sure the regulator
inlet connector mates with the
cylinder valve outlet properly,
safely and firmly.
13. To install the “AAA” battery (N), remove the
igniter button by turning it counterclockwise
and inserting the “AAA” battery (N) with the
positive end facing out. Reinstall the igniter
button by turning it clockwise and hand
tightening.
13
N
OPERATING INSTRUCTIONS
Lowes.com/masterforge
13

14 Lowes.com/masterforge
CAUTION: Make sure the hose is not touching the smoker body.
Any fuel supply cylinder used must be constructed and marked in accordance with
for propane cylinders of the U.S. Department of Transportation (DOT) CFR 49, or the Standard for
Cylinders, Spheres and Tubes for the Transportation of Dangerous Goods, CAN/CSA B339. The
appliance is to be used only with the 20-lb., vertical standing vapor withdrawal type tank and must
include a collar to protect the cylinder valve.
A. DO NOT store spare LP cylinders under or near the smoker.
B. NEVER cylinder more than 80% full.
C. DO NOT store cylinder indoors.
WARNING: ALL INSTRUCTIONSAND SAFEGUARDS ON THIS PAGE MUST BE FOLLOWED
TO PREVENT FIRE, DAMAGE AND/OR INJURY.
WARNING: If instructions A, B and C are not followed exactly, a causing death or serious
injury may occur.
This smoker is designed to operate on LP gas only. The gas cylinder used must include a collar to
protect the cylinder valve. The cylinder supply system must be arranged for vapor withdrawal. Do
not allow dirt or foreign material to get into or onto tank connection when it is not attached to the fuel
supply system. Use the protective cap provided.
WARNING: ALL INSTRUCTIONSAND SAFEGUARDS ON THIS PAGE MUST BE FOLLOWED
TO PREVENT FIRE, DAMAGE AND/OR INJURY.
The cylinder outlet must have Type 1 gas connection termination in order to mate with gas hose
provided with smoker. The pressure regulator and hose assembly supplied by the manufacturer with
the appliance must be used. Replacement pressure regulators and hose assemblies must be those
by the appliance manufacturer.
This unit is not to be utilized with a non-self-contained LP-gas supply system.
Valve/pressure regulators are factory set to the correct operating pressures. No attempts should be
made to adjust these settings.
OPERATING INSTRUCTIONS
Disconnect the LP Tank
Make sure that the knob on the LP tank is clockwise to a full stop (CLOSED).
Hold the regulator in one hand, turn the coupling to the valve outlet counterclockwise and unthread
the connection by hand only. Do not use tools.
Place dust cap on cylinder valve outlet whenever the cylinder is not in use. Only install the type of dust
cap on the cylinder valve that is provided with the cylinder valve. Other types of caps or plugs may
result in leakage of propane.
Always hang the regulator on the tank retention wire while not in use, disconnected from the LP tank,
and when the unit has cooled.

15 Lowes.com/masterforge
Checking for Leaks
After connections are made, check all connections and for leaks with a soap solution.
1. With all valves closed, apply the leak check solution (50/50 mix of dishwashing soap and water) to
all gas carrying connections and
2. Open tank valve.
Presence of bubbles at areas of wet solution indicates a gas leak. If leaks are detected or you smell
or hear gas, shut off the valve and repair the leak or replace the defective part. Do not use the smoker
until all leaks are corrected.
For vapor withdrawal, LP tanks are intended to be operated in the upright position only.
If the product is not in use, the gas must be turned off at the supply cylinder and the cylinder should
be disconnected from the appliance.
Storage of the appliance indoors is only permissible if the cylinder is disconnected and removed from
the appliance. Do not store cylinder indoors.
Before First Use
Remove all hangings or plastic straps, if present.
Before you cook food in your smoker, it is important to “season” your smoker. Seasoning seals the
paint and interior of your smoker to enhance durability and overall performance.
To season your smoker, simply use it as you normally would only do not cook any food. You will need
to follow all of the operating procedures in the next few sections of this manual.
Using your desired woods and marinades, burn your smoker at low temperature (around
175˚F / 79.4˚C) for 45 – 60 minutes. Let the smoker cool and clean out the water and wood.
Once seasoning is complete, your smoker’s interior will have a durable, seasoned coating.
Adding Water
To add water before cooking, simply remove the water bowl and it with water slightly below the rim.
Place the bowl back into the smoker. Adding water before cooking is recommended. To add water
while cooking, if a sizzling sound indicating lack of water is heard, or there is a need to add water,
open the bottom door with care and avoid taking in the smoke. Use a long nose kettle-like water can,
stand as far from the smoker as you can, the water bowl up to 1 inch below the rim.
CAUTION: DO NOT pull the water bowl out beyond the rack when the smoker is hot.
OPERATING INSTRUCTIONS

16 Lowes.com/masterforge
Cooking Tip
Line the water bowl with aluminum foil before each use. This will make it easy to clean and help your
water bowl last longer.
To make adding water easier and safer, use a clean watering can with a long spout.
Adding Wood Chips
To add wood chips before cooking, simply the wood chip box with your choice of
hardwood chips. The amount and type of wood you use is entirely dependent on the desired amount
of Once the box is place the lid on top of the box and set the box in the smoker.
To add wood chips while cooking, we recommend using tongs or long handled pliers to remove
the box lid and to place the pieces into the wood chip box without removing the box. It is not
recommended to remove the wood chip box while the smoker is in operation.
CAUTION: The wood chip box and lid get very hot. Avoid handling them while in use.Always
wear protective oven mitts when handling hot components.
• Small wood chips work best inside the wood chip box.
• Use dry hardwoods such as hickory, pecan, apple, cherry or mesquite.
• To produce more smoke and prevent fast burning, pre-soak the wood chips in a separate bowl of
water for at least 20 minutes, or wrap the chips in perforated aluminum foil.
•Most smoke occurs within the hour of cooking. Adding wood chips after the hour is
typically not necessary unless extra smoke is desired.
Always follow the manufacturer's recommendations for cleaning and care. Monitor your fuel supply.
Consider having a spare tank nearby as a back-up in case fuel runs out during the smoking process.
OPERATING INSTRUCTIONS

17 Lowes.com/masterforge
Tips on Smoking
Here's a list of the most popular smoking woods and information about each.
Type of Wood Suggested Food Comments
Apple All meats Mild and sweet with a slight hint of fruity Each
species of apple wood should give off a slightly different
Apple smoke produces an attractive browning effect.
Almond All meats Produces a sweet smoke with a natural nutty
Ash Fish and red meat Very light
Citrus Pork and chicken Lemon and orange wood produce light but fruity
Cherry Pork and beef Light and fruity
Fruitwood Pork, poultry and Wood such as peach, pear and plum produce a mild but
sweet smoke with a hint of fruity
Grapevine Poultry, game and
lamb Grapevine wood produces a lot of smoke. A little wood
goes a long way. It produces a tart that has a
hint of fruit.
Hickory Pork and beef Hickory produces very strong so we recommend
starting slow with this wood.
Maple Pork and poultry Light and sweet.
Mesquite Beef, chicken and This wood burns very hot so be aware. Much like hickory,
mesquite produces a strong
Oak Red meats, game,
ribs and Another wood that produces a heavy smoke.
Start slow with this wood.
Pecan Ribs and red meat Produces a light smoke that offers a sweet and nutty
OPERATING INSTRUCTIONS

18 Lowes.com/masterforge
Suggested Smoking Times and Temperatures
Please understand these are only guidelines. All smokers are different. Take into consideration other
variables such as weather conditions, wind, ambient temperature, etc., and things can vary by as
much as an hour or more.
Food to be Smoked Suggested Smoking
Temperature Estimated Time
to Complete
Brisket (sliced or pulled) 225˚ 1.5 hours/pound
Pork Butt (sliced or pulled) 225˚ 1.5 hours/pound
Whole Chicken 250˚ 4 hours (approx.)
Chicken Thighs 250˚ 1.5 hours
Chicken Quarters 250˚ 3 hours
Whole Turkey – 12 lb. 250˚ 6.5 hours
Turkey Leg 240˚ 4 hours
Meat Loaf 250˚ 3 hours
Spare Ribs 250–300˚ 6 hours
Baby Back Ribs 225–240˚ 5 hours
Corn 225˚ 1.5–2 hours
Potatoes 225˚ 2–2.5 hours
OPERATING INSTRUCTIONS

Match Lighting Procedure
1. Repeat steps 1 through 5 of the igniter lighting system.
2. Open both doors. Place a lit match on to the burner as shown below.
Quickly turn the control knob to the “HIGH” position. If the burner does not light in 5 seconds,
turn the control knob off, wait at least 5 minutes and for the gas to clear. Repeat the process.
19 Lowes.com/masterforge
OPERATING INSTRUCTIONS
LIGHTING INSTRUCTIONS
CAUTION: If the flame extinguishes accidentally during ignition or operation,
immediately TURN OFF the cylinder valve and then TURN OFF the control knob.
Igniter Lighting System
1. Check all connections for leaks using the “soap water” test as explained on page 14
for “checking for leaks.”
2. Open both of the smoker cabinet doors. Always keep the doors open during lighting.
3. Check for any blockage to the venturi tube or burner, damper setting, ventilation setting.
Remove any foreign objects or matter.
4. Be sure the burner control knob is in the
“OFF” Oposition.
5. Open the LP cylinder valve by turning
counterclockwise .
6. Push igniter on the control unit down 1 to
2 seconds then push and turn control knob to
“HIGH” , while still holding the ignitor button
down. At this point the burner should ignite.
7. If ignition does not take place within 5 seconds, immediately turn the control knob to OFF O.
Wait 5 minutes and repeat above steps 6 and 7.
8. If burner still fails to light, try match lighting using the instructions on page 18.
9. Once the burner is lit, close the doors to allow heat to accumulate. The smoke stack
on the top of the smoker can be adjusted to the desired setting to allow proper ventilation
and combustion. NEVER CLOSE THE SMOKE STACK COMPLETELY.

20 Lowes.com/masterforge
Cooking Tip–Damper Adjustments
WARNING: The dampers on the smoker body and the handle on the smoke stack may become
very hot while cooking. Always wear a heat resistant glove when adjusting.
• For best performance, rotate the smoker so that the front or back of the body is facing the wind.
This allows the adjustment of the dampers to be more effective and accurate.
• The twodampers on smoker body should never be fully closed.
• Opening the damper of the smoke stack helps to exhaust both the heat and smoke.
• The key to effective smoking is to watch your heat indicator on the door and adjust the damper
accordingly.
• Temperature maintenance is best controlled by different damper adjustment
Turning off the Smoker
CAUTION: The smoker can become very hot while in use. Do not touch any portion of the
smoker except for the door handle and burner control knob. It may be necessary to use
protective gloves.
1. Turn the burner control knob off by pushing in and rotating to “OFF”. The burner should go
out.
2. Turn off the LP cylinder valve by turning the knob clockwise until it cannot go any farther. Follow
all warnings and safety precautions before removing meat from smoker or preparing the unit for
storage.
Adding Wood Chips
Additional wood may be required to maintain or increase cooking temperature.
WARNING: Use caution since can when fresh air suddenly comes in contact
with When opening the door, keep hands, face and body a safe distance from hot steam
and
1. Stand back and carefully open smoker box door allowing heat and steam to escape away from
your face. Use caution since can when fresh air suddenly comes in contact with
Inspect the level in pan.
2. Wearing retardant oven mitts/gloves, stand back a safe distance and use long cooking tongs
to lightly brush aside ashes on hot coals. Use cooking tongs to add wood to pan, being careful not
to stir-up ashes and sparks.
WARNING: Never add charcoal lighting to hot or even warm coals as may occur
causing severe burns.
3. Close smoker box door and allow food to continue cooking.
Allow the ashes to completely cool before reusing or cleaning the smoker.
OPERATING INSTRUCTIONS
This manual suits for next models
1
Table of contents
Languages: