Master Tailgaters MR-50-C1 User manual

Rear View Mirror Clip on with HD 1080p 140° Dash Cam, 5" IPS LCD
Screen, Collision Sensor, Parking Monitor and Backup Camera
User Manual
Model: MR-50-C1
Master
Tailgaters

CONTENTS
The packaging should contain the following items, please contact Master Tailgaters as soon as possible
if anything is missing.
1. Rear View Mirror
2. Backup Camera
3. Cigarette Lighter Power Adapter
4. Backup Camera Wiring
5. Mirror Attachment Straps
6. Cleaning Cloth
SPECIFICATIONS
Built-In Image Sensor 1200W
Resolution of Rear Camera 640x480
Lens Angle 140
Video Resolution 1080p and 720p
Image Resolution 1920x1088
Storage and Compression Method MJPEG
Video Format AVI
Image Format JPEG
Storage Temperature -4° ~ 158°
Operational Temperature 32° ~ 122°
Operational Humidity 15-65% RH
Standard Voltage DC5V

BUTTON FUNCTIONS
1. Power Button
2. Mode Button
3. Up Button
4. Down Button
5. Ok Button
6. Menu Button
7. USB Port
8. Backup Camera Port
9. Micro SD Card Slot
10. Reset Button

BUTTON FUNCTIONS
Power Button
Function 1: Power On and O
When the mirror is o, press and hold the power button for 2 seconds to power on the mirror.
When the mirror is on, press and hold the power but ton for 2 seconds to swtich o. Note the
video file will automatically be saved.
Function 2: Turn Screen On and O
In stand-by mode, press the power button to turn o the screen and again to turn the screen on.
Mode Button/Emergency Lock Button
Function 1: Emergency Lock
During recording press the mode button to start the emergency lock function. A lock icon will appear on
the upper part of the screen indicating that the video is locked and will not be overwritten.
Function 2: Mode Switch
In stand-by mode, press the mode button to switch between video, recording, photograph, and replay
modes.
Up Button/Rewind/Camera Switch
Function 1: Page Up
In the menu and replay modes this button will move up a menu item.
Function 2: Rewind
In replay mode short press the up button to rewind the footage.
Function 3: Camera Switch
In recording mode, short press the up button to switch display modes (picture in picture mode, front
camera, or rear camera). In photo mode short press the up button to switch between the front camera
and rear camera. Note: The backup camera will need to be installed in order to see the rear camera
display.
Down Button/Sound Recording/Fast Forward/
Parking Monitor
Function 1: Turn O Sound Recording
In video recording mode short press the down button to o the sound recording. The Microphone icon
on the lower left of the screen will be crossed out to show that the sound is not being recorded. Short
press the down button again to re-enable sound recording.
Function 2: Page Down
In the menu and replay modes this button will move down a menu item.
Function 3: Fast Foward
In replay mode short press the down button to fast forward the footage.

Function 4: Parking Monitor
In standby mode long press the down button to turn on or o the parking monitor function.
Ok Button/Video/Image/File Play
Function 1: Turn On or O Video Recording
In video recording mode short press the ok button to start video recording. Press again to stop record-
ing.
Function 2: Take Picture
In photo mode short press the ok button to take a picture.
Function 3: File Play
In the file browse mode short press the ok button to play video.
Function 4: Confirm
In video recording, photo, or replay modes press the menu button to enter the main menu mode, press
the up/down buttons to browse menu items, and use the ok button to confirm.
Menu Button
In standby mode press the menu button to enter the main menu. Press the
button again to exit the menu.
Reset Button
When the device is not responding it can be reset by pressing the reset button on the back device.
INSTALLATION INSTRUCTIONS
1. Shut o the vehicle’s engine.
2. Insert the Micro SD card into the card slot on top of the mirror.
Note: The Micro SD card needs to be a high-speed class 6 or above with a capacity between
512MB and 32GB.
3. Using the included straps attach the mirror over the exisiting rear view mirror of the car.
4. Plug the power cable into the vehicle’s cigarette lighter.
5. Connect the mini USB cable end of the power cable into the mirror.
Note: The wire can often be tucked between the ceiling panel and windshield in most cars
6. Install the backup camera at the rear of the vehicle. Installation will vary from vehicle to vehicle,
guides for most vehicles will be on the internet or you can consult a trained professional.
7. Start the vehicle’s engine to check if the backup camera turns on when the car is in reverse and the
DVR starts recording both front and back footage. When installed correctly the charge indicator will be
on, the video indicator will flick, and the recorder will start.

FUNCTIONS
Automatic Recording Function
When the vehicle’s engine is started the recorder will automatically start and the charge system along
with the charge indicator will be on. The vidoe indicator icon will flicker. When the engine is stopped
the recorder will automatically save the recording to the Micro SD card in segments and stop recording
automatically. When the Micro SD card is full earlier footage will be overwritten.
The recording interval can be set up in the menu, with options of 1 minute, 2 minutes, 3 minutes, and o.
If the recording interval is set to 1 minute, 2 minute, or 3 minutes the recorder will overwrite previously
recorded video once the Micro SD card is full. If the recording interval is set to o, the recorder will save
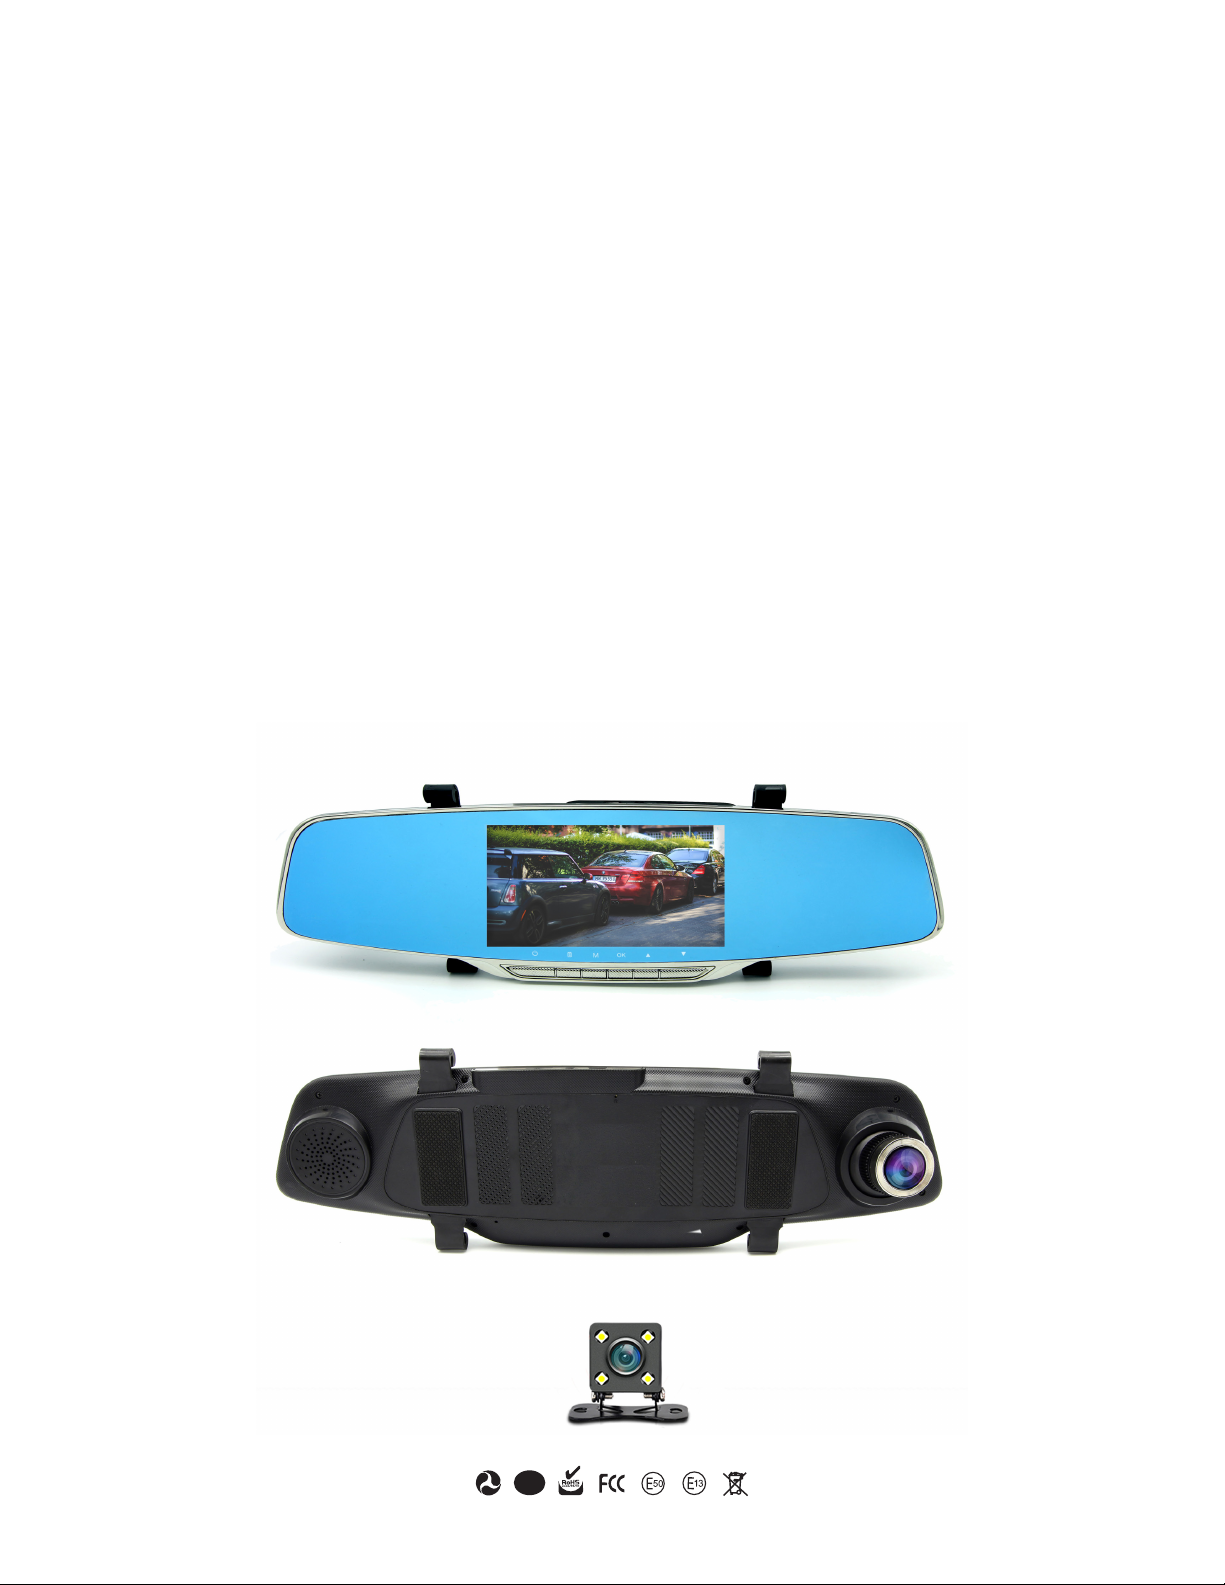
file segments every 5 minutes and stop recording once the Micro SD card is full. Front camera video is
saved in the DCIMA folder and backup camera video is saved in the DCIMB folder.
Manual Recording Function
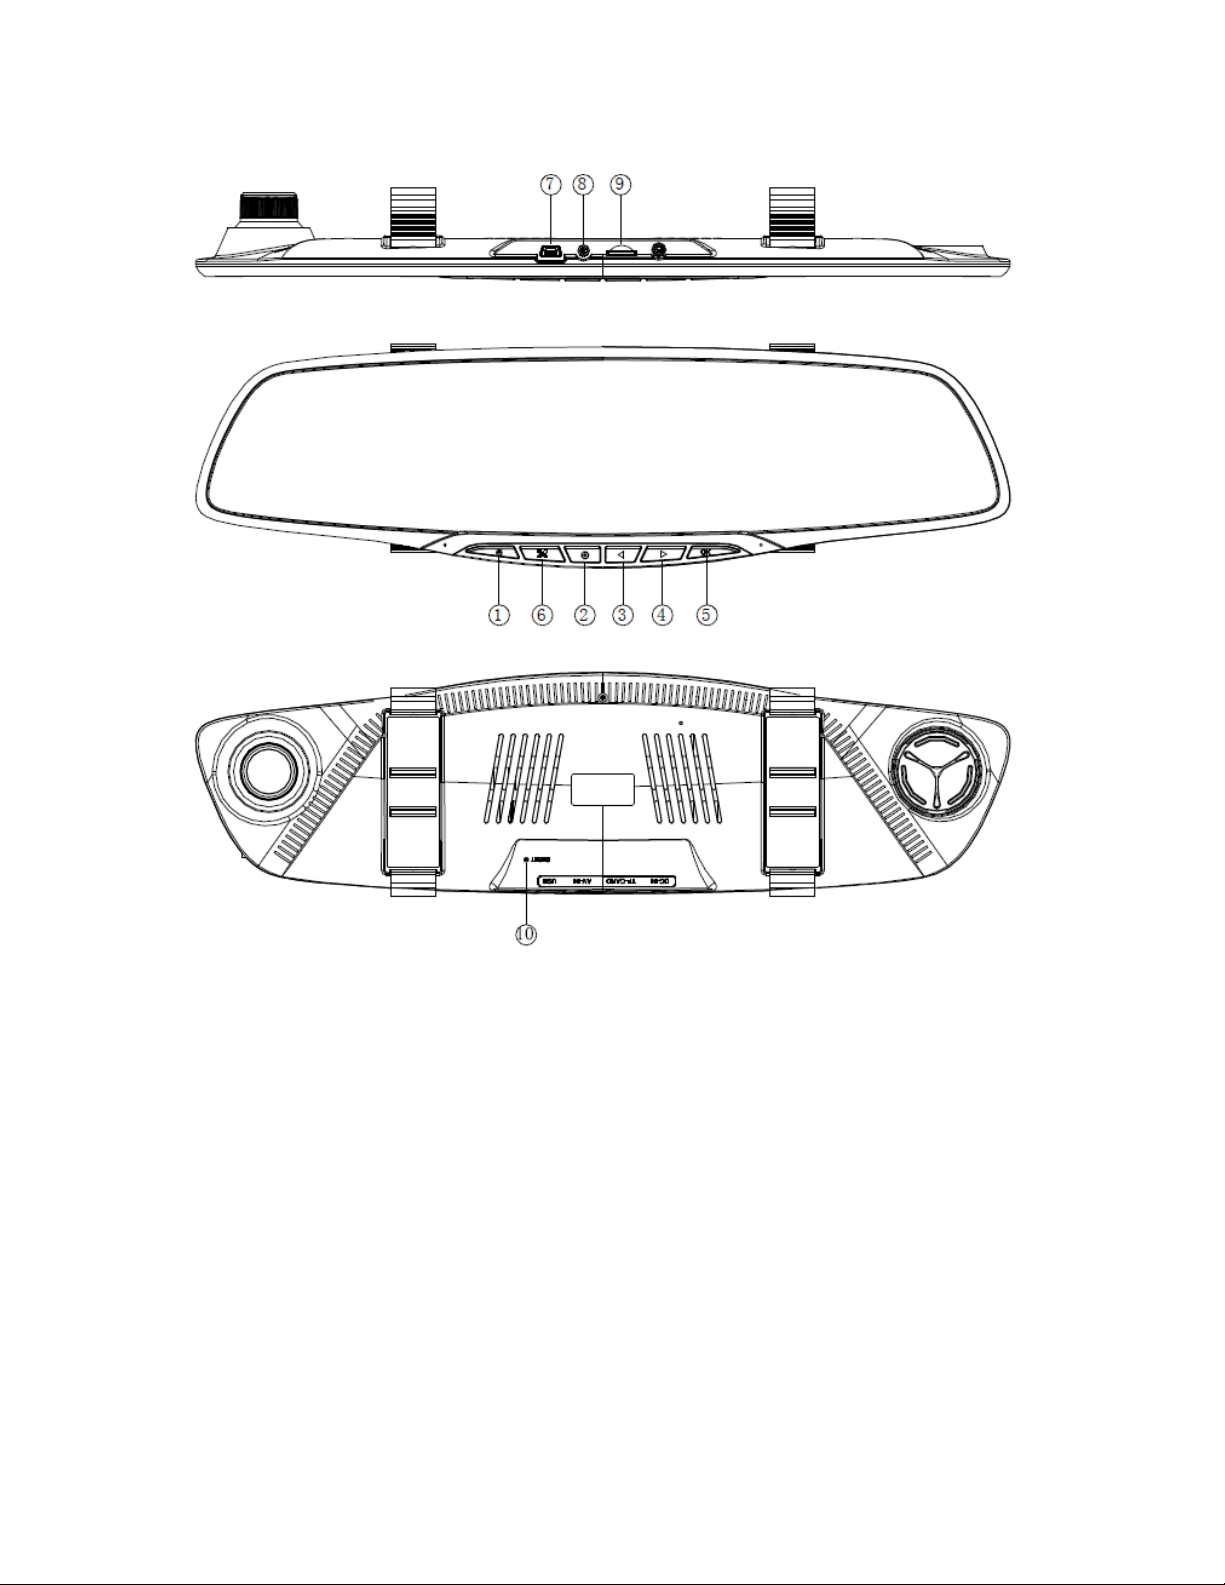
Press the power button on the mirror to activate the recorder and start automatic recording. Press and
hold the power button again for 2 seconds, the mirror will automatically save the video and power o.
Picture Function
If the mirror is powered on press the mode button to enter the photo mode. In the upper left corner of
the screen the video recording icon will change to the image icon. Press the ok button to take a picture.
To switch back to video mode press the mode button twice.
Collision Sense Function
A built in G-sensor will detect motions that indicate a collision has occured and will automatically lock
the recorded video from the incident. A lock icon will appear on the upper left screen. This video will not
be overwritten. The filename of locked footage begins with SOS (whereas regular files would begin with
REC). In the menu options the senstivity of the g-sensor can be adjusted.
One Button Lock Function
To protect the video from being overwritten press the mode button while in video recording mode and
that footage will be locked.
Date and Time Setup
In the standby state, press the menu button to enter the system setup menu. Press the up/down buttons
to move to the date setup option, then press the ok button. Adjust the date and time using the up/down
buttons. Press the ok button to switch between date and time.

One Button Mute Function
While the camera is recording press the down button, the microphone icon on the lower left screen
while to turn on sound recording. Press the down button again to turn o. This option will be saved
automatically (either muted or un-muted).
U-Disc Mode
The mirror can be connected to a computer with a USB cable. When connected the screen will display
three options: mass storage, PC camera, and REC mode. With the up/down buttons select the mass
storage option and press ok to enter the u-disc mode.
Replay Mode
In the power on state, press the mode button twice to switch to replay mode. Press the up/down but-
tons to find the desired file, then press the ok button to play the file. To exit press the mode button
again.
Backup Camera Display
If a backup camera is connected to the mirror and wired to the reverse light the mirror will display the
backup camera view when the vehicle is in the reverse gear.
Parking Monitor
When the parking monitor function is turned on and the mirror is powered o slight vibrations to the
vehicle the mirror will record video automatically.
Table of contents
Other Master Tailgaters Automobile Accessories manuals