MasterTop 156016XX User manual

Loss of vehicle control involves risk of death or serious injury, particularly to parts of your body not
restrained within vehicle. This product is intended for weather protection only and should not be relied
upon to contain occupants in the event of an accident or to protect from either ground contact or fall-
ing objects. To reduce risk of accident or injury:
•ALWAYS WEAR SEATBELTS
• Always keep head, arms & body parts within vehicle.
• Fully secure or stow the soft top before driving according to instructions. Never try to latch or fold
soft top while driving. Do not use if damaged or worn.
• Read and follow all instructions & warnings accompanying this product, in your vehicle owner’s
manual and O Road Driving Supplement.
RISK OF EYE INJURY. Safety glasses should be worn at all times while installing or maintaining this
product.
Part List:
Top Deck/Header and Rear Bows assembly-QTY 1
Driver side quarter Window - QTY 1
Passenger side quarter window - QTY 1
Rear window - QTY 1
Center bow assembly- QTY 2
Driver side door surround- Qty 1
Passenger side door surround- QTY 1
Door surround Rubber - Qty 2
Door Surround Screws - Qty 4
Door surround knobs-QTY 8
Tailgate Bar - QTY 1
Tailgate Bar Corner Mounts - QTY 2
Corner Mounts short knobs - QTY 2
Rear bow screws & nuts - Qty 4
Rear bracket screws & nuts - Qty 2
Rear Main bracket screws and nuts - Qty 2
4mm Allen Wrench - QTY 1
Rear Main Bracket Screws M6 - Qty 4
5mm Allen Wrench - Qty 1
Required Tools:
Safety glasses
Socket wrench
10mm socket & driver
Phillips head screw driver
WARNING
CAUTION
Installation Instructions
MasterTop Complete Soft Top for 18-Current
Jeep®JLU 4Dr. Wrangler
Item #156016XX

Important Safety information
Your MasterTop® Complete Soft Top is intended to increase the utility and enjoyment of your o road
capable vehicle. Before installation, please take a moment to review the following safety information and
installation instructions. Important safety information is generally preceded by one of three signal words
indicating the relative risk of injury.
A hazardous situation which, if not avoided, could result in death or serious injury. You CAN be KILLED
or SERIOUSLY HURT if you don’t follow instructions.
WARNING
CAUTION
NOTICE
A hazardous situation which, if not avoided, could result in minor or moderate injury. You CAN be mod-
erately HURT and also may suer property damage if you don’t follow instructions.
Careful attention is required to this instruction or operation but does generally not relate to personal
injury. Damage to your Mastertop® product or other property may result if you don’t follow instruc-
tions.
For a smooth t and ease of installation, this top should be installed at temperatures above 72 de-
grees. Below this temperature, the fabric may contract an inch or more making it dicult to install.
We highly recommend taking the top out of the package and letting it sit inside a warm place or direct
sunlight for 1-2 hours before you install the top. When warm, this top will install quickly.
NOTICE
2
When unpacking, carefully check to make sure all parts are included.
If any part is missing or broken, please call MasterTop customer service at 720-575-5440.
Step 1: Un-packing & Organizing the Door Surrounds:
Put on safety glasses. Carefully remove all the contents of the large shipping box onto a table top or onto
the grown on top of a soft towel.
Before you begin Installation:
Congratulations on your purchase of the MasterTop Complete Soft Top! This high quality soft top is
designed to provide years of protection from whatever nature can throw at you! We have used only the
finest materials in creating this soft top but like any product that is exposed to the elements, there is
some general maintenance that is required to keep your Top looking like new. Please see page 13for
these important maintenance tips.
Thank you again for your purchase and let’s start the installation process!
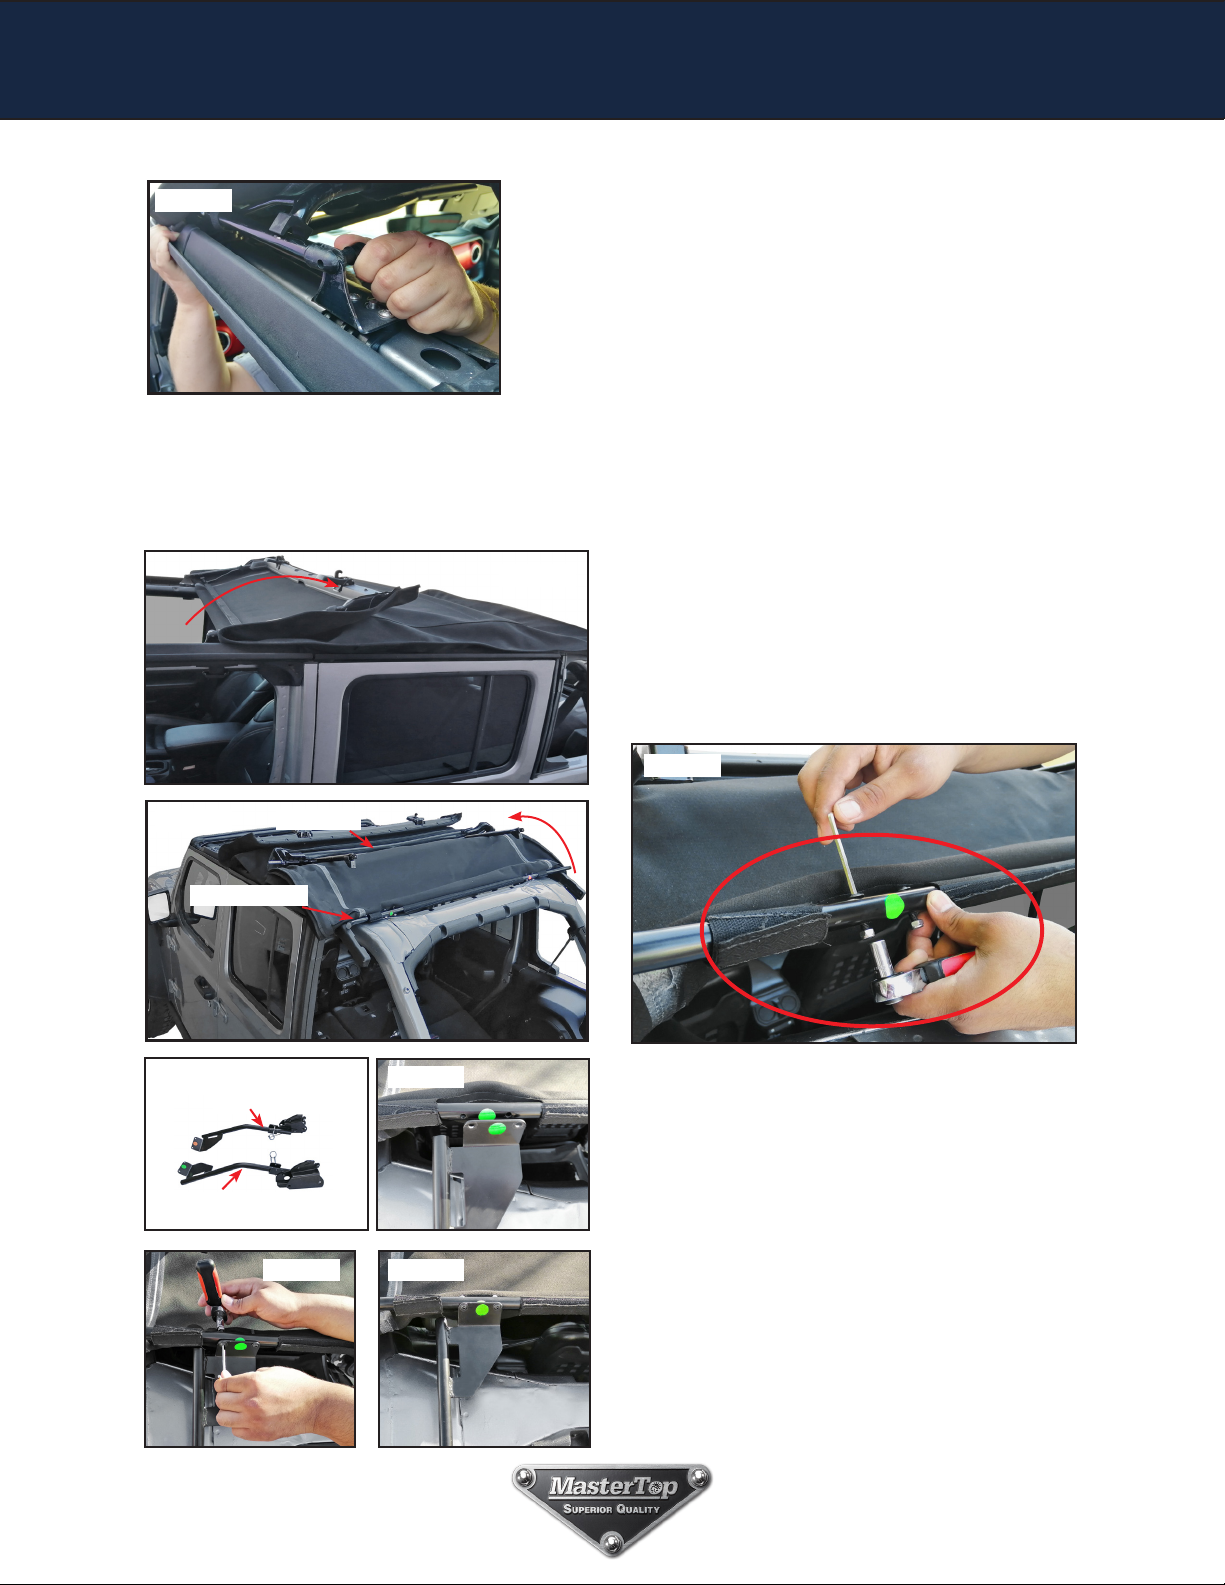
Once the components are removed from the shipping box, locate the front and rear door surround com-
ponents and accessories as shown in FIG1.
Carefully remove the contents of each box organizing them as shown in Fig.1 making sure the passen-
ger side and driver’s side components are separated.
The signal words mean
FIG 1
Driver Side Door Surround
Knobs
4mm Allen
Wrench
Passenger Side Door Surround

3
FIG 2
Step 2: Rear Over Door Surround Assembly
Passenger
side Pillar
Assembly
Driver
side Pillar
Assembly
Passenger side
Rear Over-Door
Assembly
4mm Allen
Wrench
FIG 3 FIG 5
Passenger Front door surround
Driver Front door surround
Driver side Rear Over-Door
Assembly
Locate the assembled Driver’s side rear door sur-
round (Fig 6).
On the bottom of the vertical pillar portion of the
assembled door surround are two pins as shown
in FIG 7 that will be inserted into the body tub.
Step 3: Install Rear Door Surrounds to Jeep
FIG 6
FIG 8
Insert this pin into the body tub as shown in FIG’s
8 & 9.
Repeat this procedure on the passenger side rear
door surround.
FIG 9
FIG 7
FIG 4
Rubber
Seal
Locate the driver’s side rear over door assembly,
the driver’s side Pillar assembly, The Rubber seal
and the 4mm Allen head wrench (Fig 2).
On the driver’s side rear over door assembly,
there are two screws installed for shipping (Fig 3).
Remove thesescrews and set aside.Place the
rubber seal on the driver’s side pillar assembly
(Fig 3A) Line up the Driver side pillar assembly
and the driver side rear over door assembly as
shown in fig 4. Insert the screws and tighten using
the included 4mm Allen wrench securing the two
pieces (fig 5).
Repeat the above assembly on the passenger
side rear over door and pillar assemblies.
FIG 3A

4
Step 4: Secure Front & Rear Door Surrounds to the Roll Bar
Locate the two sets of screw knobs and the driver’s
side front and rear door surrounds. There should
be 2 sets of four knobs. These knobs go
on the front and rear holes of the Brackets pre-
viously installed in step 3 on the door surrounds.
Line up the front driver’s side door surround
bracket holes with the vertical holes in the over
door horizontal roll bar. Slip the front two knobs
through the brackets holes in the front door
surround (FIG10) lining it up with the hole in the
top of the surround bracket on top of the front
horizontal roll bar. If you use a rolling motion while
you push the brackets on it will be easier to install.
Loosely tighten each of the knobs securing the
front door surround. Note: if you have difficult lining
up the top of the knobs with the upper bracket hole,
you can remove the installed top brackets covering
the top hole to get a better view of how the screw
lines up. Repeat on the passenger side of the
vehicle.
FIG 10
FIG 11
Step 5: Secure Front & Rear Door Surrounds to the Roll Bar Continued
Line up the rear end of the front door surround
with the front of the rear door surround as shown
in g 12. Make sure the rear door surround seals
are on top of the front Door Surrounds as shown
in Fig 13. Line up the rear door surround
bracket holes with the vertical holes in the
rear horizontal roll bar. If you use a rolling motion
while you push the brackets on it will be easier to
install. Slip the two knobs through the brackets
holes in the rear door surround. Loosely tight-
en the knob securing the front door surround.
Note: if you have dicult lining up the top of
the knobs with the upper bracket hole, you can
remove the installed top brackets covering the top
hole to get a better view of how the screw lines
up. Repeat on the passenger side of the vehicle.
FIG 12
FIG 13

5
Step 6: Installing the Center Bow #1 & #2
Locate the center bow #1 (Fig 14). Each Bow has
been labeled to make identication easier. Loos-
en the screws holding on the top brackets. With
the help of a friend, place the Quick release end
on the bottom of the bow leg over the second ver-
tical bracket (Fig 15). Pull the quick release knob
out and push the bow down mounting the quick
release to the bracket. The quick release knob is
spring loaded so you should here a “click” when
it is secure in the bracket (Fig 16). once the bow
is installed, tighten the bow mount bracket on the
door surround.
FIG 14
FIG 15
FIG 16
Center Bow #1 Center Bow #2
Repeat this bow mounting on the other side of the
vehicle and then repeat the above procedure with
center bow #2 (FIG 14). Tighten down the door
surround knobs on each side of the vehicle secur-
ing the Door surrounds and the two bows.
Step 7: Installing the Deck and Front Windshield Header
With the help of a friend you will need to lay the
entire top deck assembly onto the vehicle with the
topping fabric/vinyl facing up and the front header
resting on the windshield (Fig 17). Locate the two
rear bow arms attached to the front windshield
header (Fig 18).
FIG 18
FIG 17

6
Step 9: Installing the Rear Legs to the Rear Bow
FIG 18
FIG 19
The bow arms will install to the front bow mount
brackets located on the top of the door sur-
rounds. Loosen the bow mount brackets mounted
on the door surround. With the help of a friend, lift
each of the bow legs over the bow mount bracket
(Fig 19). Once lined up with the bow mount bracket,
install the header assembly by pulling out the quick
release knob and push over the mount until you
hear a “click” (Fig 19). The front header should now
easily rest on top of the windshield when folded
down. Tighten the Bow mount brackets on the front
door surround.
Step 8: Installing the Deck and Front Windshield Header Continued
With the front header folded back towards
the rear of the vehicle (Fig 20), and the rear
bow #3 folded to the front (Fig 21). Locate the #4
rear bow.There is a screw and nut installed for
shipping (Fig 22). Remove this screw and nut
using a 10mm socket and the included 5mm Allen
head tool and set aside.
Rear bow #4
FIG 20
FIG 21
FIG 22
Driver side rear leg w/rear
main Bracket
Passenger side rear leg
w/rear main Bracket
FIG 23 FIG 24
FIG 25 FIG 26
Locate the rear leg with rear main bracket installed
for shipping (Fig 23). Line up the driver’s side rear
leg with main bracket to the rear bow #4as shown
in g 24.
Insert the previously removed screw to the hole
and place the nut to the screw and tighten with the
included 4mm Allen wrench to secure as shown in
g 25 & 26.
Repeat the above on the other side of the vehicle
Repeat on the passenger side.
Rear bow #3

FIG 27
Step 10: Installing the Rear Main Bracket to the Vehicle
7
On the rear sport bar, pull o the plastic bracket
that comes with the jeep, there is two metal clips
that hold it in place (Fig 27).
Line up the rear main bracket over the holes (Fig
28). Insert the M6 screws and using the included
5mm Allen head tool, tighten the bracket in place
(Fig 29).
FIG 28
Make sure the pin secure the rear leg as shown in
g 30 & 31.
FIG 29 FIG 30
Pin securing leg
FIG 31
Step 11: Installing the rear bow with leg to the main bracket
FIG 32 FIG 33 In the Driver’s side rear main bracket, there is
a screw and nut installed for shipping (g 32).
Remove this screw and nut, and set aside. Place
the Driver rear leg to the main rear bracket (g 33
& 34).
Nut & Screw
Make sure the holes of the rear leg and main
bracket line up (g 34). Insert the screw and nut
previously removed using a 10mm socket and the
included 4mm Allen head tool. Tighten and secure
the bracket (g 35).
Rear Bow #4
Rear Leg
FIG 34
FIG 35
Repeat this procedure on the passenger side.
Repeat this procedure on the other side of the
vehicle

8
Step 12: Installing the Top Deck
FIG 36
FIG 38 FIG 39
FIG 37
FIG 40 FIG 41
Square Bracket
Once the rear bow is installed (Step 11), SLOWLY
fold the front header down resting the windshield
header on the windshield (g 38). The rst time
you fold this header down it will be very tight.
Make sure before you fold down the header that
the front two header corner pockets are in place
and not lifted up over the header.
Repeat on the passenger side
FIG 42 FIG 43
Step 13: Installing the Side quarter window
Locate the driver side square bracket on the rear
driver door surround as shown in g 37. Secure
the deck to the bracket by rolling the plastic into
the slot on the bracket (Fig 39). With the header
resting on the windshield, close the front header
latches to secure the front of the top to the wind-
shield. See FIG’s 40 & 41.
Locate the drivers rear quarter window. Line up
and slide the rear quarter window into the “C”
Channel sewn on the Top Deck as shown in FIG’s
42 & 43
Repeat on the passenger side
Step 14: Attaching the Corner Mounts and Tailgate Bar
Locate the corner mounts and two short knobs
(FIG 44). Locate the driver’s side corner mount
and line up with the corner of the body tub. With
the short knob, secure the corner mount to the
body tube and tighten. See Fig’s 45 & 46
Repeat this procedure on the passenger side.
FIG 44 FIG 45
FIG 46

9
FIG 47a FIG 48 FIG 49
Step 15: Insert the side corner window
Locate the rear window and line up and slide the
rear window into the “C” Channel located at the
top of the rear portion of the top deck and slide it
across (FIGs 50 & 51).
Once both quarter windows and the upper portion
of the rear window are secured to the top deck,
line up the driver’s side rear zipper on the Quarter
window to the zipper on the rear window and zip it
down a few inches (FIG 52).
FIG 51
FIG 52 Repeat this on the passenger side of the rear win-
dow. You may have to lift the quarter window up to
secure this second zipper a few inches. Once both
side zippers are attached, zip the rear window
zippers down about half way (Fig 53).
You will close these zippers completely at the end
of the install.
Go inside the vehicle and locate the second and
third center bow hook and loop ap sewn into
the top deck. Wrap this ap around the second
& third center bow securing the top deck to the
bows (FIG 54).
FIG 50
FIG 53
FIG 54
On the rear of the quarter window there is a corner support installed. The quarter window corner support
will engage with the plastic piece up in the in the soft top (fig 47 & 47a). Once the upper is secure, in the
bottom of this corner support is a tab that locks to the corner bracket mount installed in step 14, see Fig
48 & 49).
Repeat on the passenger side.
Step 16: Installing the Rear Windows
FIG 47
Corner
support

9
FIG 63 Each Time you remove the windows:
Completely pull the windows out of the “C” Channel
before pulling the windows down!
Do not “Peel” the windows out. See Fig 55.
There may be times when the “P” extrusion may come out of the “C” Channel ends due to
extreme downward pressure. This is normal. If this occurs, slide the “P” extrusion out of
the C channel and re install securing the window back into the “C” Channel.
NOTICE
When removing the quarter and rear windows from the Top deck be sure to slide them out
completely before pulling down. Disengage the side hook and loop before sliding the win-
dows out. DO NOT “Peel” the windows out! Failure to completely disengage the windows
from the “C” Channel will damage the Top and quarter window!
NOTICE
FIG 56
FIG 57
Step 17: Securing the Side and Rear Windows to the Vehicle
FIG 58
FIG 59
As shown in fig’s 56 & 57, roll the vertical plastic
strip into the door surround slot securing it to the
door surround. Next, starting at the driver’s side
front, attach the side belt rail into the vehicle body
by “rolling” the plastic into the slot (FIG’s 58 & 59).
Note: You may have to pull the corners around to-
wards the front or back of the vehicle to center the
top on the vehicle. If this is too difficult, release the
front windshield header latches. Once installed
the first time these windows will easily install.
Repeat this on the passenger side centering the
top over the rear bow.
Seal hook and loop around windows (Fig 60 & 61)
FIG 60 FIG 61
FIG 55

10
Step 18: Securing the tailgate bar & rear window to the vehicle
Take the tailgate bar and orient the “C“-Channel
with the round seal facing down and slide the “C”
Channel onto the rear window retainer as shown
in FIG 62 & 63. After sliding the retainer all the way
through the “C” Channel, roll the tailgate bar into
the mounts with the outside of the fabric facing
towards the rear of the Vehicle (Fig 64 ).
FIG 62 FIG 63 FIG 64 FIG 65
FIG 66
FIG 67
Once the Tailgate bar in secure, lower zippers on both sides of the rear curtain and move to the rear
driver’s side corner mounts and “roll” the plastic into the corner mount as shown in FIG 65.Secure the
rear zipper cover flap as shown in Figs 66 & 67. Repeat this procedure on the passenger side.
Using Your Complete Soft Top
Open over the front driver and passenger com-
partments:
FIG 68 FIG 69
FIG 70
Your Soft top hardware has multiple front
fold back options. Depending on how much
sun and weather you want to let into the
cab determines the options available to you
Option #1 & #2
Unlatch the two front Windshield latches (Fig 68
& 69). Push the front header up and over to open
the “sunroof”. When you open the front portion
there will be fabric still hanging down over your
head(Fig 70) This is Option #1 which provides
protection from the sun while opens the “sunroof”.
If you push the fabric up in the center of the folded
back “sunroof” and tuck/ fold it under the header,
this is option #2 which opens up the “sun roof”
completely. This option is shown in Fig 70A.
FIG 70A

11
Using Your Complete Soft Top Continued
Fully Open Front and Rear Passenger “Sun Roof”:
Option #3 & #4
FIG 71
These options open both the front cab and rear
cab portions of the top. This option requires
you to remove the front header arms and the
two bows from the bow mount brackets. Fig 71
shows the nished look of this “Sun Roof” op-
tion with the front header installed on the third
bow bracket mount and the header folded all
the way back to the rear of the vehicle.
FIG 73
With the header latches un-latched and front
section open(Fig 71) un-hook the 2 quick release
knobs located on the end of the header arms as
circled in Fig 72. Next, un-hook the 4 quick re-
lease knobs on bow #1 and bow #2 (Fig 72) leav-
ing the two rear bows (Bow #1 & #2) encased in
the hook and loop aps. Once The front bow arms
and two rear bows are disconnected from the bow
mount brackets, with the help of a friend, carefully
fold back the front header and two bows layering
the top and bows under the fabric and then con-
nect the front bow arms quick release brackets to
the rear-most third bow mount bracket as circled
in Fig 73. This is option # 3. Notice in Fig.74 how
the fabric is “layered back and the front Bow Mount
Brackets are installed to the rear bow brackets.
This is option #4 with the entire fabric assembly
folded back and secured to the rear brackets.
FIG 74
WARNING
The front header arms must be secure to the third bow mount bracket and the fabric/ bows must be layered back
before the vehicle is driven! Failure to secure these bow mounts will cause the top to potentially y o the vehi-
cle causing damage to the top, vehicle and potentially other vehicles on the road.
FIG 72

12
Using Your Soft Top Hardware Continued
Fold Back down Feature Use and secure:
To fold back down and secure, remove the rear
and quarter windows from your soft top. Unlatch
the quick release knobs (both sides) from the front,
Center #1, Center #2 bows (g 75), unhook the
pin securing the rear leg (g 75a). With the help of
a friend, fold back the entire top to the rear of the
vehicle as shown in g 76.
FIG 75
Center Bow #1
Center Bow #2
Front Bow
FIG 76
Threading Straps through Buckles:
For the following strap attachment you will need to thread webbing straps through buckles.
Please review the picture to the left for correct strap routing through the buckles. As a rule of
thumb, run the strap below and through the sewn side of the buckle first and then back down
through the end of the buckle. Tighten the strap by simply pulling the exposed webbing after
threading the strap through the buckle.
To secure your soft top, locate the two side tension straps (g 77). Hook the end of strap under the belt
rail (g 78), insert the other side of the tension strap through the strap is sewn for shipping in the front
leg, see g 79. Thread through the buckle and tight to secure as show in g 80 & 81. Repeat on the other
side of the vehicle.
Front leg
FIG 77 FIG 78 FIG 79
FIG 80 FIG 81
Unhook pin securing rear leg
FIG 75a
Strap Sewn
WARNING
When folding back your soft top, it must always be secured to the vehicle using the enclosed straps shown
above. When the Top is folded back in the sun roof position,make sure the quick release knobs are secure.
Failure to do so may result in damage to your vehicle, hardware system, soft top and your person.

Care and Maintenance of your MasterTop® Product:
Your MasterTop Fastback made of the nest materials available but to keep it looking new and for the
maximum possible wear, it will need periodic cleaning and basic maintenance. The main threat to your
soft top is pollutants, dirt and grime. By keeping your top clean you will prolong the life of your top.
We recommend the following to keep your top like new:
Washing:
The soft top fabric should be washed often using a mild soap, warm water and a soft bristle brush. You
can also use special soft top cleaners available on our Distributors websites. Make sure that after clean-
ing you rinse with clear water to remove all traces of soap to avoid residue.
Water/Fabric:
In the event of seeping through the seams, 3M Scotchgard® may be applied on the inside of the seams
to stop the seeping. Rips in the fabric may be repaired with Bondex® iron on patches. Iron the patches to
the Inside of the top, carefully following the Bondex® instructions.
Windows:
It is very important that you keep your Soft Top windows clean! Use a mild soap and water solution to
gently clean your windows. NEVER wipe your windows clean with a dry cloth! Dust and dirt on a dry cloth
can scratch your win- dows causing “fogging” and permanent damage. When removing your windows,
store them with a towel. If frost or ice forms on the outside of your windows during the winter, DO NOT
use an ice scraper to remove this frost. Over time you will see small micro scratches in your windows
which are natural wear and tear. These Micro scratches can be “polished” out using the window polish
available at your MasterTop Distributor.
Zippers:
Keeping the zipper cleaned and lubricated with a silicone lubricant (available online) will help prevent
damage and keep the zippers in a smooth working condition. If zipper opens behind the slider, the slider
may have been spread apart. This problem can usually be xed by using an ordinary pair of pliers to
bring the sides back into parallel. Return slider to the end of the zipper in the normal Open position.
Squeeze lightly at rst and test zipper. If the zipper continues to remain open squeeze more rmly with
pliers and try the zipper again. Repeat procedure until your zipper operates correctly.
13
The Perfect add-on Accessory: MasterTop 5 Layer Cab Cover for 18-Current
Jeep Wrangler JLU Unlimited

Limited 3 Year Warranty
Your MasterTop® accessory is covered by the following Limited Warranty provided exclusively by Master-
Top, Inc., 420 J Corporate Circle, Golden, CO 80401.
This Limited Warranty is the only warranty made in connection with your purchase. MasterTop neither
assumes nor authorizes any vendor, retailer or other person or entity to assume for it any other obligation
or liability in connection with this product or Limited Warranty. This Limited Warranty does not apply and is
not cumulative to any accessory or part distributed by any MasterTop distributor for which the Manufacturer
provides a separate written warranty.
What is Covered: Subject to the terms, exclusions and limitations herein and with respect only to Master-
Top branded accessories rst sold in the United States, MasterTop warrants to the initial retail purchaser
only that your MasterTop accessory shall be free of defects in material and workmanship; for a period of 3
years from date of initial retail sale.
All other warranties are hereby disclaimed, except to the extent prohibited by applicable law in which case
any implied warranty of merchantability or tness for a particular purpose on this product is limited to 3
years from date of initial retail sale. MasterTop reserves the rights to: (a.) require invoice or other proof
your product is within the terms of this Limited Warranty as a condition of warranty service and, (b.) make
future revisions to this product and Limited Warranty without prior notice or obligation to upgrade your pro-
duct.
What is Not Covered: Your MasterTop Limited Warranty does not cover products or parts MasterTop de-
termines to have been damaged by or subjected to: (a.) installation damage, alteration, modication, failure
to maintain or attempted repair or service by anyone not authorized by MasterTop, (b.) normal wear and
tear, cosmetic damage or damage from water immersion, (c.) Acts of God, accidents, misuse, negligence,
inadequate mounting or impact with vehicle(s), obstacles or other aspects of the environment, (d.) theft,
vandalism or other intentional damage, (e.) eet, rental or commercial use, (f.) use in competition or racing.
Remedy Limited to Repair/Replacement: The exclusive remedy provided hereunder shall, upon Mas-
terTop inspection and at MasterTop’s option, be either repair or replacement of product or parts (new or
refurbished) covered under this Limited Warranty. Customers requesting warranty consideration on Mas-
terTop Products should rst contact MasterTop to obtain a RGA number (720-575-5440). All labor, removal,
shipping and installation costs are customer’s responsibility.
Other Limitations - Exclusion of Damages
- Your Rights Under State Law:
In consideration of the purchase price paid, neither MasterTop nor any independent MasterTop distributor
/licensee are responsible for any time loss, rental costs, or for any incidental, consequential, punitive or
other damages you may have or incur in connection with any part or product purchased. Your exclusive
remedy hereunder for covered parts is repair/replacement as described above.
This Limited Warranty gives you specic rights. You may also have other rights that vary from state to state.
For example, some states do not allow limitations of how long an implied warranty lasts and/or do not allow
the exclusion or limitation of incidental or consequential damages, so the limitations and exclusions herein
may not apply to you.
© MasterTop, Inc. 2022. All Rights Reserved. The terms MasterTop® and MasterTwill® are Registered
Trademarks of MasterTop Incorporated, Registered in U.S. Patent and Trademark Oce.
www.MasterTop.com
Part # 941082.01 Version 06.21.22 LTR
Table of contents
Other MasterTop Automobile Accessories manuals

MasterTop
MasterTop 15420301 User manual

MasterTop
MasterTop 15433301 User manual

MasterTop
MasterTop SkyMaster 15501 Series User manual

MasterTop
MasterTop 15433301 User manual

MasterTop
MasterTop 142037 Series User manual

MasterTop
MasterTop SkyMaster 158004 Series User manual

MasterTop
MasterTop 8420110X User manual

MasterTop
MasterTop ShadeMaker 142017 Series User manual

MasterTop
MasterTop Bimini Top Plus User manual