Matrix CTM697 User manual

XR CONSOLES
CTM697
TROUBLESHOOTING GUIDE
ISSUED 2018-07-02
JOHNSON HEALTH TECH –TCMT
V2 –UPDATED 2022-09-22

TABLE OF CONTENTS
XR
2
Troubleshooting Guide
INTRODUCTION ....................................................................................................................... 4
USING THE TROUBLESHOOTING GUIDE ...............................................................................................................................4
CONSOLE IDENTIFICATION....................................................................................................... 5
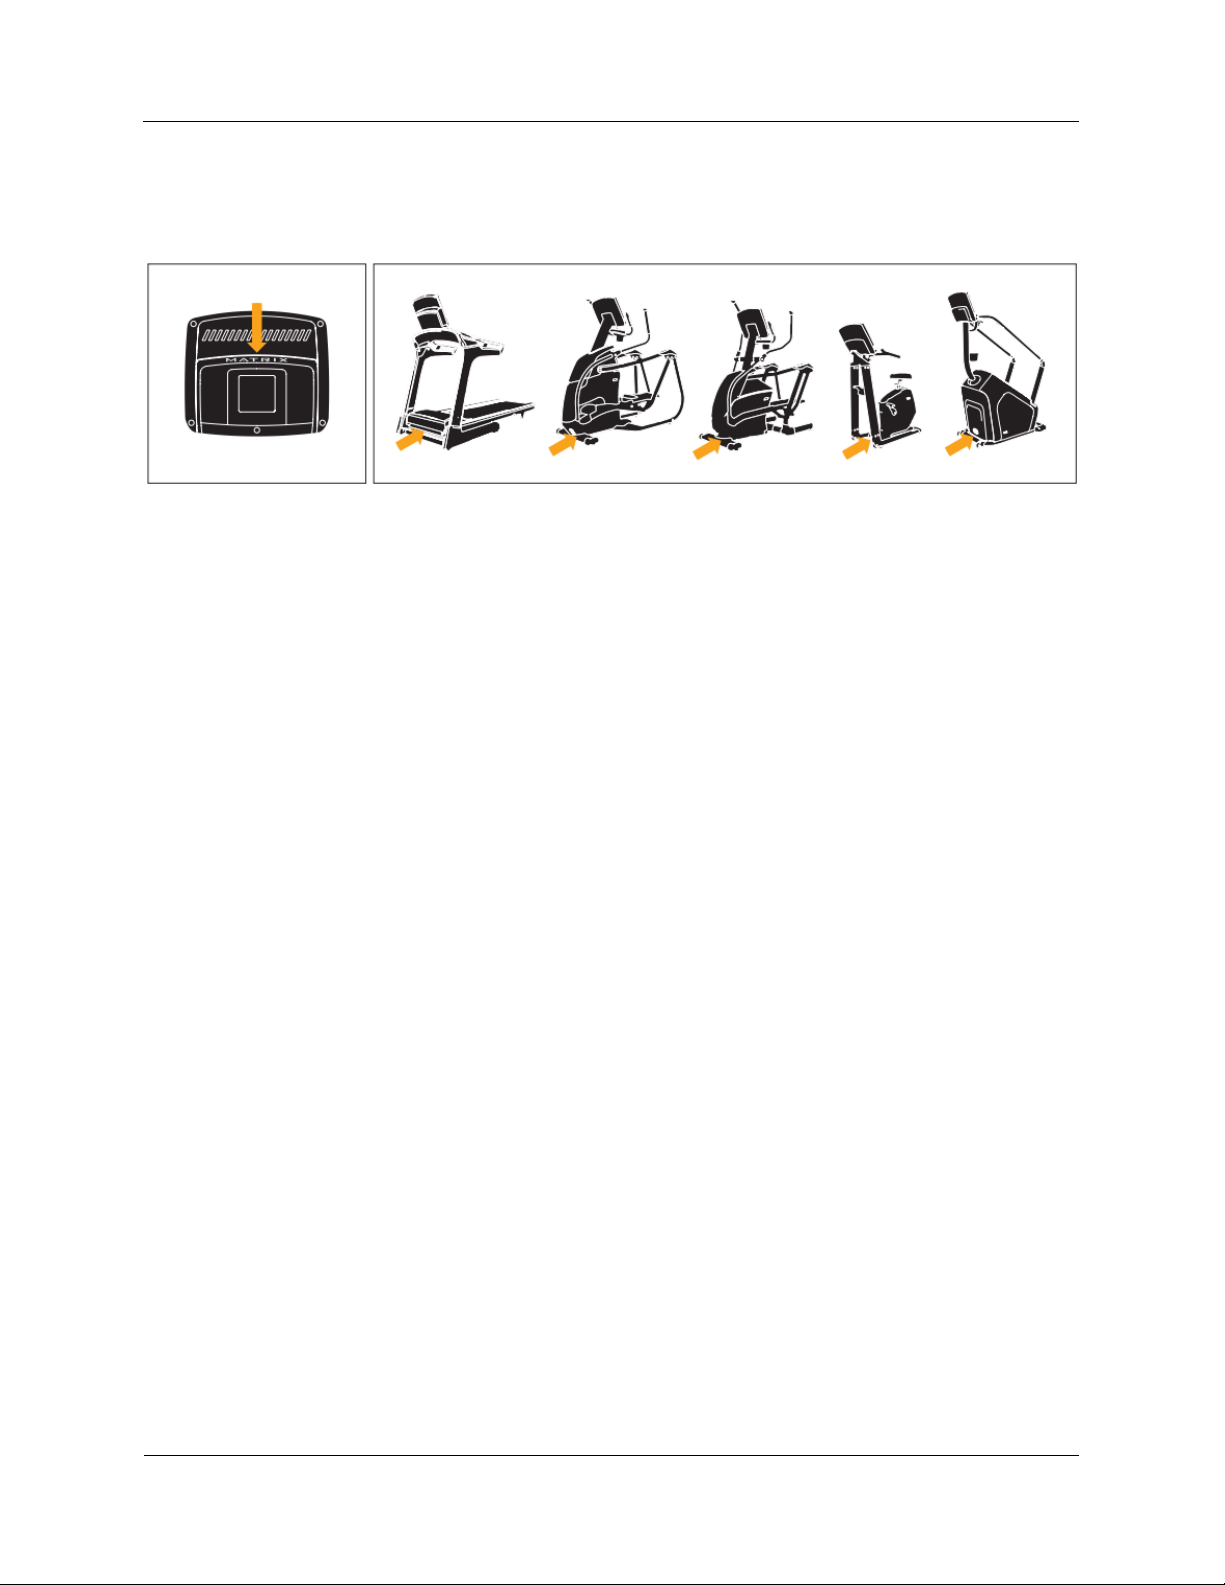
SERIAL NUMBER LOCATION ..............................................................................................................................................5
HOW TO DIFFERENTIATE BETWEEN XR AND XR-03 CONSOLES ...............................................................................................5
UPDATE CENTER ...................................................................................................................... 6
KNOW ISSUES ................................................................................................................................................................ 6
SOFTWARE HISTORY ....................................................................................................................................................... 6
CONSOLE INSTRUCTIONS......................................................................................................... 7
CONSOLE DESCRIPTION ................................................................................................................................................... 7
DISPLAY DESCRIPTION .....................................................................................................................................................8
FIRST-TIME SETUP..........................................................................................................................................................9
BEFORE YOU BEGIN ........................................................................................................................................................ 9
Set Up xID Account for ViaFit/ViewFit Connectivity..............................................................................................9
Passport Media Player ........................................................................................................................................10
Syncing Console with Passport............................................................................................................................10
GETTING STARTED ........................................................................................................................................................11
Treadmills Only ...................................................................................................................................................11
All Models ...........................................................................................................................................................11
Option 1: Quick Start Up .....................................................................................................................................11
Option 2: Select a Program .................................................................................................................................11
Finishing Your Workout.......................................................................................................................................11
TO RESET THE CONSOLE ................................................................................................................................................11
AUDIO IN/OUT ............................................................................................................................................................11
ENERGY SAVER (STANDBY MODE) ...................................................................................................................................12
CLEANING THE CONSOLE SCREEN.....................................................................................................................................12
FAQS........................................................................................................................................................................12
Does the heart rate strap that comes with the product need to be synced to Bluetooth?.................................12
Where can I learn more about Sprint 8?.............................................................................................................12
Where can I learn more about the programs on my machine? ..........................................................................12
What is the workout time range? .......................................................................................................................12
SERVICE AND SPECIAL FUNCTIONS ........................................................................................ 13
REBOOT/RESTORE FACTORY DEFAULTS ............................................................................................................................13
PASSPORT SYNC ...........................................................................................................................................................13
WI-FI SETUP ...............................................................................................................................................................13
SOFTWARE UPDATES ....................................................................................................................................................14
ENGINEERING MENUS AND FUNCTIONS ............................................................................................................................16
ENGINEERING MODE FUNCTIONS DESCRIPTION..................................................................................................................17
ELECTRICAL DIAGRAM ........................................................................................................... 19
DISPLAY CONNECTION WIRE...........................................................................................................................................19
KEYPAD CONNECTION WIRE ...........................................................................................................................................19

TABLE OF CONTENTS
XR
3
Troubleshooting Guide
UCB DIAGRAM............................................................................................................................................................20
TROUBLESHOOTING .............................................................................................................. 21
GENERAL TROUBLESHOOTING .........................................................................................................................................21
ALL OR SOME KEYS ON THE CONSOLE DO NOT WORK .........................................................................................................22
HANDLEBAR KEYPAD FAILURE .........................................................................................................................................23
NO DISPLAY/CONSOLE DOES NOT TURN ON.....................................................................................................................24
INCOMPLETE DISPLAY....................................................................................................................................................25
SPEED DOES NOT DISPLAY (FOR BK/EP/AT) ....................................................................................................................26
CALORIE COUNT INACCURATE (A30/50, E30/50 ONLY).....................................................................................................26
CONSOLE DOES NOT SAVE USER .....................................................................................................................................27
WI-FI CONNECTIVITY ....................................................................................................................................................28
WORKOUTS DO NOT POST TO VIAFIT/VIEWFIT .................................................................................................................29
PASSPORT PLAYER DOES NOT SYNC WITH THE CONSOLE ......................................................................................................29
WRONG MODEL TYPE/PAUSING DURING WORKOUT..........................................................................................................30
WRONG MODEL TYPE/SAFETY KEY ERROR........................................................................................................................30
OTHER ERROR MESSAGES,CODES,AND IMAGES ................................................................................................................31
Lubricate the Chain/Lube Belt.............................................................................................................................31
“Clave De Seguridad Desactivada” Message ......................................................................................................31
Display Shows Red Safety Button is Pressed (C50)..............................................................................................31
Image of Foot on the Control Zone (C50)............................................................................................................32
Image of Foot Blocking the IR Signal (C50) .........................................................................................................32
PARTS REPLACEMENT............................................................................................................ 33
CONTROL BOARD REPLACEMENT.....................................................................................................................................34
OVERLAY AND KEYPAD REPLACEMENT ..............................................................................................................................35
CHANGE LOG ......................................................................................................................... 36

INTRODUCTION
Table of Contents
XR
4
Troubleshooting Guide
INTRODUCTION
This Troubleshooting Guide will be updated periodically with new, emerging, and resolved issues. New
and updated information will funnel through the Update Center. See the Change Log for revision
information.
Using the Troubleshooting Guide
1. Locate the serial number on both the frame and console of the unit.
2. Reference the appropriate guide depending on serial number prefix, or product code.
Within this guide, you will be directed to external documents that can be found on the Johnson
Customer Service Portal, or “CS Web” – http://service.johnsonfitness.com/cs_new/login.asp
The documents you may need to reference include the following:
•MXR19 Cardio Consoles Owner’s Guide (under Owner’s Manuals)
•Testing with a Multi-Meter (NB-1909009)
•Passport Owner’s Manual
•Time Zone Chart (NB-2102006)
Note: For JHTNA, the documents above are also available in Online Remedy.
Additionally, the Matrix Fitness YouTube channel contains support videos for the Matrix consoles. See
the playlist “Matrix for the Home: Assembly, Service, & Maintenance”.
Please direct any questions not addressed in this guide to your Customer Tech Support team.

CONSOLE IDENTIFICATION
Table of Contents
XR
5
Troubleshooting Guide
Console Identification
Serial Number Location
Every frame and console will have their own unique serial number. These numbers can be found at the
designated locations shown above. XR consoles will start with the prefix CTM697
How to Differentiate Between XR and XR-03 Consoles
•The fastest way to tell the difference between and XR and XR-03 console is by checking the
serial number. Consoles that have a CTM697 serial number are XR.
•When powering on the console it will display the model name (XR or XR-03) and software
version.

UPDATE CENTER
Table of Contents
XR
6
Troubleshooting Guide
Update Center
Know Issues
•A store might not be able to attach the POP display piece to a floor model because the console
cover screws are too short (see image below). Send the store two of longer screw 0000095416
for each POP display piece.
•If the XR console is connected to an R30 frame and a workout does not begin when the user
presses the green Start button, a wire may not have been properly connected during assembly.
Try unplugging the contact wires underneath the seat and then reconnecting them. See
troubleshooting case All or Some Keys on the Console Do Not Work further information.
Software History
•Version 13.002 includes support for the new Lite-On A3 motor control board and fixes a bug
that caused incorrect calories to show during a workout.
•Version 12.002 adds compatibility with Passport 1.0.
•Version 9.011 adds compatibility with the C50 ClimbMill.

CONSOLE INSTRUCTIONS
Table of Contents
XR
7
Troubleshooting Guide
Console Instructions
Console Description
Note: There is a thin protective sheet of clear plastic on the overlay of the console that should be
removed before use.
A) LCD DISPLAY WINDOW: Displays workout feedback, program profile and more.
B) GO/PAUSE: Press to start, pause or resume your workout.
C) STOP: Press to stop your workout. Press and hold for three seconds to reset the console.
D) ENTER: Confirm each program setting.
E) ARROWS: Used to adjust program settings
F) NUMBER KEYPAD: Used to enter program data during program setup and to adjust speed /
resistance level during workout. Press the Enter/√button to confirm setting.
G) BACK: Go to previous program setting.
H) TOGGLE DISPLAY: Press to change display feedback during workout. Press and hold to scan.
I) BLUETOOTH:Press to connect to Bluetooth HR straps and popular training and coaching apps.
J) ENERGY SAVER LIGHT:Indicates if machine is in energy saver mode. Press any key to wake up
the machine.
K) READING RACK:Holds reading materials or electronic device.

CONSOLE INSTRUCTIONS
Table of Contents
XR
8
Troubleshooting Guide
Display Description
Time: Is always shown in the larger central portion of the display. Shown as minutes : seconds. View the
time remaining or the time elapsed in your workout.
Incline: Shown as percent. Indicates the incline of your walking or running surface (Treadmills and
Ascents only).
Distance: Shown as Miles or Kilometers* based on your default setting. Indicates distance traveled or
distance remaining during your workout.
Speed: Shown as MPH or KPH* based on your default setting. Indicates how fast the footpads/pedals
are moving.
Calories: Total calories burned or calories remaining to burn during your workout.
Heart Rate: Shown as BPM (beats per minute). Used to monitor your heart rate (when wearing a
wireless heart rate strap or when contact is made with both pulse grips).
Resistance (RES): Shows the current resistance level (Bikes, Ellipticals, Ascents only).
RPM: Revolutions Per Minute (Bikes, Ellipticals, Ascents only).
Watts: Displays current user power output (Bikes, Ellipticals, Ascents only).
Pace: Indicates how many minutes it takes to complete a mile based on your current speed (Treadmills
only).
Program Profile: The dot matrix will show the program profile as you progress through your workout.
Profile represents incline, resistance or speed (depending on model type and workout type).
Passport: Indicates Passport box connection is present.
WI-FI: Indicates wireless connection is present and the strength (low, medium, high). Flashes when Wi-Fi
is trying to connect.
* Default is set during console install. If logged in with xID, the default is set by user profile.

CONSOLE INSTRUCTIONS
Table of Contents
XR
9
Troubleshooting Guide
First-Time Setup
When you power on the console for the first time you will be prompted to perform initial setup.
Plug in the power cord and turn the equipment ON (Note: Some equipment does not have a power
switch). TREADMILLS ONLY: Insert the safety key into the safety key hole.
1. Select your language and check the Enter/√button to confirm.
2. Select your frame model number and press the Enter/√button to confirm.
3. Select metric / standard and press the Enter/√button to confirm.
Before You Begin
Set Up xID Account for ViaFit/ViewFit Connectivity
Connect to ViaFit (North America)/ViewFit (global) and discover a powerful new way to get more results
from your workouts, your tracking and your social networking. Up to four users can be saved on a
machine. This process is the first step in connecting your equipment. It must be done from a
computer, tablet, or mobile device that is connected to the internet.
1. Visit the website www.viafitness.com (North America) or www.viewfit.com (global) to create an
account and connect your console to home wireless network.
2. Click on Connect Your Equipment.
3. Sign In if you already have an xID account or Create an Account by entering your information.
4. Continue to follow the online instructions to complete the process of connecting your console to
your home wireless network.
5. Manage the console user accounts from your Account Profile at www.viafitness.com (North
America) or www.viewfit.com (global).

CONSOLE INSTRUCTIONS
Table of Contents
XR
10
Troubleshooting Guide
Passport Media Player
Passport player, featuring Virtual Active™ technology, is a high-definition experience that uses real
destination footage and matching ambient sounds from stunning destinations around the world. The
ultimate in workout entertainment, Passport lets you escape the confines of a regular workout routine
while enjoying a dynamic experience.
A Passport player is available for purchase separately from your Matrix Retailer. Additional courses are
available from your Matrix Retailer. For more information, go to: www.passportplayer.com
Syncing Console with Passport
1. Use the arrow buttons (↑↓) on the Passport remote to scroll to the set
up icon and press Select.
2. Follow the on-screen prompts to press the Passport symbol on the console.
3. The Passport icon will flash while connecting and remain steady once it has synced successfully.
Note: See the Passport Owner’s Manual or the videos “Pairing an LED Console via Hotspot” and
“Pairing an LED Console via Wi-Fi” for more information.

CONSOLE INSTRUCTIONS
Table of Contents
XR
11
Troubleshooting Guide
Getting Started
1. Check to make sure not objects are nearby that will hinder movement of the equipment.
2. Plug in the power cord and turn the equipment ON (Note: Some equipment does not have a
power switch).
Treadmills Only
3. Stand on the side rails of the treadmills.
4. Attach the safety key clip to part of your clothing make sure that it is secure and will not become
detached during operation.
5. Insert the safety key into the safety key hole.
All Models
6. Select the user (User 1-4) that you linked your xID to in your user profile.
7. If prompted, enter your Passcode using the keypad and then press the Enter/√button.
8. You are now logged into our xiD.
Option 1: Quick Start Up
Simply press the green GO/Pause button to begin working out. Time, distance, and calories will all count
up from zero. Or…
Option 2: Select a Program
1. Use the arrow buttons (↑↓) to select a program and then press the Enter/√button.
2. Set workout program information using the arrow buttons (↑↓) and press the Enter/√button
after each selection. Press the back button () by the number keypad to go back a step in the
setup.
3. Press the Go/Pause button to begin workout.
Finishing Your Workout
When your workout is complete, the display will flash “WORKOUT COMPLETE” and beep. Your workout
information will stay displayed on the console for 30 seconds and then reset.
To Reset the Console
Hold the Stop button for three seconds.
Audio In/Out
You can play audio through the console speakers by connecting a device to the audio jack that is located
beneath the display. Plug your headphones into the audio jack and use them instead of the console
speakers.

CONSOLE INSTRUCTIONS
Table of Contents
XR
12
Troubleshooting Guide
Energy Saver (Standby Mode)
To turn Energy Saver mode on:
1. Enter Engineering mode:
a. Treadmills: Press and hold Incline Up and Speed Down for five to 10 seconds.
b. All other frames: Press and hold Resistance Up and Resistance Down for five to 10
seconds.
2. Press an up/(↑) arrow button (on the console screen or the platform) until “SWITCH FUNCTION”
appears.
3. Press the Enter/√button.
4. Press the Enter/√button until the console displays “ENERGY SAVER OFF”.
5. Press an up or down arrow button (↑↓). The screen will display “ENERGY SAVER ON”.
6. Press and hold the Stop button to exit Switch Function mode.
7. Press and hold the Stop button to exit Engineering mode.
Note: When the machine is in Energy Saver mode, you can press any button to wake up the console.
Cleaning the Console Screen
To clean the console screen, we recommend spraying a soft, lint-free, dry cloth with the screen cleaner
and gently wiping the console.
•Avoid using products that contain ammonia and alcohol.
•Do not use abrasive pads or paper towel, and do not spray the console directly, as liquid could
leak into the console and cause damage.
•Monitor wipes may also be used.
FAQS
Does the heart rate strap that comes with the product need to be synced to
Bluetooth?
No, the Polar heart rate strap that comes with the console is a 5kHz transmitter. (The XR console does
not have Bluetooth connectivity.)
Where can I learn more about Sprint 8?
Learn more at Sprint8.com.
Where can I learn more about the programs on my machine?
Please refer to the MXR19 Cardio Consoles Owner’s Manual for a complete description of the programs
available on your machine.
What is the workout time range?
The workout time range that you can set on the XR console is five-99 minutes.

SERVICE AND SPECIAL FUNCTIONS
Table of Contents
XR
13
Troubleshooting Guide
SERVICE AND SPECIAL FUNCTIONS
Reboot/Restore Factory Defaults
From the home screen, press 2009 Enter/√on the console keypad. The console will show “REBOOTING”
and will reset settings, including Language, Model, and Unit. The console will return to the standby page
once the reboot is complete.
Passport Sync
From the home screen, press and hold the Passport icon for three seconds. The console will show “RF
SYNC”. Once the sync is complete, the console will show “PASSPORT READY”.
Wi-Fi Setup
1. Disconnect your wireless device (laptop or smart phone) from its wireless network.
2. Press and hold the Wi-Fi button on your console.
3. Enter your time zone code on the console. (See the “Time Zone Chart”, NB-2102006.)
4. On your personal mobile device, connect to the network “Matrix XR”. (It may take a minute for
the network to appear in your device’s network list.)

SERVICE AND SPECIAL FUNCTIONS
Table of Contents
XR
14
Troubleshooting Guide
5. Open a web browser on your device and enter http://10.10.100.254/dist/en/setup.html (This is
the ViaFit/ViewFit website. This alternative way of accessing the website will only work if you
are successfully connected to “Matrix XR”.)
6. The Wi-Fi symbol on the console will change from blinking to solid. Important: The Wi-Fi symbol
may disappear completely, for up to two minutes, before turning solid.
7. Press the up and down buttons on the console; the screen should show “UPDATING USER INFO”.
If the message displays, the Wi-Fi connection was successful. If the message does not display,
the connection was not successful; repeat the steps above to reattempt the connection.
Software Updates
1. Go to the appropriate website for your region and download the XR-03 software to a USB flash
drive:
a. United States: https://matrixhomefitness.com/pages/support-consoles
b. All other regions: https://www.matrixfitness.com/eng/home/support/software-updates
2. Make sure that the unit is plugged in and turned on.
3. Access the upper control board:
a. Treadmill or ClimbMill: Use a Phillips screwdriver to remove the console back cover.
b. All other frames: Use a 5 mm Allen wrench to disconnect the console from the console
mast.

SERVICE AND SPECIAL FUNCTIONS
Table of Contents
XR
15
Troubleshooting Guide
4. Insert the USB flash drive into the upper control board.
5. The console will show the message “SOFTWARE UPDATE PRESS ENTER”. Press Enter/√. The
software will automatically update and reboot the console.
6. After reboot, the console will show the current version of the console. The update is complete.
Note: If the update fails, perform the process again with a different USB flash drive.

SERVICE AND SPECIAL FUNCTIONS
Table of Contents
XR
16
Troubleshooting Guide
Engineering Menus and Functions
Press 2001 Enter/√ on the number pad to enter the
engineering mode.
Use the Up and Down buttons to scroll through the menu.
ENG0 DISPLAY TEST
ENG1 HARDWARE TEST
ENG2 SWITCH FUNCTION
ENG3 INFORMATION
ENG4 SET DAPI
To select, press Enter/√ to go into the next level of menu options.
Press Stop for three seconds to return to the previous menu.

SERVICE AND SPECIAL FUNCTIONS
Table of Contents
XR
17
Troubleshooting Guide
Engineering Mode Functions Description
MODE FUNCTION DESCRIPTION
ENG 0
Display Test
Start Key – LCD/LED on including ERP Stop
Key – LCD/LED off including ERP
Any Other Key - Will show on the display window. Hold
the STOP key for 3 seconds to return to the
ENG 0 Menu.
ENG 1
Hardware
Test
Resistance or drive motor test.
Incline motor test
Heart rate grip test
ENG 2
Switch
Function
P1- Unit setting. (KM or Mile). Press Enter/√ to save
P2. Language selection (Use ↑↓ button to select
language) Press Enter/√ to save
P3. Machine selection (Use↑ ↓ button to select a
machine type from Treadmill, ClimbMill, Elliptical,
Bike or Ascent Trainer.) Press Enter/√ to save
P4. Model selection. (Use ↑↓ button to select a
model) Press Enter/√ to save
P5. Energy mode selection. (Use ↑↓ button to switch
between ON/OFF) Press Enter/√ to save
P6. First Boot selection (Switch “First Boot” Flag
using ↑↓ button)
Note:
Model default R30
ERP is by default set to on.

ASSEMBLY INFORMATION
Table of Contents
XR
20
Troubleshooting Guide
UCB Diagram
Reverse side of UCB
Ref #
Description
A
Program Keypad
B
Quick Keys (from grips)
C
LCD Display Port
D
USB Port
E
Program Keypad
F
USB Interface
G
Safety Key
H
Console Cable
I
Ground Wire
J
Hand Grip L
K
Hand Grip R
L
Wireless HR (to Polar board)
M
LCD Display Port
ABCD
E
IJ K L
M
M
F
G
H
Other manuals for CTM697
1
Table of contents
Other Matrix Music Mixer manuals

Matrix
Matrix 2016 3x console User manual

Matrix
Matrix T-7xi-C Quick guide

Matrix
Matrix XR User manual

Matrix
Matrix XUR User manual

Matrix
Matrix 7xe User manual

Matrix
Matrix XUR User manual

Matrix
Matrix T5X GROUP TRAINING User manual

Matrix
Matrix 3x User manual

Matrix
Matrix XIR User manual

Matrix
Matrix CTM697 User manual