Maxon MX-6810 User manual

Unlock the SIM ............ (ON)bPIN1b
National Calls ..............FULL NUMBER b
International Calls .......=b(hold)COUNTRY CODEb
FULL NUMBER b
View Call List ................ b-/]b
Emergency Calls ............ (or local number)b
Ending Calls ................
Answering Calls ..........
Earpiece Volume .........Volume keys
YES
NO
YES
YES
YES
YES
YES
Quick Guide
✃
■
weight 64g(without battery)
■
volume 95cc
■
Full Graphic display
■
3 X 6 Chinese display
■
4 X 16 Roman display
■
Dimensions 110 X 46 X 21mm
■
Support Phase 2 plus Feature
■
Real Time Clock
■
Advice of charge
■
Conference call
■
Cell broadcast
■
Fixed dialled numbers
■
20 numbers redial
■
Hook on/off by Flip(MX-6811)
■
CLIP/CLIR
■
Connected Line Identification
■
SIM Application Toolkit (Optional)
■
SMS by T9 Text Input(Optional)
■
On board 14.4kbps Data/fax/
E-mail(Optional)
■
Vibrating battery(Optional)
GB
937601 (Rev. 0)
MX .6810/11
MX .6810/11
For more information about
visit our hompages:
www.maxon.co.kr
www.maxon.dk
D•U•A•L•B•A•N•D
ENGLISH

Billing .......................... b b -/]b[
Keypad Lock/Unlock ... b
Read SMS Messages .. b b -/]b[
Operating Mode .......... b b -/]b[
Forward All Calls ............ b b [bNUMBER b
Menu Features
Selections ................... b-/](group)b[b
-/](feature) b[
Looking Up Phone Book Numbers
By Name...................... b[bPART NAME b-/]b[
By Location................. b[b-/]
NO
✃
Dial a displayed number, answer
an incoming call and store an entry
End a call and exit a feature
Switch the phone ON and OFF
Clear a number
Upward search
Downward search
Enter the phone book or go back
one step in the menu
Enter the menu or select a menu
feature
Earpiece
Microphone
Antenna
Volume adjustment
Ringing buzzer
Hole for Belt Clip
Flip (MX-6811) Open to answer calls
Close to end calls
1
2
3
4
5
6
YES
7
NO

ENGLISH
10
10.2
Contents
Introduction
Security
Safety
Getting Started
Calls
Basics
The Phone Book
Network Features
Troubleshooting
Accessories
T9 Text input
Index
The phone is normally set up to automatically show
display text in the language of the SIM. If this is not
the case, please refer to section 3 for language
change instructions.
2
1
3
5
4
6
7
8
ENGLISH
10
9

ENGLISH
10
10.2
Security
■if your phone is lost or stolen, you must report it to your
network operator or service provider so that they can
bar the phone and SIM from use. This is important as
you may be liable for the cost of unauthorised calls
until the equipment is barred
■when you ring the network operator or service provider
they will need the IMEI number of the phone. This is
printed on the label attached to the back of the phone
under the battery. Copy the number onto the label
below for future reference
■you can help prevent mobile phone crime by taking the
following precautions:
-always have the SIM PIN enabled and change it if
you think someone else knows the number
-don’t leave your phone visible in a vehicle when you
leave it. Take the phone with you or lock it in the boot
or glove compartment
- set call bars to limit fraudulent use
Made by
Type: MX-6811
Introduction
Congratulations on choosing the Maxon MX-6810 or
6811 GSM Dual Band mobile phone. This user guide
describes the features of MX-6810 and MX-6811. The
user guide is based on the MX-6811. The only
difference between these products that MX-6810 is a
non-flip phone.
The MX-6810/11 has been designed to operate on any
digital GSM network, GSM900, GSM1800 and
GSM900/1800, subject to individual network roaming
agreements. GSM is becoming a worldwide standard
communications system, giving you the freedom to
stay in touch wherever you are.
Your mobile phone is intended for use with the
supplied rechargeable battery, charger and any of the
approved accessories shown in section 7 of this user
guide. Other usage will invalidate any approval and
warranties given to this equipment and may be
dangerous.
The MX-6810/11 conforms to the GSM type approval
for class 4 for GSM900 (2W) and class 1 for DCS1800
(1W) mobile phones.
Maxon Electronics Co.,LTD. reserves the right to make
changes and improvements to any of the products
described in this guide wihout prior notice.
© Maxon Electronics Co., LTD. 2000
ENGLISH
000000-00-0000000-0

ENGLISH
10
ENGLISH
10
Battery
■do not short circuit the battery terminals. This will
damage the battery, produce heat and may cause a
fire
■never dispose of batteries in a fire as this can cause
them to explode. Return dead batteries to your
supplier or an approved recycling centre. DO NOT put
in with the household waste
WARNING: If the battery case breaks, avoid contact
with the contents. Wash contaminated skin with lots
of water and seek medical attention if necessary.
On the Road
■before making or receiving calls acquaint yourself
thoroughly with the applicable local laws and
guidelines regarding the use of mobile radio
telephones and observe them at all times
■air safety bags, anti-lock brakes, speed control and
fuel injection systems are normally immune to radio
transmissions, but if you experience problems,
consult your vehicle dealer
■switch off your mobile phone when refuelling or where
there are signs restricting the use of 2-way radio
equipment. Do not store or carry flammable or
explosive materials in the same compartment as your
mobile phone, internal sparks could cause ignition
Inside Aircraft
■switch off your mobile phone when in an aircraft. The
use of mobile phones in an aircraft may be dangerous
to the operation of the aircraft, disrupt the cellular
network and is illegal
Safety
Personal
■operation of any radio equipment including mobile
phones may interfere with the function of inadequately
shielded medical devices such as hearing aids and
pacemakers. You must consult the manufacturer of
the device or your physician before use
■observe restrictions on the use of radio equipment in
fuel depots, chemical plants, in areas where explosive
gases are present or where blasting operations are in
progress. Your mobile phone will continue to transmit
call responses if left in standby mode. You must
switch off when requested to do so
■do not move the antenna close to, or touching any
exposed part of the body when making a call, a
damaged antenna may cause a minor burn
Mobile Phone
■your mobile phone produces magnetic fields, do not
place next to magnetic storage media such as
computer diskettes
■operating your mobile phone close to other electrical
equipment such as televisions, phones, radios and
personal computers, may cause interference
■do not expose your mobile phone to strong sunlight,
direct heat or liquids (such as water)

ENGLISH
10
10.2
ENGLISH
1
Getting Started
Read this section before attempting to use your
phone. It tells you how to attach, charge and care for
the phone’s battery. We have also included general
information about the digital GSM network and given
instructions of how to insert and unlock the SIM. Your
phone has an indicator to visually show its status
when you cannot see the display. Details about the
indicator are also shown in this section.
The Battery 1.1
Removing and Attaching
the Battery 1.1
Charging the Battery 1.1
Battery Performance 1.3
Battery Power Level 1.3
Network Connection 1.4
The SIM 1.4
Inserting the SIM 1.4
Unlocking the SIM 1.5
Connecting to the Network 1.6
The Display 1.7

ENGLISH
1
1.2
The Battery
Your phone is supplied with a rechargeable battery
and quick charger. Before you use the phone for the
first time, it is important that you FULLY CHARGE
THE BATTERY. Failure to do this will affect the life of
the battery and reduce operating times between
recharges.
Full battery capacity will only be achieved after fully
charging and discharging the battery two or three times.
Removing and Attaching the Battery
■to remove, slide in the direction of the arrow then
remove the battery away from the phone
■to attach, place the battery on the phone and slide to
the bottom of the phone and lock the battery in
position
Charging the Battery
■insert the charger connecter into the base of the
phone
■plug the charger into the power supply. A filling
battery symbol and ‘CHARGING’ in the display
indicates charging
■the battery is recharged when the symbol remains all
black and ‘CHARGING COMPLETED’ appears. This
takes approximately 1 hour depending on the size of
the battery. It is normal for the battery, phone and
charger to become warm during charging
■after charging, switch OFF the power supply, then
disconnect the charger from the phone and the power
supply
WARNING: Charge the battery in a well-ventilated
area between +5°C and +40°C using the supplied
charger. The use of non-approved chargers could
result in a fire or injury through an electrical shock
and will invalidate all warranties given on this
product.
ENGLISH
1
1.1
5
1
2
3
4
Removing
Removing

Network Connection
The SIM
Your network provider will supply you with a plug-in
SIM for use with your phone. The SIM (Subscriber
Identity Module) is your personal key to the digital
GSM network.
All the information needed to connect you to the
network and to initiate billing for your calls is stored in
the gold-plated area along with names, numbers and
messages which you have entered into the phone
book or received. The SIM can be removed and
inserted into any GSM phone using the same size
reader (the new phone automatically takes the identity
of the SIM).
To prevent losing or corrupting information, avoid
touching the gold area and do not place the SIM near
electrical or magnetic fields. A damaged SIM will not
allow you to access the GSM network.
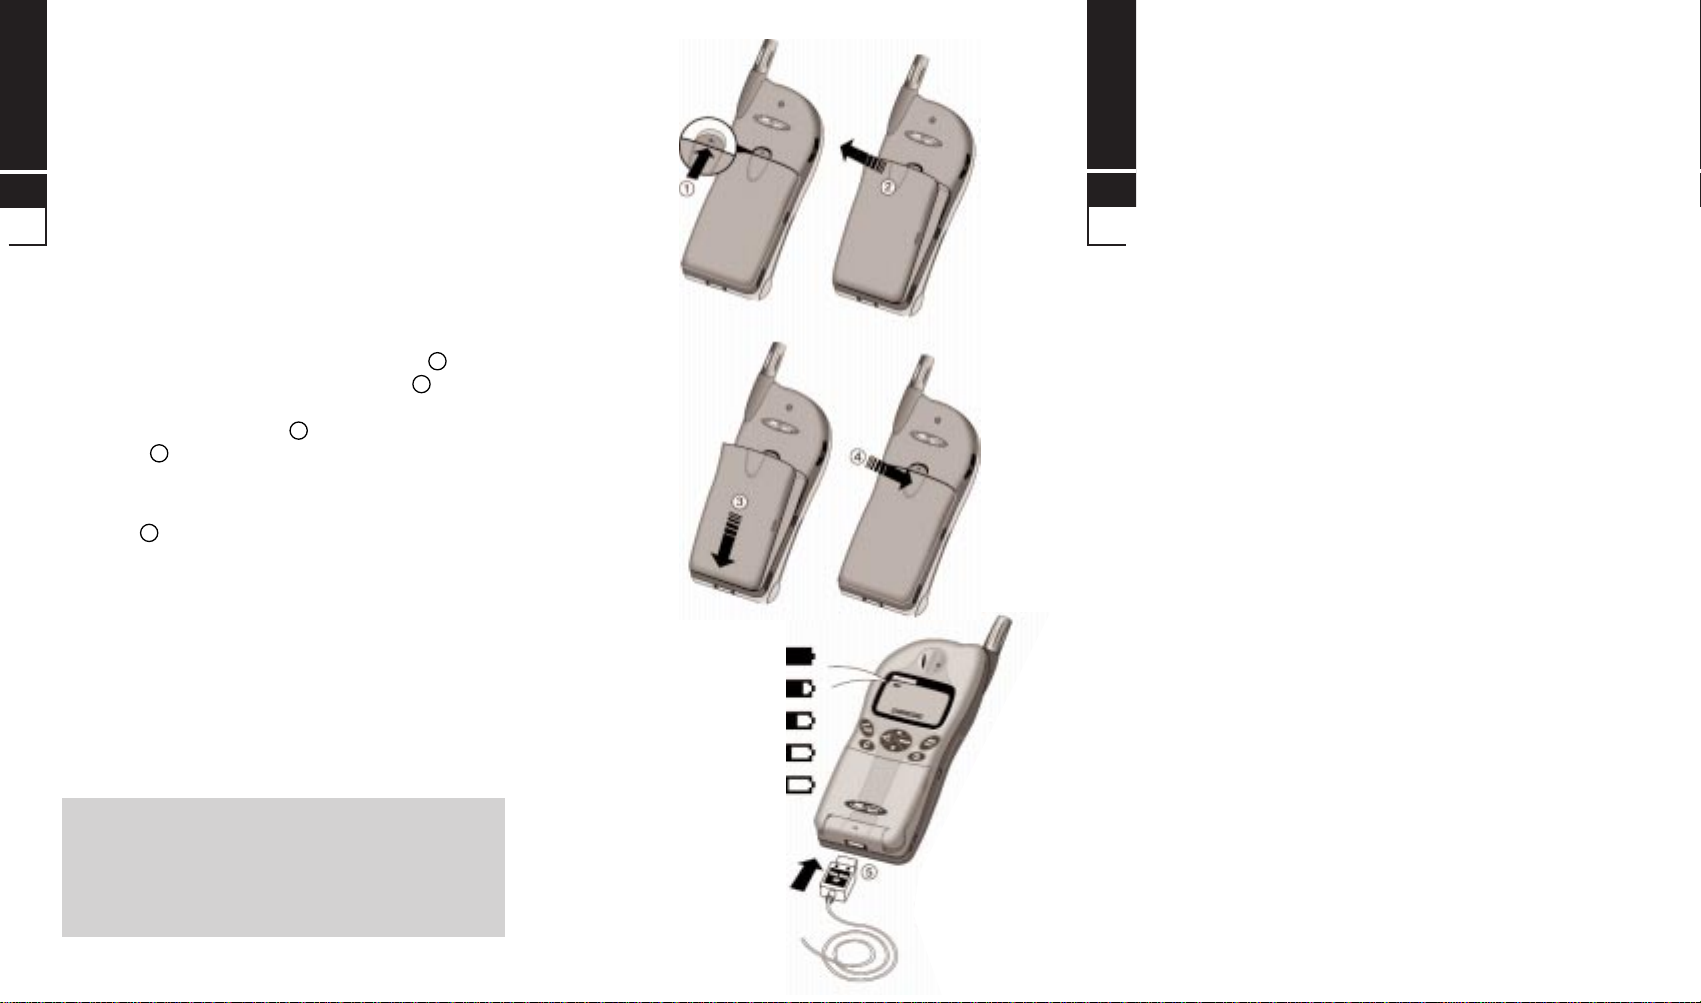
Inserting the SIM
The SIM will probably be supplied in a card holder and
you’ll need to carefully press it free before fitting.
■switch OFF the phone, remove the battery and any
external power supply
■insert the SIM under the two lugs so that the gold
area is facing down and the angled corner is
positioned as shown in the diagram
■engage the lock and attach the battery
■if you need to remove the SIM, remove the battery,
disengage the lock then carefully lift and slide the SIM
from the phone
ENGLISH
1
1.4
Battery Performance
To maintain battery performance you should operate
the phone until you will see the low power warning
message LOW BATTERY or preferable, the phone
switches itself OFF. If the battery is only partly used
before recharging, it can self-adjust to holding a
reduced charge with the resultant progressive
reduction in operating times.
Because it is not always convenient to wait for the
phone to switch off, there is a self discharge feature
which will safely discharge the battery in the minimum
time. This feature won’t work when the phone is
connected to the charger. Please refer to section 3 for
activate instructions.
The standby and talk times quoted are estimates
based on ideal operating conditions. Battery life
achieved in use will vary between networks and with
different conditions and applications.
Battery Power Level
The battery power level is shown in the top left corner
of the display when you switch the phone ON. Five
levels are displayed from full (all black) to empty.
The phone will automatically switch OFF shortly after
the empty battery symbol starts flashing and ‘LOW
BATTERY’ appears on display. You can clear the
message temporarily by pressing any key.
ENGLISH
1
1.3
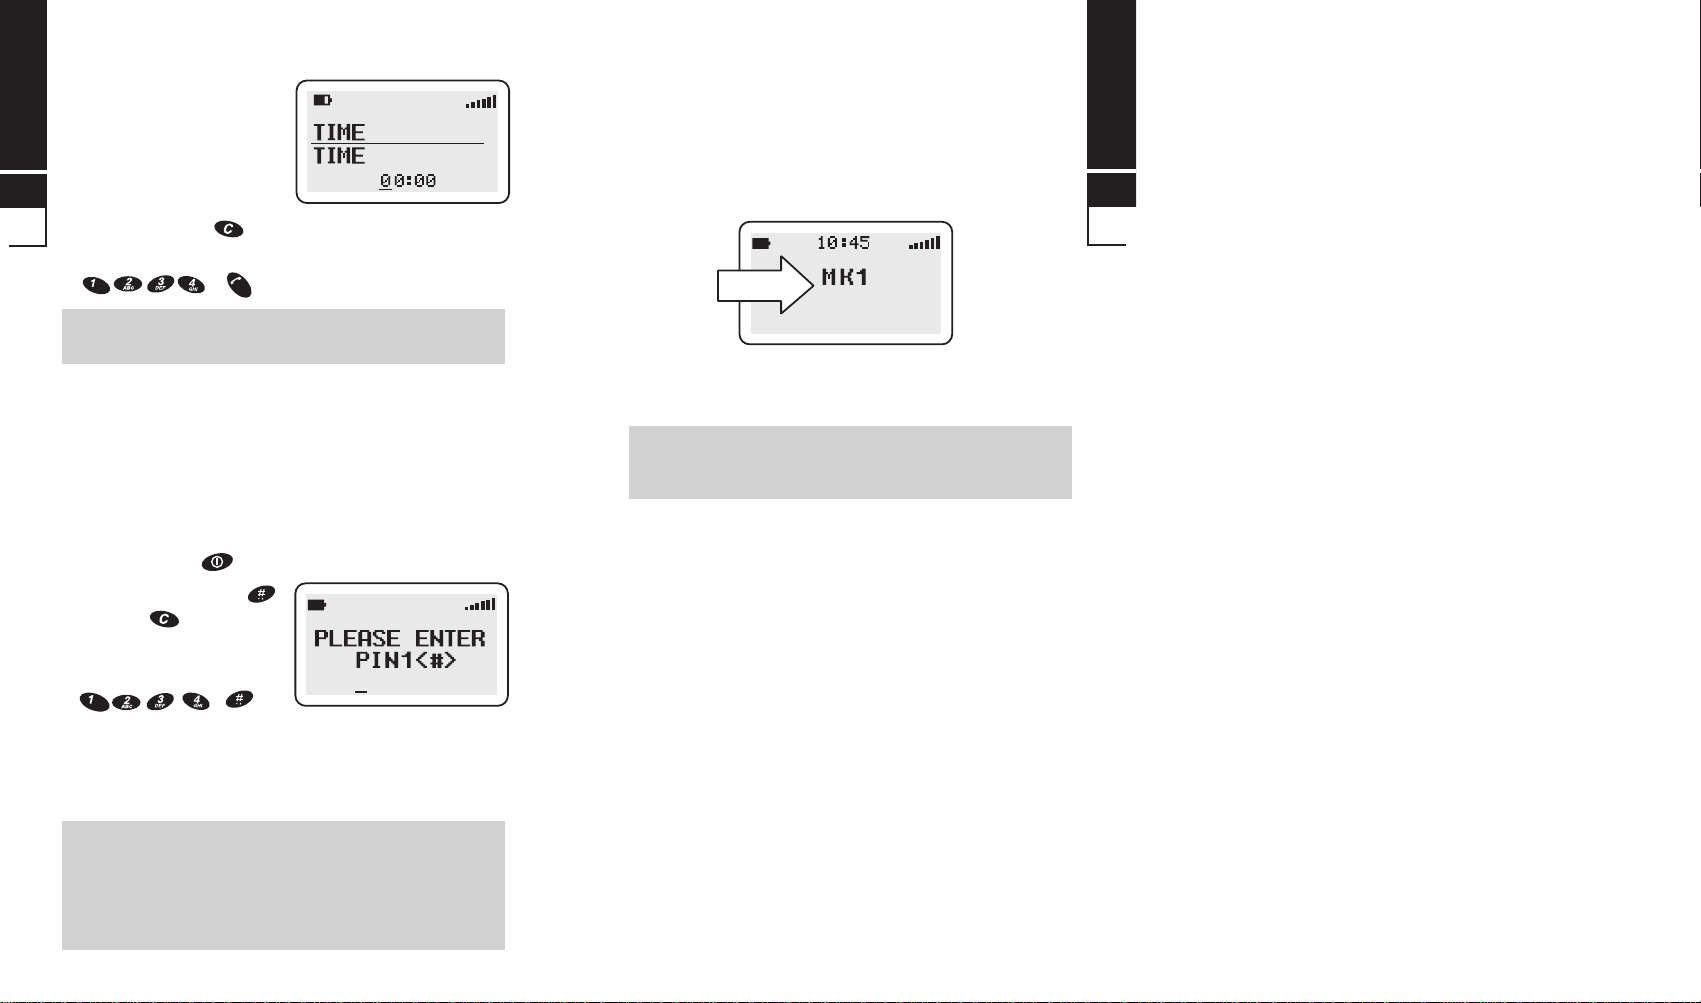
WARNING: Always switch the phone OFF before
removing the battery or SIM. Never insert or remove
the SIM when an external power supply (e.g. the
quick charger) is connected, otherwise the SIM may
be damaged .
3
1
2

ENGLISH
1
1.6
Connecting to the Network
After unlocking the SIM, the phone will make an
automatic search for your home network or another
suitable operator in your location (‘SEARCHING’
displayed). When connected, the name of the operator
appears in the center of the display.
Your mobile phone is now in standby mode, ready to
make and receive calls.
‘EMERGENCY CALLS ONLY’ means that you are
outside co-operating network coverage but you can
still make emergency calls subject to signal strength.
Set Time
■if the battery has been
disconnected, you will
see the screen.
■enter the current time.
For examble if the time
is 14:30 (use the key
to clear an error)
■
MPORTANT: The time must be set when the battery
has been disconnested/cinnected.
Unlocking the SIM
To prevent unauthorised use, the SIM is protected by a
PIN1 (Personal Identity Number) code. When enabled,
you must enter the PIN1 each time you switch your
phone ON. This will unlock the SIM and allow you to
make and receive calls. You can choose to disable the
PIN1 (refer to section 3) in which case your SIM will
not be protected against unauthorised use.
■press and hold to switch the phone ON
■enter the PIN1 then
(use the key to clear
an error). For example if
the PIN is set to 1234
■
If you enter the wrong PIN1 three times in succession,
your SIM will be barred from the network and the
phone will ask for the PUK 1. Refer to section 6 for
help.
IMPORTANT: The supplied PIN1 (4 to 8 digits) may
be a standard number used for all SIM’s issued by
your network operator, you should therefore change
it to any personal number of your choice as soon as
possible. Please refer to section 3 for instructions.
ENGLISH
1
1.5
YES

ENGLISH
2
Calls
After setting up the phone, you’ll want to make and
receive calls. This section gives you all the basic
information you’ll need.
Making Calls 2.1
National Calls 2.1
Calls to a Fixed Phone
Extension 2.2
International Calls 2.2
Call List 2.2
Emergency Calls 2.3
Answering Calls 2.3
Missed Calls 2.3
ENGLISH
1
1.7
The Display
The display will give you a lot of information via its
indicators and symbols.
Indicates your current position in the display.
Indicates your current selection.
The scrollbar appears when the menu contains
more than 3 options, and it indicates if you can
scroll up or down.
Indicates the battery power level.
The envelope indicates that you have received a
message. A text message is shown as an
envelope, and a voice message is an envelope
with ››. The voice message has higher priority
than the other in case you receive both types of
messages. After listening to the recorded
message the ›› will disappear and the envelope
will inform you that you also have a text message.
Actual time can be set in either 24 hrs. or AM/PM
format.
Indicates that the alarm is set.
Indicates that a barring is set.
Signal strength is indicated by the bars in the top
right of the display (6 bars for optimum signal
strenght).
Indicates that the Broadcast is set. If a Barring or
Forwarding is set this icon will not be shown.
Indicates that call Forwarding is set. If Barring is
set the indication will shift between Forwarding
and Barring.
i

ENGLISH
2
2.2
Calls to a Fixed Phone Extension
■some fixed extension phones cannot be called direct,
you need to connect to the exchange before dialling
the extension number. The phone will do all the
dialling for you with one key press provided that you
enter a pause (-) between the telephone (exchange)
number and the extension number. To enter a pause,
press three times (shown as - below)
AREA CODE ■NUMBER ■-■EXTENSION ■
(if used)
International Calls
■unlike most fixed phones, you don’t need to enter a
separate exit code to get an international line out of
the country you are calling from, simply enter ‘+’ (by
pressing until +is displayed), the code of the
country you are calling and the full telephone number
=■COUNTRY CODE ■FULL NUMBER ■
■for example, to make a call to France:
(+displayed0
)■ ■ FULL NUMBER ■
Call List
■called and received numbers are stored as a list in the
phone with the last number at the top of the list. Each
number is identified as outgoing, incoming, SMS or
missed. Old numbers are automatically deleted when
the call list is full. To see the list
(latest) ■-/](search)
■any displayed number on the list can be dialled by
pressing
■the call list can be reset (cleared)
■ ■ -/]■ [
Making Calls
The network operator name must appear in the center
of the display before you can make or receive calls.
Signal strength is indicated by the bars in the top right
of the display (six bars for optimum signal strength).
Call quality can be affected by physical obstructions,
so moving only a few metres may significantly improve
signal strength.
National Calls
■if the country you are
operating in uses area
codes, they must be
included even when
making local calls.
‘CALLING’ appears during
dialling and changes to
‘ACTIVE’ when connected
AREA CODE ■NUMBER ■
(if used)
■(to hang up at the end of the call press
or close the flip (even if the other person hangs up
first)
ENGLISH
2
2.1
DIALLED NUMBER
OPERATOR NAME
SIGNAL STRENGTH
NO
YES
YES
YES
YES
YES
YES

Basics
This section will help you to get to know the phone’s
feature, phone book and call menus, provides details
about customising the phone for your own use and
shows you how to use the basic operating features.
The Feature Menu 3.1
Selecting a Feature by Search 3.1
Selecting a Feature by Number 3.1
Feature Menu Structure 3.2
Call Menu Structure 3.2
Phone Book Menu Structure 3.3
Customising 3.4
Display Text 3.4
Greeting Message 3.4
SIM PIN 1 Change 3.4
SIM PIN 2 Change 3.4
Keypad Lock 3.5
Redialling 3.5
Ring Tones and Melodies 3.5
Vibrating Battery 3.6
Keypad Sound 3.6
Information Tones 3.6
Backlight 3.6
Contrast 3.6
Layout 3.6
Basic Features 3.7
Battery Discharge 3.7
Voice Mail 3.7
Billing (Advice of Charge) 3.8
DTMF Tones 3.9
Earpiece Volume 3.9
Scratch Pad 3.9
Any Key Answer 3.9
Call Timer 3.10
Alarm 3.10
Time 3.10
Data 3.10
Reset 3.10
ENGLISH
3
Emergency Calls
■it should be possible to call the emergency services in
any country which uses the digital GSM network
provided you are within network coverage (check for
signal strength bars). If your network operator does
not have a roaming agreement in the area (no
displayed name) ‘EMERGENCY CALLS ONLY’ will
appear to let you know that this type of call is
available.
It is possible to make the
call even if the SIM has
been removed provided
that you are within
network coverage
■
■112 is the standard GSM emergency number which
can be used on any GSM network worldwide
■a local alternative to 112 can be stored in a reserved
slot in the phone, please refer to section 4 for details
Answering Calls
■(to answer an incoming call when the phone rings and
appears on display, press
or open the flip
■(to hang up at the end of the call press
or close the flip (even if the other person hangs up
first)
Missed Calls
■If you do not answer an incoming call the phone will
store the calling number in the ‘Call List’ and display
the number of missed calls
■clear the message then search through the ‘Call List’
for the calling number
■ ■ -/]
ENGLISH
2
2.3
YES
YES
NO
YES

ENGLISH
3
3.1
The Feature Menu
All the operating features of the phone are stored in
the easy to use menu. A feature can be selected direct
via its feature number (see list on next page) or by
searching and selecting using the keys (to move the
cursor) at the top of the keypad as follows:
- enter the feature menu or
[- select a menu group or feature
- ] - search through the groups and features
- go back one step
- hold to exit the menu
- store an entry
- exit a feature
Selecting a Feature by Search
■-/](group) ■ ■ -/](feature) ■
Selecting a Feature by Number
■FEATURE NUMBER ■-/]■
■for example, to change the ring type:
/■ ■ -/]■[■(hold)
Please note that you can press and hold ,
or close the flip to exit a menu feature (the phone will
exit on its own after a long delay).
FEATURE FOLDER
CURSOR
CURRENT
SELECTION 10
11
12
SCROLLBAR
Feature Menu Structure
Call Menu Structure (see section 5 for details)
REMOVE THIS LINE
NO
YES
NO

Customising
Display Text
■The phone will display text in the language of the SIM
(automatic) or you can choose a language from a list
■ ■ -/]■(select)
Greeting Message
■You can input a 36 character message (3 lines of 12)
to be displayed each time the phone is switched ON
■ ■ INPUT MESSAGE ■
■Please refer to ‘The Phone Book’ (page 4.1) if you
don’t know how to enter text. The number of
characters remaining for the message is shown in the
top right of the display
SIM PIN1 Change
■Your SIM is protected by a secret PIN1 to prevent
unauthorised use. If you want to change the PIN1 you
can change it to any four to eight digit PIN of your
choice
■ ■ OLD PIN1 ■NEW PIN1
■NEW PIN1
■The PIN can be disabled to allow other people to use
your phone without having to reveal the PIN.
Remember to enable the PIN1 again after their use
■ ■ -/](ON/OFF) ■PIN1
SIM PIN2 Change
■A second PIN (PIN2) is used to protect Memory B on
the SIM (refer to page 4.1 for details). You can
change the PIN2 just like the PIN1
■ ■ OLD PIN2 ■NEW PIN2 ■
NEW PIN2
ENGLISH
3
3.4
Phone Book Menu Structure (see section 4 for details)
REMOVE THIS LINE
YES

ENGLISH
3
3.6
Vibrating Battery
■if you have a vibrating battery you can set the phone
to vibrate (refer to above)
■ ■ -/]■(select and see)
Keypad Sound
■to change the sound of the keypad (beep, tones, off)
■■ -/]■(select)
Information Tones
■you can switch the information tones (see list below)
ON and OFF
■ ■ -/]■(select)
■an information tone sounds when:
• the battery is low • a call is proceeding
• switching the phone • auto redialling
ON/OFF • call set up fails etc.
• location update
Backlight
■the backlight can be switched off to save battery
power or set to automatically switch on for several
seconds each time a key is pressed
■ ■ -/]■(select and see)
Contrast
■the contrast can be changed
■ ■ -/]■(select and see)
Layout
■The character font can be changed to either small or
large
■ ■ -/]■(select and see)
ENGLISH
3
3.5
Keypad Lock
■You can lock the keypad to help prevent
unauthorised or accidental use of your phone. There
are three lock options:
LOCK NOW - lock the keypad immediately
MANUAL -you must lock the keypad by
pressing ■
AUTOMATIC -the keypad will lock at each period
of inactivity (shortly after the last
key is pressed) except when you
are in an editor
■ ■ -/]■(select)
■Incoming calls can be answered when the keypad is
locked by pressing but you must unlock the
keypad to make a call or use the other features
■to unlock the keypad press ■
Redialling
■You can set the phone to automatically redial an
engaged (busy) number (up to 10 attempts are
made). A tone sounds at each redial and when the
call is connected
■ ■ -/]■(select)
■to stop redialling at any time press or close flip
Ring Tones and Melodies
■the volume and type of ring tone can be changed
volume: ■ ■ -/]■(select/hear)
type: ■ ■ -/]■(select/hear)
YES
NO

ENGLISH
3
3.8
ENGLISH
3
3.7
Basic Features
Battery Discharge
■It is important to fully discharge the battery once in a
while before recharging. This can be achieved
quickly and safely by selecting one of the following
discharge options
This feature will not work when the phone is
connected to the charger or if a Li-lon battery is used.
DISCHARGE NOW - discharging will start
immediately, you won’t be able to use the phone
unless you remove and refit the battery
AUTOMATIC - when the battery level drops to the
point where the phone automatically switches OFF,
discharging will commence
MANUAL - discharging will not start until ‘discharging
now’ is selected
■ ■ -/]■(select)
■the discharge message will disappear when the
battery is ready for recharging. If you need to use the
phone during discharging, switch off the phone then
operate as normal (provided there is sufficient power
left in the battery)
Voice Mail
■if you subscribe to a voice mail service where the
message retrieval number is fixed on the SIM card,
you can access One Touch Mail by long pressing on
Key 1. (memory location 1 will be reserved for One
Touch Voice Mail) (Key 1 icon) (Press 3 sec)
■if you subscribe to a voice mail service where the
number is not fixed on the SIM, you can either place it
in memory location 1 or into the reserved memory
slot. Select ‘LISTEN’ in the voice mail menu to hear
your message.
■to enter the voice mail number
■ ■ NUMBER ■
■to listen to your messages
■(’CALLING’ appears when the number
is dialled)
Billing (Advice of Charge)
The phone has built-in call timers which can be used to
display the cost of outgoing calls and limit the use of
the phone by cost. To enable the feature to work you
must select the currency and enter the current call
price per unit.
This advice of charge feature is not supported by
all network operators and may be subject to tariff
restrictions.
Viewing Call Costs
■Call cost information is displayed in the following
order:
LEFT - the remaining amount of the maximum
allowed costs
LAST - the cost of the last call
TOTAL STATUS - the cost of all calls since the last
reset
TOTAL CLEAR - select to reset the total cost (status)
MAXIMUM STATUS - the maximum allowed cost
MAXIMUM EDIT - select to change the maximum
allowed cost
■ ■ -/]■
Setting Up Billing
■All the call cost information that you need to enter
can be checked and edited through one menu:
STATUS - check the current rate and currency
PRICE/UNIT - edit the call price per unit
CURRENCY - select a currency
■ ■ -/]■
YES

ENGLISH
3
3.10
ENGLISH
3
3.9
DTMF Tones
■Your phone automatically generates DTMF tones so
that you can control advanced facilities such as
paging, messaging and home banking services. The
tones can be annoying to your caller when entering
numbers on display during a call (refer to íScratch
Padí) and could cause accidental operation of a
connected facility. To prevent this you can switch the
tones OFF and ON when necessary
■ ■ -/]■
Earpiece Volume
■to adjust the earpiece volume, press the volume
keys on the side of the phone
(decrease) ■(increase)
Scratch Pad
■whilst engaged in a call, you can make a note of a
telephone number using the keypad. You may want
to inform your caller that audible tones will be
generated when you press the keys (you have the
option to turn the tones OFF, refer to DTMF tones
above)
■the noted number is stored in the phone as the last
dialled number (refer to Call List on page 2.2), so
you can recall and dial it later. If other numbers are
dialled before recall, you will have to search for the
noted number in the list
(latest) ■ -/](search) ■ (dial)
Any Key Answer
■You can set the phone to answer incoming calls via
the SEND key or the volume keys and, -
, and keys
■ ■ -/]■
YES
YES
Call Timer
■You can check duration of last call made (bottom line
of display) and total call time
■ ■ -/]■
Alarm
■You can set two types of alarm
Alarm 1 is repeating: ■ ■ ENTER TIME
Alarm 2 is only active once: ■ ■
ENTER TIME
■The alarm will be active for 30 seconds rising in
volume. When the alarm is active, press end to
cancel. When an alarm is set, a bell will be displayed
in the top of the display
Time
■The time must be set when the battery has been
disconnected
■the time is always shown in the top of the display.
The time should always be entered in 24 hrs format.
The time can be set
■ ■ ENTER TIME ■
■You can choose to have the time shown in AM/PM if
chosen under format
■ ■ (select)
Data
■a data cable is available as an accessory. A user
manual describing the facilities will accompany the
cable. Contact joyr local dealer
Reset
■The phone can be reset to the original manufacture
settings
■ ■ -/]■
YES
YES

ENGLISH
4
ENGLISH
3
3.11
The Phone Book
Everything you need to know about the phone book
has been grouped together in this section, from
storing names and numbers to recalling and dialling.
The Phone Book 4.1
Storing Information 4.1
Storing a Number and Name 4.2
To Look up a Number 4.2
Phone Book Dialling 4.2
To Edit 4.2
Deleting Entries 4.3
Your Own Number 4.3
Memory Access 4.3
Emergency Number 4.3
Memory Status 4.3

ENGLISH
4
4.2
ENGLISH
4
4.1
The Phone Book
The phone can store telephone numbers and names
onto the SIM. This means that you will always have
important numbers with you, even if the SIM is being
used in a different phone. The number of memory
locations and the number of characters and digits that
you can store in each location are SIM dependent.
Every SIM has a MEMORY A, and some have an
additional MEMORY B which is protected by the PIN2.
Please refer to separate heading ‘Memory Access’ for
details of MEMORY B.
Storing Information
■each dialling key is used to enter several characters (see
below). Repeatedly press the key that shows the
character that you want until it appears on the display.
Wait for the cursor to move before entering the next
character
■when you need a space, press or once. Holding
down a key will change from upper (A) to lower (a) case
characters. Press and hold again to change back
■use the key to clear errors, a short press for the last
character or press and hold for the complete entry
1 SPACE
2 A B C Å Ä Æ
2 a b c å ä æ
3 D E F É
3 d e f é
4 G H I
4 g h i
5 J K L
5 j k l
6 M N O Ö Ø
6 m n o ö ø
7PQRS
7 p q r s
8 T U V Ü
8 t u v ü
9 W X Y Z
9 w x y z
+– /=
&() %£$¥¤@§
., ; : ” ’ ? ! ¡ ¿
Storing a Number and Name
■enter the phone book menu
■select NEW for MEMORY A
or NEW B for MEMORY B (or -■)
■select a location number from the list -/]■
■enter the telephone number, NUMBER ■
it is a good idea to always add +and
the country code to a phone number
then you can use your phone book abroad
and it will still work inside your own country
■enter the name NAME ■
Press and hold or to exit the phone book.
To Look up a Number
■enter the phone book and select LOOK UP ■
■to look up in alphabetical order -/]■
■to look up in location number order ■-/]
Phone Book Dialling
There are five ways to dial a stored number.
■press and hold to dial number stored in location 1
■look up the number (see above)
■enter location number, press for MEMORY A
or for MEMORY B to view the number then
■enter the phone book, press then the initial
letters of name
■ ■ INITIAL LETTER ■-/]■
■press the last number of the location number for 3
sec. and the stored number is dialled
To Edit
■enter the phone book and select EDIT ■
(or /-■)
■look up the name and select -/]■
■edit the number and store =/ / / ■
■edit the name and store / / / / ■
YES
YES
YES
NO
YES
YES
YES
YES
YES

ENGLISH
5
Deleting Entries
■enter the phone book and select DELETE ■
(or /-/-■ ■ )
■look up the name and delete -/]■
Your Own Number
■you can store your own number if the SIM supports it
■(or -■[)■
■if your SIM doesn’t support your own number, you can
store it in the Phone Book
Memory Access
■if your SIM has two phone book memories
(MEMORY A and MEMORY B) you can choose to
allow access to both A and B or only B (sometimes
MEMORY B is referred to as Fixed Dialled Numbers)
■if you have selected ONLY B, you can only call
numbers stored in MEMORY B
■ ■ PIN 2 ■
■activating ONLY B locks supplementary network
services such as call forwarding, call barring,
sending SMS and call waiting. You must deactivate
before you can change the status of these services
■selecting A and B reinstates Memory A and gives
access to call any number
Emergency Number
■you can enter an alternative emergency service
number into a special location
■(or -■)■NUMBER ■
Memory Status
■you can display the number of free, occupied and the
total number of entries in either or both memories
■(or -■)■-/]■
YES
YES
YES
ENGLISH
4
4.3
Network Features
In addition to making and receiving calls, the digital
GSM network offers other advanced benefits detailed
in this section. Some of the features may not be
supported by your network operator or by a foreign
network when roaming.
Text Messages 5.1
SMS Messages 5.2
Cell Broadcasts 5.6
Call Forwarding 5.8
Call Barring 5.9
Network Selection 5.11
Call Menu 5.13
This manual suits for next models
1
Table of contents
Other Maxon Cell Phone manuals