MB Companies HLP User manual

Operator’s Manual
Model HLP/HTP
Hydraulic Power Broom
MB Companies, Inc. – Attachment Sales
1615 Wisconsin Avenue, P.O. Box 200
New Holstein, WI 53061
Telephone: 800-558-5800
FAX: (920) 898-4588
Please have your SERIAL NUMBER ready when
contacting your authorized dealer for replacement
parts or service information.

Copyright 2004 M-B Companies, Inc.
All Rights Reserved
2
SERIAL NUMBER:

Copyright 2004 M-B Companies, Inc.
All Rights Reserved
3

Copyright 2004 M-B Companies, Inc.
All Rights Reserved
4
Table of Contents
CONTENTS:
Safety Rules & Information
General Operation...…….............. 4
Service and Maintenance............. 4
Safety Decals……..…………..….. 5
Identification Numbers……………....… 6
Setup and Adjustments….....….…….... 7
General Operation
Pre-Startup Checks……...........… 8
Operation……………….….…...… 8
Operating Tips……...………..…... 8
Maintenance
Maintenance Schedule...……....... 9
Lubrication………………………… 9
Filler Replacement…….………….10
Troubleshooting……………….…......… 11
Parts List………………………….…..…..11
WARNING
You must read, understand and comply with all the safety and operating instructions in
this manual before attempting to set-up and operate your power broom.
Failure to comply with the safety and operating instructions can result in loss of machine
control, serious personal injury to you and/or bystanders, and risk of equipment and
property damage. The triangle
in the text signifies important cautions or warnings
which must be followed.

Copyright 2004 M-B Companies, Inc.
All Rights Reserved
5
Safety
Read these safety rules and follow them closely. Failure to obey these rules could result
in loss of control of the unit, sever personal injury or death to you, or bystanders, or damage to
property or equipment. The triangle in the text signifies important cautions or warnings which
must be followed.
GENERAL OPERATION
•Read, understand and follow all instructions in the
manual and on the unit before starting.
•Only allow responsible adults who are familiar with
the instructions, to operate the unit (local regulations
can restrict operator age).
•Clear the area of object such as rocks, toys, wore,
etc., which could be picked up and thrown.
•Be sure the area is clear of other people. Stop unit if
anyone enters the area.
•Always look down and behind before and while
traveling in reverse.
•Be aware of broom discharge direction and do not
point it at anyone. Do not point the discharge at glass
enclosures, automobiles, or windows.
•Disengage all clutches and PTO’s before starting
engine.
•Never leave running unattended. Always disengage
the broom and traction controls and stop engine.
•Operate only in daylight or good artificial light.
•Do not operate the unit while under the influence of
drugs or alcohol.
•Watch for traffic when operating near or crossing
roadways.
•Use extra care when loading or unloading the unit
into a trailer or truck.
•Keep in mind the operator is responsible for accidents
occurring to other people or property.
•Data indicates that operators, age 60 years and
above, are involved in a large percentage of power
equipment-related injuries. These operators should
evaluate their ability to operate the unit safely enough
to protect themselves and others from injury.
•All operators should seek and obtain professional and
practical instruction.
•Always wear substantial footwear and appropriate
clothing. Wear footwear that improves traction on
slippery slopes. DO NOT wear long scarves or loose
clothing that could become entangled in moving
parts.
•Before using, always visually check that hardware is
present, in-tact and secure. Replace worn or
damages parts.
•Never operate the machine with defective guards, or
without safety protective devices in place.
•Stop engine before: refueling, removing the broom
assembly, or making adjustments.
•Follow the manufacturer’s recommendations for
wheel weights or counter weights.
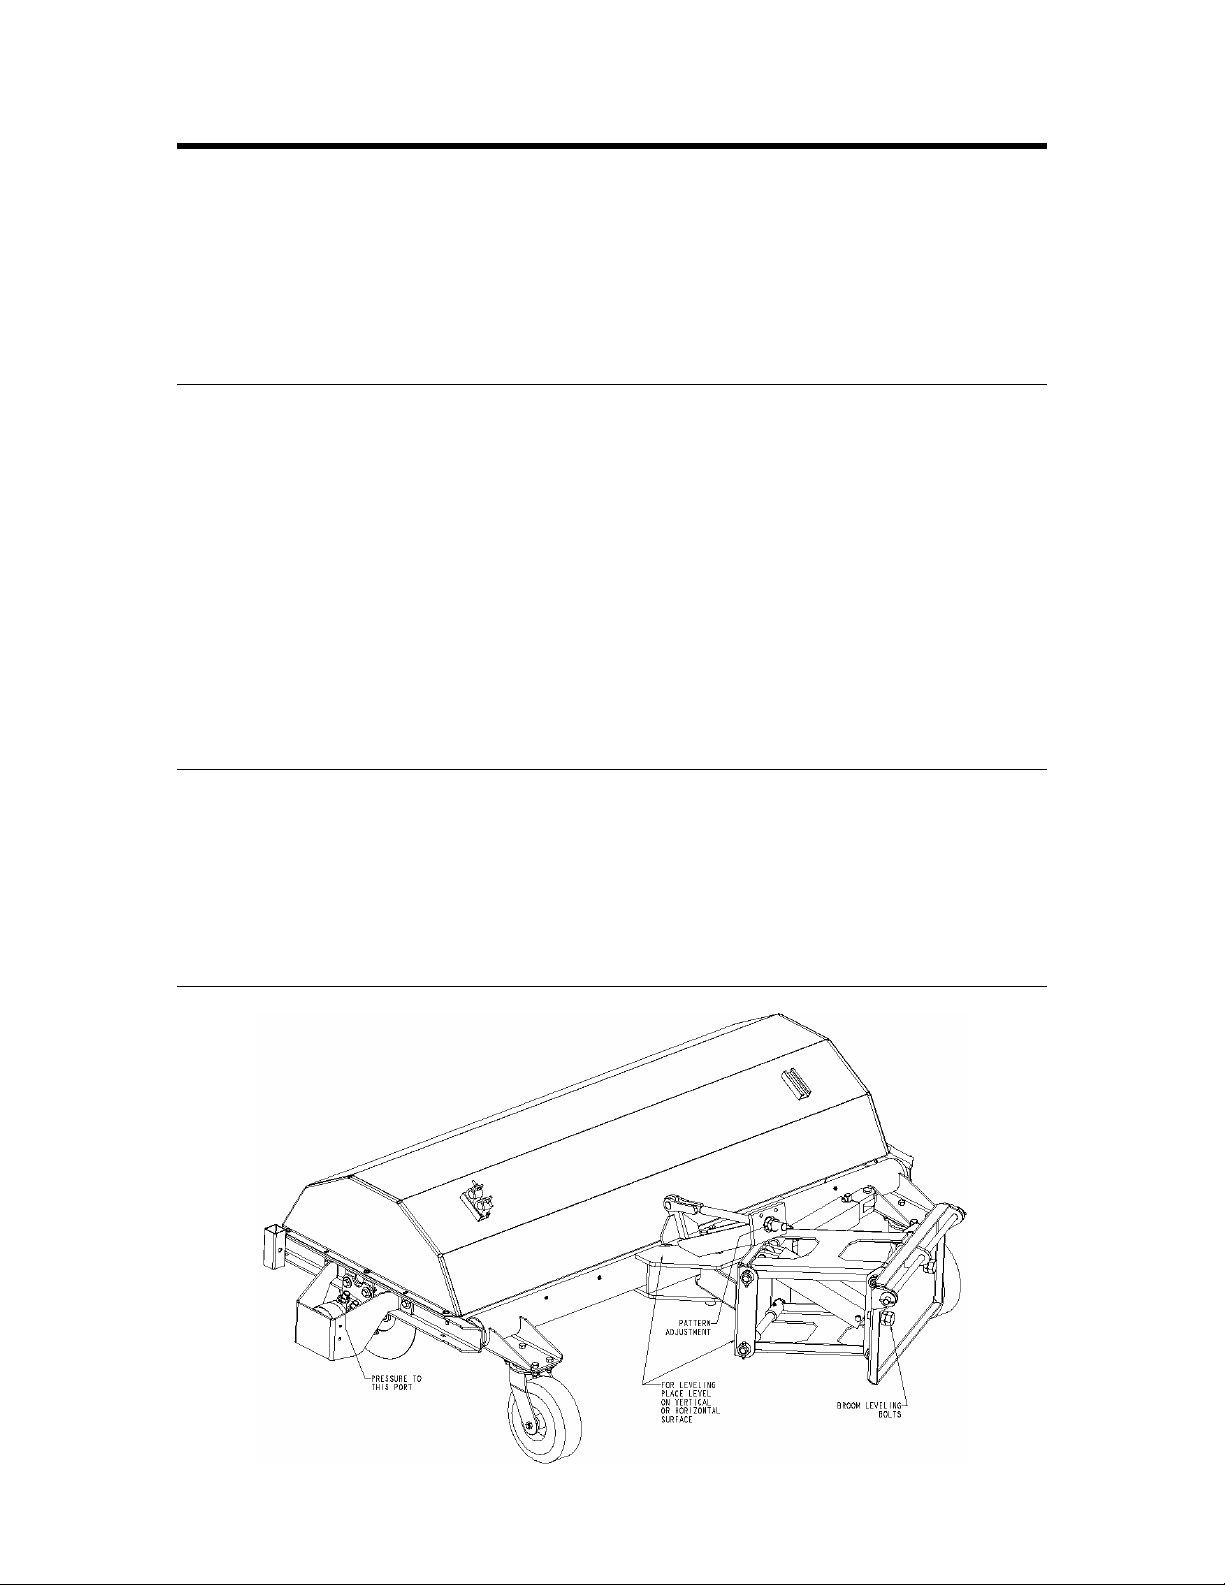
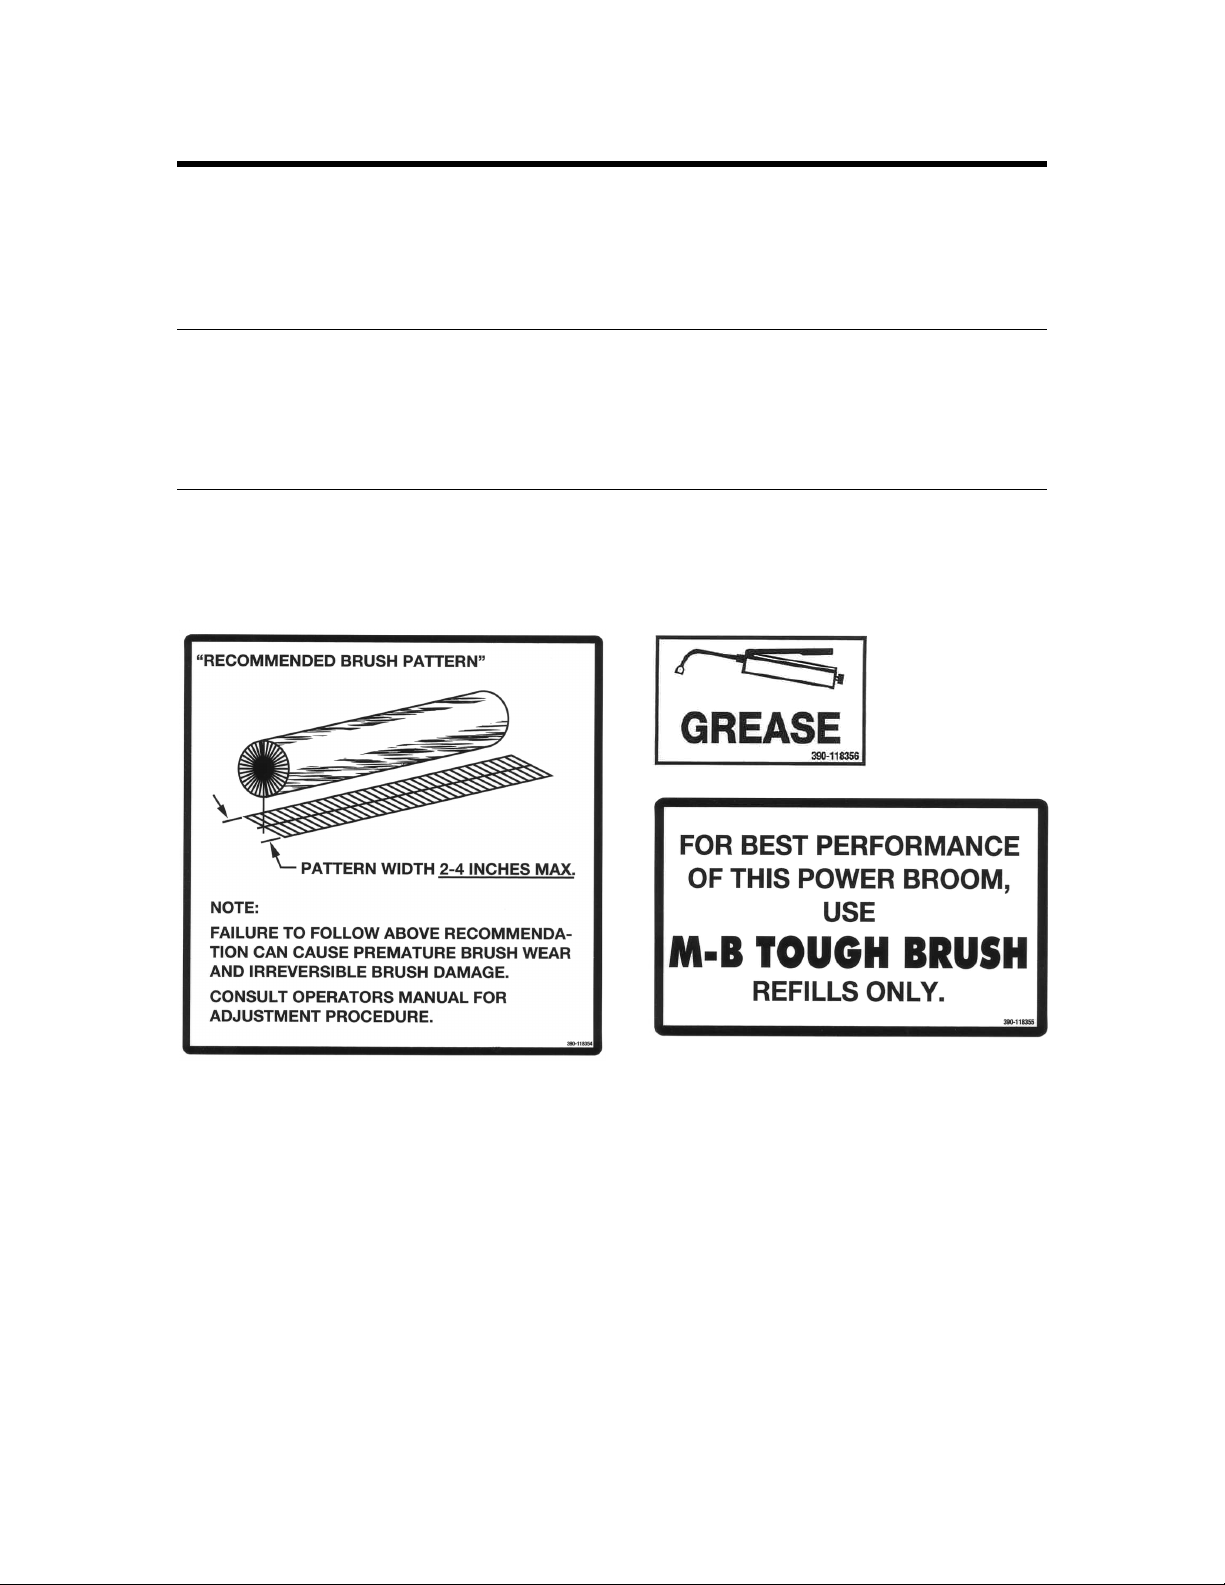
•Adjust leveling and pattern adjustments before
operating.
•Do not touch power broom parts which may be hot
from operation. Allow such parts to cool before
attempting to service the unit.
SERVICE AND MAINTENANCE
•Maintain and replace safety and instruction labels as
necessary.
•Never run a unit in an enclosed area.
•Keep nuts and bolts tight and keep equipment in
good condition
•Never tamper with safety devices. Check their proper
operation regularly and make necessary repairs if
they are not functioning properly.
•Keep unit free of debris and build-up. Clean up any oil
spillage.
•Stop and inspect equipment if you strike an object.
Repair, if necessary, before restarting.
•Never make adjustments or repairs with the engine
running unless specified otherwise in the engine
manufacture’s manual.
•Components are subject to wear, damage, and
deterioration. Frequently check components and
replace with the manufacturer’s recommended parts,
when necessary.
•Check control operation frequently. Adjust and
service as necessary.
•Use only factory authorized parts when making
repairs.
•Always comply with factory specifications on al
settings and adjustments.
•Only authorized service locations should be utilized
for major service and repair requirements.
•Never attempt to make your own repairs on this unit
unless you have been properly trained. Improper
service procedures can result in hazardous operation,
equipment damage and voiding the manufacturer’
warranty.

Copyright 2004 M-B Companies, Inc.
All Rights Reserved
6
Safety Decals
DECALS
This unit has been designed and manufactured to
protect you with the safety and reliability you would
expect from an industry leader in pavement
maintenance equipment.
Although reading this manual and safety instructions it
contains will provide you with the necessary basic
knowledge to operate this equipment safely and
effectively, we have placed several safety labels on the
unit to remind you of this important information while
you are operating your unit.
All WARNING, CAUTION, and instructional messages
on your unit should be carefully read and obeyed.
Personal bodily injury can result when these
instructions are not followed. The information is for your
safety and it is important.
The safety decals below are on your unit.
If any of these labels are lost or damaged, replace them
at once. See you local dealer for replacements.
These labels are easily applied and will act as a
constant visual reminder to you, and others who may
use the equipment, to follow the safety instructions
necessary for safe, effective operation.

Copyright 2004 M-B Companies, Inc.
All Rights Reserved
7
Identification Numbers
IDENTIFICATION NUMBERS
When contacting your authorized dealer
for replacement parts, service or
information you MUST have these
numbers.
Record your model name/number,
manufacturer’s identification numbers in the
space provided for easy access. These
numbers can be found in the location
shown.
Model Description Name/Number:
Date Purchased :
Serial #:
Serial # Plate

Copyright 2004 M-B Companies, Inc.
All Rights Reserved
8
Setup and Adjustments
SETUP
Proper setup and leveling of your power broom will
increase the life of the brush and produces more
efficient movement of material. Visually inspect the
adjustments on the broom before each operating
session and measure the adjustments once every 10
hours.
The following procedures must be followed in the
prescribed order in order to be effective.
Once the broom has been properly adjusted, a short
operation period is recommended for break-in;
approximately 15 minutes. After this break-in period
repeat the leveling procedure to ensure that it is correct.
Mounting instructions can be found either in an
installation pamphlet or in the back of this manual.
LEVELING
•After the broom is mounted to the tractor, loader,
mower, or skid-steer, park the unit on a flat level
surface; preferably concrete or asphalt.
•If mounting to a skid-steer, lower the arms all the way
down and tilt the quick-attach all the way back.
•If mounting to a loader, tilt the bucket cylinders all the
way back and lower the arms until the horizontal
mounting shaft is 18” from the ground. If there is a
way to set this location on the loader hydraulics, do
so at this time.
•If mounting to a mower, set the down limit location so
that the horizontal mounting shaft is as close to 18”
as it can be. Because of the constrained spaces on
some mowers it maybe necessary that the shaft is
higher or lower.
•*Note* - occasionally the horizontal mounting shaft is
replaced by pins or bolts based on mounting.
•Swing the broom so that it is horizontal and tighten
the pattern adjustment nuts all the way down. (See
Illustration A)
•Adjust the swing frame so that it are level by adjusting
the bolts in or out on the back of the swing frame.
(Refer to Illustration A) Adjust both bolts evenly to
maintain an even load on the mounting frame and the
arms. Check to see that the frame is level by placing
a small torpedo level vertically on the swing frame or
horizontally on the pivot frame.
•Recheck for level after any other adjustments,
including pattern adjustment. If the broom is still level
continue to Pattern Adjustment. If not, re-start the
process of leveling.
PATTERN ADJUSTMENT
•After the broom has been leveled, the last adjustment
is to set the brush pattern. This adjustment is located
at the top of the broom. (Refer to Illustration A)
•With the unit set-up on a flat level surface adjust the
nuts on the top of the anchor so that the broom has
approximately 3” of contact from the front-most
contact point to the rear-most contact point.
Loosening the nuts will create more pattern.
•Once this adjustment is set, it can be confirmed by
running the unit for about 30 seconds in the down
position while stationary. Stop the broom and back
the unit away. The ‘cleaned’ portion of the surface
should be 2”-4”.
ILLUSTRATION A

Copyright 2004 M-B Companies, Inc.
All Rights Reserved
9
General Operation
PRE-STARTUP CHECKS
1) Visually inspect equipment and hardware to ensure
that all parts are secure and all hardware is
tightened and secure.
2) Check for oil leaks and loose hose connections.
3) Inspect the broom adjustments to ensure that the
broom is level and that there is proper brush
pattern.
4) Inspect the bristle length to determine is
replacement segments are needed.
OPERATION
•Sweep at a speed that is appropriate for the
conditions and location.
•For heavy material such as gravel or stones, drive
more slowly with high broom speed. For lighter
material, drive faster with lower broom speed.
•It may be necessary to increase broom pattern under
some conditions. If the surface being swept is uneven
and causes the broom to leave upswept patches,
increase the pattern to compensate.
•If the material being swept is dried-on or difficult to
remove such as mud or ice, it may be necessary to
drive extremely slow to allow the broom to “scrub” the
surface.
STORAGE
•Always store the broom in a supported position with
the bristles off the ground. If the bristles are stored in
a deformed position for extended periods of time the
broom will become severely out of balance.
•Store the broom in a location out of the sun and
weather to prevent premature failure of plastic
bristles. Bristles can become brittle when subjected to
sunlight or repeated temperature changes.
•Disconnect all electrical connections between the
broom and tractor for extended storage to prevent
battery drain.
•Properly clean the unit before storage and remove
dirt, debris, salt, etc. to extend paint life.
•If the unit is power-washed, all lubrication points
should be greased before storage.
Warning
Oil escaping under pressure can puncture the skin and cause serious
injury. Do not touch any hydraulic components until the tractor engine has been turned off and
hydraulics disconnected. Before startup, check for loose hydraulic connections.

Copyright 2004 M-B Companies, Inc.
All Rights Reserved
10
Maintenance
MAINTENANCE SCHEDULE
•Check adjustments – every 10 hours
•Grease bearings – every 10 hours
•Grease pivot points – every 50 hours
•Check and refill oil level – every 50 hours
•Replace oil filter – every 250 hours
•Replace hydraulic oil – annually
•Replace brush filler – as needed
•*Note* – Maintenance pertaining to oil and oil filter
only refers to the independent hydraulic systems
provided by M-B.
LUBRICATION
Grease bearings and pivot points per the maintenance
schedule using Chevron Ultra Duty II, Grade 2; or
equivalent high-temp grease.
There are minimum of (8) grease points on the unit;: (4)
at the swing arms, (2) at the pivot points and (2) on the
bearings.
Use Chevron Rykon MV or Dexron-III/Mercon ATF or
equivalent for M-B supplied independent hydraulic
systems. If the oil is supplied by the prime mover, use
the prime mover manufacturer’s recommended fluid.
DECALS
The following informational decals are on your unit.
All grease points on the unit are indicated by the
‘GREASE’ decal.

Copyright 2004 M-B Companies, Inc.
All Rights Reserved
11
Maintenance
FILLER REPLACEMENT
CORE REMOVAL
•Lower broom until brush contacts the ground via
hydraulic lift cylinder or mechanical head anchor.
•Remove bolts attaching motor guard to the brush
frame. Remove guard and set aside.
•Remove (2) ½” bolts attaching motor mount plate to
the brush frame. Slide motor out of mating splined
hub. Let motor hang on hoses.
•Remove hardware holding pillow block bearing to
bottom of brush frame. Complete steps 2 thru 4 on
both ends of core.
•Slide core out the front of broom.
BRUSH REMOVAL
•Remove (3) ½” bolts attaching splined hub to end of
core. Remove hub and set aside.
•Remove (3) or (4) bolts attaching wafer retainer plate
(end disc) to end of core. Set retainer and hardware
aside.
•Slide spent filler and spacers off core and discard.
BRUSH INSTALLATION
•Stand core in upright position and begin filling the
core by sliding an individual segment and spacer
down the full length of the core starting with a poly
segment. Note the location of the drive pin on the
inside ring of each segment. Be sure to rotate each
segment so the position of the pin is on a different
side of the core with each segment being installed.
This will help to insure proper balance on the core.
•Continue stacking the core in a segment-spacer,
segment-spacer configuration until it is full ending
with a segment. Always start and finish with a poly
segment.
•The last segment should actually extend beyond the
end of the core (Minimum ½”) so when the end disc is
installed it compresses the filler onto the core when
the bolts are tightened.
•Install end disc to the end of the core and secure with
original bolts.
•Reinstall splined hub and bearing.
CORE INSTALLATION
•Position refilled core in front of the broom head. Lift
the broom head high enough to place the filled core
back into its original position. Once in place, lower
broom head down onto the pillow block bearing at
each end of the core.
•Reverse steps 2 – 4 from core removal section to
complete reinstallation. Note: Apply grease or anti-
seize to splines before installing hydraulic motors.
•Before placing machine back into service, adjust and
test for proper amount of brush pattern. Excessive
pattern can cause brush failure or premature wear.

Copyright 2004 M-B Companies, Inc.
All Rights Reserved
12
Troubleshooting
Trouble Possible Cause Remedy
Broom does not rotate
1) No hydraulic pressure/flow
2) Hoses disconnected
3) Hoses bent or kinked
4) Pressure relieving to low
5) Electric valve not functioning
a) Check tractor operation
b) Connect hoses and fittings
c) Remove sharp bends and kinks
d) Adjust relief valve
e) Check electrical connections
Bristles wearing unevenly
1) Swing arms out of adjustment
2) Broom head not level
3) Pattern adjustment not set
a) Adjust using bolts on rear
b) Adjust using leveling bolt
c) Adjust on head anchor
Broom sweeping poorly
a) Material is ‘caked-on’ or frozen
b) Uneven sweeping surface
c) Material is too heavy
d) Broom rotating too slowly
e) Tractor moving too fast
f) Pattern adjustment not set
a) Slow down and ‘scrub’ surface
b) Increase pattern to compensate
c) Slow down tractor speed
d) Increase engine speed
e) Slow down tractor speed
f) Adjust at head anchor
Broom does not lift or angle
1) No hydraulic pressure/flow
2) Electric valve not functioning
3) System backpressure
a) Check tractor operation
b) Check electrical connections
c) Check tractor manual
Pump making noise
1) Pump intake blocked
2) Shaft seal leaking
a) Check inlet lines for obstructions
b) Check and repair as necessary

Copyright 2004 M-B Companies, Inc.
All Rights Reserved
13
Parts List

Copyright 2004 M-B Companies, Inc.
All Rights Reserved
14
Parts List
STANDARD MOTOR PARTS (201-75209)
Item Description Part Number Quantity
1 Dust Seal 1
2 Split Wire Ring 1
3 Metal Backup Shim 1
4 High Pressure Seal 1
5 Metal Backup Shim 1
6 Polyamide Seal 1 Items 1-12 are available as a kit
7 Shaft Seal 1 Part# 201-92039
8 Rear Housing Seal 1
9 Body Seals 2
10 Endcover Seal 1
11 Seal Carrier 1
12 Thrust Washer 1
13 Rear Thrust Bearing 201-92027 1
14 Front Housing Bearing 201-92129 1
15 Housing
(Includes #14 & #16)
201-92022 1
16 Rear Housing Bearing 201-92130 1
17 Driveline Link 201-92029 1
18 Reverse Manifold 201-92031 1
19 Manifold Boot 201-92038 1
20 Driveline Spacer 1
21 Freeturn Rotor 201-92032 1
22 Balance Plate 201-92034 1
23 Steel Ball 201-92033 4
24 Endcover 201-92035 1
26 Bolt Set 201-92036 1
27 Shaft 201-92028 1
32 Front Thrust Bearing 1
*Note-Motor shaft shown with keyway, actual shaft has a spline.
This manual suits for next models
1
Table of contents