MD HearingAid H Series User manual

Series H • User Manual
VOLT
+

“
My hearing was so bad,
I felt le out and didn’t
go out much. I hear
sounds now that I haven’t
heard in years. This has
changed my life.
— Phyllis G.

Congratulations
With the VOLT
+
, you are back in control of
the sounds around you, thanks to digital,
rechargeable technology, paired with
user-adjustable controls.
Please read this User Manual in its entirety.
Practice and patience are important as your
ears relearn how to hear. Your results, and
improved quality of life, will depend on the
type and degree of your hearing loss, your
expectations, and frequency of use.

We’re here to help.
Our dedicated, U.S.-based hearing instrument
specialists are the heart and soul of MDHearingAid.
They’re happy to guide and assist you with any
questions you may have. Take advantage of our
free one-on-one phone consultations.
312-366-3899
800-918-3914 (toll-free)
Mon.–Fri. 7:30AM–4:45PM (CST)
24 hours a day, 7 days a week

“
The customer
service has been
outstanding. They
continue to solve
the problem and
give solutions.
— Joan P.

Table of Contents

Package Contents...........3
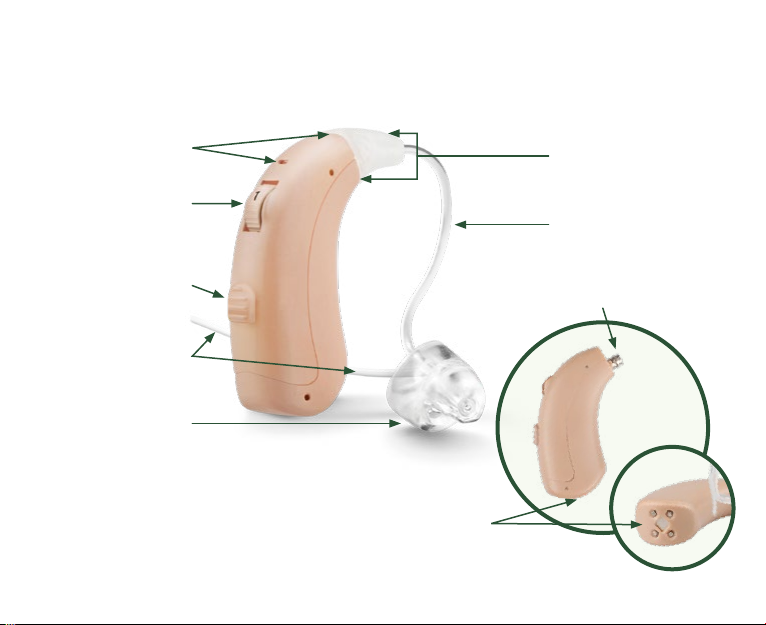
VOLT Diagram ..............4
Quick Start Guide ...........6
Charge ....................7
Place On Ear ..............10
Turn On/Volume ...........11
Program Selection .........12
Care & Cleaning ...........13
Ordering Parts & Protection..16
Replacing Tips & Tubing ....17
Using the Telephone .......20
Troubleshooting ...........21
Warranty & Replacements ..25
Return Policy..............27
Warning to Dispensers......29
Important Notice for Users..31
Notice of Cancellation ......33
Technical Specifications ....34
2

Package Contents*
*Contents will vary depending on quantity ordered.
a) VOLT Hearing Aid(s)
c) Cleaning Tool
b) Charger
Wire Magnet Brush
Thin Tubing
ComfortTIP™
Case
Cord
Power
Adapter
3

VOLT
Body
VOLT Diagram
Microphones
Program Button
Thin Tubing
VOLT comes assembled for your convenience.
Tubing Base
Volume Dial
(on/o control)
Stabilizer Bar
Charging Port
ComfortTIP™
Snap End
4

“
I’m impressed with
the quality and
clarity of sound.
I love that it is
rechargeable.
— Michael S.
5

Le VOLT
in le hand.
Right VOLT
in right hand.
Quick Start Guide
Three Easy Steps for Using Your MDHearingAid®VOLT
If you have a pair, first identify the le and right hearing aid.
Step 1: Charge VOLT
Step 2: Place VOLT on ear
Step 3: Turn VOLT on
To identify le/right VOLT: Hold an aid upright in each hand, with controls
facing you. The tips/tubing point toward each other when in the correct hand.
6

1
a) Plug charging case into a standard outlet.
b) Place VOLT in the charger facing forward.
Blue light will turn on to indicate “charging”.
You may close the case or leave it open—the
hearing aids will charge either way.
c) When fully charged, blue light will turn
green and VOLT is ready to use.
*
b)
a)
c)
*It takes approximately 2.5 hours to fully charge the
VOLT. On average, a full charge lasts 24–30 hours.
Step 1: Charge VOLT
Please note: VOLT does not have
to be turned o in order to charge,
but we recommend turning it o
to avoid whistling.
7

Charging Case Information
Charging case can charge VOLT up to three (3) times without being plugged in.
*
When case has less than 20% power, the middle light on case will flash green.
When case has more than 20% power, the light will be solid green.
Once battery is full, a sensor stops the charging process. There is no risk
of battery degeneration if VOLT is le on the charger. The charger can also
remain plugged in while not in use.
Blue
Light Device
Solid Green
Flashing Green
O
Hearing aids or case
Case only
Hearing aids or case
*It takes approximately 4.5 hours to fully charge the case.
Meaning
Charging
Fully charged
Less than 20% power
Not charging
8

2
Charging Case Assembly
The charger is made up of three pieces:
a charging case, a cord, and a power adapter.
a) Connect the small end of cord to the
opening on the back of charging case.
b) Connect the other end of cord (USB) to
the power adapter.
a)
b)
Charging
Case
Cord
(small end)
Cord
(USB end)
Power
Adapter
9

2
ý
þ
Step 2: Place On Ear
Prevent ComfortTIP™from coming o
in ear. Always verify the tip is pushed
all the way on tubing before inserting
tip in ear.
a) Hold thin tubing at the stabilizer
bar junction. Insert ComfortTIP with
gentle pressure into ear canal.
b) Place VOLT body behind ear.
The curve of thin tubing should rest
on top of your ear comfortably (next
to glasses).
c) Tuck stabilizer bar in the outer bowl of ear.
It may be trimmed to suit the size of your ear.
b)
a)
c)
10

3
Turn O/
Decrease
Turn On/
Increase
Caution! When VOLT is turned on, it will
beep and then take a few seconds to begin
amplifying sound. To avoid a sudden blast
of sound, please raise the volume SLOWLY.
Please note: You may hear whistling if VOLT is on but not positioned securely
in your ear. Once the ComfortTIP is properly inserted, whistling should stop.
Step 3: Volume
The VOLT uses a volume dial ranging from
0 (minimum) to 3 (maximum). The volume
dial also functions as the on/o control.
• ON/Increase: Rotate volume dial up.
• OFF/Decrease: Rotate volume dial down.
11

Program Selection
To change programs, press the program button.
Beeps will indicate a program change.
Experiment with these programs at various volumes
to find what combinations work best for you.
Watching TV and time with family at home.1. Quiet*
Program Best ForBeeps
2. Social
3. Noisy
4. Restaurant
1 beep
2 beeps
3 beeps
4 beeps
Small group meetings, church, time
with friends.
Large crowds, restaurants, traic, nature
sounds, or high octave music.
Any loud environment where you need to
hear directly in front of you.
*Program 1 is the default setting. When VOLT is turned o, it will reset to Program 1.
12

Care and Cleaning
Daily Cleaning:
Use the cleaning tool brush to remove dust, earwax, or other debris from the
ComfortTIP™, buttons, and microphones (found on the top and front of VOLT).
The VOLT body can be cleaned with a tissue or so cloth. Do not use water,
alcohol, or other liquid agent to clean the VOLT as it may damage it.
ComfortTIP MicrophonesButtons
13

Regular Cleaning:
Use the cleaning tool wire to remove debris from tubing.
a) Remove tubing (see page 18).
b) Thread wire through tubing base and out of the tip.
c) Wipe end of wire clean and repeat as necessary.
d) Reattach tubing to VOLT body.
14

Water-Resistance and General Tips
A water-resistant coating (IP57 rating) protects the VOLT
from moisture, sweat, dust, and debris. However, we still
recommend keeping the VOLT dry at all times.
Tips for Optimal Performance:
• Avoid physical shock, such as dropping it on the floor.
• Store in a cool dry place, such as a hearing aid dehumidifier.
• For maximum battery life, charge VOLT until blue light turns
green with each charge.
• To extend the overall life of your battery, do not store your
VOLT or charging case for over a month without charging.
• Do not use hair spray or a hair dryer while wearing your VOLT.
• Do not expose your VOLT to excess moisture or heat.
15
This manual suits for next models
1
Table of contents
Popular Personal Care Product manuals by other brands

Juzo
Juzo JuzoPro Manu Xtec Palmar Instructions for use

Orlaya skin
Orlaya skin DermaDeep RF Pro instruction manual

Direct Healthcare Services
Direct Healthcare Services DYNA-TEK HEEL PAD user manual

Philips
Philips AVENT SCF154/10 Specifications

Orliman
Orliman THERMOMED 4401 INSTRUCTIONS FOR USE AND PRESERVATION

DeVilbiss Healthcare
DeVilbiss Healthcare SleepCube DV55 Bilevel ST cpap Series instructions