Mecal UNI MECAL VERSION User manual

UNI operating instructions Created by Mecal s.r.l. 1
Mecal Srl
Sede legale e Stab.: Strada per Felizzano, 18 - 15043 Fubine (Al)
Tel. (0131) 792792 - Fax (0131) 792733/792734Cap. Soc. € 500.000 int.vers.
Registro delle Imprese di Alessandria n. 11690 - CCIAA Alessandria - REA N. 153887 - N. Meccanografico AL002563
Codice Fiscale 01328270069 – Codice ISO: IT - Partita Iva: 01328270069
ISTRUZIONI OPERATIVE UNI VERSIONE MECAL
OPERATION AND MAINTENANCE MANUAL FOR UNI MECAL
VERSION

UNI operating instructions Created by Mecal s.r.l. 2
MECAL s.r.l.
Strada per Felizzano 18
Fubine (AL) 15043
ITALY
Phone: +39 0131 792792
Fax: +39 0131 792733
Email : info@mecal.net
Web : www.mecal.net
Preferred by Professional EDS Specialist
Queste istruzioni sono state create in data Aprile 2009, possono essere soggette a modifiche.
Inoltre MECAL dichiara che le immagini riportate in questo manuale non potrebbero essere
aggiornate con modifiche tecniche apportate sulla macchina per effettuare migliorie o richieste
particolari.
Preferred by Professional EDS Specialist
These instructions have been created in April 2009 and Mecal reserves the right to modify it at
anytime. Furthermore, the pictures shown might not represent the latest configurations or special
versions manufactured to satisfy special customers needs.

UNI operating instructions Created by Mecal s.r.l. 3
INDICE: Pagina INDEX: Page
1) Avvertenze importanti …………………
1.1) Simbologia …………………………
2) Identificazione …………………………..
3) Descrizione del prodotto ……………...
3.1) Caratteristiche tecniche ….……….
3.2) Descrizione del prodotto ………….
4) Ispezione alla consegna ………………
5) Installazione ……………………….…….
5.1) Installazione UNI …………………..
5.2) Montaggio Kit di aggraffatura …….
5.3) Inserimento terminale ……………..
6) Regolazioni ………………………………
6.1) Regolazione altezza terminale……
6.2) Regolazione lama terminale………
6.3) Regolazione guida terminale……..
6.4) Regolazione posizione arpione ….
6.5) Alimentazione terminale ………….
6.6) Regolazione posizione
avanzamento……………………….
6.7) Regolazione posizione riarmo
(passo del terminale) ……………..
6.8) Regolazione Bell-Mouth ………….
7) Manutenzione …………………...
7.1) Particolari di ricambio ……..
7.2) Pulizia e lubrificazione …….
7.3) Immagazzinamento ………..
8) Ricerca guasti e risoluzione
problemi …………………..
04
05
06
07
07
08
09
10
11
12
15
21
21
21
22
22
23
23
24
24
26
26
27
27
29
1) Important warnings …………………….
1.1) Symbology ………………………….
2) Identifcation ……………………….……..
3) Product description ..…………………..
3.1) Technical information ……………...
3.2) Product description ………………..
4) Inspection upon delivery ……………...
5) Installation ……………………………….
5.1) UNI’s installation …………………...
5.2) Crimping kit …………………………
5.3) Terminal insert ……………………..
6) Adjustment ………………………………
6.1) Terminal Height adjustment ………
6.2) Blade terminal adjustment ………..
6.3) Guide terminal adjustment ………..
6.4)
6.5) Terminal alimentation ……………..
6.6) Advanced settino ………………….
6.7) Feeding adjustment ……………..
6.8) Bell-Mouth adjustment ……………
7) Maintenance …………………………….
7.1) Spare parts …………………..……
7.2) Cleaning and lubrication ………….
7.3) Storage ………………………..…...
8) Problem shooting ……………………..
04
05
06
07
07
08
09
10
11
12
15
21
21
21
22
22
23
23
24
24
26
26
27
27
29

UNI operating instructions Created by Mecal s.r.l. 4
1) Avvertenze importanti
1) Important warnings
Fase Fase Operazione - Operation
• Rimuovere l’ anello di
protezione in gomma • Remove the spacer’s
rubber inserted
• Verificare la corretta
altezza di taratura
della pressa al punto
morto inferiore PMI,
pari a mm 153,8.
• Verify the press
crimping height
setting : 153,8,8 mm
at Bottom Dead
Center.
• Verificare
assolutamente
l’allineamento
dell’asse pressa con
l’attrezzo di lavoro
• Carefully verify that
the press and the
applicator’s axis are
perfectly in line
• Posizionare la ghiera
di regolazione
secondo le indicazioni
riportate sulla
targhetta di
identificazione
• Set the top ring of
the continuous
adjusting head
according with the
data on the
identification plate
N.B. Dopo aver installato l’ UNI, far compiere manualmente alla pressa un ciclo completo per mezzo
dell’apposita chiave, per verificare che:
• Non ci siano impedimenti al libero funzionamento dell’applicatore
Note: After having installed the UNI, cycle manually the press by means of the
supplied wrench in order to check that:
• The applicator turns smoothly without sticking in any way

UNI operating instructions Created by Mecal s.r.l. 5
1.1) Simbologia 1.1) Symbology
ATTENZIONE: questo simbolo viene utilizzato per indicare alcune parti del manuale in
cui vengono riportate operazioni che devono essere lette con attenzione
WARNING: this symbol identifies any portion of this manual that should be carefully
read and understood
STOP: questo simbolo viene utilizzato per indicare alcune parti del manuale in cui
vengono riportate operazioni che devono essere controllate e, quindi, non proseguire. Si
potrebbe causare un danno meccanico alla macchina.
STOP: this symbol identifies all the situations where the operator is supposed to stop
and procede to the suggested checks before resuming the operation.
Ignoring it would mean causing damages to the equipment.
INFORMAZIONI: questo simbolo viene utilizzato per indicare alcune parti del manuale in
cui vengono riportate note di informazioni generiche
INFORMATION: this symbol identifies any portion of this manual where generic
informations and suggestions could be found
RICICLO: questo simbolo indica le parti della macchina o dell’imballo che devono essere
riciclate o smaltite secondo le norme vigenti
RECYCLE: this symbol identifies the parts of the product and its package that must be
recycled or disposed in accordance with the local rules.
SALVATAGGIO: questo simbolo viene utilizzato per indicare alcune parti del manuale in
cui vengono riportate note o consigli dove occorre effettuare un salvataggio dei dati
dell’attrezzatura
SAVE : this symbol identfies any portion of this manual that refers to data that should be
saved.
UNI operating instructions Created by Mecal s.r.l. 6
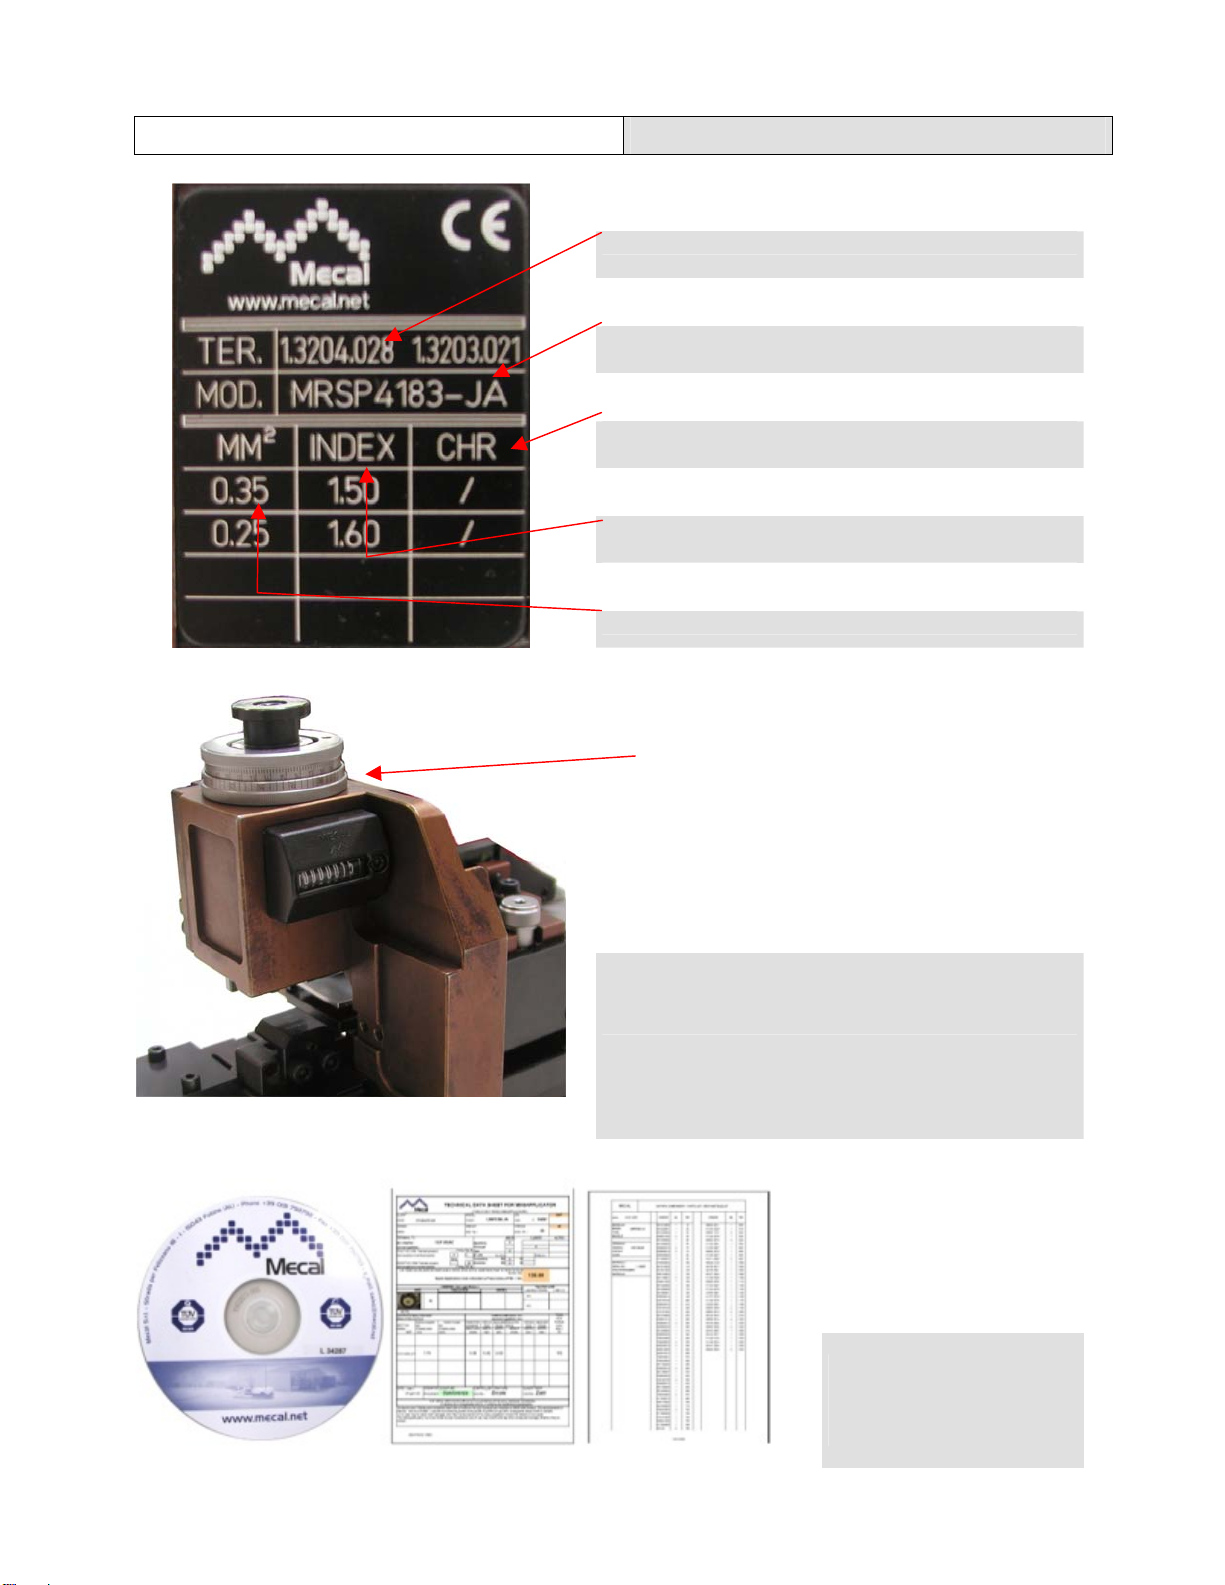
2) Identificazione 2) Identification
P/N terminale del cliente o fornitore
Terminal customer reference (Part Nr.)
Modello miniapplicatore relativo al P/N del terminale
Mecal’s Miniapplicator code (related to the above
mentioned terminal)
Altezza di aggraffatura (CHR)
Crimping Height (CHR)
Posizione della ghiera (INDEX) riferita all’altezza di
aggraffatura (CHR)
Position of the top adjusting ring (INDEX) allowing to
obtain the crimping height (CHR) written on the right
Minima e massima sezione di cavo
Wire cross section (min & max)
Numero di serie
Serial number
CD con numero di serie e
documentazione completa
di Data Sheet, distinta base
ed esplosi
CD containing all the
applicator’s relevant data,
including component list
and drawings

UNI operating instructions Created by Mecal s.r.l. 7
3) Descrizione del prodotto 3) Product description
3.1) Caratteristiche tecniche 3.1) Technical data
• NOME
UNI
• TIPOLOGIA
Miniapplicatore laterale con avanzamento
manuale.
• ALTEZZA DI LAVORO
153,8 mm (6,055”)
• CORSA DI LAVORO
40 / 30mm (1,575 / 1,18”)
• TIPOLOGIA CONTATTI
Laterali in bandella
• SPESSORE MATERIALE CONTATTO
Max 0,6mm ( 0,023 “) con sezione max 6mm²
( 9 AWG )
• ALIMENTAZIONE
Manuale
• PESO
8,8 Kg (19,5 lb)
• DIMENSIONI
W 315 x H 212 x D 125 (mm)
W 12,4 x H 8,4 x 4,9 (“)
• REGOLAZIONE AGGRAFFATURA
Ghiera micrometrica con campo di
regolazione 2,7mm (0,106”) e risoluzione di
0,02mm (0,00078”). Cod 951270204
• MATRICI
Standar Mecal
• NAME
UNI
• DESCRIPTION
Manual left side feed miniapplicator
• PRESS LOWER DEAD POINT
153,8mm (6,055”)
• STROKE
40 / 30mm (1,575 / 1,18”)
• TERMINAL DESCRIPTION
• TERMINAL THICKNESS
Max 0,6mm ( 0,023 “) and section max 6mm²
( 9 AWG )
• FEEDING
Manual
• WEIGHT
8,8 Kg (19,5 lb)
• DIMENSIONS
W 315 x H 212 x D 125 (mm)
W 12,4 x H 8,4 x 4,9 (“)
• CRIMPING HEIGHT REGULATION
Continuous regulation head with a2,7mm
range (0,106”)and 0,02mm resolution
(0,00078”). Part number 951270204
• CRIMPERS
Standar Mecal
UNI operating instructions Created by Mecal s.r.l. 8
3.2) Descrizione del prodotto 3.1) Product description
L’ UNI è un alimentatore universale di terminali metallici per unità di aggraffatura.
L’ alimentazione dei terminali avviene tramite azionamenti manuali,conservando il corretto
posizionamento del terminale sull’ asse di aggraffatura.
Le operazioni di regolazione dell’UNI verranno descritte nel paragrafo 5.3 ed avvengono
mediante l’ uso di pomelli dal pratico utilizzo che si possono così raggruppare:
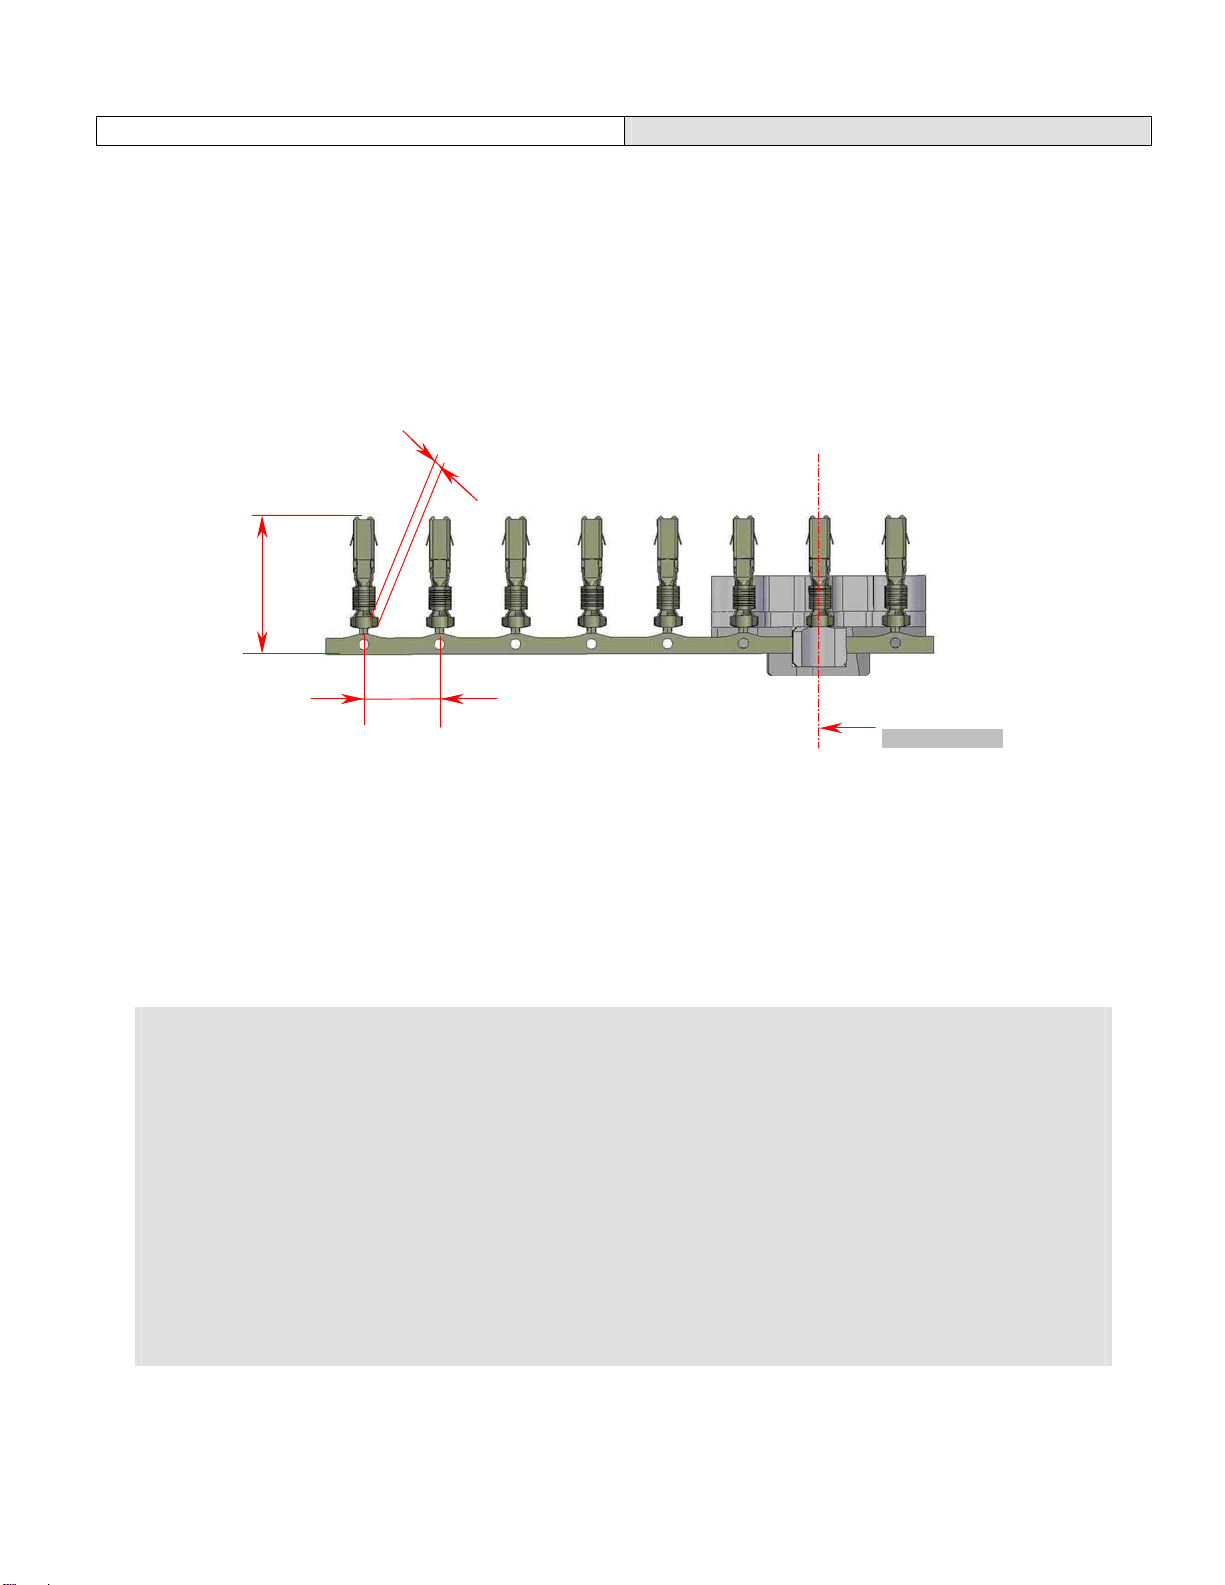
- regolazione in funzione della lunghezza del terminale L1 (vedi Fig, 1)
- regolazione in funzione dell’ altezza del terminale H1 (vedi Fig, 1)
- regolazione in funzione del passo della bandella P1 (vedi Fig, 1)
Fig. 1
L’ingombro contenuto permette all’ UNI di essere applicato sulla pressa MECAL P107 o
similari con aggancio standard e altezza di taratura macchina al P.M.I. (punto morto
inferiore) di 153,8mm. La regolazione della profondità dell’impronta delle matrici di
aggraffatura avviene mediante una ghiera di regolazione dell’ altezza di aggraffatura con
un campo di lavoro di 2,7mm ed una risoluzione di centesimale.
UNI is universal terminals supplied to cross unit crimping.
Terminal supply happen by means manual operation always the mantain the correct
position of the terminal to right crimping axis.
This operations for setting the UNI will be described in the 5.3 paragraph and happening
by means the dedicated screws by easily use as wich can gather:
- set the length’ s terminal L1 (vedi Fig, 1)
- set the height’ s terminal H1 (vedi Fig, 1)
- set the pitch’s terminal P1 (vedi Fig, 1)
Thanks to the reduced dimensions, the UNI can fit on the P107 Mecal press or similar
with a standard coupling and with the lower dead point of 153,8mm. The adjustment of the
depth of the crimping zone is done through the continuous regulation head with a 2,7 mm
range and a resolution of 0.02mm.
P1
L1
H1
ASSE DI AGGRAFFATUR
A
CRIMPING AXIS

UNI operating instructions Created by Mecal s.r.l. 9
4) Ispezione alla consegna 4) Ispection upon delivery
L’UNI viene consegnato in apposito imballo
contenente:
• UNI
• CD istruzioni e uso manutenzione
(Optional) su richiesta:
• Kit aggraffatura
• Foto sezione terminale aggraffato (allegato a
file si CD)
• Capability (allegato a file su CD)
Alla consegna:
• Verificare che l’applicatore non abbia
subito danni e non vi siano parti mancanti
controllando il documento di
accompagnamento
• In caso di anomalia avvisare Mecal
entro e non oltre i 10 giorni dalla data di
ricevimento
•
L’imballaggio deve essere smaltito
come da norme vigenti, non disperdere
nell’ambiente: rivolgersi ad aziende
autorizzate per lo smaltimento.
The UNI is delivered protected by a dedicate
packaging, which will contain:
• UNI
• CD
(Optional) upon request
• Kit of cross spare parts
• One picture of the terminal cross section
(insert file on CD)
• One capability study (insert file on CD)
Alla consegna:
• Check for transportation damages and
make sure that all the parts listed are there
• In case of damages and/or missing
parts, please notify Mecal within 10 days
from receiving the applicator
• The packge should be disposed
according the local rules

UNI operating instructions Created by Mecal s.r.l. 10
5) Installazione 5) Installation
Questa operazione preliminare e' molto importante per il corretto funzionamento. Pulire la
superficie di staffaggio Agarantendo un buon appoggio fra la base della pressa e quella
dell’ UNI.
Settare con apposito Strumento di taratura l'altezza corretta di lavoro al punto morto
inferiore PMI=153,8 (±0.01).
This preliminary operation is very important in order to assure a perfect working of the tool.
Clean the surface A, guaranteeing the maximum of the supporting plane between the base
of the press and the one of the Uni tool’s.
Set the correct height with an appropriate crimp height gauge. This height must be, in its
lower dead point, 153,8 mm (+/- 0,01).
A

UNI operating instructions Created by Mecal s.r.l. 11
5.1) Installazione UNI 5.1) UNI Installation
ATTENZIONE: tutte le operazioni di installazione vanno effettuate con pressa in emergenza o
spenta.
WARNING : make sure the press is either turned off or in “emergency” condition.
• Posizionare l’attrezzo sulla base di fissaggio A, allineare la basetta Ddell’UNI con il
dentino Be avvitare il pomello di serraggio C.
• Verificare che la chiusura avvenga in modo corretta controllando che l’attrezzo sia
perfettamente aderente alla base di fissaggio A. Il perno Edell’applicatore deve
essere centrato con l’attacco a “T” della pressa.
• Place the tool on the fixing plate A, line up the UNI Dbase with the B hook and
tighten up the knob C.
• Verify that the tool is flat on the A base and make shure that the applicator’s E pin
must be perfectly centered with referenche to the press “T “ shank.
C
A
EB
D

UNI operating instructions Created by Mecal s.r.l. 12
5.2) Montaggio kit di aggraffatura 5.2)
ATTENZIONE: tutte le operazioni di settaggio macchina vanno effettuate con pressa in emergenza
o spenta.
WARNING : make sure the press is either turned off or in “emergency” condition.
Regolare le ghiere del miniapplicatore nella
posizione corrispondente allo 0
X( Ghiera rame )
Y( Ghiera resina )
Installare i coltelli del kit di aggraffatura sulla
mazza porta-coltelli e serrare la vite Z
X
Y
Z

UNI operating instructions Created by Mecal s.r.l. 13
Installare le incudini del kit di aggraffatura sulla
slitta e serrare la vite W
Bloccare la slitta per mezzo della leva Ke
verificarne la corretta battuta con il blocchetto
installato sulla basetta.
W
K

UNI operating instructions Created by Mecal s.r.l. 14
Verificare l’ allineamento tra il kit incudini ed il
kit dei coltelli ed eventualmente intervenire
utilizzando la vite Q come specificato nella figura
seguente.
Utilizzare una chiave H per agire sulla vite Qche
permette di regolare l’allineamento tra il kit delle
incudini e quello dei coltelli senza rimuovere la
slitta porta incudini..
Verificare la corretta posizione dell’ estrattore ed
eventualmente intervenire allentando la vite Je
correggendone la posizione
Ottenuta la posizione corretta serrare la vite J.
Q
J
H

UNI operating instructions Created by Mecal s.r.l. 15
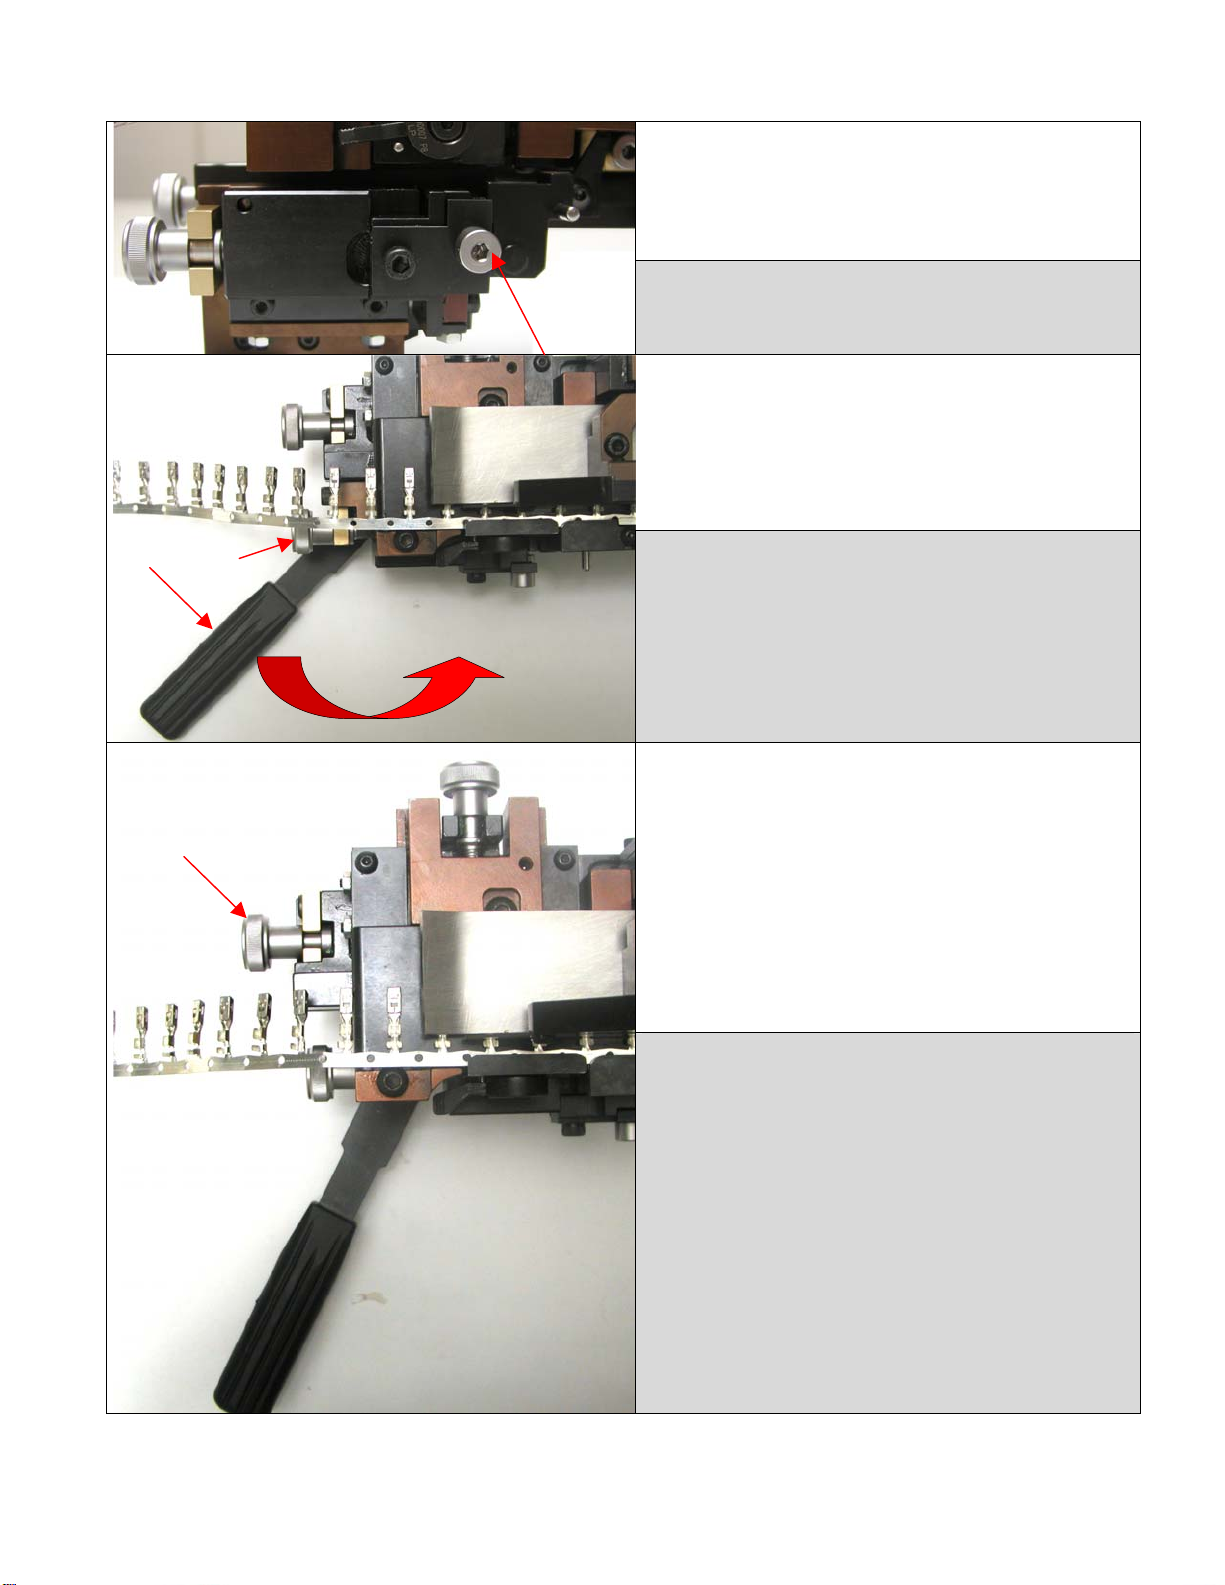
5.3) Inserimento terminale 5.3)
ATTENZIONE: tutte le operazioni di settaggio macchina vanno effettuate con pressa in emergenza
o spenta.
WARNING : make sure the press is either turned off or in “emergency” condition.
Liberare la frizione mediante il particolare eccentrico A
Release the clutch by means of the lever A
Presentare il terminale da aggraffare e regolare
l’altezza del terminale H1 agendo sul pomello B
H1
A
B

UNI operating instructions Created by Mecal s.r.l. 16
Regolare la posizione della lama guida terminale
tra l’aletta rame e l’aletta resina D1 agendo sulla
vite C
Regolare l’ altezza della lama guida terminale
allentando le vite 1e 2.
Serrare le viti una volta trovata la posizione
corretta.
Inserire il terminale da aggraffare nella guida Ee
portarlo in posizione come illustrato
1 2
C
E
D1

UNI operating instructions Created by Mecal s.r.l. 17
ATTENZIONE: Per sfilare il terminale
abbassare l ‘ arpione ,come illustrato in
figura.
Chiudere la frizione mediante il particolare
eccentrico A
UNI operating instructions Created by Mecal s.r.l. 18
Portare l’ arpione in posizione di lavoro e inserirlo
nel foro presente sulla bandella agendo sul
pomello a vite L
Azionare la leva manuale Me portare il primo
terminale della bandella sull’ asse di aggraffatura e
regolare la corretta centratura sull’ asse tramite il
pomello I
Portare in riarmo l’ arpione e regolare la battuta
del carrello mediante il pomello a vite N in modo
da agganciare il passo di un solo terminale.
I
L
M
N
UNI operating instructions Created by Mecal s.r.l. 19
Regolare la posizione del Bell-Mouth utilizzando
il pomello G
Si consiglia di effettuare manualmente un ciclo completo della pressa con l’apposita chiave e
verificare che:
1) Non ci devono essere impedimenti meccanici nelle parti di scorrimento
2) Il terminale deve essere posizionato correttamente in asse con i particolari di aggraffatura
e taglio come descritto nel paragrafo 5.3
After having installed the applicator, by means of the supplied wrench manually cycle the press, in
order to check that:
1) The Magnum applicator cycles smoothly without sticking
2) The terminals correctly placed on the anvil, in line with the same and the other crimping
and cutting parts. If further adjustments are needed, as described in the 5.3 paragraph
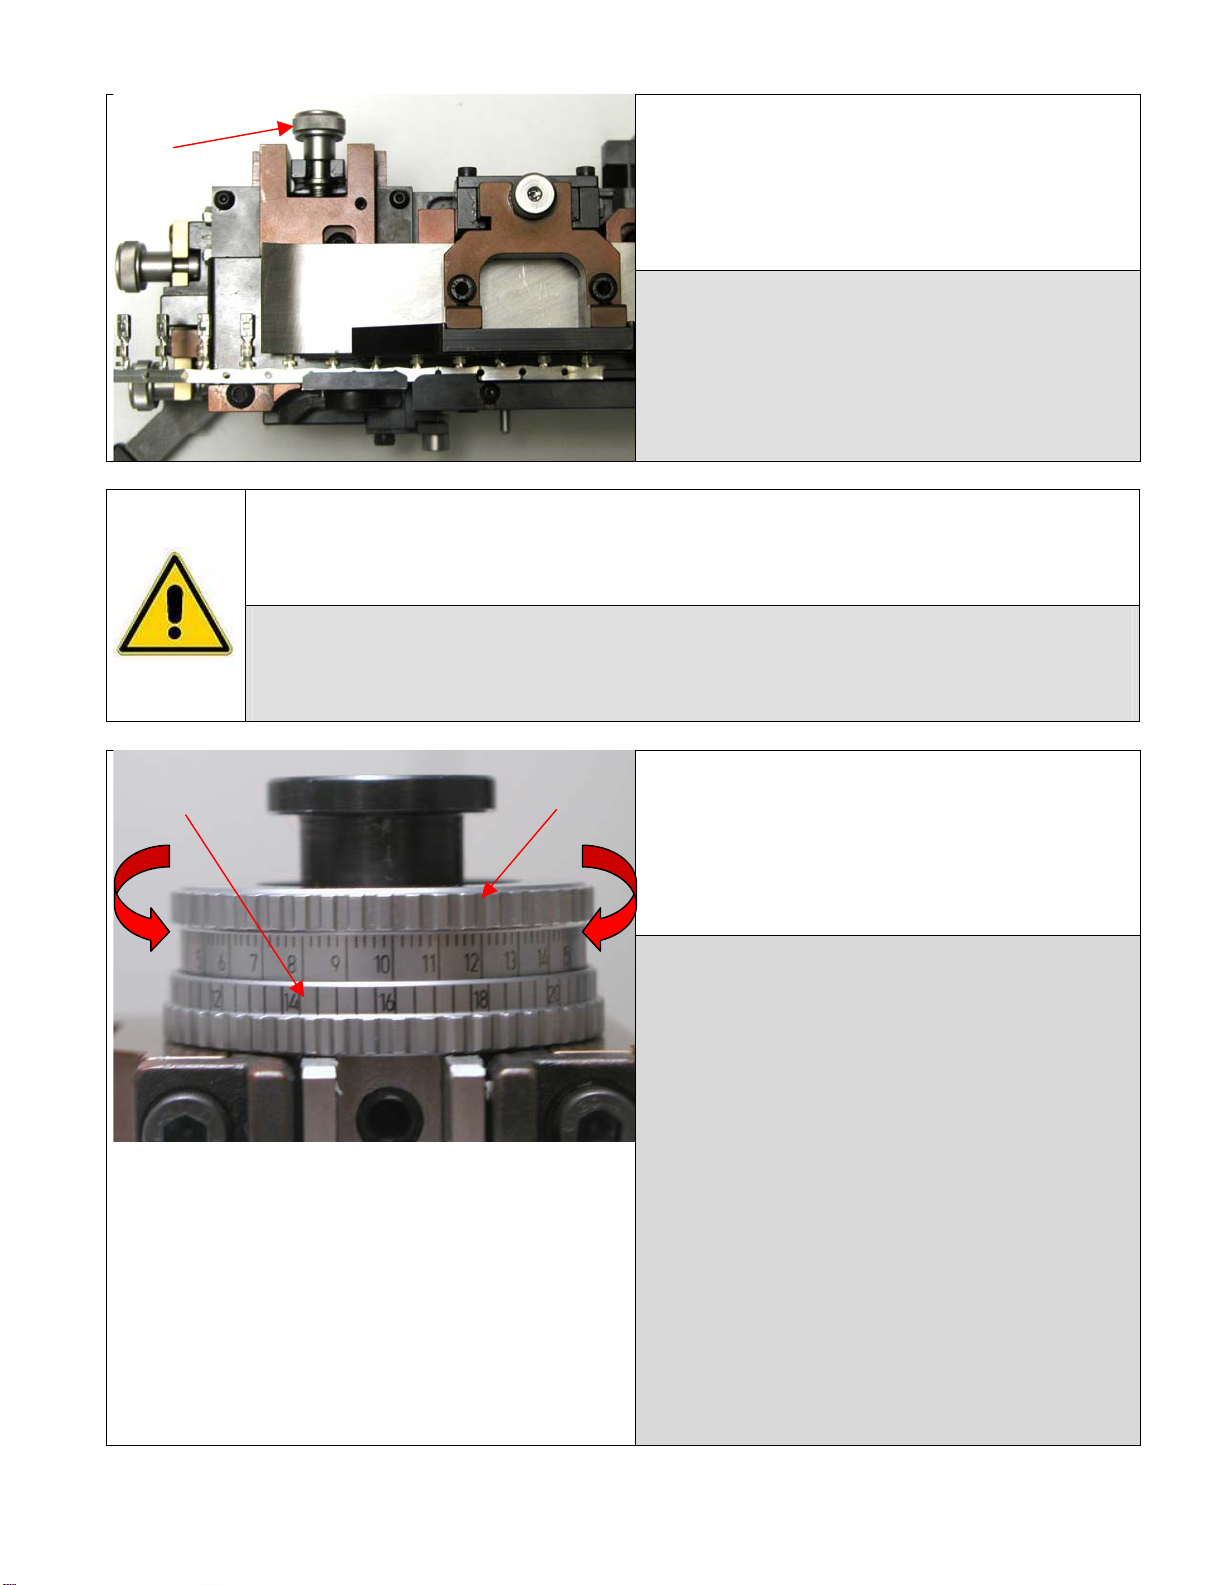
Regolare le ghiere del miniapplicatore nella
posizione corrispondente all’ altezza di
aggraffatura desiderata
X( Ghiera rame )
Y( Ghiera resina )
G
X
Y

UNI operating instructions Created by Mecal s.r.l. 20
ATTENZIONE: nel caso in cui la bandella presenti piegature troppo evidenti o addirittura tratti di
materiali deformati , rimuovere tali parti mediante appositi troncatori. Per un corretto funzionamento
della macchina occorre garantire il buono stato della bandella per tutta la sua lunghezza.
Se durante il ciclo manuale si riscontrano impedimenti meccanici verificare:
1) Corretto bloccaggio dell’applicatore sulla pressa, paragrafo 5.1 (Installazione UNI)
2) Corretto settaggio della pressa al P.M.I. di 153.8 mm. paragrafo 1 (Avvertenze importanti) e
5 (Installazione)
3) Verificare la posizione delle ghiere che non siamo completamente aperte/chiuse, vedi
paragrafo 5.2 (Montaggio kit di aggraffatura)
Se il terminale non è posizionato correttamente:
1) Verificare che la bandella non abbia subito pieghe brusche durante lo svolgimento dalla
bobina ed impediscano il libero passaggio fra le guide
2) Verificare che l’eccentrico frizione o la leva siano in posizione di lavoro vedi paragrafo 5.3
(Inserimento terminale)
If, while manually cycling the press, something binds, stop immediately and make sure that:
1) The tool is correctly mated to the press – see point 5.1
2) The press id correctly set at the standard di 153.8 mm crimping height – see point 1 & 5
3) The adjusting rings are not set too low (too small crimping height) – see point 5.2
If the terminal is not correctely positioned, verify that:
1) Verificare che la bandella non abbia subito pieghe brusche durante lo svolgimento dalla
bobina ed impediscano il libero passaggio fra le guide
2) The brake cam and/or lever are in the operating position – see point 5.3
ATTENZIONE: tutte le operazioni di regolazione vanno effettuate con pressa in emergenza o
spenta.
WARNING : make sure the press is either turned off or in “emergency” condition.
Table of contents
Other Mecal Industrial Equipment manuals


Popular Industrial Equipment manuals by other brands

ABB
ABB Power2 Series Aassembly Instructions

Eaton
Eaton SOL30X2 Series Instruction leaflet

Labrie
Labrie Automizer Versa Hand General Maintenance

SUHNER ABRASIVE
SUHNER ABRASIVE LTB 6-500 Technical document

Southwestern Industries
Southwestern Industries TRAK A.G.E. 2 Programming and operating manual

SCHUNK
SCHUNK VERO-S Series Assembly and operating manual


