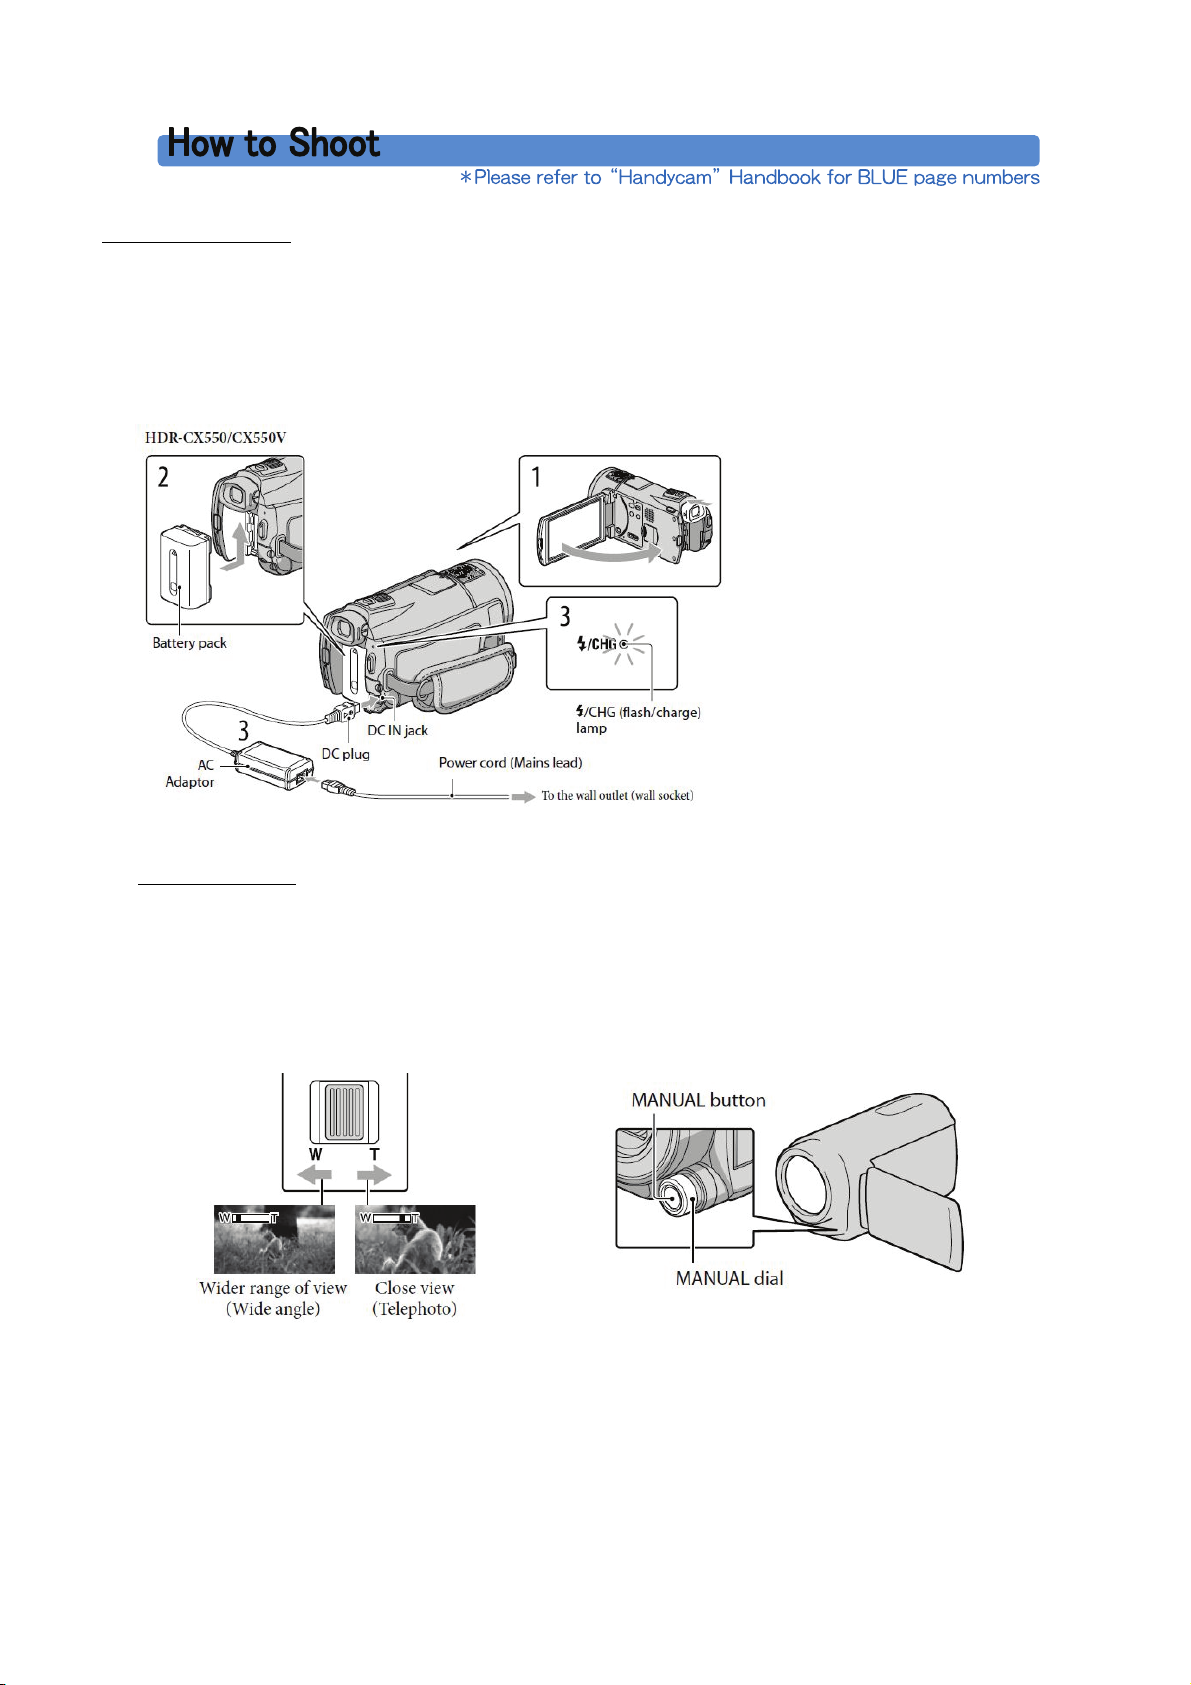
manuals.online logo
Brands
  1. Home
  2. •
  3. Brands
  4. •
  5. MeCan
  6. •
  7. Professional Video Accessories
  8. •
  9. MeCan MA-HDS User manual

MeCan MA-HDS User manual

Connect main unit(①) and φ37mm
conversion ring(④) for XR550V.
Install ( ①+④) to camera’s filter
thread which is located around lens.
Instruction for connecting to each
microscope type is as follow.
Take out eyepiece lens
and directly install main
unit(①)
When inside diameter
of eyepiece is φ30mm,
use conversion ring(②)
Insert main unit ( ①)
directly into phototube.
If a fixating screw is
attached to phototube,
use it to secure the
adapter tightly to the
phototube.
※Compatible with direct (1.0x) c-mount only
※When unstable, try fixate with duct tape, or
have a support unit beneath the camera.
Screw-in C-mount sleeve
(③) to microscope’s
C-mount. Install
conversion ring ( ②) to
main unit(①), and insert
into C-mount sleeve.
Secure with screw at the
side.
Install [NY-JIS ]
fixation sleeve (sold
separately) to JIS
phototube. Then,
Insert main unit( ①)
into it and secure with
screw at the side of
[NY-JIS].
Install [NY-BH ]
fixation sleeve (sold
separately) to PT
phototube. Then,
Insert main unit and
secure with screw at
the side of [NY-BH].
Camera Preparation
・ Connect the AC Adaptor and the power cord (mains lead) to your camcorder and the wall outlet
(Auto shut-off feature would be canceled) p12
・ Open the LCD screen and turn on your camcorder by pressing power. p15
・ Set the recording aspect ratio according to the connected TV (16:9 or 4:3) p40, 87
・Select the recording media (internal hard disk or memory card)。p18
1. Recording Movie
・ Press MODE button and select movie recording mode. Please make sure Movie recording
lamp is lit. p21
・ Adjust the zoom to the extent where there is no vignette. (Vignette would occur with WIDE ANGLE,
please set zoom to TELEPHOTO setting. When using a micrometer, please adjust the zoom to the
extent where the micrometer scale is clearly visible.p26
・ When shooting with high magnification (such as with biological microscopes), we recommend that you
set the focus until it cannot be adjusted any farther away (mountain mark will appear) using MANUAL
dial. A detailed focusing should be done with the microscope. p31-32
・ Set flash mode off. p81
・ Start recording and stop by pressing start/stop button.
・ Camera has image stabilization, but operation with a remote control is recommended.p123
▼
Shooting still photo. Press POWER and by using MODE button, select RECORDING PHOTO.
Photo recording lamp will turn on. Press PHOTO button. You can capture still images by pressing PHOTO
button even while recording a movie.
3. Manual settings・・・ items used mostly for capturing microscopic images
Shooting set ・・・ manual setting for movie shooting p86
▼
AE Shift. p74
・ You can manually adjust exposure to brighter or darker.
▼
WB (white balance) shift. p85
・ You can adjust the white balance manually.
Shooting Option setting・・・you can alter the settings by using the OPITON MENU p68
▼
Manual white balance setting. p72
・ Select white balance from option.
・ Touch ONE PUSH. Frame a white object on the microscope stage such as a piece of paper, to fill the
screen under the same lighting conditions as you will shoot the subject. Touch . flashes
quickly. When the white balance has been adjusted and stored in the memory, the indicator stops
flashing
※ When the microscope light is too bright, it may cause vignette since the camera automatically reduces
exposure. In that case, please adjust the lighting intensity of the microscope.
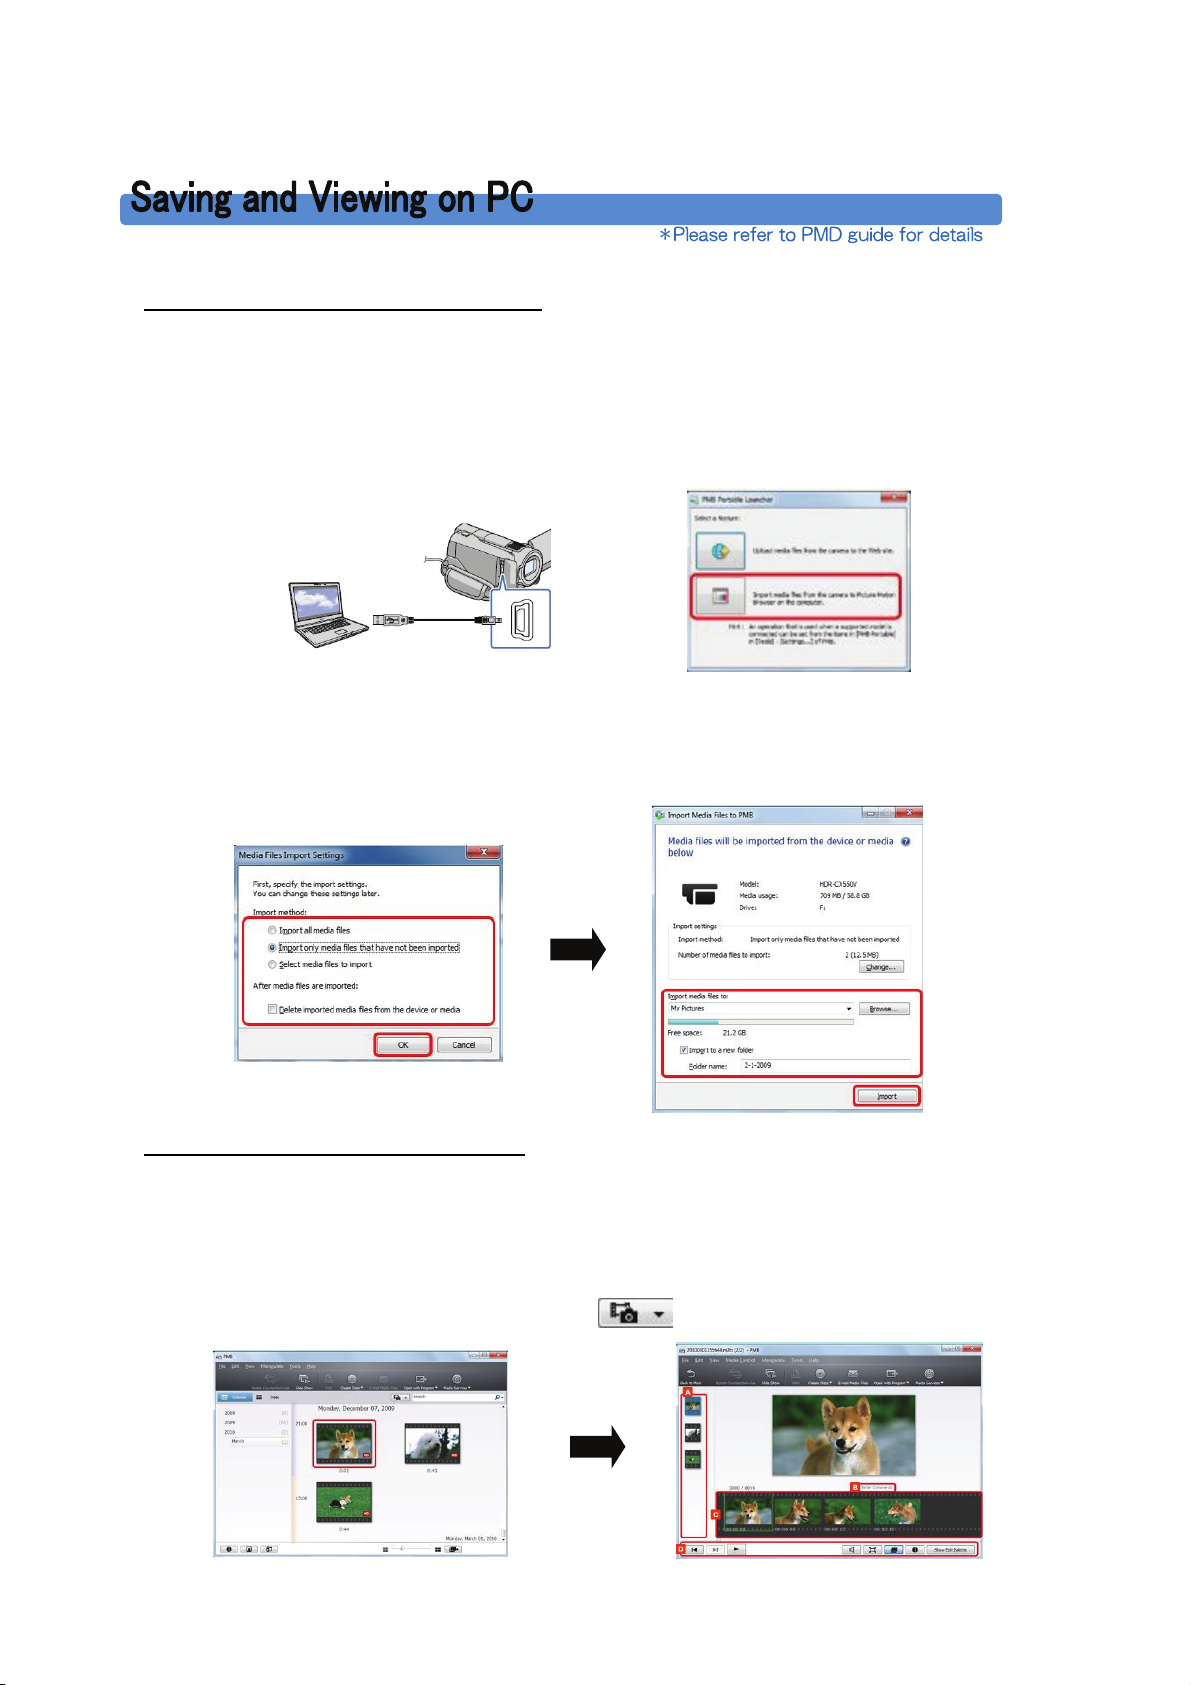
1. Playback movie on LCD of camcorder
・ Press (View images). The VISUAL INDEX screen appears after a few seconds.
(Movies are displayed and sorted by recording date)
・ Select movie from INDEX and play. p33-34
2. Playback photo on LCD of camcorder
・ Press (View images). The VISUAL INDEX screen appears after a few seconds.
(you can search photo from data button) p33
・ Touch , and select the desired photo from the list.
・
3. Playing images on a TV
・ Switch the input on the TV to the connected jack. p39
(Refer to the instruction manuals of the TV)
・ Open the cover of the connector on your camcorder.
・ Select the type of connection cables between camcorder and TV (refer top42~for each type)
・ Operate with LCD monitor after done connecting and image appeares on LCD,
1. Importing videos and photos to a computer
・ Connect your camcorder to the computer, or insert the memory card into the computer.
* If the [PMB Portable Launcher] window opens, select [Import media files form the camera to
Picture Motion Browser on the computer].
* If [USB SELECT] is displayed on the LCD screen of your camera/camcorder,
select the recording medium.
・ When you first import media files, the [Media Files Import Settings] window opens.
Select the import method, and click [OK].
・ The [Import Media Files to PMB] window opens. Confirm the folder to be imported, and click [Import].
2. Playing back videos/photo with computer
With PMB, you can select video/photo from the thumbnail list and play them back on a larger window.
・ In Calendar View or Index View, double-click the video/photo you want to view. If you want to view
multiple video/photo, select the video/photo, right-click one of the video/photo and select [Preview].To
display only video/photo in the main window click and select [Show video/photo only].
For more information such as Editing, saving to DVD etc., please refer to the PMB support site
http://support.d-imaging.sony.co.jp/www/disoft/int/pmb/index.html
3. Saving images in external media
・ Through USB cable, you can save movies and photos on external media, such as an DVD, Blue-Ray
recorder etc. You can save HD quality images without any degradation.

Popular Professional Video Accessories manuals by other brands

PROAIM CINEMA SJ30 Assembly manual

PROAIM

PROAIM CINEMA SJ30 Assembly manual

Camtree Hunt CH-MPC-SRP instruction manual

Camtree Hunt

Camtree Hunt CH-MPC-SRP instruction manual

Filmcity Easy Teleprompter Assembly manual

Filmcity

Filmcity Easy Teleprompter Assembly manual

Data Video TP-650 MARK II instruction manual

Data Video

Data Video TP-650 MARK II instruction manual

PROAIM SR-250-00 Assembly manual

PROAIM

PROAIM SR-250-00 Assembly manual

Moman MTRX user manual

Moman

Moman MTRX user manual

Data Video TP-200 instruction manual

Data Video

Data Video TP-200 instruction manual

VADDIO PAN/TILT PRO manual

VADDIO

VADDIO PAN/TILT PRO manual

PROAIM Atlas V2 Assembly manual

PROAIM

PROAIM Atlas V2 Assembly manual

Ikan PT3500 quick start guide

Ikan

Ikan PT3500 quick start guide

Square Perfect Table Top Deluxe 24" Assembly and user's manual

Square Perfect

Square Perfect Table Top Deluxe 24" Assembly and user's manual

Tangent Wave Wave 2 user manual

Tangent Wave

Tangent Wave Wave 2 user manual

PROAIM P-TRK-FLX instruction manual

PROAIM

PROAIM P-TRK-FLX instruction manual

Glidecam 2000 Pro manual

Glidecam

Glidecam 2000 Pro manual

Ross XPression Getting started

Ross

Ross XPression Getting started

PROAIM P-OHCP-01 Assembly manual

PROAIM

PROAIM P-OHCP-01 Assembly manual

PROAIM CINEMA Series Assembly manual

PROAIM

PROAIM CINEMA Series Assembly manual

AUTOCUE SSPi Guide

AUTOCUE

AUTOCUE SSPi Guide

manuals.online logo
manuals.online logoBrands
  • About & Mission
  • Contact us
  • Privacy Policy
  • Terms and Conditions

Copyright 2025 Manuals.Online. All Rights Reserved.