Med-Fit KTR-2492 User manual
medfit
Patient Instructions & User Manual
Instrucciones para el paciente y
manual de usuario
Patientenanweisungen und
Benutzerhandbuch
Instructions pour les patients et
manuel d’utilisation
Tel: +44 (0)161 429 7330
emai: [email protected]
www.tensmachineuk.com
Med-Fit
0413
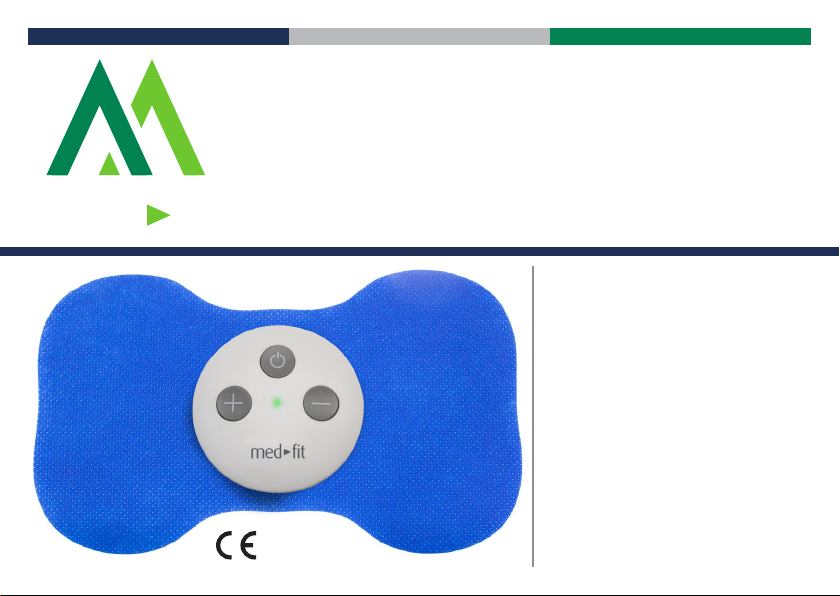
Painless Wireless TENS Machine

2

3
CONTENTS
GENERAL DESCRIPTION ................................................................................................................................4
CONTRAINDICATIONS.....................................................................................................................................5
PRECAUTIONS ...............................................................................................................................................5
WARNINGS .....................................................................................................................................................6
INTRODUCTION TO TENS ...............................................................................................................................8
CONTENTS & GENERAL INFORMATION .........................................................................................................9
OPERATING INSTRUCTIONS ........................................................................................................................10
USING YOUR REMOTE CONTROL..................................................................................................................12
INSTALLING THE BATTERY...........................................................................................................................13
INSTRUCTIONS FOR USE .............................................................................................................................14
PAINLESS TENS PROGRAMMES...................................................................................................................15
USING YOUR MODULE ..................................................................................................................................16
CHARGING THE PAINLESS TENS .................................................................................................................17
ELECTRODE INSTRUCTIONS FOR USE ........................................................................................................ 18
TROUBLESHOOTING ....................................................................................................................................20
MAINTENANCE, TRANSPORTATION AND STORAGE ....................................................................................21
HELPFUL TIPS..............................................................................................................................................22
CONFORMITY TO SAFETY STANDARDS ......................................................................................................23
TECHNICAL SPECIFICATIONS ......................................................................................................................23
GLOSSARY OF SYMBOLS..............................................................................................................................24
ELECTROMAGNETIC COMPATIBILITY DESCRIPTIONS..................................................................................91

4GENERAL DESCRIPTION
The Painless TENS is a battery operated single channel electronic nerve stimulator.
The wireless painless TENS is a single channel transcutaneous electrical nerve stimulator (TENS). The device generates
small pulses of electrical current and delivers the pulse to the user though self-adhesive electrodes such that the
underlying nerves are activated and the pain associated with sore and aching muscles is relieved. The painless TENS
is portable, compact, rechargeable and stylish in design. It may help relieve pain in various areas of the body, such as
lower back, shoulders, arms and legs.
The device generates small pulses of electrical current and delivers the pulse to the user’s skin through adhesive gel
electrode pads such that the underlying nerves are activated and the pain associated with sore and aching muscles is
relived.
The PAINLESS TENS is portable, compact, rechargeable and stylish in design. It may help to revive pain in various areas
of the body, such as the lower back, shoulders, arms and legs.
INTENDED USE
To be used for temporary relief of pain associated with sore and aching muscles in the shoulder, waist, back, back of the
neck, arm, leg and foot, due to strain from exercise or normal household and work activities.

5
CAUTIONS
CONTRAINDICATIONS
1. Patients with pacemakers and cardiovascular problems should not use the device.
2. The device should not be administered over the abdomen or pelvis during pregnancy.
3. Patients with epilepsy should not apply the electrodes to the neck or head.
4. Patients with heart disease, cancer or any other health conditions should not use the device, unless recommended by
a medical practitioner.
5. Patients who have suffered acute trauma or surgical procedures in the past six months.
6. Patients with undiagnosed pain syndromes should not use the device, unless recommended by a medical
practitioner.
PRECAUTIONS
1. Do not apply the electrodes on inappropriate sites, such as over chest, the head, anterior neck, eyes, mouth and the
front of throat.
2. Do not apply the electrodes on areas of broken or damaged skin, such as open wounds.
3. Do not apply the electrodes on the swollen, infected or inamed areas or skin eruptions.
4. Do not apply the electrodes on the skin with diminished sensation because nerve damage is likely to diminish the
effectiveness and the patient maybe unaware that high-intensity currents are causing skin irritation.
5. Patients should not use the device in water or when operating hazardous machinery such as driving.
6. Do not use the device near monitoring equipment.
7. Do not use the device close to transdermal drug delivery system.

6WARNINGS
1. PATIENT with an implanted electronic device (such as a cardiac pacemaker) should not use the device unless
specialist medical opinion has rst been obtained.
2. Simultaneous connection of a PATIENT to a high frequency surgical ME EQUIPMENT may results in burns at the site
of the STIMULATOR electrodes and possible damage to the STIMULATOR.
3. Operation in close proximity (e.g. 1m) to a shortwave or microwave therapy ME EQUIPMENT may produce instability
in the STIMULATOR output.
4. Application of electrodes near the thorax may increase the risk of cardiac brillation.
5. Stimulation should not be applied across or through the head, directly on the eyes, covering the mouth, on the front
of the neck, (especially the carotid sinus), or from electrodes placed on the chest and the upper back or crossing over
the heart.
6. Stimulation should not be applied over the carotid sinus nerves, particularly in patients with a known sensitivity to the
cartid sinus reex.
7. Stimulation should not be applied transthoracically in that the introduction of electrical current into the heart may
cause cardiac arrhythmias.
8. Stimulation should not be applied transcerebrally.
9. Never use the device while driving, operating machinery or during activities in which involuntary muscle contractions
may endanger the user or others.
10. Do not use the device in the bath or shower.
11. Never use the device while sleeping.
12. Never immerse the device in any liquid.
13. No service and no maintenance shall be done while in use with a patient.

7
WARNINGS
14. Do not modify the device without authorization of the manufacturer.
15. Keep unit out of the reach of young children.
16. Apply the whole surface of the electrodes rmly to the skin. Do not use electrodes that do not stick properly to the
skin or only partially stick to the skin.
17. The electrodes should be discarded when they are no longer adhering.
18. Only use the electrodes provided by the manufacturer, do not use other kinds of electrodes. Otherwise, it will cause
skin irritation if the current density is more than 2mA/cm2
19. Over long application may cause harm to the patient.
20. Stimulation should not be done in conjunction with OXYGEN RICH ENVIRONMENTS.
ADVERSE REACTIONS
1. You may experience skin irritation and burns beneath the stimulation electrodes applied to your skin;
2. You should stop using the device and should consult with your healthcare advisor if you experience adverse reactions
from the unit.

8INTRODUCTION TO TENS
What is TENS?
Transcutaneous electrical nerve stimulation is a pain control treatment. It is often called TENS for short.
A TENS unit is a portable, pocket-sized, battery-powered device.
The TENS unit uses mild, safe electrical signals to help control pain and delivers the electrical signal to the body through
self-adhesive conductive electrodes.
How does TENS work?
The most common TENS programmes use
high-frequency stimulation, which is the rst choice for
both acute and chronic pain. High-frequency stimulation
sends impulses to the nervous system’s own
pain-inhibiting mechanisms, which block the pain.
You can use it as often and as long as you like, but each
treatment should last at least 1 hour.
Another type of TENS is low-frequency stimulation.
Low-frequency TENS treatment can alleviate pain
by stimulating muscles to release the body’s own
morphine-like substances, endorphins.
Place the electrodes on a muscle in the painful area so
that a visible contraction occurs.

9
CONTENTS & GENERAL INFORMATION
Please check carefully the contents of the Painless wireless TENS
TENS Device and Electrode Pads
* In case of any discrepancy between the physical and picture, refer to the actual product.
1. Painless TENS module x1
2. Remote control x1
3. AC adaptor and charging lead x1
4. Self Adhesive Electrodes x4
5. Large buttery electrode x1
6. Instruction & User Manual x1
2
3
6
1
4
5
+
_
F
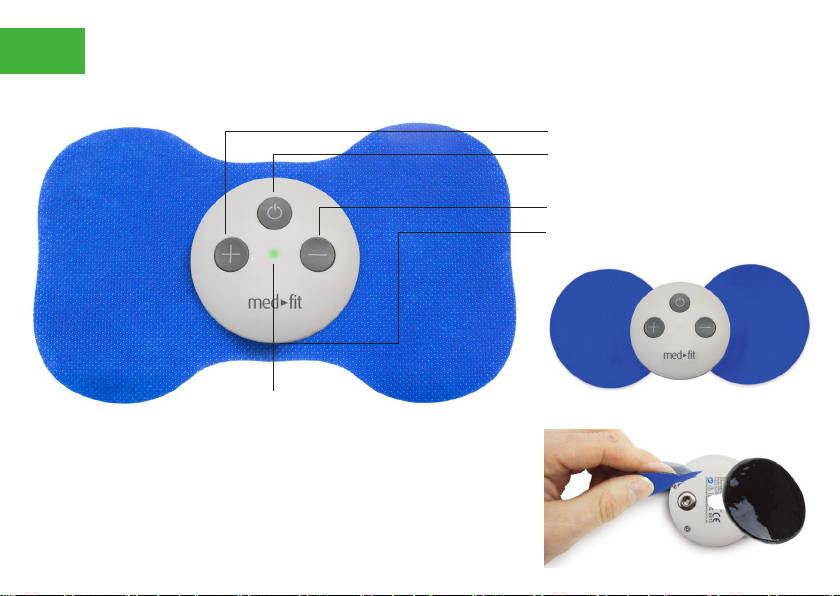
10 OPERATING INSTRUCTIONS
Painless TENS connected to the buttery electrode
+ Intensity increase
When the TENS is switched on and not in use, it will automatically turn off
after approximately one minute, to conserve battery life.
Please note when using the small round shaped electrodes (see Fig B)
you must connect 2 electrodes one to each connection point.
FIG B
On / Off button
- Intensity decrease
Charging port
LED indicator
Green - Painless TENS on
Green ashing - Low battery
Green ashing - Charging indicator

11
OPERATING INSTRUCTIONS
Mode display Timer display
Intensity display
Intensity up Mode select button
Intensity down On-Off button
Mode A has 6
programmes
Mode A has 9
programmes
Single press
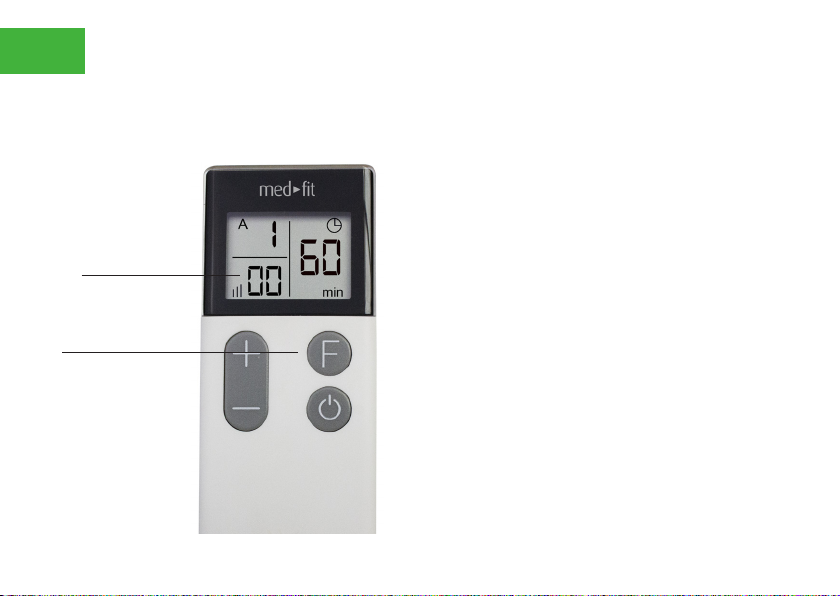
12 USING YOUR REMOTE CONTROL
Before using your painless TENS we highly recommend you familiarise yourself with the features available.
The intensity has 16 levels available. Pressing the +/- buttons increases and decreases between 1 -16
Remote control modes
Please note the time is always set at 60 minutes turning off you’re remote will always re-set the time at 60 minutes.
Intensity display
Mode select button
Short press to change
the programme
Long press to
change the mode
The remote control has two modes
A mode and M mode
A mode is modulation mode
M mode is a continuous mode
To change between M mode and A mode press and hold the F
button for approx 3 seconds.
Once you have chosen the desired mode a single press on the
F button changes the programme.
13
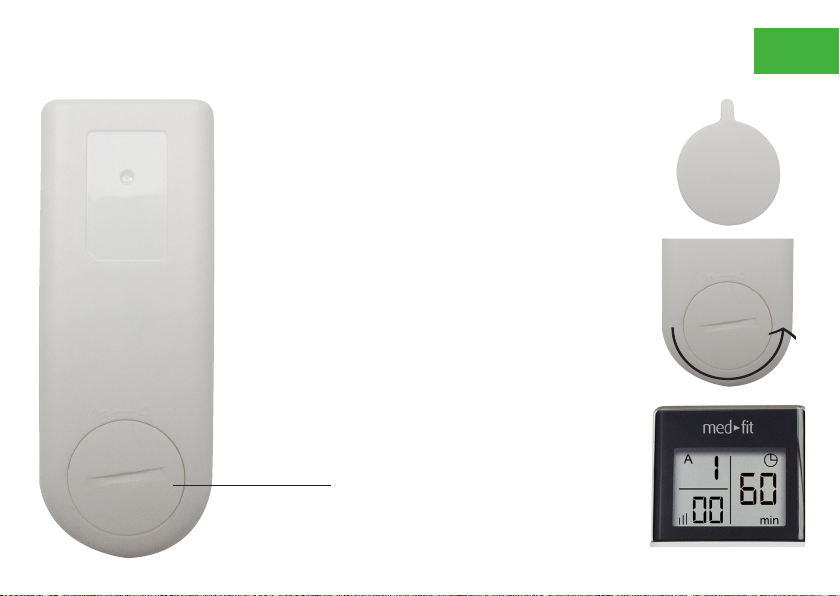
INSTALLING THE REMOTE CONTROL BATTERY
Remove the cover by using the battery cover tool provided,
to remove the cover insert the plastic disc into the slot and
turn anti-clockwise.
Insert the battery into the battery compartment, please
check the battery is the correct way round, place the battery
cover back and turn clockwise to lock into position.
Two CR2032 batteries are supplied (one spare).
Replacement batteries can be purchased from most
supermarkets and convenience stores.
Turn on your remote control by pressing the On-Off button
once, the screen should now display as Fig 1.
Fig 1.
Battery cover

14 INSTRUCTIONS FOR USE
Once you are familiar with the features and general operating instructions,
Please follow the steps below.
1. Make sure both inputs of the Painless TENS unit are connected into the snap-pin connectors of the gel electrode pad
or pads.
2. Peel off the plastic lm from the opposite side of the buttery or standard gel electrodes supplied.
3. Place the Painless TENS attached to the gel electrode pad onto the treatment areas. Press down rmly and ensure a
full and rm contact is made with the skin.
4. Press the On/Off power button to turn on the TENS module as indicated by the LED light being green.
5. Turn on your remote control you should hear two beeps this indicates the remote and tens modules are responding.
We recommend starting with M1 as this is ideal for rst-time use.
6. Once you have set M1, increase the intensity slowly by pressing the + button. Set a level that is a pleasant sensation
and not too strong.
7. To turn off your remote by pressing the ON./OFF button, this will also turn off the intensity of the TENS module the
green light on the TENS module will stay on. This feature allows you to turn on your TENS module again if required. If
your remote is not activated again within one minute your TENS module will turn off automatically.

15
PAINLESS TENS PROGRAMMES
Below is the table of programmes available:
A MODE - PROGRAMMES A1 TO A6
Each A programme has a modulation frequency 20Hz - 100Hz with a set pulse width of 120 microseconds.
Modulated TENS is ideal for long-term use varying the frequency during treatment reduces the factor of TENS
accommodation.
Try each programme A1 - A6 to see which helps with the best pain relief.
M MODE - PROGRAMMES M1 TO M9
The M programmes are set frequencies with 120-microsecond pulse width.
Each programme has 3 modes again reduces the accommodation factor.
Try each programme M1 - M9 to see which helps with the best pain relief.

16 USING YOUR MODULE INDEPENDENTLY
You may use the TENS Module in a standalone mode without the use of the remote control. To do this follow the simple
steps below.
1. Turn on your TENS module by pressing the On-Off button once your TENS module shows a solid green light.
2. Connect one large pad or 2 smaller pads and place on the treatment area.
3. To increase the intensity press the + button to the desired level each press increases the intensity allowing
approximately 10 to 15 seconds for the intensity to reach the desired level.
4. Your TENS module has 3 available programmes in stand-alone mode to change the programmes hold down the
button for 3 seconds, then increase the intensity as already described. The treatment time in stand-alone mode is set
at 60 minutes.
On / Off button
- Intensity decrease+ Intensity increase
Charging port

17
CHARGING THE PAINLESS TENS
It is always recommended that you charge your TENS module prior to using it for the rst time.
There are two methods of charging your painless TENS.
To charge from a mains outlet socket, simply connect the USB cable to the mains charging adaptor and the other end to
the Painless TENS. Please do not force the USB cable into the sockets as they are designed to t one way only see Fig C
Charging the Painless TENS via a computer USB port.
You may charge your Painless TENS through a computer by using the USB cable port see Fig D
How long should I charge the Painless TENS.
Once connected the charging light will ash green a fully charged battery is indicated by a continuous green LED.
Auto shut down mode.
To save battery life the painless TENS will automatically shut down once switched on but is not being used.
Fig C Fig D

18
Turn Stimulator OFF before applying or removing electrodes
Application of the self-adhesive pads & aftercare
The electrode pads have a maximum usage of 25-30 applications to keep your pads in good condition apply a small
amount of water to the gel side of the pad every 4th application (do not over wet). Do not apply any gels or creams to
the pads as this will destroy the hydro-gel on the electrode pad.
Application
1. Skin site must be very clean and dry, dirty, aky or oily skin will prevent electrodes from adhering to the skin. If
necessary, trim excess hair with scissors. If skin is oily wipe down with an alcohol or electrode skin prep prior to
application. Be sure to wash hands before handling electrodes.
2. Remove electrodes from bag and reseal bag to protect remaining electrodes.
3. Insert the stud electrode on to the back of the device.
4. Grasping a tiny edge of the electrode, peel and remove electrode from the protective plastic liner. Save liner for
electrode storage.
5. Place electrode onto skin treatment site (as recommended by your clinician) by rmly applying from the center of the
electrode to the outer edges. Adhesion improves when electrodes reach skin temperature.
6. If gel appears over-saturated with excessive moisture or perspiration, allow the electrode to air dry in a refrigerator
with the gel side facing up until the gel regains its tack. If the gel appears dry, try adding a few drops of water to the
gel and allow to rest in a dust-free environment until the gel regains its tack.
ELECTRODE INSTRUCTIONS FOR USE

19
ELECTRODE INSTRUCTIONS FOR USE
Removal and storage
1. Lift a corner of the electrode and slowly peel the electrode off the skin, touching the adhesive gel as little as possible.
2. Place the electrodes back onto the saved protective plastic liner.
3. Return the electrodes back into the storage bag and reseal tightly to prevent dry-out.
4. Store at room or cool temperature and keep out of direct sunlight.
5. The life of the electrode varies depending on skin conditions, amount of use, storage and climate. Electrode life may
be extended by carefully following the application, removal, and storage instructions.
Caution
1. DO NOT place electrodes on broken skin. If skin irritation develops discontinue use. Consult physician. Replace
electrodes when they do not adhere or when treatment becomes uncomfortable.
2. DO NOT use unit while driving or operating machinery
3. DO NOT wear electrodes when showering, bathing or swimming
4. DO NOT apply electrodes across the head or across the heart or on the front neck.
5. Keep electrodes separated during treatment
6. DO NOT exceed 0.1 watts/cm2
7. Using stimulation electrodes that are small or incorrectly applied could result in discomfort or skin burns.
Latex Free

20
When the TENS is switched on, pushing the + button, if the device emits 1 bleep and the green light ashes once, but
you feel no sensation through the electrode pads this may be due to the following conditions:
1. The TENS Pads are not securely fastened to the skin.
2. The area being treated is to dry please remove your pads and rub warm water into the treatment area and reapply the
pads.
3. The electrode pads need replacing.
* Please note self-adhesive pads need replacing after 20-30 applications. To increase the life of your pads smear small
amount of water onto the pad every 4th application.
If your device is not operating properly please check for common problems and suggested solutions. If the
recommended action does not solve the problem, please contact the seller.
Stimulation is weak or non-existent
• Be sure skin is clean and gel electrode pads are rmly attached to the skin.
• The battery is low and needs to be charged.
• The gel electrode pad needs to be replaced.
TROUBLESHOOTING
Table of contents
Languages:
Other Med-Fit Medical Equipment manuals


Popular Medical Equipment manuals by other brands


Getinge
Getinge Arjohuntleigh Nimbus 3 Professional Instructions for use

Mettler Electronics
Mettler Electronics Sonicator 730 Maintenance manual

Pressalit Care
Pressalit Care R1100 Mounting instruction

Denas MS
Denas MS DENAS-T operating manual

bort medical
bort medical ActiveColor quick guide

AccuVein
AccuVein AV400 user manual


