Medela Pump In Style Series User manual

Pump In Style®
Advanced
EN Instructions for use |SP Instrucciones de uso |FR Mode d’emploi
Backpack
The Metro Bag™
On-the-go Tote

Questions? Visit www.medela.com or call us at 1-800-435-8316. 3
2
Important Safeguards
When using electrical products, especially when children are present, basic safety precautions
should always be followed.
READ ALL INSTRUCTIONS BEFORE USING THIS PRODUCT.
The warning symbol identifies all instructions that are important to safety. Failure to
observe these instructions can lead to injury or damage to the breastpump. When
used in conjunction with the following words, the warning symbols stand for:
WARNING Can lead to serious injury or death.
CAUTION Can lead to minor injury.
NOTE Can lead to material damage.
INFO Useful or important information that is not related to safety.
WARNING: To avoid health risk and reduce the risk of injury:
• This product is intended for use by a single user only and should not be shared between
users.
• Do not drive while pumping.
• Never use while pregnant, as pumping can induce labor.
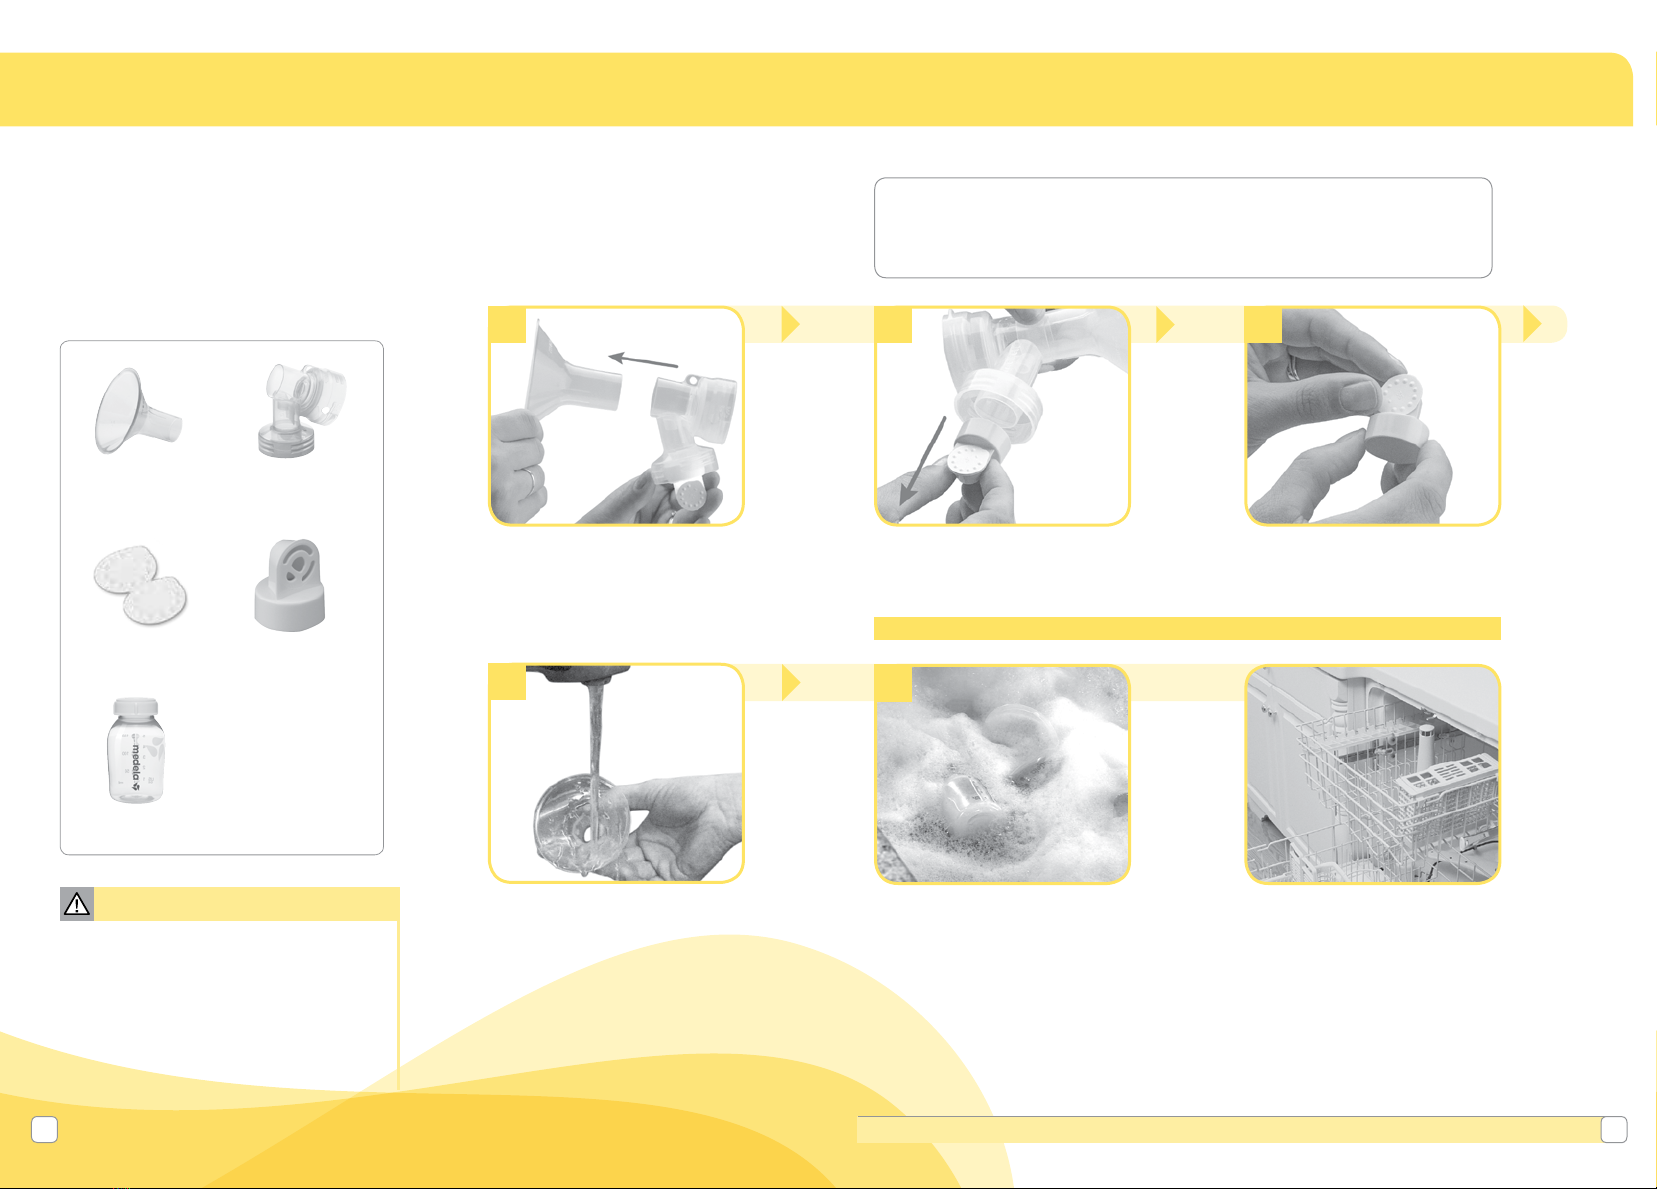
• Clean and sanitize all parts that come in contact with your breast and breastmilk prior to first
use.
• Wash all parts the come in contact with your breast and breastmilk after every use.
• Inspect all appropriate pump components before each use.
• Do NOT continue pumping for more than 2 consecutive pumping sessions if no results are
achieved.
• Do not thaw frozen breastmilk in a microwave or in a pan of boiling water.
• If tubing becomes moldy, discontinue use and replace tubing.
• If breastmilk backup occurs you must clean tubing, faceplace and diaphragm before your
next pumping session.
WARNING: To avoid fire, electrocution, or serious burns:
• Do not leave product unattended when plugged into an electrical outlet.
• Close supervision is necessary when this product is used near children or persons with
disabilities.
• Use the product only for its intended use as described in this manual. Do not use
attachments not recommended by the manufacturer.
• Never operate this product if it has a damaged cord or plug, if it is not working properly, if it
has been dropped or damaged, or dropped into water.
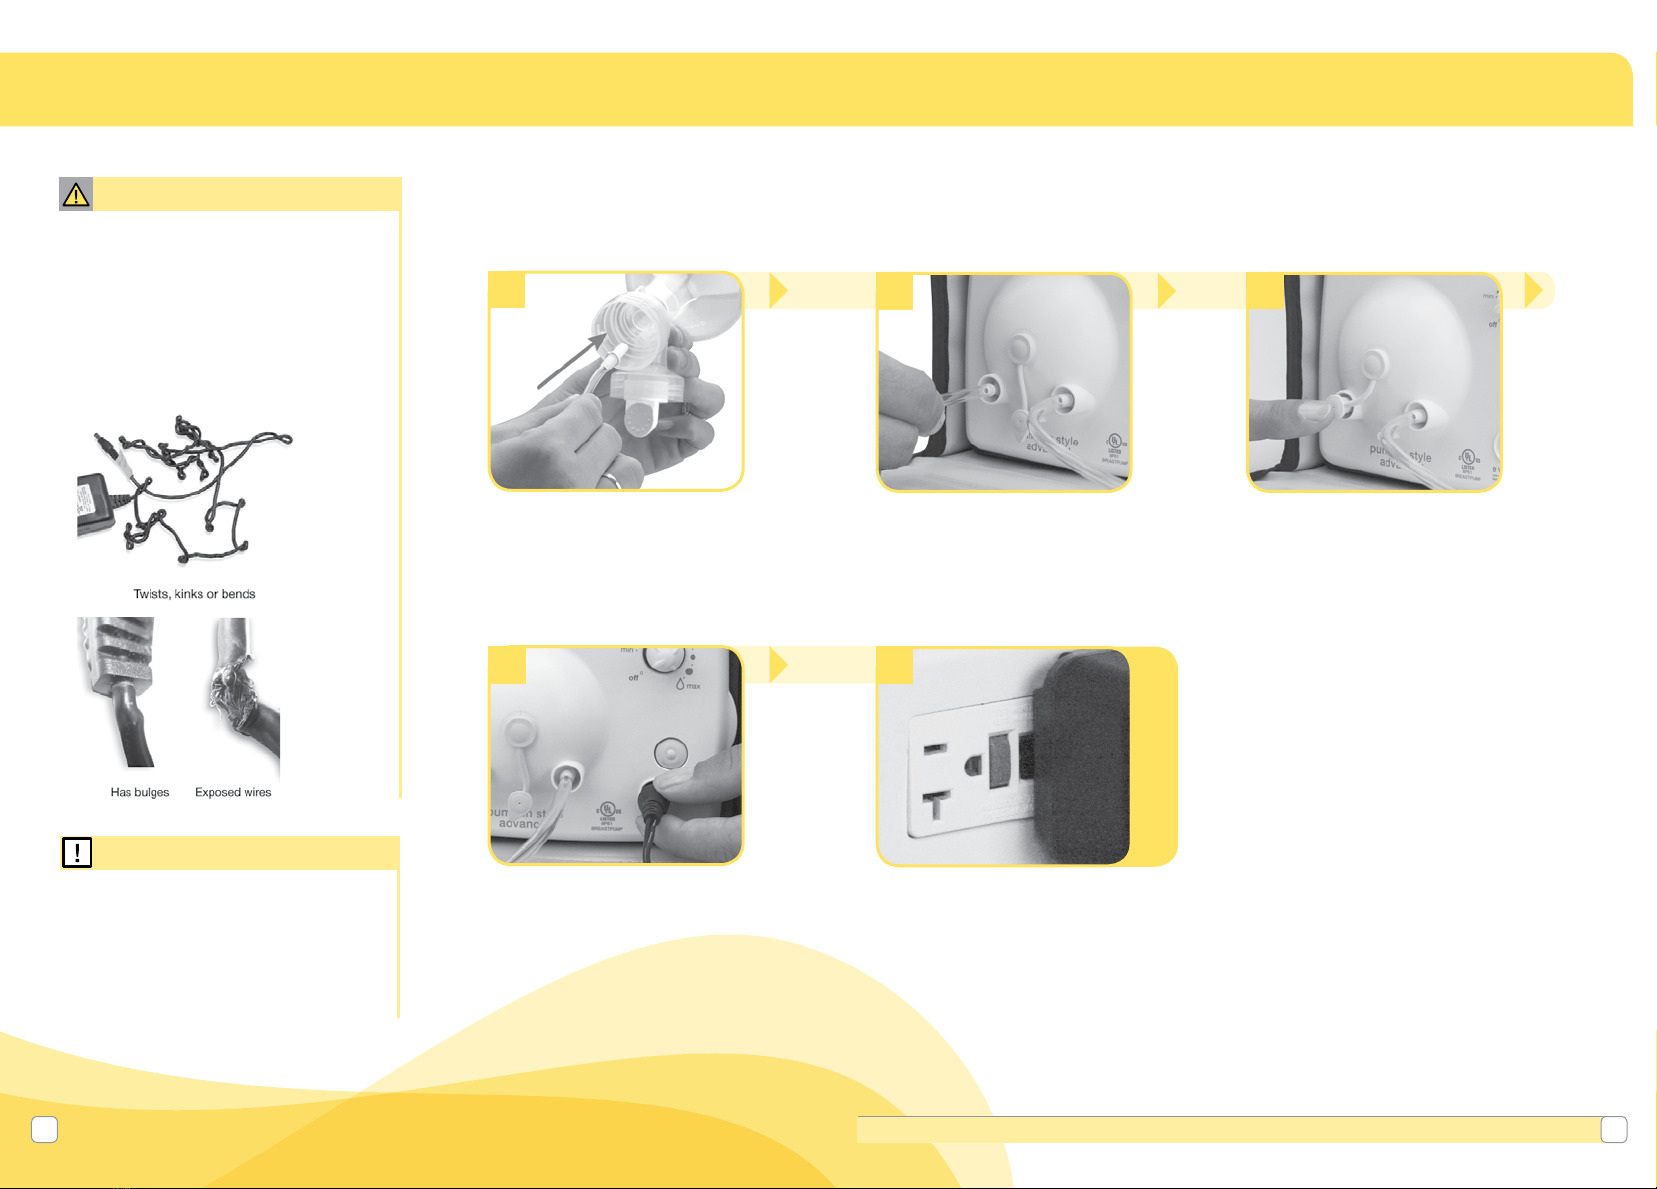
• Keep cord away from heated surface.
• Never use while sleeping or when drowsy.
• Never drop or insert any object into any opening or tubing.
• Do not use outdoors, or operate where aerosol (spray) products are being used or where
oxygen is being administered.
• Aways inspect power adaptor and battery pack wires prior to use for damage or exposed
wire. If damage is found, immediately discontinue use of power adaptor or battery pack and
call Medela Customer Service at 1-800-435-8316.
DANGER: To reduce the risk of electrocution:
• Always unplug electrical product immediately after use.
• Do not use while bathing.
• Do not place or store product where it can fall or be pulled into a tub or sink.
• Do not place or drop into water or other liquid.
• Do not reach for a product if it has fallen into water. Immediately unplug from electrical outlet.
CAUTION: Can lead to minor injury:
• Do NOT wrap cord around adaptor body.
• Use only the power adaptor that comes with the Pump In Style®Advanced breastpump.
• Use only the Pump In Style Advanced Battery Pack that comes with the Pump In Style
breastpump.
• Pump only with the breastpump in an upright position.
• Do NOT shorten tubing.
• Make sure the voltage of the power adaptor is compatible with the power source.
• Plug the power adaptor into the breastpump first and then into the wall socket.
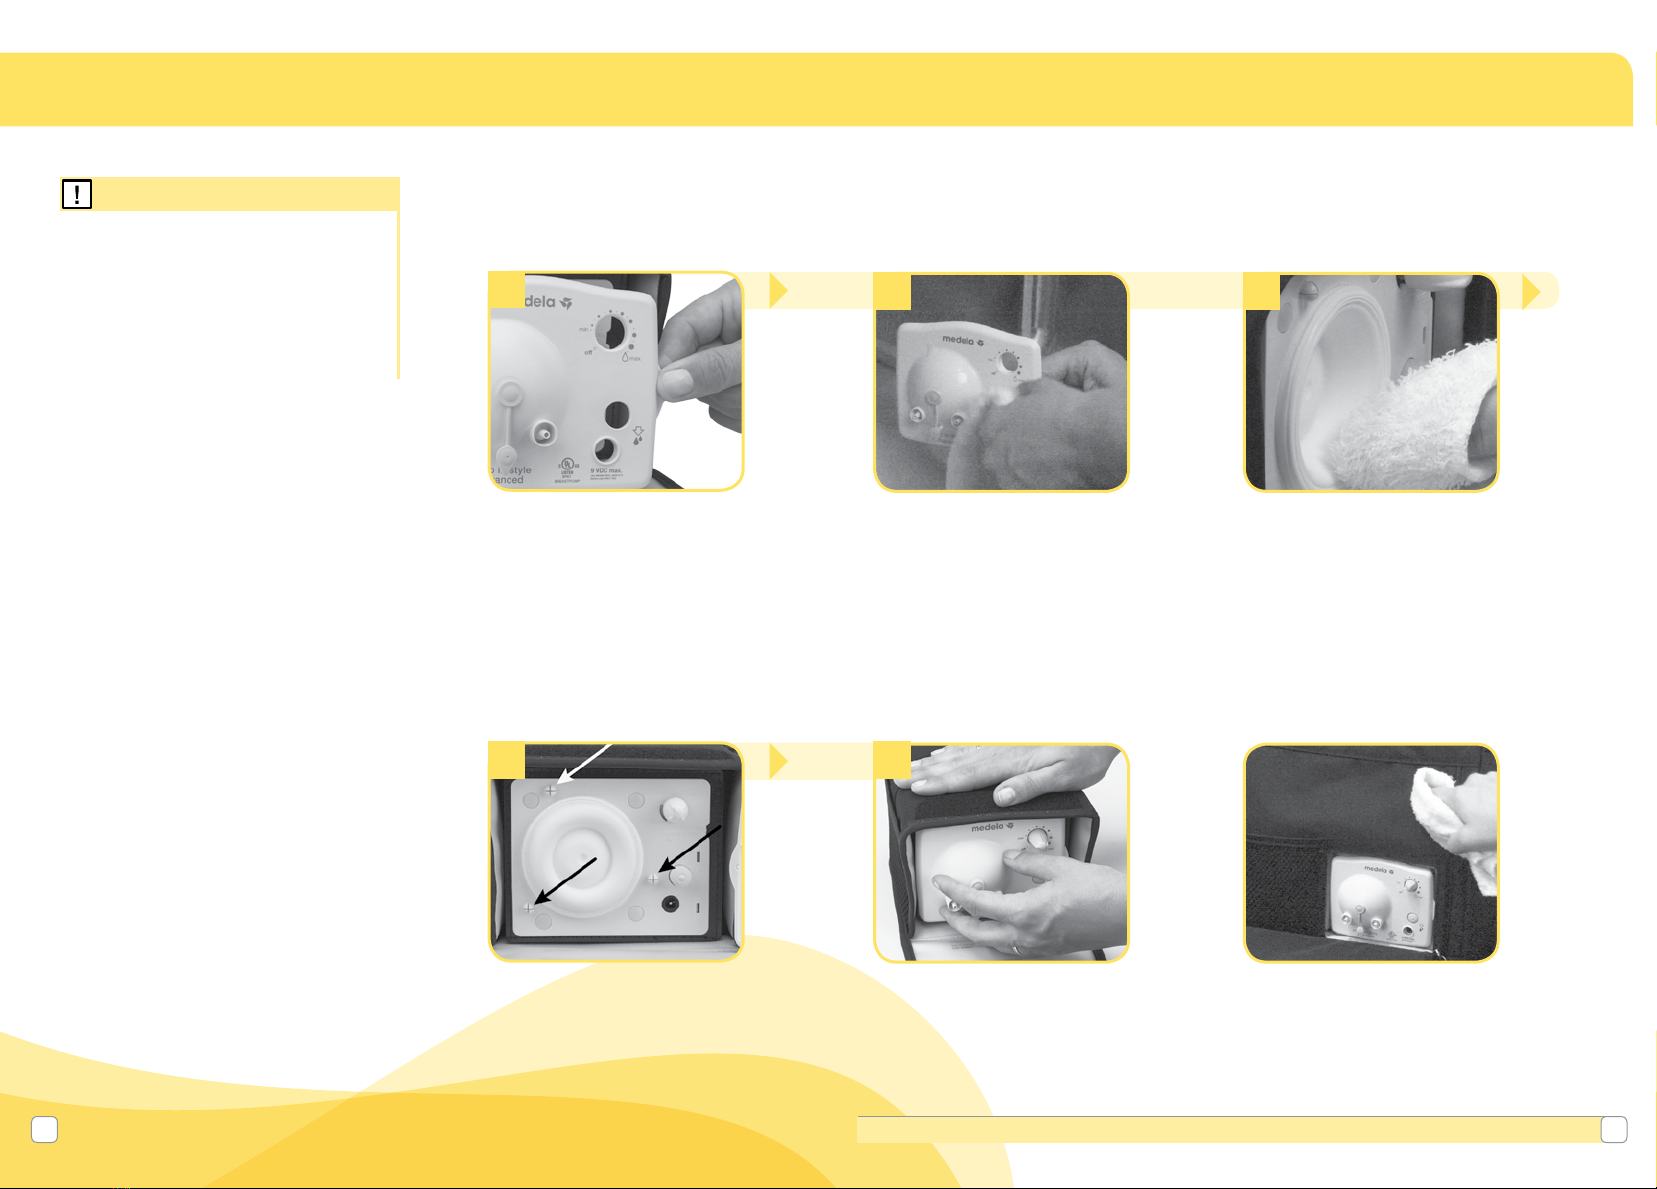
• Do NOT use antibacterial or abrasive cleaners/detergents when cleaning breastpump or
breastpump parts.
• Never put breastpump motor in water or a sterilizer, as you can cause permanent damage
to the breastpump.
• Do not attempt to remove the breastshield from your breast while pumping. Turn the
breastpump off and break the seal between your breast and breastshield with your finger,
then remove breastshield from your breast.
• If pumping is uncomfortable or causing pain, turn the unit off, break the seal between the
breast and the breastshield with your finger and remove the breastshield from your breast.
SAVE THESE INTRUCTIONS

Table of Contents
Questions? Visit www.medela.com or call us at 1-800-435-8316. 5
4
1. Cleaning Instructions.................................................................................................8-15
1.1 Before using for the first time ...................................................................................... 8
1.2 After each use..........................................................................................................8-9
1.3 Sanitize daily........................................................................................................ 10-11
1.4 Tubing and faceplate cleaning.............................................................................. 12-14
1.5 Cleaning your breastpump bag................................................................................. 15
2. Assembly...................................................................................................................16-23
2.1 Assembly of pump kit .......................................................................................... 16-19
2.2 Correctly fitting breastshields .................................................................................... 20
2.3 Power options ..................................................................................................... 21-23
2.3.1 Power adaptor care ........................................................................................ 21
2.3.2 Battery Pack................................................................................................... 22
2.3.3 Traveling outside of the U.S. ........................................................................... 23
3. Pumping with Your PNSA ........................................................................................24-27
3.1 Device operation.................................................................................................. 24-26
4. Storing Breastmilk......................................................................................................... 28
5. Preparing & Feeding Breastmilk .................................................................................. 29
5.1 Preparing breastmilk ................................................................................................. 29
5.2 Feeding breastmilk.................................................................................................... 29
6. Troubleshooting............................................................................................................. 30
7. Supplemental Information ............................................................................................ 31
8. Warranty......................................................................................................................... 32
Take a moment to read through this entire instruction manual before using this product for
the first time.
PLEASE SAVE THESE INSTRUCTIONS.
It is best to wait until your breastfeeding routine is established (approximately 4weeks)
before expressing breastmilk, unless otherwise advised by your healthcare professional.
Glossary of Terms
2-Phase Expression®technology – research based technology that mimics a baby’s
natural nursing rhythm.
Expression Phase – slower sucking/pumping rhythm for gentle and efficient milk removal
as quickly as possible.
Maximum Comfort Vacuum™ –highest vacuum setting where a mother still feel
comfortable during pumping. It is different for every mother.
Stimulation Phase – fast sucking/pumping rhythm to stimulate the milk ejection reflex and
to start the milk flowing.
Intended Use
For lactating women to express and collect milk from their breasts to complement
breastfeeding.
If you have medical reasons or other needs for exclusively pumping, it is recommended that
you use a hospital grade breastpump such as our Symphony breastpump with 2-Phase
Expression technology. To learn more, visit us at www.medelabreastfeedingus.com.
Product Description
Pump In Style®Advanced (PNSA) is a personal use electric breastpump that includes
2-Phase Expression technology and is capable of single and double pumping.

2x PersonalFit™Breastshields M (24 mm)
(for other breastshield sizes
see Secion 2.2, page 20)
87073
2x connectors
87071
2x valves
87089
2x membranes
87088
2x bottles
6100050
2x lid
8107183
2x tubing
87212
Product Description
1x power adaptor
Replacement 68030
Item 9207010
1x ice pack
Item 8117010
1x battery pack
Replacement 67553
Item 9017002
1x cooler
bag (includes
ice pack)
BCOOL001
1x faceplate
On/Off button
Increase/reduce
vacuum
Let-down
button
Power
adaptor port
Tubing port Tubing portPort plug
BackpackOn-the-go Tote
Questions? Visit www.medela.com or call us at 1-800-435-8316. 7
6
27 mm PersonalFit Breastshields.................... 87274
Metro Bag including:
Flexible, Plastic Workspace ........................ 3007299
2 Mesh Storage Bags
Additional parts included with The Metro Bag™
Pump In Style®
Advanced
The Metro Bag

21 3
45
1.1 Before using for the first time
Clean and sanitize the parts below before
using your pump for the first time. Follow
the cleaning and sanitizing instructions in
Sections 1.2 (start at step 4) and 1.3
that follow.
1. Cleaning
1.2 After each use
Clean all parts that come in contact
with your breast and breastmilk.
See image in Section1.1.
Twist and pull the yellow valves
off the breastshield connectors.
Separate breastshields from
breastshield connectors.
Remove the white membranes
from the yellow valves.
• Only use drinking-quality tap or bottled
water for cleaning.
• Take apart and wash all parts that
come in contact with the breast and
breastmilk immediately after use to
avoid dry up of milk residues and to
prevent growth of bacteria.
Caution Rinse in cool water all separated
parts that came in contact with
breast and breastmilk in order to
remove breastmilk residue.
Washing in sink:
Washing Options:
or
Washing in dishwasher:
• Soak all separated parts in warm soapy
water for 5minutes.
• Clean with a clean dish-cloth or soft
brush.
• Rinse all separated parts with clear
water.
• Allow all parts to air dry in a clean area.
• Store dry parts when not in use.
• Wash all separated parts on top rack of
dishwasher.
• Allow all breastpump parts to air dry in
a clean area.
• Store dry parts when not in use.
Questions? Visit www.medela.com or call us at 1-800-435-8316. 9
8
• Breastshield • Breastshield
connector
• White membrane • Yellow valve
• Breastmilk bottles
and lids
Supplies Needed: • Mild Dish Soap
• Clean Dish Towel or
Soft Brush
• Clean Sink or Bowl
• Drinking Quality
Water

3
12
4
1.3 Sanitize daily
• Wash breastpump kit parts after each
use.
• Sanitize breastpump kit parts once daily.
Note
Wash hands thoroughly.
Allow water to cool and gently remove
parts from water with tongs.
Separate all parts that come in
contact with your breast and
breastmilk.
Refer to image in Section 1.1
• Fill a pot with enough water to cover all
parts.
• Bring water to a boil.
• Place parts in boiling water for
10 minutes.
• Place parts on a clean surface and/
or towel.
• Allow all parts to air dry.
• Store dry parts when not in use.
Do NOT store wet or damp parts.
You may sanitize your kit parts by
following the instructions on Medela’s
Quick Clean™Micro-Steam™bag.
or
1. Cleaning (cont.)
Questions? Visit www.medela.com or call us at 1-800-435-8316. 11
10

1
4
2
5
3
6
• Tubing should be washed if dirty or
milk is present. Follow instructions in
Section 1.4.
Note
1. Cleaning (cont.)
1.4 Tubing and faceplate
cleaning
Clean the faceplate monthly. Also,
inspect tubing after each pumping
session. Clean tubing and faceplate if
there is any sign of condensation and/
or milk.
• Do not store wet or damp parts as
mold may develop.
• If tubing becomes moldy, discontinue
use and replace tubing. Contact
Medela Customer Service at
customer.service@medela.com or
1-800-435-8316.
Caution
Turn off breastpump.
Remove tubing from
breastshield.
Unplug breastpump from
power source.
Remove tubing by pulling
straight out of tubing ports. Do
not wiggle or pull tubing at an
angle.
Rinse tubing in cool water to
remove breastmilk.
• Wash tubing in warm soapy water.
• Rinse tubing with clear water.
• Hang to air dry.
Continued
next page.
Questions? Visit www.medela.com or call us at 1-800-435-8316. 13
12

7
10
8 9
11
1.4 Tubing and faceplate
cleaning (cont.)
1.5 Cleaning your
breastpump bag
Snap off the faceplate using the
thumb tab.
Locate the 3 connection points
on the reverse side of the
faceplate and on the pump.
• Soak in warm soapy water for
5 minutes.
• Clean with a clean dish-cloth or
soft brush
• Rinse parts with clear water.
• Allow to air dry in a clean area.
• Wipe diaphragm with a clean (no soap),
damp cloth.
• Allow to air dry in a clean area.
Align connection points and hold
back of pump with one hand while
pushing on the faceplate until it
snaps into place.
Use a damp (not wet) cloth to
wipe the breastpump bag after
each use.
• Make sure faceplate and diaphragm are
completely dry before reseating.
• The faceplate must be seated correctly
and snapped together at all connection
points. This ensures the pump will
have adequate vacuum and optimum
performance.
Note
1. Cleaning (cont.)
Questions? Visit www.medela.com or call us at 1-800-435-8316. 15
14

1
4
2
5
3
6
• Inspect valves for cracks or chips and
inspect membranes for holes, tears or
warping. If you notice any damage to
these parts, replace them immediately.
Note
2.1 Assembly of pump kit
Wash hands before touching
breastpump, kit and breasts
and avoid touching the inside of
containers or lids.
Snap membranes onto valves
until membranes lie completely
flat on valve.
Place your breastpump on a
clean and dry surface. Ensure
that the surface is solid and
secure so your breastpump will
not tip over or fall.
Securely attach breastshield to
breastshield connector.
Push assembled yellow valves and
white membranes onto bottom of
breastshield connectors.
Screw bottles onto breastshield
connectors.
Continued
next page.
2. Assembly
Questions? Visit www.medela.com or call us at 1-800-435-8316. 17
16
Parts you will need for this step:
• Breastshield
• Tubing
• Breastshield
connector
• Battery pack
• White membrane
• 9 volt power
adaptor
• Yellow valve
• Breastpump • Metro motor
• Breastmilk bottles
and lids
or
or

789
1110
Warning
• Use only the power adaptor supplied with
the Pump In Style Advanced.
• Always inspect the 9 volt power adaptor
and Battery Pack cords prior to use for
damaged, kinked, twisted, frayed or
exposed wires. If damaged, immediately
discontinue use and call Medela
Customer Service at 1-800-435-8316.
Refer to Power Adaptor Care
in Section 2.2.1
2.1 Assembly of pump kit
(cont.)
Plug the metal fitting on end of
9 volt power adaptor or Battery
Pack cord into the power jack on
front of breastpump faceplate.
Double pumping: Insert
free ends of tubing onto both
ports on front of breastpump
faceplate.
Insert hard yellow adapter ends
of tubing into hole on the back
of breashield connectors.
Single pumping: Insert free end
of tubing onto one port on front
of breastpump faceplace. Place
port cap over the unused port.
Plug 9 volt power adaptor into
a standard electrical outlet.
2. Assembly (cont.)
• See Section 2.3.2 Battery Pack
Assembly for instructions on the use of
the Battery Pack.
• See Section 2.3.3 Traveling Outside
the U.S. for information on using your
device internationally.
Note
Questions? Visit www.medela.com or call us at 1-800-435-8316. 19
18

2.2 Correctly fitting breastshields
Properly fitting breastshields will ensure comfort and efficient milk expression. To
determine if you have the correct size, look at the following diagram:
• The nipple should be centered in the tunnel of the shield.
• The nipple should move freely without rubbing when the
pump is turned on.
• Minimal or no part of your areola should be pulled into the tunnel of the
breastshield.
• You should see a gentle, rhythmic motion in the breast with each cycle
of the pump.
• After pumping, your breast should
feel much less full with no areas of
hardness.
Medela offers smaller and larger
sizes which are available at many
local retailers or visit
www.shopmedela.com.
PersonalFit Breastshields
21 mm (Small)
Item 87072
24 mm (Medium)
Item 87073
27 mm (Large)
Item 87274
30 mm (X-Large)
Item 87075
36 mm (XX-Large)
Item 87084
Choosing the right size PersonalFitTM
breastshield:
1. Determine the size you’re currently using. If you’re
not sure, look for the size embossed on your
breastshield (see picture).
24 mm (M) breastshields
are provided with
Medela breastpumps.
2. While pumping, compare your fit to the images below
as a sizing guideline.
Your breastshield
is too large;
try a smaller size
Correct fit
Your breastshield
is too small;
try a larger size
24 mm
Choosing the right size PersonalFitTM
breastshield:
1. Determine the size you’re currently using. If you’re
not sure, look for the size embossed on your
breastshield (see picture).
24 mm (M) breastshields
are provided with
Medela breastpumps.
2. While pumping, compare your fit to the images below
as a sizing guideline.
Your breastshield
is too large;
try a smaller size
Correct fit Your breastshield
is too small;
try a larger size
24 mm
• While some discomfort may be felt when first using a breastpump, using a breastpump
should not cause pain. If you are unsure about breastshield sizing, please contact a
healthcare professional or breastfeeding specialist who can help you get a proper fit.
Caution 2.3 Power options
2.3.1 Power adaptor care
To care for your adaptor be sure to follow these storage directions.
Do not wrap cord of power
adaptor around the plug body.
Do not unplug power adaptor
by pulling on the cord.
2. Assembly (cont.)
Questions? Visit www.medela.com or call us at 1-800-435-8316. 21
20
Correct!
Correct!

1
4
2 3
• Remove the batteries if the Battery Pack
is not going to be used for an extended
period of time.
• If breastpump does not turn on, make
sure the batteries have been inserted
properly. If this does not solve the
problem refer to the troubleshooting
section of this instruction booklet or
contact Medela Customer Service at
1-800-435-8316.
• Each set of batteries will provide
approximately 2hours of pumping time.
Note
2.3 Power options (cont.)
2.3.2 Battery Pack
Use 8 AA rechargeable batteries
or alkaline batteries.
Replace battery cover.
Slide off both battery covers.
Four (4) batteries are placed on
each side of battery pack.
When traveling outside of the U.S., there are 2 power options:
Place the NEGATIVE (-) end of the battery
against the front of the spring by pushing the
battery in and down in one motion until the
battery snaps into place.
The POSITIVE (+) end of the battery should be
near the positive sign on the battery pack.
Use the Battery Pack that was
included with your Pump In Style®
Advanced breastpump.
Purchase the 9 volt Vehicle Lighter Adaptor
(sold separately). Locate a Medela Retailer
at: http://medela.findlocation.com or visit our
online store at www.shopmedela.com.
2.3.3 Traveling outside the U.S.
2. Assembly (cont.)
or
Questions? Visit www.medela.com or call us at 1-800-435-8316. 23
22
Replace all batteries at the
same time.

4
123
5 6
3.1 Device operation
Wash hands before touching
breastpump, kit and breasts
and avoid touching the inside of
containers or lids.
After two minutes, the pump
will automatically change to the
Expression Phase.
a. If you let-down (your milk starts to
flow) sooner than 2 minutes, press
the let-down button.
b. If let-down has not happened
during the Stimulation Phase and
the pump has switched to the
Expression Phase, press the let-
down button once to return to
the Stimulation Phase.
• Always inspect breastshield,
breastshield connectors, white
membranes, yellow valves, and tubing
prior to use for cleanliness. If dirty, see
Section 1.2.
• If you experience pain or other
symptoms while pumping seek advice
from your healthcare professional or
breastfeeding specialist. See Section 7
for more information.
• Do not try and express with vacuum
that is too high and uncomfortable
(painful). The pain, along with potential
breast and nipple trauma may decrease
milk output.
• Make sure tubing is not kinked or
pinched while pumping.
Center the assembled
breastshields over your nipples.
To begin pumping, turn dial clockwise from
the off position. Your pumping session
will start in the Stimulation Phase. While
pumping, adjust the speed/vacuum by
turning the dial to your comfort level.
To find your Maximum Comfort
Vacuum, increase speed/
vacuum until pumping feels
slightly uncomfortable (not
painful), then decrease slightly.
When your pumping session
is over unplug tubing from the
back of the breastshield(s)
before setting down the
bottles.
Continued
next page.
Caution
3. Pumping
• Research has shown that you will
pump more efficiently – get more
milk in less time – when pumping at
Maximum Comfort Vacuum™during the
Expression Phase.
• You should reassess your Maximum
Comfort Vacuum throughout your
pumping experience because it can
change during the different stages of
lactation.
• Do not tilt or overfill containers when
pumping.
Info
Questions? Visit www.medela.com or call us at 1-800-435-8316. 25
24

7
11
Allow the pump to continue to run
while you store your breastmilk.
This will allow any condensation
that has formed from the natural
results of humidity to dry in the
tubing.
Disassemble and clean per
Cleaning Instructions in
Section1.
3. Pumping (cont.)
3.1 Device operation (cont.)
• How often should you pump? A
breastpump is a replacement for when
you are separated from your baby. It
is important to pump when the baby
would be breastfeeding, which usually
means a working mother pumps 2-3
times during an 8 hour working day.
• How long should your pumping
session last? Pumping times can vary
from mother to mother sometimes 15
minutes, sometimes up to 30 minutes.
• How should your breasts feel after
pumping? After pumping, your breasts
should feel soft and there should be
no firm areas. Before pumping, your
breasts will have a firm, heavy feeling.
After pumping make sure your breasts
are not firm or have lumpy areas. This
could indicate that the breast is not
draining all over. See Section7 for
more information.
Info
8 9
10
Turn off breastpump. Unplug breastpump from
power source.
Prior to storing your pump
remove tubing by pulling straight
out of tubing ports. Do not wiggle
or pull tubing at an angle.
Questions? Visit www.medela.com or call us at 1-800-435-8316. 27
26

4. Storing Breastmilk 5. Preparing and Feeding Breastmilk
• Check with your hospital or healthcare
provider if you require specific storage
instructions.
• Do not thaw frozen breastmilk in a
microwave or in a pan of boiling water.
4.1 Storing breastmilk in
Pump In Style®Advanced
cooler bag
• Do not microwave breastmilk.
Microwaving can cause severe burns
to baby’s mouth from hot spots that
develop in the milk during microwaving.
(Microwaving can also change the
composition of breastmilk.)
• If the ice pack is frozen solid, it will
safely cool your breastmilk for up
to 12 hours in a room temperature
environment.
Caution
Warning
Note
Questions? Visit www.medela.com or call us at 1-800-435-8316. 29
28
5.1 Preparing breastmilk
• Thaw breastmilk overnight in the refrigerator. Thawed breastmilk is safe in the
refrigerator for 24hours. Do not refreeze thawed breastmilk.
• Quickly thaw breastmilk by holding the bottle under warm running water.
• Place the sealed bottle in a bowl of warm water for 20minutes to bring it to body
temperature.
• If you are adding expressed breastmilk to a container of already frozen breastmilk,
make sure to add a lesser amount than the already frozen amount.
5.2 Feeding breastmilk
It is recommended that breastfeeding is well established prior to bottle feeding your
baby.
• Always inspect the bottle, nipple and other components immediately before and after
each use. If nipple appears cracked or torn, discontinue use immediately.
• To prevent possible choking hazard, test strength of nipple by pulling on bulb portion
of the nipple.
• Do not attempt to enlarge the nipple hole.
• Infants must not be bottle fed without adult supervision.
• Nipple should not be used as a pacifier.
The Pump In Style Advanced cooler
bag requires one contoured ice
pack (#87092, included) for cooling
up to four 5 oz bottles of breastmilk.
• As soon as you are finished
pumping, place the breastmilk
bottle or breastmilk storage bag in
the cooler bag with the ice pack.
• Transfer breastmilk bottles or
breastmilk storage bag to the
refrigerator or freezer once you are
home.
Room
Temperature Cooler with
Ice Pack Refrigerator Thawed
Breastmilk
Freezer
Freshly Expressed Breastmilk
Storage Guidelines
(For Healthy Term Babies)
4–6 hours
at 66–78 °F
(19–26 °C)
24 hours
at 59 °F
(15 °C)
3–8 days
at 39 °F
or lower
(4 °C)
use within
24 hrs
6–12
months
0–-4 °F
(-18–-20 °C)

6. Troubleshooting 7. Supplemental Information6. Troubleshooting
Questions? Visit www.medela.com or call us at 1-800-435-8316. 31
30
Low or No Suction Valve and Membrane Check
• Remove and separate valve from membrane
• Inspect the valve for chips or cracks. Inspect the membrane for holes or tears. If
flawed or damaged replace valve and/or membrane prior to pumping
• Wash valve and membrane per Cleaning section
• Reassemble. Make sure the membrane lays flat on the valve, and if it does not,
replace the valve and/or membrane prior to pumping
Breastshield and Breastshield Connector Check
• Inspect breastshield and breastshield connector to make sure there are no
cracks and they securely attach to each other
Faceplate Check
• Wash faceplate and backplate per Milk Overflow section steps 1.4
on pages 12-15.
• Reassemble faceplate and backplate, and reattach tubing to faceplate port
Connection Point Check
Inspect following connection points to ensure attachment is secure
• Tubing adapter to breasthield connector
• Tubing end to faceplate port
• Faceplate to backplate
• Test vacuum. If suction is not improved, contact Medela Customer Service at
1-800-435-8316.
Audible air coming from
port cap/faceplate
• There is a built-in air leak for vacuum control, some audible air is normal.
CAUTION: Do not attempt to plug hole in cap or port with additional material.
Power source • If pump is not turning on with the power adaptor try the battery pack.
• If the pump is not turning on with the battery pack, be sure the batteries have
been inserted correctly.
• If pump is still not working with the power adaptor or the battery pack, contact
Medela Customer Service at 1-800-435-8316.
Faceplate port broken/
cracked
• Contact Medela Customer Service at 1-800-435-8316 or order online at www.
shopmedela.com.
CAUTION: If you are feeling a loss of suction with the broken faceplate, do not
use the pump until the new faceplate arrives.
Condensation or milk in
tubing
• Refer to “Tubing and faceplate cleaning” section 1.4.
No “let-down” or
breastmilk expression
• Ensure your breastpump is assembled correctly and that there is suction.
• Relax and take a 10-15 minute break if let down is not achieved after 2
consecutive pumping sessions.
• Consult with your healthcare provider or breastfeeding specialist if expression
does not occur.
If you have not resolved the problem with your breastpump or your have further questions, please
Following are some common breastfeeding related conditions. If you experience any of these
symptoms, contact a healthcare professional or breastfeeding specialist.
Symptom Potential Causes
Engorgement Breasts are hard and uncomfortable,
possibly with reddened areas.
Milk not draining properly from breast.
Milk can drain back into the tissue
causing areas to swell and become
tender.
Blocked/Plugged
Ducts
Area of breast will look reddened and may
be tender to touch.
Milk not being drained from a specific
duct. The area becomes ‘clogged’ up
and milk is then prevented from flowing.
Mastitis It often follows on from engorgement
but can just occur suddenly. The initial
symptoms are similar to flu – fatigue,
headache and muscle aches, fever and
localized breast tenderness. It can be in one
or even both breasts and needs immediate
treatment.
A bacterial infection in the breast tissue
which is often accompanied by cracked
nipples.
A Lactation Professional or Healthcare Professional can give you guidance in breastfeeding your baby and
using a breastpump. Their guidance is valuable in terms of the lifetime of health benefits for both you and your
baby. A listing of Lactation Professionals are available at www.medelalocator.com or call 1-800-TELL-YOU
(1-800-835-5968).

This is a single user product. Use by more than one person may present a health risk
and performance questions and voids the warranty.
Caution
8. Warranty
32
This product is warranted by Medela, Inc. to the original retail purchaser to be free from
defects in material and workmanship for the period of one year for pump mechanism
(90 days for parts and accessories) from the date of purchase. In the event of a defect,
Medela will repair or, at Medela’s option, replace this product, without charge for such
replacement, parts or labor. Purchaser shall bear all expense for returning this product
to Medela. This warranty does not apply to any product used commercially or which has
been subjected to misuse, abuse or alteration.
ANY AND ALL IMPLIED WARRANTIES, INCLUDING THE WARRANTY OF
MERCHANTABILITY, ARE LIMITED TO A DURATION OF 90 DAYS FROM DATE OF
PURCHASE. SOME STATES DO NOT ALLOW LIMITATIONS ON HOW LONG AN
IMPLIED WARRANTY LASTS, SO THE ABOVE LIMITATIONS MAY NOT APPLY TO YOU.
THIS WARRANTY GIVES YOU SPECIFIC LEGAL RIGHTS AND YOU MAY ALSO HAVE
OTHER RIGHTS WHICH VARY FROM STATE TO STATE.
Before you make a claim under this warranty, it may save time and expense to call
Medela Customer Service (toll free) at 1-800-435-8316. You may also call this number
for additional information concerning this warranty. If you wish to make a claim under
this warranty, you must return this product to Medela with a return authorization number
received from Medela Customer Service, prepaid, together with your dated bill of sale or
other proof of purchase and a brief statement of the problem to the following address:
Medela, Inc.
4501 Prime Parkway
McHenry, IL 60050
ATTENTION: RETURNS
Call first for authorization number. Returns not accepted without an authorization
number.

35
¿Tiene alguna pregunta? Visite www.medela.com o llámenos al 1-800-435-8316.
Medidas preventivas importantes
Cuando se utilizan aparatos eléctricos, en especial si hay niños presentes, siempre deben tomarse
medidas de precaución básicas.
LEA TODAS LAS INSTRUCCIONES ANTES DE USAR ESTE PRODUCTO.
El símbolo de advertencia indica todas las instrucciones que es importante respetar
para mantener la seguridad. De lo contrario, pueden ocasionarse lesiones o puede
dañarse el sacaleches. Cuando se utilizan junto con las palabras que se mencionan
a continuación, los símbolos de advertencia significan lo siguiente:
ADVERTENCIA Pueden ocasionarse lesiones graves o muerte.
PRECAUCIÓN Pueden ocasionarse lesiones leves.
NOTA Puede ocasionarse daño material.
INFO Información útil o importante que no está relacionada con
la seguridad.
ADVERTENCIA: A fin de prevenir un peligro para la salud y de reducir el
riesgo de lesiones:
• Este producto es para uso individual únicamente y no debe utilizarse entre varias usuarias.
• No maneje mientras se extrae leche.
• Nunca lo utilice mientras esté embarazada, ya que la acción de bombeo puede inducir el
parto.
• Limpie y desinfecte todas las piezas que entran en contacto con el seno y la leche materna
antes de utilizarlo por primera vez.
• Lave todas las piezas que entran en contacto con el seno y la leche materna después de
cada uso.
• Revise todos los componentes apropiados del sacaleches antes de cada uso.
• NO lo use durante más de dos sesiones consecutivas si no logra ningún resultado.
• No descongele la leche materna en el microondas ni en un recipiente con agua hirviendo.
• Si se forma moho en la manguera, deje de usarla y cámbiela.
• Si se acumula leche, debe limpiar la manguera, la placa frontal y el diafragma antes de su
próxima sesión.
ADVERTENCIA: A fin de prevenir el riesgo de incendio, electrocución o
quemaduras graves:
• No desatienda el aparato cuando esté enchufado en un tomacorriente.
• Es necesario supervisarlo de cerca cuando este aparato se utilice cerca de niños o de
personas discapacitadas.
• Utilice el aparato solamente para su uso previsto según lo descrito en este manual. No utilice
accesorios que no estén recomendados por el fabricante.
• Nunca utilice este aparato si tiene el cable o el enchufe dañado, si no funciona
correctamente, si se ha caído o estropeado, o si se cayó al agua.
• Mantenga el cable alejado de superficies calientes.
• Nunca lo utilice cuando duerma o esté somnolienta.
• Nunca deje caer ni inserte ningún objeto en ninguna de las aberturas ni en la manguera.
• No lo utilice al aire libre ni en lugares donde se utilicen aerosoles (pulverizadores) o se
administre oxígeno.
• Siempre revise los cables del adaptador de corriente y del dispositivo para pilas antes de
usarlos, para asegurarse de que no estén dañados ni pelados. Si detecta algún problema,
deje de usar inmediatamente el adaptador de corriente o el dispositivo para pilas y llame al
Servicio al Cliente de Medela al 1-800-435-8316.
PELIGRO: A fin de reducir el riesgo de electrocución:
• Desenchufe siempre los aparatos eléctricos inmediatamente después de usarlos.
• No los utilice al bañarse.
• No coloque ni guarde el aparato en un lugar del que pueda caerse a una tina o fregadero.
• No lo coloque ni lo sumerja en agua ni en otro líquido.
• No trate de recoger ningún aparato que se haya caído dentro del agua; desenchúfelo
inmediatamente del tomacorriente.
PRECAUCIÓN: Pueden ocasionarse lesiones leves:
• NO enrolle el cable alrededor del cuerpo del adaptador.
• Use solamente el adaptador de corriente que viene con el sacaleches Pump In Style®
Advanced.
• Use solamente el dispositivo para pilas de Pump In Style Advanced que viene con el
sacaleches Pump In Style.
• Utilice el sacaleches únicamente en posición vertical.
• NO acorte la manguera.
• Asegúrese de que el voltaje del adaptador de corriente sea compatible con la fuente de
alimentación.
• Enchufe el adaptador de corriente primero en el sacaleches y luego en el tomacorriente de
la pared.
• NO use limpiadores ni detergentes abrasivos o antibacterianos cuando limpie el sacaleches
o sus piezas.
• Nunca coloque el motor del sacaleches en agua ni en un esterilizador, ya que puede dañar
de forma permanente el sacaleches.
• No intente sacarse el embudo del seno mientras se extrae leche. Apague el sacaleches,
separe el embudo del seno con un dedo y luego retire el embudo.
• Si el proceso de extracción le resulta incómodo o le provoca dolor, apague la unidad,
separe el embudo del seno con un dedo y retire el embudo.
CONSERVE ESTAS INSTRUCCIONES
34

37
36 ¿Tiene alguna pregunta? Visite www.medela.com o llámenos al 1-800-435-8316.
Índice
1. Instrucciones de limpieza........................................................................................40-47
1.1 Antes del primer uso................................................................................................. 40
1.2 Después de cada uso.......................................................................................... 40-41
1.3 Desinfección diaria............................................................................................... 42-43
1.4 Limpieza de la manguera y de la placa frontal...................................................... 44-47
1.5 Limpieza de la bolsa del sacaleches ......................................................................... 47
2. Armado......................................................................................................................48-55
2.1 Armado del juego de sacaleches ......................................................................... 48-51
2.2 Cómo colocarse los embudos correctamente........................................................... 52
2.3 Opciones de energía eléctrica.............................................................................. 53-55
2.3.1 Adaptador de corriente................................................................................... 53
2.3.2 Dispositivo para pilas ...................................................................................... 54
2.3.3 Si viaja fuera de los Estados Unidos ............................................................... 55
3. Cómo extraerse leche con su PNSA ......................................................................56-59
3.1 Funcionamiento del aparato................................................................................. 56-59
4. Almacenamiento de la leche materna......................................................................... 60
5. Preparación de la leche materna y alimentación con leche materna...................... 61
5.1 Preparación de la leche materna............................................................................... 61
5.2 Alimentación con leche materna ............................................................................... 61
6. Detección y solución de problemas ............................................................................ 62
7. Información complementaria....................................................................................... 63
8. Garantía.......................................................................................................................... 64
Antes de usar este producto por primera vez, le aconsejamos que se tome unos minutos
para leer este manual de instrucciones en su totalidad.
CONSERVE ESTAS INSTRUCCIONES.
Antes de extraerse leche, lo más recomendable es esperar hasta que se haya establecido
el amamantamiento (alrededor de cuatro semanas), a menos que el profesional médico
que la atiende le indique otra cosa.
Glosario de términos
Tecnología de extracción en dos fases o etapas 2-Phase Expression®:tecnología
basada en investigaciones que imita el ritmo natural de succión del bebé.
Etapa de extracción: ritmo de succión/extracción más lento para extraer la leche con
suavidad y eficacia lo más rápido posible.
Vacío de máxima comodidad Maximum Comfort Vacuum™:nivel de vacío máximo
que la madre puede usar sin dejar de sentirse cómoda durante la extracción. Varía de
madre a madre.
Etapa de estimulación: ritmo de succión/extracción rápido para estimular el reflejo de
eyección de leche y hacer que la leche comience a fluir.
Uso previsto
Destinado a madres lactantes para extraerse y recolectar leche materna a fin de
complementar el amamantamiento.
Si por cuestiones médicas u otras razones solamente puede alimentar a su bebé con
leche extraída, le recomendamos que use un sacaleches de calidad hospitalaria tal como
nuestro sacaleches Symphony con tecnología de extracción en dos fases. Para obtener
más información, visítenos en www.medelabreastfeedingus.com.
Descripción del producto:
Pump In Style®Advanced (PNSA) es un sacaleches eléctrico de uso personal que incluye
la tecnología de extracción en dos fases y sirve para extracciones simples o dobles.

39
38 ¿Tiene alguna pregunta? Visite www.medela.com o llámenos al 1-800-435-8316.
2 embudos PersonalFit™tamaño M (24 mm)
(por otros tamaños de embudo, consulte la
Sección 2.2 en la página 52)
87073
2 conectores
87071
2 válvulas
87089
2 membranas
87088
2 biberones
6100050
2 tapas
8107183
2 mangueras
87212
Descripción del producto
1 adaptador de
corriente
Repuesto 68030
Artículo 9207010
1 paquete de hielo
Artículo 8117010
1 dispositivo para pilas
Repuesto 67553
Artículo 9017002
1 bolsa
refrigerante
(incluye paquete
de hielo)
BCOOL001
1 placa frontal
Botón de
encendido y
apagado
Aumento y
reducción del
vacío
Botón de
bajada de
leche
Entrada del
adaptador
de corriente
Orificio para la
manguera
Orificio para la
manguera
Tapón de
orificios
MochilaBolso de viaje
Embudos PersonalFit de 27 mm..................... 87274
Bolsa Metro Bag con:
Mantel de plástico flexible para apoyar
el sacaleches y sus piezas.......................... 3007299
2 Bolsas de malla para guardar piezas
Piezas adicionales que vienen con la bolsa The Metro Bag™
Bolsa The Metro
Bag de Pump In
Style®Advanced
This manual suits for next models
3
Table of contents
Languages:
Other Medela Toddler Feeding manuals