Medema Mini Crosses M2 4W Cabin User manual

User Manual
Mini Crosser M24W Cabin
P9-0152-B ver. 3.0.0 - September 2013 GB
medemagroup
U
ser Manual
M
ini
C
rosser M
2
4W
C
abi
n
m
edem
a
g
rou
p

User guide P9-0152-B 2 of 60 Version 3.0.0/2013
Medema Production A/S
Serial number: ___-______________-______-_______
Delivery date: ________________ Year 20______
This vehicle was supplied by: Date: /

User guide P9-0152-B 3 of 60 Version 3.0.0/2013
Medema Production A/S
Contents
Symbols.................................................................................. 4
Warning!................................................................................. 4
Alarm ...................................................................................... 4
Contagion!.............................................................................. 4
Introduction............................................................................ 5
Declaration of conformity..................................................... 6
Control panel ......................................................................... 7
User menu.............................................................................. 8
Programming the User Menu ............................................... 11
Preparations / Adjustments prior to use............................. 13
Seat rotation........................................................................... 15
Steering column .................................................................... 16
Serial number......................................................................... 17
Driving the Mini Crosser M2Cabin ...................................... 18
Specific driving situations.................................................... 23
Long hills/difficult ground.................................................... 25
Anti-tilt wheels / stabilisers.................................................. 26
General care and maintenance ............................................ 27
Insurance................................................................................ 28
Batteries................................................................................. 29
Charging................................................................................. 29
Battery disposal..................................................................... 31
Storage................................................................................... 31
Cleaning ................................................................................. 31
Fuel for heater........................................................................ 32
Heater ..................................................................................... 32
Windscreen wiper / washer .................................................. 33
Replacing the wiper blade.................................................... 34
Replacing the bulb - headlight............................................. 34
Changing the wheels............................................................. 36
Fuses...................................................................................... 38
Brakes..................................................................................... 40
Disengagement...................................................................... 40
Transporting by motor vehicle............................................. 41
Securing with belts................................................................ 42
Transporting by plane........................................................... 44
Towing.................................................................................... 44
Dimensioned drawing, Mini Crosser M24W........................ 45
Introduction to seats - Ergo Standard................................. 46
Introduction to the EBLO seat.............................................. 48
Troubleshooting .................................................................... 50
Programming......................................................................... 53
Technical data........................................................................ 53
International addresses........................................................ 56

User guide P9-0152-B 4 of 60 Version 3.0.0/2013
Medema Production A/S
Symbols
Used in the manual to indicate sections describing situations
where extra care is required owing to the risk of personal injury.
Used to indicate sections on electromagnetic compatibility
(EMC).
Warning!
For safety reasons the vehicle must not be lent to persons who
are not completely familiar with it. The vehicle is designed for
one person only.
The Mini Crosser M2Cabin has been designed for users
weighing max. 175 kg. The vehicle can be specially adapted at
the factory for users weighing up to 200 kg.
Alarm
Temperature sensor, alarm system and tilt alarm are built into
the same box that can be acquired as an option for the Mini
Crosser M2.
Note!
The alarm is always turned off on delivery. See the chapter
about ”Programming the User Menu” to turn on the alarm.
Contagion!
Note!
The tires can sometimes rub off on floor coverings, particularly
linoleum. Medema Production assumes no responsibility in
case of contagion.
To prevent this, we recommend that you protect delicate floors
with some sort of driving surface.

User guide P9-0152-B 5 of 60 Version 3.0.0/2013
Medema Production A/S
Introduction
Congratulations on your new Mini Crosser M24W Cabin electric
mobility scooter.
You have now taken possession of an electric mobility scooter
developed for outdoor driving by active users. It is what is
called a Class C vehicle in accordance with the European
classification of electric scooters.
For optimum enjoyment of this vehicle - and to avoid breakdowns
and accidents - we recommend that you read this User Manual
carefully. As a new user, you should pay particular attention to
the section entitled “Driving the Mini Crosser M2Cabin”.
The Mini Crosser M2Cabin is designed for safe travel for at
least 10 years, up to a max. of 5,000 hours, provided it is
serviced and safety-checked every year, corresponding to
500 hours of operation. The service must be carried out by an
authorised workshop.
IMPORTANT! For safety reasons it is of the utmost importance
that service and safety check intervals are complied with, as
this minimises the risk of brake failure and short-circuits in the
wiring, which could generate heat and cause a fire.
We offer a wide range of accessories for the Mini Crosser
M2Cabin that can make everyday life easier for you. You are
always welcome to contact us for further information on special
accessories and adaptations.
Medema Production A/S is not responsible for any damage
or injuries caused by inappropriate or unsafe use of the Mini
Crosser M2Cabin.
If you have any further questions about the Mini Crosser M2
Cabin or this User Manual, you are always welcome to get in
touch. Our contact details are as follows:
Medema Production A/S
Tel: +45 7010 2054 - Email: info@minicrosser.com
Internet: www.minicrosser.dk
NB: Errors and omissions excepted. We reserve the right to
update this manual as required.

User guide P9-0152-B 6 of 60 Version 3.0.0/2013
Medema Production A/S
Declaration of conformity
Medema Production A/S hereby declares that:
Machine: Mini Crosser
Use: (Prescribed use in
User Manual)
Model No: M24W Cabin
Complies with the Medical Device Directive 93/42/EEC
The product is made in accordance with the harmonized
standard EN 12184 - Electrically powered wheelchairs, scooters
and their chargers.
The product is risk analysed in accordance with the harmonized
standard DS/EN ISO 14971:2007-04-10 2. edition - Medical
devices - Application of risk management to medical devices.
The Mini Crosser can, for a fee, be taken to the nearest
dealer for disposal in accordance with current environmental
regulations.
Manufacturer: Medema Production A/S
Address: Enggårdvej 7, DK-7400 Herning
Tel./Fax +45 7010 2054 +45 9716 8582
Date: 12.04.2010 Signature: _____________________
User guide P9-0152-B 7 of 60 Version 3.0.0/2013
Medema Production A/S
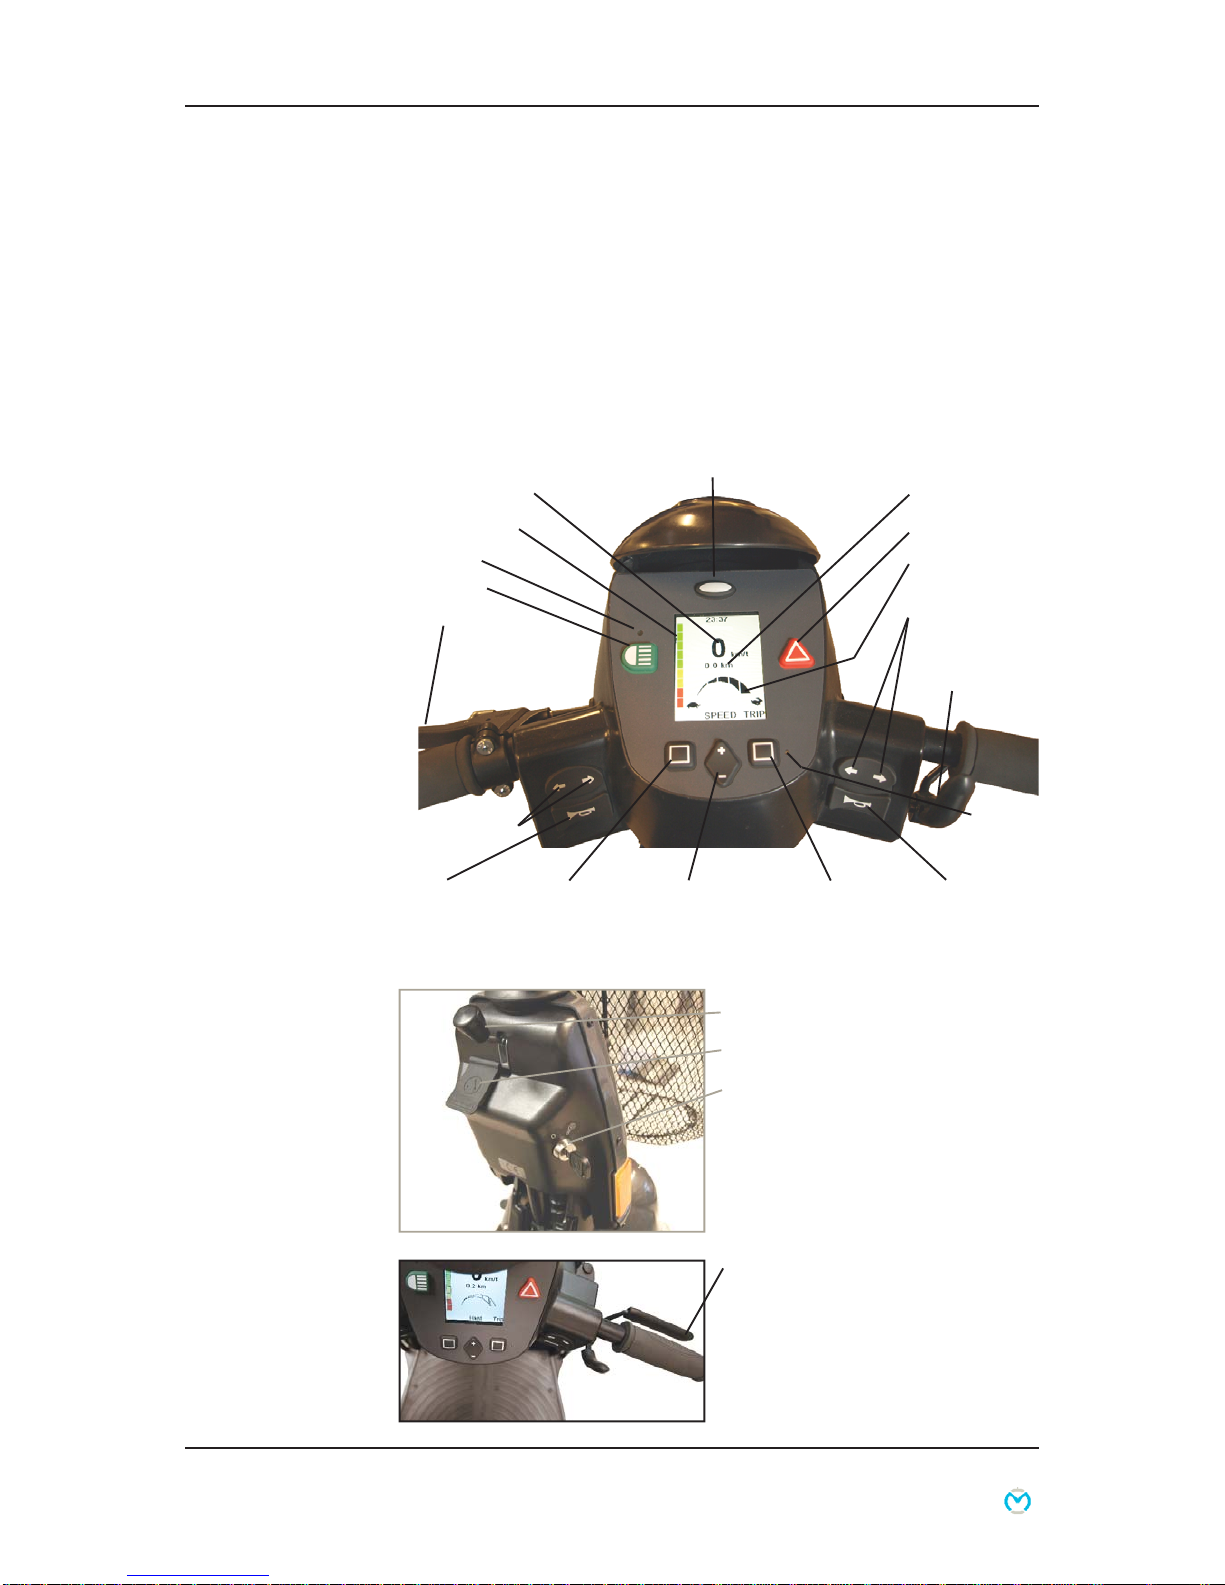
Control panel
Avoid subjecting the control panel to jarring and knocks. Take
care when driving and avoid hitting obstacles.
The manufacturer accepts no liability in respect of the
unauthorised opening, adjustment or modification of the control
panel.
Lever for adjusting the angle of the handlebars
Charging socket
Key switch
Accelerator
(four-finger control)
Indicator lights, R/L
Horn
Indicator lights,
R/L
Horn
Speed selector
Hazard warning lights
Battery indicator
Handbrake
Light switch
Actual speed
Accelerator
(four-finger control)
Speed
regulation
Menu / information
Trip meter
Mileage
Light sensor
Extra Switch
Can be used
for optional
functions.
anti-theft alarm

User guide P9-0152-B 8 of 60 Version 3.0.0/2013
Medema Production A/S
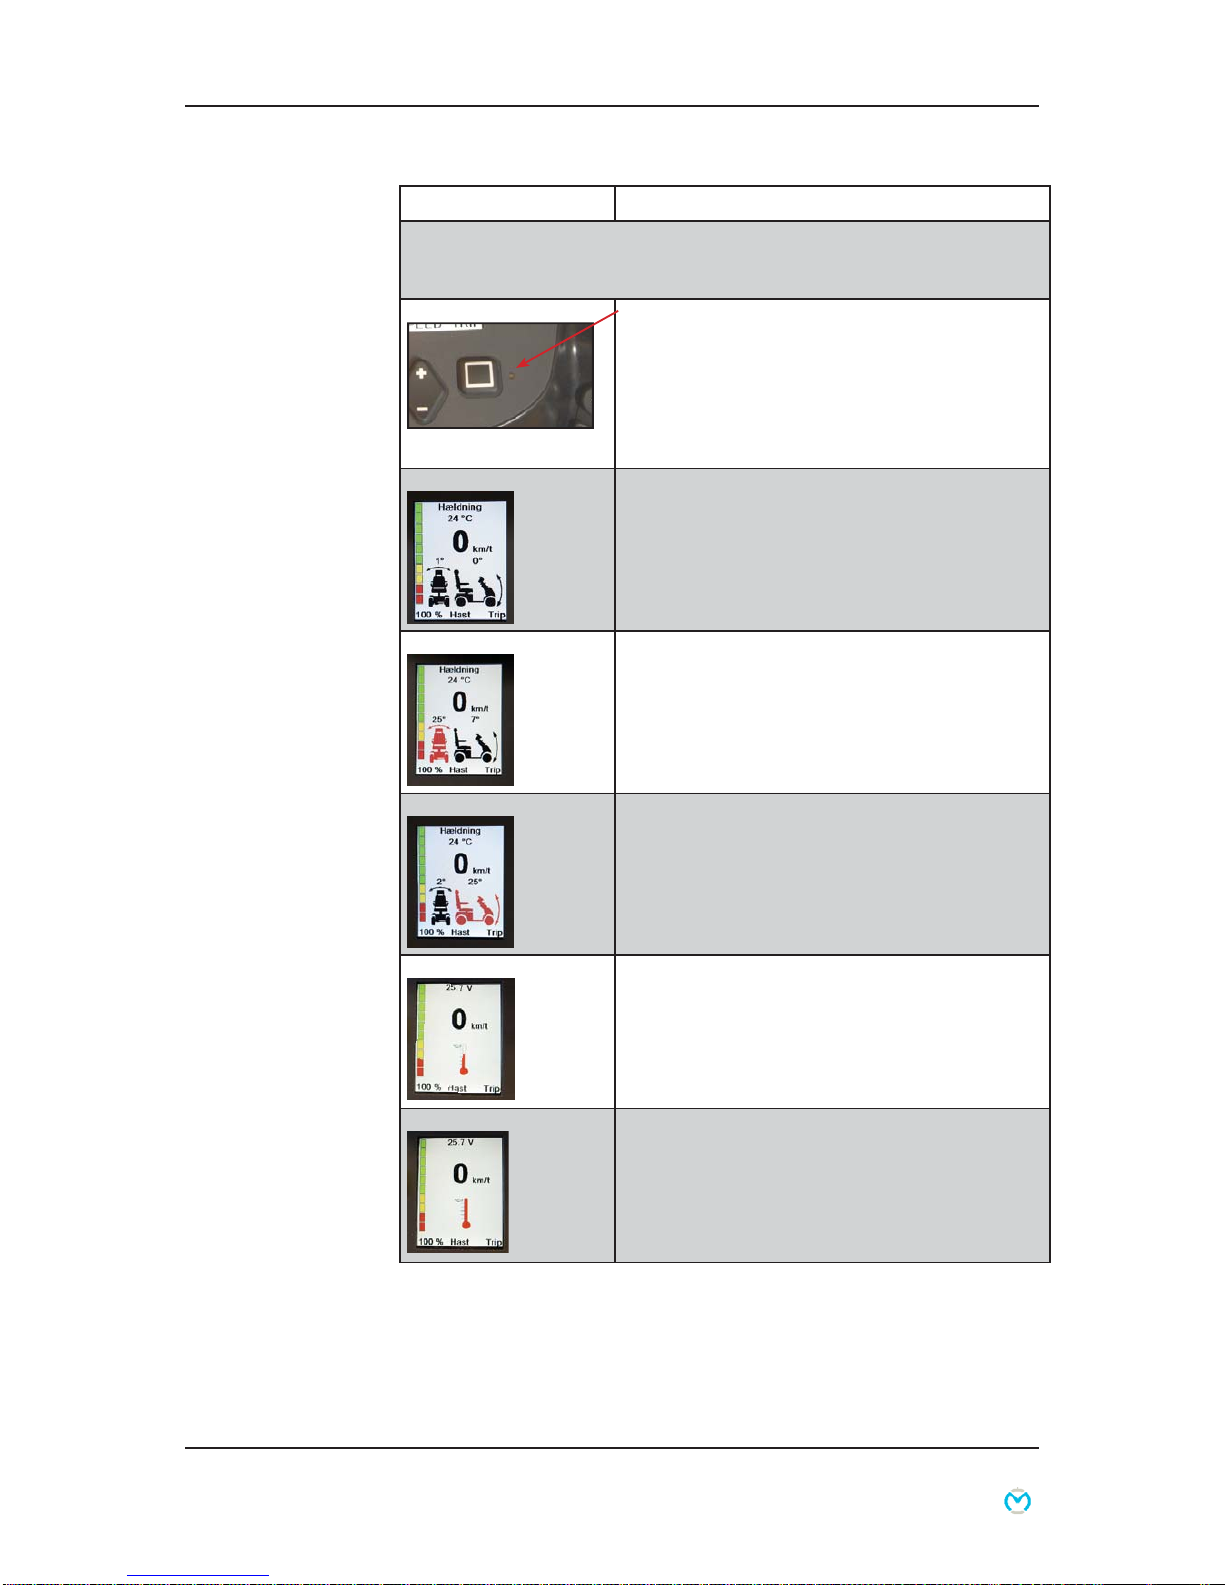
User menu
Term Description
Menu / information Press the button and a menu at the top of the display
switches between ”Date”, ”Time”, ”Complete km”,
”Complete running time”, ”Battery Voltage” Service
”and” inclination ”.”Slope” is optional, and appears
only if it is engaged.
Button Menu / information are also used to modify the
user parameters.
Access these parameters by holding the menu button
for approx. 3 sec.
Key switch To start the vehicle:
Turn the key to position (1). When the ignition key is
turned to drive position (1), the display lights up. The
Scooter can drive within approx. 1 second. The first
half second after the Mini Crosser is on, the control is
making a safety check of the electrical system. If the
accelerator is affected during this time, the Mini Crosser
will not be able to run, before the key again has been
turned at 0 and back to 1 again.
Speed selector
The turtle indicates lowest speed range. 0-6 km / h.
The hare indicates the highest speed range. Up to 15
km / h. Increase/decrease with + / - button.
The icons turtle/hare can be turned on/off from the
User menu.
Battery indicator
The left side of the display shows battery level indicator.
Indicates that after approx. ½ seconds, the battery state of
charge. Provides a more accurate indication after approx. 1
minute drive. When both red, yellow and green box lights
are the batteries fully charged. Can be divided into 10 or
3 boxes. When the view is down the bottom of the yellow
batteries should be recharged as soon as possible. If there
is only light in the red boxes or flashing the batteries must
be charged immediately.
Trip meter TRIP button resets the trip meter. Can be used while
driving.
Hand brake Works on the left rear wheel and should only be used
as extra brake / emergency brake and parking brake.
It can be blocked in the locked position. Also available
as a foot brake.

User guide P9-0152-B 9 of 60 Version 3.0.0/2013
Medema Production A/S
Term Description
Accelerator
Forw. / Backw.
Front arm activates slowly and the Mini Crosser will
start running forward. The more press, the faster it will
run. When the lever is released, the arm flips itself back
to the starting position and Mini Crosser stops.
Upon activation of the posterior arm, the Mini Crosser
run backward. The Magnetic brake on the rear wheels
will strike at standstill, corresponding to the parking
brake on a car. With speed regulation, speed can also
be regulated downhill. The engine will then act as a brake.
Light switch Turns on the front and rear lights. The key switch must
however be turned to position 1 (drive).
Hazard warning lights Turns on all lamps at once. Also works when the key
is removed, or turned to 0 (stop position).
Indicator lights switch Arrow left: lamp left side. Arrow Right: lamp right side.
Activate the same button again to turn off flashing
lights.
Horn Electric horn which can be programmed in volume in
the User Menu. Activated by pressing the horn button.
Charging socket Turn off the Mini Crosser (key in position 0) during
charging. Note that it is not possible to run while the
batteries recharge. See also the section ”Batteries
and Charging.”
User guide P9-0152-B 10 of 60 Version 3.0.0/2013
Medema Production A/S
Term Description
Extras
Anti-theft alarm (Extra) With this parameter set to ON, the anti-theft
alarm is turned on every time you turn off the Mini
Crosser. An activated alarm is turned off by turning the
key to 1 (drive).
If you have no opportunity to get to the Mini Crosser
with the key, the alarm will stop after approx. 20
seconds. Shake the scooter again, the alarm will be
activated again.
Tilt Tilt-symbols.
Tilt Alarm sideways By exceeding the preset value, the symbol flashes and
the horn hoots, if the parameter is enabled.
Tilt Alarm forw./backw. By exceeding the preset value, the symbol illuminate
and the horn hoots, if the parameter is enabled.
Overheating step 1 Step 1: The symbol flashes and the speed is reduced to
half power. Wait for 3-5 min and start again.
Overheating step 2 Step 2: The symbol will illuminate and Mini Crosser
stops. Wait 3-5 minutes and start again.

User guide P9-0152-B 11 of 60 Version 3.0.0/2013
Medema Production A/S
Programming the User Menu
Access the menu by holding the Menu/information button for approx.
3 sec. Scroll up and down with the + / -button under the display.
The active parameter is highlighted with yellow writing and blue
background. Access the value of the selected parameter by pressing
Enter. Change the value using the +/- button. Confirm with Enter and
exit with the Menu/information button.
Parameter description
Date Format Choose between:
ddmmyy - day/month/year
mmddyy - month/day/year
yymmdd - year/month/day
Temp. unit
(Temp. unit is extra) Choose between Celsius or Fahrenheit. Displays ambient
temperature.
Limited speed
(On/Off) Limited speed On/Off.
To edit this function you will be asked for a 4 digit code.
From the factory this code is set to be 1234, but it can be
altered by a service technician.
Use the +/- button to each digit. Go to the next digit with
the “Next” button. Confirm with “Enter” Turn this parameter
On/Off – Confirm with “Enter”.
Limited speed (value) Limited speed - value.
To edit this function you will be asked for a 4 digit code.
From the factory this code is set to be 1234, but it can be
altered by a service technician. Use the +/- button to set %
value, that you want the scooteres max speed reduced to.
Move in increments of 5%.
Backlight (value) The displays backlight can be changed in increments of
5%. Typically used in winter or when driving in darkness,
where the intense light from the display may seem
annoying.
Backlight auto
(On/Off) Selecting ”On” reduced intensity of the backlight
automatically when darkness falls or when driving into
a tunnel or similar. Light sensor sits just above the light
switch. See the Control panel.
Backlight threshold Here max. light intensity is shown in%. Move in increments
of 5%.
Reverse Buzzer (Off/
Beep/Buzze) Same warning horn as it is known from trucks in reverse
gear.
Choose from ”Off”, ”Beep” - low horns, or ”Buzzer” - sharp
horns.
Keyboard sound
(On/Off) With ON / OFF select whether to be acknowledged with a
little beep when you press the contacts on the dashboard.
These are: flashing, lights, hazard, menu, arrows and
MENU keys.
Blinker sound (Off/
Beep/Buzze) Choose whether you want a sound when flashing lights on
the scooter is on. Just as we know it from a car. You can
select ”Off”, ”Beep” - low horns, or ”Buzzer” - sharp horns.
User guide P9-0152-B 12 of 60 Version 3.0.0/2013
Medema Production A/S
Parameter description
Clock Set time and date using the up / down with arrows. Moving
to the next digit by pressing the ”next” button. Quit with the
”Enter”
Hazard enabled
(On/Off) By default hazard (emergency lights) is operable even if the
scooter is switched off and the key is removed.
If you wish the hazard not be activated with the scooter
turned off, you should select ”Off.” here.
Alarm enabled
(On/Off) Extra With this switch ”On”, the burglar alarm is turned on every
time you turn off the scooter. The small lamp next to the
”Trip meter” will flash a few seconds interval.
An activated alarm is turned off by switching the key on the
scooter. If you have no opportunity to get to the scooter
with the key, the alarm will switch off after approx. 20th
seconds. Shake / move the scooter again, the alarm will be
activated again.
Tilt Present (On/Off)
Extra With this parameter set to ”On”, will turn the tilt icons to red
and blinking, and there will be a whining tone (if enabled) if
you are running on a slope that is steeper than allowed.
P&G fault log Here are the faults that P & G engine management have
registered. The system can record 8 different types of
faults. Each fault can be recorded up to 30 times.
The newest registered fault is written at the top of the list.
They are shown as follows:
[1502] 2
None
None
None
None
None
None
In this case, the fault 1502 appeared twice. If you press
ENTER on the fault you will get an explanatory text. In this
case, ”Solenoid brake fault”
None means that there have been other fault.
In case of fault on the scooter, it will be a great help if
the fault type can be given to the Mini Crosser or his
representative during troubleshooting.
Temperature sensor, alarm system and tilt alarm are built into
the same box that can be acquired as an option for the Mini
Crosser M2Cabin.
User guide P9-0152-B 13 of 60 Version 3.0.0/2013
Medema Production A/S
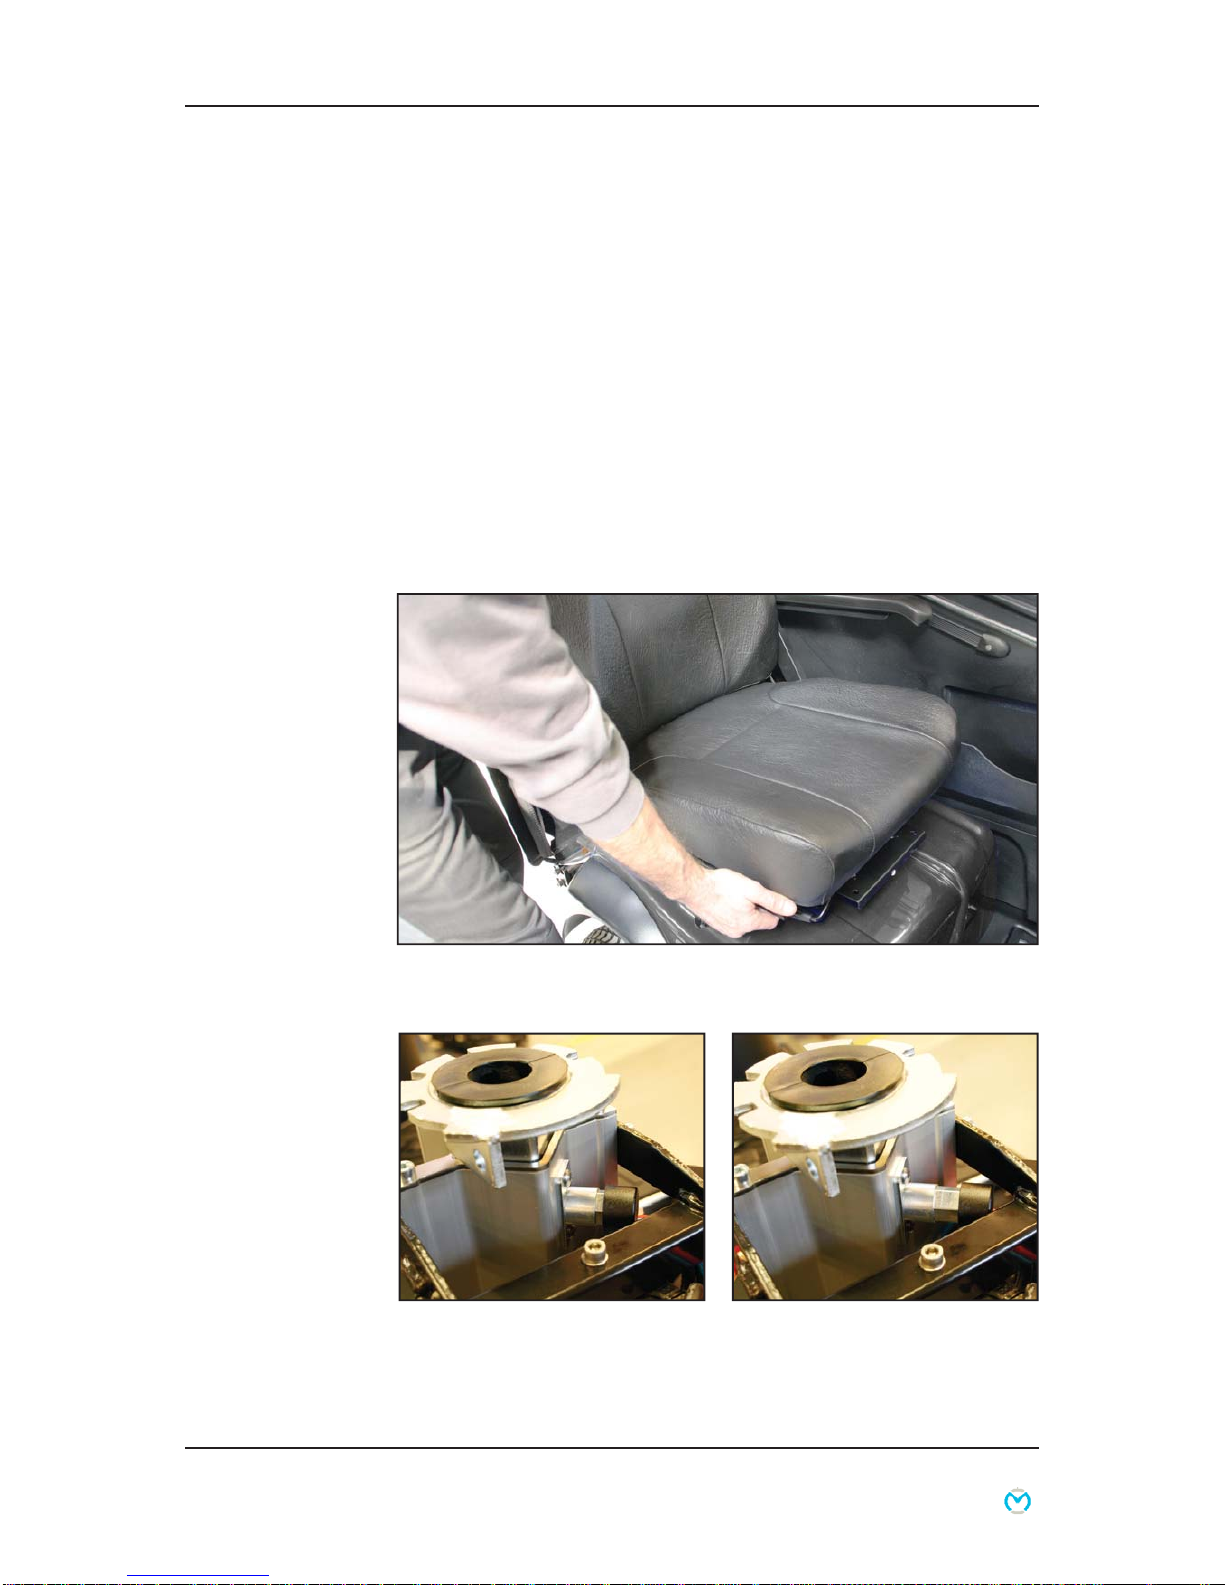
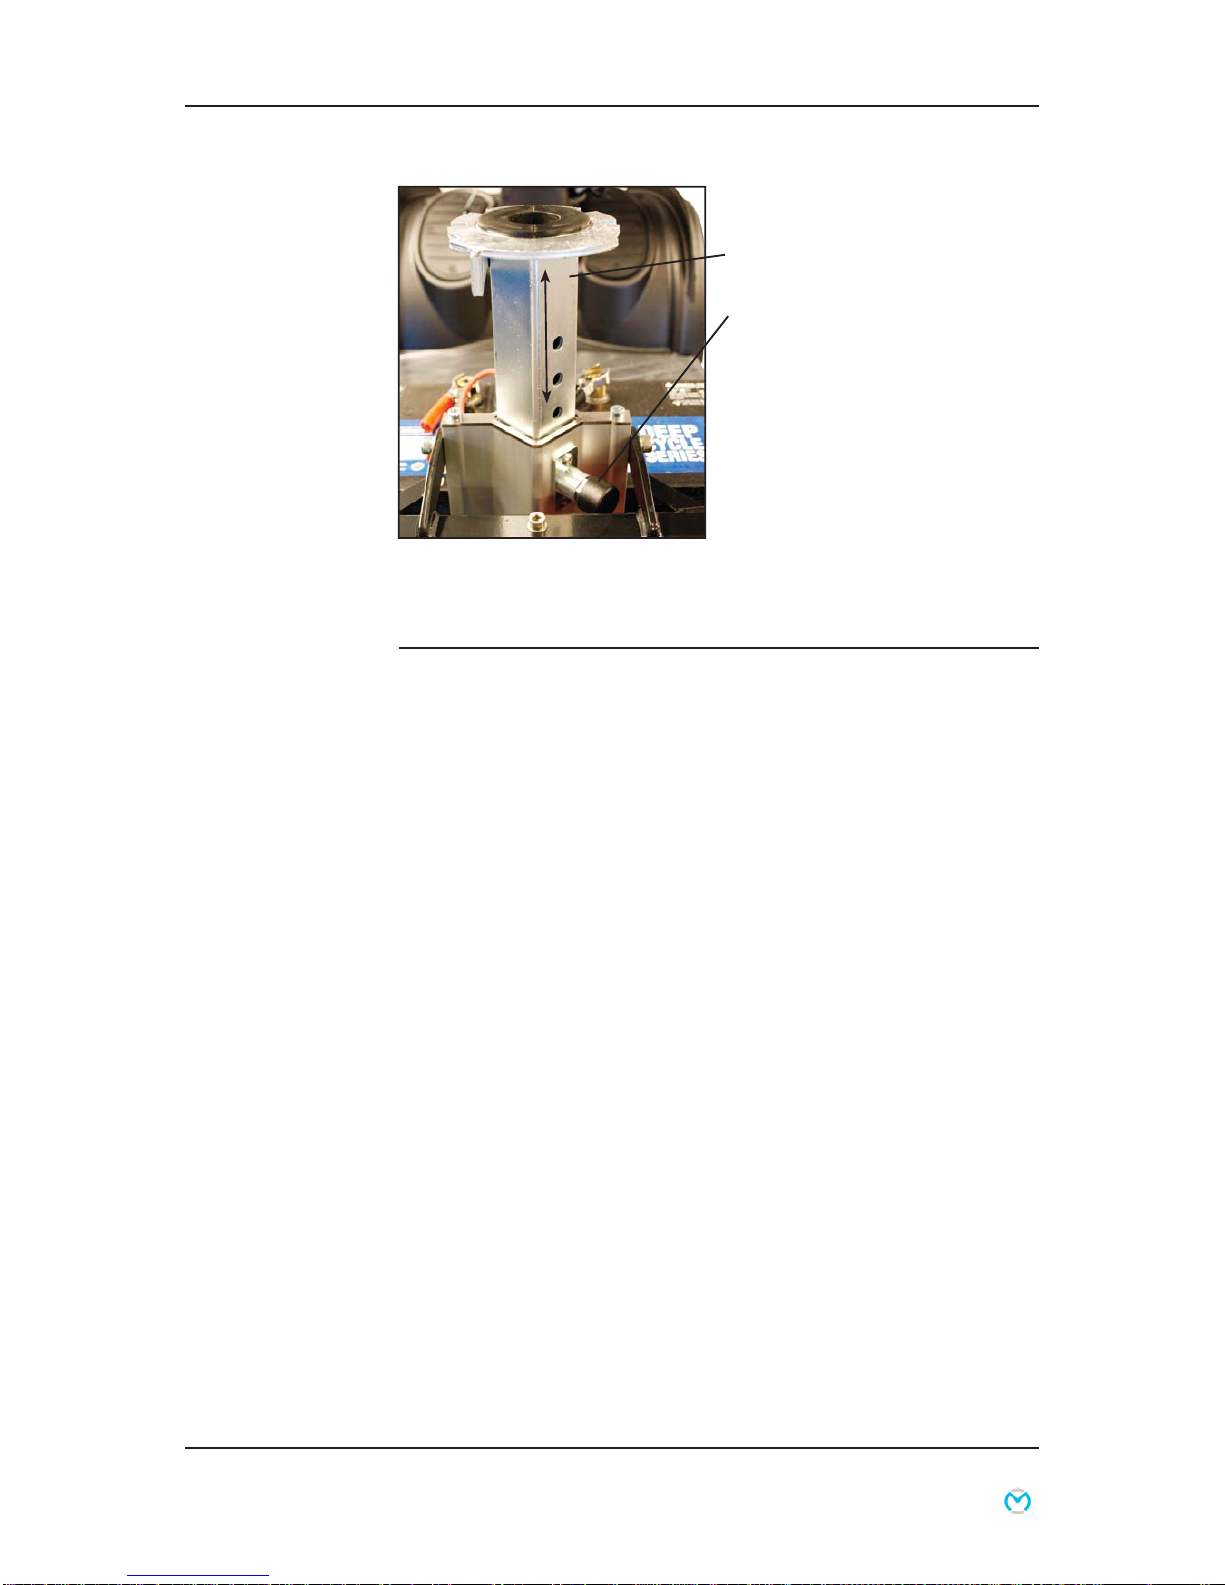
Lift the seat off the seat tube.
Preparations / Adjustments prior to use
Adjusting the height of the seat
Lift the seat off and remove the rear cover. Press the release
button out and adjust the seat tube to the desired position.
See the picture on the next page. Check that the seat height
is correct and press the release button in again. Move the seat
tube up/down until the release clicks into a hole.
Make sure you keep your back straight when lifting the seat,
which is very heavy. (See below.)
The resease button pressed in. Press
the button out to release the seat tube. Resease button pressed out. Now the
seat tube can be moved up/down to the
hight you wish. Press the release button
again and make sure it is fitted in one of
the 5 holes in the seat tube.
User guide P9-0152-B 14 of 60 Version 3.0.0/2013
Medema Production A/S
Seat tube in top position. There are five
holes for adjusting the seat tube. The
release must be in a hole for the seat to
be stable.
Seat tube
Release

User guide P9-0152-B 15 of 60 Version 3.0.0/2013
Medema Production A/S
Seat rotation
Pull the release lever back. The seat can be rotated 90° to
either side. When the lever is released, it engages with the seat
and holds it in place at 45° intervals.
Other seats that can be supplied for the Mini Crosser work on
similar principles. The release lever is normally mounted on the
right, but can be put on the left if so wished.
IMPORTANT!
The Mini Crosser is most stable when the seat is in its lowest
position. Always drive carefully when the seat is raised. Never
use the seat adjustment when driving on an uneven surface or
in hilly terrain.
Take extra care when lowering the seat on a Mini Crosser using
electric seat adjustment. Make sure that nothing is trapped in
the space between the seat and the chassis.
Avoid trapping anything when lowering the seat.
Release lever for seat rotation. Release lever for seat forward/back.
User guide P9-0152-B 16 of 60 Version 3.0.0/2013
Medema Production A/S
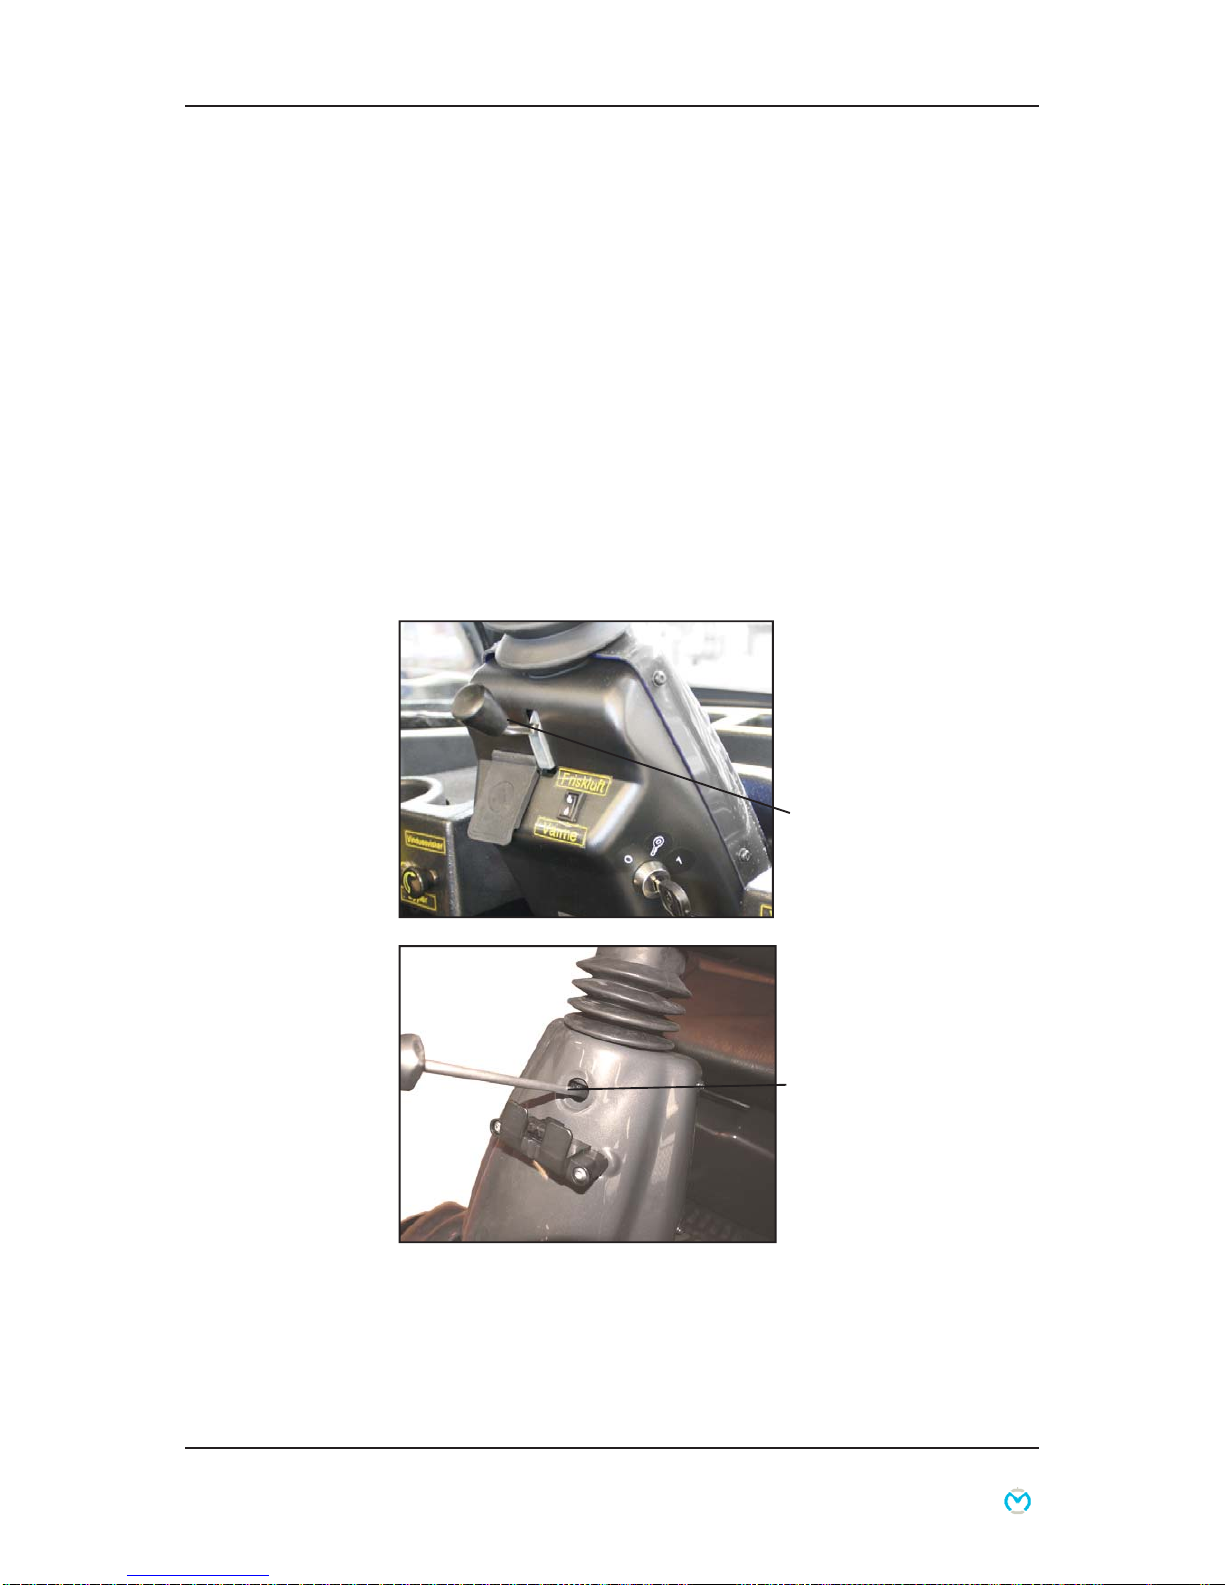
Steering column
Can be adjusted forward/back with the release lever. Pull down
on the lever and pull the handlebars closer for a good driving
position. Use the lever again and push the steering column
forward to make it easier to get out.
The height of the steering column can be adjusted approx. 11
cm up/down. First remove the rubber plug covering the Allen
screw. Adjust the height using a 4 mm Allen key.
Adjusting the height of
the handlebars.
Lever for adjusting the angle of
the handlebars
Adjusting the height of
the handlebars.
Allen screw for height
adjustment

User guide P9-0152-B 17 of 60 Version 3.0.0/2013
Medema Production A/S
Serial number
All vehicles have a serial number plate showing the year of
production and serial number. The same serial number can also
be found on the front of the User Manual.
Please quote this number when making inquiries about
servicing, spare parts, etc.
Maximum user weight
Vehicle’s unladen weight inc.
batteries and seat
Position of serial number plate on vehicle.
Serial number
Model description
Year of production Max. speed

User guide P9-0152-B 18 of 60 Version 3.0.0/2013
Medema Production A/S
Driving the Mini Crosser M2Cabin
Getting in and out
It is important to learn a safe technique for getting in and out of
the Mini Crosser.
In general the following method should be followed:
• Make sure that the Mini Crosser M2Cabin is off (switch turned to
0) when getting in and out, otherwise the Mini Crosser could start
if the accelerator was touched inadvertently.
• Make sure that the brake is on. (Lever for disengaging motor in
top position.)
• Put the steering column in vertical position.
• If necessary, raise the armrest.
Note! - Do NOT use the dors as support, when entering or
getting out of the vehicle.
For some users the assistance of an attendant can be
recommended. The attendant should:
• Take care not to injure him/herself when lifting/lowering/supporting
the user.
• Make sure that the Mini Crosser is stable and unable to move.
Turn off the Mini Crosser and check that the brake is on.
• Make sure that the seat the user is being moved to is stable.
Turn the Mini Crosser off, return the
steering column to upright position and
raise the armrest.
IMPORTANT!
The Mini Crosser will turn
itself off automatically after
it has been stationary for
10 minutes even if the key
has been turned to driving
position. The battery indicator
flashes with 6 lamps at a rate
of about 3 seconds.
To restart the vehicle, the
key must be turned to stop
position (0) and then to
driving position (1).

User guide P9-0152-B 19 of 60 Version 3.0.0/2013
Medema Production A/S
Braking systems
There are three braking systems on the Mini Crosser:
• Motor brake - adjusts vehicle speed also when going downhill.
• Magnetic brake - the magnetic brake is automatic and
engages when the Mini Crosser stops. In an emergency,
the Mini Crosser can be stopped instantaneously by turning
the key switch. Please note that this will cause very sharp
braking.The brake must never be disengaged mechanically
using the disengagement lever on a slope. This function is
only designed for use when pushing the Mini Crosser on a
flat road.
• Electric safety brake - if the brake is somehow disengaged on
a slope/hill, the Mini Crosser will brake automatically when it
reaches a certain speed. There is an electric safety feature in the
control system, which works even if the battery is disconnected.
This is also the reason why the Mini Crosser cannot be towed at
more than 5 km/h. See the section about towing.
• Handbrake - intended as an emergency brake and parking
brake. It must be operated with caution when driving in
slippery conditions and downhill.
General safety advice
Make sure that the backrest is upright and the seat is as low as
possible.
Positioning belts are recommended if the user is unable to
maintain a good driving posture independently.
Adjust your driving to road conditions. Take account of light,
traffic and weather. Be particularly careful when driving in the
When using the handbrake as a parking
brake, lock it in braking position by
pressing the button in while applying the
brake.
To release the brake, press the button
again.
Handbrake lock

User guide P9-0152-B 20 of 60 Version 3.0.0/2013
Medema Production A/S
dark or in bad weather, such as rain or snow. Avoid driving on
gradients with poor surfaces, such as: snow, ice, new-mown
grass, wet grass and wet leaves.
Never drive when under the influence. This applies not only to
alcohol, but also to drugs and medicines.
Reduce speed immediately if you feel you are losing control.
Always use the indicators when changing direction.
Check that lights and indicators are working before driving off.
Use your lights when driving after lighting-up time.
As far as possible, grip the handlebars firmly with both hands.
Take care not to have anything in the basket at the front that
might inadvertently operate the accelerator.
WARNING! Do not lower the handlebars so far that the
accelerator can hit you on the leg when you turn the vehicle and
so be operated in advertently. If the handlebars need to be very
low, a twist grip accelerator is recommended. This is particularly
relevant if leg supports are being used.
ALWAYS switch the scooter off when it is not in use. Turn the
key to 0.
Driving
Even though the Mini Crosser is very stable, it can tip over.
Avoid sudden changes of speed and direction when travelling at
high speed, on poor surfaces and, not least, on slopes.
For short distances the Mini Crosser can drive up steeper
gradients than it has been tested as dynamically stable for. The
same applies to driving down such gradients. In such cases
there is an increased risk of the Mini Crosser tilting and even
tipping over. So be extra careful in following the driving tips
given below.
Anti-tilt wheels are recommended for driving in very hilly terrain.
(Optional extra)
Table of contents
Other Medema Scooter manuals

Medema
Medema Mini Crosser M1 Cabin User manual

Medema
Medema Mobility Scooter User manual

Medema
Medema Mini Crosser M1 User manual

Medema
Medema MC 1122 Quantum User manual

Medema
Medema Mini Crosser M2 User manual

Medema
Medema Mini Crosser M-MaxX User manual

Medema
Medema Mini Crosser M1 User manual

Medema
Medema M Joy User manual

Medema
Medema M1 joy User manual

Medema
Medema Mini Crosser X1 User manual


