IAdea XMP-7300 Instructions for use

XM
P
Har
d
P
‐730
0
d
war
U
0
U
ser
M
M
anu
a
a
l

i
Contents
1.Introduction1
1.1.Packagecontents1
1.2.Installation1
1.3.Physicalview2
2.TechnicalData3
2.1.Specifications3

i
1. Intr
o
Thisd
o
1.1.
P
NOTI
N
1.2.
I
Attac
h
Attac
h
Mou
n
builti
n
Med
Ve
l
o
ductio
n
o
cumentdes
c
P
ackage
c
N
CLUDED:A
U
I
nstallati
o
h
wirelessa
h
thewireles
s
n
tingOption
n
VESAMIS‐D
iaPlayerUnit
l
cro(2sets)
n
c
ribesthehar
c
ontents
U
SBmouseis
o
n
ntenna
s
antennaas
:[VESAMo
u
100(100mm
x
(wit
h
dwareofthe
requiredfor
s
shownbelo
w
u
n
t
]Theplay
e
x
100mm)co
m
ACAdapter
h
selectpowe
XMP‐6200.
s
ystemsetup
w
,andthens
c
e
rcanbeatt
a
m
patiblemou
n
rplug)
c
rewantenn
a
a
chedtomou
n
n
tingflange(s
c
Wi‐FiAnt
e
a
clockwiseo
n
tingpostso
n
c
rewthread:
e
nna
ntothepost.
n
thebackof
s
M4)
HDMI
s
creenswith
t
Cable
t
he

i
1.3.
P
Phys
i
P
hysical
v
i
calfeatures
Resetbutt
USBports
f
Power(gre
HDMI2.0
c
Ethernetp
Wirelessa
VESAmou
n
MicroSD
c
HDMIpor
t
DCinputp
MicroUSB
v
iew
(lefttorig
h
ontoperfor
m
f
orUSBcont
e
en)andStatu
c
onnectorfor
p
ortfornetw
o
ntennapost
n
t
c
ardslot
t
ort
forADB,An
d
h
tinaboveil
m
factoryrese
t
e
ntupdatean
s(orange)LE
D
digitalvideo
o
rkcontentu
p
d
roiddebugc
lustration)
t
dconfigurati
o
D
indicator
andaudioco
m
p
date
onsoleport
o
n
m
binedoutp
u
u
t

i
2. TechnicalData
2.1. Specifications
XMP‐7300
VideoformatsupportPOPAIScreenMediaStandards
S6(MPEG‐1SIF,3MbpsCBR)
S7(MPEG‐1480p,10MbpsCBR)
S8(MPEG‐1720p,15MbpsCBR)
S9(MPEG‐2480p,6MbpsCBR)
S10(MPEG‐2720p,12MbpsCBR)
S11(MPEG‐4AVC,480p,6MbpsCBR)
S12(MPEG‐4AVC,720p,10MbpsCBR)
E4(VC‐1/WMV9,MP@ML,720p)
E7(MPEG‐4ASP,480p,10MbpsCBR)
E8(MPEG‐4AVC,1080p,10MbpsCBR)
H.265/HEVC
ImageformatsupportPOPAIScreenMediaStandards
S1(JPEG480pbaseline)
S2(JPEG720pbaseline)
S3(JPEG1080pbaseline)
E1(PNG24bpp+alpha,480p)
E2(PNG24bpp+alpha,720p)
E3(PNG24bpp+alpha,1080p)
AudiocodecsupportPOPAIScreenMediaStandards
S4(MPEGL2audio)
S5(MP3audio,320Kbps)
DynamiccontentW3CHTML5(HTML,CSS,JavaScript)
W3CSMIL3.0instructions(sub‐set)
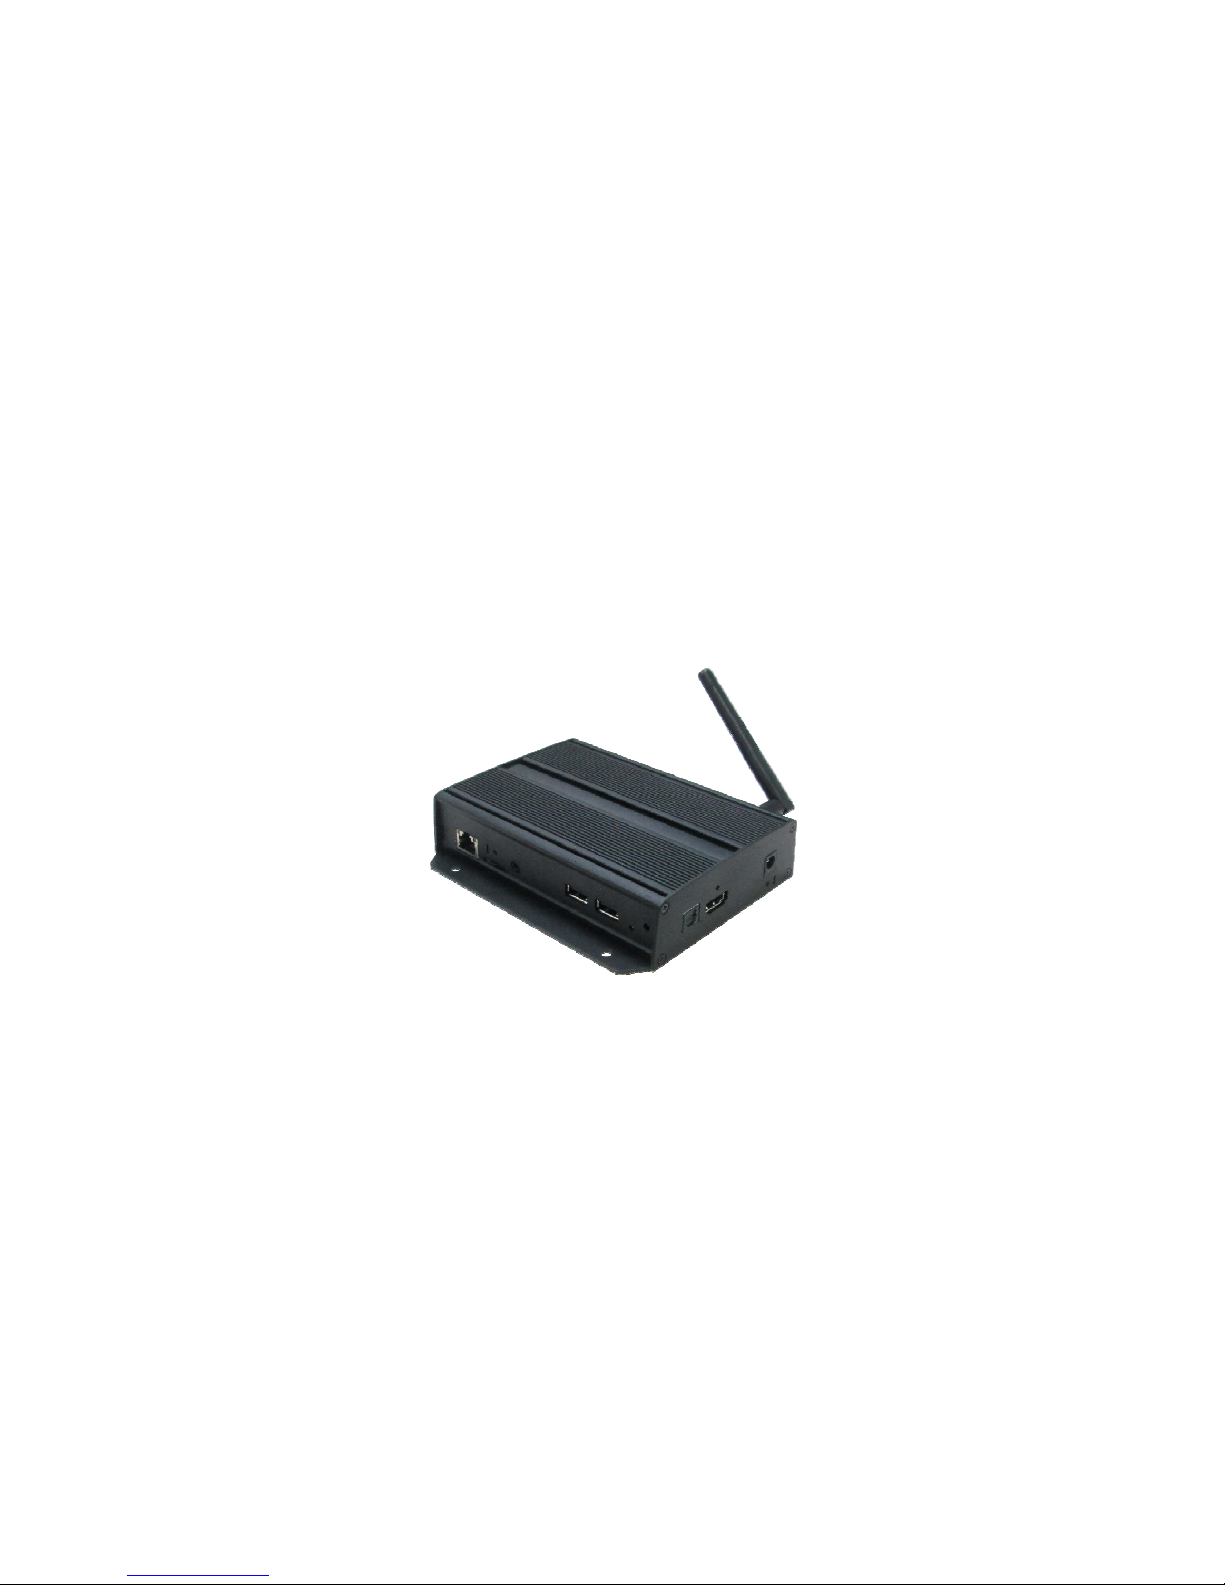
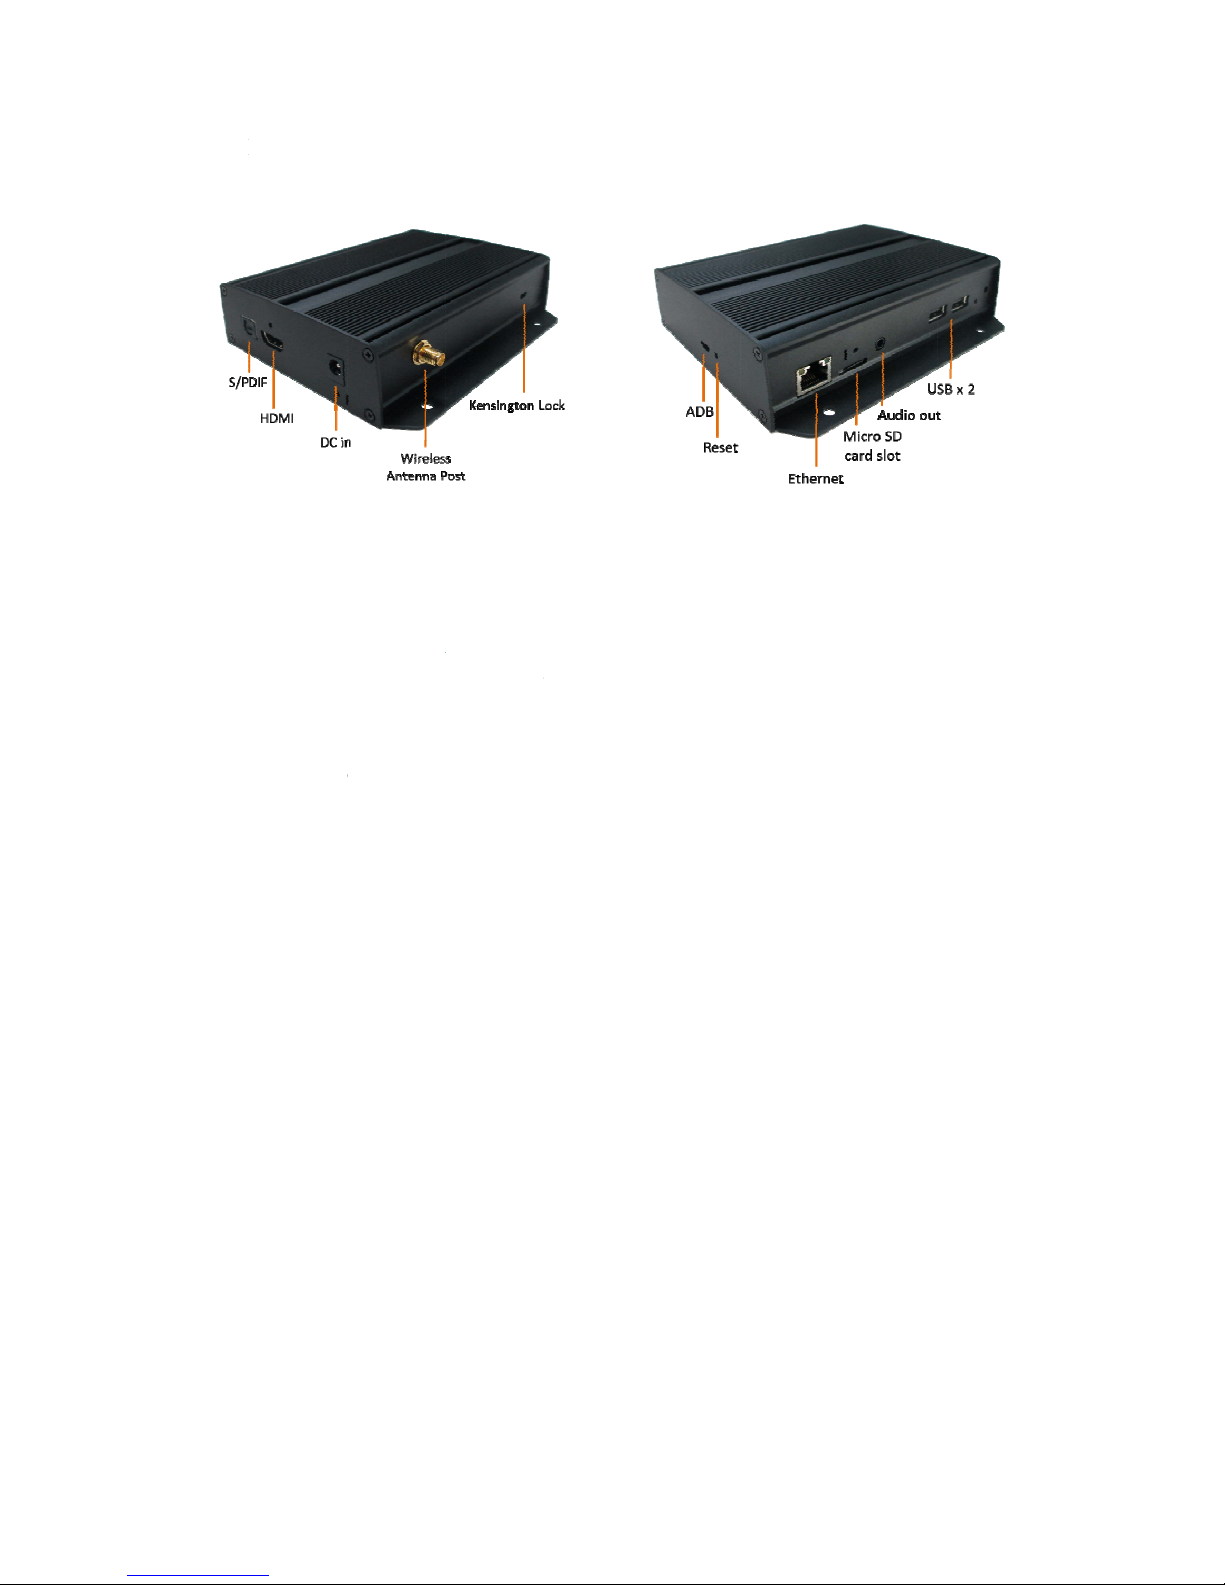
PhysicalI/OconnectorsHDMI2.0
USB2.0x2
RJ45Ethernetport(GigaLAN)
Wi‐Fiantennaport
MicroUSBforADB
MicroSDcardslot
Audioout(3.5mmAnalog,S/PDIF)
LED:Power(green)/Status(orange)
Localstorage8GBon‐boardflashmemory(upto6hrsoftypical720pvideo@3Mbps)
MicroSDcardexpansionslot
AccessoriesACadapter
HDMIcable
Wi‐Fiantenna
Velcro(2sets)
MicroSDcardslotstopper/screwx1
DCjackprotectionstopper/screwx1
Powerrequirement12V1.5ADC
Powerconsumption7.5W
EnvironmentalTophousing:143.60x100.66x33.65mm(5.65x3.96x1.32inches)
Base:143.60x128.13x33.65mm(5.65x5.04x1.32inches)
Dimensions167x118.8x24.5mm(6.57x4.67x0.96inches)
Weight500g
1.10lbs
SafetyUL/FCC/CE/CCC/C‐Tick/VCCIcertifiedpowersupplies
CertificationsCE/FCC

i
Warr
a
Fi
r
Fir
Me
a
nty
r
mw
a
mwa
r
diaPl
a
XMP
One
a
re
U
r
ever
s
a
yers:
‐6200
‐yearlimited
U
ser
M
s
ion
–
M
parts&labor
M
an
u
–
1.2
M
BR‐110
0
u
al
0
XMP‐73
0
0
0

i
Contents
FirmwareUserManual4
1.Introduction1
1.1.Features1
2.ConfiguringthePlayer1
2.1.Systemconnections1
2.2.Basicsettings2
2.3.Connecttheplayertoyournetwork3
2.4.Timezonesettings7
2.5.Contentsettings8
2.6.PlayerInformation9
2.7.Contentconfiguration–AppStart10
2.8.Contentconfiguration–FailSafe10
2.9.Contentconfiguration–EasyPlay10
2.10.Displaysettings13
2.11.Soundsettings16
2.12.Systemconfiguration–Playername17
2.13.Systemconfiguration–Security18
2.14.Systemconfiguration–TimeServer18
2.15.Systemconfiguration–Scheduledreboot19
2.16.Systemconfiguration‐Firmwareupdate19
2.17.Systemconfiguration–Expansionstorage20
2.18.Systemconfiguration‐Factoryreset22
2.19.Systemconfiguration–Powersave23
3.ContentManagement23
4.AuthoringinHTML523
5.WorkingwithSMIL23
5.1.Introduction24
5.2.www.a‐smil.orgfordevelopers24
6.Appendix:FAQ24

1
3. Introduction
Thisdocumentdescribesthebasicoperationoftheplayerandfrequentlyaskedquestions.
3.1. Features
ThisisaFullHD1080phighdefinitiondigitalsignageplayerfeaturingindustrialgrademechanicaldesignand
versatileopen‐standardHTML5andSMILprogrammability.
SupportforHTML5widgetsfordynamiccontent(W3CWidgetsstandard)
IndustryleadingW3CSMILsupportfordevelopers
FullHD1080phardwaredecodingofMPEG1/2/4,H.264,andVC‐1mediaformats
SupportsfullPOPAIScreenMediaFormatsStandardsprofilesS1toS12,andE1toE8
Multiple3rdpartysoftwaresolutioncompatibility
4. ConfiguringthePlayer
4.1. Systemconnections
Ifitisamediaplayer,connectittoamonitorviaanHDMIcable.
Ifitisasignboard(withbuilt‐inscreen),nomonitorisrequired.However,asignboardplayercanstillbe
connectedtoamonitorviaHDMIforlargerdisplayarea.
WhenusinganHDMIconnection,audioissentalongwithvideoovertheHDMIcable,sonoadditionalcablesare
required.
1AttachtheACpoweradaptertopowerontheunit.Afterapproximately15seconds,thebootinganimation
willbedisplayedonscreenasshownbelow:
2Theboot‐upprocesstakesapproximately40secondstocomplete.
TroubleshootingTipsformediaplayers
Theoperationindicatorslightup,butnovideoisdisplayedonscreen
Ensurethatyourvideocable(HDMI)issecurelyconnected.WhenusinganHDMIconnection,
choosehighquality,certifiedHDMIcablesortryusingshorterlengthcables
Checkif
y
ourmonitoristurnedonandthecorrectvideoin
p
utsourceisselected

2
Afterboot‐upcompletes,playerwillstayinBasicsettingsmenuifnocontentservicehasbeenconfigured(i.e.
firstboot‐upforbrandnewunitorafterafactoryreset).Ifyouhavealreadysetcontentintotheplayer,contents
willplaybackautomaticallyafter15secondsafterboot‐up.
4.2. Basicsettings
YoumustattachaUSBmousetotheplayertoconfiguresettings.Iftheplayerhastouchscreen,thentheUSB
mouseisnotrequired,andalltheclickactioncanbereplacedbytapaction.
(Fig.2.2.1)
Basicsettings:
–Network,TimezoneandContent.
EachtimetheBasicsettingsmenuisentered,playbackwillautomaticallybeginafter15secondsifcontent
serviceshavebeenpreviouslyset.Autoplaybackcanbecanceledbyclickingonthebuttonbeforethecountdown
ends.
UserisabletoenterAdvancedSettingsbyclickingtheAdvancedbutton.
Toenterthemenusystematanytimeduringplayback,pluginaUSBmouseandholdtheleftmousekeyinthe
cornerareaasshownbelowfor10seconds.Iftheplayerhastouchscreen,thentappingandholdinginthe
cornerareasfor10secondswouldalsobringyoutothemenu.
*Playerwillaskforpasswordifpasswordhasbeenconfigured.

3
4.3. Connecttheplayertoyournetwork
Wirelessconnection
1ClicktheWirelessLANsettingtolaunchthewirelessconfigurationUI.
(Fig.2.3.1)
2ClicktheON/OFFbuttonasindicatedbelowtoturnONWirelessinterface(network).
(Fig.2.3.2)
3Theplayerwillscanforwirelesssignalsnearbyandavailableaccesspointswillbelisted.
(Fig.2.3.3)
4ClickonthenetworkIDtoconnect.Ifthenetworkrequiresauthentication,youwillbeaskedtoprovidea
password.

4
(Fig.2.3.4)
StaticIP–manuallyassignnetworkIPaddress
1Checktheboxthatsays"Showadvancedoptions"
(Fig.2.3.5)
Clickdownarrowtohidekeyboardifneeded.
Youcanalsoscrolldown/swipetoseetherestofthemenu.
2UnderIPsettings,changeDHCPtoStatic.
(Fig.2.3.6)
3FilltheformandclickConnecttocompletethesetting.
(Scrolldown/swipetoseetherestofthemenuifneeded)
(Fig.2.3.7)
Wiredconnection
TousethewiredEthernetconnection,connectanEthernetcable.Ethernetconnectiontakeshigherpriority.

5
DHCP–automaticallyassignnetworkIPaddress
1TurnonEthernet.IfusingDHCP,nofurtheractionisrequired.
(Fig.2.3.8)
StaticIP–manuallyassignnetworkIPaddress
1ClickStaticIPSettingstoconfigurestaticIPaddress.
(Fig.2.3.9)
Proxysettings
1InBasicsettings,clicktheAdvancedbutton,advancedconfigurationmenuwillbelaunched.
(Fig.2.3.10)
2ClickNetwork,andthenclickAdvanced.

6
(Fig.2.3.11)
3Proxysettingmenuwillbelaunched,inputproxyhostnameandport,thenclickDonetofinish
configuration.
(Fig.2.3.12)
ShowIPsettings
1InBasicsettings,clicktheAdvancedbutton,advancedconfigurationmenuwillbelaunched.(Fig.2.3.10)
2ClickNetwork,andthenclickShowIP.
(Fig.2.3.13)
3ThisfeatureistocontrolwhethertheIPaddressbeingdisplayedinBasicsettingsmenu.Thisisdefault
enabled.Whendisabled,Basicsettingswilldisplay“connected”insteadofIPaddress.

7
(Fig.2.3.14)
4.4. Timezonesettings
1ClickTimezone.
(Fig.2.4.1)
2Choosethecorrecttimezonefromtheavailableoptions.
(Fig.2.4.2)

8
4.5. Contentsettings
1ClicktheSetcontentbutton.
(Fig.2.5.1)
2InputtheSMIL/HTML5contentURLandclickSet.ItwillreturntoBasicSettingsautomatically.
(Fig.2.5.2)
3TheplayerwillchecktheavailabilityofSMIL/HTML5contentURL,withthePlaybuttonshowingChecking…
ThecheckingactioncanbecanceledbyclickingChecking…button,itwillchangebacktoPlay.
NOTE:
ItishighlyrecommendedtolettheplayerchecktheavailabilityofthecontentURL.ClickingPlaybuttonwith
abad/invalidURLsetwouldcausetheplayertoreboot,iftheFailSafefunctionisnotconfigured.
(Fig.2.5.3)
4IftheSMIL/HTML5contentURLisavailable,thePlaybuttonwillchangetoa15‐secondcountdownandthe
playbackwillstartafterthecountdown.Thecountdowncanbecanceledbyclickingthebutton.

9
IfitkeepsshowingChecking…foralongtime,pleasegobacktoSetcontenttocheckthecorrectnessofthe
URL.
(Fig.2.5.4)
4.6. PlayerInformation
Usercanchecktheplayer’sbasicinformationincludingtheHealthstatus,Firmwareversion,andPlayerID.
1ClicktheAdvancedbutton,advancedconfigurationmenuwillbelaunched.
(Fig.2.6.1)
2ClickonInformation.ThedefinitionsoftheHealthStatus:
Green–Normal.ThedeviceisconnectedtotheURLserver.
Blue–Local.ThedeviceisplayingcontentfromtheUSBdriveorSDcard.
Gray–Disconnected.Thedeviceisdisconnected.
(Fig.2.6.2)

10
4.7. Co
User
c
1
Cl
2
Cl
3
E
n
U
R
4
T
h
4.8. Co
User
c
1
Cl
2
Cl
3
E
n
4
T
h
4.9. Co
Thef
e
Pleas
e
notb
e
ntentco
n
c
anassignthe
ick
the
Adva
n
ickon
Conte
n
n
terthevalid
R
Lvia”
Setco
h
eAdvanced
o
ntentco
n
c
anassignthe
ick
the
Adva
n
ickon
Conte
n
n
tertheURL
o
h
eAdvanced
o
ntentco
n
e
atureEasyPl
a
e
notemedia
f
e
removed.
n
figurati
o
URLandAPP
n
ced
button.(
n
t
,andthenc
URLofHTML
/
ntent
”(Fig.2
o
ptionisuse
d
n
figurati
o
URLandAPP
n
ced
button,
a
n
t
,andthenc
o
fHTML/SMI
L
o
ptionisuse
d
n
figurati
o
a
yallowsthe
p
f
ilesdoesnot
o
n–AppS
t
forexecutio
n
Fig.2.6.1)
lickon
AppSt
a
/
SMILin
App
S
.5.2),theUR
L
d
for3rd‐part
y
o
n–FailS
a
forexecutio
n
a
dvancedcon
f
lickonFailSa
f
L
inFailSafe.
d
for3rd‐part
y
o
n–Easy
P
p
layertoplay
copiedtopla
t
ar
t
n
rightaftert
h
a
rt
.
S
tart
(Fig.2.7
.
L
wouldbesh
o
y
Appconfigu
r
a
fe
n
whilethesy
f
igurationm
e
f
e.
y
Appconfigu
r
P
lay
mediaconte
n
yer’sinternal
h
esystemsta
.
1).Ifyoualr
e
o
wedhere.
r
ationonly.
stemhasfail
e
e
nuwillbela
u
r
ationonly.
n
tfromtheU
storage,so
U
rtsup.
e
adyconfigur
e
e
dtoplaythe
u
nched.(Fig.
2
SBflashdriv
e
U
SBflashdriv
e
e
dSMIL/HTM
(Fig.2.
7
assignedcon
2
.6.1)
(Fig.2.
8
e
(orMicroSD
e
(orMicroS
D
L5content
7
.1)
tent.
8
.1)
card)directl
y
D
card)must
y
.

11
When
topla
y
1
In
2
Cl
3
Cl
4
Cl
M
Confi
g
1
Cl
di
2
Cl
Confi
g
1
Cl
d
r
2
Cl
3
T
h
m
EasyPlayise
n
y
contentfro
m
sertUSBdriv
e
ickthe
Adva
n
ickon
Conte
n
ick
Disabled/
odeandMo
v
g
urePhoto
M
ickonPhoto
f
rectoriesfor
p
ick
Set
butto
n
g
ureMovie
M
ick
on
Movie
.
r
ive.
ick
Set
butto
n
h
efilesinthe
enu.
n
abled,thep
l
m
theURLse
r
e
orMicroSD
n
ced
button.(
n
t
,andthenc
Enabled
butt
o
v
ieMode.
M
ode
f
orchoosing
p
p
hotosandm
n
afterselecti
n
M
ode
.
Clickonthe
b
n
afterthefol
d
selectedfold
e
l
ayerwillpla
y
r
verconfigure
cardcontain
i
Fig.2.6.1)
lickon
EasyPl
o
ntoenable
E
p
hotosandm
usicfromth
e
n
gthedirect
o
b
uttonasma
r
d
erisselecte
d
e
rswillbepla
y
content
onl
y
dvia”
Setco
n
i
ngmediaco
n
ay
.
E
asyPlay,and
usic.Clickon
e
USBdrive.
o
ries.
r
kedinredb
e
d
.
yedafterclic
k
y
fromtheUS
B
n
tent
”,
EasyP
l
n
tentthatyo
u
choosefrom
thebuttons
a
e
low,andsel
e
k
ingthePlay
b
B
drive(orMi
l
ay
mustbed
u
wanttopla
y
2availableo
p
a
smarkedinr
e
ctthedirect
o
b
uttoninthe
croSDcard).
isabled.
y
.
p
erationmod
(Fig.2.9.1)
edbelow,an
d
(Fig.2.9.2)
o
ryformovie
s
BasicorAdv
a
Ifuserwants
es,Photo
d
selectthe
s
fromtheUS
B
a
ncedsetting
s
B
s

12
Easy
P
1
Cl
2
Cl
3
Cl
T
4
T
h
b
e
(
P
laySchedu
l
ick
theAdva
n
ickon
Conte
n
ickonthebu
t
T
ypethesch
e
USBkeyboar
d
h
e"On"time
s
e
low:
(
Fig.2.9.5)
l
econfigura
t
n
cedbutton.(
n
t
,andthenc
t
tonsmarked
e
duledtimei
n
d
.
s
assignedint
t
ion
Fig.2.6.1)
lickon
Sched
u
inredbelow
n
thedialogu
e
hetimeslots
u
le
.
toenable/di
s
e
boxesmark
e
A‐Eare
inclu
s
s
abletheEas
y
e
dinbluebel
o
s
ive
.Forexa
m
y
Playschedul
e
o
wbyusingt
h
m
ple,asched
u
(Fig.2.9.3)
e
foreachtim
h
epop‐upke
y
(Fig.2.9.4)
u
leassigneda
eslots.
y
boardorthe
stheexampl
e
e

13
T
a
4.10.
D
Reso
l
Forb
e
blur.
Ifyou
forop
t
1
Cl
2
Cl
3
Cl
D
e
T
heexactpla
y
a
retheoverl
a
D
isplayse
t
l
utionsettin
g
e
stquality,se
t
areconnecti
n
t
imalsetting
s
ickthe
Adva
n
ickthe
Displ
a
ick
on
Resolu
e
tect,player
w
y
backtimew
i
a
ptimeofC/
D
t
tings
gs(formed
i
t
theoutputr
e
n
ganLCDco
m
s
.
n
ced
button,
a
a
y/sound
but
t
tion
,andsel
e
w
illautodete
i
llbethetim
e
D
andD/E.
i
aplayers)
e
solutionto
m
m
putermonit
o
a
dvancedcon
f
t
on,andthen
e
ctsuitablere
ctanduseth
e
e
slotsmarke
d
m
atchyourdi
s
o
r,projector,
f
igurationm
e
clickon
Displ
solutionfro
m
e
bestoptimi
z
d
inblueassh
(Fig.2.9.6)
s
play’snative
orplasmadi
s
e
nuwillbela
u
ay
.TheDispl
a
m
thepopup
m
z
edresolutio
n
owninfigure
resolutiont
o
s
play,referto
u
nched.(Fig.
2
a
ySettingsp
a
(
m
enu.Default
n
thatyourdi
s
2.9.6.Thed
a
o
avoidimage
thedevices
p
2
.6.1)
a
gewillbelau
(
Fig.2.10.1)
configuratio
n
s
playsupport
s
a
rkblueparts
scalingand
p
ecifications
nched.
n
isAuto
s
.
Table of contents
Other IAdea Media Player manuals

IAdea
IAdea XMP-6200 Instructions for use

IAdea
IAdea XMP-3450 User manual

IAdea
IAdea VS16021 User manual

IAdea
IAdea HMP-505S User manual

IAdea
IAdea NMP-200U User manual

IAdea
IAdea N Series User manual

IAdea
IAdea XMP-8552 User manual

IAdea
IAdea XMP-6200 User manual

IAdea
IAdea XDS-2450 User manual

IAdea
IAdea XMP-6200 User manual

IAdea
IAdea XMP-2200 User manual

IAdea
IAdea HMP-500S User manual

IAdea
IAdea XMP-6400 Instructions for use

IAdea
IAdea XDS-104 User manual

IAdea
IAdea XMP-300 User manual

IAdea
IAdea XDS-1070 Instructions for use

IAdea
IAdea XDS-101 User manual

IAdea
IAdea XMP-300 User manual

IAdea
IAdea MBR-1100 User manual

IAdea
IAdea XMP-320 User manual