Medite Meditome M 530 User manual
Manual
Rev.02(2010‐05‐06)Manual_M530_Rev02.doc
Medite GmbH . Wollenweberstr. 12 . D-31303 Burgdorf/Germany
Tel. +49 (0) 51 36/88 84-0 . Fax +49 (0) 51 36/88 84-55 .info@medite.de .www.medite.de
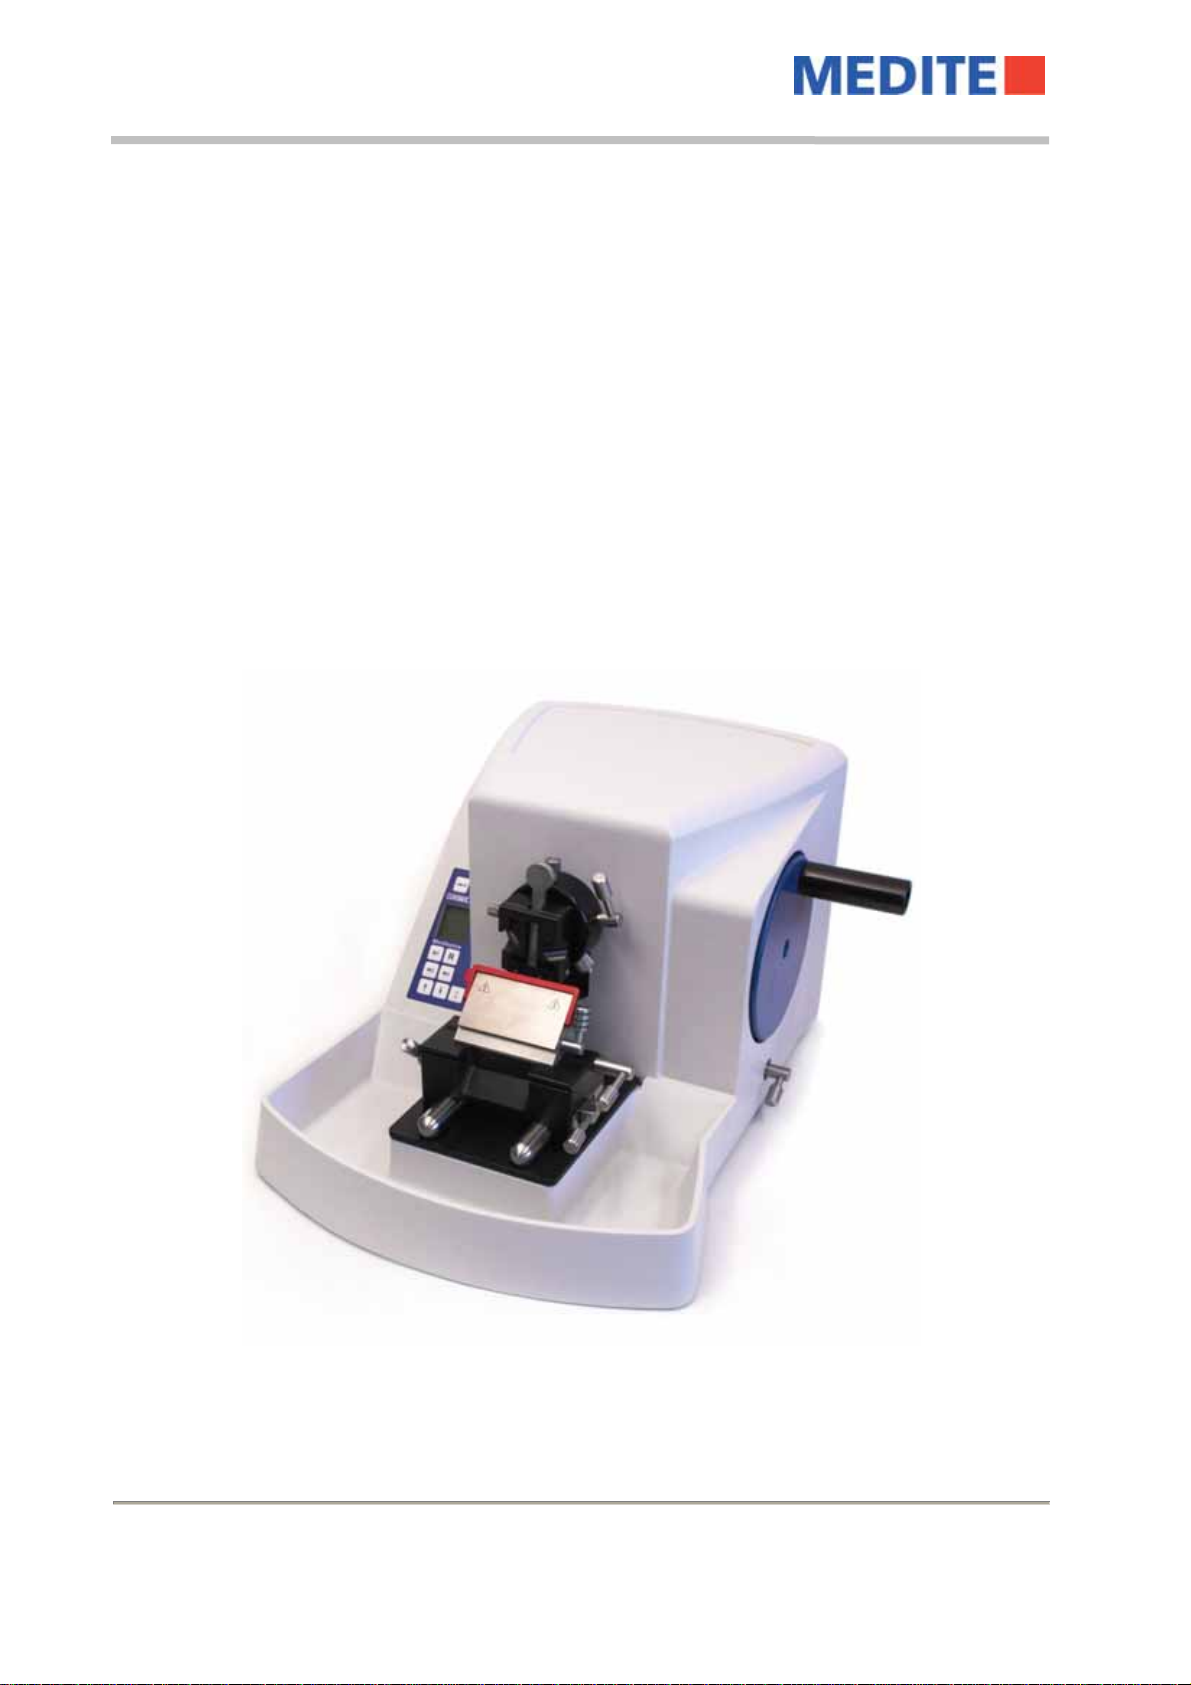
Rotary
Microtome
Meditome M 530
© Copyright: Duplication of this manual by any means for any purpose without written consent of
MEDITE GmbH is prohibited.
Subject to change without prior notice. Errors excepted.

Manual
Page 1of26Rev.02(2010‐05‐06)Manual_M530_Rev02.doc
Medite GmbH . Wollenweberstr. 12 . D-31303 Burgdorf/Germany
Tel. +49 (0) 51 36/88 84-0 . Fax +49 (0) 51 36/88 84-55 .info@medite.de .www.medite.de
Konformitätserklärung
Certificate of Conformity
Attestation de Conformité
Type of instrument: Rotary Microtome
Model: Meditome M 530
Serial No.:
We do hereby certify that the above mentioned product meets the requirements set forth in the CE
Guidelines indicated below including all changes and addendums to date thereto. The above
mentioned product has been controlled by an authorized test center and meets the following
standards and guidelines:
Richtlinie 2006/42/EWG Maschinen
Richtlinie 89/336/EWG EMV
Richtlinie 2006/95/EWG Niederspannung
DIN EN ISO 9001
VDE 701
Burgdorf, 20.05.2007 M. Ott – Managing Director

Manual
Rev.02(2010‐05‐06)Manual_M530_Rev02.doc Page 2of26
Medite GmbH . Wollenweberstr. 12 . D-31303 Burgdorf/Germany
Tel. +49 (0) 51 36/88 84-0 . Fax +49 (0) 51 36/88 84-55 .info@medite.de .www.medite.de

Manual
Page 3of26Rev.02(2010‐05‐06)Manual_M530_Rev02.doc
Medite GmbH . Wollenweberstr. 12 . D-31303 Burgdorf/Germany
Tel. +49 (0) 51 36/88 84-0 . Fax +49 (0) 51 36/88 84-55 .info@medite.de .www.medite.de
Contents
1.Safety ....................................................................................................................................... 5
1.1Introduction ....................................................................................................................5
1.2UsedSymbols .................................................................................................................. 5
1.3IntendedUse................................................................................................................... 5
1.4SourcesOfDanger........................................................................................................... 6
1.5AuthorizedUser/Operator ............................................................................................ 6
1.6SafetyInstructionsOnInstallationSite........................................................................... 7
1.7SafetyEquipment............................................................................................................ 7
1.8CaseOfEmergency ......................................................................................................... 7
2.Transport/Installation............................................................................................................ 8
2.1TechnicalData................................................................................................................. 8
2.2Transport/Storage......................................................................................................... 8
2.3Unpacking........................................................................................................................ 8
2.4SetupAndConnection .................................................................................................... 9
2.5OperatingConditions .................................................................................................... 11
2.6FunctionalComponents ................................................................................................ 11
3.Operation/BeforeOperation ............................................................................................... 12
3.1SwitchingOnTheUnit................................................................................................... 12
3.2CuttingProcessAndHandwheel................................................................................... 12
3.3AdjustmentByOperatorPanel ..................................................................................... 13
3.3.1SectionCounterAndObjectFeedPosition................................................................... 13
3.3.2ObjectFeed‐TrimAndFineMode............................................................................... 14
3.3.3AutomaticRetraction.................................................................................................... 15
3.3.4PositionMemory........................................................................................................... 15
3.4ObjectClamp................................................................................................................. 16
3.4.1UniversalCassetteClamp.............................................................................................. 16
3.4.2ObjectOrientation ........................................................................................................ 17
3.4.3FixingObjectClamps..................................................................................................... 18
3.4.4Re‐AdjustingTheSpecimenClamp ............................................................................... 18
3.5KnifeCarrier .................................................................................................................. 19
3.5.1InsertingTheKnife ........................................................................................................ 19
3.5.2Forward/BackwardAdjustmentOfTheKnifeCarrier................................................. 20
3.5.3AdjustingTheKnifeCarrierAngles ............................................................................... 21
4.RegularCleaningAndMaintenance ...................................................................................... 22
4.1CleaningInstructions..................................................................................................... 22
4.2TimingOfCleaningAndMaintenance .......................................................................... 23
5.Troubleshooting..................................................................................................................... 24
5.1ChangingTheFuses....................................................................................................... 24
5.2Troubleshooting ............................................................................................................ 25

Manual
Rev.02(2010‐05‐06)Manual_M530_Rev02.doc Page 4of26
Medite GmbH . Wollenweberstr. 12 . D-31303 Burgdorf/Germany
Tel. +49 (0) 51 36/88 84-0 . Fax +49 (0) 51 36/88 84-55 .info@medite.de .www.medite.de
6.Abandonment/Recycling ..................................................................................................... 25
7.Greasing ................................................................................................................................. 25
8.Equipment ............................................................................................................................. 25

Manual
Page 5of26Rev.02(2010‐05‐06)Manual_M530_Rev02.doc
Medite GmbH . Wollenweberstr. 12 . D-31303 Burgdorf/Germany
Tel. +49 (0) 51 36/88 84-0 . Fax +49 (0) 51 36/88 84-55 .info@medite.de .www.medite.de
1. Safety
1.1 Introduction
By purchasing this Meditome, you decided for a quality product of MEDITE GmbH, Germany.
Intention of this manual is to help you working with your unit. Please read it carefully and completely
and follow its advices.
1.2 Used Symbols
This symbol warns you of risks for the life or health of persons. Pay attention!
This symbol warns you of risks for machine, material or environment. Pay
attention!
This symbol stands for areas of information. Pay attention!
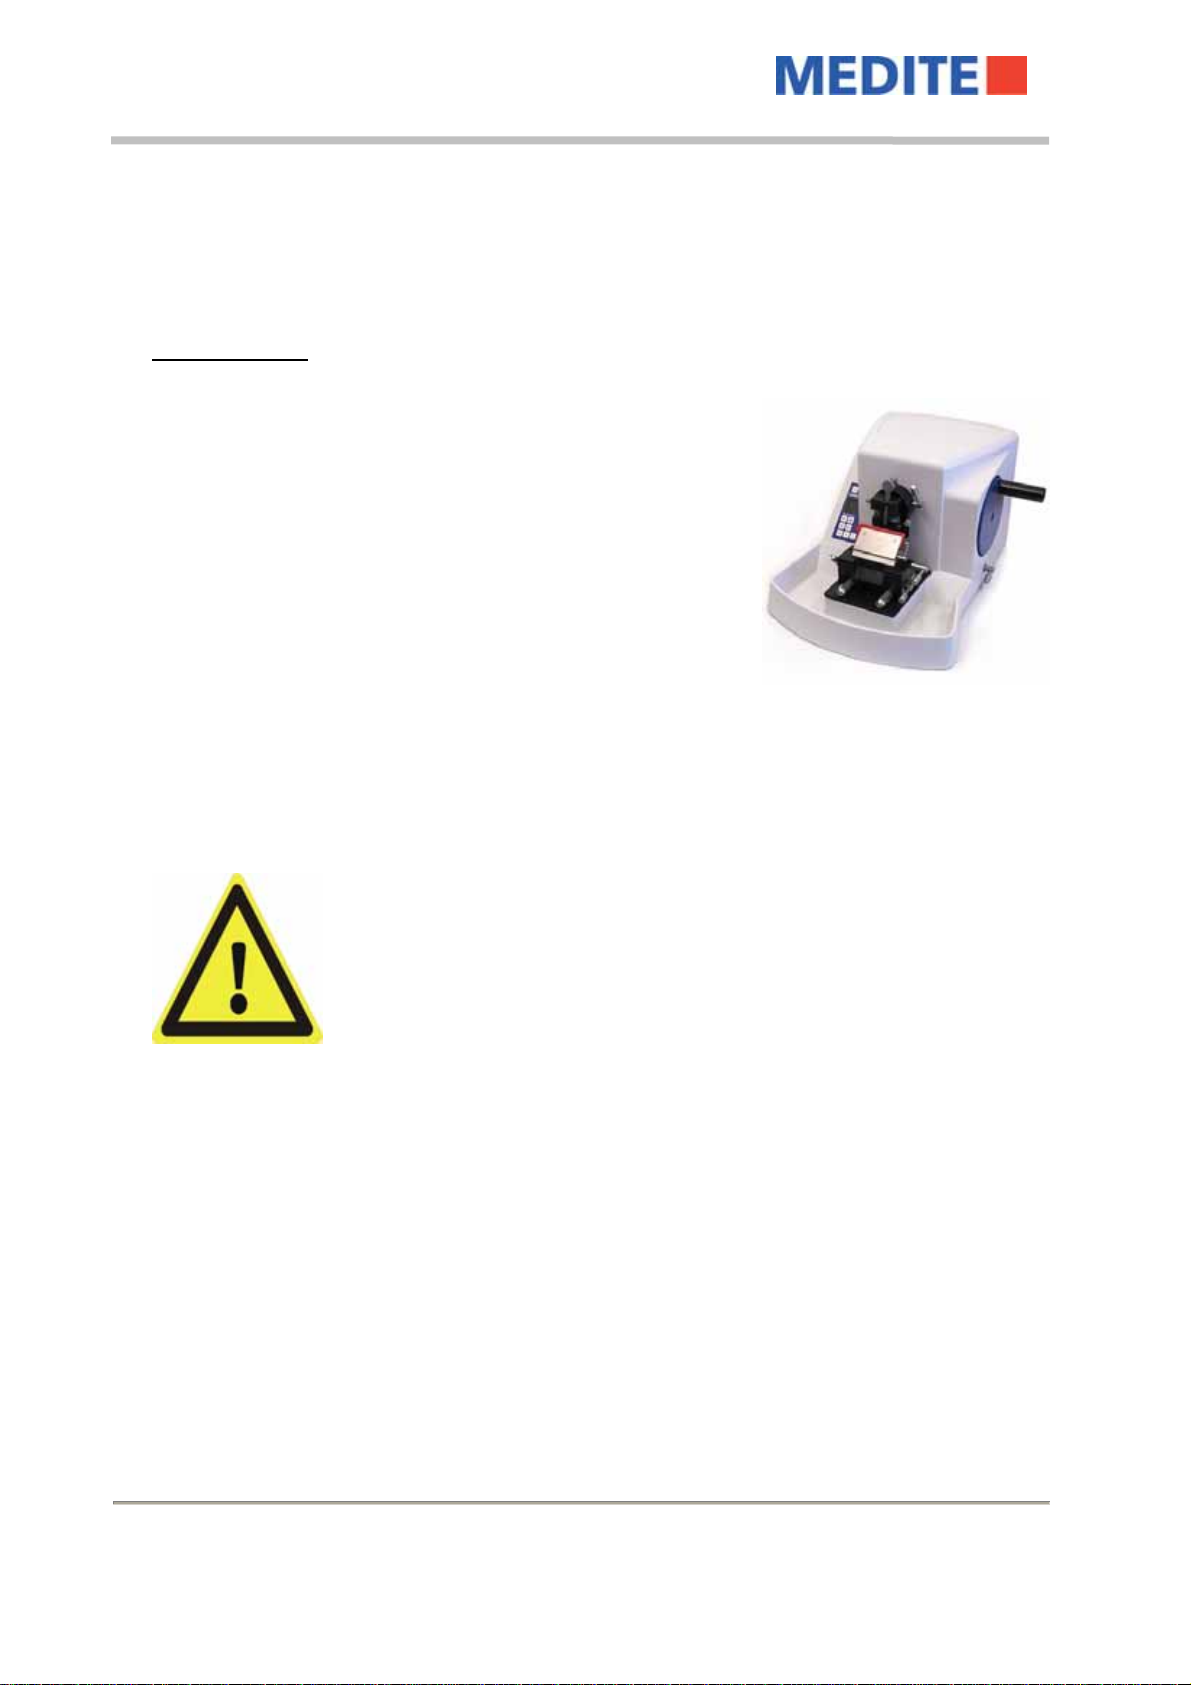
1.3 Intended Use
The Meditome is a highly efficient multi-purpose microtome which can be used for any tasks in
paraffin, hard- and thin-sectioning techniques in biology, medicine, industry and research.
A use in food industries and similar facilities is strictly prohibited.
Arbitrary rebuilding or changing of this laboratory instrument is strictly prohibited due to safety
reasons. Use only original MEDITE spare parts in case of replacement issues.
Operation, maintenance or service conditions mentioned in this manual have to be strictly observed.

Manual
Rev.02(2010‐05‐06)Manual_M530_Rev02.doc Page 6of26
Medite GmbH . Wollenweberstr. 12 . D-31303 Burgdorf/Germany
Tel. +49 (0) 51 36/88 84-0 . Fax +49 (0) 51 36/88 84-55 .info@medite.de .www.medite.de
1.4 Sources Of Danger
RISK OF INJURY
When adjusting the specimen and the knife, the finger protection should be used to decrease the risk
of injury at the blade.
If possible, the specimen should be inserted before the knife is clamped into the knife carrier. Always
remove the knife or the blade when changing the knife carrier.
A knife not being used should always be kept in the knife case!
Never try to catch a dropping knife!
Never check the sharpness of the Meditome knife with your fingers!
The blade is extremely sharp! Be careful with cutting and removing sections!
1.5 Authorized User / Operator
Users working with the Meditome may only be those, who have been instructed by the operator. The
operator is responsible to third persons on the operating site. The operator has to make this
instruction manual available to the users and to make sure, the users have read and understood it.

Manual
Page 7of26Rev.02(2010‐05‐06)Manual_M530_Rev02.doc
Medite GmbH . Wollenweberstr. 12 . D-31303 Burgdorf/Germany
Tel. +49 (0) 51 36/88 84-0 . Fax +49 (0) 51 36/88 84-55 .info@medite.de .www.medite.de
1.6 Safety Instructions On Installation Site
The Meditome M530 has to be installed only on a stable, even and solid basis to be sure, it stands
and works safely. A falling instrument means a big accident risk!
Violation of the technical regulations of use of the Meditome or improper substitution means
exclusion from any warranty for defects!
1.7 Safety Equipment
The Meditome M530 offers a protective bar, which can be flapped up to secure the area of the knife.
The handwheel brake – if activated – keeps the handwheel in its position.
You should always activate these two safety precautions, when the Meditome is not in use.
1.8 Case Of Emergency
In case of injuries due to a cut by the knife, directly start first aid actions and inform your local
medical emergency service! Follow your local first aid regulations for such situations!
Manual
Rev.02(2010‐05‐06)Manual_M530_Rev02.doc Page 8of26
Medite GmbH . Wollenweberstr. 12 . D-31303 Burgdorf/Germany
Tel. +49 (0) 51 36/88 84-0 . Fax +49 (0) 51 36/88 84-55 .info@medite.de .www.medite.de
2. Transport / Installation
2.1 Technical Data
Meditome M530:
Power supply:
Section thickness:
Section resolution:
Trimming thickness:
Trimming resolution:
Width:
Depth:
Hight:
Weight:
Storage temperature:
Operating conditions:
110…240 VAC / 50…60 Hz
1 - 99 µm
1 µm
5 - 500 µm
5 µm
377 mm
530 mm
281 mm
26 Kg
-20°C up to +50°C
+5°C up to +40°C
2.2 Transport / Storage
The Meditome is delivered in a protection box. Please move it only upright and avoid shocks.
Remove the section waste tray when transporting or lifting the Meditome
because it will get loose during carriage!
It can be removed from the unit by pulling it to the front.
Read 2.4 carefully!
2.3 Unpacking
Put the machine on a flat and stable surface and remove the packing. You should keep the material
for safety in cases of later transports, if possible.
Check the integrity of the delivery.
The standard equipment of the Meditome contains:
1 power cable
1 instruction manual
1 section waste tray
1 dust cover
1 tool kit (allen key)

Manual
Page 9of26Rev.02(2010‐05‐06)Manual_M530_Rev02.doc
Medite GmbH . Wollenweberstr. 12 . D-31303 Burgdorf/Germany
Tel. +49 (0) 51 36/88 84-0 . Fax +49 (0) 51 36/88 84-55 .info@medite.de .www.medite.de
2.4 Setup And Connection
When unpacking, carrying or moving the Meditome use the recessed
handles, which are positioned at the front and at the back
underneath the unit.
- Do never use the object holder or the handwheel as handle for
carrying!
- Do never use the knife holder or the section waste tray as handle
for carrying!
- Remove the knife holder and the section waste tray!
Remove the section waste tray by pulling it to the front and the knife
holder by unlocking it and also pulling it away to the front. (3.5.2)
Carry handles
Manual
Rev.02(2010‐05‐06)Manual_M530_Rev02.doc Page 10of26
Medite GmbH . Wollenweberstr. 12 . D-31303 Burgdorf/Germany
Tel. +49 (0) 51 36/88 84-0 . Fax +49 (0) 51 36/88 84-55 .info@medite.de .www.medite.de
Before initially switching on the Meditome M530, leave the unit on the
designated workspace for at least 2 hours or more, to adjust to room
temperature.
To ensure a faultless function, the microtome has to be placed on a stable
and vibration-free table.
For detailed information ask your local MEDITE sales representative.
Before connecting the instrument to the power supply, make sure the unit
is adequate to your local electrical power line. The unit is delivered “ready
to start”. For the connection to your laboratory power supply use the
supplied power cord and a socket with an intact ground wire.
Do not put or store inflammable things nearby the Meditome.
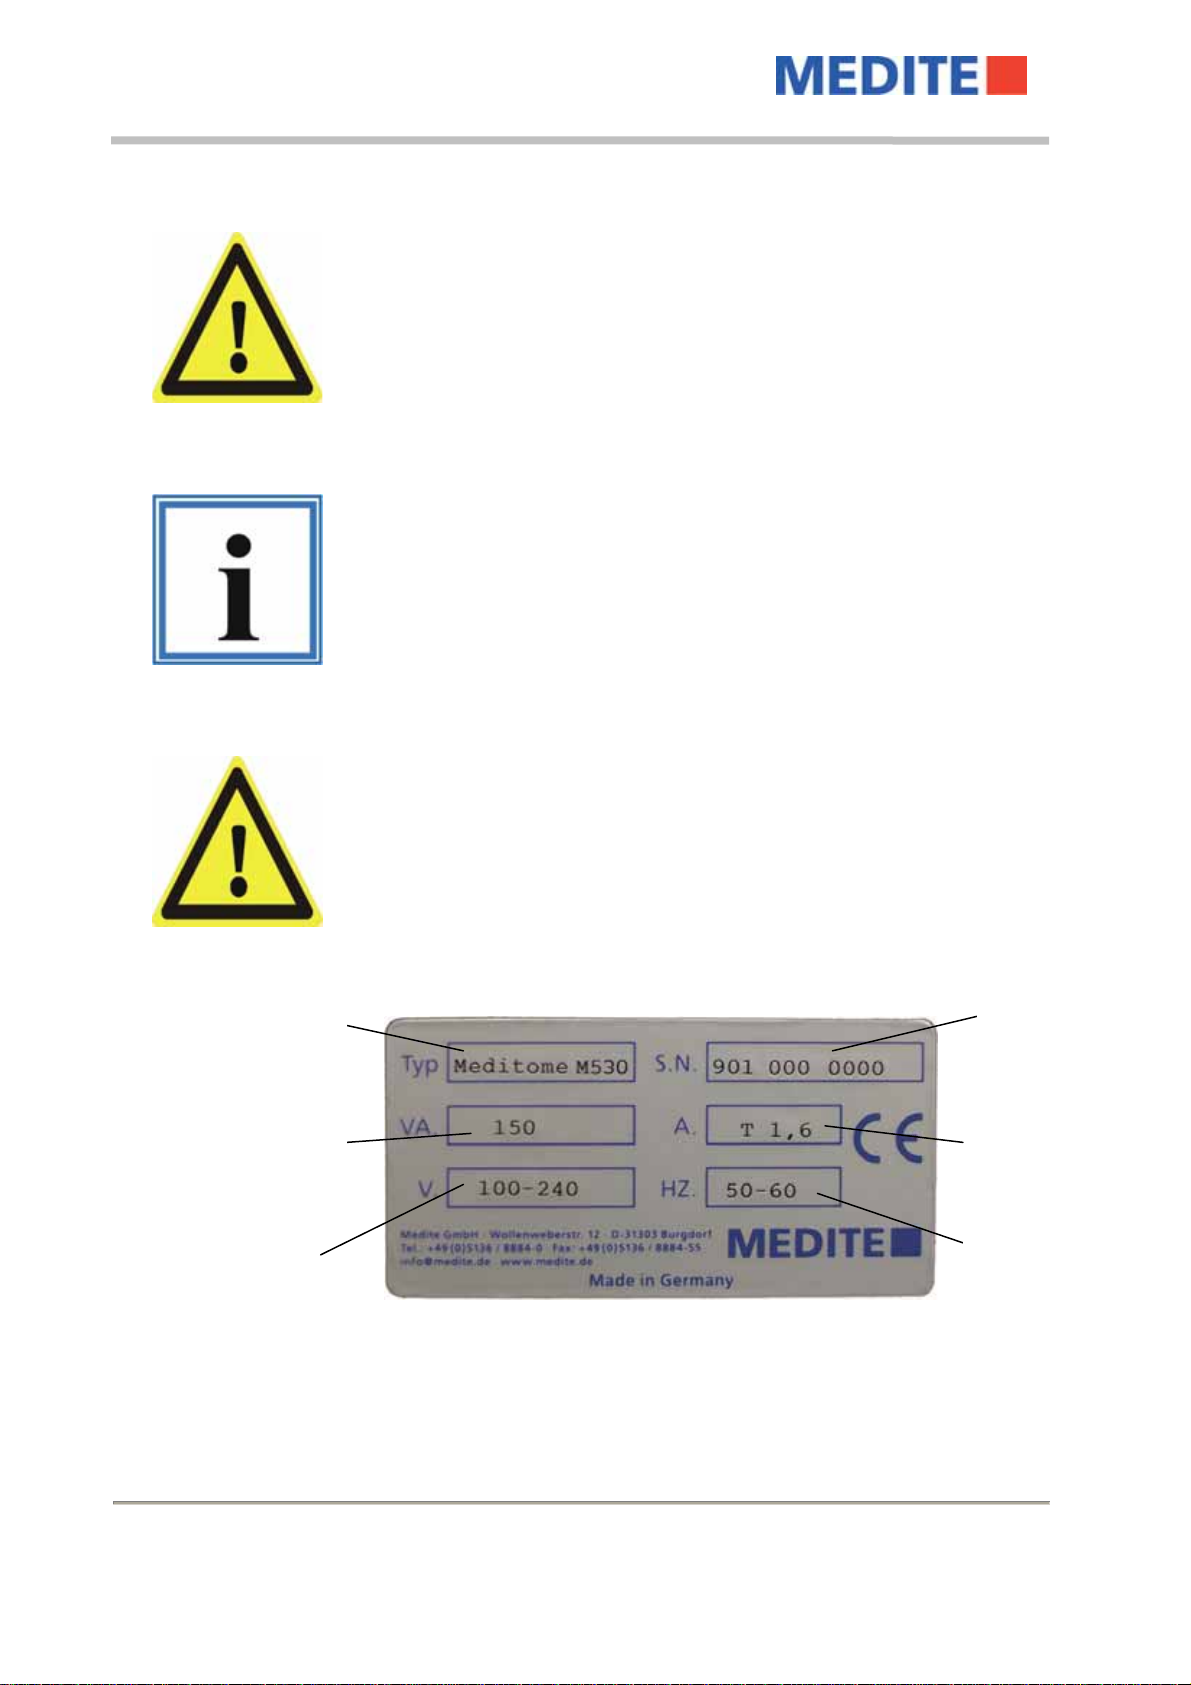
Serial‐No.
FuseRating
Frequency
TypeofInstrument
Power
Voltage

Manual
Page 11of26Rev.02(2010‐05‐06)Manual_M530_Rev02.doc
Medite GmbH . Wollenweberstr. 12 . D-31303 Burgdorf/Germany
Tel. +49 (0) 51 36/88 84-0 . Fax +49 (0) 51 36/88 84-55 .info@medite.de .www.medite.de
2.5 Operating Conditions
- Operating of the Meditome M530 is only intended within closed premises
- Field temperatures may differ from + 5°C to + 40°C (no big oscillations)
- Max. allowed height over sea: 2000 m (EN 61010-1:2001)
- Vibration free and weight-adequate work ground assumed
- Relative air humidity max. 80%, not condensing for temperatures up to 31°C, Linearly decreasing
to 50% relative humidity at 40°C
- No variations of electrical power supply more than to 10%
2.6 Functional Components
Handwheel
Handwheel
brake
Section waste tray
Specimen
clamping system
Display
Operator panel
Knife carrier
Turn and
push button

Manual
Rev.02(2010‐05‐06)Manual_M530_Rev02.doc Page 12of26
Medite GmbH . Wollenweberstr. 12 . D-31303 Burgdorf/Germany
Tel. +49 (0) 51 36/88 84-0 . Fax +49 (0) 51 36/88 84-55 .info@medite.de .www.medite.de
3. Operation / Before Operation
3.1 Switching On The Unit
Press the power switch on the back panel of the
unit.
When switching the unit on the specimen clamp
moves to the reference position. This is
repeated every time the unit is switched on so
that a high accuracy of positioning is
guaranteed. As soon as the reference position
is found, the display shows the data and setting
parameter required for operation.
3.2 Cutting Process And Handwheel
The handwheel is integrated in the casing. The position of the handwheel handle corresponds to the
respective vertical position of the specimen.
The cutting stroke of the microtome is produced by turning the handwheel. The section is done by the
downward movement of the specimen which is positioned in the object clamp. Continuing to turn the
wheel results in the upward and return movement of the object. During this return movement the
specimen is retracted to protect the knife and the specimen.
During retraction the display shows the symbol “!” .
If required, the retraction (3.3.3) can be switched off.
It is possible to block the handwheel by using the brake,
so that it cannot be turned any longer.
To lock the wheel the brake lever has to be turned up,
and turned down to loosen it.
RISK OF INJURY
For safety reasons the handwheel always has to be locked during transport or
change of objects.
locked
unlocked
Manual
Page 13of26Rev.02(2010‐05‐06)Manual_M530_Rev02.doc
Medite GmbH . Wollenweberstr. 12 . D-31303 Burgdorf/Germany
Tel. +49 (0) 51 36/88 84-0 . Fax +49 (0) 51 36/88 84-55 .info@medite.de .www.medite.de
3.3 Adjustment By Operator Panel
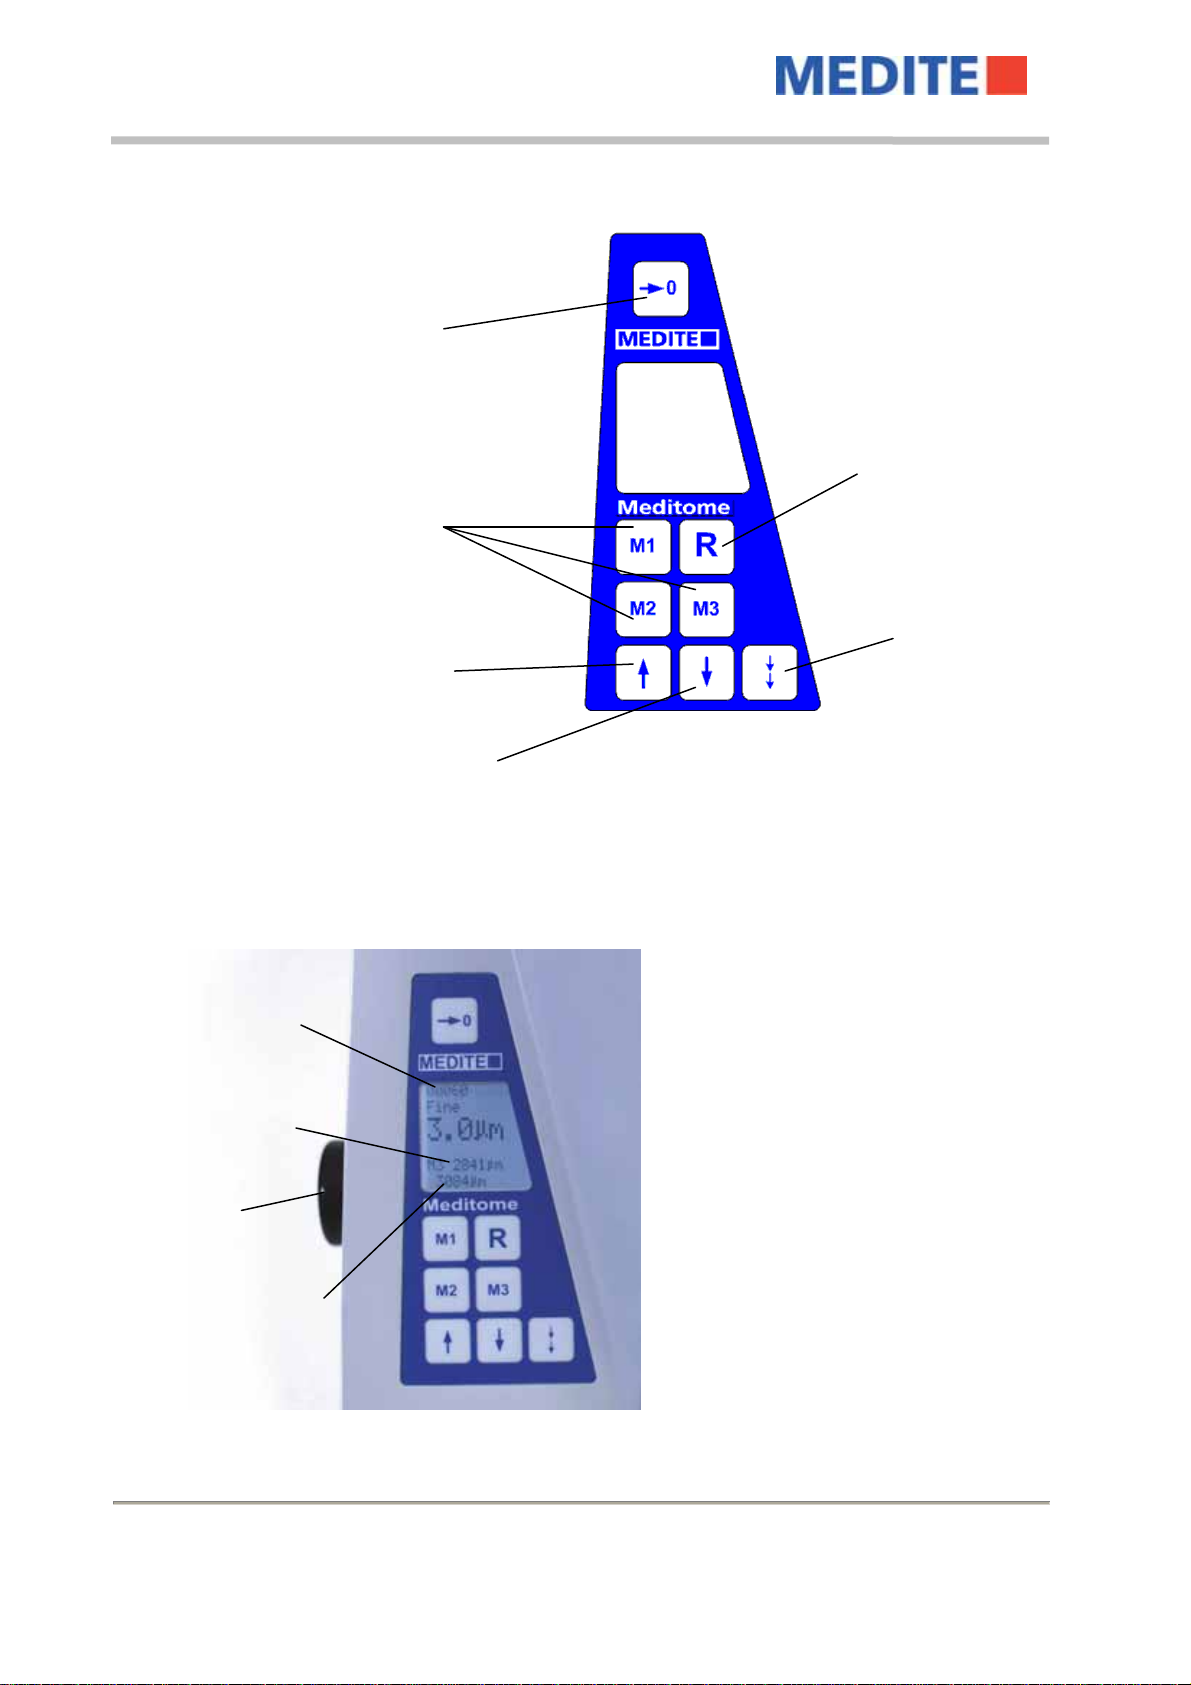
3.3.1 Section Counter And Object Feed Position
The following information is shown on the
Meditome display:
With every cut movement of the object
clamp one step is added on the section
counter.
By pushing the “Reset counter” key above
the display, the counter is set to “0” again.
The value of the section counter is shown
in the first line of the display.
Another indication shows the current
position of the object clamp. (“0” is
completely back, the value counts up when
the feed starts moving towards the knife)
The actual value can be found at the
bottom of the display.
Object feed forward
Object feed backward Trim
Automatic
Retraction
Reset counter
Memory keys for
object feed values
Section
counte
r
Position of
object feed
Memory
values
Turn and
p
ush button
Manual
Rev.02(2010‐05‐06)Manual_M530_Rev02.doc Page 14of26
Medite GmbH . Wollenweberstr. 12 . D-31303 Burgdorf/Germany
Tel. +49 (0) 51 36/88 84-0 . Fax +49 (0) 51 36/88 84-55 .info@medite.de .www.medite.de
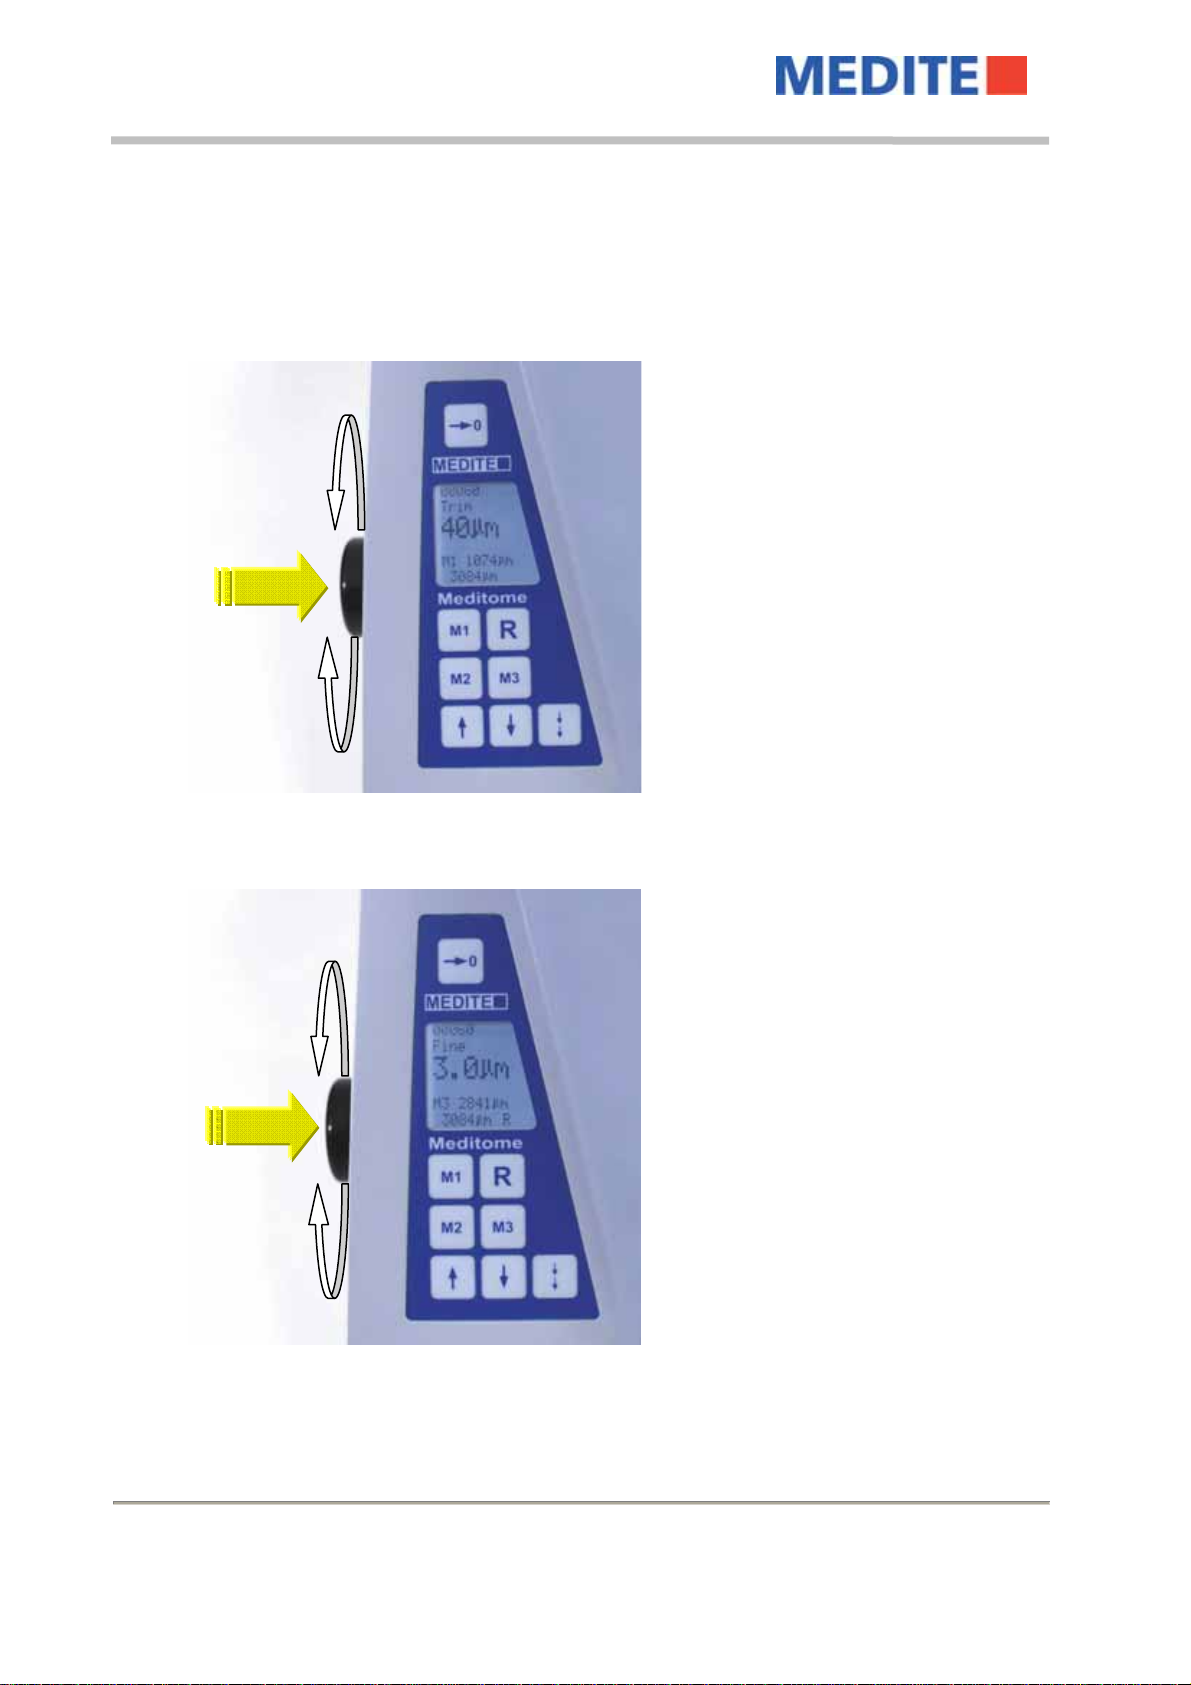
3.3.2 Object Feed - Trim And Fine Mode
To achieve a fast change of the distance between specimen and knife edge, the Meditome offers
a motorized object feed with a “Trim” (coarse) and a “Fine” movement, offering also 3 memory
keys for storing regular used values.
To set your desired “Trim” or “Fine” values
just use the “turn and push” button on the
left side of the Meditome. Push the button
to switch between trim and fine (shown in
the display) and turn it left or right to
change the values.
The left picture shows the “Trim” mode (set
to 40µm).
Also the memory value for “M1” is shown
(1074µm).
(Read 3.3.4 for further information)
The actual value here is “3084”.
In the next picture “Fine” mode for object feed is activated and set to 3µm (shown in the display).
As soon as the key “object feed forward” is
pressed, the specimen is moving towards
the knife. When the key is released the
feed stops.
By tapping on the key „Trim“, one feed with
the value saved in “Trim”, is accomplished.
If the key is held for longer while the
handwheel is turned, one feed with the
value saved in “Trim” is carried out each
cut.
When the key “Trim” is released, the value
seen in the display is active again.
In the picture on the left “Retraction”
function is activated, which is signed by an
“R” at the lower border of the display.
(Read 3.3.3 for further information)
To move the specimen in the object clamp away from the knife the key „object feed backward“
can be used. If the key is held for longer, an acoustic beep confirms an automatic movement of
the object clamp to its reference position. By pressing the key “object feed forward” the
movement is interrupted and stopped.

Manual
Page 15of26Rev.02(2010‐05‐06)Manual_M530_Rev02.doc
Medite GmbH . Wollenweberstr. 12 . D-31303 Burgdorf/Germany
Tel. +49 (0) 51 36/88 84-0 . Fax +49 (0) 51 36/88 84-55 .info@medite.de .www.medite.de
ATTENTION!
The very fast approach of object feed and blade has to be observed
thoroughly to prevent damages at the microtome knife and the
specimen.
3.3.3 Automatic Retraction
To prevent the knife and the specimen from damage when the object clamp is moving up again,
the specimen can be pulled back during upward movement by activating the automatic
“Retraction”.
The “Retraction” can be switched on and off by pressing the “R” key.
If the function is activated there is an “R” appearing in the display.
3.3.4 Position Memory
The Meditome offers the possibility to store 3 values for trimming positions. These values can be
used to recover certain positions within a short time.
A position can be stored by pushing one of the memory keys (M1, M2 or M3) for more than one
second until a signal appears. The value of the actual positioning then is stored in your chosen
memory and can be approached any time later on by just pushing the memory key again.
Occupied memory numbers are shown “M1 … M3” including their values in the display to avoid
an overwriting of your positions.
Of course you can overwrite your values just by proceeding the same way again.
After each restart of the Meditome these values are deleted for safety.

Manual
Rev.02(2010‐05‐06)Manual_M530_Rev02.doc Page 16of26
Medite GmbH . Wollenweberstr. 12 . D-31303 Burgdorf/Germany
Tel. +49 (0) 51 36/88 84-0 . Fax +49 (0) 51 36/88 84-55 .info@medite.de .www.medite.de
3.4 Object Clamp
3.4.1 Universal Cassette Clamp
The universal cassette clamp is a quick change system. By pulling the lever (fig. 1, no. 1) to the
front, the cassette can be inserted or removed between the fixed (fig. 1, no. 2) and the movable
(fig. 1, no. 3) jaw.
figure 1
Make sure the contact surfaces of the cassette are free from paraffin to
achieve an optimal clamping.
1
2
3
Manual
Page 17of26Rev.02(2010‐05‐06)Manual_M530_Rev02.doc
Medite GmbH . Wollenweberstr. 12 . D-31303 Burgdorf/Germany
Tel. +49 (0) 51 36/88 84-0 . Fax +49 (0) 51 36/88 84-55 .info@medite.de .www.medite.de
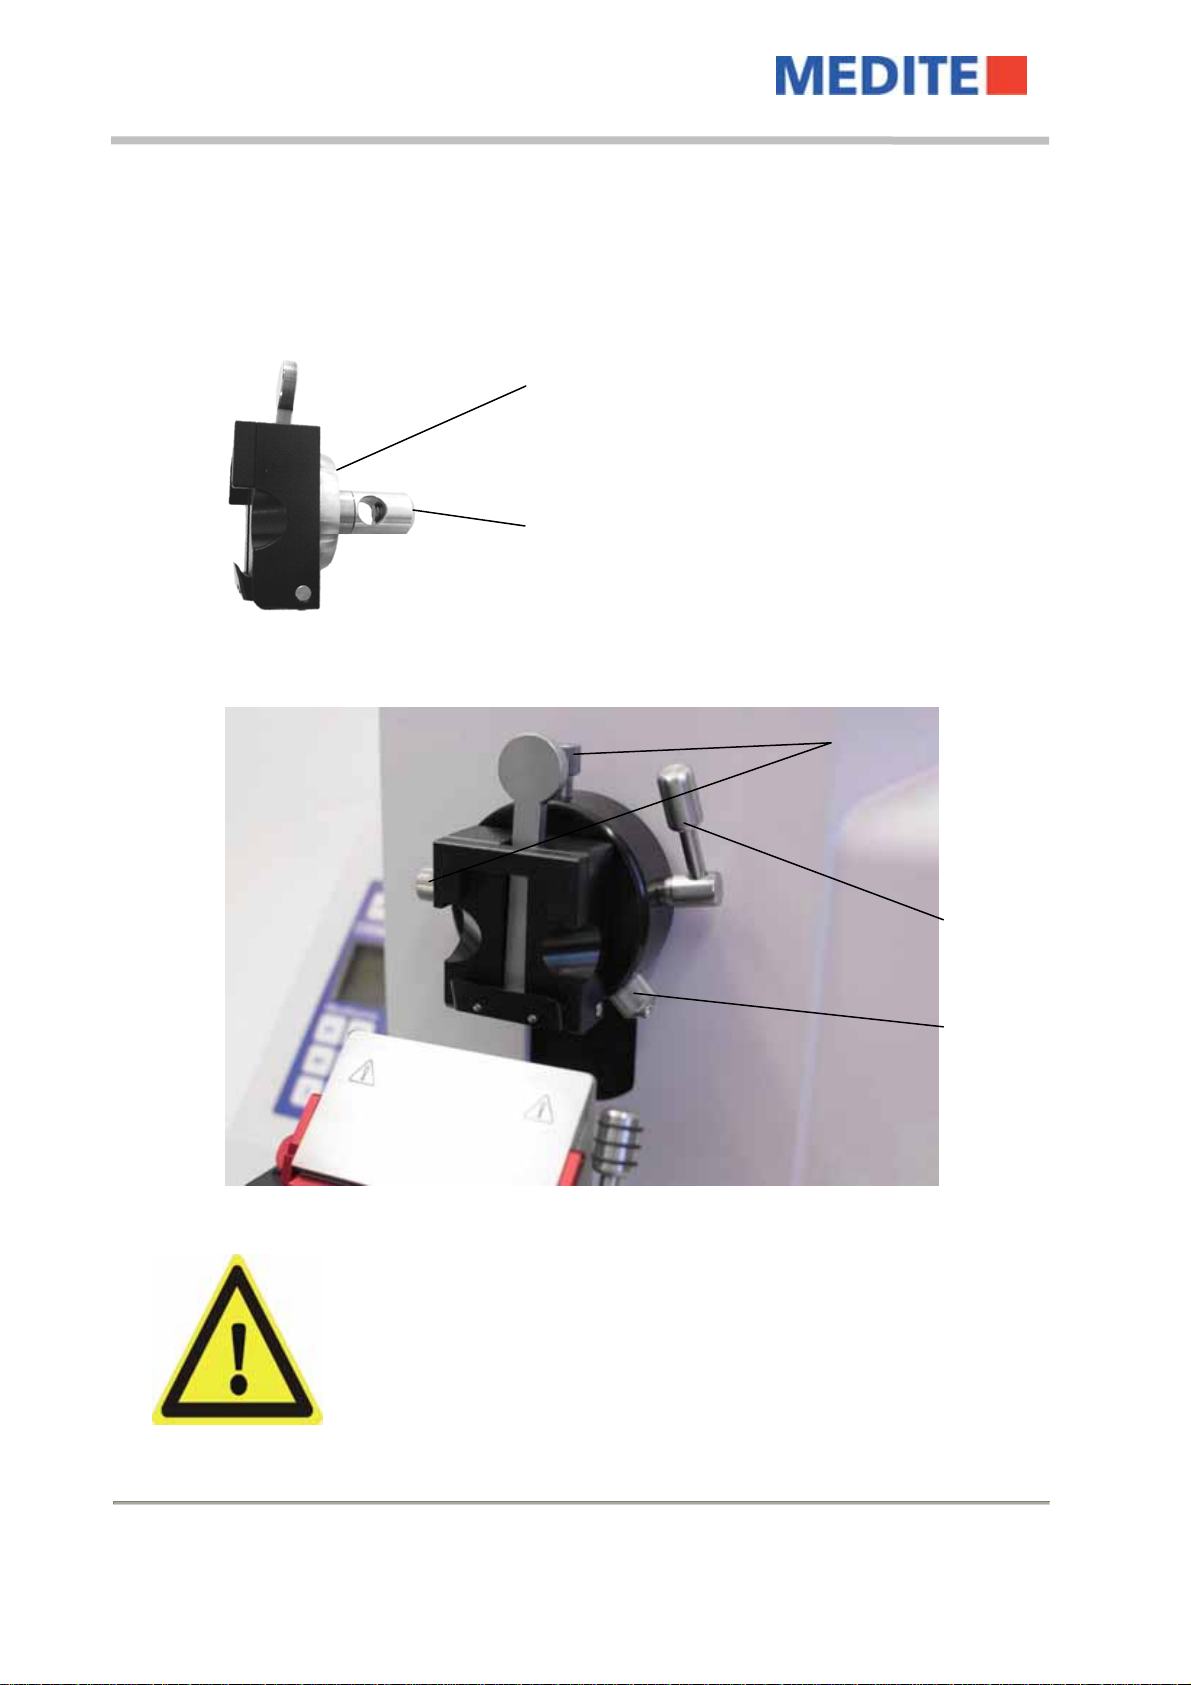
3.4.2 Object Orientation
By the adjustable adaptor (fig. 2, no. 1) at the cassette clamp, which is fixing the object clamps at
the cylinder head, the specimen can be oriented.
figure 2
To adjust the specimen in the desired position, the
clamping lever (fig. 3, no. 2) has to be turned to the
front. Thereby the object clamp is released and can
be turned 360° to find your desired position.
In addition the object clamp can be adjusted by 8°
in each direction (left/right and up/down) by using
the two adjusting screws (fig. 3, no. 1).
When the adjustments are done the clamping lever
(fig. 3, no. 2) has to be pushed back up, so that the
adjusted orientation of the specimen is fixed.
Note: To facilitate the orientation of the specimen,
the clamping lever (fig. 3, no. 2) may be pushed up
slightly. The slight fixing prevents undesired
movements of the clamp during adjustments.
figure 3
To keep the adjusting screws under constant tension, the spring bolt
(fig. 3, no. 3) always has to be tightened.
1
3
2
1
2

Manual
Rev.02(2010‐05‐06)Manual_M530_Rev02.doc Page 18of26
Medite GmbH . Wollenweberstr. 12 . D-31303 Burgdorf/Germany
Tel. +49 (0) 51 36/88 84-0 . Fax +49 (0) 51 36/88 84-55 .info@medite.de .www.medite.de
3.4.3 Fixing Object Clamps
A specimen clamp is exchanged by turning the eccentric lever (fig. 3, no. 2) down and pulling it
out to the side. In addition the two adjusting screws (fig. 3, no. 1) and the spring bolt (fig. 3, no. 3)
have to be unscrewed a little, so that the specimen clamp can be pulled out to the front and be
exchanged with another one.
When inserting a specimen clamp into the cylinder head the clamping lever has to fit all the way
through the hole of the adapter from the right side. After pushing it in, the spring bolt (fig. 3, no. 3)
has to be tightened and by using the adjusting screws (fig. 3, no. 1), the specimen clamp can be
oriented. At the end the clamping lever (fig. 3, no. 2) has to be pushed back up to fix the
adjustment.
3.4.4 Re-Adjusting The Specimen Clamp
After frequent use the clamping lever might lose its adjustment, so that an optimal clamping of the
specimen clamp is not possible any longer. If there are no re-adjustments done, the clamping
might not work at all anymore after a while.
To achieve an optimal clamping, the locked clamping lever (fig. 3, no. 2) should be in an almost
upright position. The clamping position of the lever can be readjusted by turning the inner screw
on the back side of the orienting adapter (fig. 2, no. 2) with the help of an Allen key (size 3 mm). If
there is no clamping at all or the clamping position of the lever is too high, the Allen key has to be
turned in a clockwise direction. Consequently, it has to be turned counter-clockwise if the
clamping position of the lever is too low.
After the adjustment the specimen clamp can be inserted and the clamping position has to be
checked. If necessary, the correction can be repeated once more in the same way.
To decrease the risk of injury, the clamping plate is equipped with a
bracket (fig.8, no.2 or fig.7, no.3). It has to be turned up over the cutting
edge during any adjustments at the knife or the specimen. Even better is,
to take out the blade before doing any adjustment work.
Manual
Page 19of26Rev.02(2010‐05‐06)Manual_M530_Rev02.doc
Medite GmbH . Wollenweberstr. 12 . D-31303 Burgdorf/Germany
Tel. +49 (0) 51 36/88 84-0 . Fax +49 (0) 51 36/88 84-55 .info@medite.de .www.medite.de
3.5 Knife Carrier
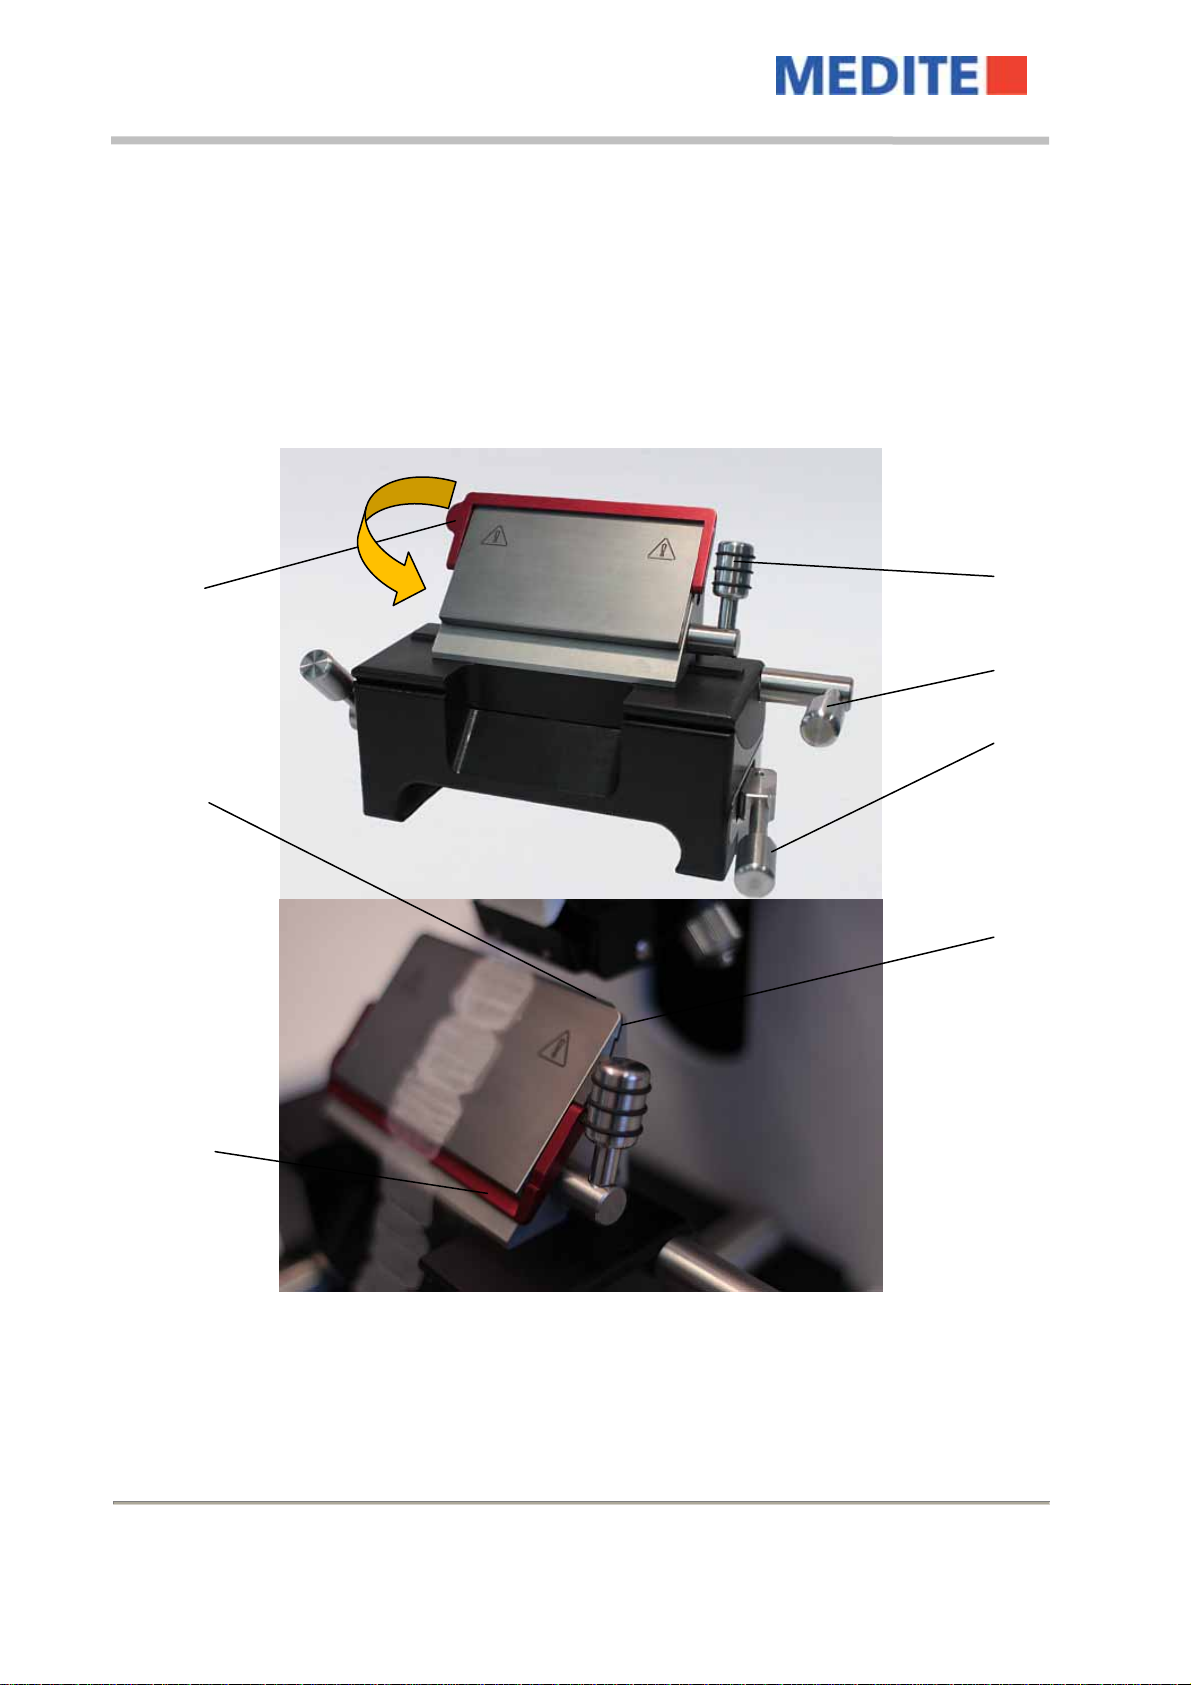
3.5.1 Inserting The Knife
The disposable blade carrier can be used for commercially available low profile blades.
For inserting a blade, the clamping lever (fig. 4, no. 4) and the finger protection (fig. 4, no. 1) have
to be turned to the front. This opens a gap (fig. 4, no. 2) between the rail and the clamping plate
in which the disposable blade (fig. 4, no. 6) can be pushed from the side to the middle. After the
insertion the clamping lever can be turned back, so that the blade is fixed.
figure 4
If the clamping lever (fig. 4, no. 3) is released and the bracket (fig. 4, no. 1) is turned up, the
blade and the clamping plate can be moved together to the left or to the right. Thereby the whole
cutting length of the blade can be used. At the end of any adjustments the clamping levers have
to be fastened again!
1
2
3
4
5
1
6
Table of contents
Other Medite Laboratory Equipment manuals


