manuals.online logo
Brands
  1. Home
  2. •
  3. Brands
  4. •
  5. CORNING
  6. •
  7. Laboratory Equipment
  8. •
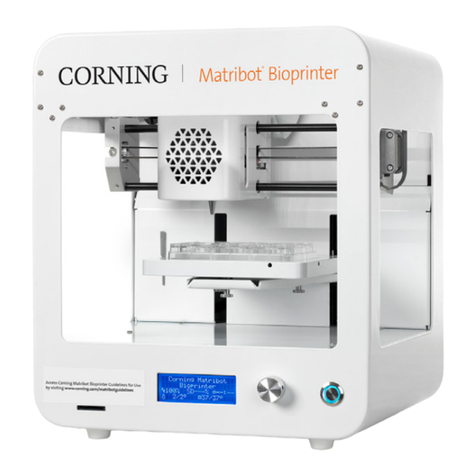
  9. CORNING Matribot Bioprinter User manual

CORNING Matribot Bioprinter User manual

Corning®Matribot®Bioprinter
Demonstration Equipment
Instructions
These instructions are to help guide you through unpacking the Corning
Matribot bioprinter at the beginning of your demo and through repacking the
Corning Matribot bioprinter at the end of your demo. If you have any questions,
please contact your Corning representative.
1
Unpacking the Corning® Matribot® Bioprinter
Follow these steps to unpack the Corning Matribot Bioprinter.
Do not attempt to unpack the Corning Matribot Bioprinter without reviewing the procedures below. Doing so risks personal
injury and equipment damage.
Always use a minimum of two people to unpack and move the Corning Matribot Bioprinter.
The Corning Matribot Bioprinter should never be placed on wet, damp, moist, or humid surfaces.
Do not force or tear anything during the unpacking or setup process as this may irreversibly damage your Corning Matribot
Bioprinter.
Position the system to ensure the user has fast access to the power cable or that the system is run through an emergency
disconnect when an emergency stop may be required.
The device must be connected to a power outlet with protective grounding.
1. Clear a sturdy table benchtop and floor space of at least 2 x 3 feet
(0.6 x 0.9 meters).
2. Place the box on the floor and open it.
3. Save boxes to return the unit after the demo is completed. A return shipping label is included in the consumables supply box.
4. Remove the two loose item boxes.
5. Review the contents of the two boxes to ensure that you have received all of the items listed below.
• Electrical supply box contains:
[1x] 24V Power supply
[2x] Power cord
[1x] USB cable A male to B male 1.83m
[1x] SD card, 32GB, SDHC
[1x] 384-well microplate nozzle thermal insulator
[1x] Standard nozzle thermal insulator
[1x] Surface probe
[1x] Toolkit for preventive maintenance (3 hex keys)
• Consumables supply box contains:
[5x] 3 mL syringes, sterile
[10x] High precision conical bioprinting nozzles, 22G (non-sterile)
[10x] High precision conical bioprinting nozzles, 25G (non-sterile)
[1x] Glass Petri dish
[1x] Return shipping label
2
6. Remove the top protective shipping foam.
7. Use the Corning Matribot bioprinter frame
to grab the device. Be careful not to grab
any movable parts or loose components. It is
recommended to have 2 people lift from the
sides of the frame at the indicated locations.
Remove the device out of the box and place it
on the table or benchtop.
8. Remove the protective plastic bag from the unit.
9. Remove the top inner foam insert as shown. DO NOT pull on the printhead cable.
3
11. Lift the printbed support located at the back of the printer to release the lower foam
insert. Pull the foam insert from the front of the printer to remove as shown below.
12. Take the surface probe out of the electrical supply box and place it inside the device.
13. Refer to the Corning Matribot Bioprinter Instruction Manual (CLS-AN-641DOC) or the
Corning Matribot Bioprinter Introduction videos for start up instructions and support.
NOTE: Please do not add/delete files to the SD card provided in the package.
10. Remove the middle inner foam insert as shown.
14. Keep all of the original packaging materials such as foams, plastic envelopes, return shipping label, and boxes in a safe place. You will
need them for repacking the instrument after completion of the demo.
4
Preparing to Return the Corning® Matribot® Bioprinter
Returning the Corning Matribot Bioprinter to Default Settings
Please return the Corning Matribot bioprinter to default settings by navigating on the LCD interface. First, navigate to the Prepare Bioprint
menu and select Home Axes to return the printhead to the home position. Then, navigate to the Utilities menu and confirm that SD print
is not enabled.
Cleaning or Sanitizing the Corning Matribot Bioprinter
Before cleaning, turn off and unplug the Corning Matribot Bioprinter. The Corning Matribot Bioprinter has a chemical-resistant coating.
Clean or sanitize it with >70% (v/v) ethanol. Spray the surface, and wipe it with a soft cloth while wearing gloves to avoid direct contact
with the unit.
After using ethanol, wait at least 60 seconds before starting the Corning Matribot Bioprinter. Ethanol is flammable, and this
ensures that all remaining ethanol vapor is ventilated. Failure to wait can cause equipment damage and personal injury.
Task Action
Clean the gantry system Remove any dirt that is on the rods or the lead screw
with a clean, lint-free rag, or by using your finger (with
gloves on).
Clean exterior (sides, back, front, top) Clean the surface with a cloth and ethanol >70% (v/v).
Clean LCD screen Clean carefully with a smooth cloth and without using
heavy solvents.
Clean printbed Clean the printbed body with a smooth cloth and
ethanol >70% (v/v). Pay special attention to the auto-
calibration pad. If needed, the pad can be detached for a
thorough cleaning.
Clean printhead Clean the printhead body with a smooth cloth to remove
any dust and debris. Check the fan of the printhead for
residues or accumulated dirt.
Repacking the Corning Matribot Bioprinter
1. Unplug the power supply and outlet cord as well as the USB cable from the Corning Matribot bioprinter. Remove any attached thermal
insulators from the cooling block, detach the surface probe from its storage magnet, and eject the SD card if in use.
2. Return all items to the electrical supply box (smaller white box), confirming that the following items have been placed inside the
original packaging:
• [1x] 24V Power supply
• [2x] Power cord
• [1x] USB cable A male to B male 1.83m
• [1x] SD card, 32GB, SDHC
• [1x] 384-well microplate nozzle thermal insulator
• [1x] Standard nozzle thermal insulator
• [1x] Surface probe
• [1x] Toolkit for preventive maintenance (3 hex keys)
3. Return the empty consumable box (larger white box insert). NOTE: Remember to remove
the return shipping label from the consumables box and set aside for returning the unit
once the demo is complete.
5
6. Make sure the syringe plunger is straight
so it is aligned with the slot in the top
foam and hold the printhead cable out of
the way, ensuring it is aligned with the
cable cutout in the back of the foam insert.
Insert the top inner foam insert from the
top of the unit as shown.
4. Lift the printbed support located at the back
of the printer to raise the printbed slightly
higher than required to fit the lower inner
foam insert. Push the lower inner foam
insert from the front of the printer to slide it
under the printbed. Lower the printbed onto
the foam by gently pushing on the printbed
support located at the back of the printbed.
5. Confirm that the thermal insulator has been
removed from the cooling block to prevent
damaging the thermal insulator. Gently
move the printhead to the center of the
unit and slide the middle inner foam insert
from the front as shown. Align the lower
and middle foam inserts with each other by
adjusting the position of the printhead.
7. Place the Corning® Matribot® bioprinter inside the plastic bag, ensuring that the
bioprinter is completely covered.
6
8. Remove the top shipping foam from the shipping box, and confirm that the bottom
shipping foam is positioned as below.
NOTE: The bottom shipping foam has a cutout for the LCD knob on the Corning®
Matribot® bioprinter (see red arrow).
9. Use the Corning Matribot bioprinter frame to grab the device. Be careful not to grab
any movable parts or loose components. It is recommended to have 2 people lift from
the sides of the frame at the indicated location. Carefully place the bagged Corning
Matribot bioprinter into the bottom shipping foam, ensuring the LCD knob goes into
the foam cutout.
10. Place the top shipping foam onto the
top of the Corning Matribot bioprinter,
encapsulating the unit in the box.
11. Place the empty consumables box on top of the shipping foam above the
Corning Matribot bioprinter and place the electrical supply box in the foam
insert next to the Corning Matribot bioprinter.
12. Attach the return shipping label (provided in the consumables box), and remove or mark out any previous shipping labels. Secure the
shipping box by folding the top flaps and taping it shut.
Warranty/Disclaimer: Unless otherwise specied, all products are for research use or general laboratory use only.* Not intended for use in diagnostic
or therapeutic procedures. Not for use in humans. These products are not intended to mitigate the presence of microorganisms on surfaces or in the
environment, where such organisms can be deleterious to humans or the environment. Corning Life Sciences makes no claims regarding the performance
of these products for clinical or diagnostic applications. *For a listing of US medical devices, regulatory classications or specic information on claims, visit
www.corning.com/resources.
For a listing of trademarks, visit www.corning.com/clstrademarks. All other trademarks are the property of their respective owners.
© 2022 Corning Incorporated. All rights reserved. 1/22 CLS-AN-670DOC REV1
Corning Incorporated
Life Sciences
www.corning.com/lifesciences
NORTH AMERICA
t 800.492.1110
t 978.442.2200
ASIA/PACIFIC
Australia/New Zealand
t 61 427286832
Chinese Mainland
t 86 21 3338 4338
India
t 91 124 4604000
Japan
t 81 3-3586 1996
Korea
t 82 2-796-9500
Singapore
t 65 6572-9740
Taiwan
t 886 2-2716-0338
EUROPE
[email protected]
France
t 0800 916 882
Germany
t 0800 101 1153
The Netherlands
t 020 655 79 28
United Kingdom
t 0800 376 8660
All Other European Countries
t +31 (0) 206 59 60 51
LATIN AMERICA
[email protected]
Brazil
t 55 (11) 3089-7400
Mexico
t (52-81) 8158-8400
Uninstalling Corning® DNA Studio Software
After your demo of the Corning Matribot® bioprinter is complete, please uninstall/remove Corning DNA Studio software from your
computer following the instructions below.
• If you are using a Windows operating system, locate Corning DNA Studio in the Apps and Features settings or in the Control Panel
Programs and Features. Select uninstall.
• If you are using a Mac operating system, remove Corning DNA Studio by dragging it from the Applications folder to the Trash can.

Other CORNING Laboratory Equipment manuals

CORNING 6928 User manual

CORNING

CORNING 6928 User manual

CORNING LSE User manual

CORNING

CORNING LSE User manual

CORNING LSE 6780-FP User manual

CORNING

CORNING LSE 6780-FP User manual

CORNING Axygen Axypet User manual

CORNING

CORNING Axygen Axypet User manual

CORNING OptiTect User manual

CORNING

CORNING OptiTect User manual

CORNING MicroDEN User manual

CORNING

CORNING MicroDEN User manual

CORNING AXYGEN AxySpin R User manual

CORNING

CORNING AXYGEN AxySpin R User manual

CORNING Cell Counter User manual

CORNING

CORNING Cell Counter User manual

CORNING LSE 6765-HS User manual

CORNING

CORNING LSE 6765-HS User manual

CORNING LSE 6703 User manual

CORNING

CORNING LSE 6703 User manual

CORNING LSE 6875-SB User manual

CORNING

CORNING LSE 6875-SB User manual

CORNING LSE 6755 User manual

CORNING

CORNING LSE 6755 User manual

CORNING Gosselin S-Blender 1 Product information sheet

CORNING

CORNING Gosselin S-Blender 1 Product information sheet

CORNING LSE 6775 - 120V US User manual

CORNING

CORNING LSE 6775 - 120V US User manual

CORNING LSE 6775 User manual

CORNING

CORNING LSE 6775 User manual

CORNING SCF-1296 User manual

CORNING

CORNING SCF-1296 User manual

CORNING LSE 6783 User manual

CORNING

CORNING LSE 6783 User manual

CORNING LSE 6783 User manual

CORNING

CORNING LSE 6783 User manual

CORNING Spin-X UF 6 Instruction manual

CORNING

CORNING Spin-X UF 6 Instruction manual

CORNING LSE 6780-4 User manual

CORNING

CORNING LSE 6780-4 User manual

CORNING LSE 6785-SB User manual

CORNING

CORNING LSE 6785-SB User manual

CORNING Labnet Prism R User manual

CORNING

CORNING Labnet Prism R User manual

CORNING LSE 6709 User manual

CORNING

CORNING LSE 6709 User manual

CORNING Lambda EliteMax User manual

CORNING

CORNING Lambda EliteMax User manual

Popular Laboratory Equipment manuals by other brands

Bullard Edge Thermal Imager user manual

Bullard

Bullard Edge Thermal Imager user manual

Fluke tix640 user manual

Fluke

Fluke tix640 user manual

CANGAROO PRESTO LS-B329 user manual

CANGAROO

CANGAROO PRESTO LS-B329 user manual

Neuation iFUGE D08 Product user manual

Neuation

Neuation iFUGE D08 Product user manual

BIOMET Clotalyst manual

BIOMET

BIOMET Clotalyst manual

Dionex ICS-900 Operator's manual

Dionex

Dionex ICS-900 Operator's manual

NoiseKen LSS-6330-A20A instruction manual

NoiseKen

NoiseKen LSS-6330-A20A instruction manual

CoolLED pE-100 Series quick start guide

CoolLED

CoolLED pE-100 Series quick start guide

Applied Photonics LIBSCAN 25+ user manual

Applied Photonics

Applied Photonics LIBSCAN 25+ user manual

Teledyne 4700 Serivce guide

Teledyne

Teledyne 4700 Serivce guide

BMG Labtech FLUOstar Omega operating manual

BMG Labtech

BMG Labtech FLUOstar Omega operating manual

BIO RAD QX200 instruction manual

BIO RAD

BIO RAD QX200 instruction manual

Shimadzu LC-40D X3 CL instruction manual

Shimadzu

Shimadzu LC-40D X3 CL instruction manual

GE 800 user manual

GE

GE 800 user manual

Hettich ROTOFIX 46 operating instructions

Hettich

Hettich ROTOFIX 46 operating instructions

Funke Gerber CryoStar I manual

Funke Gerber

Funke Gerber CryoStar I manual

GYROZEN 1730R user manual

GYROZEN

GYROZEN 1730R user manual

Amsco Century Operator's manual

Amsco

Amsco Century Operator's manual

manuals.online logo
manuals.online logoBrands
  • About & Mission
  • Contact us
  • Privacy Policy
  • Terms and Conditions

Copyright 2025 Manuals.Online. All Rights Reserved.