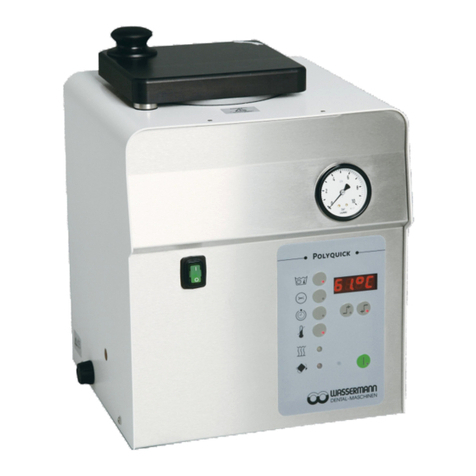
Wassermann Polyquick 260 User manual

Combination Automat
Polyquick 260
Pressure Polymerisation Unit and Compactor
USER MANUAL

Dear customer,
Thank you for choosin a product from the Wassermann ran e. Wassermann Dental-
Maschinen incorporates the hi hest standards of quality and the latest technolo y.
In order to enjoy maximum performance and years of trouble-free operation, please read
this user manual carefully before you connect this device and start work, and operate the
device accordin to the recommended uidelines. The operation safety and the
functionality of this device can only be uaranteed if you follow both the eneral safety
uidelines and the applyin laws to prevent accidents as well as the precautions iven in
this user manual. We are not liable for any dama es which occur due to inappropriate
usa e or faulty operation of this device.
Make sure that anyone usin this device has read and understood this user
manual.
Keep this user manual in a safe place where it can be referred to as required at
any time.
The unit complies with the relevant EU uidelines.
The unit is subject to the EU uidelines 2012/19/EU (WEEE Directive).
Company address:
Wassermann Dental-Maschinen GmbH
Rudorffwe 15-17
21031 Hambur , Germany
Phone : +49 (0)40 730 926 -20/ -24 Fax.: +49 (0)40 730 37 24
www.wassermann.hambur
Erstellt: 14.07.17/ msc Version: 2 Polyquick 260: 170993 ab #00158938
.

Contents
1 Features.............................................................................................................................4
2 Safety Symbols used in this Manual..................................................................................4
3 Safety Guidelines...............................................................................................................5
4 Responsibility for Operation or Dama e............................................................................6
5 Application..........................................................................................................................6
6 Before Startin ...................................................................................................................7
6.1 Transport.....................................................................................................................7
6.2 Installation...................................................................................................................7
6.3 Stora e........................................................................................................................7
7 Installation/ Start-up...........................................................................................................8
7.1 Settin the Correct Pressure.......................................................................................8
7.2 Start-up........................................................................................................................9
8 Operation.........................................................................................................................14
8.1 General Operatin Instructions.................................................................................14
8.2 Operation...................................................................................................................15
9 Troubleshootin ...............................................................................................................16
10 Care and Maintenance...................................................................................................17
10.1 Cleanin ..................................................................................................................17
10.2 Maintenance............................................................................................................17
10.3 Repairs....................................................................................................................18
10.4 Spare Parts..............................................................................................................18
10.5 Service Hotline 0049 (0)40 / 730 926 -20/ -24........................................................18
10.6 Scope of Delivery/ Accessories...............................................................................18
10.7 Warranty..................................................................................................................18
11 Technical Data...............................................................................................................19
12 Disposin of the Unit......................................................................................................20
12.1 Information on Disposal for Countries within the EU..............................................20
13 EU Declaration of Conformity........................................................................................21

1 Features
• Compact table-top unit for pressure polymerisation up to 105°C in a water bath
• Very lar e capacity Ø 240 mm, usable depth 160 mm, suitable for extra lar e articulators
• Touch screen for fast and easy operation
• Up to three individually confi urable polymerisation sta es
• The device can also be operated as a pressure compactor
• Rapid drainin : prompt switch between the two modes
• Separate menu for each mode
• Intelli ent workflow preset by the software helps the user to ensure operational safety
• Remainin time displayed to the second
• Powerful, electronically controlled heatin for optimal water temperature
• Pressure relief valve for protection in case of malfunction (7 bar)
• Safety lid with bayonet lock
• Dry-run protection
• En ravin in container indicatin max. water level
• Time and cost savin due to thermal insulation
• Low maintenance, easy to service
• Made almost entirely of stainless steel
2 Safety Symbols used in t is Manual
Warning!
This is a warnin of risk situations and dan ers.
Failure to observe this warnin could be life-threatenin . These warnin s has to
be observed.
Information!
This symbol draws your attention to specific features that has to be observed.
4

3 Safety Guidelines
Confi urin and operatin this equipment requires precise knowledge and observance
of the instructions in this user manual. The equipment is desi ned only for its intended
application.
WARNING:
Servicin and repairs should be carried out only by authorised specialists.
Disconnect the power plu before startin any maintenance work.
Make sure that the equipment is connected to the correct power source.
The safety valve on the pressure tank opens automatically if the operatin
pressure is more than 7 bar.
The pressure can be activated only if the door is closed completely, since a
safety door contact is installed.
Dry-run protection, which switches off at 112°C (brown button on the left side of
the device).
WARNING: Risk of scalding during t e Hot Polymerisation.
Never open t e lid w ile t e unit is under pressure !
Never open t e lid w ile t e temperature is ig er t an 97 °C !
Open t e lid slowly!
Display information ave to be followed !
For safety-related reasons ( ot water, pressure), only t e valves and oses
meant for t is purpose must be used for draining. If parts of different
design are used / installed (self-made), t ere is a risk of scalding!
5

4 Responsibility for Operation or Damage
The responsibility for operatin the device lies exclusively with the owner or user if said
device is incorrectly serviced, maintained or altered by persons not employed by an
authorised dealer or if the device is used in a manner contrary to its specified purpose.
The unit has to be maintained and operated in accordance with this user manual.
Wassermann Dental-Maschinen GmbH is not responsible for dama e arisin from the
nonobservance of these instructions.
Warranty and responsibility provisions contained in the sales and supply conditions of
Wassermann Dental-Maschinen GmbH are not extended by these instructions.
5 Application
The Polyquick 260 is a pressure polymerisation unit for hot and cold polymerisation of
plastics. It can be set to a maximum temperature of 105°C and the polymerisation
pressure can be adjusted to a maximum of 5 bar. In automatic mode, the polymerisation
time can be preselected up to 99 hours. It has a particularly lar e pressure pot volume and
can hence also accommodate extra lar e articulators or up to 6 brass flasks includin
clamp. A touch screen and the newly developed control panel allow the user to set the
relevant parameters quickly and easily usin self-explanatory symbols. The Polyquick 260
can also be used as a pressure compactor without heatin .
Only use the device for this type of application.
6

6 Before Starting
6.1 Transport
Before transportin the unit, ensure that it has been unplu ed from the power socket.
Make sure that it is packed correctly in order to avoid accidental dama e.
Be sure to check for any transport dama e when unpackin the oods. Note
down any dama e if found.
6.2 Installation
Open the box, remove the packin materials, and carefully lift out the device and
accessories. Check the included accessories.
The device has to stand horizontally on a steady and even surface.
Install the device in a place where it will not block the workin area and the
functionality (take the dimensions into account).
Do not install the unit outdoors or in places without proper ventilation.
Before start-up, be sure the device reaches room temperature.
It is advisable to install the device firmly on the draina e system, since very hot
water can drain off from it. This also simplifies the process of complete
emptyin , e. . for cleanin .
6.3 Storage
If the unit is to be stored for an extended period, protect it from moisture and dust.
7

7 Installation/ Start-up
Before commissionin , please install the followin connections:
Install the pressure hose included in the scope of supply and provide for an
appropriate outlet.
After settin the workpiece, fill the device with tap water, at most up to the en ravin in the
tank. Establish a pneumatic connection of minimum 2 bar. If the pneumatic pipe is lon ,
pay attention to the hose cross-section (internal diameter min. 6 mm). Every pneumatic
pipe must always have a maintenance unit. Ensure a constant pressure by usin the
pressure reducer.
Finally, insert the plu into the socket – make sure that the volta e specification of the
device and the mains network is identical.
Never operate the device wit out water, since the heatin unit immediately
heats up to 60°C or to the preheatin temperature when the power switch is
activated. If required, the heatin unit can be switched off via the display.
7.1 Setting t e Correct Pressure
Before fillin the tank, remove the accessories and set the correct polymerisation
pressure. Proceed as follows (ima e, see 5.2):
1. Activate main switch ( reen rocker switch).
2. Close lid.
3. Touch the Pressure key (ima e, see 5.2). (4.0 bar default).
4. If the pressure is very less (min. 2 bar), increase the pressure (max.5 bar) usin the
black re ulator on the back side. Release the re ulator by pullin to do the settin
and press it in once a ain.
5. If the pressure is too hi h, switch off the pressure (ima e, see 5.2) and release
the pressure. Turn the pressure re ulator on the back side in the "minus" direction
several times; then, apply pressure to the tank. You can set the desired pressure by
turnin the re ulator in the "plus" direction (max. 5 bar)
8
5
5

7.2 Start-up
Define the unit's main parameters before switchin it on. These settin s are performed in
the Set-Up Menu . Familiarise yourself with the system's various options before
startin the polymerisation process. This particularly applies to functions and .
(Please see „setup menu pa e 1“ on pa e 10 of this manual).
T e Start menu in Polymerisation mode
Name of the unit Actual-Temperatur Open Setup menu
Heater ON/OFF* Pressure ON/OFF* Pro ramme parameter and
Polymerisation
*Inverted (back round is black) = ON
T e Start menu in Compactor mode (wit out eater)
9
13
2
456
3
714

Setup menu page 1
In the Setup menu the followin settin s can be made:
Preheatin temperature Clock timer Forward in menu
Sleep Heater ON/OFF back to Start menu
Mode: Polymerisation / Compaction wit out eater
Setup menu page 2
°C/°F Date and Time Forward in menu
Work mode Information back to Start menu
10
89
13 9
15
7
10
12
14
16
16
11

6
5
Description of features 5 – 14
Pressure ON/OFF
Bevore startin the pro ramme you have to choose the pressure.
Programme parameter und Polymerisation
Defines the parameters for the pro ramme temperature.
You can store 3 pro ramme counter (P1, P2 und P3). In every counter up to three
polymerisation sta es #1-3 can be mapped.
Touch the numbers to chan e the values.
Polymerisation level 1 (P1):
Delete Next step Save
Examples of level 2 and level 3 : Start
Touch the arrow (Start) to start the process of polymerisation. Pause or cancel the
pro ramme by pressin the "Stop/Pause"symbol. In P2 and P3 the practice is the same.
11

T e Polymerisation
Stop/Pause Break-of Pause Back Start
Pre eating temperature
Defines the tar et temperature once the main switch has been activated. The pre-heat
temperature also applies to waitin times and rest periods. Default: 60°C
If the pro ramme temperature selected is hi her, the temperature reverts back
to this value when the pro ramme ends.
After definin the desired workin mode , it may make sense to adjust the pre-heat
temperature of the pro ramme temperature. This avoids lon heat-up or cool-down
phases.
Clock timer
This defines the weekday activation and deactivation times.
12
7
8
14

Pro rammes runnin currently have a hi her priority; they are not switched off until
complete.
Sleep button display
When you press the Sleep button, the device oes into the Sleep mode (all functions
except the Timer function are switched off). The device ets actuated when you press the
touch display or with the timer and heats up or cools down to the preset pre-heatin
temperature.
Heater ON/OFF
Choosin the pressurepolymerisation mode (pressure and temperature) or Compactor
mode (pressure without heater).
Selection of t e temperature unit (Fa ren eit or Celsius)
Pictograms for t e time and date function cycle.
13
10
13
12
11

Selection of t e working mode
Defines whether the polymerisation process should start immediately or only after the
heatin value has been reached.
(a) (Default) The device heats to the temperature pro rammed under . After reachin
this value, the result measured is validated by a control cycle. If the value is confirmed, the
wax polymerisation process will start.
(b) The pro rammed polymerization be ins immediately.
Information
Here the parameters of the touch screen, sensors, hardware and software are displayed.
8 Operation
8.1 General Operating Instructions
All instructions for usin the unit, whether in verbal or written form, are based on our own
experience and experimentation and can only be re arded as uidelines.
14
14
a
b
15
6

Please put on heat-resistant loves
Durin lon er periods of non-use please disconnect the power plu .
8.2 Operation
•Open the lid.
•First set the workpieces, then fill the water till all the polymerisation parts are
covered (max. up to the en ravin = Markin in the tank) and close the lid up to the
stop.
•Switch on the main switch, the device will automatically heat up to 60°C or up to the
value selected as the pre-heatin temperature. If warnin appears, close the
lid.
•Activate the pressure.
•The process of polymerisation starts when you touch the symbol . After the
process of polymerisation has ended, the temperature falls/rises to the preset
temperature a ain.
15
A
56
5
6
A

9 Troubles ooting
Fault Cause Solution
Polyquick 260
does not heat
Lid is open (Fi . 1) Close lid a ainst safety contact.
Temperatur-pro ramme-
parameter is to low
Adapt the parameters.
Preheatin temperature
is to low
Adapt the parameters.
Heater faulty Please contact our service department.
Pressure does
not increase in
chamber
Lid seal O-rin faulty Check O-rin and replace if necessary.
Pressure re ulator set to 0
(pressure au e).
Check pressure and adjust if necessary.
Lid not fully closed Close lid a ainst safety contact or
contact faulty.
Temperature monitor off or faulty Press in safety knob (left side of unit)
and/or replace knob. Please contact our
service department.
Display blank Temperature monitor off or faulty Press in safety knob (left side of unit)
and/or replace knob. Please contact our
service department.
Touchscreen
malfunction
Calibrate the touch display Switch on the unit. While the lo o of
Wassermann appears please contact
the touch display two times.
Then you will reach the self-explanatory
touch panel-calibration (Fi . 2-3).
Touchscreen under pressure Please contact our service department.
Screen protector dama ed? Please contact our service department.
Unit does
nothin
Blown fuse Replace fuse at rear of unit.
If the above recommendations do not solve the problem, contact your dental
depot or our service department.
16
Fig. 2 Fig. 3
Fig. 1

10 Care and Maintenance
10.1 Cleaning
Disconnect the power plu before startin any maintenance work.
The identification plate has always to be kept in easily le ible condition and has
not to be removed.
Remove external dirt from time to time with some form of cold cleaner.
Use only cold cleaners to avoid dama in the paintwork or removin the letterin .
10.2 Maintenance
At re ular intervals, check the cover asket (item no. 380063) for dama es; for this
purpose, remove the asket rin (reddish brown silicon rin ) from the rin roove of the
pressure tank usin a pair of blunt tweezers. The rin roove for holdin the asket rin
must always be kept clean.
Use Vaseline or oil while insertin the asket rin back into the rin roove.
Check the functionin of the lid safety switch by openin and closin the lid multiple times;
a soft click must be audible while closin or openin .
C ange t e sealing ring every 18 mont s.
17

10.3 Repairs
Servicin or repairs to the unit has only to be carried out by qualified technicians.
Only ori inal spare parts are to be used. Responsibility for the product is voided
if unauthorised persons alter it or if inappropriate components are installed.
10.4 Spare Parts
If necessary please contact our service hotline phone.
10.5 Service Hotline 0049 (0)40 / 730 926 -20/ -24
10.6 Scope of Delivery/ Accessories
Included parts Item no.
Flask bracket support 170414
Compressed air hose, 2 m 320026
Dischar e hose, 2 m 320031
Fuse 6,3 AM/250 V D 5 x 20, 2 pcs. ---
Accessories/ Spare parts Item no.
Flask bracket support 170414
Compressed air hose per meter 320026
Dischar e hose per meter 320031
On request: flask basket as special accessory ---
Fuse 6,3 AM/250 V D 5 x 20 582013
10.7 Warranty
The warranty period for our equipment is 12 months. If faults occur within the
warranty period, contact your dental depot or et in touch directly with our service
department.
Your equipment should only be operated in perfect condition. If faults occur which
could harm operators or third parties, the unit should not be used until it has been
fixed.
This warranty does not cover dama e caused by improper use, external mechanical
causes, transport dama e or interference with the unit by unauthorized persons.
18

11 Tec nical Data
Polyquick 260 Item no.: 170993
Volta e 220–240 V / 50/60 Hz
Power consumption 4.3 A
Output 1100 W
W x H x D 421 x 437 x 485 mm
Wei ht 36.8 k
Compressed air connection min. 2 bar
Operatin pressure max. 5 bar
Pressure chamber Ø 240 mm, depth 175 mm (usable depth 160 mm)
The noise level of the unit amounts to ≤ 70 dB (A).
Other volta es on request.
Technical chan es reserved.
19

12 Disposing of t e Unit
The unit has to be disposed by an authorized recyclin operation. The selected company
has to be informed of all possibly health-hazardous residues in the unit.
12.1 Information on Disposal for Countries wit in t e EU
To conserve and protect the environment, prevent environmental pollution and
improve the recyclin of raw materials, the European Commission adopted a
directive that requires the manufacturer to accept the return of electrical
and electronic units for proper disposal or recyclin .
Within the European Union units with this symbol should not therefore be disposed of
in unsorted domestic waste.
For more information re ardin proper disposal please apply at your local authoritie.
20
Table of contents
Other Wassermann Laboratory Equipment manuals
Popular Laboratory Equipment manuals by other brands

Sartorius stedim
Sartorius stedim Sartobind Phenyl nano 3 ml operating instructions

Grant-bio
Grant-bio Vortexer PV1 operating instructions

formlabs
formlabs IBT Resin Instructions for use

Molecular Devices
Molecular Devices SpectraMax L user guide

OHAUS
OHAUS Frontier FC5707 instruction manual

REPLIGEN
REPLIGEN TangenX PRO Compatibility guide