MedNet Wellue viatom CheckmePod User manual

Checkme Pod
User manual

1
Contents
1. Introduction....................................................................2
1.1 Safety....................................................................... 2
1.2 Intended Use............................................................2
1.3 Overview..................................................................3
1.4 Packing List.............................................................. 3
1.5 Symbols....................................................................5
2. Getting Started............................................................... 6
3. Operation........................................................................7
3.1 Taking Measurements............................................. 7
3.2 Settings.................................................................. 10
3.3 History....................................................................11
3.4 Using the App........................................................ 11
3.5 Using the PC Software........................................... 15
4. Maintenance.................................................................16
4.1 Battery................................................................... 16
4.2 Care and Cleaning.................................................. 16
5. Trouble Shooting.......................................................... 17
6. Accessories................................................................... 17
7. Specifications................................................................18
8. Electromagnetic Compatibility..................................... 19

2
1. Introduction
1.1 Safety
Warnings and Cautionary Advices
Do not use this device during MRI examination.
Never submerge the device in water or other liquids. Do not
clean the device with acetone or other volatile solutions.
Do not drop this device or subject it to strong impact.
Do not place this device in pressure vessels or gas sterilization
device.
Do not dismantle the device, as this could cause damage or
malfunctions or impede the operation of the device.
This device is not intended for use by people (including
children) with restricted physical, sensory or mental skills or a
lack of experience and/or a lack of knowledge, unless they are
supervised by a person who has responsibility for their safety
or they receive instructions from this person on how to use the
device.
This device displays changes in the pulse rate and blood
oxygenation etc. which may have various different causes.
These may be harmless, but may also be triggered by illnesses
or diseases of differing degree of severity. Please consult a
medical specialist if you believe you may have an illness or
disease.
Do not self-diagnose or self-medicate on the basis of this
device without consulting your doctor. In particular, do not
start taking any new medication or change the type and/or
dosage of any existing medication without prior approval.
The device has no alarms and will not sound if the
measurement reading is too low or too high.
1.2 Intended Use
The Checkme Pod Vital Signs Monitor is intended to be used for
measuring, displaying, storing and reviewing of multiple physiological
parameters including pulse oxygen saturation (SpO2) and

3
temperature in home or healthcare facilities environment.
The data and results provided by this device are for pre-check
screening purpose only and cannot be directly used for diagnostic or
treatment.
1.3 Overview
1. Touch Screen
2. Home button
Power on/Power off the device.
Press this button to return to the main screen or upper menu.
3. Micro-D port
Connect with external probe or micro-D adapter for measuring.
Connect with Micro-D cable fro charging.
4. ▲button and button
The functions of these two buttons are depend on the current
feature, see below for details.
5. Speaker
1.4 Packing List
Main unit, SpO2 probe for adult, USB extension cable, USB charging
cable, user manual.
Option: SpO2 probe for baby, Temperature probe, Multi-functional
adapter.
Note: The features described in this manual may not be applicable to
all models, refer to the specific model purchased and accessories.
5

4
Home Screen
The home screen on the device is shown as below.
Item
Explanation
Measure
Tap to enter the real-time measuring mode.
History
Tap to view the historical data.
Settings
Tap to setup the device configuration.
Note: The device will enter the home screen in the following situation:
no operation for 5 minutes in measuring mode.
no operation for 60 seconds in non-measuring mode.
Monitoring Screen
The real-time monitoring screen is shown as below.
Item
Explanation
1
Real-time SpO2 value
2
Real-time pulse rate value

5
3
Real-time Plethysmogram
4
Pulse bar
5
Real-time temperature value (Optional)
6
Real-time perfusion index value
7
Tap to save the current measuring value
8
Device time
9
Battery indicator
1.5 Symbols
Symbol
Meaning
Application part type BF
Manufacturer
CE0197
In conformity with Directive 93/42/EEC
European Representative
Symbol for “ENVIRONMENT PROTECTION – Waste
electrical products should not be disposed of with
household waste. Please recycle where facilities exist.
Check with your local authority or retailer for recycling
advice”.
IP22
Against ingress of solid foreign objects ≥12.5mm
diameter, Against dripping(15° tilted)
Follow operating instructions
No alarm system.

6
2. Getting Started
Before Use
The Checkme Pod supports real-time monitoring the
oxygen saturation
(SpO2), P
ulse Rate
(PR),
Perfusion Index(PI) and body temperature by
external SpO2 probe and temperature probe.
Power On/Off
Press the Home button to power on the device.
Press and hold Home button for 2 seconds to power off thedevice.
Prior to Measure
Before me asure, pay attention to the following points in order to
obtain precise measurements.
The finger inserted in SpO2sensor must be clean.
Any of the following conditions may cause inaccurate
measurements of oxygen saturation (SpO2), P
ulse Rate
(PR)
and
Perfusion Index(PI)
, including but not limited to:
-
Flickering or very bright light;
-
Poor blood circulation;
-
Low hemoglobin;
-
Hypotension, severe vasoconstriction, severe anemia or
hypothermia;
-
Nail polish, artificial nails;
-
Any tests recently performed on you that required an
injection of intravascular dyes.
If blood circulation is poor, SpO2, PR, and PI may not be
measured. Rub your finger to increase circulation, or place
the SpO2 sensor on another finger.
The device measures oxygen saturation of functional
hemoglobin. High levels of dysfunctional hemoglobin (caused
by sickle cell anemia, carbon monoxide, etc.) could affect the
accuracy of the measurements.
The pleth waveform displayed on the device is normalized.
Please keep the temperature probe close to the skin when
measuring. If it is loose, the temperature measurement result
7
could be inaccurate.
Before measuring the temperature, make sure that the skin
that is in contact with the temperature probe is flat and
wrinkle-free.
3. Operation
3.1 Taking Measurements
3.1.1 SpO2 Measurement
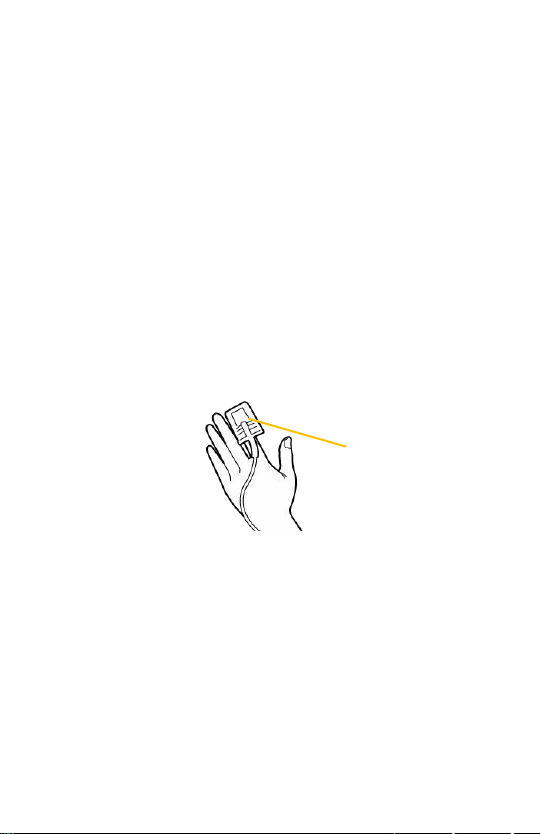
Measuring with Adult Probe
Please follow the below instruction:
1.Connect the external SpO2 adult probe with the device.
2.Insert your finger into the external probe.
3.Click the
<Measure>
icon on home screen to start measuring.
4.Wait for a few seconds, the screen will display the
measuring
value.
Measuring with Baby Probe(Optional)
Please follow the below instruction:
1.Choose the wrap with appropriate size, place the probe into the wrap.
2.Place the wrap with the probe on the foot, with the probe part running
on the outside edge of the foot, the probe cable should be oriented to
the baby’s leg.
3. Attach the wrap velcro securely with no gap between the probe and
the baby’s skin.
4.
Click the
<Measure>
icon on home screen to start measuring.
5.Wait for a few seconds, the screen will display the
measuring
value.
Finger nail position

8
Note:
The light emitter and the light detector should be opposite to
each other on the two sides of the foot.
For the right foot, the Light Emitter should be on the top.
For the left foot, the Light Emitter should be on the bottom.
For the baby is 0~3 months old, suggests to choose the
smaller wrap.
Caution: Limit finger movement as much as possible when measuring
blood oxygen, which might result in incorrect reading.
3.1.2 Temperature Measurement (Optional)
Please follow the below instruction:
1.Connect the external temperature probe with the device.
2.Use medical tape to stick the probe under the armpit of the human
body.
3.Click the
<Measure>
icon on home screen to start measuring.
4.Wait for 2 minutes approximately, the screen will display the
stable
And and accurate measuring
value.
Note:
In order to avoid pain when removing the tape, please avoid the

9
hair when applying the tape or scrape the hair before applying the tape.
3.1.3 Using Adapter (Optional)
To measure blood oxygen and body temperature at the same time,
please use the multi-function adapter to connect with the SpO2 probe
and temperature probe.
3.1.4 Saving Record
In measuring mode, you can click the Save button on the screen to
save the current measuring value.
The device will automatically save
the data when the measurement is stopped. You can review the saved
data on
<History>
menu.
3.1.5 Rotating Screen Display
In measuring mode, you can click the ▲button or button to
switch the screen display direction.

10
3.2 Settings
To setup the device configuration, please click <Settings> icon on
home screen to enter the settings menu.
Tapping the ▲button or button on the left side of the screen to
select the item.
Tapping the Home button to enter or exit the menu.
Menu Item
Explanation
Bluetooth
Turn on/off Bluetooth function.
Option: On/Off (default: Off)
To PC
Enter the connection mode to PC.
Volume
Adjust the volume of pulse rate sound.
Option: 1-3 (default: 2)
Brightness
Adjust the brightness of the screen.
Option: 1-6 (default: 3)
Date&Time
Setup the date and time of the device.
TEMP Unit
Setup the temperature unit.
Option: ℃/℉(default: ℃)
Erase All Data
Erase all the data on the device .
Note: All measurements saved in the device
will be deleted.
Factory Reset
Restore the factory default settings on the
device.
Software Update
Update the device software.
About
Display the device information, such as
software version, SN etc..

11
3.3 History
To review the history data, please click <History> icon on home screen.
Swiping up or down on the screen to view the data.
Tapping the ▲button or button on the left side of the screen to
turn to the previous or next page.
Deleting Records
Long press one of the measurement records to delete it.
3.4 Using the App
The ViHealth app supports to transmit data after the monitor stops
measurements, and monitoring of SpO2 and temperature.
3.4.1 Downloading the App
App name: ViHealth
iOS: App Store
Android: Google Play
3.4.2 Installing the App
Install the app on an Apple product or Android-powered device,
including smart phones and tablets.
Note: For Android devices, please accept the permissions requested at
the time of running the app.
Compatibility
The devices that are compatible with the monitor and app must meet

12
the following minimum requirements:
iOS: iOS 9.0 or later
Android: 5.0 OS or later
Note:Android version 5.0 also known as Android Lollipop was released
in November 2014. Most devices manufactured after this date will likely
have this version or a newer version installed.
3.4.3 Pairing the Device
1.Make sure that Bluetooth is enabled on your smart device.
2.Turn on the Bluetooth on Settings screen of the device.
3.Run the ViHealth app, and tap the device icon in the ViHealth app.
4.Follow the connection guide on the app to start pairing.
3.You can log in to the ViHealth app after successful pairing.
Caution: DO NOT pair the device in your smart device’s settings.
3.4.4 Transmitting Data
The monitor will automatically transmit the latest data to the ViHealth
app after successful pairing.
13
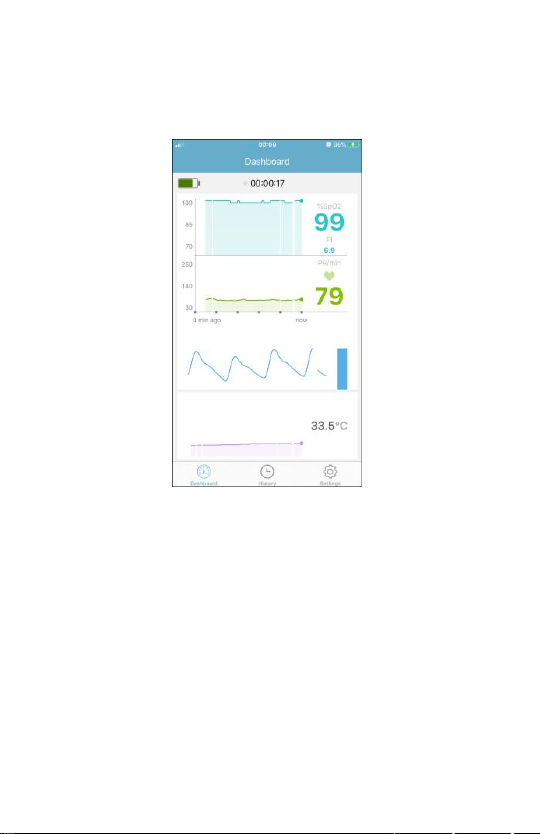
3.4.5 Real-time Monitoring
The ViHealth app allows you to monitor blood oxygen and temperature
in real-time on the Dashboard screen.
3.4.6 History Records
You can review the history measurement records on History screen.
There are two type of history record:
1. APP Records: the measuring data is saved on the app. There are
graphic trends for the SpO2, pulse rate and temperature records.
You can tap the desired record to view the detail information as
shown.
2. Device Records: the measuring data is saved on the device.

14
History Screen
App Record Detail Screen

15
Reviewing Measured Value
Tab to review the measured value from a certain moment during
the recording. Then move the cursor, the measured value of the cursor
position will be displayed.
Zooming Graphic Trends
To view detailed measurements during the recording. You can use pinch or
spread your fingers to zoom in and out from the graphic trends on the
trend view area.
Sharing Record
Tap to share the current record to your doctor or friends.
For App Records, you can share the record information as a picture.
For Device Records, you can share the record information as a PDF file.
Deleting Records
Use gestures to swipe left on the record in History screen, then choose
“Delete” to delete the current record.
3.5 Using the PC Software
The device supports to export the data to PC software via USB. You can
review history records and reports on your computer.
Please follow the below instruction:
1. Install the PC software “Checkme Browser Pro” on your computer. You
can Download the software from the website: www.getwellue.com
2. Turn on your device, tap the menu [Settings]->[To PC], then connect
the device to your computer by the USB cable.
3. You can review the measurement data on the PC software after the
data is downloaded from the device.
Note: The PC software only supports to be installed on Windows PC
(Win7/Win8/Win10).

16
4. Maintenance
4.1 Battery
This device is integrated a rechargeable Lithium-ion battery. The
battery is charged automatically when the device is connected to a
powered USB port.
On-screen battery symbols indicate the battery status as follow:
To charge the battery, connect the USB charging cable as shown.
The device cannot be used for any measurement during charging.
Use USB charging devices comply with electrical safety standard, for
example IEC 60950.
4.2 Care and Cleaning
Clean the device by carefully swabbing the device surface with a soft
cloth swab with water or alcohol.
The battery is fully charged.
The solid portion represents the remained battery energy.
If the solid portion moves from left to right, then it means
that the battery is being charged.
The battery is almost depleted and need to be
charged immediately. Otherwise the device will shut down
automatically.

17
5. Trouble Shooting
Note: Have the device repaired by authorized service centers only,
otherwise its warranty is invalid.
6. Accessories
Warnings and Cautionary Advices
Use accessories specified in this chapter. Using other
accessories may cause damage to the device or not meet the
claimed specifications.
Problem
Possible Cause
Solution
The device does
not turn on.
1.
The battery may be
low.
2.
The device might be
damaged.
1.
Charge the battery and
try again.
2.
Please contact with
your local distributor.
SpO2or pulse rate
shows no value, or
the number
fluctuates.
1. Finger may not be
insertedcorrectly.
2. Finger or hand may
be moving.
1. Remove finger and
reinsert, as directed.
2. Try to keep perfectly
still and test again.
“Error XX”
occurred.
Software or hardware
failure.
Restart the device. If the
error persists, contact
with authorized service
center.
Abnormal body
temperature
display or no body
temperature
display.
Thermometer wearing
position is incorrect.
Check and adjust the
wearing posit.
Part Number
Description
540-00193-10
SpO2 probe for Adult
540-00194-00
USB charging cable, micro D
540-02255-00
USB extension cable
540-02262-00
Temperature probe(optional)
540-02031-00
SpO2 probe for Baby(optional)
540-00354-00
Multi-functional adapter(optional)

18
7. Specifications
En
v
i
r
on
me
n
ta
l
Item
Operating
Storage
Temperature
5 to 45°C
-25 to 70°C
Relative humidity
(non condensing)
10% to 95%
10% to 95%
Barometric
700 to 1060 hPa
700 to 1060 hPa
Degree of dust & water
resistance
IP22
Physical
Size
82×55×13 mm
Weight
Less than 62 g (main unit)
Display
2.4” touch screen, color, backlit
Connector
Micro-D connector
Power Supply
Battery type
Rechargeable lithium-polymer battery
Battery run time
Continuously measure: about 5 hours
Charge time
Less than 2 hours to 90%
Temperature
Temperature type
Contact temperature
Measuring position
Underarm
Temperature range
30.0 to 45°C
Temperature Accuracy
±0.1°C
SpO2
Measurement accuracy verification: The SpO2 accuracy has been
verified in human experiments by comparing with arterial blood
sample reference measured with a CO-oximeter. Pulse oximeter
measurement are statistically distributed and about two-thirds of
the measurements are expected to come within the specified
accuracy range compared to CO-oximeter measurements.
SpO2 range
70% to 100%
SpO2 Accuracy (Arms)
80-100%:±2%, 70-79%:±3%
PR range
30 to 250 bpm
PR accuracy
±2 bpm or ±2%,whichever is greater

19
PI range
0.5-15
Measurement summary
SpO2, PR, PI
Review
Storage
100 records
8. Electromagnetic Compatibility
The device meets the requirements of EN 60601-1-2. All the
accessories also meet the requirements of EN 60601-1-2 when in use
with this device.
Warnings and CautionaryAdvices
Using accessories other than those specified in this manual
may result in increased electromagnetic emission or
decreased electromagnetic immunity of the equipment.
The device or its components should not be used adjacent to
or stacked with other equipment.
The device needs special precautions regarding EMC and
needs to be installed and put into service according to the
EMC information provided below.
Other devices may interfere with this device even though
they meet the requirements of CISPR.
When the inputted signal is below the minimum amplitude
provided in technical specifications, erroneous measurements
could result.
Portable and mobile communication equipment may affect
the performance of this device.
Other devices that have RF transmitter or source may affect
this device (e.g. cell phones, PADs, and PCs with wireless
function).
The EMC table information is listed on our website:
http://api.viatomtech.com.cn/documents/2017/emc_en.pdf
Table of contents
Other MedNet Medical Equipment manuals


Popular Medical Equipment manuals by other brands


Getinge
Getinge Arjohuntleigh Nimbus 3 Professional Instructions for use

Mettler Electronics
Mettler Electronics Sonicator 730 Maintenance manual

Pressalit Care
Pressalit Care R1100 Mounting instruction

Denas MS
Denas MS DENAS-T operating manual

bort medical
bort medical ActiveColor quick guide

AccuVein
AccuVein AV400 user manual


