Megatron UP-PN-II User manual
1 UP-PN-II v0.8
8 needles printer mechanism
Easy loading of paper
Powered by battery or mains
Interfaces IrDA IrLPT & IrCOMM 3-wire raw
RS232C from 110 to 19200 baud
USB 2.0
24 and 40 characters per line
Programmable text which can be printed on internal timer or by
interface
Remote of an external instrument (RS232 or timer )
Optical detection of paper end
Can print double ply paper.
Perfect for process control
English – version 0.8
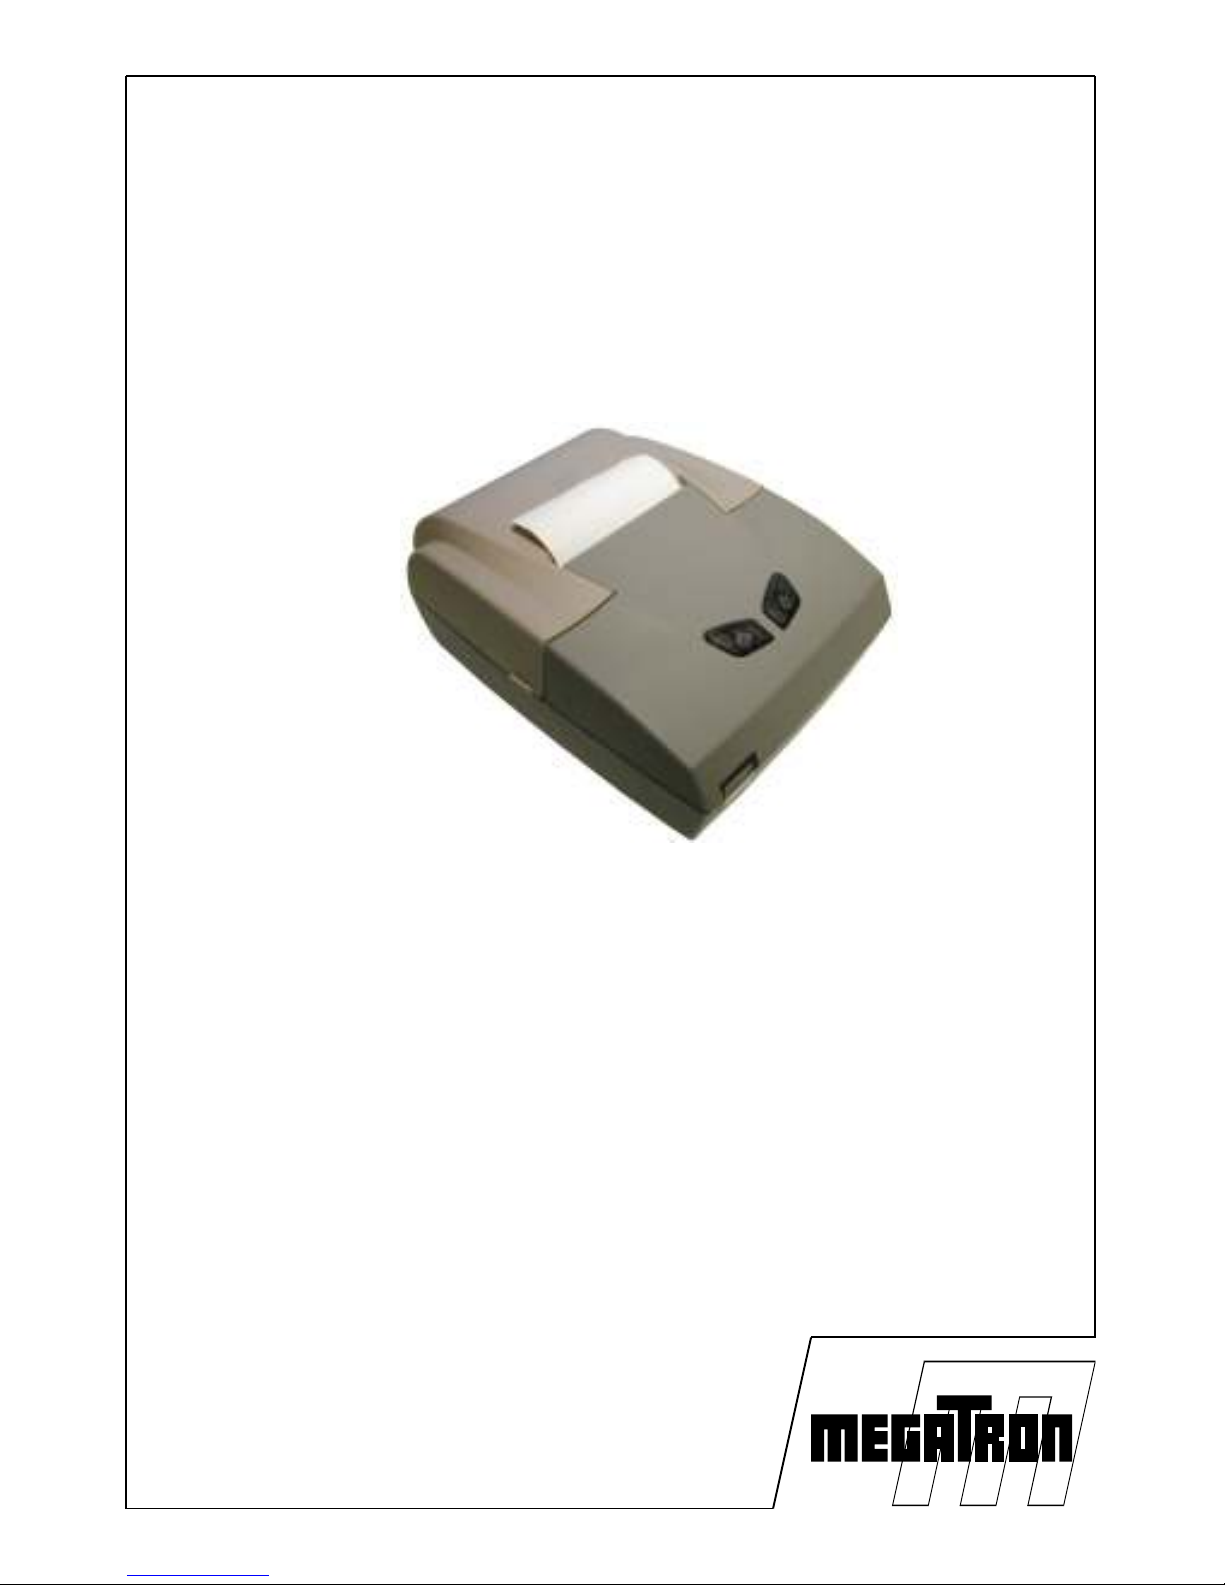
UP-PN-II
Portable Dot Matrix Printer
User Manual

UP-PN-II v0.8 2
Table of contents
Overview ..............................................................................................3
Chapter 1 specifications .....................................................................4
1.1 References .........................................................................4
1.2 Printing features ..................................................................4
1.3 Roll of paper .......................................................................4
1.4 Ribbon .................................................................................4
1.5 Print commands ..................................................................5
1.6 Interface ..............................................................................5
1.7 Power supply ......................................................................6
1.8 Power up and auto power off .............................................7
1.9 Environmental specifications .............................................7
1.10 Dimensions .......................................................................7
1.11 Weight ...............................................................................7
Chapter 2 Installation and operating .................................................8
2.1 Installation ...........................................................................8
2.2 Connecting the power .........................................................8
2.3 Loading of paper .................................................................9
2.4 Replacement of ink ribbon ...............................................10
2.5 Selecting the interface ......................................................10
2.6 Interface connection .........................................................11
2.7 Play with buttons & leds ...................................................13
Chapter 3 Configuration enu ........................................................14
Menu parameters ....................................................................17
Chapter 4 Characters & Co ands ...............................................18
4.1 Driver ................................................................................18
4.2 Character set ....................................................................19
4.3 Control codes PCL Raw ...................................................19
4.4 Control codes ESC/P 9 PINS ...........................................20
4.5 Control code ESC/P Basic ................................................20
4.5.1 Character set control codes ........................................22
4.5.2 Enhancement control codes .......................................22
4.5.3 Horizontal spacing .......................................................23
4.5.4 Vertical spacing ...........................................................23
4.5.5 Graphics ......................................................................24
4.5.6 Logo & Messages .......................................................26
4.5.7 Special Commands .....................................................28
4.5.8 Optional clock not available .......................................29
4.5.9 Configuration commands ............................................30
4.5.10 System Commands ...................................................31

3 UP-PN-II v0.8
Overview
UP-PN-II portable eight dot matrix printer features as following
Structure for easy paper loading
Powered by mains or battery pack for quick replacing and portability
IrDA infrared interface for easy interfacing and communication wireless
(IrLPT & IrCOMM 3-wire Raw classes)
Serial RS232C interface from 110 to 19200 baud
(can work at 9600 baud simultaneously with IrDA)
Interface USB 2.0
2 characters fonts allowing 24 and 40 characters per line
Optical detection of paper end
Copy ability; it can provide an original and a copy
Pre-programmed messages activated by interface or timer
Query on external RS232 peripheral on interface or timer
UP-PN-II printer is suitable for application of mobile instrument or such as PDA,
POS, devices, etc...
for application of mobile instrument,
with IrDA wireless instrument or PDA, ...
with computer, POS, ...
In stand alone mode with RS232 measurement devices (Multimeter,
Sliding caliper, etc)
Thanks to its dot matrix technology, it is perfectly adapted to process controls
where ticket must be stored.
Product and documentation can be modified
without notice .
Chapter 5 Annex ................................................................................32
5.1 Battery version ................................................................. 32
5.1.1 Battery charge ............................................................ 32
5.2 Main version ..................................................................... 32
5.3 Cables & accessories ...................................................... 33
5.4 Character set ................................................................... 34

UP-PN-II v0.8 4
1.2 Printing features
•Printing method Dot matrix printing
•Copy ability 1(original) +1
•Model UP-PN-II uses an EPSON M-192 printing mechanism.
The main characteristics are detailed in the following table
•With a font in matrix 6×10, 40 characters by line are available.
•With a font in matrix 10×10, 24 characters by line are available.
Other fonts are downloadable allowing other character sets or sizes.
1.3 Paper roll
•Normal paper roll, max Outer Ø 50mm, Inner Ø 12.5mm
•Paper width 57.5 ± 0.5mm
•Paper thickness 0.065µm, 53~64g/m
2
1.4 Ribbon
•MDE-250-V cassette, purple, life 100 000 characters.
•MDE-250-N cassette, black, life 100 000 characters.
Model
Density
(dots/line)
Dot size
H x V
(mm)
Characters
per line
6×10
(char)
Character
dimension
6x10 (mm)
Characters
per line
10×10
(char)
Character
dimension
10x10 (mm)
Printing
speed
(line/s)
Paper feed
speed
(lines/s)
Reliability
MCBF
(lines)
UP-PNII
240 0,2 x 0,37 40 1,2 × 3,7 24 2 × 3,7 1.5 3.0 1 000 000
Chapter 1 Features
1.1 References
Reference : UP-PN-II -
X
X
X
The reference will be set by replacing
each "x" character by the letter
corresponding to your needs.
Example: UP-PN-
II
- UI
W
IRELESS
I
NTERFACE
- No Wireless interface
I IrDA interface
P
OWER
S
UPPLY
On battery with ext. mains charger B
Mains (external mains supply) S
W
IRED
I
NTERFACE
U USB 2.0
V Serial RS232C

5 UP-PN-II v0.8
1.5 Printing co ands
The UP-PN-II provides ESC/POS (ESC/P 9 pins and ESC/P Basic) commands
and a simple PCL compatibility (raw graphic).
•Two fonts are included providing 224 IBMII characters IBMII in different
matrix. On request other fonts can be downloaded.
•ESC/P commands provide following functions
Character and graphic printing, enlarge characters, underline, user defined
characters, formatting, hexadecimal dumping.
•PCL commands allow raw graphic which are suitable for most PDA and
handled computer
1.6 Interface
UP-PNII exists in several versions
with a serial RS232 interface
with a serial RS232 interface and an infrared IrDA interface
with a serial USB 2.0 interface
with a serial USB 2.0 interface and an infrared IrDA interface
•Serial RS-232
Baud 110 to 19200 Baud (9600 at delivery)
Handshake RTS or XON/XOFF
Format 7 or 8 bits ,
parity no, even ou odd,
1 or 2 stop bits
Connector RJ-12 6 pins
Signal level EIA ±3 ~±15V
•Infrared port IrDA
Classes IrLPT and IrCOMM-3 wire Raw
Distance 1 m (max.)
Angle 30°
Note USB 2.0 can operate in the same time as the Irda.
RS232 can operate in the same time as the Irda. But in this case, the
baudrate for the RS232 is 9600 Bd
•USB 2.0
Printer class (class 7)
Full Speed
B typ USB Connector
UP-PN-II v0.8 6
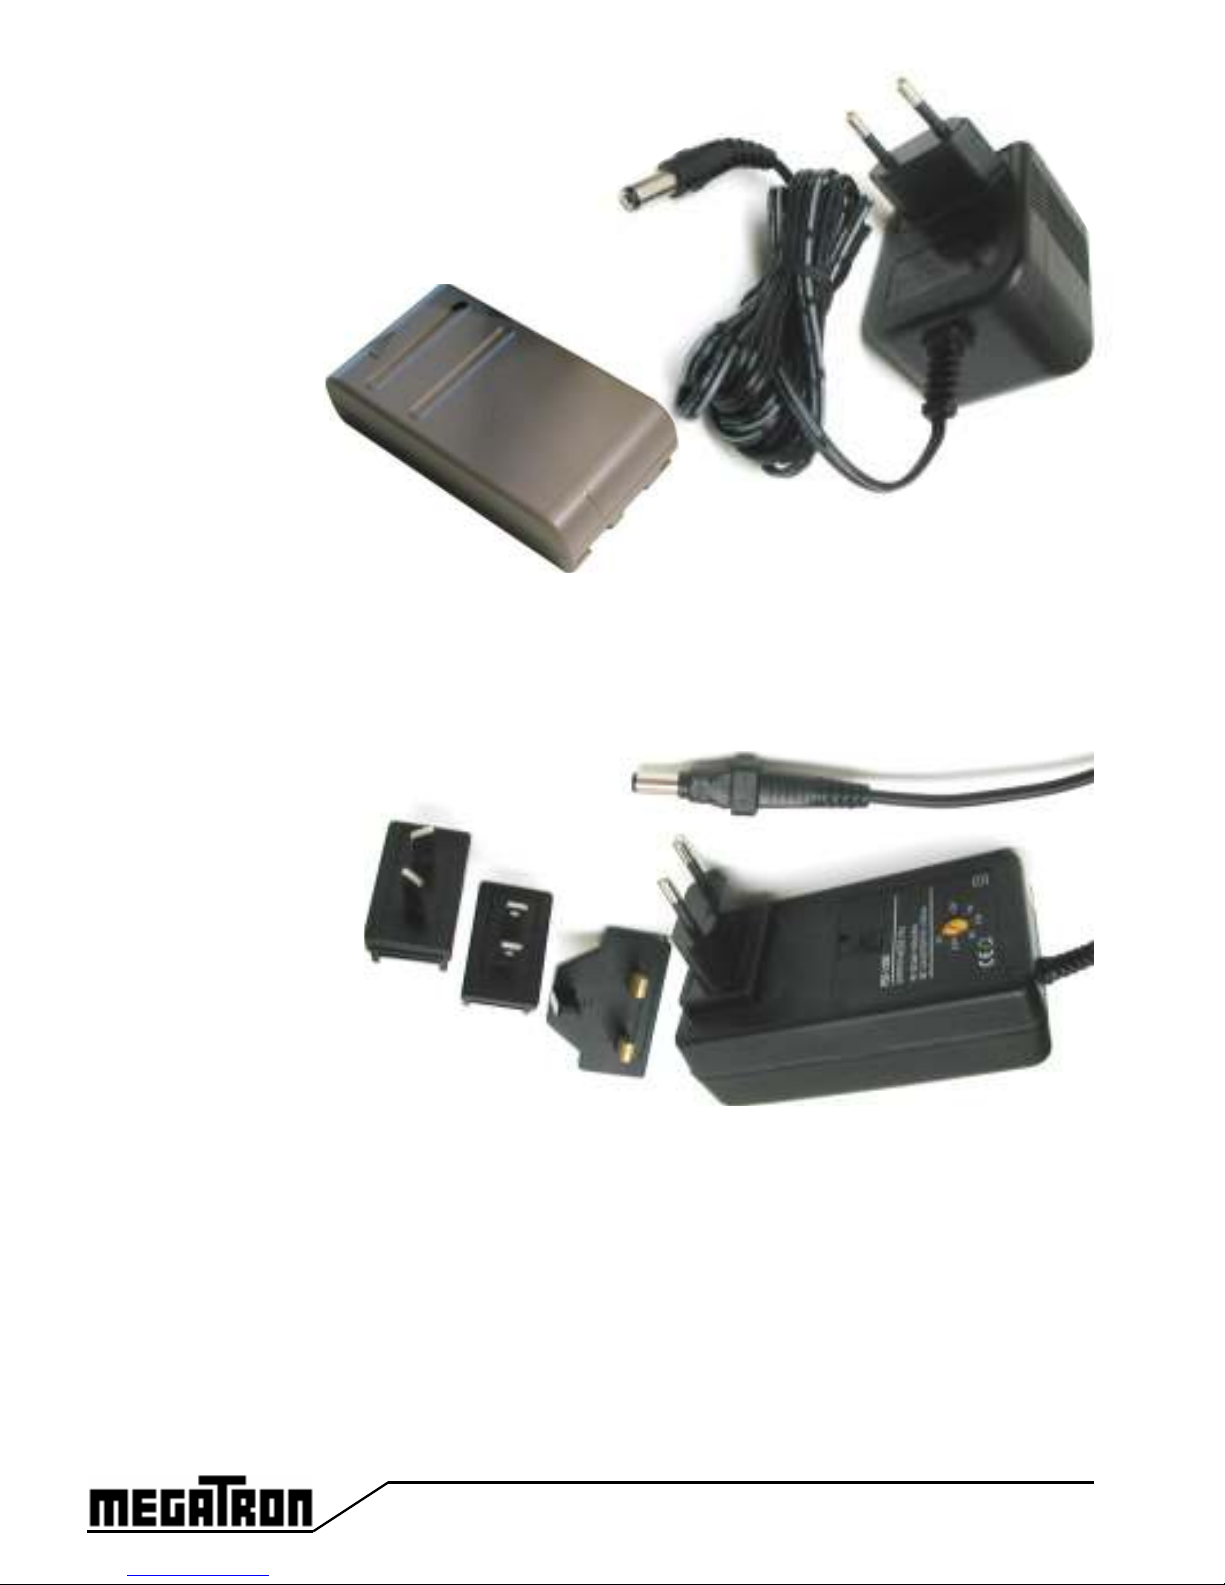
1.7 Power supply
Two kind of power supply are available
UP-PN-II-B Battery and mains charger
•Battery Pack 6VDC 1500mAh.
•DC power plug 9~12VDC / 300mA
UP-PN-II-S operates on mains 100-240 VAC
•DC power plug 6VDC/5A

7 UP-PN-II v0.8
1.8 Power on and auto power off
Push the « on » button for power on.
The shut off can be
•Auto after a programmable delay of inactivity (1 up to 15 minutes)
•Manual after the « on » button is pressed for 5 seconds.
1.9 Environ ental conditions
•Temperature 0~50°C
•Humidity 10~80% RH
1.10 Size
•153(L) × 116(W) × 65(H) mm
1.11 Weight
530g (without the paper roll)

UP-PN-II v0.8 8
Chapter 2 Installation and Operation
2.1 Installation
Overview of the UP-PN-II dot matrix printer is shown figure 2-1
2.2 Connecting the power
Mains version: the printer is not equipped with a battery
A DC power plug is delivered (6VDC/5A).
Battery version: A rechargeable battery is delivered with the printer with a
mains charger. When the charger is connected, the charge begins for 14 hours.
After the first use, we recommend to charge the battery.
Installation of the battery clip the battery in the case below the printer.
You can hear a sound.
Removing the battery press on the plastic bar which is near the battery.
(fig 2.2)
An external charger can be use for fast charging.
Shut off the printer and remove the battery pack
then connect the battery pack to the external
charger.
Warning: The printer can't work if a battery is
not connected.
Figure 2-1 overview of UP-PNII
Bottom case
IrDA window
Output of
paper
ON/OFF
Button
LF button (line
feed)

9 UP-PN-II v0.8
2.3 Loading of paper
Follow these steps
1 Open the case (Fig 2.3 a & b)
2 Place the roll of paper in its clips. Insert the paper in the slot and press « LF »
button until the paper outputs.
3 Close the case (fig 2.3 d)
Battery
Release Bar
Connectors
DC power jack
Serial RJ12
Battery place
Figure 2-2 battery
- +
Figure 2-3 loading of paper
(a) (b)
Ink ribbon
(c) (d)
Paper clips

UP-PN-II v0.8 10
2.4 Replace ent of ink ribbon
The ink ribbon must be replaced when the printing becomes too light. Follow
these steps
1 Open the case
2 Push on the ribbon where it is written. (fig 2.4) and remove the ribbon
3 Place a new one instead. The paper must be inside the ribbon. Turn the little
wheel on the ribbon until the ribbon is tight.
4 Close the case
2.5 Selecting the interface
Use the configuration menu for select IrDA, RS232 or USB 2.0.
1) Serial Interface RS-232C
Set the menu « Printer -> Interface » on « serial »
The whole set of parameter must match the host.
2) Infrared IrDA
Set the menu « Printer -> Interface » on « IrDA/Ser9K6 » or « IrDA/USB »
The baud are automatically adapted to the host.
The protocol supports IrLPT et IrCOMM-3 wire Raw
RS232 baudrate is limited to 9600 Baud
3) USB Interface
Set the menu « Printer -> Interface » on « IrDA/USB ».
Figure 2-4 Ink ribbon

11 UP-PN-II v0.8
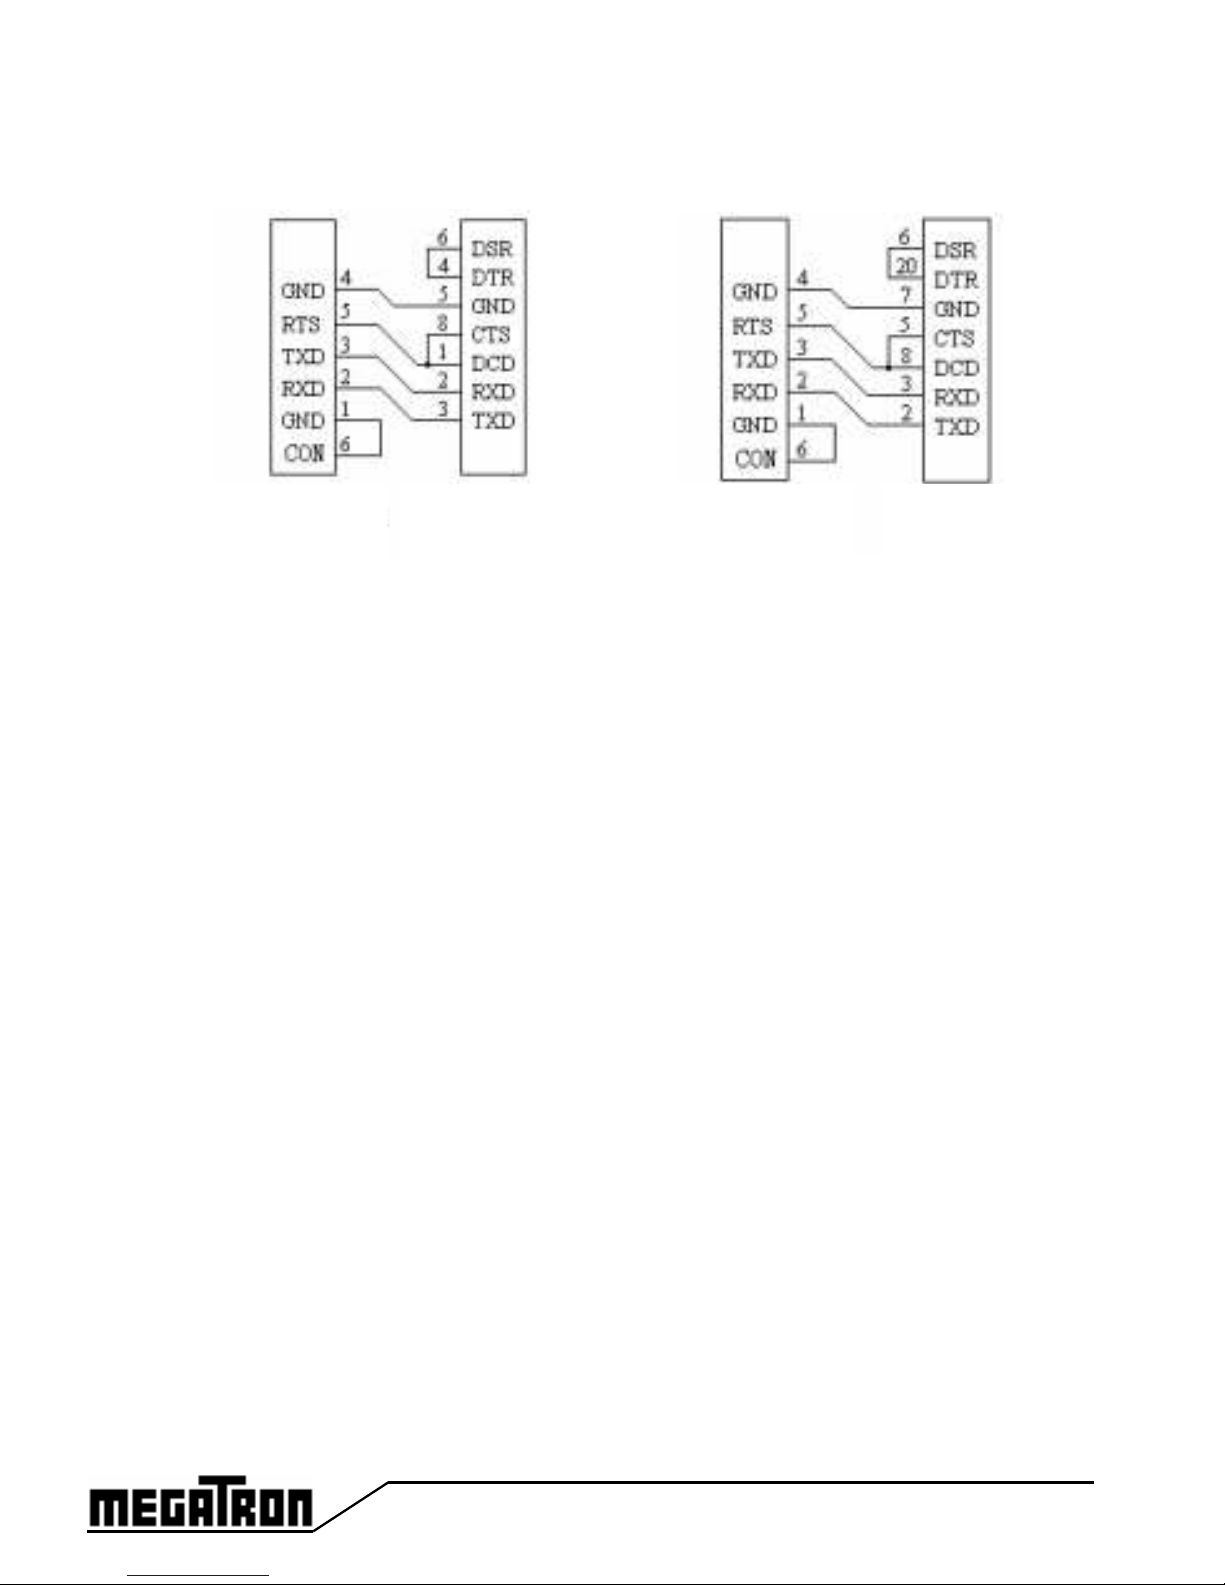
Pin Signal Source Description
1 GND Printer Signal ground
2 RXD Host Printer receiving data sent by host
3 TXD Printer Printer sends data to host
4 GND Printer Signal ground
5 RTS Printer
“Mark” indicates printer is bussy and can't receive data
“Space” indicates printer is ready to receive data
6 - - Not connected
Mark=logic “1”(EIA level -3V~-15V)
Space=logic “0”(EIA level +3V~+15V)
2) Serial port signal definition
2.6.3 RS232 serial connection
UP-PN-II portable printer provides a RS-232C port 6 pins RJ-12
modular jack
1) RJ-12 pin alignment
Figure 2-5 RJ-12
2.6 Interface connection
2.6.1 Interface IrDA
Infrared port IrDA
Classes IrLPT and IrCOMM-3 wire Raw
Distance 1m (max.)
Angle 30°
Note IrDA can operate in the same time as the USB 2.0 and RS232.
In this case, RS232 baudrate is 9600 Bd.
Other parameters are freely configurable.
2.6.2 Interface USB 2.0:
USB 2.0
Printer Class
type B USB connector
UP-PN-II v0.8 12
4) Transmit parameters
Baud 110 to 19200 Baud (9600 at delivery)
Handshake RTS or XON/XOFF
Format 7 or 8 bits , parity no, even ou odd, 1 or 2 stop bits
Connector RJ-12 6 pins
Signal level EIA ±3 ~±15V
3) Connecting with personal computer
Figure 2-6 Connecting with PC
Printer serial
RJ-12 port
PC serial
port DB-9-M
Printer serial
RJ-12 port
DB-25-F
Port série
PC
DKM-275 cable drawing
( not included)
DB-25 male PC cable
13 UP-PN-II v0.8
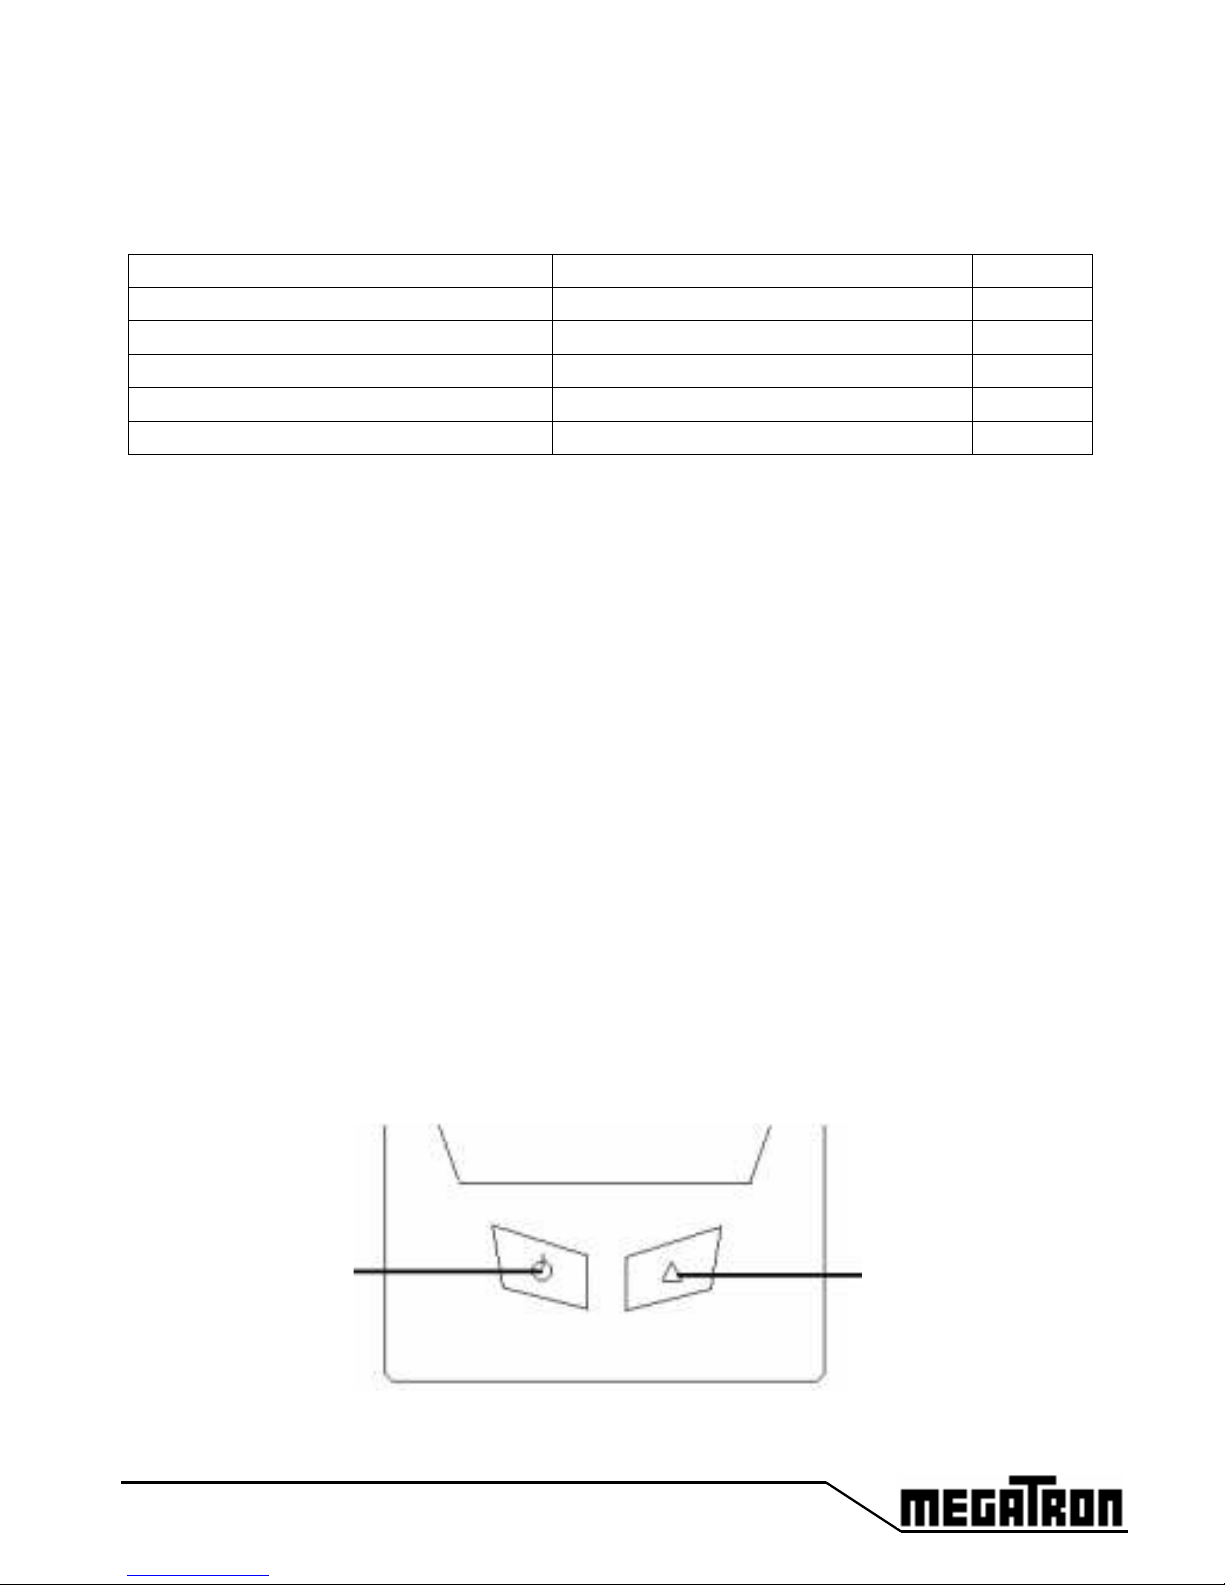
UP-PNII has two buttons « ON » « LF » (see fig 2.8)
(1) Power on Press ON button. The red light blinks.
(2) Shut off Auto after a delay of inactivity (1 up to 15 min), or press « ON » for 5
sec. When the 2 lights blink, release the button. The printer shuts off. You can
inhibit the auto shut off with the menu « Advanced -> Power OFF -> Manual »
(3) Autotest when the printer is off, press and maintain LF, then press ON. When
the print begins, release the buttons. The printer prints a ticket with the
current parameters.
(4) Hex dump when the printer is off, press and maintain LF, then press ON.
When the print begins, maintain the LF until the message « DUMP HEXA
MODE » appears on the paper. Then release LF. The printer is now printing
the received datas in Hex format.
(5) Line feed when the printer works, press LF and the paper goes ahead.
(6) When the printer is on, press simultaneously the two buttons The menu is
entered.
ON button
Green light LF button
Red light
Figure 2-8 Lights & buttons
2.7 Play with buttons & leds
UP-PNII has two leds
•The green one « POWER » blinks when then printer is working
•The red one « FAULT » blinks in case of errors (see table 2.7)
(
on –
off ).
Table 2-7 Error indicator
Meaning
Normal
Paper end
Print Head fault
Battery low
Red led System
No
No
Yes
Yes
Memory fault Yes

UP-PN-II v0.8 14
C
HAPTER
3 M
ENU
Setting of the printer is normally made with the interface (see command ESC "]");
If you can't use this method, the printer can also be set by a printing menu.
Press simultaneously LF & POWER when ON, then the menu is entered.
The text 'MENU ACTIVATED' is printed.
The first group of parameters is printed.
In order to modify the settings, you must navigate in the groups (1), fields (2) and
values (3).
(1) Navigate in the groups:
Short push:
A short push on LF goes to the next group.
A short push on POWER goes to previous.
Every group is printed after a push.
Long push:
A long push on LF enters in a field for the current group.
A long push on POWER quits the group and save settings.
After the last group, the text 'MENU EXITED' is printed. The printer is initalized.
(2) Navigate in the fields:
Short push:
A short push on LF goes to the next field.
A short push on POWER goes to previous.
Every field is printed with its current value.
Long push:
A long push on POWER allows the return to the navigation in the groups.
A long push on LF enters the choice of values for the current field.
(3) Navigate in the values:
Short push:
A short push on LF goes to the next value.
A short push on POWER goes to previous.
The value is printed after a period without any push.
Long push:
A long push on POWER allows the return to the navigation in the fields.
A long push on LF validates the new value. This one is then printed in bold.
The printer returns to the navigation in the field.

15 UP-PN-II v0.8
Q
UICK
E
XPLANATION
OF
PARAMETERS
:
•
Set Clock: (non available, for future option)
•
Printer:
⇒Interface IrDA or RS232 or USB 2.0
⇒Font 2 fonts
⇒Direction Sets the direction of the printing (text or data).
⇒Nat. Chars. Choice of national characters. This is useful for the accent
characters when 7 data bits.
⇒Width Default width of characters.
⇒Height Default height of characters.
⇒Page Length Default page length in lines
⇒Tab Length Default character number between 2 tabulations
⇒GR Hor_Res Zoom factor in graphic mode
•
Serial and Ser9600:
⇒Baud from 110 baud to 19k2 baud
Always 9600 Baud with Ser9600 Menu
⇒Databits 7 or 8
⇒Parity None, Odd, Even
⇒Xon Quantity of XON transmitted at the power on
- Single XON
- Repeat XON (every 300 ms)
•
Advanced :
⇒Compatible ESC/P 9Pins, ESC/P Basic, ESC/P Cust, PCL Raw
⇒Paper end In case of paper end, the printer can
if 'Set Busy', stops the printing and sets RTS.
if 'Fill Buff.', stops the printing, and continues to accept datas until the
buffer is full.
if 'Ignored', continues to print even there is no paper at all.
if 'Warn Host', warns the host and continues the printing
Notes: paper fault : The modes 'Set Busy', 'Fill Buff.' et 'Warn Host'
warn the host by sending the character EM
(19h)
. When fault is cleared,
the printer sends ETB
(17h)
Head fault : Printer sends the character DC2 (18h), sets RTS=BUSY
and sends XOFF). In this case, verify the head (paper jam). A push on
LF may help to reactivate the head. When the fault is cleared, the
character DLE (16h) and XON are emitted, RTS remains to FREE.

UP-PN-II v0.8 16
⇒Power OFF Auto shut off in order to save batteries, or Manual.
⇒Winter/Sum Not available.
⇒Info Stamp Auto print of information after every printed line.
- No Stamp nothing
- Add Date not available
- Add Logo prints logo
(programmable text)
⇒Input Data - Immediate print of datas, or fills in buffer
⇒IrDA Ident Auto-reprogrammation of the Chip MCP2150
for the next Power-On. (Factory use only)
•
Ti er : Event ti er for logo or messages 2 and 3.
⇒Timer Use Enable / inhibit timer at power on
⇒Timer Second Sets timer (from 0 to 59 seconds)
⇒Timer Minute Sets timer (from 0 to 59 minutes)
⇒Timer Hour Sets timer (from 0 to 12 hours)
Caution if values are 0, the timer is inhibited.
⇒Alt Print If n>0, the timer prints n times the message 2,
then once the message 3.
17 UP-PN-II v0.8
M
ENU
PARAMETERS
G
ROUPS
F
IELDS
V
ALUES
Clock Hours
Minutes
Days
Months
Year
Printer
Group 2
1 Interface Serial, IrDA/Ser9k6, IrDA/USB
2 Font Std_6x10 (Font 1), Std_10x10 (Font 2)
3 Direction TEXTMODE, DATAMODE
4 Nat. Chars USA, FRA, GER, ENG, DK1, SWE,
ITA, SPA, JAP, NOR, DK2, NDL
5 Width Width x1, Width x2
6 Height Height x1, Height x2
7 PageLength 1 - 255, défaut 10
8 Tab Length 1 - 16, défaut 6
9 Gr.Hor_Res No Zoom, Zoom x2, Zoom x4
Serial
Group 3
1 Baud Ser 110, 150, 300, 600, 1200,
2400, 4800, 9600, 19k2
2 Databits 7 databits, 8 databits
3 Parity No, Even, Odd parity
4 Xon Single Xon, Repeat Xon
Ser.9600
Group 4
2 Databits 7 databits, 8 databits
3 Parity No, Even, Odd parity
4 Xon Single Xon, Repeat Xon
Advanced
Group 5
1 Compatible ESC/P Basic, ESC/P 9 pins,
ESC/P Cust, PCL Raw
2 No Paper Fill Buff., Set Busy, Ignored, Warn Host
3 Power OFF 1mn, 2mn, 3mn, 4mn, 5mn, 10mn, 15mn, Manual
4 Winter/Sum Disabled, Enabled
5 Info Stamp No Stamp, Add Date, Add Logo
6 Input Data Print Imm., Buff>Print
7 IrDA Ident Disabled, Enabled
Timer
Group 6
1 Timer Use Disabled, Enabled
2 Timer Second 0..59 seconds
3 Timer Minute 0..59 minutes
4 Timer Hour 0..12 hours
5 Alt. Print 0..255
Clock Option is not available in this printer.
All settings are without effect.
UP-PN-II v0.8 18
C
HAPTER
4
FONTS
&
CONTROL
CODES
4.1 D
RIVER
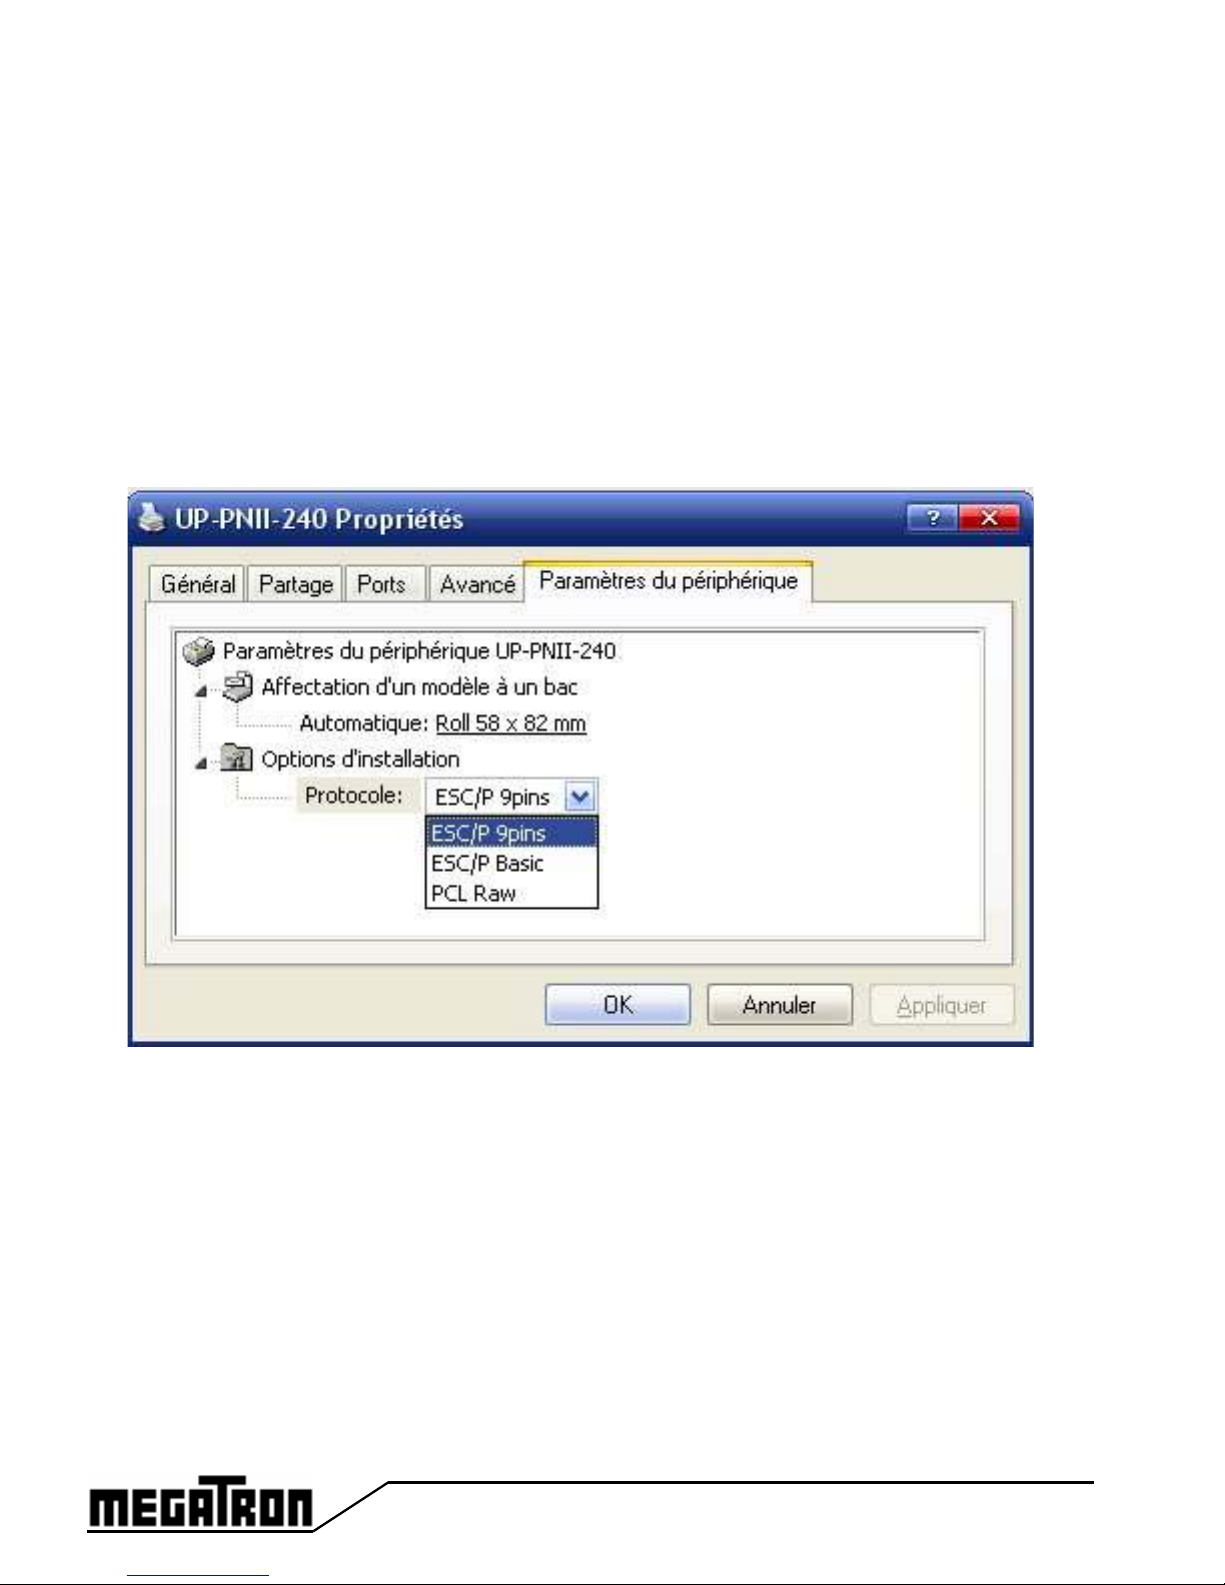
Windows 2000 & XP A driver is available on our internet site
http //www.megatron.fr.
Since this driver is not signed, you must accept the installation.
In the folder Para eter, you must select the kind of compatibility that you want
(ESC/P 9pins, ESC/P Basic or PCL Raw)
This parameter must match the one chosen in the menu
Advanced->Co patible of the printer.
For other OS, you can try some drivers for EPSON 9 pins or HP PCL, and
setting the printer accordingly.
19 UP-PN-II v0.8
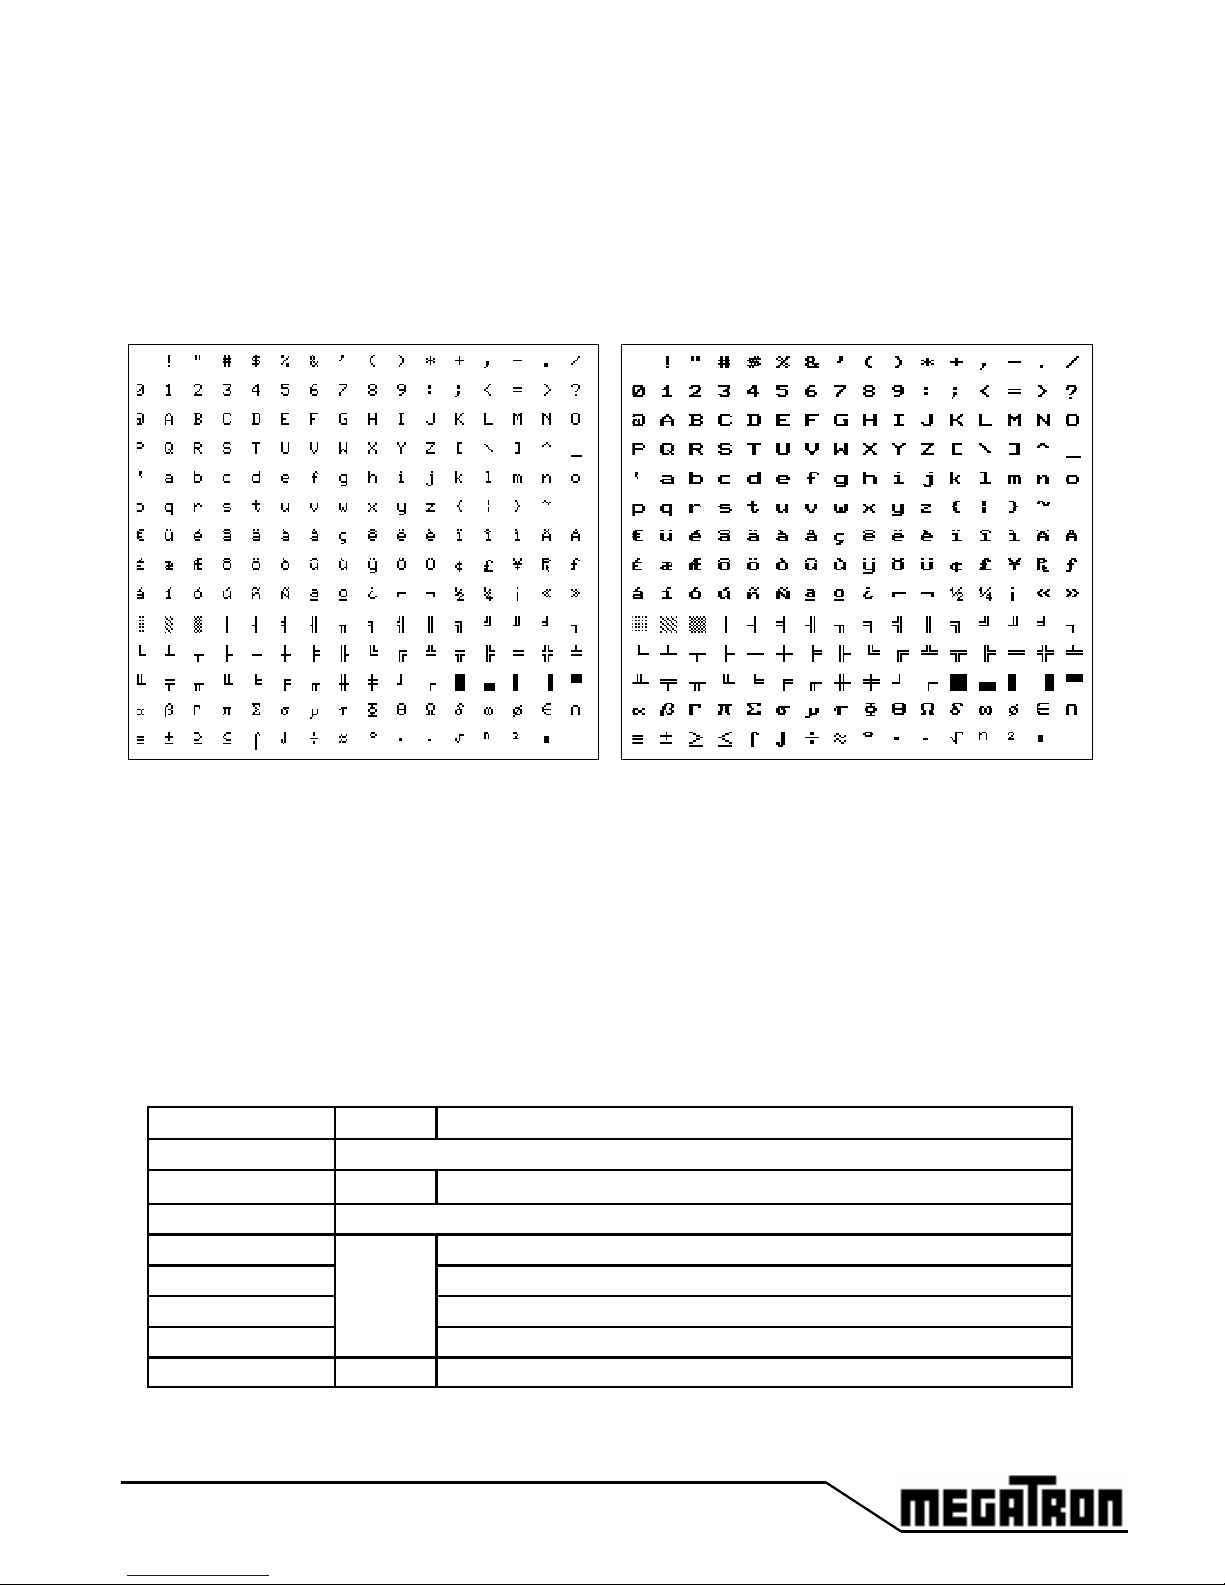
Font 1 Std_6x10
4.2 C
HARACTER
S
ETS
Two complete sets of 255 IBM-II characters are available in ROM as well as na-
tional characters. Characters exist in 6x10 and 10x10 matrix allowing 40 or 24
characters by line with uppercase and lowercase letters.
The selection of national characters is done by software or by the configuration
menu.
Font 2 Std_10x10
Mnenonics Hex PCL codes available
ESC "&" 1B 26
ESC "&" a # H
Horizontal position
ESC "*" 1B 2A
ESC "*" b # W Graphics printing
ESC "*" b # M Selection of compression algorithm (without, Run Length, Tiff)
ESC "*" r # T Page length
ESC "*" p # X Page width
ESC "E" 1B 45 Soft reset
4.3 C
ONTROL
CODES
PCL R
AW
The compatibility PCL Raw has been implemented in order to allow the printer to
work with computers. Only the graphic functions are implemented. The other
control codes are ignored. The compression algorithms Run Length and Tiff are
supported. Delta Row will be available as soon as possible.

UP-PN-II v0.8 20
4.4 C
ONTROL
CODES
ESC/P 9 PINS
The compatibility ESC/P 9 PINS has been implemented in order to allow the
printer to works with computers. Only the graphic functions are implemented.
The other control codes are ignored. The codes implemented are shown with a
mark in the column ‘9 Pin’ of the table.
4.5 C
ONTROL
CODE
ESC/P B
ASIC
Only the ESC/P Basic codes are detailed in the next pages. These codes are
less compatible with ESC/P, but they give some functions more specific to the
printer. Most of these codes work same way as 9 pins.
Attention, Major difference in graphic:
The graphic modes are very similar, but the function of the CR at the end
of the graphic is different
•for ESC/P Basic, the code CR makes a line feed like a LF code.
•for ESC/P 9 pins, the code CR makes only a carriage return without any
line feed.
The characters with their ASCII values between 01 hex and 1F hex are control
characters and are not printable. These characters allow to modify the behaviour
of the interface (control characters). .
Table of contents
Other Megatron Printer manuals

Megatron
Megatron PORTI-T380 User manual

Megatron
Megatron GeBE-COMPACT Plus User manual

Megatron
Megatron WSP-R241 User manual

Megatron
Megatron WSP-i350 User manual

Megatron
Megatron WSP-i250 User manual

Megatron
Megatron WSP-CP260 User manual

Megatron
Megatron MRSi-x200 User manual

Megatron
Megatron TP UP-NH User manual

Megatron
Megatron WSP-R240 User manual

Megatron
Megatron MTH-2500 User manual


