MEI PTC 4020 User manual

MANUAL DE INSTRUÇÕES / INSTRUCTION MANUAL
AQUECEDOR CERÂMICO E VENTILADOR
CERAMIC HEATER AND VENTILATOR
PTC 4020

2

3
CONTEÚDO/CONTENT
PORTUGUÊS
INSTRUÇÕES DE SEGURANÇA ............................................................................................................ 5
INSTRUÇÕES ESPECIAIS DE SEGURANÇA .......................................................................................... 5
DESCRIÇÃO DOS COMPONENTES ..................................................................................................... 6
NOTAS DE UTILIZAÇÃO ....................................................................................................................... 7
Desembalar o aparelho ................................................................................................................ 7
Ligação elétrica ............................................................................................................................. 7
INSTRUÇÕES DE FUNCIONAMENTO ................................................................................................... 7
Modo aquecimento (Botão ON/OFF) .......................................................................................... 7
Regular a temperatura (Botão TEMP) .......................................................................................... 8
Modo de ventilação ..................................................................................................................... 8
Oscilação (Botão SWING) ............................................................................................................. 8
Temporizador (Botão TIMER) ......................................................................................................... 8
Bloqueio do visor ............................................................................................................................ 9
Ligar/desligar o visor ...................................................................................................................... 9
Fim de operação ........................................................................................................................... 9
LIMPEZA E MANUTENÇÃO .................................................................................................................. 9
Armazenamento .......................................................................................................................... 10
ESPECIFICAÇÕES TÉCNICAS ............................................................................................................ 10
GARANTIA ........................................................................................................................................ 11
SIGNIFICADO DO SÍMBOLO “CONTENTOR DO LIXO” .................................................................... 11
ENGLISH
SAFETY INSTRUCTIONS ...................................................................................................................... 13
SPECIAL SAFETY INSTRUCTIONS ....................................................................................................... 13
OVERVIEW OF THE COMPONENTS ................................................................................................... 14
GENERAL OPERATING NOTES ........................................................................................................... 15
Unpacking .................................................................................................................................... 15
Electric connection ...................................................................................................................... 15
WORKING INSTRUCTIONS ................................................................................................................. 15
Heating mode (ON/OFF button) ................................................................................................ 15
Temperature selector (TEMP button) .......................................................................................... 16

4
Fan mode ..................................................................................................................................... 16
Swing ............................................................................................................................................. 16
Timer .............................................................................................................................................. 16
Display Lock .................................................................................................................................. 17
Turn the display on/off ................................................................................................................. 17
End of operation .......................................................................................................................... 17
CLEANING AND MAINTENANCE ...................................................................................................... 17
Storage ......................................................................................................................................... 18
TECHNICAL ESPECIFICATIONS ......................................................................................................... 18
WARRANTY ........................................................................................................................................ 19
DISPOSAL: MEANING OF THE DUSTBIN SYMBOL .............................................................................. 19

5
INSTRUÇÕES DE SEGURANÇA
Leia atentamente o manual de instruções do aparelho antes de colocá-lo em
funcionamento. Guarde o manual em local seguro juntamente com o talão de compra, e
se possível com a caixa original.
AVISO: Este aparelho foi concebido apenas para utilização directa em tomadas de
utilização doméstica, devidamente instaladas e com ligação terra.
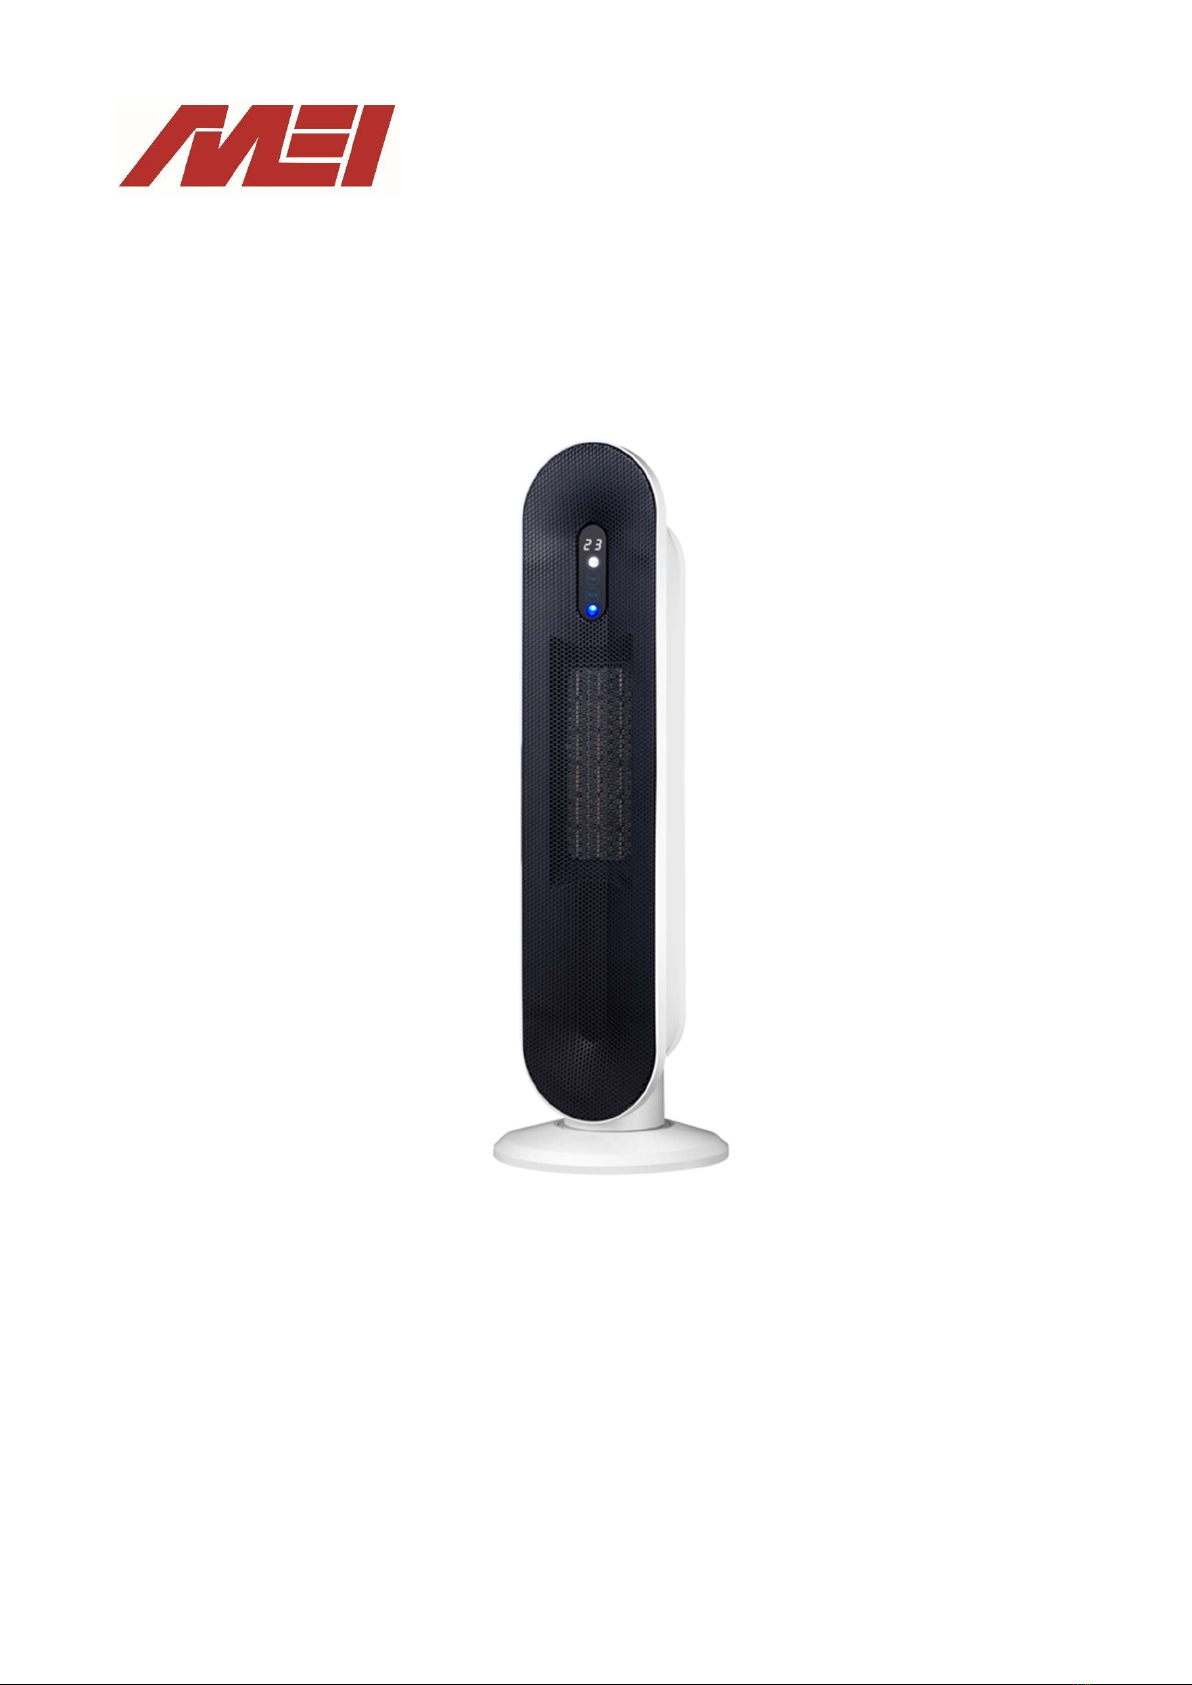
Este aparelho foi desenhado exclusivamente para utilização doméstica e para a aplicação
prevista, não sendo por isso adequado a utilização comercial. Utilize este termoventilador
unicamente em espaços interiores. Mantenha-o afastado de fontes de calor, luz directa do
sol, humidades (NUNCA derrame líquidos em cima do aparelho). Não manuseie o aparelho
com mãos molhadas. No caso do aparelho se encontrar com qualquer tipo de líquido ou
humidade, retire-o imediatamente da tomada.
Durante a sua limpeza, mantenha o aparelho desligado. No caso de não utilizar o aparelho
por um longo período de tempo, é aconselhável desligá-lo e guardá-lo juntamente com os
seus acessórios em local seguro.
Não deixe o aparelho em funcionamento sem supervisão muitas horas nem saia de casa
sem desligar o aparelho. Verifique com regularidade se o aparelho possui alguma avaria ou
dano. Nunca o utilize quando detectada alguma avaria.
Em caso de avaria técnica, não tente repará-lo sozinho. Contacte um técnico
especializado para efectuar as reparações necessárias. Devem serem apenas utilizadas
peças originais no aparelho.
Para a segurança das crianças, deve manter afastados todos os acessórios de embalagem
(plásticos, caixas, esferovite, etc.) uma vez que poderão tornar-se perigosos – risco de
sufocação.
A fim de proteger as crianças de perigos inerentes de equipamentos eléctricos, certifique-se
de que o aparelho é utilizado apenas sob supervisão. O artigo só poderá ser utilizado por
pessoas com capacidades físicas, motoras e psicológicas reduzidas ou sem experiência,
caso lhes sejam dadas as devidas instruções de utilização e as mantenha sob supervisão.
INSTRUÇÕES ESPECIAIS DE SEGURANÇA
ATENÇÃO: Não ligue o aparelho em extensões, temporizadores, nem ligue nenhum outro
aparelho ao mesmo circuito. Pode resultar em sobreaquecimento, mal funcionamento,
danos, ferimentos graves ou morte, caso não cumpra as devidas instruções especiais de
segurança.
AVISO: O aparelho fica quente durante a sua utilização. Não toque nas superfícies do
aparelho durante a sua utilização.

6
O aparelho não deve ser coberto com roupas ou objectos, poderá provocar
sobreaquecimento.
Mantenha uma distância de 1 metro em relação a objectos inflamáveis como móveis e
cortinas.
Atenção ao local seleccionado para colocar o aparelho! Certifique-se de que o coloca
num local sem qualquer obstrução, pois pode causar danos no aparelho ou choque
eléctrico e incêndio.
Tenha o cuidado de não colocar quaisquer objectos nos orifícios do aparelho.
Deixe arrefecer o aparelho antes de o guardar. Retire sempre a ficha da tomada quando
não estiver em utilização.
Não utilize o aparelho nas proximidades de uma banheira, duche ou piscina ou de outros
locais com água.
O ar que sai do aparelho está quente, não deixe as crianças brincarem nas suas
proximidades sem vigilância!
Para desligar o aparelho desligue primeiro no botão e depois retire a ficha da tomada.
DESCRIÇÃO DOS COMPONENTES
Saída de ar
Entrada de ar
Botão ligar/desligar
Painel de
controlo digital
Saída de ar

7
NOTAS DE UTILIZAÇÃO
Desembalar o aparelho
Retire o artigo da caixa e todo o seu conteúdo de embalamento.
Verifique se o conteúdo está completo e em condições. Caso encontre o aparelho
danificado ou incompleto, não coloque o aparelho em funcionamento. Devolva
imediatamente ao seu distribuidor.
Ligação elétrica
Antes de ligar o aparelho à tomada verifique se a tensão de rede que vai usar
corresponde à do aparelho. Consulte as características técnicas.
CUIDADO! Perigo de sobrecarga! Este aparelho é muito potente, não o coloque em
funcionamento em tomadas múltiplas ou extensões.
Ligue o aparelho apenas a uma tomada corretamente instalada e com ligação à
terra.
INSTRUÇÕES DE FUNCIONAMENTO
1. Insira a ficha do aparelho na tomada.
2. Ligue o botão que encontra na parte traseira do aparelho. Ouve-se um sinal
sonoro e o visor acende-se, mostrando a temperatura ambiente. O aparelho
encontra-se em standby.
3. Pressione o botão ON/OFF para ligar o aparelho.
NOTA: O painel funciona com botões touch. Cada vez que pressiona um dos botões é
emitido um sinal sonoro.
Modo aquecimento (Botão ON/OFF)
4. Execute os pontos anteriores do 1 ao 3.
5. Pressione 1x o botão ON/OFF para iniciar o modo de aquecimento baixo. O botão
fica aceso a azul.
6. Para colocar em modo de aquecimento alto, pressione novamente o botão
ON/OFF para colocar e o botão fica aceso a vermelho.
7. Pressionando novamente o botão ON/OFF o modo de aquecimento desliga-se, e
o aparelho volta ao modo de standby.

8
Regular a temperatura (Botão TEMP)
Em qualquer modo de funcionamento, pode pressionar o botão da temperatura TEMP.
Pressione o botão TEMP 1x. O símbolo aparece no visor e os números começam a
piscar. A temperatura que aparece por defeito são 25ºC.
Pressione repetidamente o botão da temperatura para aumentar a temperatura até
ao máximo de 40ºC, e após este valor a temperatura continua a partir dos 15ºC.
Após definir a temperatura, se não pressionar mais nenhum botão dentro de 3
segundos, o visor pisca 3 vezes e a temperatura exibida irá ser a que ficará
selecionada.
Se definir a temperatura 2 ou 3ºC acima da temperatura ambiente, o aparelho irá
funcionar em modo de aquecimento baixo. Se a temperatura definida for 4ºC acima
da temperatura ambiente, ou superior, o aparelho irá funcionar em modo de
aquecimento alto.
No caso de a temperatura ser igual, inferior ou 1ºC acima da temperatura ambiente,
o aparelho apenas irá funcionar com o modo de ventilação.
Modo de ventilação
Para colocar o aparelho a funcionar apenas como modo de ventilação, selecione, com o
botão TEMP, a temperatura igual ou inferior à temperatura ambiente indicada no visor.
Oscilação (Botão SWING)
Poderá optar por ativar o modo de oscilação ao pressionar o botão SWING. O botão
fica iluminado.
Volte a pressionar o botão SWING para parar o modo de oscilação.
NOTA: O aparelho irá parar imediatamente na posição em que se encontrar. Não tem uma
posição fixa de retorno.
Temporizador (Botão TIMER)
Durante o funcionamento, pressione o botão TIMER para ativar o temporizador. O
botão fica iluminado.
Cada vez que pressionar o botão TIMER aumenta, em intervalos de 1 hora o número
de horas até o aparelho se desligar automaticamente.

9
Bloqueio do visor
Em standby ou durante o funcionamento, pressione em simultâneo os botões TEMP e
TIMER cerca de 3 segundos. Será emitido um aviso sonoro.
O visor fica bloqueado em todas as funcionalidades.
Volte a pressionar os botões TEMP e TIMER cerca de 3 segundos para desativar o
modo de bloqueio.
Ligar/desligar o visor
Com o aparelho em funcionamento, mantenha pressionado o botão de oscilação
SWING. O visor desliga-se e o aparelho mantém-se em funcionamento.
Para voltar a ativar o ecrã, pressione qualquer botão.
Fim de operação
Para desligar o aparelho, pressione o botão ON/OFF até o mesmo se apagar.
O aparelho continua a ventilar durante 15 segundos, fazendo o arrefecimento, e no
visor aparece a contagem decrescente até se desligar.
O aparelho emite um aviso sonoro ao desligar-se.
LIMPEZA E MANUTENÇÃO
AVISO: Retire sempre a ficha da tomada antes de limpar e espere até que o aparelho
tenha arrefecido. Não mergulhe o aparelho em água! Isto poderá resultar num choque
eléctrico ou incêndio.
CUIDADO: Não utilize qualquer escova de arame ou outros objectos abrasivos. Não use
detergentes abrasivos ou ácidos.
Limpe as entradas de ar regularmente, com um aspirador (com utilização regular,
pelo menos duas vezes ao ano).
Poderá limpar o exterior do aparelho com um pano macio.
Para remover nódoas ou sujidade persistente, humedeça ligeiramente um pano com
água. Preste especial atenção para que não entre humidade para o interior do
aparelho.

10
Armazenamento
Limpe o aparelho como descrito e deixe-o completamente seco.
Recomendamos guardar o aparelho na embalagem original se não o quiser usar por
longos períodos de tempo. Guarde sempre o aparelho fora do alcance das crianças
num local bem ventilado e seco.
ESPECIFICAÇÕES TÉCNICAS
Modelo PTC 4020
Alimentação 220-240 V, 50/60 Hz,
Potência de consumo 1300/2000 W
Classe de proteção II

11
GARANTIA
Este aparelho foi devidamente testado de acordo com as normas da UE. Durante o período
de garantia (36 meses a partir da data do talão de compra), procederemos à reparação
ou, segundo a nossa decisão, à substituição – das deficiências do aparelho ou dos
acessórios que provenham de erros de material ou de fabricação. A prestação de serviços
relacionados com a garantia não prolongará a mesma, nem iniciará um novo prazo de
garantia! O talão de compra constituirá prova desta garantia. Sem o mesmo, não será
possível proceder-se a qualquer troca ou reparação gratuita. Em caso de garantia,
entregue o aparelho completo, juntamente com o talão de compra, na loja onde o mesmo
foi comprado. Danos causados por quebras de peças de vidro ou de plástico terão de ser
pagos pelo cliente. Não estão incluídos na garantia quaisquer defeitos de acessórios ou de
peças que se desgastem, nem a limpeza, a manutenção ou a substituição de peças que se
desgastem, devendo tais despesas ser suportadas pelo cliente. A garantia terminará sempre
que tenha havido intervenção alheia nos aparelhos, por técnicos autorizados pela MEI
Europa.
Após a expiração do prazo de garantia, poderão ser efectuados arranjos por pessoal
especializado, ou pelos nossos serviços de reparações, mediante aprovação de
orçamento.
SIGNIFICADO DO SÍMBOLO “CONTENTOR DO LIXO”
Poupe o nosso meio ambiente, não deite aparelhos eléctricos para o lixo
doméstico.
Dirija-se aos locais destinados à recolha especial de aparelhos eléctricos e
entregue aí os aparelhos que não pretende continuar a utilizar.
Desta forma, contribuirá para ajudar a evitar os potenciais efeitos perniciosos que um falso
depósito de objectos usados terão, tanto no que diz respeito ao ambiente, como à saúde
humana. Dará igualmente a sua contribuição para o reaproveitamento de materiais, para
a reciclagem e outras formas de aproveitamento de aparelhos eléctricos e electrónicos
usados. Receberá, nas autarquias e juntas de freguesia, informações sobre os locais onde
poderá entregar tais aparelhos.
MEI EUROPA LDA
Linha Verde: 800 200 092
Website: www.mei.pt

12

13
ENGLISH
INSTRUCTION MANUAL
CERAMIC HEATER AND VENTILATOR
PTC 4020
SAFETY INSTRUCTIONS
Read the operating instructions carefully before putting the appliance into operation and
keep the instructions including the receipt and, if possible, the box with the internal packing.
If you give this appliance to other people, please also pass on the operating instructions.
WARNING: The appliance was designed ONLY to use directly on safety installed sockets with
earth connection.
The appliance is produced for private use ONLY and for the envisaged purpose. This
appliance is not fit for commercial/intense use. Do not use it outdoors. Keep it away from
heat, direct sunlight, humidity (never dip it into any liquid) and sharp edges. Do not handle
the device with wet hands. If the device is humid or wet, unplug it immediately. When
cleaning or putting it away, switch off the appliance and always pull out the plug from the
socket (pull the plug itself, not the lead) if the appliance is not being used and remove the
attached accessories. Do not operate the device without supervision. If you leave the room
you should always turn the appliance off. Remove the plug from the socket. The appliance
and the mains lead have to be checked regularly for signs of damage. If damage is found
the appliance must not be used. Use only original spare parts.
SPECIAL SAFETY INSTRUCTIONS
ATTENTION: Do not plug the appliance directly to extensions cords, temporizers, neither
connect other appliance to the same circuit. This can result in overheating, malfunctioning,
damages, serious injuries or death, in case the following special safety instructions are not
followed.
WARNING: In order to prevent overheating, the fan heater must not be covered.

14
WARNING: Some parts of the product can become very hot and cause burns. Avoid contact
with the skin.
This appliance can be used by children aged from 8 years and above and persons with
reduced physical, sensory or mental capabilities or lack of experience and knowledge only if
they have supervision or instruction concerning use of the appliance in a safe way and
understand the hazards involved. Cleaning and user maintenance shall not be made by
children without supervision.
Please keep a safety distance of at least 1m between all sides of the device and furniture
and other objects. Do not insert any objects into the fan heater. Ensure that a safety distance
is maintained between the power cord and the housing.
Do not use the fan heater in close proximity to bathtubs, showers or swimming pools.
Do not repair the appliance by yourself. Always contact an authorized technician. If the
supply cord is damaged, it must be replaced by the manufacturer, its service agent or
similarly qualified persons in order to avoid a hazard.
OVERVIEW OF THE COMPONENTS

15
GENERAL OPERATING NOTES
Unpacking
Remove all packaging materials and all its content.
Make sure that the appliance is complete. In you find it damage or incomplete, do
not operate it. Return to your supplier immediately.
Electric connection
Before connecting the device to the socket, check that the mains voltage you are
going to use corresponds to that of the device. Consult the technical characteristics.
WARNING! Overload hazard! This appliance is very powerful, do not use it in multiple sockets
or extension cords.
Only connect the device to a properly installed and earthed socket.
WORKING INSTRUCTIONS
1. Insert the appliance plug into the socket.
2. Turn on the key on the back side of the appliance. The display turns on and shows
the room temperature. The appliance is now on standby mode.
3. Press the ON/OFF key button to turn on the appliance.
NOTE: The display has a touch display. Each time you press on of the key a beep will sound.
Heating mode (ON/OFF button)
4. Press the ON/OFF button once, to turn on he low heating mode. The button lights
up on the display, turning blue.
5. Press again the ON/OFF button to put on high heating mode. The button lights up
on the display, turning red.
6. If you press the third time the ON/OFF button, the heating mode turns off, and the
appliance returns to standby mode.

16
Temperature selector (TEMP button)
During any working mode, you can press the TEMP button.
Press the TEMP button once. The symbol appears on the display and the numbers start
to blink. By default, the temperature that appears is 25ºC.
Press repeatedly the temperature key to increase the temperature till maximum of
40ºC, after that the temperature continues starting from 15ºC.
If you don't press any key within 3 seconds, the final temperature in the display is your
set temperature.
If the set temperature is 2 or 3ºC higher than the ambient temperature, the appliance
will work on low heating mode. If the set temperature is 4ºC higher than the ambient
temperature, the appliance will work on high heating.
If the displayed setting temperature is the same, lower or only 1ºC higher than the
ambient temperature, the product will only work on fan mode.
Fan mode
To put the appliance on working on fan mode, select with the TEMP button, the temperature
less or the same as the ambient temperature indicated on the display.
Swing
You can choose to activate the swing mode by pressing the SWING key. The button
lights up on the display.
Press again the key to stop the swing mode.
NOTE: The appliance will immediately stop in any position it is faced. There is no return fixed
position.
Timer
While working press the TIMER key to activate the timer. The TIMER key button lights up
on the display.
Each time you press the key, it increases in 1-hour intervals, the number of hours till the
appliance turns off automatically.

17
Display Lock
During standby or working mode, press simultaneous the TEMP and TIMER keys of 3
seconds. You will hear a beep.
The display is now locked of the functions.
Press again the TEMP and TIMER keys of 3 seconds, to unlock the display.
Turn the display on/off
While working, keep pressed the SWING button. The display lights off and the
appliance keeps working.
Press any key to turn on the display again.
End of operation
To end the operation, press the ON/OFF button till the light turns off.
The appliance continues to ventilate for 15 seconds, cooling down, on the display
there is a countdown till turning off.
A beep will sound.
CLEANING AND MAINTENANCE
WARNING: Always remove the mains lead before cleaning! Wait until the appliance has
cooled down completely. Under no circumstances should immerse the appliance in water.
Otherwise, this might result in an electric shock or fire.
CAUTION: Do not use a wire brush or any abrasive items. Do not use any acidic or abrasive
detergents.
Clean the air inlets regularly with a vacuum (with regular using, at least twice a year).
Wipe off the fan heater with a dry cloth to remove dust.
To remove stains or stubborn dirt, lightly dampen a cloth with water. Pay particular
attention to ensure that no moisture enters inside of the appliance.

18
Storage
Clean the appliance as described and let it dry completely.
We recommend keeping the appliance in its original package if it’s not going to be
used for long periods of time.
Always keep the appliance in a dry and safe place out of children reach.
TECHNICAL ESPECIFICATIONS
Model PTC 4020
Power supply 220-240 V, 50/60 Hz
Power consumption 1300/2000 W
Protection class II

19
WARRANTY
This appliance has been properly tested to the EU standards. During the warranty period, we
will proceed to the free removal - for repair or, in our decision, for replacement - of defects in
the device or accessories that may arise from material or manufacturing errors. The provision
of warranty services will not extend it, nor will they start a new warranty period! The purchase
receipt will consist of proof of this guarantee. Without it, it will not be possible to make any
free exchange or repair.
In the event of a warranty, please return the complete appliance together with the
purchase receipt to the store where it was purchased. *) In the event of damage to any
accessories, a complete replacement of the appliance will not be carried out automatically.
Contact our green phone in this case. Damage caused by broken glass or plastic parts will
have to be paid by the customer. No defects in accessories or wearing parts, or cleaning,
maintenance or replacement of wearing parts are included in the warranty, and such costs
must be reimbursed. The guarantee will be terminated whenever there has been
interference on the equipment.
After warranty period expiration, fixings may be made by specialized personnel or by our
repair services after budget approval and pre-payment received.
DISPOSAL: MEANING OF THE DUSTBIN SYMBOL
Protect our environment: do not dispose of electrical equipment in the
domestic waste. Please return any electrical equipment that you will no
longer use to the collection points provided for their disposal. This helps
avoid the potential effects of incorrect disposal on the environment and
human health. This will contribute to the recycling and other forms of reutilization of electrical
and electronic equipment. Information concerning where the equipment can be disposed
of can be obtained from your local authority.
MEI EUROPA LDA
Free Line: 800 200 092
Website: www.mei.pt

20
Table of contents
Languages:
Other MEI Heater manuals