Merck Millipore Auto2D User manual

1
20424817 Rev 06/21
SigmaAldrich.com
English . . . . . . . . . . . . . . . . . . . . . . . 2
Français (French) ................7
Español (Spanish) ..............13
Nederlands (Dutch) .............19
Deutsch (German) ..............25
Italiano (Italian) ...............30
日本語 (Japanese) ...............36
中文 (Chinese) .................41
Korean) .................46
Product Ordering ...............51
Quick Start Guide
Auto2D®Mode
(original)
BM-100

2 3
20424817 Rev 06/21 20424817 Rev 06/21
English English
English
Intended Use
The Auto2D
®
Electrophoresis Device fully
automates the process of 2D electrophoresis,
separating proteins first by isoelectric point and
second by molecular weight. Complete protein
separation is achieved in just two hours.
Contents
• Auto2D®Electrophoresis Device
• Electrical Power Cables:
• Power cable for JP
and North America
• 3P-2P Conversion Plug
for JP and North America
• Power cable for Europe
• Power cable for China
• Power cable for UK
Also Needed (not included)
See Product Ordering on p. 51 for
catalogue numbers.
• Auto2D®Electrode Chip
• Auto2D®PAGE Chip
• Auto2D®IEF Chip
• Auto2D®Solution Chip
• Auto2D®Tris-Glycine or Tris-Tricine
Reagent Kit
• Ampholyte (choose appropriate
ampholyte based on IEF Chip pH range)
• Distilled water
User Guide Online
The complete User Guide includes detailed
instructions and recipes. It can be downloaded
from the Auto2D®Device product page at
SigmaAldrich.com.
Storage and Stability
The Auto2D®device should be used/stored
indoors only. See each component’s product
label for storage requirements.
YYPrecautions
For research use only.
Please read the Safety Sheet (enclosed) and
the complete User Guide at SigmaAldrich.com
carefully before using this product.
Auto2D®Workflow
Total process: 100–155 minutes
(depending on the recipe)
Sample Preparation
Removal of Impurities
Addition of Reagents
Sample Loading
and Gel Rehydration
First Dimension:
Isoelectric focusing
SDS Equilibration
Second Dimension:
SDS-PAGE
Detection
30 Minutes
5 Minutes
30 Minutes
30 Minutes
5 Minutes
Preparation
Reagents
1. Prepare and store Reagent Kits as
directed in the literature provided with the
kits, or the complete User Guide (online).
2. Allow the following products stored at
low temperatures to equilibrate to room
temperature (20–25 °C approximately
10 minutes).
• IEF Chip
• PAGE Chip
• Rehydration Solution
• DTT Solution
• Ampholyte
3. Prepare Working Rehydration Solution
for rehydration of IEF Chip and
extraction/dilution of protein sample:
Reagents Volume
Final
Concentration
Rehydration
Solution 189 µL
DTT Solution
(1M) 10 µL 50 mM
Ampholyte* 1–2 µL 0.5–1% v/v
Total 200 µL
* Select ampholyte according to the range
of IEF Chip used. For ampholytes at
40% w/v stock concentration, add 1 µL.
For ampholytes at 100X, add 2 µL.
4. Prepare Working Equilibration Buffer for
equilibration of focused proteins before
SDS-PAGE.
Reagents Volume
Final
Concentration
Equilibration
buffer premix 760 µL
DTT Solution
(1M) 40 µL 50 mM
Total 800 µL
Sample Preparation
Dissolve the protein sample in the
Working Rehydration Solution, prepared
according to step 3. Sample may be
diluted 2-fold or more with Working
Rehydration Solution to reach desired protein
concentration and decrease salt concentration.
A high salt concentration can affect protein
separation during isoelectric focusing and
cause the current to exceed 100 µA. Samples
with a high salt concentration should be
desalted by either:
TCA/acetone precipitation and resuspension
of proteins in Working Rehydration Solution
OR
Buffer exchange using a spin column
NOTE: During protein resuspension, avoid
heating proteins over 37 °C.
Quantify proteins. Between 0.1–25 µg of
protein can be loaded for 2D electrophoresis.
The optimum amount of protein will depend on
detection method and sample complexity. The
following protein amounts should be used as a
starting point, users may need to optimize the
loading amount for their particular sample.
• Coomassie Brilliant Blue staining: 25 µg
• Fluorescent staining: 10 µg
• Silver staining: 5 µg
• Fluorescent pre-labeling: 3 µg
The sample volume applied to the device
is 10–12 µL. Sample can be diluted with
Working Rehydration Solution as necessary.
Power the Auto2D®Device
Select the appropriate power cord (provided
with the device) that is compatible with the
power outlets in your country. Firmly push
the matching end into the back of the
Auto2D
®
Device, and the other end into
the power outlet.
The power switch is located next to the AC plug
port on the back of the Auto2D®Device. Press
the switch up to turn on.
The application will be automatically launched.
From the screen, select Auto2D®mode
(original).

4 5
20424817 Rev 06/21 20424817 Rev 06/21
English English
Load a Recipe
Choose SETTING > RECIPE. Touch the Recipe
Information screen. Recipe select dialog box
will appear.
Select ”RECIPE NAME” > LOAD > OK > EXIT.
Note: Confirm the desired Recipe name is
displayed on upper right of the screen.
Chip Assembly
PAGE Chip
E Chip
Cathode Side
Anode Side
1. Remove the white tape on the
anode side of the Chip.
2. Carefully remove the plastic cover
on the cathode side of the chip.
3. Gently rinse anode and cathode buffer
wells with distilled water. Using a paper
cleaning wipe, carefully wipe any liquid
from the top of the Chip making sure not
to damage the thin strip of gel located
on the cathode side of the Chip.
Insert the Chips Into the Tray
On the Auto2D®Device touch screen, choose
OPEN > OK. Once tray is open, place the
PAGE Chip (light blue line) with the anode
side in front. Place the Solution Chip (dark
blue lines) on top of the PAGE Chip with the
cut-off corners in the front.
Apply the Solutions
7
6
5
1
2
4
a
b
c
3
3
1. Cathode Buffer, 4500 µL
2. Anode Buffer, 4000 µL
3. Distilled Water, 4000 µL
4. Working Equilibration Buffer
a. 700 µL
b. 700 µL (optional)
c. 700 µL (optional)
5. Working Rehydration Solution, 100 µL
6. Sample Solution, 10–12 µL
7. Molecular Weight Marker*
0.5–0.7 µL
* Cannot include SDS or
Bromophenol Blue
Anode Side
Cathode Side
Place the Electrode Chip
1
2
1. IEF Electrode portion of Electrode Chip
and IEF Chip groove of Solution Chip.
2. Set the Electrode Chip onto the assembled
gel and solution chip so the marking
faces front.
IEF Chip
Remove the IEF Chip protective film.
Insert the IEF Chip into the slot in the
Electrode Chip.
Before the Starting Eletrophoresis step, verify
the following:
• Electrode Chip is not wet except for anode
and cathode chamber.
• The clear cover on the cathode side of the
PAGE Chip is removed.
• Solution has been added where required.
Start Electrophoresis
Choose CLOSE > OK > START > OK.
Electrophoresis will begin.

6 7
20424817 Rev 06/21 20424817 Rev 06/21
English French
After Electrophoresis
Remove the Gel
Choose OK > OPEN > OK.
1. Remove and dispose of the IEF Chip and
remaining solutions in the Solution Chip.
See Disposal section.
2. Remove the PAGE Chip and rinse with
distilled water.
3. Open the cassette with spatula.
4. Mark the orientation of the gel by making
an small cut in one of the corners. This
will help you to locate the alkaline and
acidic sides and high-low molecular
weight in your gel (see below).
High
Molecular
Weight
Low
Molecular
Weight
Acidic
Alkaline
Clean Up
Clean the Electrode Chip with distilled water
immediately and let it air dry after use.
Power Off
Choose MENU > EXIT APPLICATION > OK >
SYSTEM/OS SHUT DOWN > OK
Turn off switch on the back of the
Auto2D Device.
NOTE: If condensation is observed inside the
device, leave the tray open for a while before
turning off the power, to allow the inside
to dry.
Disposal
Components exposed to samples should
be disposed of with biological waste. Other
materials should be disposed of according to
all applicable international, federal, state, and
local regulations. Refer to the components’
Safety Data Sheet for hazard information.
Notice
We provide information and advice to our
customers on application technologies
and regulatory matters to the best of our
knowledge and ability, but without obligation
or liability. Existing laws and regulations are
to be observed in all cases by our customers.
This also applies in respect to any rights of
third parties. Our information and advice
do not relieve our customers of their own
responsibility for checking the suitability
of our products for the envisaged purpose.
The information in this document is subject
to change without notice and should not
be construed as a commitment by the
manufacturing or selling entity, or an affiliate.
We assume no responsibility for any errors
that may appear in this document.
Contact Information
For the location of the office nearest you,
go to SigmaAldrich.com/offices.
Technical Assistance
Visit the tech service page at
SigmaAldrich.com/techservice.
Standard Warranty
The applicable warranty for the products
listed in this publication may be found at
SigmaAldrich.com/terms.
Français (French)
Utilisation prévue
L’appareil d’électrophorèse Auto2D
®
permet
d’automatiser intégralement la procédure
d’électrophorèse 2D, en séparant d’abord les
protéines selon leur point isoélectrique, puis
selon leur poids moléculaire. La séparation
complète des protéines est obtenue en deux
heures seulement.
Sommaire
• Appareil d’électrophorèse Auto2D®
• Cordons d’alimentation électrique:
• Cordons d’alimentation pour le Japon
et l’Amérique du Nord
• Fiche de conversion 3P-2P pour
le Japon et l’Amérique du Nord
• Cordon d’alimentation pour l’Europe
• Cordon d’alimentation pour la Chine
• Cordon d’alimentation pour le
Royaume-Uni
Également requis (non inclus)
Voir la section Guide d’achat, p. 51, pour
connaître les références.
• Puce Électrodes Auto2D®
• Puce PAGE Auto2D®
• Puce IEF Auto2D®
• Puce Solutions Auto2D®
• Kit de réactifs Tris-glycine ou Tris-Tricine
Auto2D®
• Ampholyte (choisir l’ampholyte approprié
selon la plage de pH de la Puce IEF)
• Eau distillée
Manuel d’utilisation en ligne
Le manuel d’utilisation complet inclut des
instructions détaillées et les recettes.
Il peut être téléchargé depuis la page produit
de l’appareil Auto2D®sur SigmaAldrich.com.
Stockage et stabilité
L’appareil Auto2®ne doit être utilisé et stocké
qu’à l’intérieur. Voir l’étiquette produit de
chaque composant pour les conditions
de stockage.
YYPrécautions
Pour une utilisation en
recherche uniquement.
Veuillez lire attentivement la fiche de
données de sécurité (ci-jointe) et le manuel
d’utilisation complet disponible sur le site
SigmaAldrich.com avant d’utiliser ce produit.
Déroulement du travail
Auto2D®
Durée totale de la procédure:
100–155 minutes (selon la recette)
Préparation de l'échantillon
Élimination des impuretés
Chargement des réactifs
Chargement de l'échantillon
et réhydratation du gel
Première dimension:
focalisation isoélectrique
Équilibration SDS
Deuxième dimension:
SDS-PAGE
Détection
30 minutes
5 minutes
30 minutes
30 minutes
5 minutes

8 9
20424817 Rev 06/21 20424817 Rev 06/21
French French
Préparation
Réactifs
1. Préparer et conserver les kits de réactifs
comme indiqué dans la documentation
fournie avec les kits ou dans le manuel
d’utilisation complet (en ligne).
2. Les produits suivants, conservés à
basse température, doivent reposer
à température ambiante (20–25 °C)
pendant environ 10 minutes.
• Puce IEF
• Puce PAGE
• Solution de réhydratation
• Solution de DTT
• Ampholyte
3. Préparer la solution de réhydratation de
travail, qui sera utilisée pour réhydrater
la Puce IEF et extraire/diluer l’échantillon
protéique:
Réactifs Volume Concentration
finale
Solution de
réhydratation 189 µL
Solution de
DTT (1 M) 10 µL 50 mM
Ampholyte* 1–2 μL 0,5–1 % v/v
Total 200 µL
* Sélectionner l’ampholyte selon la plage
de pH de la Puce IEF utilisée. Dans le
cas des ampholytes à une concentration
mère de 40 % p/v, ajouter 1 µL. Dans
le cas des ampholytes concentrés
100X, ajouter 2 µL.
4. Préparer le tampon d’équilibration de
travail, qui sera utilisé pour équilibrer
les protéines lors de l’IEF avant
l’analyse SDS-PAGE.
Réactifs Volume Concentration
finale
Pré-mélange
de tampon
d'équilibration 760 µL
Solution de
DTT (1 M) 40 µL 50 mM
Total 800 µL
Préparation de l’échantillon
Dissoudre l’échantillon protéique dans la
solution de réhydratation de travail préparée
suivant l’étape 3. L’échantillon peut être
dilué d’un facteur 2 ou plus avec la solution
de réhydratation de travail pour obtenir la
concentration souhaitée en protéines et
réduire la concentration en sels.
Une concentration élevée en sels peut
perturber la séparation des protéines lors de
la focalisation isoélectrique et entraîner une
hausse du courant au-delà de 100 µA. Les
échantillons présentant une concentration
élevée en sels peuvent être dessalés par
l’une des méthodes suivantes:
Précipitation à l’acide trichloracétique
(TCA)/acétone et remise en suspension des
protéines dans la solution de réhydratation
de travail
OU
Échange de tampons à l’aide d’une
colonne à centrifuger
REMARQUE: Lors de la remise en suspension
des protéines, éviter de les chauffer à une
température supérieure à 37 °C.
Quantifier les protéines. Charger entre
0,1 et 25 µg de protéines pour
l’électrophorèse 2D. La quantité optimale
de protéines dépend de la méthode de
détection et de la complexité de l’échantillon.
Les quantités suivantes de protéines doivent
être utilisées comme point de départ. Il est
possible que les utilisateurs doivent optimiser
la quantité de protéines chargées pour leur
échantillon particulier.
• Coloration au bleu brillant de Coomassie:
25 µg
• Marquage fluorescent : 10 µg
• Coloration à l’argent: 5 µg
• Pré-marquage fluorescent: 3 µg
Le volume d’échantillon appliqué à l’appareil
est compris entre 10 et 12 µL. L’échantillon
peut être dilué avec la solution de
réhydratation de travail, si nécessaire.
Mise en marche de
l’appareil Auto2D®
Sélectionner le cordon d’alimentation
(fourni avec le dispositif) compatible avec
les prises secteur de votre pays. Brancher
fermement une extrémité du cordon à la
prise correspondante à l’arrière de l’appareil
Auto2D®et l’autre extrémité à une
prise secteur.
L’interrupteur de mise en marche se trouve
près de la prise du cordon d’alimentation,
à l’arrière de l’appareil Auto2D®. Appuyer
sur l’interrupteur vers le haut pour mettre
l’appareil en marche.
L’application sera automatiquement lancée.
Sur l’écran, sélectionner le mode
Auto2D®(original).
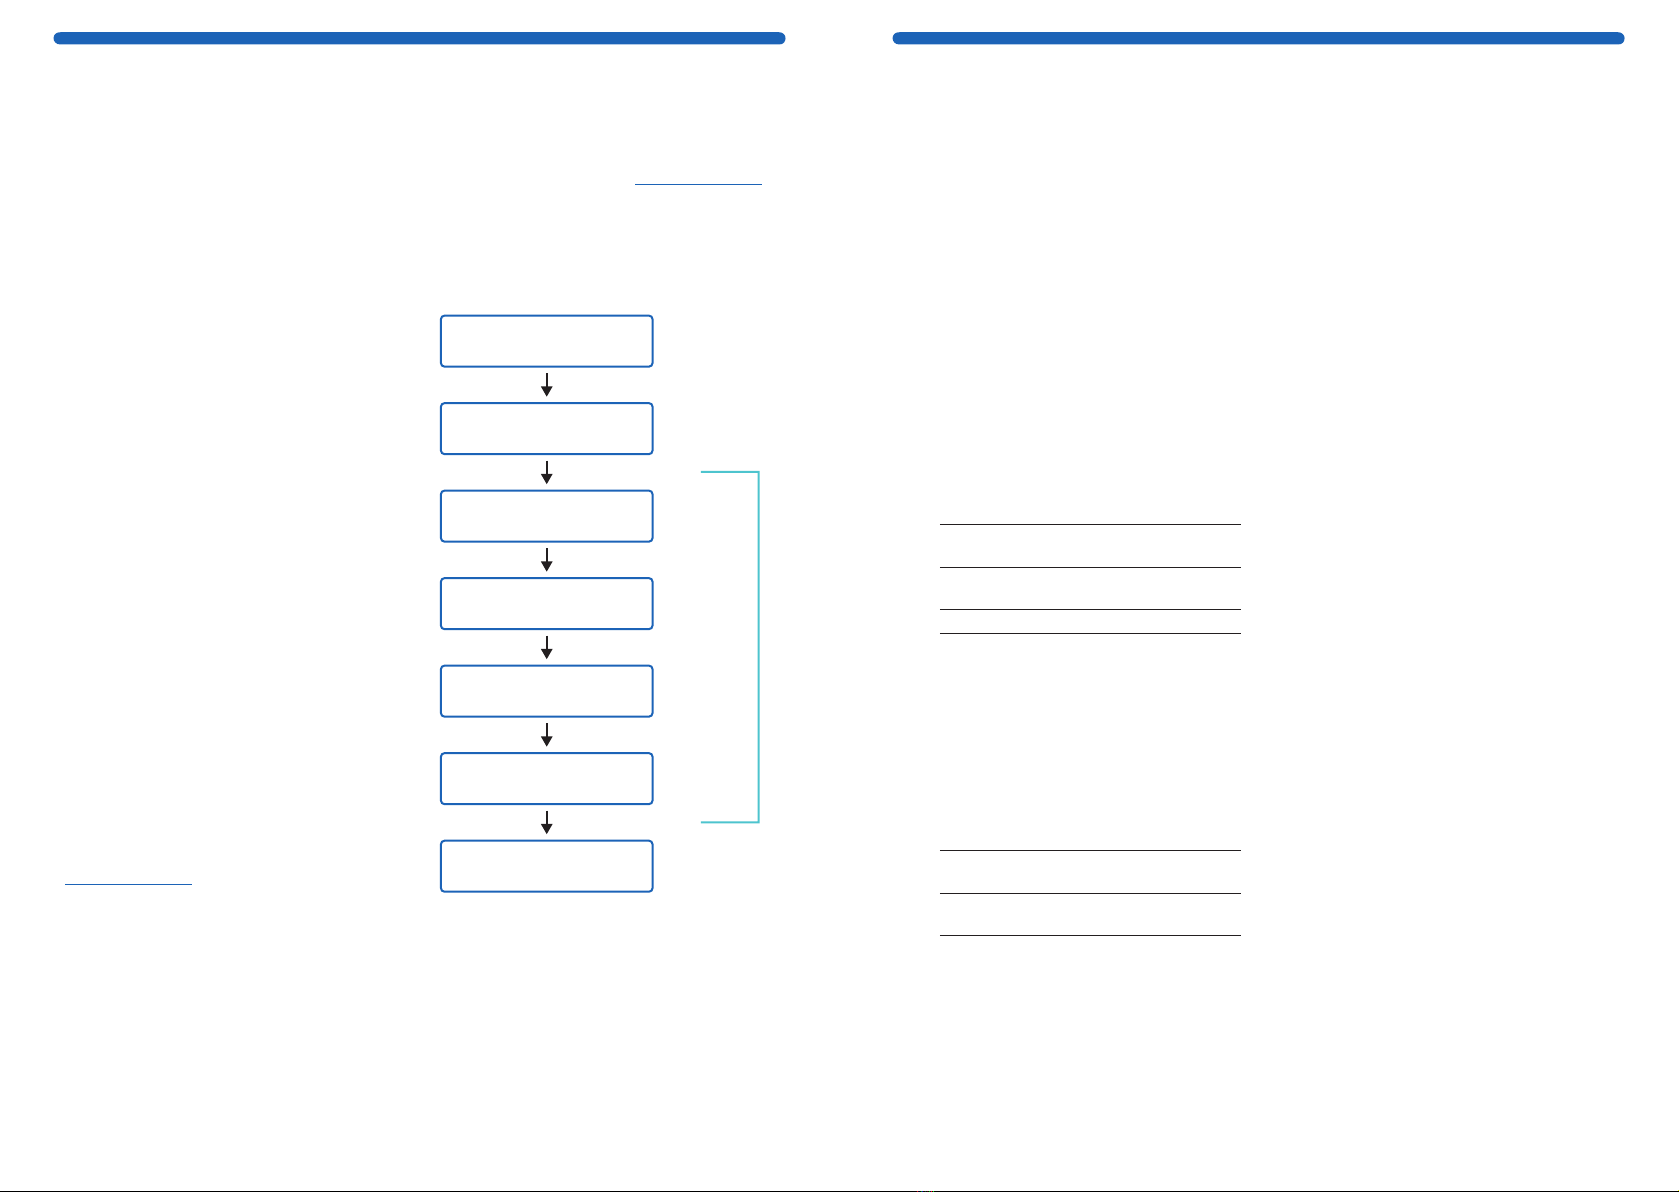
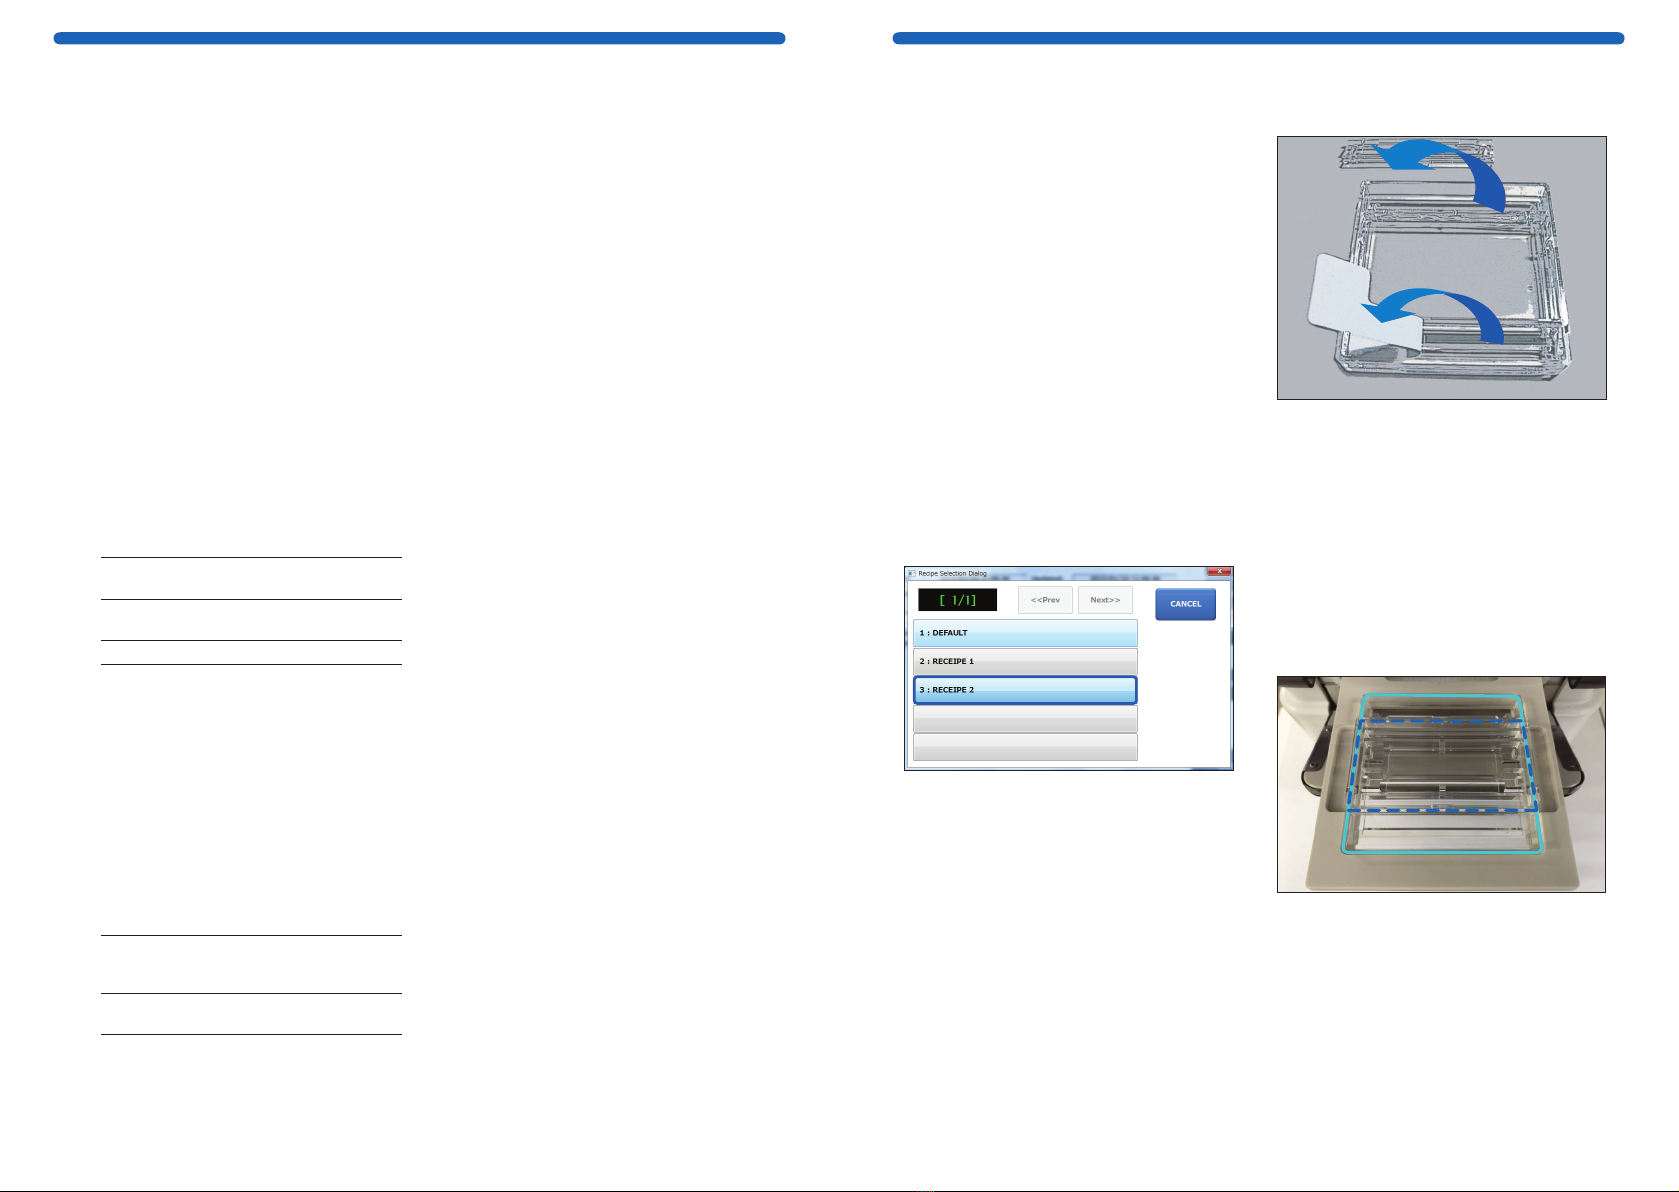
Chargement d’une recette
Sélectionner SETTING (Réglages) >
RECIPE (Recette). Toucher l’écran Recipe
Information (Informations sur les recettes).
Une boîte de dialogue pour sélectionner la
recette s’affiche.
Sélectionner
RECIPE NAME (Nom de la recette) >
LOAD (Charger) > OK > EXIT (Quitter).
REMARQUE: vérifier que le nom de la recette
souhaitée est affiché en haut à droite de
l’écran.
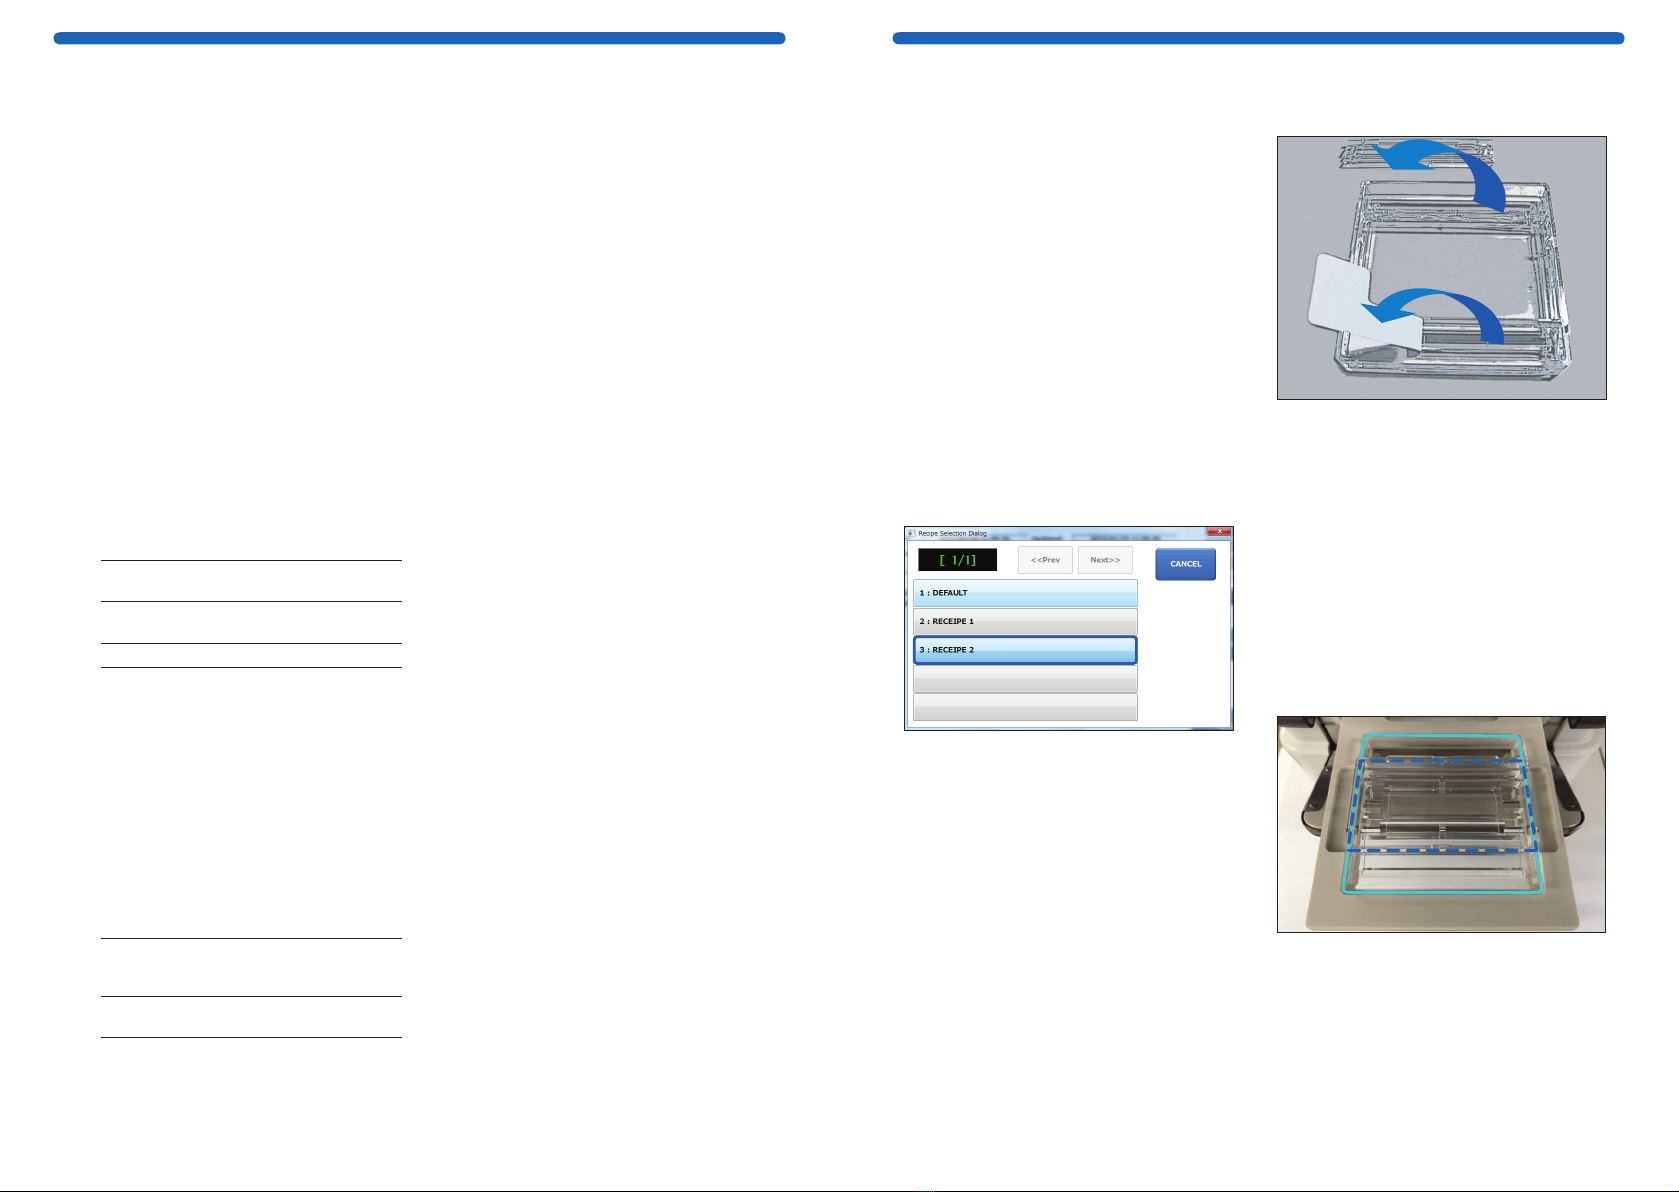
Mise en place des Puces
Puce PAGE
Côté cathode
Côté anode
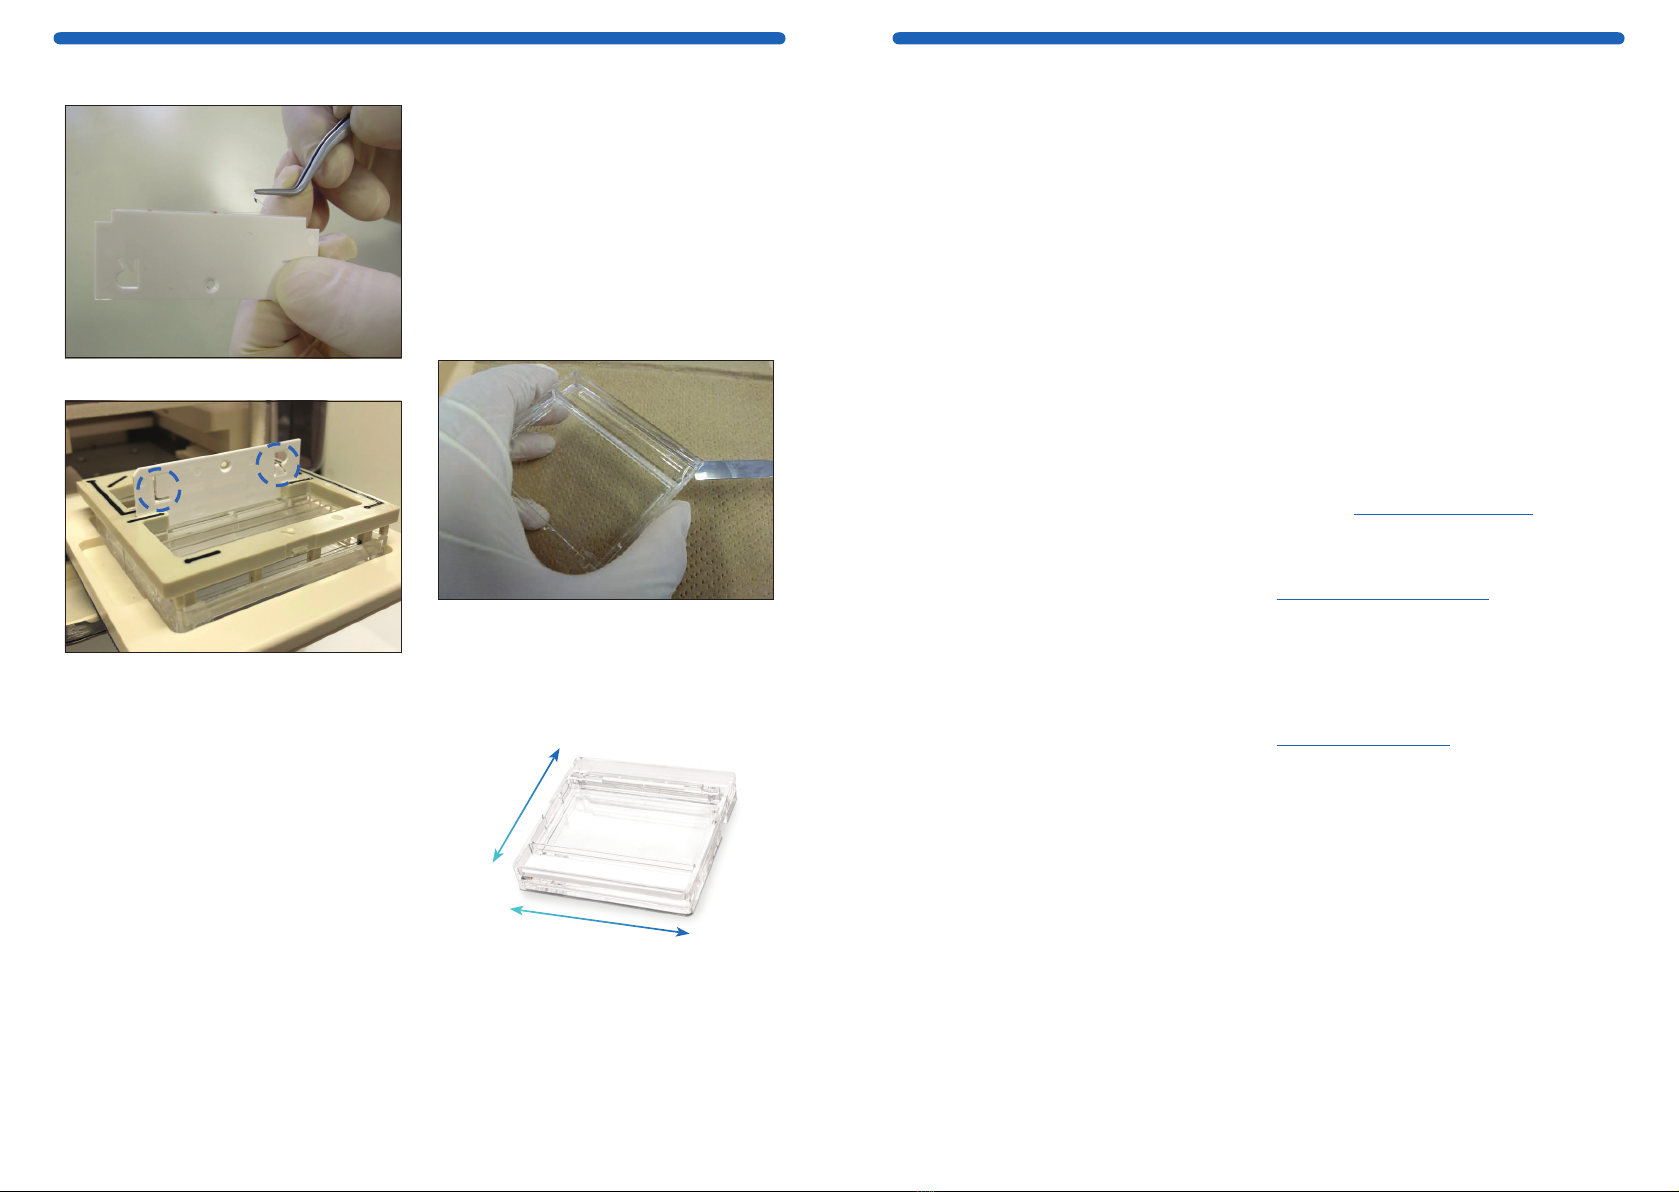
1. Retirer la bande adhésive blanche côté
anode de la Puce.
2. Retirer la cache en plastique côté cathode
de la Puce.
3. Rincer délicatement les puits de tampon
d’anode et de cathode avec de l’eau
distillée. À l’aide d’une lingette en papier,
essuyer avec précaution tout liquide
présent sur la face supérieure de la Puce,
en veillant à ne pas endommager la fine
bande de gel située côté cathode.
Insertion des Puces dans le plateau
Sur l’écran tactile de l’appareil Auto2D®,
sélectionner OPEN (Ouvrir) > OK. Une fois le
plateau ouvert, placer la Puce PAGE (ligne bleu
clair) en orientant le côté anode vers l’avant.
Placer la Puce Solutions (lignes bleu foncé)
audessus de la Puce PAGE en orientant les
angles coupés vers l’avant.

10 11
20424817 Rev 06/21 20424817 Rev 06/21
French French
Chargement des solutions
7
6
5
1
2
4
a
b
c
3
3
1. Tampon de cathode, 4500 µL
2. Tampon d’anode, 4000 µL
3. Eau distillée, 4000 µL
4. Tampon d’équilibration de travail:
a. 700 µL
b. 700 µL (facultatif)
c. 700 µL (facultatif)
5. Solution de réhydratation de travail,
100 µL
6. Échantillon, 10–12 μL
7. Marqueurs de poids moléculaire*
0,5 à 0,7 µL
* Ne peuvent pas contenir de SDS
ou de bleu de bromophénol
Mise en place de la Puce Électrodes
1
2
8. Partie électrode IEF de la Puce Électrodes
et fente de Puce IEF de la Puce Solutions.
9. Placer la Puce Électrodes sur l’ensemble
gel-Puce Solutions de façon à ce que le
symbole soit orienté vers l’avant.
Puce IEF
Enlever le film protecteur de la Puce IEF.
Insérer la Puce IEF dans la fente de la
Puce Électrodes.
Avant l’étape de démarrage de
l’électrophorèse, vérifier ce qui suit:
• La Puce Électrodes n’est pas humide,
sauf au niveau des compartiments d’anode
et de cathode.
• La cache transparente côté cathode
de la Puce PAGE est retirée.
• Les solutions ont été ajoutées aux
emplacements prévus.
Démarrage de
l’électrophorèse
Sélectionner CLOSE (Fermer) > OK >
START (Démarrer) > OK.
L’électrophorèse commencera alors.
Après l’électrophorèse
Retirer le gel
Sélectionner OK > OPEN (Ouvrir) > OK.
1. Retirer et éliminer la Puce IEF et les
solutions restantes dans la Puce
Solutions. Voir la section Élimination.
2. Retirer la Puce PAGE et la rincer avec
de l’eau distillée.
3. Ouvrir la cassette avec une spatule.
4. Marquer l’orientation du gel en faisant une
petite incision dans l’un des angles. Cela
vous permettra de situer les côtés acide
et alcalin et les zones de poids moléculaire
élevé à faible du gel (voir ci-dessous).
Poids
moléculaire
élevé
Faible
poids
moléculaire
Acide
Alcalin
Nettoyage
Nettoyer immédiatement la Puce Électrodes à
l’eau distillée et la laisser sécher à l’air après
utilisation.

12 13
20424817 Rev 06/21 20424817 Rev 06/21
French Spanish
Mise hors tension
Sélectionner MENU > EXIT APPLICATION
(Quitter l’application) > OK > SYSTEM/OS
SHUT DOWN (Éteindre le système/SE) > OK
Éteindre l’appareil Auto2D à l’aide de
l’interrupteur situé à l’arrière.
REMARQUE: si une condensation est visible
dans l’appareil, laisser le plateau ouvert
pendant un moment avant d’éteindre l’appareil
pour lui permettre de sécher.
Élimination
Les composants exposés aux échantillons
doivent être éliminés dans les déchets
biologiques. Le reste du matériel doit
être éliminé conformément à toutes les
réglementations internationales, nationales,
régionales et locales. Se reporter à la fiche de
données de sécurité des composants pour des
informations concernant les risques.
Avis
Nous fournissons à nos clients des informations
et des conseils relatifs aux technologies et aux
questions réglementaires en lien avec leurs
applications au mieux de nos connaissances
et compétences, mais sans obligation ni
responsabilité. Les lois et réglementations
existantes doivent dans tous les cas être
respectées par nos clients. Cela s’applique
également au respect des droits de tiers. Nos
informations et nos conseils ne dispensent
pas nos clients de leur propre responsabilité
de vérifier l’adéquation de nos produits avec
l’utilisation envisagée.
Les informations figurant dans le présent
document sont sujettes à modifications sans
préavis et n’impliquent aucun engagement
de la part de la production, de l’entité
commerciale ou d’une filiale. Nous déclinons
toute responsabilité quant aux erreurs
susceptibles de figurer dans ce document.
Coordonnées
Pour contacter la filiale la plus proche,
rendez-vous sur SigmaAldrich.com/offices.
Assistance technique
Consulter la page de notre Service technique
à l’adresse SigmaAldrich.com/techservice.
Garantie
La garantie applicable aux produits figurant
dans cette publication est disponible sur
SigmaAldrich.com/terms.
Español (Spanish)
Indicaciones de uso
La unidad de electroforesis Auto2D®
automatiza por completo el proceso de
electroforesis bidimensional separando las
proteínas primero por el punto isoeléctrico
y luego por el peso molecular. La separación
completa de la proteína se consigue en poco
más de dos horas.
Contenido
• Dispositivo de electroforesis Auto2D®
• Cables de alimentación eléctrica:
• Cables de potencia para JP
y Norteamérica
• Enchufe de conversión 3P-2P para
JP y Norteamérica
• Cable de alimentación para Europa
• Cable de alimentación para China
• Cable de alimentación para el
Reino Unido
También necesarios (no incluidos)
Véanse los números de referencia en
la pág. 51 de la orden de pedido.
• Chip de electrodo Auto2D®
• Chip de PAGE Auto2D®
• Chip de IEF Auto2D®
• Chip de disolución Auto2D®
• Kit de reactivo Tris-glicina o Tris-tricina
Auto2D®
• Anfolito (elija el anfolito apropiado en
función del intervalo de pH del chip IEF)
• Agua destilada
Manual del usuario virtual
El manual del usuario completo contiene
las instrucciones detalladas y las recetas.
Puede descargarse de la página del dispositivo
Auto2D®en SigmaAldrich.com.
Almacenamiento
y estabilidad
El dispositivo Auto2D®debe utilizarse
y conservarse únicamente en interiores.
En la etiqueta de producto de cada componente
encontrará los requisitos de conservación.
YYPrecauciones
Para uso exclusivo en investigación.
Antes de utilizar este producto lea
detenidamente la ficha de seguridad
(adjunta) y el manual del usuario completo
en SigmaAldrich.com.
Secuencia de trabajo Auto2D®
Proceso total: 100–155 minutos
(dependiendo de la receta)
Preparación de la muestra
y eliminación de impurezas
Adición de los reactivos
Carga de la muestra en
el gel de rehidratación
Primera dimensión:
Enfoque isoeléctrico
Equilibrio SDS
Segunda dimensión:
SDS-PAGE
Detección
30 minutos
5 minutos
30 minutos
30 minutos
5 minutos

14 15
20424817 Rev 06/21 20424817 Rev 06/21
Spanish Spanish
Preparación
Reactivos
1. Prepare y conserve los kits de reactivos
como se indica en el prospecto
suministrado con los kits o en el
manual del usuario completo (virtual).
2. Deje que los siguientes productos
conservados a bajas temperaturas se
equilibren a temperatura ambiente
(20–25 °C aproximadamente 10 minutos).
• Chip de IEF
• Chip de PAGE
• Disolución de rehidratación
• Disolución de DTT
• Anfolito
3. Prepare la disolución de rehidratación de
trabajo para la rehidratación del chip IEF
y la extracción o dilución de la
muestra proteica:
Reactivos Volu-
men Concentración
final
Disolución de
rehidratación 189 µL
Disolución de
DTT (1M) 10 µL 50 mM
Anfolito* 1–2 µL 0,5–1 % v/v
Total 200 µL
* Seleccione el anfolito de acuerdo con
el intervalo de pH del chip de IEF que
vaya a utilizar. Para anfolitos a una
concentración madre del 40 %,
añada 1 µL. Para anfolitos a 100X,
añada 2 µL.
4. Prepare el tampón de equilibrio de trabajo
para equilibrar las proteínas separadas
por IEF antes de la separación por
SDS-PAGE.
Reactivos Volu-
men Concentración
final
Premezcla del
tampón de
equilibrio 760 µL
Disolución de
DTT (1M) 40 µL 50 mM
Total 800 µL
Preparación de las muestras
Disuelva la muestra de proteínas en la
disolución de rehidratación de trabajo
preparada según el paso 3. La muestra puede
diluirse dos veces o más con disolución de
rehidratación de trabajo hasta alcanzar la
concentración de proteínas deseada y
disminuir la concentración de sal.
Una concentración elevada de sal puede
afectar a la separación de proteínas durante
el enfoque isoeléctrico y hacer que la corriente
supere los 100 µA. Las muestras con una
elevada concentración de sal deben ser
desaladas mediante:
Precipitación con ácido tricloroacético (TCA)
o acetona y resuspensión de las proteínas
en disolución de rehidratación de trabajo
O
Cambio de tampón utilizando una columna
de centrifugación
NOTA: Durante la resuspensión de las
proteínas, evite el calentamiento de las
proteínas por encima de 37 °C.
Cuantificación de proteínas. Para la
electroforesis en 2D, pueden cargarse entre
0,1 y 25 µg de proteína. La cantidad óptima
de proteína dependerá del método de detección
y de la complejidad de la muestra. Como punto
de partida deberán utilizarse las siguientes
cantidades de proteínas; los usuarios quizá
tengan que optimizar la cantidad cargada en
función de su muestra concreta.
• Tinción con azul brillante Coomassie: 25 µg
• Tinción fluorescente: 10 µg
• Tinción con plata: 5 µg
• Premarcaje fluorescente: 3 µg
El volumen de muestra aplicado al dispositivo
es 10–12 µL. La muestra puede diluirse con
disolución de rehidratación de trabajo según
necesidad.
Encendido del dispositivo Auto2D®
Seleccione el cable de alimentación apropiado
(suministrado con el dispositivo) que sea
compatible con los enchufes de su país.
Encaje firmemente el extremo correspondiente
del cable en la parte trasera del dispositivo
Auto2D®y el otro extremo en el enchufe de
la luz.
El interruptor de alimentación está situado
cerca del puerto del enchufe de corriente
alterna en la parte posterior del dispositivo
Auto2D®. Presione el interruptor hacia arriba
para encenderlo.
La aplicación se lanzará automáticamente.
Desde la pantalla, seleccione el modo
Auto2D®(original).
Carga de una receta
Elija SETTING > RECIPE (CONFIGURACIÓN >
RECETA). Toque la pantalla de información de
recetas. Aparecerá el cuadro de diálogo de
selección de recetas.
Seleccione ”RECIPE NAME” > LOAD > OK >
EXIT («NOMBRE DE LA RECETA» > CARGAR >
OK > SALIR).
Nota: confirme que en la parte superior
derecha de la pantalla aparece el nombre
de la receta deseada.
Montaje de los chips
Chip de PAGE
Lado del cátodo
Lado del ánodo
1. Retire la cinta blanca del lado del ánodo
del chip.
2. Retire con cuidado la tapa de plástico del
lado del cátodo del chip.
3. Enjuague suavemente con agua destilada
los pocillos para tampón del ánodo y del
cátodo. Utilizando una toallita de papel,
seque con cuidado cualquier líquido que
pueda haber en la parte superior del chip
asegurándose de no dañar la fina tira de
gel localizada en el lado del cátodo
del chip.
Introducción de los chips en
la bandeja
En la pantalla táctil del dispositivo Auto2D®,
elija OPEN > OK (ABRIR > OK). Una vez
abierta la bandeja, coloque el chip de PAGE
(línea azul clara) con el lado del ánodo
hacia delante. Coloque el chip de disolución
(líneas azul oscuro) en la parte superior del
chip de PAGE con las esquinas recortadas
hacia delantera.

16 17
20424817 Rev 06/21 20424817 Rev 06/21
Spanish Spanish
Aplicación de las disoluciones
7
6
5
1
2
4
o
b
c
3
3
1. Tampón del cátodo, 4500 µL
2. Tampón del ánodo, 4000 µL
3. Agua destilada, 4000 µL
4. Tampón de equilibrio de trabajo:
a. 700 µL
b. 700 µL (opcional)
c. 700 µL (opcional)
5. Disolución de rehidratación de
trabajo, 100 µL
6. Disolución de muestra, 10–12 µL
7. Marcador del peso molecular*
0,5–0,7 µL
* No puede incluir SDS o azul de
bromofenol
Colocación del Chip electrodo
1
2
1. Parte del electrodo IEF del chip de
electrodo y ranura del chip de IEF del chip
de disoluciones
2. Coloque el chip de electrodo en el gel
montado y el chip de disoluciones de
modo que la marca mire hacia delante.
Chip de IEF
Retire la película protectora del chip de IEF.
Introduzca el chip de IEF en la hendidura
en el chip electrodo.
Antes de empezar la etapa de electroforesis,
verifique lo siguiente:
• El chip de electrodo no está húmedo excepto
en las cámaras del ánodo y del cátodo.
• Está retirada la tapa transparente del lado
del cátodo del chip de PAGE.
• Se ha añadido la disolución donde
es necesaria.
Inicio de la electroforesis
Elija CLOSE > OK > START > OK
(CERRAR > OK > INICIAR > OK).
La electroforesis empezará.
Después de la electroforesis
Retirada del gel
Elija OK > OPEN > OK (OK > ABRIR > OK).
1. Retire y deseche el chip de IEF y las
disoluciones que queden en el chip de
disolución. Véase el apartado Eliminación.
2. Retire el chip de PAGE y enjuague con
agua destilada.
3. Abra la cajita con una espátula.
4. Marque la orientación del gel haciendo un
pequeño corte en una de las esquinas.
Esto le ayudará a localizar los lados
alcalino y ácido y el peso molecular
alto-bajo en el gel (vea a continuación).
Peso
molecular
alto
Peso
molecular
bajo
Ácido
Alcalino
Limpieza
Limpie el chip electrodo con agua destilada
inmediatamente y déjelo secar al aire después
de su uso.

18 19
20424817 Rev 06/21 20424817 Rev 06/21
Spanish Dutch
Apagado
Elija MENU > EXIT APPLICATION > OK >
SYSTEM/OS SHUT DOWN > OK (MENÚ >
SALIR DE LA APLICACIÓN > OK > SISTEMA/
APAGAR SO > OK)
Apague el interruptor de la parte trasera
del dispositivo.
NOTA: Si observa condensación en el interior
del dispositivo, deje abierta la bandeja durante
un rato antes de apagarlo para permitir que se
seque el interior.
Eliminación
Los componentes expuestos a las muestras
deben desecharse como residuos biológicos.
El resto de materiales deben desecharse según
todas las normativas internacionales, federales,
estatales y locales pertinentes. Encontrará
información sobre peligros en la ficha de
datos de seguridad de los componentes.
Aviso
Ofrecemos información y soporte a
nuestros clientes sobre las tecnologías de
las aplicaciones y temas normativos según
nuestro conocimiento y experiencia, pero sin
obligación ni responsabilidad alguna. Nuestros
clientes deben respetar en todos los casos las
normativas y leyes vigentes. Esto también se
aplica con respecto a los derechos de terceros.
Nuestra información y asesoramiento no exime
a nuestros clientes de su responsabilidad de
comprobar la idoneidad de nuestros productos
para el propósito contemplado.
La información contenida en este documento
está sujeta a cambios sin previo aviso y no
debe interpretarse como un compromiso por
parte de la entidad fabricante o vendedora, ni
filial. No aceptamos responsabilidad alguna por
cualquier error que pudiera aparecer en este
documento.
Información de contacto
Encontrará la ubicación de la oficina más
próxima en www.sigmaaldrich.com/offices.
Asistencia técnica
Visite la página de servicio técnico en
SigmaAldrich.com/techservice.
Garantía estándar
La garantía aplicable a los productos indicados
en esta publicación puede encontrarse en
www.sigmaaldrich.com/terms.
Nederlands (Dutch)
Bedoeld gebruik
Het Auto2D
®
Electrophoresis Device
automatiseert het proces van 2D elektroforese
volledig, en scheidt de eiwitten eerst per
isolektrisch punt en als tweede per moleculair
gewicht. Volledige eiwitscheiding wordt in iets
langer dan een uur bereikt.
Inhoud
• Auto2D®Electrophoresis Device
• Stroomkabels:
• Stroomkabel voor JP en Noord Amerika
• 3P-2P conversieplug voor JP en
Noord Amerika
• Stroomkabel voor Europa
• Stroomkabel voor China
• Stroomkabel voor het
Verenigd Koninkrijk
Tevens benodigd (niet meegeleverd)
Zie Bestellen Product 51
voor catalogusnummers
• Auto2D®Electrode Chip
• Auto2D®PAGE Chip
• Auto2D®IEF Chip
• Auto2D®Solution Chip
• Auto2D®Tris-Glycine of Tris-Tricine
Reagent Kit
• Amfolyt (kies de geschikte amfolyt op
basis van IEF chip pH-bereik)
• Gedestilleerd water
Online Gebruikershandleiding
De complete Gebruikershandleiding omvat
gedetailleerde instructies en procedures.
Het kan worden gedownload via de
productpagina van Auto2D®Device op
SigmaAldrich.com.
Opslag en Stabiliteit
Het Auto2D®apparaat dient uitsluitend
binnenshuis te worden gebruikt en opgeslagen.
Zie het productlabel voor elk onderdeel
voor opslagvereisten.
YYVoorzorgsmaatregelen
Uitsluitend voor onderzoeksdoeleinden.
Raadpleeg het Veiligheidsblad (bijgesloten) en
de volledige Gebruikershandleiding zorgvuldig
op SigmaAldrich.com voordat u dit product
gebruikt.
Auto2D®Workflow
Totale proces: 100–155 minuten
(afhankelijk van de procedure)
Monster preparatie
verwijderen van
onzuiverheden
Toevoegen van reagentia
Monster laden en gel
rehydratatie
Eerste dimensie:
Isoelektrische concentratie
SDS Equilibratie
Tweede dimensie:
SDS-PAGE
Detectie
30 minuten
5 minuten
30 minuten
30 minuten
5 minuten

20 21
20424817 Rev 06/21 20424817 Rev 06/21
Dutch Dutch
Preparatie
Reagentia
1. Prepareer en bewaar Reagent Kits
zoals aangegeven in de bij de kits
meegeleverde literatuur, of de volledige
Gebruikershandleiding (online).
2. Laat de volgende producten die
op een lage temperatuur zijn
opgeslagen, op kamertemperatuur
komen (20–25 °C ongeveer 10 minuten).
• IEF Chip
• PAGE Chip
• Rehydration Solution
• DTT Solution
• Amfolyt
3. Prepareer de Working Rehydration
Solution voor rehydratatie van IEF Chip
en extractie/verdunning van eiwitmonster:
Reagentia Volume
Definitieve
concentratie
Rehydration
Solution 189 µL
DTT Solution
(1 M) 10 µL 50 mM
Amfolyt* 1–2 μL 0,5–1% v/v
Totaal 200 µL
* Selecteer amfolyt op basis van IEF
chip. Voeg voor amfolyten met 40%
stockconcentratie, 1 µL toe. Voeg voor
amfolyten met 100X, 2 µL toe.
4. Prepareer Working Equilibration Buffer
voor equilibratie van geconcentreerde
eiwitten voor SDS-PAGE.
Reagentia Volume
Definitieve
concentratie
Equilibration
buffer premix 760 µL
DTT Solution
(1 M) 40 µL 50 mM
Totaal 800 µL
Monsterpreparatie
Los het eiwitmonster op in de Working
Rehydration Solution, geprepareerd volgens
stap 3. Het monster mag 2 maal of meer
verdund worden met Working Rehydration
Solution om de gewenste eiwitconcentratie te
bereiken en de zoutconcentratie te verlagen.
Een hoge zoutconcentratie kan eiwitscheiding
beïnvloeden tijdens isoelektrische concentratie
en de stroom 100 µA doen overschrijden.
Monsters met een hoge zoutconcentratie
dienen ontzout te worden door middel van:
TCA/aceton precipitatie en resuspensie van
eiwitten in Working Rehydration Solution
OF
Buffer uitwisseling door middel van
een spinkolom
LET OP: Tijdens eiwitresuspensie dient u de
eiwitten niet boven de 37 °C te verhitten.
Eiwitten kwantificeren. Tussen 0,1–25 µg eiwit
kan worden geladen voor 2D elektroforese. De
optimale hoeveelheid eiwit is afhankelijk van
de detectiemethode en monstercomplexiteit.
De volgende eiwit hoeveelheden dienen als
startpunt te worden gebruikt, de gebruiker kan
de laadhoeveelheid optimaliseren voor hun
eigen monster.
• Coomassie Brilliant Blue staining: 25 µg
• Fluorescent staining: 10 µg
• Silver staining: 5 µg
• Fluorescent pre-labeling: 3 µg
Het geappliceerde monstervolume op het
apparaat is 10–12 µL. Het monster kan worden
verdund met Working Rehydration Solution,
indien noodzakelijk.
Inschakelen van Auto2D®Device
Selecteer het geschikte stroomsnoer
(meegeleverd met het apparaat) dat compatibel
is met de stopcontacten in uw land. Duw het
juiste uiteinde stevig in de achterkant van
het Auto2D
®
Device, en het andere uiteinde
in het stopcontact.
De stroomschakelaar bevindt zich naast de AC
plugpoort achterop het Auto2D®Device. Druk
de schakelaar omhoog om in te schakelen.
De applicatie wordt automatisch gestart.
Selecteer op het scherm de Auto2D®
modus (origineel)
Laad een procedure
Kies SETTING (instelling) > RECIPE (recept).
Raak het Recipe Information scherm aan.
Selectie dialoogvak voor procedure verschijnt.
Selecteer ”RECIPE NAME” (procedure naam) >
LOAD (laden) > OK > EXIT (afsluiten).
Let op: Bevestig dat de gewenste
Procedurenaam rechtsbovenin het scherm
wordt getoond.
Chip montage
PAGE Chip
E Chip
Kathodezijde
Anodezijde
1. Verwijder de witte tape op de anodezijde
van de Chip.
2. Verwijder voorzichtig de plastic folie op de
kathodezijde van de Chip.
3. Spoel de anode en kathodebuffer zachtjes
af met gedestilleerd water. Veeg met
een papieren reinigingsdoekje eventuele
vloeistof van de bovenkant van de Chip
af, waarbij u erop let de dunne strip
op de kathodezijde van de Chip niet te
beschadigen.
Plaats de Chips in de bak
Op het Auto2D®Device touch screen, kiest u
OPEN > OK. Zodra de bak is geopend, plaatst
u de PAGE Chip (lichtblauwe streep) met de
anodezijde naar voren. Plaats de Solution Chip
(donkerblauwe strepen) bovenop de PAGE Chip
met de cut-off hoekjes naar voren.
Breng de Solutions aan
7
6
5
1
2
4
a
b
c
3
3
1. Kathode buffer, 4500 µL
2. Anode buffer, 4000 µL
3. Gedestilleerd water, 4000 µL
4. Working Equilibration Buffer
a. 700 µL
b. 700 µL (optioneel)
c. 700 µL (optioneel)
5. Working Rehydration Solution, 100 µL
6. Monster, 10–12 μL
7. Moleculair gewicht marker*
0,5–0,7 μL
* zonder SDS of Bromophenol Blue

22 23
20424817 Rev 06/21 20424817 Rev 06/21
Dutch Dutch
Plaats de Electrode Chip
1
2
1. IEF Electrode onderdeel van Electrode
Chip en IEF Chip groef van Solution Chip.
2. Plaats de Electrode Chip op het
aangebrachte gel en solution chip zodat
de marker naar voren wijst.
IEF Chip
Verwijder de beschermfilm van de IEF Chip
Plaats de IEF Chip in het slot in de
Electrode Chip.
Verifieer alvorens de elektroforese
te starten het volgende:
• De Electrode Chip is niet nat behalve
de anode en kathodekamer.
• De doorzichtige folie op de kathodezijde
van de PAGE Chip is verwijderd.
• De oplossing is zoals vereist toegevoegd.
Start Elektroforese
Kies CLOSE (sluiten) > OK > START > OK.
De elektroforese gaat beginnen.
Na Elektroforese
Verwijder de gel
Kies OK > OPEN > OK.
1. Verwijder de IEF Chip en gooi deze samen
met resterende oplossingen in de Solution
Chip weg. Zie rubriek Afvoeren.
2. Verwijder de PAGE Chip en spoel af met
gedestilleerd water.
3. Open de cassette met spatel.
4. Markeer de oriëntatie van de gel door
een kleine inkeping te maken in een van
de hoeken. Hiermee kunt u de alkalische
en zure zijden lokaliseren en hoog-laag
moleculair gewicht in uw gel
(zie hieronder).
Hoog-moleculair
gewicht
Laag-moleculair
gewicht
Zuur
Alkalisch
Reinigen
Reinig de Electrode Chip onmiddellijk met
gedestilleerd water en laat na gebruik aan
de lucht drogen.
Uitschakelen
Kies MENU > EXIT APPLICATION (toepassing
sluiten) > OK > SYSTEM/OS SHUT DOWN
(systeem/os afsluiten) > OK
Zet de schakelaar achterop het
Auto2D®Device uit.
LET OP: Indien er condensatie wordt
waargenomen binnen in het apparaat, laat
u de bak een tijdje open staan voordat u de
stroom uitschakelt, zodat de binnenkant
kan drogen.
Afvoeren
De onderdelen die aan monsters zijn
blootgesteld dienen te worden afgevoerd met
biologisch afval. Deze stof en/of de verpakking
als gevaarlijk afval afvoeren. Alle andere
materialen dienen afgevoerd te worden volgens
toepasselijke internationale, nationale en lokale
bepalingen. Raadpleeg het Veiligheidsblad van
de onderdelen voor informatie over gevaren.

24 25
20424817 Rev 06/21 20424817 Rev 06/21
Dutch German
Deutsch (German)
Verwendungszweck
Das Auto2D®Elektrophoresegerät
vollautomatisiert den Prozess der
2D-Elektrophorese und trennt Proteine
zuerst nach isoelektrischem Punkt und dann
nach Molekulargewicht. Eine komplette
Proteintrennung wird in nur zwei
Stunden erzielt.
Inhalt
• Auto2D®Elektrophoresegerät
• Netzkabel:
• Netzkabel für Japan und Nordamerika
• 3P-2P-Konversionsstecker für Japan
und Nordamerika
• Netzkabel für Europa
• Netzkabel für China
• Netzkabel für das Vereinigte Königreich
Ebenfalls erforderlich (nicht im
Lieferumfang enthalten)
Bestellnummern finden Sie auf Seite 51.
• Auto2D®Elektrodenchip
• Auto2D®PAGE-Chip
• Auto2D®IEF-Chip
• Auto2D®Lösungschip
• Auto2D®Tris-Glycin- oder
Tris-Tricin-Reagenzienkit
• Ampholyt (wählen Sie den Ampholyten
nach dem pH-Bereich des IEF-Chips)
• Destilliertes Wasser
Bedienungsanleitung online
Die ausführliche Bedienungsanleitung enthält
detaillierte Anleitungen und Rezepturen.
Sie kann auf der Produktseite des
Auto2D®Geräts unter SigmaAldrich.com
heruntergeladen werden.
Lagerung und Haltbarkeit
Das Auto2D®Gerät sollte nur in Innenräumen
verwendet/aufbewahrt werden. Beachten
Sie bitte die Lagerungsbedingungen auf dem
Produktetikett jeder Komponente.
YYSicherheitshinweise
Nur für Forschungszwecke.
Lesen Sie bitte das Sicherheitsblatt (beiliegend)
und die ausführliche Bedienungsanleitung auf
SigmaAldrich.com sorgfältig durch, bevor Sie
dieses Produkt verwenden.
Auto2D®Arbeitsablauf
Gesamter Prozess: 100–155 Minuten
(je nach Rezeptur)
Probenvorbereitung
Entfernung
von Verunreinigungen
Zugabe von Reagenzien
Probenaufgabe und
Gelrehydrierung
Erste Dimension:
Isoelektrische Fokussierung
SDS-Äquilibrierung
Zweite Dimension:
SDS-PAGE
Detektion
30 Minuten
5 Minuten
30 Minuten
30 Minuten
5 Minuten
Kennisgeving
Wij bieden naar ons beste weten en vermogen
informatie en advies aan onze klanten over
applicatietechnologieën en bepalingen, echter
zonder enige verplichting of aansprakelijkheid.
Bestaande wet- en regelgeving dient in
alle gevallen door onze klanten te worden
nageleefd. Dit is tevens van toepassing wat
betreft eventuele rechten van derde partijen.
Onze informatie en adviezen ontheffen klanten
niet van hun eigen verantwoordelijkheid om
de geschiktheid van onze producten voor het
beoogde doel te controleren.
De informatie in dit document is onderhevig
aan wijzigingen zonder voorafgaande
kennisgeving en dient niet te worden opgevat
als een toezegging door de producerende
of verkopende entiteit, of een partner. Wij
aanvaarden geen verantwoordelijkheid voor
fouten die in dit document kunnen voorkomen.
Contactinformatie
voor de locatie van het dichtstbijzijnde kantoor,
ga naar SigmaAldrich.com/offices.
Technische assistentie
Bezoek de tech service pagina op
SigmaAldrich.com/techservice.
Standaard garantie
De toepasselijke garantie voor de producten
die in deze publicatie worden genoemd vindt
u op www.sigmaaldrich.com/terms.

26 27
20424817 Rev 06/21 20424817 Rev 06/21
German German
Schalten Sie das Auto2D®Gerät ein
Wählen Sie das Netzkabel (im Lieferumfang
enthalten), das mit den Steckdosen in
Ihrem Land kompatibel ist. Stecken Sie das
Geräteende des Kabels fest auf der Rückseite
des Auto2D®Geräts und das andere Ende in
die Wandsteckdose ein.
Der Netzschalter befindet sich neben dem
Wechselstromeingang auf der Rückseite des
Auto2D®Geräts. Drücken Sie den Netzschalter,
um das Gerät einzuschalten.
Die Anwendung wird automatisch gestartet.
Wählen Sie auf dem Bildschirm den Auto2D®
Modus (Originalmodus).
Laden Sie eine Rezeptur
Wählen Sie SETTING > RECIPE [EINSTELLUNG
> REZEPTUR]. Berühren Sie den Rezeptur-
Informationsbildschirm. Das Dialogfenster zur
Auswahl einer Rezeptur wird eingeblendet.
Wählen Sie den Rezepturnamen > LOAD >
OK > EXIT [LADEN > OK > VERLASSEN].
Hinweis: Bestätigen Sie, dass der gewünschte
Rezepturname oben rechts am Bildschirm
angezeigt wird.
Chip-Vorbereitung
PAGE-Chip
Kathodenseite
Anodenseite
1. Entfernen Sie das weiße Klebeband
auf der Anodenseite des Chips.
2. Entfernen Sie vorsichtig die
Kunststoffabdeckung auf der
Kathodenseite des Chips.
3. Spülen Sie die Anoden- und
Kathodenpufferkanäle behutsam mit
destilliertem Wasser. Wischen Sie jegliche
Flüssigkeit mit einem Papierhandtuch
vorsichtig von der Oberseite des Chips
und achten Sie dabei darauf, dass der
dünne Gelstreifen auf der Kathodenseite
des Chips nicht beschädigt wird.
Legen Sie die Chips in die
Schublade ein
Wählen Sie auf dem Touchscreen des Auto2D®
Geräts OPEN > OK [ÖFFNEN > OK]. Wenn die
Schublade geöffnet ist, legen Sie den
PAGE-Chip (hellblaue Kontur) mit der
Anodenseite nach vorn ein. Legen Sie den
Lösungschip (dunkelblaue Kontur) mit den
abgeschnittenen Ecken nach vorn auf den
PAGE-Chip.
Vorbereitung
Reagenzien
1. Zur Vorbereitung und Aufbewahrung
der Reagenzienkits beachten Sie
bitte die Anweisungen in der mit den
Kits gelieferten Literatur oder in der
ausführlichen Bedienungsanleitung
(online).
2. Lassen Sie die folgenden Produkte,
die bei niedrigen Temperaturen
aufbewahrt werden, etwa 10 Minuten auf
Raumtemperatur (20–25 °C) aufwärmen.
• IEF-Chip
• PAGE-Chip
• Rehydrierlösung
• DTT-Lösung
• Ampholyt
3. Bereiten Sie die Rehydrier-Arbeitslösung
zur Rehydrierung des IEF-Chips und
Extraktion/Verdünnung der
Proteinprobe vor:
Reagenzien Volu-
men Endkonzen-
tration
Rehydrierlö-
sung 189 µL
DTT-Lösung
(1 M) 10 µL 50 mM
Ampholyt* 1–2 µL 0,5–1 % v/v
Gesamtvolu-
men 200 µL
* Wählen Sie den Ampholyten nach
dem pH-Bereich des IEF-Chips.
Für Ampholyten in 40 % w/v
Stammkonzentration, geben Sie
1 µL zu. Für Ampholyten in einer
100X-Konzentration geben Sie 2 µL zu.
4. Bereiten Sie den Äquilibrier-Arbeitspuffer
zur Äquilibrierung fokussierter Proteine
vor der SDS-PAGE vor.
Reagenzien Volu-
men Endkonzen-
tration
Äquilibrier-
puffer-Vormi-
schung 760 µL
DTT-Lösung
(1 M) 40 µL 50 mM
Gesamtvolu-
men 800 µL
Probenvorbereitung
Lösen Sie die Proteinprobe in der gemäß
Schritt 3 zubereiteten Rehydrier-Arbeitslösung.
Die Probe kann 2-fach oder stärker mit
Rehydrier-Arbeitslösung verdünnt werden,
um die gewünschte Proteinkonzentration
zu erhalten und die Salzkonzentration
zu verringern.
Eine hohe Salzkonzentration kann die
Proteintrennung während der isoelektrischen
Fokussierung beeinträchtigen und die
Stromstärke auf über 100 µA erhöhen. Proben
mit hoher Salzkonzentration sollten entsalzt
werden durch:
TCA/Acetonausfällung und Resuspendierung
der Proteine in Rehydrier-Arbeitslösung
ODER
Pufferaustausch unter Anwendung
einer Spinsäule
HINWEIS: Vermeiden Sie bei der
Protein-Resuspendierung eine Erwärmung
der Proteine über 37 °C.
Quantifizieren Sie die Proteine. Für die
2D-Elektrophorese können zwischen
0,1 und 25 µg Protein geladen werden.
Die optimale Proteinmenge hängt von der
Detektionsmethode und der Probenkomplexität
ab. Die folgenden Proteinmengen sind als
Ansatzpunkt zu verwenden. Die Anwender
müssen die Lademenge ggf. für ihre
bestimmte Probe optimieren.
• Coomassie Brillantblau-Färbung: 25 µg
• Fluoreszenzfärbung: 10 µg
• Silberfärbung: 5 µg
• Fluoreszenz-Vormarkierung: 3 µg
Das in das Gerät gegebene Probenvolumen
beträgt 10–12 µL. Die Probe kann bei Bedarf
mit Rehydrier-Arbeitslösung verdünnt werden.

28 29
20424817 Rev 06/21 20424817 Rev 06/21
German German
Nach der Elektrophorese
Entfernen Sie das Gel
Wählen Sie OK > OPEN > OK
[OK > ÖFFNEN > OK].
1. Entfernen und entsorgen Sie den IEF-Chip
und die Restlösungen im Lösungschip.
Siehe Abschnitt zur Entsorgung.
2. Entfernen Sie den PAGE-Chip und spülen
Sie ihn mit destilliertem Wasser ab.
3. Öffnen Sie die Kassette mit einem Spatel.
4. Markieren Sie die Orientierung des Gels
durch einen kleinen Schnitt in einer Ecke.
Dies erleichtert Ihnen die Lokalisierung
der alkalischen und sauren Seiten sowie
hoher und niedriger Molekulargewichte
in Ihrem Gel (siehe unten).
Hohes
Molekular-
gewicht
Niedriges
Molekular-
gewicht
Sauer
Alkalisch
Reinigung
Reinigen Sie den Elektrodenchip unverzüglich
mit destilliertem Wasser und lassen Sie ihn an
der Luft trocknen.
Schalten Sie das Gerät ab
Wählen Sie MENU > EXIT APPLICATION >
OK > SYSTEM/OS SHUT DOWN > OK
[MENÜ > ANWENDUNG VERLASSEN > OK >
SYSTEM/OS HERUNTERFAHREN > OK]
Schalten Sie den Netzschalter auf der
Rückseite des Auto2D®Geräts aus.
HINWEIS: Falls Kondensation im
Geräteinneren vorliegt, lassen Sie die
Schublade einige Zeit offen, bevor Sie das
Gerät ausschalten, damit es trocknen kann.
Entsorgung
Probenberührte Komponenten sind zusammen
mit biologischem Abfall zu entsorgen. Andere
Materialien sollten in Übereinstimmung
mit allen internationalen, landesweiten
oder lokalen Vorschriften entsorgt werden.
Gefahreninformationen finden Sie im
Sicherheitsdatenblatt der Komponenten.
Hinweis
Wir informieren und beraten unsere Kunden
in Bezug auf Anwendungstechnologien und
regulatorische Angelegenheiten nach bestem
Wissen und Gewissen, jedoch unverbindlich
und ohne Haftungsübernahme. Bestehende
Gesetze und andere Vorschriften sind in
jedem Fall von unseren Kunden zu beachten.
Das Gleiche gilt für Rechte Dritter. Unsere
Informationen und Beratung entbinden unsere
Kunden nicht von der Verantwortung, unsere
Produkte auf die Eignung für die vorgesehenen
Zwecke zu prüfen.
Die Informationen in diesem Dokument können
jederzeit ohne Vorankündigung geändert
werden und stellen keine Verpflichtung seitens
des Herstellers oder Verkäufers bzw. eines
Tochterunternehmens dar. Wir übernehmen
keine Verantwortung für etwaige Fehler in
diesem Dokument.
Kontaktinformationen
Ihre nächstgelegene Niederlassung finden Sie
online unter SigmaAldrich.com/offices.
Technische Unterstützung
Unser technischer Kundendienst ist auf
folgender Webseite erreichbar
SigmaAldrich.com/techservice.
Allgemeine Gewährleistung
Die allgemeinen Gewährleistungen für die
Produkte in diesem Dokument finden Sie
online unter SigmaAldrich.com/terms.
Geben Sie die Lösungen zu
7
6
5
1
2
4
a
b
c
3
3
1. Kathodenpuffer, 4500 µL
2. Anodenpuffer, 4000 µL
3. Destilliertes Wasser, 4000 µL
4. Äquilibrier-Arbeitspuffer:
a. 700 µL
b. 700 µL (optional)
c. 700 µL (optional)
5. Rehydrier-Arbeitslösung, 100 µL
6. Probenlösung, 10–12 µL
7. Molekulargewichtsmarker*
0,5–0,7 µL
* Kann kein SDS oder
Bromphenolblau enthalten
Legen Sie den Elektrodenchip ein
1
2
1. IEF-Elektrodenteil des Elektrodenchips
und IEF-Chipkanal des Lösungschips.
2. Setzen Sie den Elektrodenchip auf den
Gel- und Lösungschip, so dass der
Pfeil nach vorn weist.
IEF-Chip
Entfernen Sie die Schutzfolie des IEF-Chips.
Setzen Sie den IEF-Chip in seinen Steckplatz
im Elektrodenchip ein.
Bestätigen Sie vor dem Start der
Elektrophorese, dass:
• der Elektrodenchip (außer der Anoden- und
Kathodenkammer) nicht nass ist,
• die durchsichtige Abdeckung auf der
Kathodenseite des PAGE-Chips entfernt
wurde,
• alle erforderlichen Lösungen zugegeben
wurden.
Starten Sie die
Elektrophorese
Wählen Sie CLOSE > OK > START > OK
[SCHLIESSEN > OK > STARTEN > OK].
Die Elektrophorese beginnt.

30 31
20424817 Rev 06/21 20424817 Rev 06/21
Italian Italian
Italiano (Italian)
Uso previsto
Il dispositivo per elettroforesi Auto2D®
automatizza completamente il processo di
elettroforesi 2D, separando le proteineprima in
base al punto isoelettrico e poi in base al peso
molecolare. E possibile ottenere la completa
separazione delle proteine in circa due ore.
Contenuto
• Dispositivo per elettroforesi Auto2D®
• Cavi di alimentazione elettrica:
• cavo di alimentazione per Giappone
e Nord America
• adattatore 3P-2P per Giappone
e Nord America
• cavo di alimentazione per l’Europa
• cavo di alimentazione per la Cina
• cavo di alimentazione per il Regno Unito
Altri componenti necessari (non inclusi)
Per i numeri di catalogo, vedere la sezione
Ordine dei prodotti a pag. 51.
• Chip Elettrodo per Auto2D®
• Chip PAGE per Auto2D®
• Chip IEF per Auto2D®
• Chip Soluzioni per Auto2D®
• Kit di reagenti con tris glicina o Tris-Tricina
per Auto2D®
• Anfolita (scegliere l’anfolita appropriato
in base all’intervallo di pH del chip IEF)
• Acqua distillata
Manuale d’uso online
Il manuale d’uso completo include le istruzioni
dettagliate e i metodi. Può essere scaricato
dalla pagina relativa al dispositivo Auto2D®
su SigmaAldrich.com.
Conservazione e stabilità
Il dispositivo Auto2D®deve essere
utilizzato/conservato solo in ambienti chiusi.
Per le informazioni sulla conservazione,
si rimanda all’etichetta apposta su
ciascun componente.
YYPrecauzioni
Soltanto per scopi di ricerca.
Prima di utilizzare questo prodotto leggere
attentamente la scheda di sicurezza (allegata)
e il manuale d’uso completo nel sito
SigmaAldrich.com .
Flusso di lavoro dell’Auto2D®
Tempo richiesto: 100–155 minuti (a seconda
del metodo)
Preparazione del campione
Rimozione delle impurezze
Aggiunta dei reagenti
Caricamento del campione
e reidratazione del gel
Prima dimensione:
focalizzazione isoelettrica
Equilibrazione SDS
Seconda dimensione:
SDS-PAGE
Rilevazione
30 minuti
5 minuti
30 minuti
30 minuti
5 minuti
Preparazione
Reagenti
1. Preparare e conservare i kit di reagenti
come indicato nella documentazione
fornita o nel manuale d’uso completo
(online).
2. Lasciare che i seguenti prodotti,
conservati a basse temperature,
raggiungano la temperatura ambiente
(tenere a 20–25 °C per circa 10 minuti).
• Chip IEF
• Chip PAGE
• Soluzione di reidratazione
• Soluzione di DTT
• Anfolita
3. Preparare la soluzione di reidratazione
alla concentrazione di lavoro per
la reidratazione del chip IEF e per
l’estrazione/diluizione del campione
di proteine:
Reagenti Volume Concentrazione
finale
Soluzione di
reidratazione 189 µL
Soluzione di
DTT (1M) 10 µL 50 mM
Anfolita* 1–2 µL 0,5–1% v/v
Totale 200 µL
*scegliere l’anfolita appropriato in base
all’intervallo di pH del chip IEF Per gli
anfoliti alla concentrazione stock del
40%, aggiungere 1 µL. Per gli anfoliti
alla concentrazione 100X, aggiungere
2 µL.
4. Preparare il tampone di equilibrazione alla
concentrazione di lavoro per equilibrare
le proteine separate mediante IEF, prima
dell’SDS-PAGE.
Reagenti Volume Concentrazione
finale
Premix di
tampone di
equilibrazione 760 µL
Soluzione di
DTT (1M) 40 µL 50 mM
Totale 800 µL
Preparazione dei campioni
Aggiungere il campione di proteine alla
soluzione di reidratazione alla concentrazione
di lavoro preparata come descritto al punto
3. Il campione può essere diluito 2 volte o
più con tale soluzione, fino a raggiungere
la concentrazione proteica desiderata e la
concentrazione salina adeguata.
Un’eccessiva concentrazione di sale potrebbe
compromettere la separazione delle proteine
durante la focalizzazione isoelettrica o
causare un aumento della corrente a valori
superiori ai 100 µA. I campioni con un’elevata
concentrazione salina devono essere
desalinizzati mediante una delle seguenti
metodiche:
Precipitazione con TCA/acetone seguita da
risospensione nella soluzione di reidratazione
alla concentrazione di lavoro
OPPURE
Scambio di tampone su colonnina
da centrifuga
Nota: Durante la risospensione delle proteine,
evitare di riscaldarleoltre i 37 °C.
Quantificare le proteine. Nell’elettroforesi
2D è possibile caricare 0,1–25 µg di proteine.
La quantità ottimale dipende dal metodo di
rilevamento e dalla complessità del campione.
Come punto di partenza si consiglia di usare
le seguenti quantità di proteine; gli utenti
potrebbero dover ottimizzare la quantità da
caricare in relazione al loro campione specifico.
• Colorazione con blu di Coomassie: 25 µg
• Colorazione fluorescente: 10 µg
• Colorazione argentica: 5 µg
• Pre-marcatura fluorescente 3 µg
Il volume di campione da caricare nel
dispositivo è di 10–12 µL. Se necessario,
il campione può essere diluito con la soluzione
di reidratazione alla concentrazione di lavoro.

32 33
20424817 Rev 06/21 20424817 Rev 06/21
Italian Italian
Alimentazione del
dispositivo Auto2D®
Scegliere il cavo di alimentazione (fornito con
il dispositivo) compatibile con le prese
di corrente del proprio paese. Inserire nella
parte posteriore del dispositivo Auto2D®la
spina corrispondente del cavo e l’altra nella
presa di corrente.
L’interruttore si trova accanto alla presa per
la spina CA posta sul retro del dispositivo
Auto2D®Premere l’interruttore verso l’alto
per accendere.
L’applicazione si avvierà in automatico.
Sullo schermo, selezionare la modalità
Auto2D®(original)
Impostare il metodo
Selezionare SETTING > RECIPE. Toccare la
schermata Recipe Information. Apparirà la
finestra di dialogo per la selezione del metodo.
Selezionare il nome del metodo > LOAD >
OK > EXIT.
Nota: Verificare che il nome del metodo
desiderato compaia nella parte superiore
destra dello schermo.
Assemblaggio del chip
Chip PAGE
Lato del catodo
Lato dell’anodo
1. Rimuovere il nastro bianco sul lato
dell’anodo del chip.
2. Rimuovere con attenzione la copertura di
plastica sul lato del catodo del chip.
3. Sciacquare delicatamente con acqua
distillata i pozzetti per il tampone
dell’anodo e del catodo. Utilizzando una
salviettina di carta, asciugare la parte
superiore del chip stando attenti a non
danneggiare la sottile striscia di gel
situata sul lato del catodo.
Inserire i chip nel vassoio
Sul touchscreen del dispositivo Auto2D®
selezionare OPEN > OK. Apertosi il vassoio,
posizionare il chip PAGE (linea azzurra) con
la parte dell’anodo posta anteriormente.
Posizionare il chip Soluzioni (linee blu scuro)
sopra al chip PAGE, orientandolo con gli angoli
tagliati in posizione anteriore.
Aggiungere le soluzioni
7
6
5
1
2
4
a
b
c
3
3
1. Tampone per il catodo 4500 µL
2. Tampone per l’anodo, 4000 µL
3. Acqua distillata, 4000 µL
4. Tampone di equilibrazione alla
concentrazione di lavoro
a. 700 µL
b. 700 µL (opzionale)
c. 700 µL (opzionale)
5. Soluzione di reidratazione, 100 µL
6. Soluzione contenente il campione,
10–12 µL
7. Marcatore di peso molecolare*
0,5–0,7 µL
* Non deve contenere SDS
o blu di bromofenolo
Posizionare il chip Elettrodo
1
2
1. Porzione del chip Elettrodo destinata al
chip IEF e alloggiamento per il chip IEF
del chip Soluzioni.
2. Posizionare il chip Elettrodo su gel e
chip Soluzioni assemblati in modo che
il segno sia rivolto in avanti.

34 35
20424817 Rev 06/21 20424817 Rev 06/21
Italian Italian
Chip IEF
Rimuovere la pellicola protettiva del chip IEF.
Inserire il chip IEF nell’alloggiamento indicato
dal punto bianco posto sul chip Elettrodo.
Prima di iniziare la corsa elettroforetica,
verificare quanto segue:
• il chip Elettrodo non deve essere bagnato
tranne che a livello della camera dell’anodo
e del catodo
• la copertura trasparente sul lato catodico
del chip PAGE deve essere stata rimossa
• le soluzioni richieste devono essere
state aggiunte.
Avviare l’elettroforesi
Selezionare CLOSE > OK > START > OK.
L’elettroforesi avrà inizio.
Dopo l’elettroforesi
Rimuovere il gel
Selezionare OK > OPEN > OK.
1. Rimuovere e smaltire il chip IEF e le
soluzioni rimaste nel chip Soluzioni
Vedere la sezione smaltimento.
2. Rimuovere il chip PAGE e sciacquare
con acqua distillata.
3. Aprire la cassetta con la spatola.
4. Segnare l’orientamento del gel facendo
un piccolo taglio su uno degli angoli.
Questo consentirà di distinguere nel gel
tra lato alcalino e acido e tra quello dei
pesi molecolari alti e bassi (vedere sotto).
Alto peso
molecolare
Basso
peso
molecolare
Acido
Alcalino
Pulizia
Dopo l’uso, pulire immediatamente il chip
Elettrodo con acqua distillata e lasciarlo
asciugare all’aria.
Spegnimento
Selezionare MENU > EXIT APPLICATION >
OK > SYSTEM/OS SHUT DOWN > OK
Spegnere l’interruttore sul retro del
dispositivo Auto2D.
Nota: Se all’interno del dispositivo fosse
presente della condensa, prima di spegnere
l’alimentazione lasciare aperto il vassoio per
farlo asciugare.
Smaltimento
I componenti entrati in contatto con i campioni
devono essere smaltiti come rifiuti biologici.
Gli altri materiali vanno smaltiti nel rispetto
delle normative vigenti internazionali, statali,
regionali e locali. Fare riferimento alla scheda
di sicurezza dei componenti per informazioni
sui potenziali pericoli.
Avvertenza
Ai nostri Clienti forniamo informazioni e
consigli su tecnologie applicative e questioni
legislative al meglio delle nostre conoscenze e
capacità, senza che ciò comporti alcun obbligo
o responsabilità da parte nostra. In ogni caso
i Clienti sono tenuti all’osservanza delle leggi
e delle norme in vigore, anche in relazione
a eventuali diritti di terzi. Le informazioni e
gli avvisi forniti non sollevano i Clienti dalla
responsabilità di verificare l’idoneità dei nostri
prodotti per lo scopo perseguito.
Le informazioni contenute in questo documento
possono essere modificate senza preavviso e
non devono, quindi, essere interpretate come
una dichiarazione d’impegno da parte del
produttore, del venditore o di loro affiliate.
Decliniamo qualsiasi responsabilità per
eventuali errori presenti.
Per contattarci
Per l’indirizzo della sede più vicina,
consultare SigmaAldrich.com/offices.
Assistenza tecnica
Visitare la pagina del Servizio Tecnico
SigmaAldrich.com/techservice
Condizioni generali
di garanzia
Le condizioni di garanzia applicabili ai prodotti
citati nella presente pubblicazione possono
essere consultate alla pagina
SigmaAldrich.com/terms.

36 37
20424817 Rev 06/21 20424817 Rev 06/21
Japanese Japanese
日本語 (Japanese)
用途
Auto2D®電気泳動デバイスは2D電気泳動のプロセスを
完全に自動化し、タンパク質分離をまず等電点で、次い
で分子量で分離します。わずか2時間でタンパク質の分離
が完了します。
梱包内容
• Auto2D®電気泳動装置
• 電 源 ケ ー ブ ル:
• 日本、北米用電源ケーブル
• 日本、北米用3P→2P変換プラグ
• 欧州用電源ケーブル
• 中国用電源ケーブル
• 英国用電源ケーブル
他 に ご用 意 い た だくも の (同梱されていません)
カタログ番号は51ページの「製品注文」をご覧ください。
• Auto2D® Electrode Chip
• Auto2D® PAGE Chip
• Auto2D® IEF Chip
• Auto2D® Solution Chip
• Auto2D® Tris-Glycineまたは
Tris-Tricine Reagent Kit
• アンフォライト (IEF ChipのpH範囲に応じて適切
な アンフォライト を 選 んでくだ さ い )
• 蒸留水
オンラインユーザーガイド
完全版のユーザーガイドには、詳細な手順とレシピが含
ま れ て い ま す 。 SigmaAldrich.comのAuto2D®装置製品
ページからダウンロードしてください。
保管および安定性
Auto2D®装置は屋内でのみ使用、保管してください。保管
に関する要件については、各コンポーネントの製品ラベ
ルをご覧ください。
YY 注意事項
本製品は研究用です。
本製品使用前にはSafety Sheet(同梱)と
SigmaAldrich.comの ユ ー ザ ー ガ イド完 全
版 を お 読 み く だ さ い 。
Auto2D®のワークフロ ー
全プロセス: 100~155分(レシピによる)
試料の調製と不純物の除去
試薬のアプライ
試料の導入とゲルの膨潤
1次元目:
等電点電気泳動
SDS平衡化
2次元目:
SDS-PAGE
検出
30分
5分
30分
30分
5分
準備
試薬
1. 試薬キットの調製を、キット同梱の文書または完
全版のユーザーガイド(オンライン)に従って行い
ます。
2. 低温で保管されている下記の製品を室温になじま
せます(20~25°C、約10分間)。
• IEF Chip
• PAGE Chip
• Rehydration Solution
• DTT Solution
• アンフォラ イト
3. IEF Chipの膨潤およびタンパク質試料の抽出/希
釈のためのワーキングRehydration solutionを
調 製 し ま す 。
試薬 体積 最終濃度
Rehydration
Solution 189 µL
DTT Solution
(1M) 10 µL 50 mM
アンフォラ イト 両
性電解質* 1~2 µL 0.5~1% v/v
合計 200 µL
* アンフォライトはIEF ChipのpH範囲に合わせ
て選んでください。40%原液のアンフォライトは
1µLを加えてください。100倍濃度のアンフォライ
トは2µLを加えてください。
4. SDS-PAGE前のタンパク質の平衡化用にワーキン
グEquilibration Bufferを調製してください。
試薬 体積 最終濃度
Equilibration
Buffer Premix 760 µL
DTT Solution
(1M) 40 µL 50 mM
合計 800 µL
試料の調製
タンパク質試料を、ステップ3に従って調製したワーキン
グRehydration solutionに溶解させます。液体の試料は
ワーキングRehydration solutionで2倍以上に希釈して、
目的のタンパク質濃度にし、塩濃度を出来るだけ減少さ
せ る よ う に し て く だ さ い 。
塩濃度が高いと等電点電気泳動中に電流が100µAを
超え、タンパク質分離に影響することがあります。高塩
濃度の試料は次の内何れかの方法で脱塩を実施してく
ださい。
TCA/アセトン沈殿処理からのワーキング
Rehydration solutionによる再懸濁
または
スピンカラムを用 いたワーキング
Rehydration solutionへの交換
注:タンパク質の再懸濁中、タンパク質を37 °C以上に加
熱しな い でくだ さい 。
試料中のタンパク質を定量してください。Auto2Dには0.1
~25µgのタンパク質を導入できます。タンパク質の適量
は検出方法と試料の複雑さによって異なります。次のタン
パク質量をまず試してから、個々の試料に応じた最適な
導入量を決定してください。
• CBB染色液による検出: 25 µg
• 蛍光染色液による検出: 10 µg
• 銀染色: 5 µg
• 蛍光pre-labeling: 3 µg
デバイスにアプライ出来る試料の体積は10~12 µLです。
試料は必要に応じてワーキングRehydration solutionで
希釈してください。
Auto2D®装置の電源を入れる
各国の電源コンセントに適切な電源コード(同梱)を選
択します。コードの片端をAuto2D
®
装 置 の イ ン レット に しっ
かりと差し込み、プラグをコンセントに差し込みます。
電源スイッチはAuto2D
®
装置背面のACプラグポートの隣
にあります。スイッチを上 に押し上 げて電 源を入 れます。
アプリケーションは自動的に起動します。画面から
Auto2D
®
モード(オリジナル)を選択します。

38 39
20424817 Rev 06/21 20424817 Rev 06/21
Japanese Japanese
レシピの読み込み
SETTING → RECIPE を選択します。Recipe Information
(レシピ情報)画面をタッチします。Recipe Selectionダ
イアログボックスが表示されます。
”RECIPE NAME” → LOAD → OK → EXIT を選択します。
注:使いたいレシピ名が画面右上に表示されていること
を確認します。
チップの準備
PAGE Chip
Eチップ
陰極側
陰極側
1. チップの陽極側にある白いテープをはがします。
2. チップ の 陰 極 側 に あるプラスチックの カバ ー を 慎
重に取り外します。
3. 陽極と陰極のバッファー溝を蒸留水で優しくすすぎ
ます。紙ワイパーを用いてチップ外側の液体を拭き
去ります。この際チップの陰極側に露出している細
長いゲルに傷をつけないように気をつけます。
チップをトレ イに セットする
Auto2D®装置のタッチスクリーンで OPEN → OK
を選択します。トレイが開いたら、PAGE Chip(水色の
ライン)を陽極側を手前にして置きます。Solution Chip
(濃青色のライン)をPAGE Chipの上に、角の取れた
側 を手 前 にして置きます。
溶液の注入
7
6
5
1
2
4
a
b
c
3
3
1. Cathode Buffer、4500 µL
2. Anode Buffer、4000 µL
3. 蒸留水、4000 µL
4. ワーキングEquilibration Buffer
a. 700 µL
b. 700 µL(オプション)
c. 700 µL(オプション)
5. ワーキングRehydration solution、100 µL
6. 試料、10~12 µL
7. 分子量マーカー* 0.5~0.7 µL
*SDSまたはブロモフェノールブルーを含
有するものは使えません
Electrode Chipをセットする
1
2
1. Electrode ChipのIEF電極部分とSolution Chipの
IEF溝を合わせる
2. が手前になるように、組み上がったPAGE Chip
とSolution Chipの上にElectrode Chipをセット
します。
IEF Chip
IEF Chipの保護フィルムを取り除きます。
Electrode ChipのスロットにIEF Chipを挿入します。
「電気泳動の開始」前に次を確認します。
• Electrode Chipの陰極、陽極チェンバー以外の部分
は濡れていない。
• PAGE Chipの陰極側にある透明なカバーは取り外
してある。
• 必要な溶液が全てアプライされている。
電気泳動の開始
CLOSE → OK → START → OK を選択します。
電気泳動が始まります。
This manual suits for next models
1
Table of contents
Languages:
Other Merck Laboratory Equipment manuals

Merck
Merck MilliSentials MISELLABST User manual

Merck
Merck Millipore DiluCult User manual

Merck
Merck Millipore mPAGE User manual

Merck
Merck Millipore Scepter 3.0 Installation guide

Merck
Merck Milli-Q EQ 7008 User manual

Merck
Merck Millipore ReadyStream User manual

Merck
Merck Millipore CellASIC ONIX2 User manual

Merck
Merck DiluCult User manual

Merck
Merck APC SmartTouch User manual

Merck
Merck Millipore Milliflex User manual