Merck Milli-Q EQ 7008 User manual
SigmaAldrich.com
User Manual
Milli-Q®EQ 7008/7016
Ultrapure Water Systems

2
Table of contents
INTRODUCTION 1
System identication 1
Intended use 1
Installation component 2
Water process 5
QUICK START 8
Exit screensaver 8
Dispense pure water 8
Water quality values 9
Dispense archiving 9
View & manage Alerts and Alarms 10
Navigate the screen interface 11
Collect RO water from the tank front valve 13
CONSUMABLE MENU 14
Consumables identication with card reading 15
INFORMATION MENU 16
System 16
History 16
Flow schematic 17
SETTINGS MENU 18
Manager access (& password) 19
System conguration 20
HMI conguration 21
Accessories 22
Alarm conguration 23
Connectivity 24
Date Time & Language 24
Units 25
MAINTENANCE MENU 26
Consumable installation wizards 26
Cleaning & Sanitization 29
UV lampe 30
Depressurization 30
SELF HELP GUIDE 32
Troubleshooting tips 32
Icons 35
REQUIREMENTS AND SPECIFICATIONS 36
Water specications 36
System specications 37
Power and water consumption 39
Dimensions and weights 40
Ordering information 42
LEGAL INFORMATION & WARRANTY 44

Introduction 3
INTRODUCTION
Congratulations!
Thank you for buying a Milli-Q® water purication system.
The Milli-Q® EQ 7008/7016 water purication system produces ultrapure and pure water from a tap
water source. Installation of this product should be performed by a qualied service representative
with access to installation documentation.
This user manual is a guide to be followed during the normal operation and maintenance of a Milli-Q®
EQ 7008/7016 water purication system. It is highly recommended to fully read this manual and
comprehend its contents before using the water purication system.
System identication
System Catalogue number Production ow
rate Voltage Frequency
Milli-Q® EQ 7008
water system
(includes HMI)
ZEQ7008T0C 8 L/h 100-240 V 50/60 Hz
Milli-Q® EQ 7016
water system
(includes HMI)
ZEQ7016T0C 16 L/h 100-240 V 50/60 Hz
Manufacturing site:
Millipore SAS, 67120 Molsheim, France
For more information on your Milli-Q® system, please call your local representative or visit our website
www.sigmaaldrich.com.
Intended use
The Milli-Q® EQ 7008/7016 system is intended to produce ultrapure (type 1) and pure water from a tap
water source primarily for use in research and quality control in a variety of laboratories worldwide.
The product is designed to produce ultrapure and pure water with specic characteristics (refer to
the requirements and specications section) when it leaves the Q-POD® unit, provided that it is
fed with water quality within specications and properly maintained as required by the supplier.
We do not warrant the product for any specic application. It is up to the user to determine if
the quality of the water produced by the product matches their expectations, ts with
norms/legal requirements and to bear responsibility resulting from the usage of the water.
The product is not intended to produce: water for injection, water for dialysis, sterile water for irrigation
or injection, bacteriostatic water for injection, sterile puried water in containers, and sterile water for
injection in container or ingestion. The product is not intended to be used in explosive environments
according to ATEX Directive – equipment & protective systems intended for use in potentially explosive
atmospheres. In addition the product is not intended as a Medical Device, including In-Vitro Devices.

Introduction 4
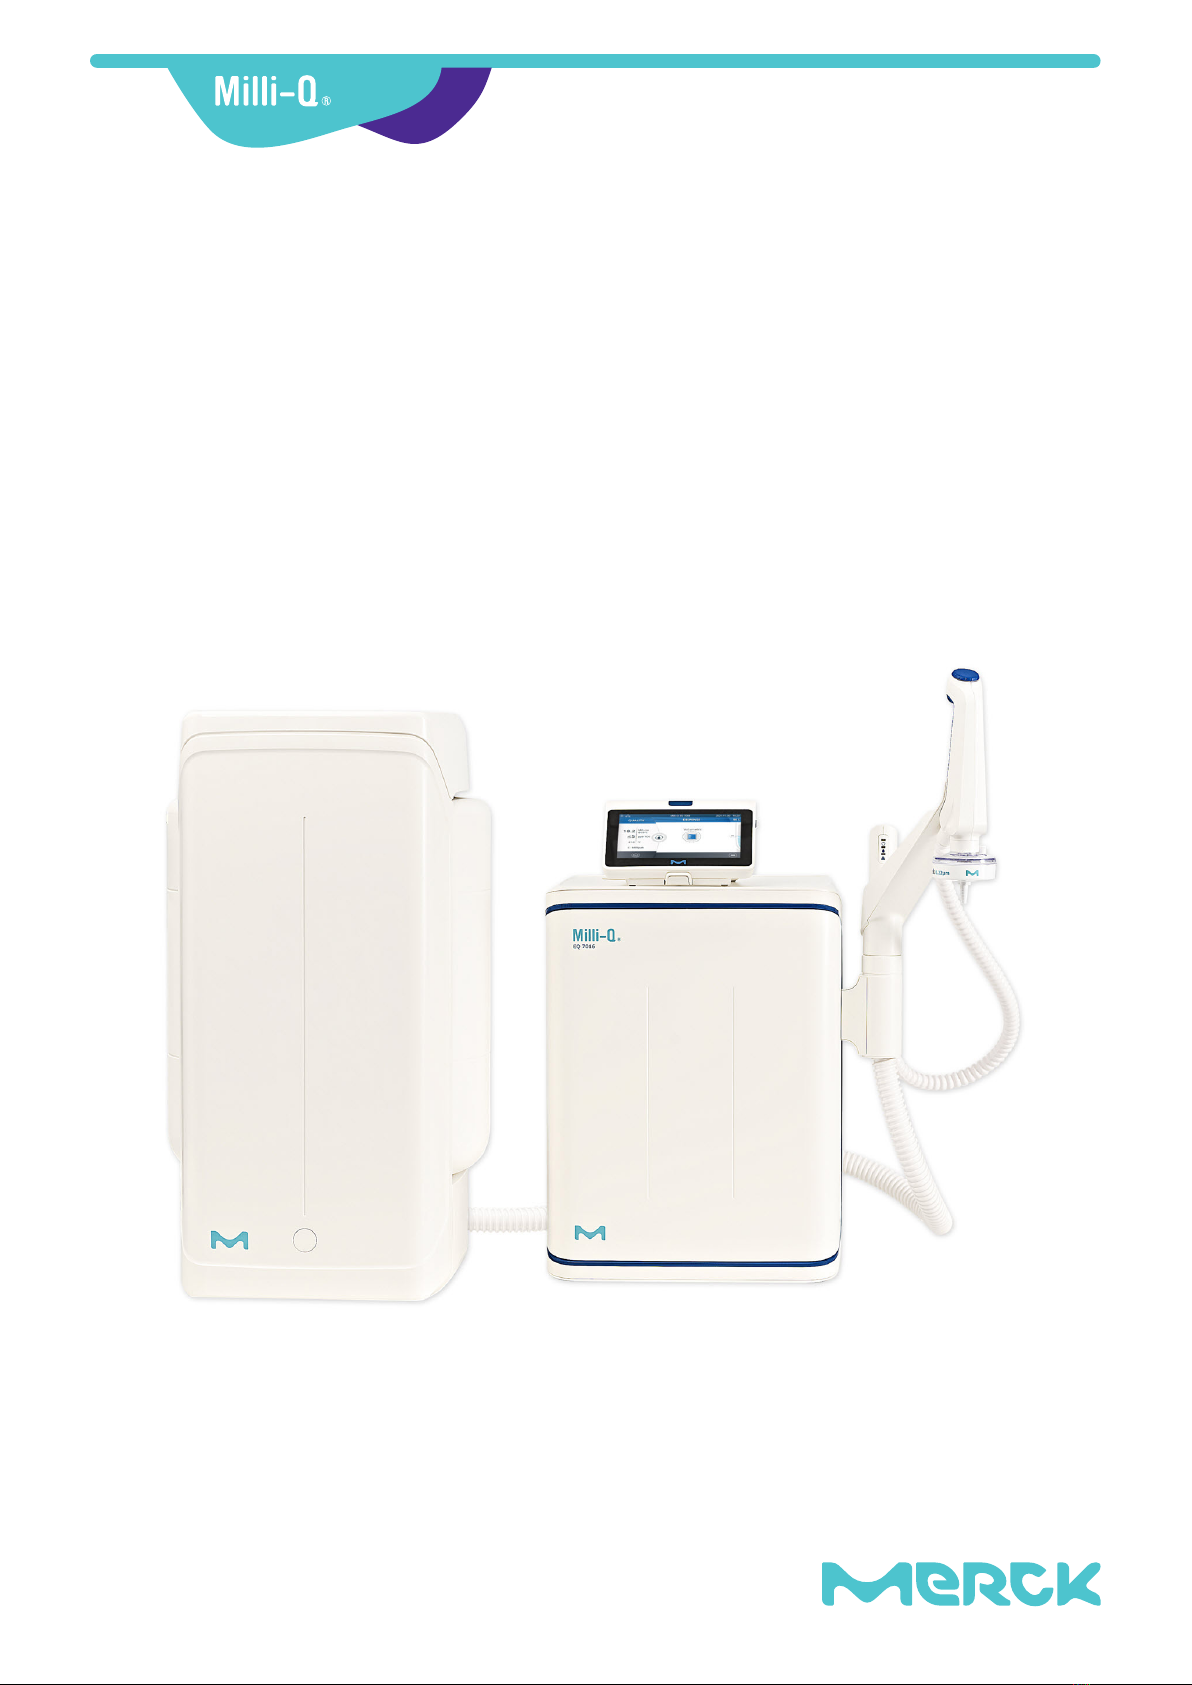
Installation components
Milli-Q® EQ 7008/7016 water system consists of at least 4 dierent components: water system
(Milli-Q® EQ 7016 on the photographs below), tank, HMI (human machine interface) display and
Q-POD® unit (Point of Dispense of ultrapure water).
1Front view of benchtop located Milli-Q®
EQ 7016 with Q-POD®unit and HMI 4Rear view of a Milli-Q® EQ 7016 system
2HMI display (bench top solution) 5Front cover
3
Front view of a wall mounted solution of
a Milli-Q® EQ 7016 water system with
Q-POD®unit and HMI
6Storage tank (50 L capacity in this ex-
ample)
1 2 3
4 5 6
Introduction 5
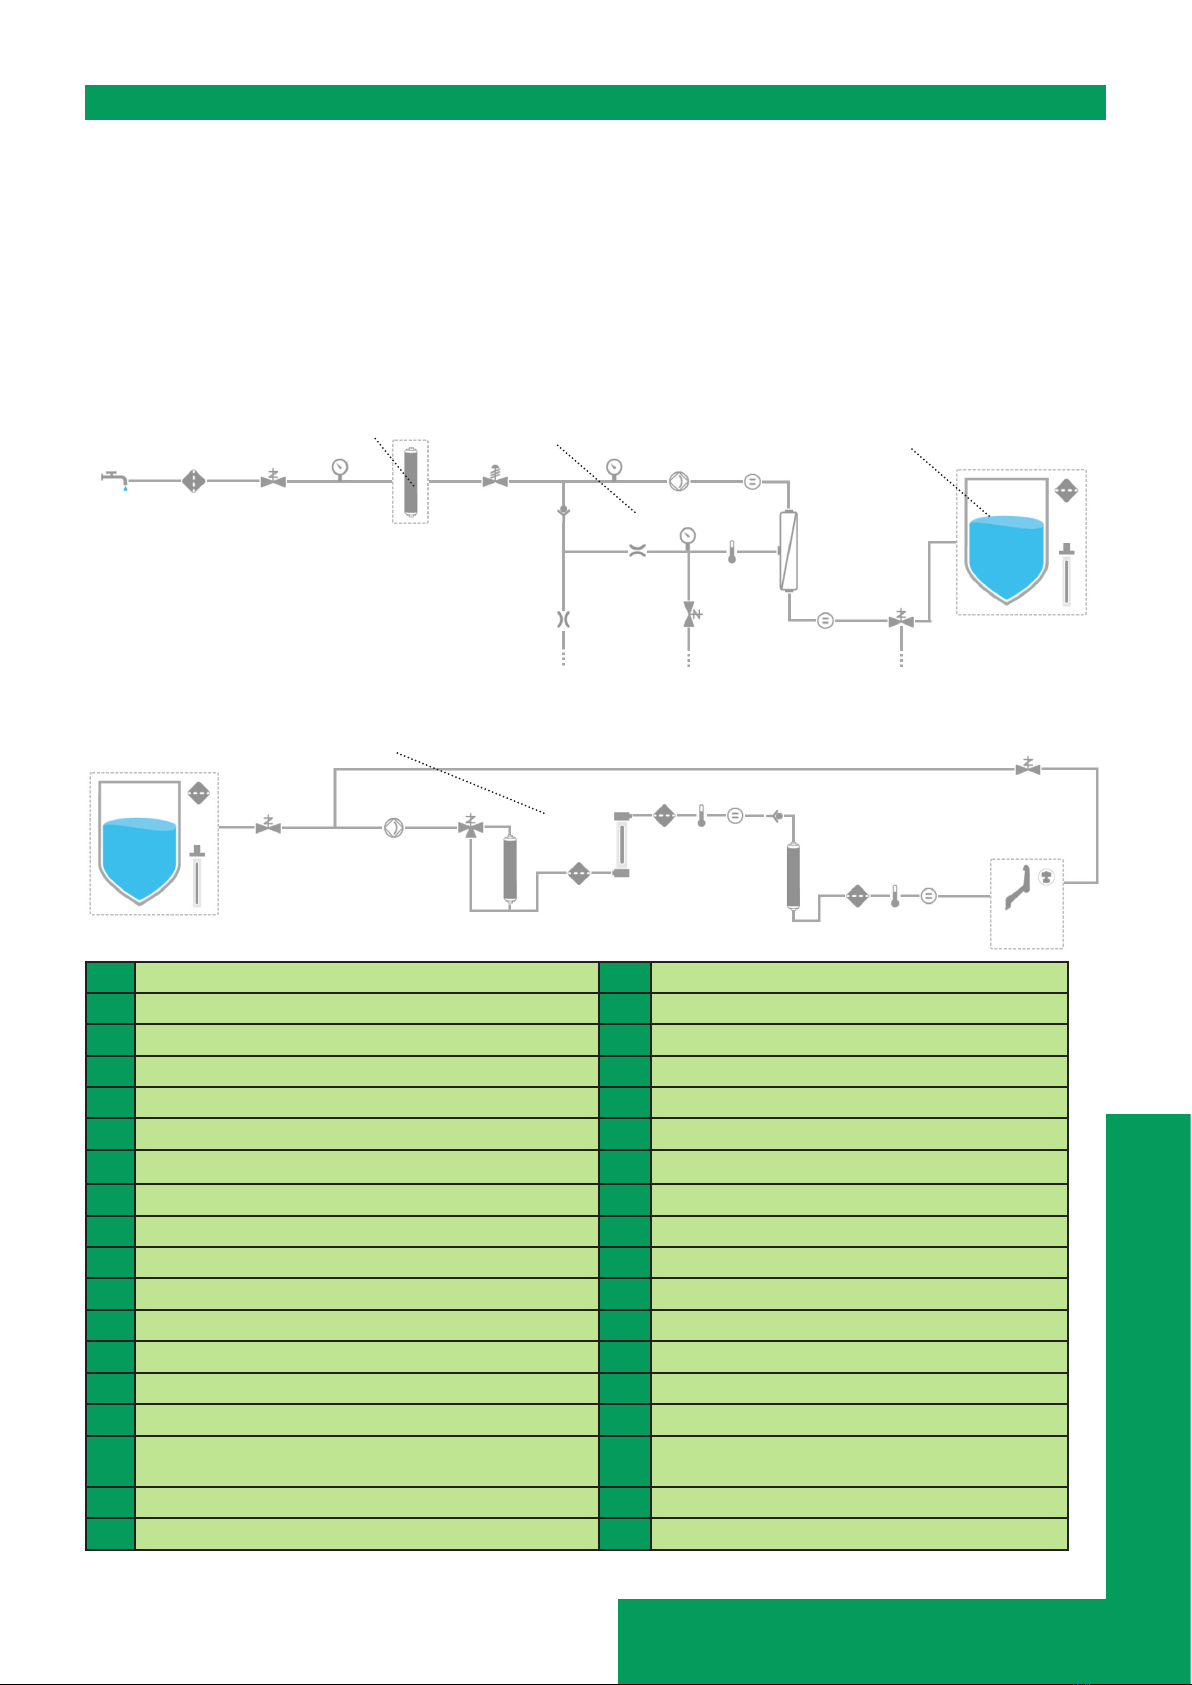
Water process
The Milli-Q® EQ 7008/7016 water system manages the production and the distribution of ultrapure
(Type 1) and pure water from a tap water source. It is composed of three dierent sections:
• Water purication unit manages the production of ultrapure water. It produces and lls the storage
tank with RO quality water.
• Storage tank stores and maintains the RO water quality.
• Point of dispense (Q-POD®unit) manages the dispensing of ultrapure water. ‘Check and Dispense’
LEDs provide information about the performance of the system.
Production ow-schematic
Distribution ow-schematic
1Tap feed water 19 Storage tank (25, 50 or 100 L)
2Inlet strainer 20 Tank vent lter
3Inlet solenoid valve 21 Automatic sanitization module [OPTION]
4System feed pressure sensor 22 Distribution inlet solenoid valve
5IPAK Gard® pretreatment pack 23 Recirculation loop
6Pressure regulator 24 Distribution pump
7RO recovery loop 25 TOC indicator 3-way valve
8RO pump feed pressure sensor 26 IPAK Meta® polishing cartridge
9Reverse osmosis (RO) reject capillary 27 Strainers
10 Flow controller 28 UV lamp
11 RO ush solenoid valve 29 Intermediate thermistor
12 RO pump 30 Intermediate resistivity cell
13 Feed conductivity cell 31 IPAK Quanta® polishing cartridge
14 RO pressure sensor 32 Milli-Q® product thermistor
15 Thermistor 33 Milli-Q® product resistivity cell
16 RO membrane (1 for Milli-Q® EQ 7008 or 2 for
Milli-Q® EQ 7016 water systems) 34 Q-POD®unit
17 Permeate conductivity cell 35 Application POD-Pak
18 Permeate 3 way valve 36 Recirculation solenoid valve
1 2 3 45
6
9
812
10
11
13
14 15
16
17
7
18
19
20
19
20
22
23
24 25
26 27
27
27
28 29 30
31 32 33
34
36
35
21
21

Introduction 6
This system uses potable tap water as feed and produces ultrapure (Type 1) delivered by 1 Q-POD®
unit.
The system is divided into three sections. These are the production, the storage and the distribution.
Production: Tap water is rst puried by the IPAK Gard® pretreatment pack
which retains particles greater than 0.5 microns and removes chlorine. This helps
to prevent clogging and/or chlorine oxidation of the reverse osmosis cartridge(s).
Following the IPAK Gard® pretreatment pack, water is puried using Reverse Osmosis (RO). This is
used to remove a large percentage of ions, particles, bacteria, and large size organic molecules. The
water from this purication stage is called permeate water. This is the water that lls the storage tank.
Storage: The RO water is stored in high-quality polyethylene tank, which is equipped with
a vent lter and as a potential option with the mercury-free ech2o® automated sanitization
module (ASM) lamp. The tank vent lter maintains the consistent purity of stored water and
provides eective protection against airborne contaminants. The optional ech2o® ASM lamp
further protects the integrity of the stored water with regular exposure to bactericidal UV light.
Distribution: resistivity, TOC temperature and pressure are monitored. Tank is congured with a 2 or
5 meters connectors to the main production unit depending on the laboratory setting. The RO water
stored in the tank, is puried one step further by the IPAK Meta® polishing cartridge composed of ion-
exchange resins, removing the bulk of the ions. Water then ows to the UV oxidation lamp. Organic
molecules are partially oxidized, resulting in a release of ions. These can then be captured in the next
stage when the puried water enters the IPAK Quanta® polishing cartridge, composed of ion-exchange
resins and synthetic activated carbon. The IPAK Meta® and IPAK Quanta® polishing cartridges always
need to be replaced together to ensure optimal purication down to trace levels of contaminants.
Throughout the purication steps, quality parameters are monitored with resistivity and temperature
sensors and the TOC (total oxidizable carbon) indicator. The TOC indicator gives an indication of the
total organic content measured in ppb at the point of distribution.
The Q-POD®dispenser is detachable from its support. The dispenser uses an adjustable selector
wheel which allows dispensing of water at either a low, medium or high ow, from 0.5 to up to higher
than 1.8 L/min. At the outlet of the dispenser, the nal purication is performed by the application-
specic POD-Pak.
The large 7” touchscreen on the HMI oers a wide range of applications for users. It also has a USB
port to easily export data.
Introduction 7
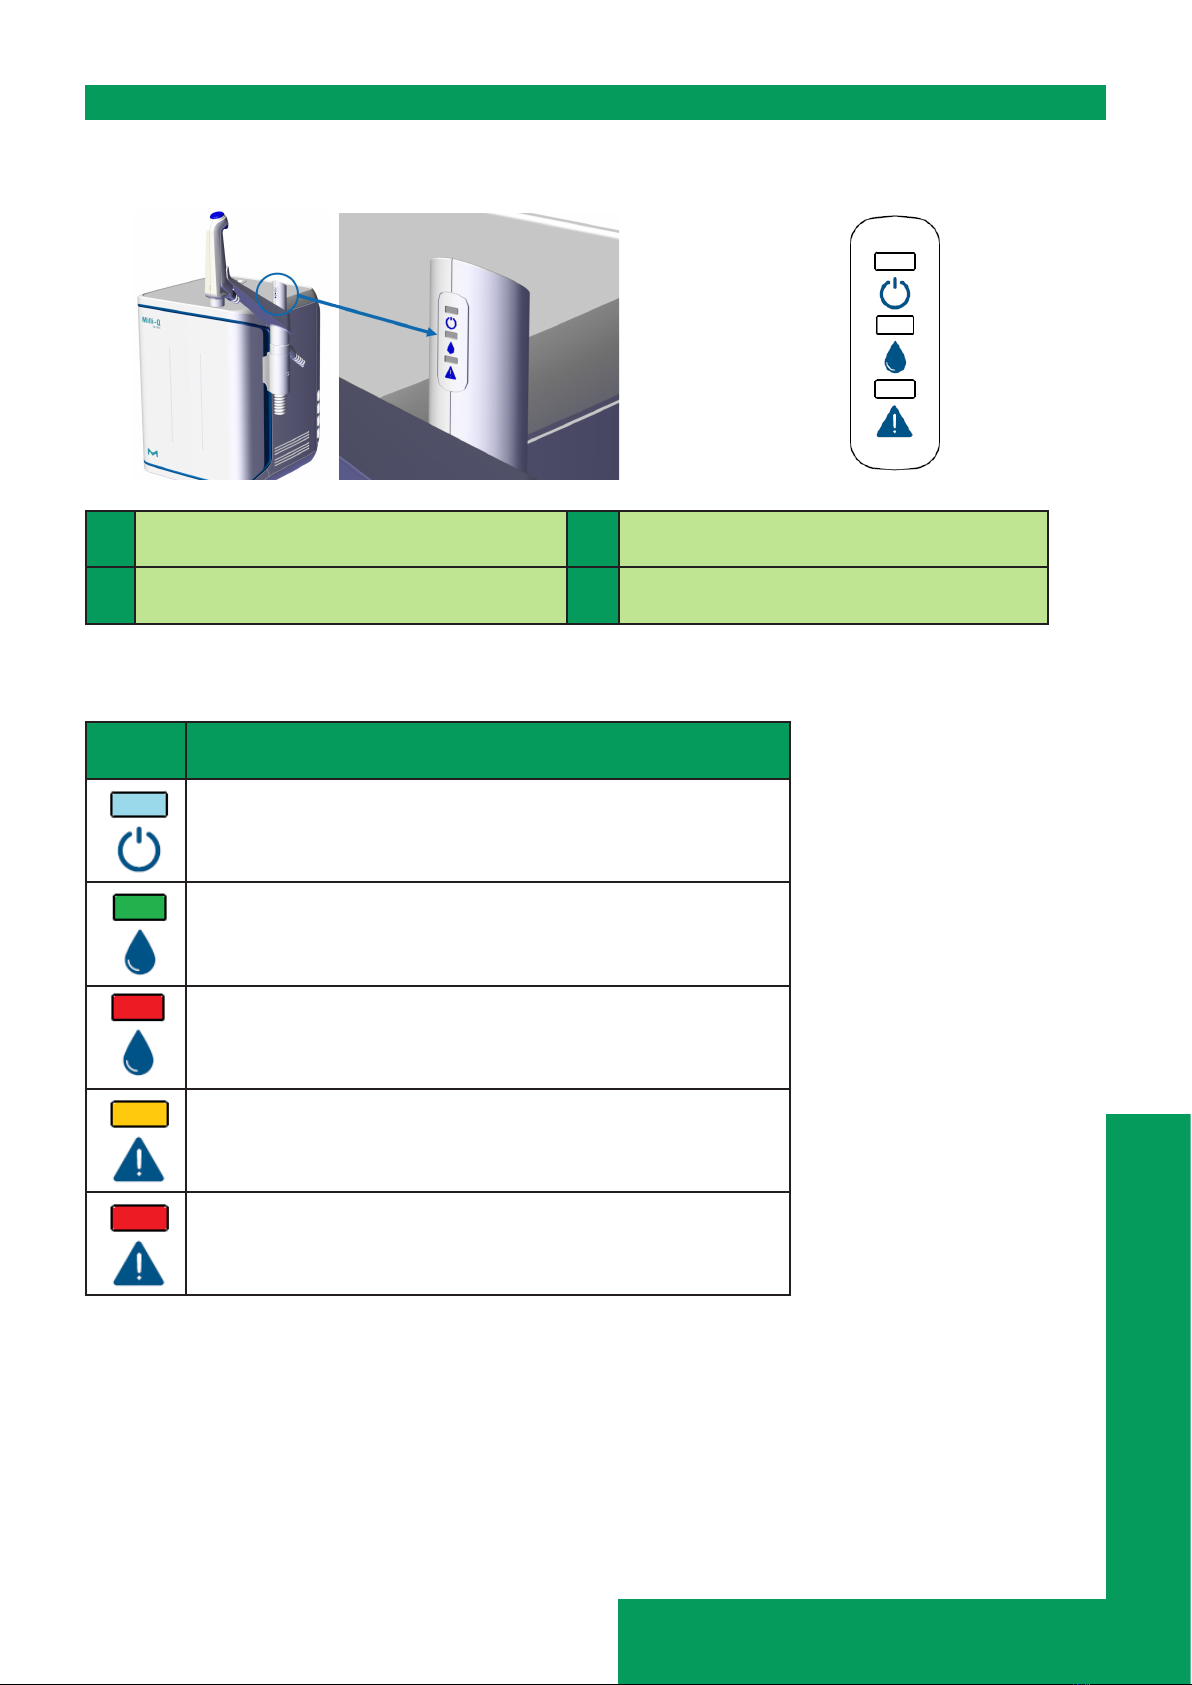
LEDs overview
On the Q-POD® unit, 3 ‘check and dispense’ LEDs indicate the dierent states of the system:
1LEDs on the Q-POD®mast 3Water Quality LED
2System Power LED 4System Alarm / Alert LED
LEDs description
LED Meaning
2
The system is powered on.
STEADY: The water quality ts the requirements (water
quality values are below alarm setpoints).
BREATHING: The system is in recirculation mode.
A water quality alarm is raised.
An alert or alarm is raised.
An alarm stop has occurred. A portion or all of the
system has stopped for safety reason.
Note:
- The 3 LEDs light up when powering the system on.
- The 3 LEDs are breathing in case of maintenance (see page 26)
1
2
3
4
Quick start 8
QUICK START (after installation performed by a qualied eld service representative)
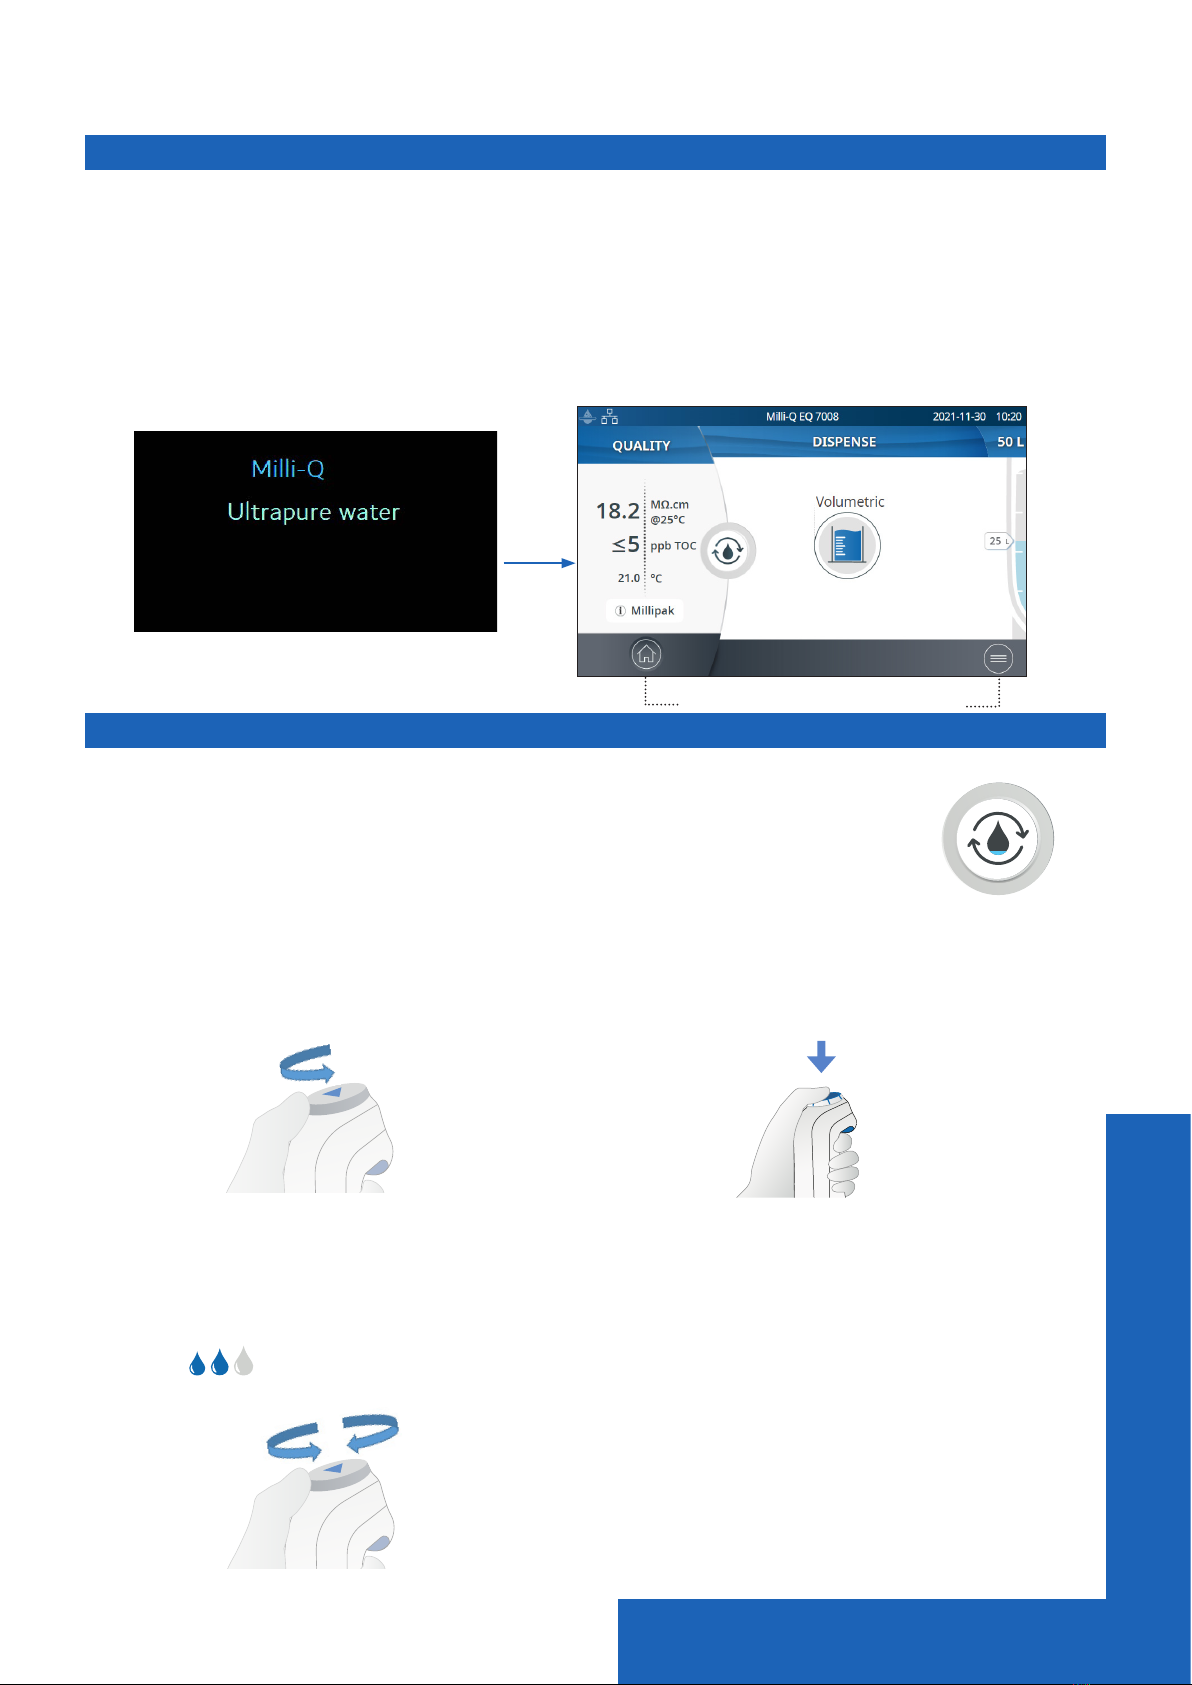
Exit screensaver
A screensaver automatically appears after a few minutes if the HMI touchscreen is not used.
Screensaver
Tap anywhere on the screen or initiate a manual dispense by pressing the dispenser wheel to exit
the screensaver.
Dispense ultrapure water
It is a good practice to recirculate water for a minute or longer before dispensing.
To do this, press on the recirculation icon,
this also refreshes the water quality parameters:
• Product resistivity
• TOC
• Temperature
There are several options to dispense ultrapure water:
Manual Dispensing
To start dispensing in low ow, turn the dis-
pense wheel one notch counter-clockwise.
To start dispensing at full ow, press down on
the dispense wheel.
Adjust owrate Stop
To increase the ow rate keep turning the
wheel counter-clockwise until full ow is
reached. To decrease the ow rate, turn the
wheel clockwise.
Low ow Full ow
To stop dispensing, press down on the wheel
or rotate the wheel clockwise until no more
water ows from the dispenser.
+
+_
Recirculate
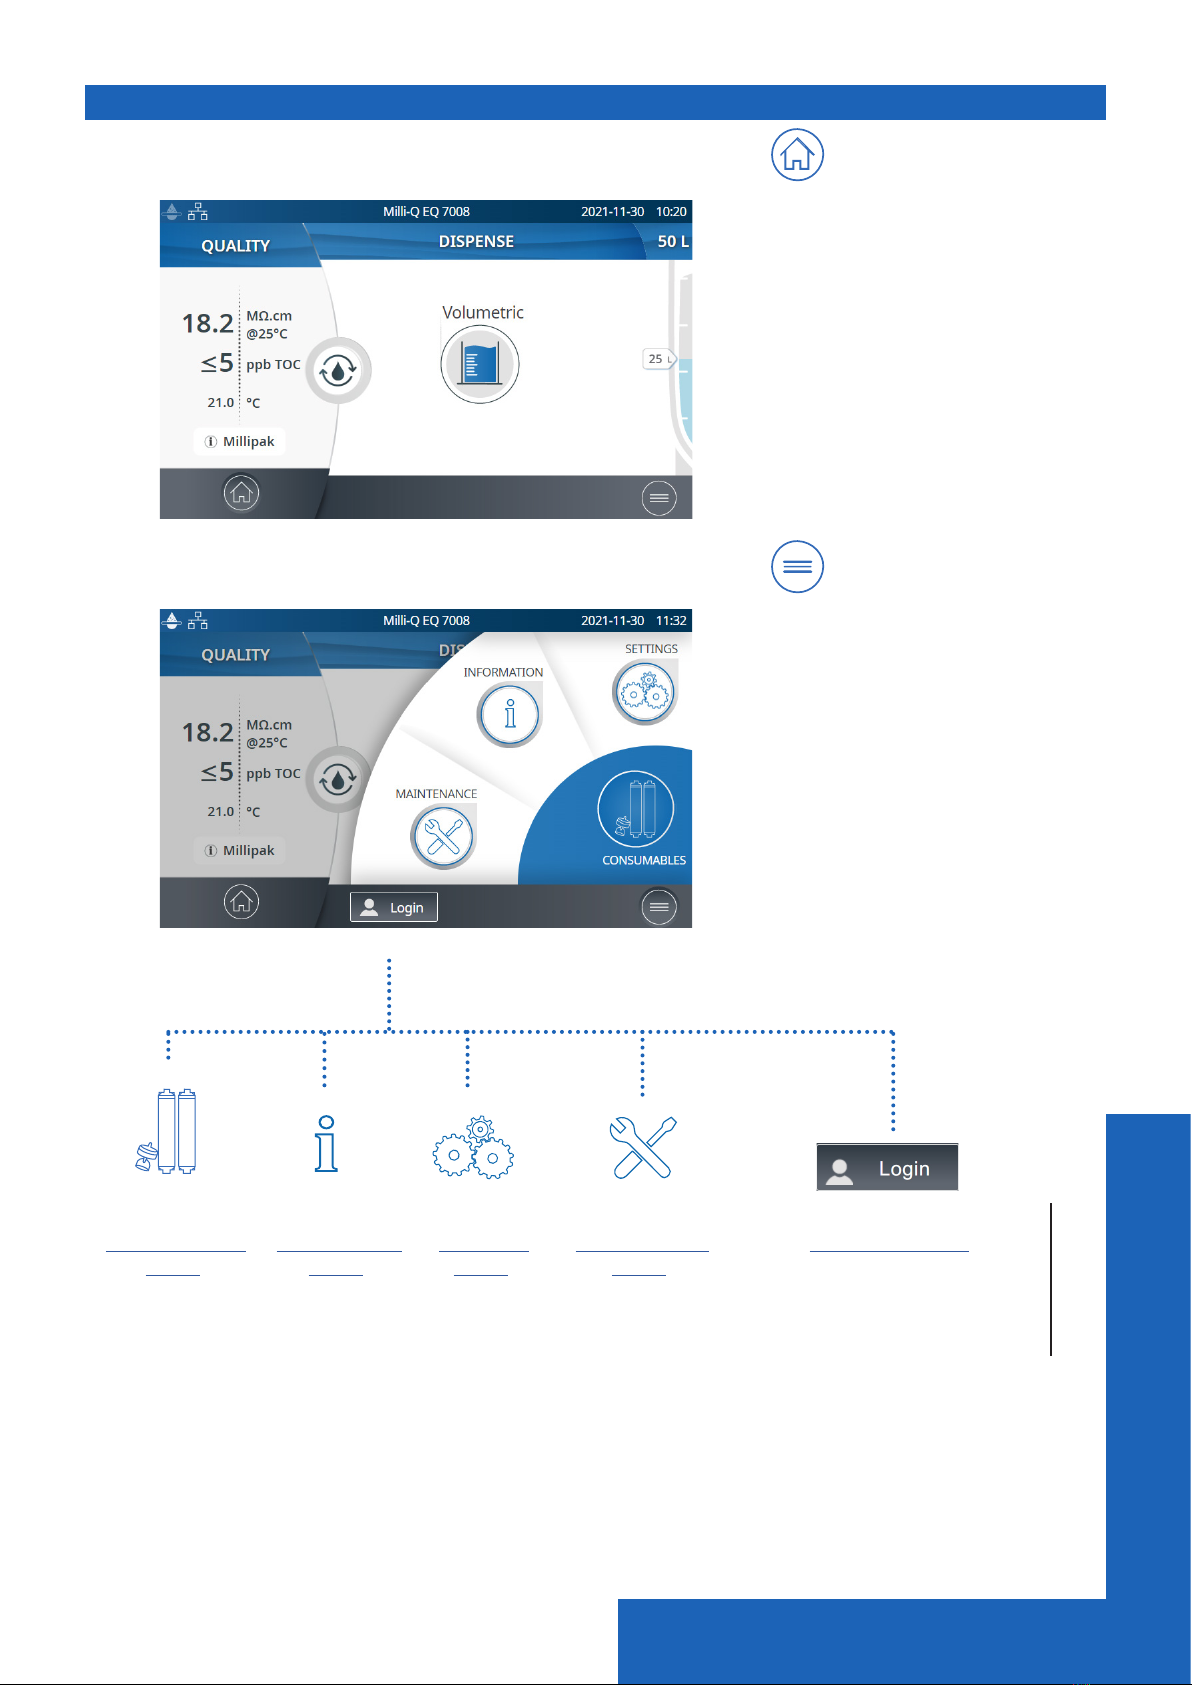
Home screen
Status bar
Home Menu

Quick start 9
Volumetric Dispensing
Enables a user to auto dispense a pre-selected volume (10mL up to 25L using the custom value).
Note: Make sure there is enough water in the storage tank before dispensing.
The water level in the storage tank is displayed on the right side of the HMI home screen:
Select the volume to dispense, press ok to
validate. The input value can be customized,
go to page 21 Settings > System conguration
Press the Play button to start dispensing the pre-
selected volume.
The system will automatically stop once the requested volume is reached.
Water Quality values
When the dispensing is nished, the resistivity and temperature are instantly displayed on the left
side of the HMI. Ninety seconds later a new TOC value is displayed.
The green LED is lit if the water quality is within specications.
If the calculated TOC value is from 0 to
5 ppb, ≤ 5 ppb will be displayed
If the calculated TOC value is from 6 to 10 ppb,
≤ 10 ppb will be displayed
When TOC values are greater than 10 ppb, then integer values are displayed (example: 13 ppb).
Dispense archiving
After each time a dispensing is done, the water quality values are automatically archived and can be
retrieved in the history report section available in the information menu. Go to page 16 Information >
History for further information.

Quick start 10
View & manage Alerts and Alarms
Alerts give you advanced warning when maintenance is required and alarms notify you when the
system has encountered a technical issue.
Yellow LED is displayed when an alert is raised.
Red LED is displayed when an alarm is raised.
Press on the alert or the alarm
1
icon
present in the bottom bar to display the alert(s)
or/and alarm(s) which are active.
Note: The notication number indicates how many active alarms are present. When there are no
active alerts or alarms, the relevant icon disappears.
Select a specic alert or alarm to get further
information and to better understand the root
cause. Advice is provided in the information
section to help the user troubleshoot.
If the issue is not resolved and depending upon
the alert and alarm, either select the Contact tab
to nd the technical support hotline number for
further assistance or the Order tab containing
ordering information when applicable.
In order to protect the system and user
applications, alarms of a serious nature will
automatically stop the system from dispensing
water.
Note: These are displayed on the screensaver to
tell the user when the system is not in active use
Alerts provide advanced warning of any
maintenance actions that will be required. Press
Close to cancel the alert for 24 hours. Press Start
on the HMI in order to begin a series of steps
which will clear the alert for a long time.
An Order tab appears when an alert is caused by
a consumable needing replacement soon. The
Order tab contains catalogue numbers of the
consumable(s).
Quick start 11
Navigate the screen interface
HOME SCREEN
Home
- Water quality information
- Dispensing functions
- Alerts & Alarms
(when generated by the system)
- Water level in tank
- Recirculation start icon
MAIN MENUS Menu
- Settings
- Information
- Maintenance
- Consumables
- Login
Go to
Consumables
Menu
Go to
Information
Menu
Go to
Settings
Menu
Go to
Maintenance
Menu
Go to
Manager access

Quick start 12
Apps
When there
are multiple
lines, a
scroll bar
is present
to swipe up
and down
Indicates how many screens are present and where you are.
Swipe left & right anywhere on screen to switch between screens.
Pops-up screens
When a text box is selected, the keypad will
automatically appear.
To remove the keypad click on or on any
zone outside the keypad.
Note: When in a menu or app level screen, the system automatically goes to the home screen after
1 minute of inactivity.
When a pop-up type of screen is displayed, the system does not automatically return to the home
screen after 1 minute of inactivity.

Quick start 13
Collect RO water from the tank front valve
Follow the steps below to collect RO water from the front of the tank.
1. Clean the tank front valve : use a lint free cloth towel, wet it with the cleaning agent and wipe
down all exposed exterior surfaces of the valve. Cleaning agents that can be used include :
- KLERCIDE™ Isopropanol 70% or equivalent composition
- SPOR-KLENZ® (Ready to use) or equivalent composition
Be sure to follow the safety precautions listed with the recommended cleaning agent.
2. Open the front valve and discard the rst liter of water dispensed from the tank front valve.
3. Open the front valve to dispense water for your needs.
4. Close the front tank valve.
5. Clean the front tank valve again using one of the cleaning agents listed above.
Consumable Menu 14
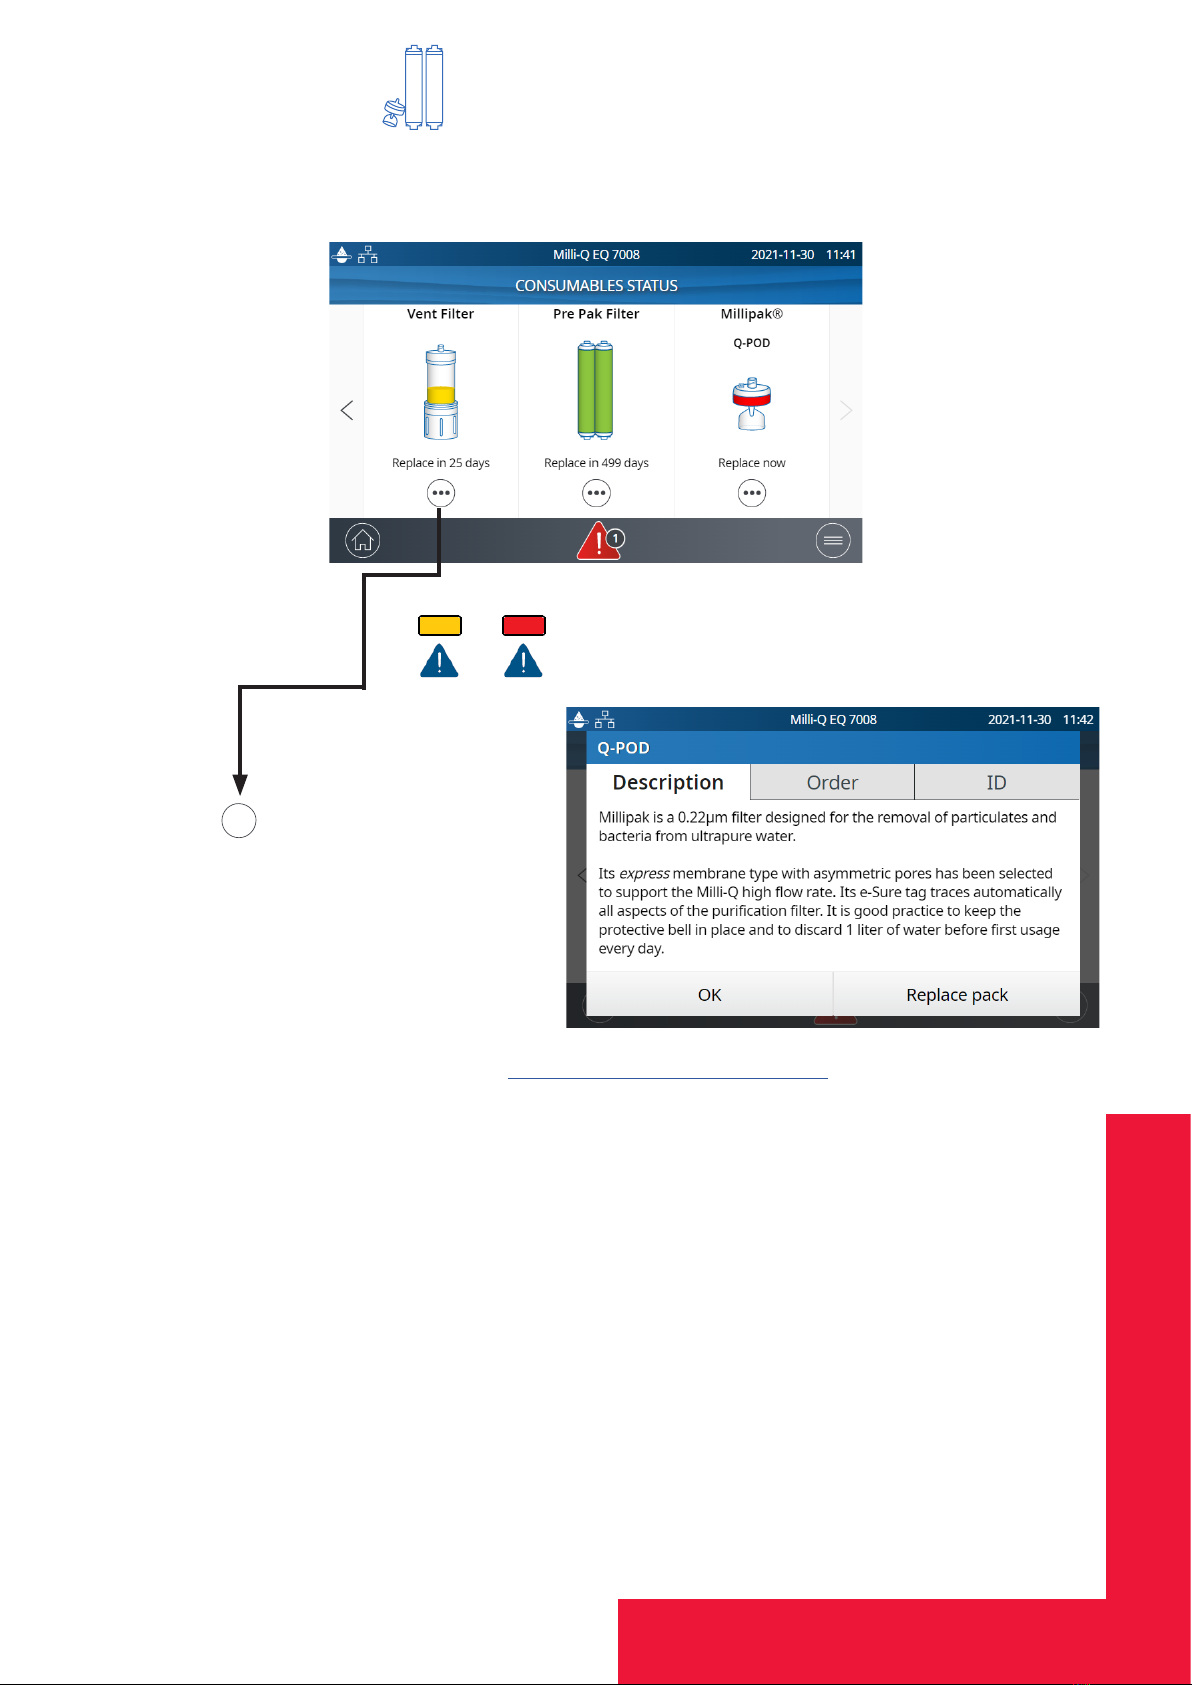
CONSUMABLE MENU
Viewing Consumables Status
By using dierent colors, the status of installed consumables are indicated.
LEDs
Green:no action required
Yellow: notice for a maintenance action
Red: maintenance required!
Press on the
•••
icon to get a description of
the consumable, the ordering information,
and the consumable’s ID.
Certicates of quality are available online www.mymilliqconsumables.com
All cartridges have been designed to be easily replaced by a user. A shortcut to access to the re-
placement wizard is available by clicking on the “Replace pack” button in the pop-up.
Note: In case of application of PrePak lter pretreatment pack (PRPK00001 or PRPK000A1), it is rec-
ommended to replace the PrePak at the same time as the IPAK Gard® pretreatment pack.

Consumable Menu 15
Consumables identication with card reading
For each consumable, the following pieces of information are available:
• lot number
• catalog number
• installation date
The IPAK Quanta®and Meta® polishing cartridges, IPAK Gard® pretreatment pack and application
POD-Paks information is automatically registered during their installation.
The tank vent lter comes with a RFID card enabling the transfer of the data into the system. Go to
page 26 Maintenance>Consumables installation wizard for further information.

Information 16
INFORMATION MENU
This menu provides system information and system status. Dispensing is available while in this
menu.
Available apps:
System
Find system details
Select System ID to nd the information on the
water system model and installation details.
History
2 user reports exist:
• Daily quality measures report
Each row represents a day (midnight to midnight) and is dated. It contains daily averages for
product resistivity, TOC and temperature dispensed each day. Also included is the total volume
dispensed during the day.
• Dispensing events report
Each row contains a record of a single dispensing. It is an archive of all the dispense reports.
To export data or preview a graph:
1. Select a time period of interest with a start
and end date.
2. A graph pre-view of the last 30 records is
available on the HMI screen.
3. Export the report in .ods (open document
source) format to visualize the full data and in-
tegrate them into a data management system.
Note: A complete history report with all system activity is available. By default it is only
available when logged-in as the system manager. This can be modied by de-activating
the system manager prole in the settings menu, go to page 19 Settings>Manager access.
System History Troubleshooting
Contacts Flow schematic

Information 17
Flow schematics
Flow schematics are graphic representations of the hydraulic components of the water purication
system. Components change color depending on the state and system status.
Grey - inactive Blue - active
Yellow - maintenance alert Red - sensor error or consumable replacement overdue alarm
Troubleshooting
Used to access a diagnostic summary.
Open this app to get information which can be communicated with a technical service representative
in case of troubleshooting.
• System information & last service visit
• Water quality & consumables (installed dates)
• Active alerts, alarms & auto-test results
• Diagnostics
Contacts
To edit contact information, login as the system manager, go to page 19 Settings>Manager access.
The user parameters are used on various reports generated by the system and can quickly help users
identify the right contact for any questions or issues.
Internal contact
Technical support
Responsible for system conguration & quality settings
In case of troubleshooting
Production ow schematic shows all
components and operating values used to
produce RO quality water and to store it.
Distribution ow schematic shows all
components and values used to purify RO
quality water from the storage tank into
ultrapure water that is dispensed
Settings 18
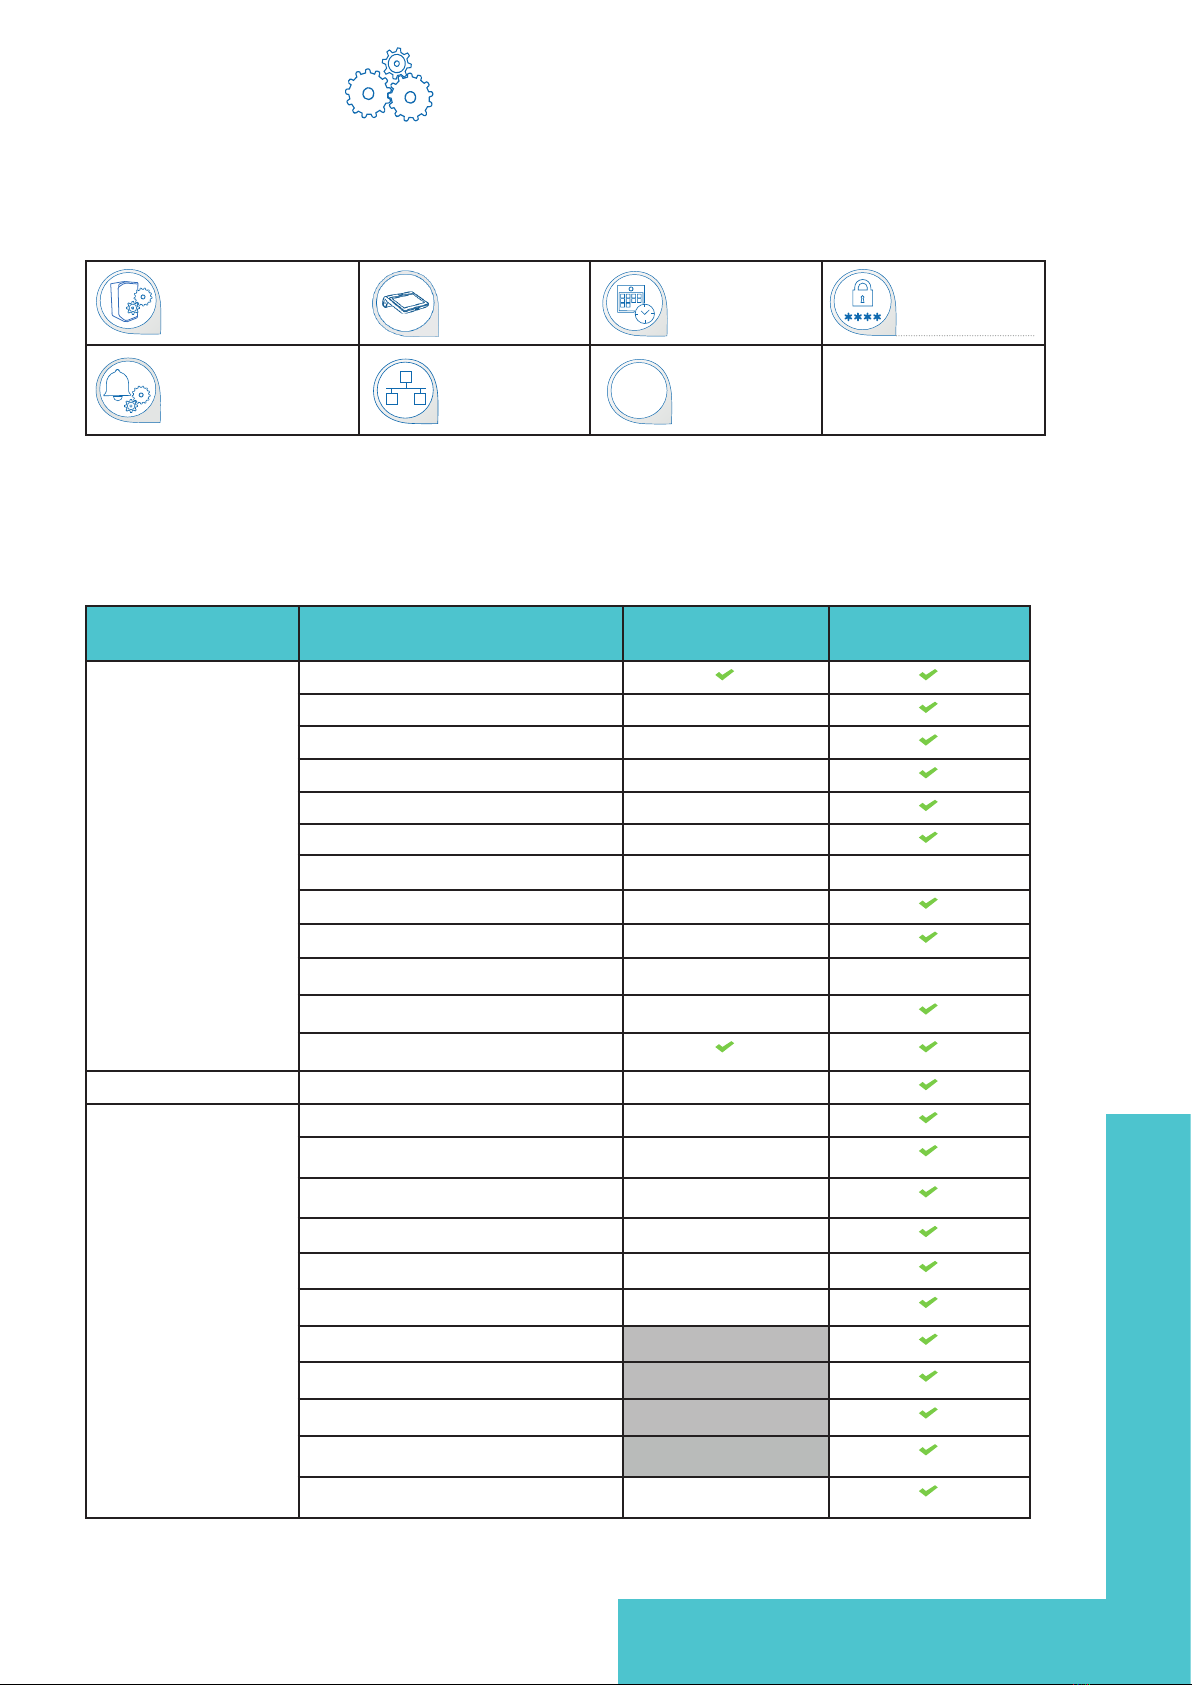
SETTINGS MENU
Dierent settings are available to customize the water purication system operation. Depending on
the user prole (end-user operator / system manager) some of the settings will have either read-
only or read & write access.
Available apps:
°C / °F
Note: Dispensing while in this menu is not available.
Settings End-user System
Manager
System
Conguration
Lab close
Screen saver Read only
Water sensor Read only
Alarm relay Read only
Foot pedal Read only
Periodic RO ush check time Read only
Tank capacity Read only Read only
Tank rell setpoint Read only
ech2o ASM lamp Read only
Recirculation duration Read only Read only
Safety ow stop Read only
Custom volume
Connectivity Local network Read only
Alarm conguration Permeate conductivity Read only
RO ionic rejection Read only
RO feed conductivity RO high Read only
RO feed conductivity tap high Read only
Inlet strainer clean Read only
Cl2 clean Read only
Pre Pak lter
IPAK Gard (lifetime)
IPAK Gard (volume)
Vent lter
Tank empty Read only
System
Conguration
HMI congu-
ration
Date, Time &
Language Password
Alarm
Conguration Connectivity Units
The table below shows the list of settings. A green tick mark symbol means that the setting can be
modied.
Settings 19
Settings End-user System
Manager
Alarm conguration Ultrapure resistivity Read only
Ultrapure TOC Read only
IPAK polishing cartridges
Millipak
Millipak Gold
LC-pak
VOC-pak
EDS-pak
HMI
conguration
Brightness
Buzzer Read only
Date, Time & Lan-
guage
Time zone - Date - Time Read only
Language Read only
Password System manager
Units Resistivity / Conductivity Read only
Temperature Read only
Storage tank Read only
Temperature compensation mode Read only
Pressure Read only
Manager access (& password)
Login as a Manager
1. Press on the menu button from the Home page.
2. Press on Login.

Settings 20
3. Enter system manager password.
To display & see the password while typing, select the Show code checkbox.
Once logged-in, the manager icon is displayed in the top left corner.
If a manual logout is not performed, the system manager prole will be automatically logged out
after 1 hour of inactivity.
Note: By default the Manager password is active. The default password is PASS
Log out as a Manager
1. Press on the menu button .
2. Press on Logout.
Modify system manager settings
This can only be done when logged-in as a
manager.
In the Password app:
1. Deactivate/re-activate the manager password
through the password activation slider button.
2. If required, change the password.
Note: Contact your technical service
representative if the password is lost or forgotten.
Important! Deactivating the system manager prole will allow any user to have read & write access
with all settings.
System conguration
Lab close
If the water system is not going to be used for more than 3 continuous days, then the Lab Close mode
can be activated in order to save energy. Before starting this mode, the tank is manually emptied.
During this mode, periodic recirculation occurs once a day instead of once per hour. A few hours
before the completion of this mode, the tank is automatically relled.
Follow the self-guided wizard to activate the lab close. It is important to realise that it can take a long
time to manually empty the tank before starting a lab close mode. The time it takes depends upon
the capacity and volume of water within the tank. It may take up to 1 hour for a 100 L tank.
In case of multi system conguration with one tank:
• If 1 Milli-Q® EQ 7000 water system is connected to 1/2 Milli-Q® EQ 7008/7016 water system(s), lab
close mode shall only be toggled on Milli-Q® EQ 7000 water system (ASM highly recommended).
In case of quality alarm/alert upon lab reopening, simply empty the tank through POD dispensing.
• If the multi system conguration is composed of 2 Milli-Q® EQ 7008/7016 water systems, both lab
close wizards shall be activated simulateanously on both systems step by step.
This manual suits for next models
1
Table of contents
Other Merck Laboratory Equipment manuals

Merck
Merck Millipore Milliflex User manual

Merck
Merck Millipore ReadyStream User manual

Merck
Merck Millipore CellASIC ONIX2 User manual

Merck
Merck DiluCult User manual

Merck
Merck Millipore Auto2D User manual

Merck
Merck Millipore Scepter 3.0 Installation guide

Merck
Merck Pellicon Capsule User manual

Merck
Merck APC SmartTouch User manual

Merck
Merck Millipore DiluCult User manual

Merck
Merck Millipore Auto2D Plus User manual


