Merck Millipore ReadyStream User manual

www.sigmaaldrich.com
User Guide
ReadyStream®System
The life science business of
Merck operates as MilliporeSigma
in the U.S. and Canada.

2
Notice
We make no warranties of any kind or nature, express or implied, including any implied warranty
of merchantability or tness for any particular purpose, with respect to any technical assistance or
information that we provide. Any suggestions regarding use, selection, application or suitability of
our products shall not be construed as an express or implied warranty unless specically designated
as such in a writing signed by an ocer or other authorized representative of our company.

3
Contents
System overview 4
Part numbers 4
Operator and equipment safety 5
Safety symbols and instrument labels 6
Specications 7
System components 8
Description of the ReadyStream®media unit 8
Description of the ReadyStream®
dispensing unit 10
Description of the ReadyStream® lter set 11
Description of the ReadyStream®media bag 11
Setting up the instrument and
consumables 12
Unpacking the instrument 12
Installing the instrument 12
Powering the instrument ON and
system initialization 13
Installment of the consumables and
calibration 14
Priming of the lter set 17
Water pump owmeter calibration 18
Reconstitution of the media bag
concentrated stock 19
Calibration of the peristaltic pump 21
Water pump calibration status check 22
Routine usage 23
Denition of the dispensing parameters 23
Selection of the dispensing parameters 23
Using a preset program 24
Scanning a test data matrix 24
Customizing parameters 25
Storing a customized program 25
Dispensing media 25
Dispensing water 26
Storing bag with reconstituted media
for later usage 27
Priority to ow rate/priority to temperature 27
Option to pre-heat in
priority-to-temperature mode 28
Cancelling a dispensing procedure 28
Tracking consumables usage 29
Tracking media bag usage 29
Filter set usage tracking 29
Common test data matrices 30
Maintenance 30
Cleaning the surface of the instrument 30
Sanitization of the internal uidic path 30
Error messages 33
Troubleshooting 34
Standard product warranty 35
Technical assistance 35

4
Carefully read the instructions before using the instrument.
Please keep these instructions for further reading.
System overview
The ReadyStream®system is designed to facilitate work in microbiological culture media
preparation and dispensing. The ReadyStream®dispensing unit is low in weight and can be
easily moved on the bench or in a microbiological safety cabinet.

5
Operator and equipment safety
All employees who will operate and/or be near the ReadyStream®system must comply with
the following:
• Read and understand this user guide before using the ReadyStream®instrument. Failure to
follow operating instructions could result in user injury or damage to the instrument.
• Read and understand all maintenance instructions in this user guide before performing
maintenance on the instrument. Failure to follow instructions could result in user injury or
damage to the instrument. Only trained, qualied and authorized technicians are allowed to
perform repair and maintenance tasks.
• Any alteration of the ReadyStream® instrument from factory specication may cause unsafe
conditions and will void the product warranty.
• Service should be performed by trained and authorized personnel only. Do not attempt to
open the ReadyStream®instrument housing.
• Place the ReadyStream® instrument upright on a clean, at, stable, and horizontal surface,
away from any source of excessive heat and close to an easily accessible, properly grounded
power supply outlet. Do not run the instrument in any other position.
• Ensure there is at least 5 cm of open space behind the instruments. Do not obstruct the
ventilation.
• Do not expose the ReadyStream®instrument to liquid. If liquid gets inside the instrument
through the ventilation cut-outs at the back of the instrument, avoid any contact with the
instrument, turn the power o, and contact your local representative.
• Do not install the ReadyStream®instrument in a humid area with greater than 80% RH.
Humidity can cause electrical shock and short circuit.
• Before cleaning, shut down the ReadyStream®instrument and disconnect from the power
source.
• The power supply must be protected by a fuse below the main connection.
• The electrical installation must comply with local standards.
• Do not use or store ammable liquids (kerosene, gasoline, etc.) in or near the
ReadyStream®. These substances may evaporate and present a risk of re or explosion.
• The bag + sample + diluent must not exceed the authorized weight on the dispensing
platform of 10 kg.
• Do not apply shock or excessive pressure to the peristaltic pump and the valve actuator.
• Ensure that there is no obstacle that might interfere with the front door.
• Ensure that the front door, peristaltic pump, and valve actuator are correctly positioned.
Improperly positioning may cause malfunction.
• Do not use sharp objects to press the buttons on the digital display/control panel.
• Do not put ngers in the pump. Fingers could be pinched.
• Do not connect the instrument’s RJ45 port to a LAN as this may lead to malfunction of the
LAN network and cause defects in the instrument.
• Use only the provided RS232 barcode scanner and approved accessories. RS232 is powered,
the use of other accessories may lead to malfunction or to damage of the connected
accessories.
• The media unit is heavy, move with care.
• Do not attempt to move the media unit with lled bag in place or connected to the deionized
water loop, risk of ooding.
• Use a container of at least the size mentioned in the respective sections of this user guide.
• Do not run the instrument with the orange cap connected to the dispensing outlet.
• The system operates at a high ow rate (up to 2 liters per minute). Use protective
equipment according to your local regulation, at least safety glasses and a protective lab
coat.

6
Safety symbols and instrument labels
Label Designation Description
Safety symbol Warning, do not insert or remove the tubing,
do not insert ngers whilst the pump is in motion
Internal safety symbol Warning, surface may be hot during operation
Internal safety symbol Warning, risk of electric shock during operation
Power switch label Label for the unit’s main power switch
Light switch label Label for the unit’s switch to turn on the LEDs.
Water inlet label Point of connection for the unit’s water supply
Barcode reader label Connection port for the unit’s barcode scanner
Power supply label
Connection port for the unit’s power supply. The system power cord is the main
disconnect device. It must be easily accessible at all times. To prevent damage
to the power cord or plug, it is recommended to pull the plug rather than the
cord when you disconnect the system from a wall outlet or a power outlet. Make
sure the power cord is not a tripping hazard. Make sure that it is not gripped too
tightly at the plug, the outlet or the point where it is connected to the system.
24 DC label Connection for 24 volt peripheral

7
Specications
Category ReadyStream®system value/range
Catalog numbers
Media unit
Dispensing unit
Standard bag holder
Large bag holder
RDYSTRM10
RDYSTRM20
RDYSTRM30
RDYSTRM40
Distribution volume range 90 mL to 9 999 mL
Distribution volume accuracy ±2%
Distribution temperature range in
heating mode
30–42 °C
Distribution temperature accuracy in priority
temperature under optimal conditions(1)
±2 °C
Ideal functioning conditions of input water
for optimal performance
Water quality deionized grade water according to
ISO 11133 without particles >200 µm
Temperature: 20 °C ±2 °C
Pressure: <3 bar
Flow rate: >2 liters per minute(2)
Dispensing time for 225 mL
(priority to speed, no heating)
<10 sec
Dispensing time for 3375 mL
(priority to speed, no heating)
<2 min
Dispensing/distribution mode Priority to speed/priority to temperature
Distribution ow rate(3) 0.5 to 2 liters per minute
In compliance with ISO 7218:2007/Amd 1: 2013
ISO 6887-1:2017
FDA-BAM/USDA
EI 61010-1
UL 61010-1
In conformity with FCC, IC, and EC as a class B equipment
Connection 24 V jack output for accessory
RS232 modied output to connect scanner
RJ-45 output to connect media unit and dispensing unit
Power source RDYSTRM10: 200-240 V/50-60 Hz, 15.5 A
RDYSTRM20: 24 V DC from main unit
Operating conditions
Max altitude
Temperature
Relative humidity
Up to 2000 m
Min 18 °C, max 40 °C
80% RH max
Dimensions (H x D x L) RDYSTRM10: 20.5 x 50.1 x 35.3 cm
RDYSTRM10 (with extension): 20.5 x 61.3 x 35.3 cm
RDYSTRM20: 46.6 x 35.3 x 23.1 cm
Max duration of one dispensing cycle
in heating mode
20 min(4)
(1) In temperature priority mode, temperature accuracy is guaranteed above 200 mL.
(2) Ensure the deionized water production system and distribution loop can supply the connected instruments; the media
preparation unit can also be connected to a container of deionized water. Please make sure the container is clean and
free of particles.
(3) In temperature priority mode, the ow rate is automatically adjusted by the instrument to keep the target temperature.
In some geographies, the maximum ow rate for heated media dispensing may be lower due to electrical limitations.
(4) Corresponding to 9999 mL delivered at 0.5 L/min.

8
System components
Description of the ReadyStream®media unit
F3: Stopcock actuator in home position
F2: Peristaltic pump head
F1: Outlet connector for the lter set
B5: Venting
B4: Marking plate
B3: Power cord connector
B2: RJ45 connector to media dispensing unit
B1: RS232 connector to barcode reader
Figure 1: Front and back views of the ReadyStream®media preparation unit

9
T1: Extension tray – pulled in
T2: Sticky pad
T3: LED transillumination panel
T4: Media bag tubing guides
R1: Extension tray screw
R2: Main power switch
R3: LED transillumination switch
R4: Accessory port
R5: Front cover pin
R6: Guide for dispensing tubing
L2: Front cover (translucent)
L1: Deionized water inlet tubing connector
Figure 2: Upper, right and left views of the ReadyStream®media preparation unit

10
Description of the ReadyStream®dispensing unit
Figure 3: Views of the ReadyStream®media dispensing unit
1: Graduated unit stand
2: Position for large
ReadyStream®bag holder
3: Position for standard
ReadyStream®bag holder
4: Bag holder magnet (inside)
5: Control panel
6: Dispensing holder
7: Height adjustment screw
8: Tube guide
9: Stand screw
10: Connector to media unit
ON/OFF Filter
priming
Bag
lling
Preset selection
and storage
Preset
LED
Set
volume
Set
temperature
Set
priority
Set
concentration
Minus/Skip Decimal
selection
Plus/Conrmation Water only
distribution
Diluted media
distribution
Cancel/Stop
Figure 4: ReadyStream®media dispensing unit control panel

11
A. Inlet blue cap
B. Male inlet connector
C. Silicone tubing
D. Cable ties
E. 0.22 µm membrane lter
F. Filter vent
G. Label
H. Male outlet connector
I. Outlet orange cap
Description of the ReadyStream® lter set
Figure 5: Description of the ReadyStream® lter set
A
B
C
C
D
E
FG
H
I
Description of the ReadyStream®media bag
A. Filter connector
B. Dispenser connector
C. Silicone tubing
D. Silicone tubing for
peristaltic pump
E. Stopcock valve
F. Bag ange connector
G. Dry media layer
H. Pillow bag
I. Label (opposite side)
J. Data matrix
(opposite side)
A
B
C
D
E
F
G
H
I
Opposite Side
J
Figure 6: Description of the ReadyStream®media bag

12
Setting up the instrument and
consumables
Unpacking the instrument
Remove the instrument components from all packaging without
damaging the packing materials.
Save the original packaging materials for use if the instrument
must be shipped for maintenance at a later date.
The shipping kit contains the following items:
• One media preparation unit box with:
– One media preparation unit assembly
– One barcode scanner
– One barcode scanner stand
– One RS232 cord for barcode scanner
– One RJ45 cable
– One inlet water tubing
– One tubing for water outlet
– One USB card with the user manual and safety instructions
• One dispensing unit box with:
– One media dispensing unit base
– One stand with dispensing arm
• One standard bag holder box
• One large bag holder box
• One power cord
• One mesh strainer
• One sanitization kit
Installing the instrument
Install the media unit on a bench or on a trolley supporting a mass
of 30 kg.
Install the dispensing unit close to the media unit (less than 1 m
distance). It is also possible to position the dispensing unit in a
laminar ow cabinet.
Connect the provided RJ45 cable to the dispensing unit connector
(Figure 3, 10) and to the media unit connector (Figure 1, B2).
Never connect the media unit or the dispensing unit
to the LAN RJ45, this may lead to malfunction of the
network and of the instrument. The ReadyStream®
cannot be connected to a network.
Connect the barcode reader to the media unit using the screws
on the connector (Figure 1, B1).
Place the magnetic bag holder on the dispensing unit (Figure 3, 4).
• Always place the bag in the holder. Alternatively,
position a 1 L vessel instead of the bag holder to
collect water dispensed during instrument set-up.
• Adjust the height of the dispensing arm to the bag
holder size, using the screw at the back of the dispenser.
!
!

13
Before the rst use, go through a sanitization procedure by
scanning the specic barcode and following the instructions
on the screen (details in the maintenance section of this user
guide on page 30).
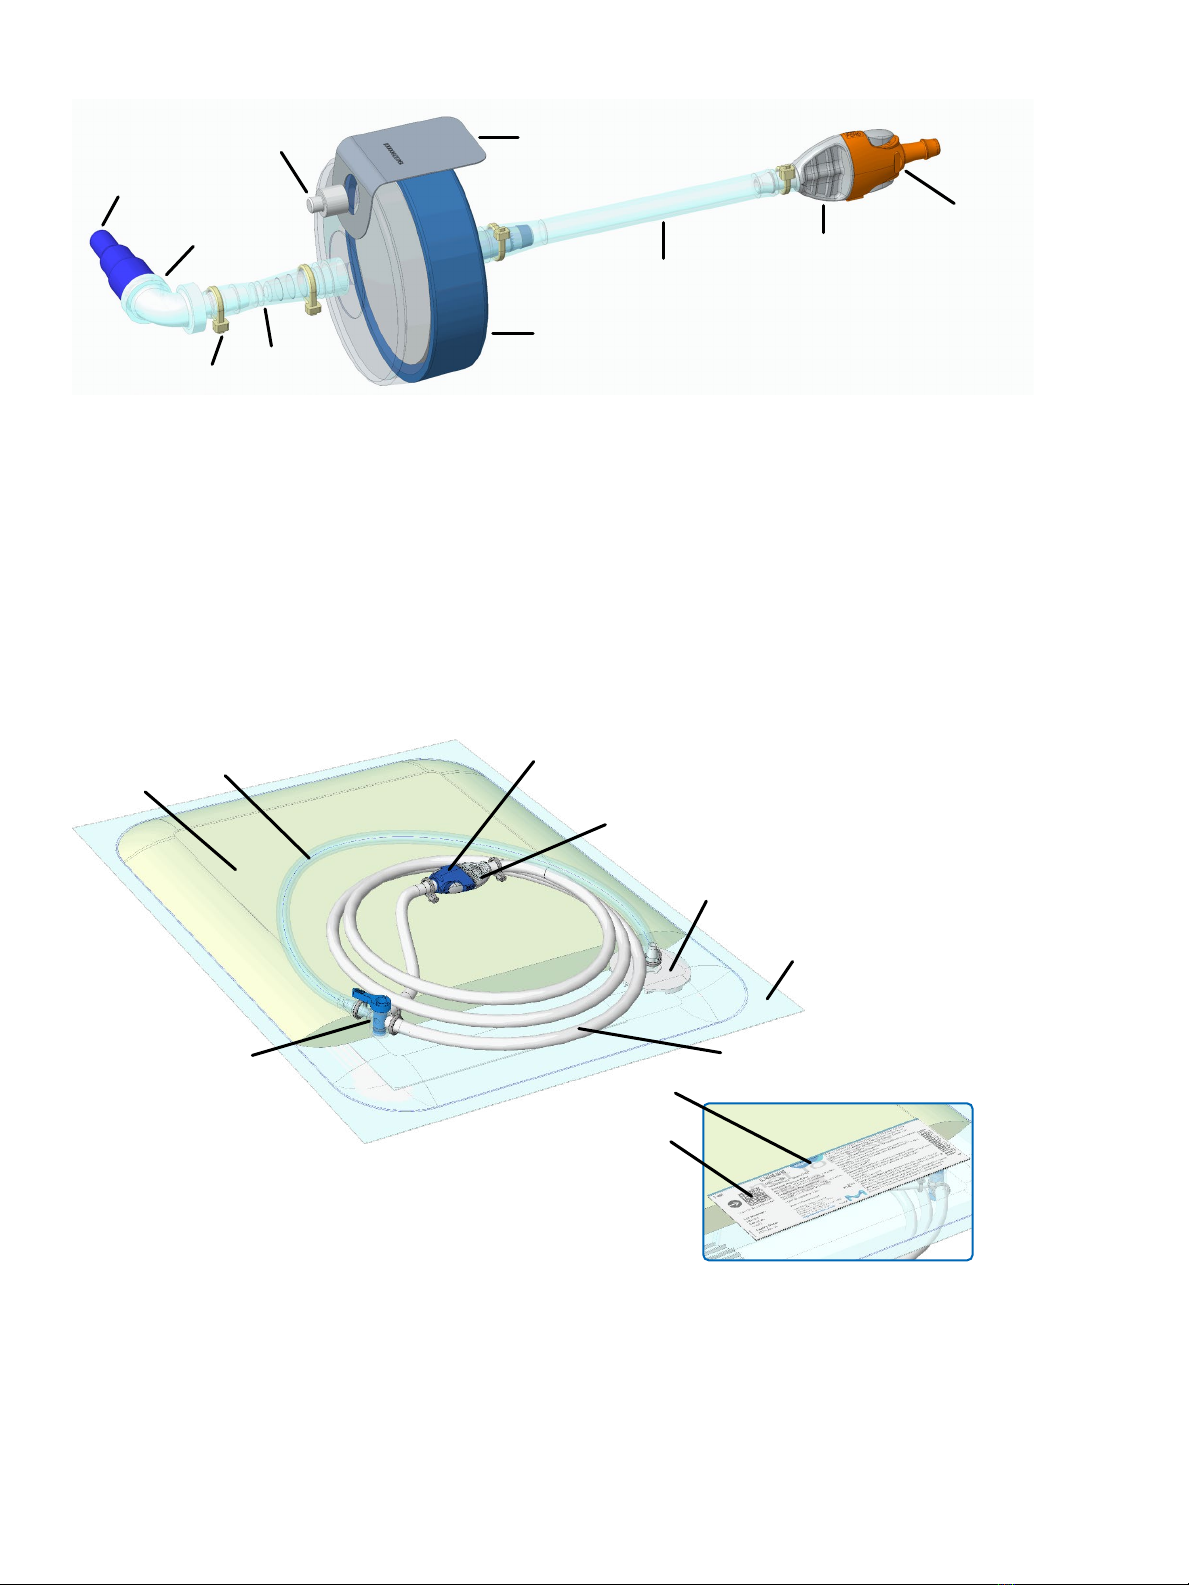
Connect the water inlet tubing to the instrument on the
connector on the left side (Figure 2, L1). Adapt the extremity
of the water inlet tubing to the deionized water faucet using
the required adaptors (standard mating CPC coupling body
for the connection to the PLCD200M8 connector on the inlet
water tubing, not provided). Alternatively, if no deionized water
production system is available in the laboratory, the water inlet
tubing can be inserted in a deionized water container. Use a tube
weight (not provided).
• If using a container, ensure that the water inlet
tubing remains in the container during dispensing,
and regularly check the level of the remaining
water to prevent the instrument from running
without water.
• Ensure the water is free of particles >200 µm that
may damage the system and reduce the lifetime
of the lter. If needed, install the provided mesh
strainer on the inlet tubing, respecting the ow
direction indicated by the arrow on the body.
Replace the strainer mesh once a year.
• Damage can occur if the system runs without
water.
• Verify that the pressure, ow rate and temperature
of the deionized water loop are within the range
of the operational conditions of the ReadyStream®
instrument. Notably, if several instruments are
connected to the water loop, ensure the ow rate is
sucient to allow the ReadyStream®media unit to
dispense at the required ow rate.
Powering the instrument ON and system
initialization
Connect the power cord to the back connector (Figure 1, B3) and
to a wall socket. The cable must be easy to unplug in the unlikely
event of an issue with the instrument.
Use the switch on the back, right side of the media preparation
unit, to power the instrument (Figure 2, R2).
The software revision is displayed, and all the LEDs are
highlighted for 5 seconds.
Press the ON/OFF button on the media dispensing unit to start
and initialize the instrument.
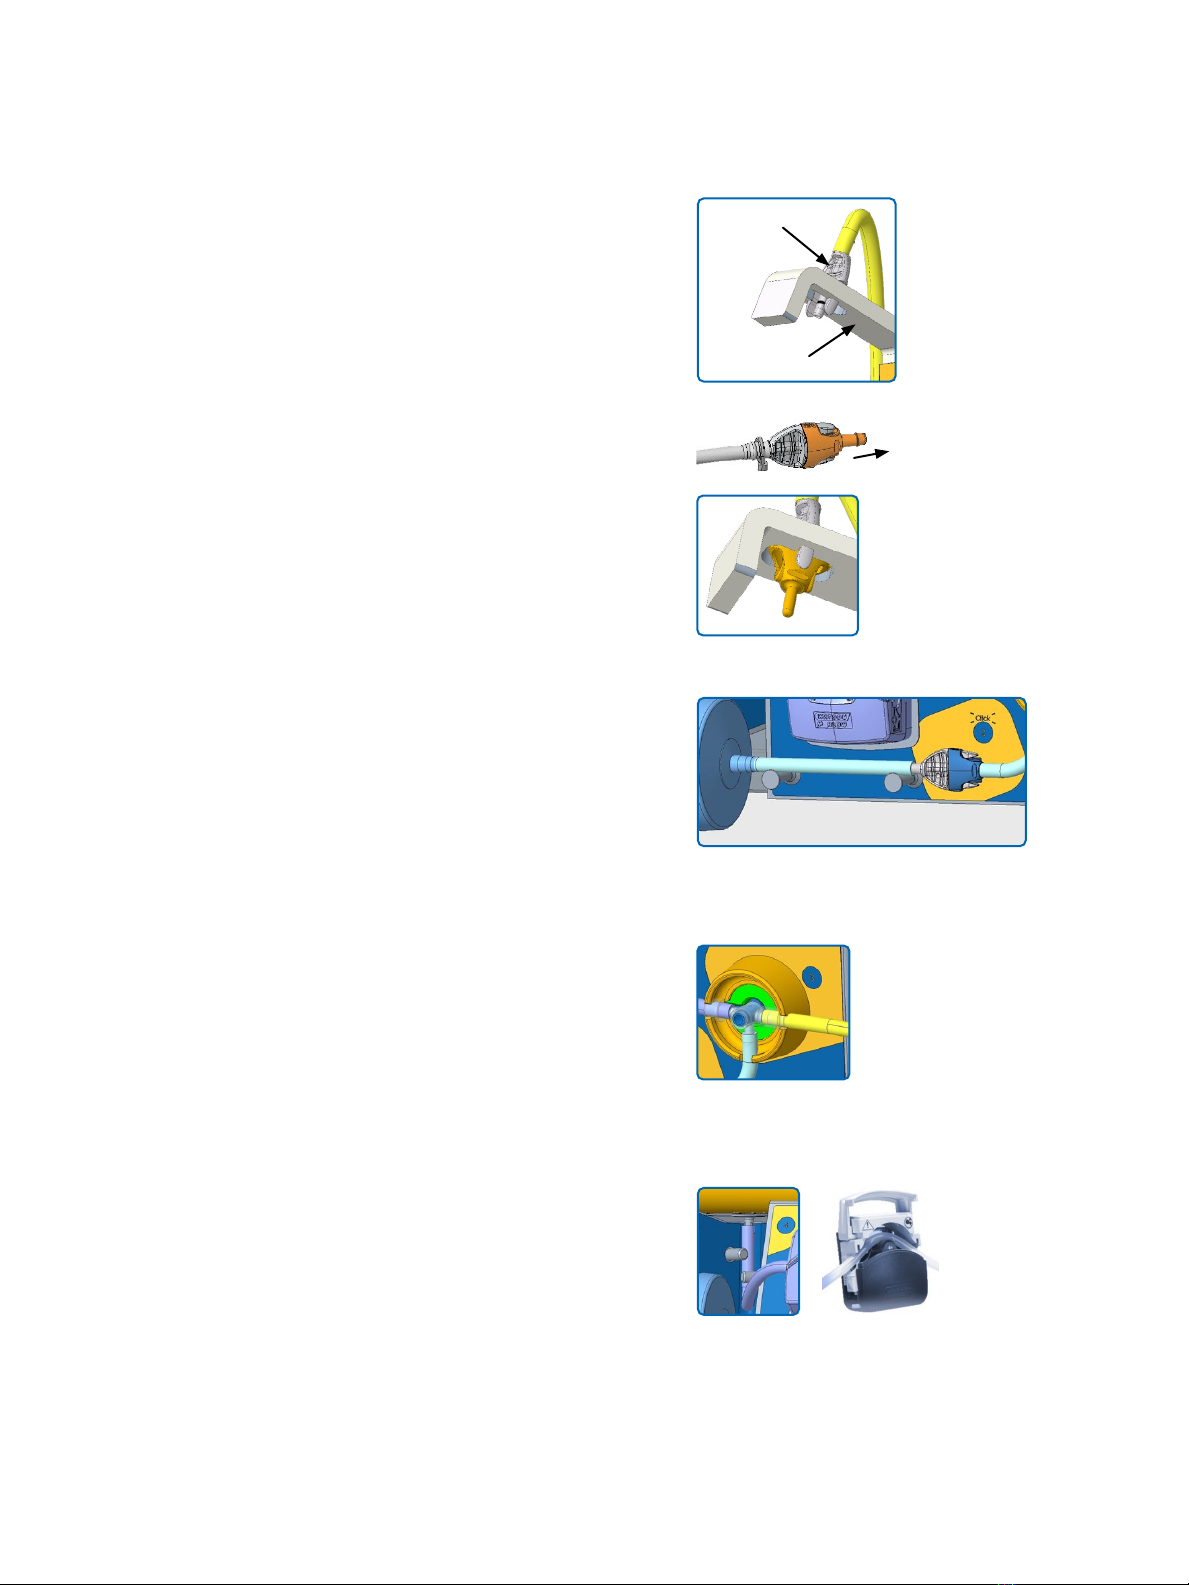
When starting the instrument, the peristaltic pump must be
closed for initialization. If not, the user will be prompted to close
the pump head, and the “Filter”, “Bag” and “Prog” LEDs will
blink in orange.
• During initialization do not attempt to open the
pump head.
• In case the instrument was not shut down properly,
the stopcock actuator (Figure 1, F3) will also turn to
the home position. Do not touch the moving part.
• In order to expand the battery lifetime of the
media unit, it is recommended to leave the main
power switch turned on and keep the instrument in
sleep mode by using the “ON/OFF” button on the
dispensing unit.
!
!
Quick connector
PLCD200M8

14
Installment of the consumables and calibration
Media bag
Filter set
Preparation unit
Dispensing unit
Barcode reader
Bag outlet set between
guiding pins
Filter set connection to
preparation module
Silicone tubing set
in pump head
4-way valve set in
rotary actuator
Filter set connection
to media bag
4
1
2
3
5
Figure 7: Step by Step installment of the consumables

15
After initialization of the pump and valve actuator, the
instrument requests to connect the lter. The “Filter”
LED on the control panel of the dispensing unit will blink
orange to indicate that an action is ongoing with the lter.
Remove the protective blue cap on the inlet extremity of
the ReadyStream® lter and connect it to the outlet of the
preparation unit (step 1). A “click” sound signals that the
connector is correctly inserted.
Keep the orange cap on the outlet of the lter to
prevent accidental contamination of the outlet.
Make sure the O-ring on the lter connector
remains in place during the connection.
In case the tubing is crushed, press with your
nger to re-open it.
Using the barcode reader, scan the data matrix on the
ReadyStream® lter’s set label.
In case of a new lter, the maximal number of connections
to media bags (e.g. C20), the maximum volume of
water (e.g. V600 Liters), and lifetime (e.g. 30 days) are
displayed. This information is stored in the instrument.
If the lter has been previously used on the same system,
the number of remaining connections to media bags (e.g.
C6 connections), the remaining volume of water (e.g.
V224 Liters), and remaining lifetime (e.g. 15 days) are
displayed.
• Always use the same lter set on the same
ReadyStream®instrument.
• Please ensure the remaining volume and
lifetime will be sucient for using the media
bag to be connected to the lter.
If the shelf life, lifetime in use, maximal volume, or
number of connections of the lter is exceeded, or
if a wrong item is scanned, an error message will be
displayed, and the “Filter” LED will blink red for 3 seconds
to indicate the error. Then the user is again prompted to
scan and connect a lter.
When an authorized lter is scanned, the “Filter” LED
turns green and the user is then prompted to connect the
media bag. The “Bag” LED blinks orange to indicate that
an action is ongoing with the media bag.
Tear open the outer packaging by using the easy opening
feature to remove the media bag from the aluminum bag.
Do not use scissors to open the outer packaging.
Place the media bag on the top of the ReadyStream®
media preparation unit, with the product label facing
upwards. When using ReadyStream®media bag
Granucult®BPW 100 L, extend the plastic tray at the back
on the instrument (Figure 2, T1).
!
!
!

16
When necessary clean (e.g. with water)
the blue stick pads on the extension tray
to prevent the bag from falling from the
instrument. The pads can be removed and re-
positioned on the extension tray.
Aseptically connect the ReadyStream®media bag to the
ReadyStream® lter set.
Follow the instructions on the ReadyStream®media
preparation unit’s front panel sticker.
• Disconnect the gray and blue connectors of the
media bag (Figure 6, A&B) and insert the gray
dispensing connector into the holder of the
dispensing unit,
• Remove the orange cap on the outlet extremity of
the ReadyStream® lter set and store it in a sterile
container for re-use.
• Option: Re-cap the gray dispensing connector with
the orange cap on the dispensing unit. The orange
cap is to be inserted perpendicularly to the gray
connector at the bottom side of the dispenser arm.
Do not run the instrument with the orange cap
connected to the dispensing outlet.
Connect the blue connector of the media bag to the
gray connector of the outlet of the lter set. A “click”
sound indicates that the connectors are properly in
place (step 2).
Connect under clean conditions. Do not touch
the extremities of the connectors with your
ngers or with contaminated material to
prevent any risk of contamination.
Connect the stopcock valve of the media bag in the
actuator of the media unit (step 3).
Stopcock shall be fully inserted, do not force.
In case the tubing is crushed, press with your
nger to re-open it.
Position the tubing in the guiding pins (step 4) and
through the peristaltic pump (step 5), without closing
the pump head.
!
!
Dispensing
connector
Dispensing
holder
!
!

17
OR
When the ReadyStream®media bag is connected to the
instrument, scan the label.
If a new bag is used, the media type (e.g. BPW100L),
the maximum number of dispensations (e.g. 29) of
a dened volume (e.g. 3375 mL), and the lifetime
after reconstitution (e.g. 5 days) are displayed. This
information is stored in the instrument.
If the media bag has been previously used on the same
instrument, the remaining volume of media (e.g. 20 x
225 mL), and the remaining lifetime (e.g. 1 day) are
displayed.
“Filter” and “Bag” LEDs should be green at this stage.
During the process, pressing [CANCEL] will
restart the bag setup.
Always use the same media bag on the same
ReadyStream®instrument.
If the shelf life of the media bag is exceeded or if
a wrong barcode is scanned, an error message will
be displayed, and the “Bag” LED will blink red for 3
seconds and the user will be asked to scan and connect
a media bag.
Priming of the lter set
For optimal performance, any air in the inlet tubing, in
the instrument, and in the lter set must be removed.
Ensure the media unit is connected to a water
source of sucient ow rate or, alternatively,
to a large container of deionized water.
During priming, excess water will be
dispensed through the gray dispenser on
the dispensing unit. Place a bag in the bag
holder or position a 1 L container below the
dispenser to collect the water.
Following the media bag installation on the
instrument, the user is prompted to prime the lter.
To remove air trapped in the lter, open the vent port on
the lter by turning slightly (one turn counter- clockwise).
Press the [PRIME] button, indicated by the “Prime”
LED blinking orange.
For more ecient priming, open the vent
before pressing [PRIME]. Close the vent when
the water level reaches the vent.
Excess water dripping from the vent will be
retained in the front door. Alternatively place
a clean tissue around the vent to collect the
droplets.
!
!
!

18
While the unit is dispensing water, the “Prime” LED will
blink green.
Once completed the user can stop the priming process
by pressing [PRIME], else the pump will automatically
stop after a few seconds.
The user will then be asked whether to continue the
priming process or to press the [-] button to move on
to the next step. Skip priming only when no air bubbles
are expelled from the instrument to the lter, and the
lter is lled at least at 95% with water.
Even if the [PRIME] button is pressed to stop
dispensing, the system will remain in the
priming mode until at least 100 mL of water
has ushed the lter.
For ecient priming, the ow rate is changing
several time during the priming process.
When re-using a lter, or re-connecting a
lter attached to a media bag previously
tted to the instrument, perform 5 priming
cycles to ush the lter and tubing with about
1 liter.
After priming, the “Prime” LED is solid green to indicate
that the instrument is ready for reconstituting the
media bag.
In case of emergency, press [CANCEL] to stop
the priming process.
When connecting to a water loop for the
rst time, or when pumping from a water
container, several priming steps may be
required to purge all air from the inlet water
tubing, the instrument, and the lter.
Water pump owmeter calibration
The owmeter calibration process is necessary every
500 L or 7 days. For more frequent calibration, do a
long press on the [WATER] button after the priming to
enter the owmeter calibration mode.
This calibration is performed at four ow rates and
volumes to ensure accuracy:
Calibration step Water volume (mL) Flow rate (L/min)
1 300 0.5
2 300 1
3 500 1.5
4 750 2
!
!

19
!
!
Make sure that the container has a capacity of
at least 750 mL and does not create splashes
as that may impact the measured volume.
The water from calibration steps 3 and 4 will
be warm.
Strictly follow instructions on the screen.
Failure to do so may aect system
performance.
Use a balance of sucient resolution with
respect to the weight.
For each calibration:
• Tare the container on a balance for weighing.
• Place the container under the dispenser.
• Press [WATER] to dispense the expected volume. The
“Water” LED will ash green during the process.
• Weight the container with the dispensed volume
when nished.
• Enter the measured volume on the dispensing unit
control panel.
The “mL” LED ashes green.
The calibration value can be adjusted using the [+] or
[–] buttons. Press the [DECIMAL] button to highlight
the digit to modify. When properly set, modication is
stored by pressing [mL].
Reconstitution of the media bag
concentrated stock
The dry media bag needs to be rehydrated to convert
the dry media into concentrated stock before further
use. The peristaltic pump head must remain open during
this lling step.
• If the pump head is closed, the “Fill” LED will blink
red and the user is requested to open the pump
head.
• If the pump head is open, the “Fill” LED will blink
orange and the user is prompted to press [FILL] to
reconstitute the media stock.
If the media bag was previously lled on
another ReadyStream®instrument press [-] to
skip lling. Filling a media bag twice will lead
to leakage and a wrong concentration of the
media bag stock.

20
!
The user is asked to conrm lling to begin by pressing
[+]. This will start the water pump and turn on the
heaters to reconstitute the media with preheated water.
While the media bag is lled, the “Fill” LED is blinking
green and the remaining lling volume is displayed.
The media bag must be softly agitated by gently
pressing all over the bag surface during the lling step.
If needed, agitate the back of the bag to detach the
media stuck on the lm.
Do not keep your nger on the valve actuator
while it is moving.
When pumping deionized water from a
container, ensure enough water is available to
cover the lling step.
Do not close the peristaltic pump head until
the lling process is over. To prevent internal
overpressure the system will stop dispensing,
report an error and the media bag will need to
be discarded.
Start the bag agitation during the lling step.
In the unlikely event of an issue during media bag
lling (e.g. leakage), press [CANCEL] to stop the
water pump safely. The “Filter”, “Bag” and “Prog”
LEDs will ash red.
Filling cannot be resumed, and therefore the media
bag must be discarded.
When the bag is lled, the “Fill” LED turns to solid
green.
The “Bag” LED is blinking green and the user is
prompted to agitate the granulated media with the
added water.
Additionnal continuous soft bag agitation is required
during a maximum of 2 min to speed up the
dissolution of the granules.
Use the side switch (Figure 2, R3) at the front, right
side, of the instrument to turn on the panel of LEDs
to illuminate the media bag. Check that no clumps
of media or a large quantity of undissolved granules
are remaining, otherwise, please continue to gently
agitate the bag.
The turbid concentrated media will become clear
during the remaining rest time indicated on the
display.
When the time has elapsed, the “Bag” LED will blink
orange and the user is asked to conrm that the
media is fully dissolved.
Carefully inspect the bag for undissolved media.
Continue to softly agitate the bag if required until
there is no granulated media left, then press [+].
This manual suits for next models
4
Table of contents
Other Merck Laboratory Equipment manuals

Merck
Merck Millipore Auto2D Plus User manual

Merck
Merck Millipore mPAGE User manual

Merck
Merck Millipore CellASIC ONIX2 User manual

Merck
Merck Millipore Milliflex User manual

Merck
Merck RQflex 10 User manual

Merck
Merck Millipore Auto2D User manual

Merck
Merck Millipore Mobius Chrom 20 System User manual

Merck
Merck Milli-Q EQ 7008 User manual

Merck
Merck MilliSentials MISELLABST User manual

Merck
Merck Supelco TLC Explorer User manual