Merkava Cruiser500 User manual

MER
>I
AVAa=
~p
W.E.~ C H_
AR
GED
iTi
Rt,:.
N S
P.
0 1R·
Ti
EJ.!llfil
CruiserSOO

CruiserS00
Quick
Start
Guide:
1. Carefully remove contents
of
box
out
of
the
packaging.
You will find:
• 1 x CruiserS00
• 1 x 110VCharger
+
basic tools
2.
Install Frontwheel and tighten quick release latch.
3. Place handle bar in place and tighten allen screws
4. Place
LED
lampin place and tighten bolts
5. Place seat
to
desired heightand tighten quick release latch.
6. Inflatetires
to
about
35-40PSI
7. Place
your
CruiserS00 on a raised surface
for
easy inspection while securingone
of
the
wheels so
it
stays in place then proceed
to
visuallycheck
the
CruiserS00 components and
ensure
that
all screws and bolts are tightened and
that
tires are correctlyinflated. Check and
adjust break lever
to
your.preference and check
that
the
derailleurfunctions properly. This
is
usually alreadydone once
at
the
factoryand once before shipping
but
as
a precautionary
measure
we
recommend you dothis
as
well before riding.
8. Charge
your
CruiserS00 in a clean environment
at
ambienttemperature until light
on
the
chargerturns
from
red
to
green
9. Once you've familiarized yourself
with
the
digital displayyou
will
be ready
to
ride. Please
ride carefullyI (see attached instruction
for
800S Intelligentdisplay)
IMPORTANT
NOTE:
TO
AVOID
DAMAGING
YOUR
BATTERY
PACK
WE
STRONGLY
RECOMMEND
USER
SHUTS
DOWN
AND
RECHARGE
THE
CRUISERSOO
ONCE
BATTERY
LEVEL
REACHES
10%.
YOU
WILL
ENTER
THIS
CRITICAL
LEVEL
SHORnY
AFTER
YOUR
DISPLAY
SHOWS
1
BAR
OR
REACHES
40V
IN
THE
VOLTAGE
METER.
Maintainingyour
CruiserS00
battery
pack:
Before shipping, each and every transporteris checked
for
overall qualitycontrol and condition
of
battery
pack. Batteryis tested and
fully
charged before shipping.
The
lithium
iontechnology
is
intended
to
last
for
several years while beingcharged and discharged many
times. However,
the
battery's lifespan will depend on
your
care
of
the
battery.
Battery life
will
depend
on
your
maintenance and care
of
the
battery.
CruiserSOO
uses advanced Lithium-
Ion batteries made
with
high capacity cells and
they
should be charged
at
leastonce a
month
(when
not
in
use)
to
ensure
the
longevity
of
your
battery. Make sure
to
only
use
our
supplied 48V charger
on
your
48V
battery.
Allow
your
battery
to
rest
for
10
minutes
after
charging before riding and
for
10min
after
riding before
charging. Unplug
your
battery
charger
after
the
lightturns green indicating
your
battery
is
fully
charged.
Always unplug
the
charger
from
the
wall
outlet
before plugging
or
unplugging
the
other
end
into
your
CruiserS00
to
avoid accidental surcharges.
Typical charging
time
after
the
batteryhas reached
the
10%critical
low
level is between 5
to
6 hours.
Caution: Do
not
expose
your
battery
to
extremely
low
or
hightemperatures
to
avoid potential damage
to
your
battery.»
IMPORTANT
NOTE:
TO
AVOID
DAMAGING
YOUR
BATTERY
PACK
WE
STRONGLY
RECOMMEND
USER
SHUTS
DOWN
AND
RECHARGE
THE
CRUISERSOO
ONCE
BATTERY
LEVEL
REACHES
10%.
YOU
WILL
ENTER
THIS
CRmCAL
LEVEL
SHORnY
AFTER
YOUR
DISPLAY
SHOWS
1
BAR
OR
REACHES
40VIN
THE
VOLTAGE
MmR.

Warranty information:
Merkava
stands
behind its products. All
our
transporters
benefit from a 2
year
limited
warranty.
The
COMP
ANY
warrants that the
frame
wilJ be free from defects in the materials and
workmanship for a period
of
2 years.
The
COMP
ANY
warrants thatthe
motor and battery pack
will be free from defects in the
materials and workmanship for a period
of
I year•.
The
COMPANY
warrants that the
electrical components including the controller and
charger
will
be
free from defects in the materials and workmanship for a period
of
6 months.
Before shipping, we conduct spot checks
on
ourtransporters to validate overall quality and
condition
of
electrical components including motor and battery pack. These checked units have
theirbattery tested and fully charged before shipping.
The
lithium iontechnology we use is intended to lastfor several years while being charged and
discharged manytimes. However, the battery's life span will depend
on
your care
of
the battery.
If
the
PRODUCT
proves defective AND a claim is filled during the warranty period, the
COMP
ANY
at
its option, will:
Repairthe
PRODUCT
by means
of
telephone support, email support, or
by
providingthe
necessary parts
at
no charge.
Warranty claims must
be
filed with Merkava
by
email: [email protected]
*Warranty
on
battery will
be
limited
to
6 months
if
it
is determined that our guidelines for proper
battery care have
not
beenfollowed.
The
following are
not
covered
by
thewarranty:
• Wearand tear
on
frame, grip tape, levers, tubes, tires, brake discs, brake pads, cables,
s~ats, plastic
f~g~
~d
-
~y
other_COIJlponent.which wears outnaturally during.usage. .
• Minorscratches and stress marks that
may
occur during shipping andhandling.
• Water damage caused
by
exposing sensitive electricalparts
to
water such as washing
transporter withhose
or
pressure washer.
• Accidents, misuse, abuse, human errors
or
lack
of
maintenance.
• Acts-of-god suchas fire, flood, earthquake, freezing, etc

Warrantyinformation continued:
The
followingwillvoid the warranty:
• The modification
of
your transporter
or
use outside those specified
on
this document.
• The serial number
of
the producthas been altered
or
removed.
• The product has been dismantled and repaired/reassemble with aftermarket parts.
• Overloading yourtransporter.
· • Storingyourtransporter outdoors.
IMPORTANT
NOTE:
TO
AVOID
DAMAGING
YOUR
BATTERY
PACK
WE
STRONGLY
RECOMMEND
USER
SHUTS
DOWN
AND
RECHARGE
THE
CRUISERSOO
ONCE
BATTERY
LEVEL
REACHES
10%.
YOU
WILL
ENTER
THIS
CRITICAL
LEVEL
SHORnY
AFTER
YOUR
DISPLAY
SHOWS
1
BAR
OR
REACHES
40VIN
THE
VOLTAGE
METER
.
Safe Operation:
Always
wear aHelmet
• Always Start
in
the
slow Pedal Assist mode
• Grip
both
hand grips
• Check brake level
for
positive braking action
•
Press
power
button
on
the
display
• Start pedaling,
motor
will
kick in
within
a second
or
two
• Once
your
comfortable riding
the
eBike you can start using
the
throttle
instead
of
pedaling.
• You should onlyuse
ONE
riding mode atatime.
If
using
throttle
do
not
pedal.
If
pedaling
with
pedal assist mode
do
not
use throttle.
• Please note,
throttle
only riding will
lower
the
max range on a charge considerably.
•
ALWAYS
follow
your
local laws regarding eBikes and be respectful
of
otherriders on
the
road and
on
trails.
Helmet
Always
wear
an
ASTM
and
CPSC
certified helmetwhen riding. Make sure
that
chin strap
is
attached before
your
ride and
follow
the
helmetmanufactures instructions
for
properuser and
fit.
Footwear
Make
sure
to
always wearshoes
that
havegood traction on
the
pedals and will stay on
your
feet.
Brakes
Squeeze
the
hand brake levers
to
ensure there
is
positive braking action before starting
your
ride.
IMPORTANT
NOTE:
TO
AVOID
DAMAGING
YOUR
BATTERY
PACK
WE
STRONGLY
RECOMMEND
USER
SHUTS
DOWN
AND
RECHARGE
THE
CRUISERSOO
ONCE
BATTERY
LEVEL
REACHES
10%.
YOU
Will
ENTER
THIS
CRITICAL
LEVEL
SHORnY
AFTER
YOUR
DISPLAY
SHOWS
1
BAR
OR
REACHES
40V IN
THE
VOLTAGE
METER.

1 Product Name
3
4
1.1 The Middle install intelligent LCD Display
1.2 Model:APT12LCD800S
Electrical Parameters
-¢-
24V/36V battery supply
-¢-
Rated operating current : 10mA
-¢-
Max operating current : 30mA
-¢-
Off
leakage current < 1
uA
-¢-
Max
output current to controller : 50mA
-¢-
Operating temperature : -30~
1o
·c
-¢-
Storage temperature : -40~
1o
·c
Dimensions & Material
4.1 Product shell is ABS, transparent window is made with high strength Acrylic, the
stiffness equals the tempered glass.
4.2
Dimensions : host/L90mm*W54mm*H13.3mm
BOO~~
lnlrll/9r•I

E
E
;
E
l
ti
5 Features
❖
Suitablefor lowtemperature, Max -30'C.
❖
Ergonomic external button design, easy to operate.
❖
Speed display : AVG SPEED,
MAX
SPEED, SPEED(Real-time).
❖
Kilometer/ Mile : Can be set according to customers' habits.
❖
Smart battery indicator : Provide a reliable battery indicator, it will not fluctuate
with the motor on/off.
❖
The brightness
of
the
backlight adjustable : 5-sections
❖
9-level Assit : 3-level/5-level/6-level/9-level... optional

❖ MIieage
Indicator
: Odometer/Trip distance/ Riding time
❖
Error code Indicator
❖
Parameter settings : Multiple parameter can be set through computer USB port,
includingAssist level / Wheel diameterI Voltage I Speed limit...
6 LCD instructions
The figure
of
LCD display
see
below:
Speed mode
Speed display
Battery indicator
/~~~~:..:..:~
-Lamp
7 Functional Description
7
.1
Power
On/Off
UP
-
POWER
DOWN
Brake
PAS level
ERROR code
Mileage mode
Mileage information
Press and hold IPowerl button
for
1 second can turn on/off
the
display.
The
Display
can
automatically shut down when there is no operate & ride for X minutes ( X could be
0~9 ) .
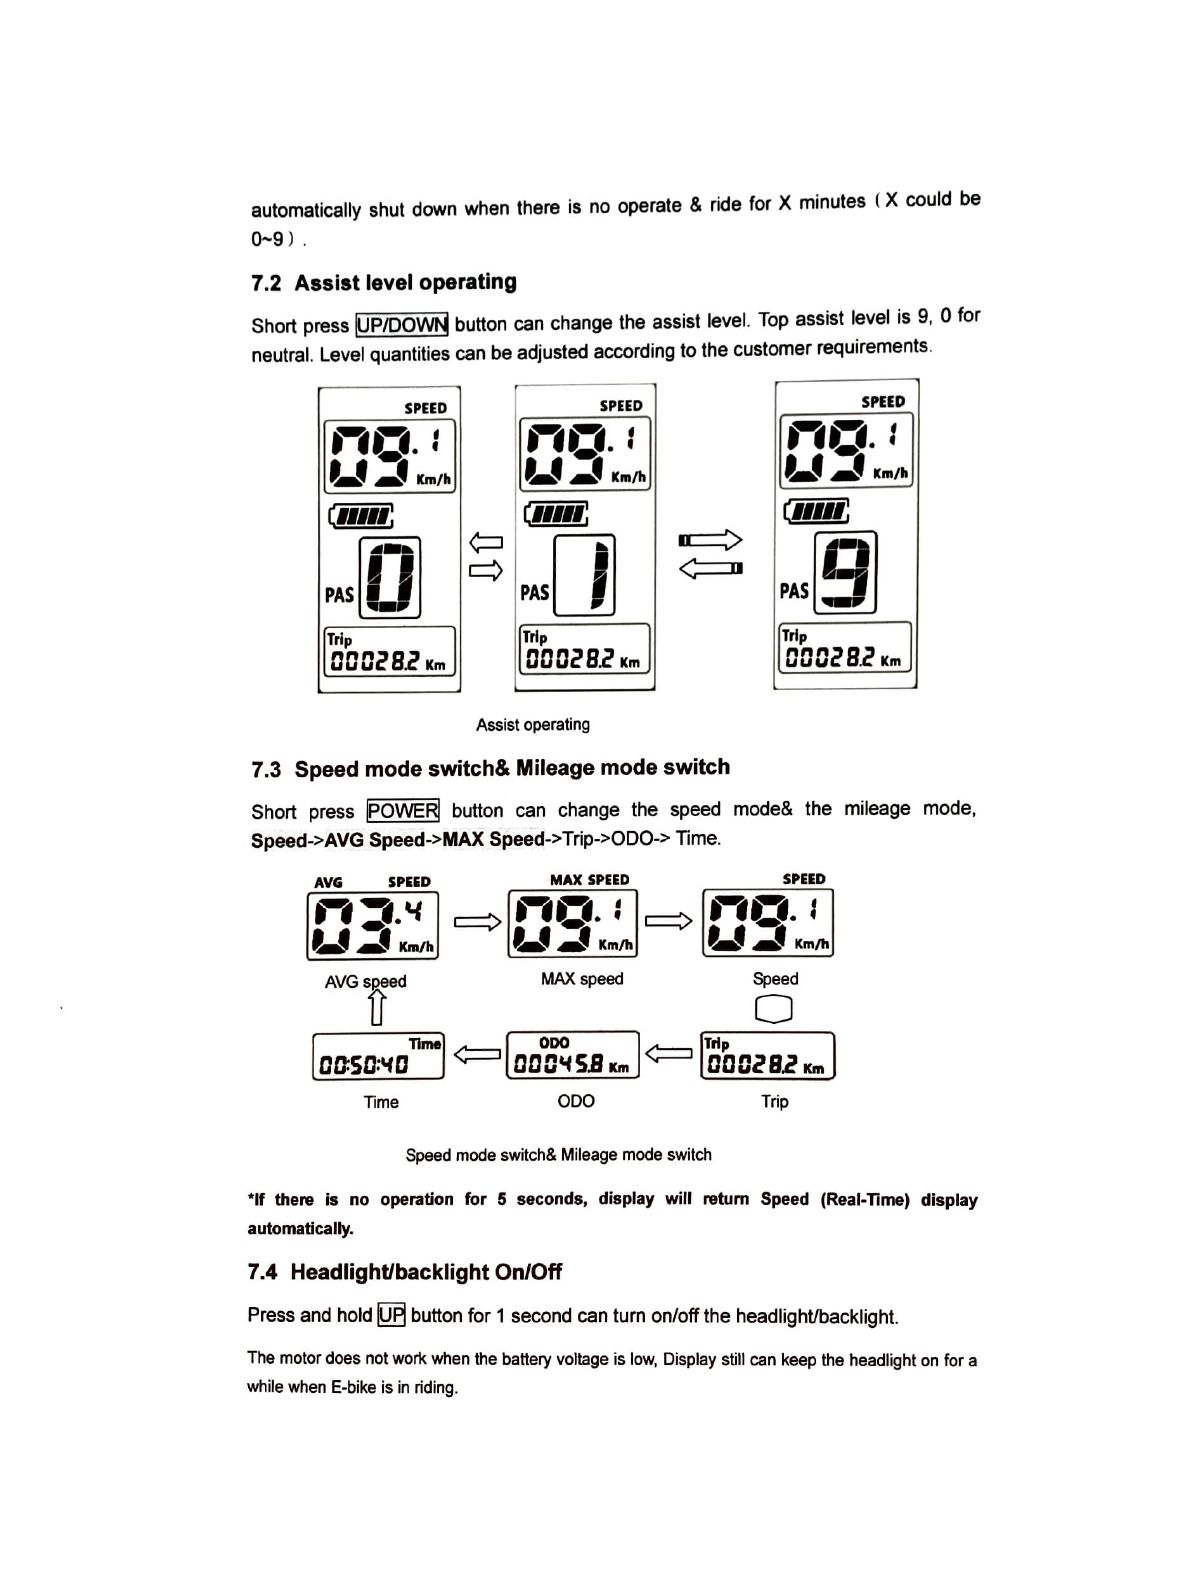
7.2 Assist level operating
Short press IUP/DOWM button can change the assist level.
Top
assist level
is
9,
0 for
neutral. Level quantities can be adjusted according to the customer requirements.
SPEED SPEED
SPEED
no.:
u~1m,
..
no.:
u~l(m/h
no.:
u~
Krw/11
(11111:
(11111:
(11111:
PMD
PAS
□
PAS~
Trip
ODCZB.ZKm
Trip
OOOZB.Z
Km
[
Trip
I
OOCZB.Z
Km
Assist
operating
7.3 Speed mode switch& Mileage mode switch
Short press
iPOWERj
button can change the speed mode& the mileage mode,
Speed->AVG
Speed->MAX Speed->
Trip->OOO-> Time.
AVG
SPHD
MAX
SPEED
SPEED
n:a
.
..,
U.J
Klll/h
C=
✓
no.:
C=
✓
no.
,
U
.J
Km/h
U
.J
Km/h
AVG
SJ28ed
MAX
speed
Speed
fi
--
0
l
00:sa
:
'fO
nm.I
¢::=i[aac~SB
Km
J¢::=i
00028.Z
Km
Time
ODO
Trip
Speed
mode
switch&
Mileage
mode
sw
i
tch
"If there
is
no operation
for
5 seconds, display
will
return
Speed (Real-Time) display
automatically.
7
.4
Headlight/backlight On/Off
Press and hold
~
button for 1 second can tum on/offthe headlight/backlight.
The
motor
does
not
work
when
the
battery
voltage
is
low
, Display still
can
keep
the
headlight
on
for a
while
when
E•
bike
is
in
riding
.
SPEED
SPEED
no.,
u~Km/h
no.,
u~
Km/h
c•••••:
c•••:
PAS9
•09
PAS...,
'Trip
!
00028.2
Km
!Trip
I
00028_2 Km
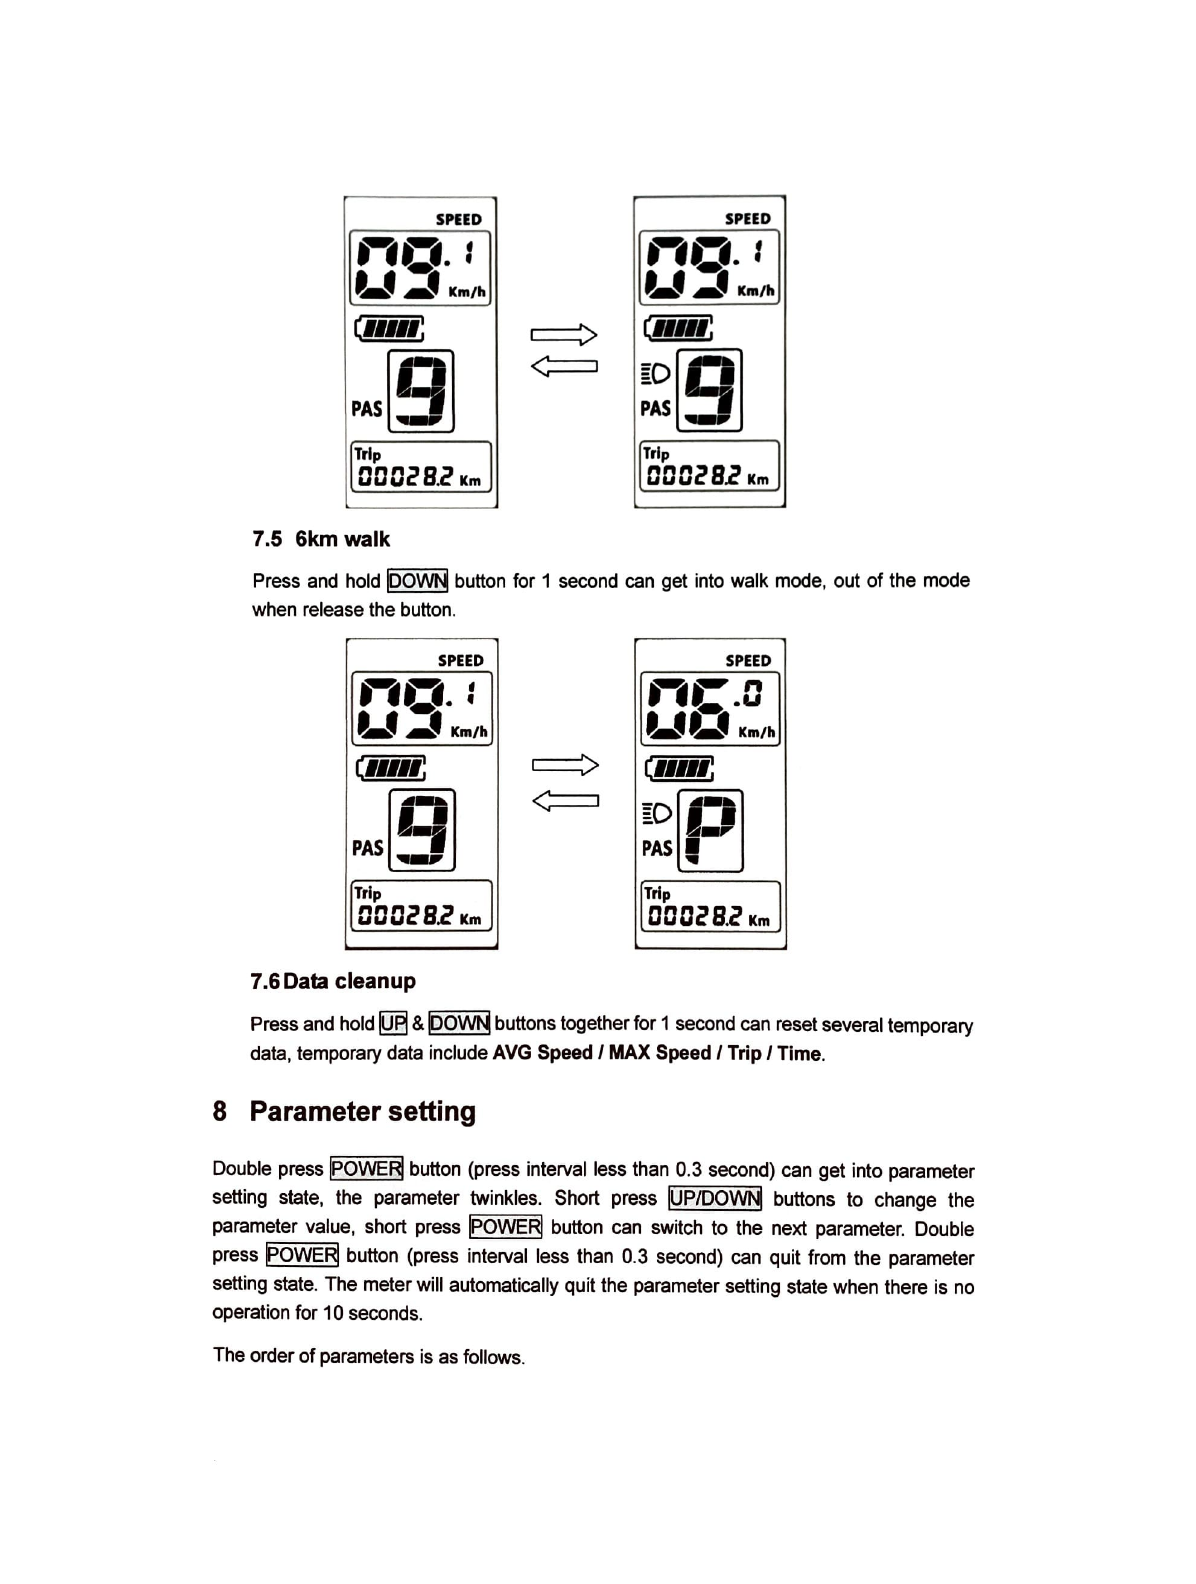
7.5 6km walk
Press and hold
~
button for 1 second can get into walk mode, out
of
the mode
when release the button.
SPEED
SPEED
no.,
u~Km/h
nc.c
UUKm/h
c••••:
c••••:
PAS9
[O[e]
PAS
I
!Trip
00028_2 Km
IITrip
I
00028.2 Km
7.6Data cleanup
Press and hold
IQEI
&powtiibuttons togetherfor 1 second can reset several temporary
data, temporary data include
AVG
Speed
/
MAX
Speed
/ Trip/
Time.
8 Parameter setting
Double press
IPOWER!
button (press interval less than 0.3 second) can get into parameter
setting state, the parameter twinkles. Short press
IUP/DOwij
buttons to change the
parameter value, short press
IPOWER!
button can switch to the next parameter. Double
press pOWER! button (press interval less than 0.3 second) can quit from the parameter
setting state. The meter will automatically quit the parameter setting state when there is no
operation for 10 seconds.
The order
of
parameters is asfollows.
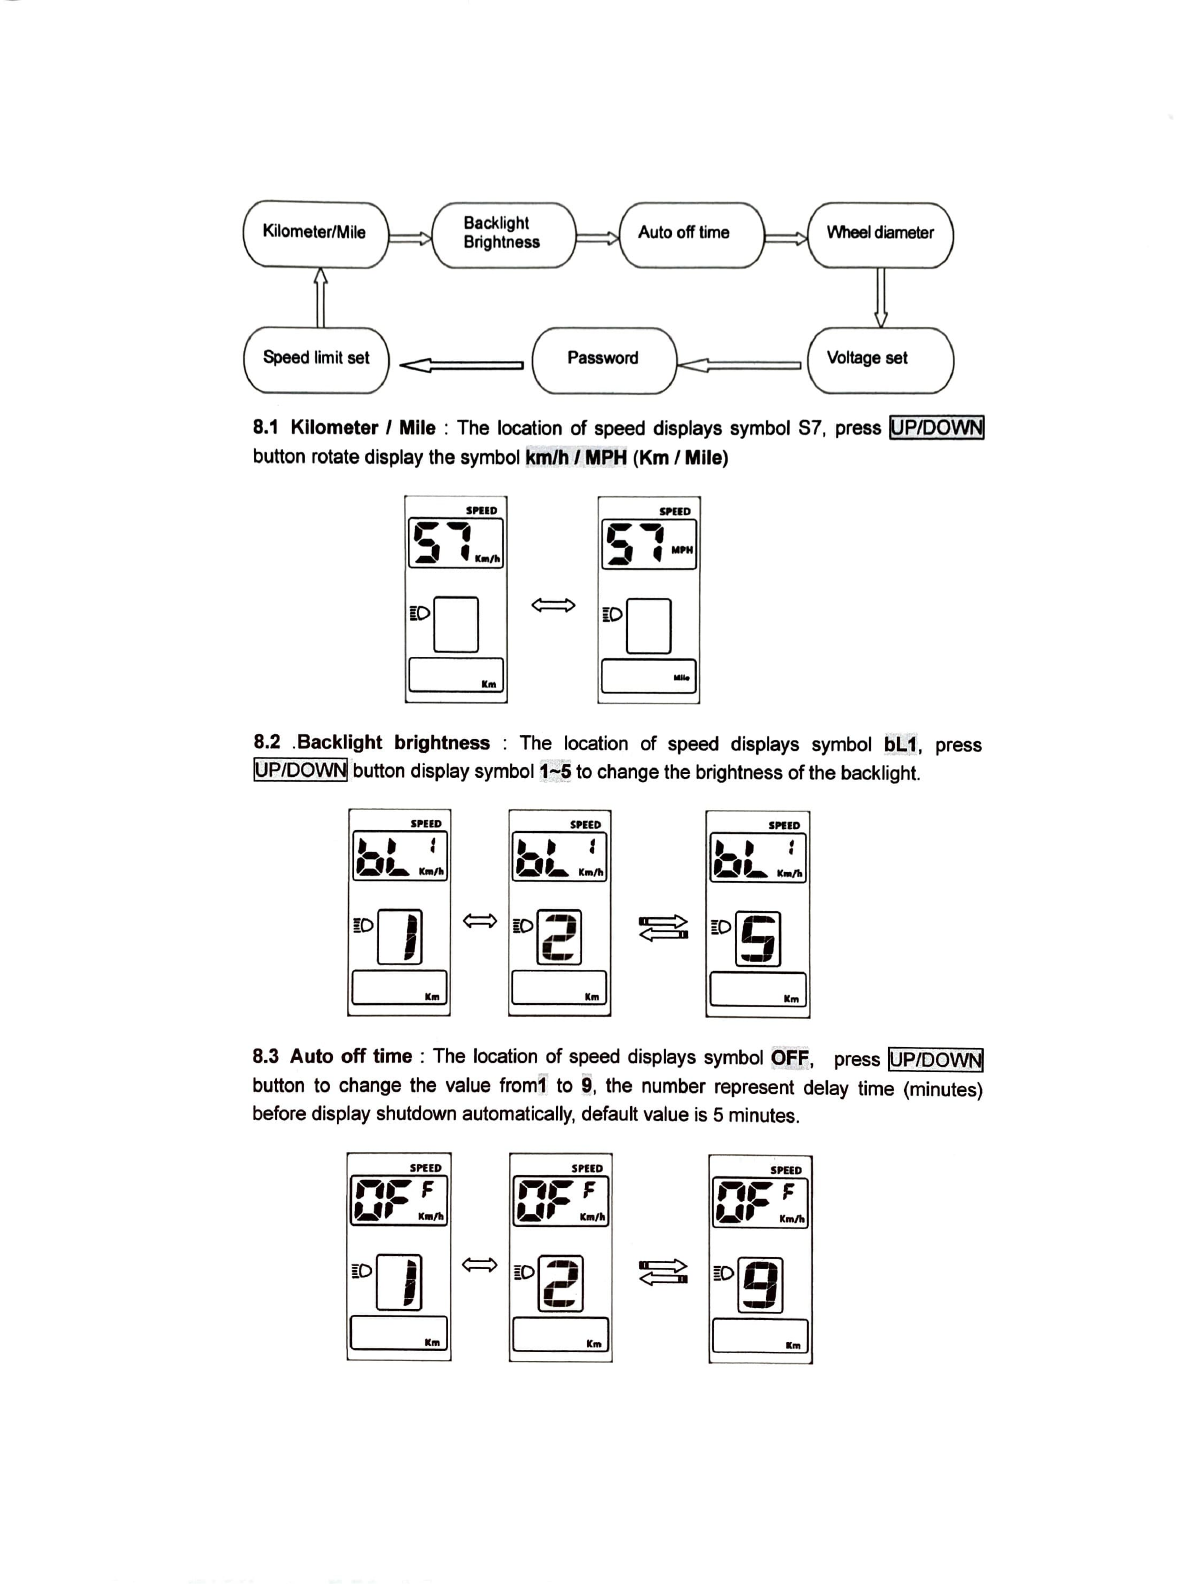
Kilometer/Mile Backlight
Brightness Auto offtime
Speed limit set
<:::::::::===={
Pouwom
}:::====i
IMleel
diameter
Voltage
set
8.1
KIiometer / Mlle :
The location
of
speed displays symbol S7, press
RPIDOwij
button rotate display the symbol
km/h/
MPH
(Km/
Mlle)
S"ID
SPUD
~
..
-
.J
.""'"'
~
(DD
ID
□
I
••
I I
-I
8.2 .Backlight brightness :
The location
of
speed displays symbol
bl
1,
press
!UP/DOWN
button display symbol
1-~
to change the brightness
of
the backlight.
SPUD SPUD
l"ID
·-.
'
u1..
...
,.
•-
•
'l
1;11.,
...
,.
·-.
:
,,._,._,_
ID
□
i0[2]
!D[S]
I
••
I I
...
I I
...
I
8.3 Auto off time : The location
of
speed displays symbol
OFF,
press
iUP/DOwij
button to change the value
from1
to
9,
the number represent delay time (minutes)
before display shutdown automatically, default value is 5 minutes.
SPIED
SPIED SPUD
nrF_
,.,,-
..
,.
nrF
,.,,-
"'""'
nrF
-
u,
.
.,.
[0[1]
ID[2]
ID[9J
I .
..
I I
...
I I ... 1
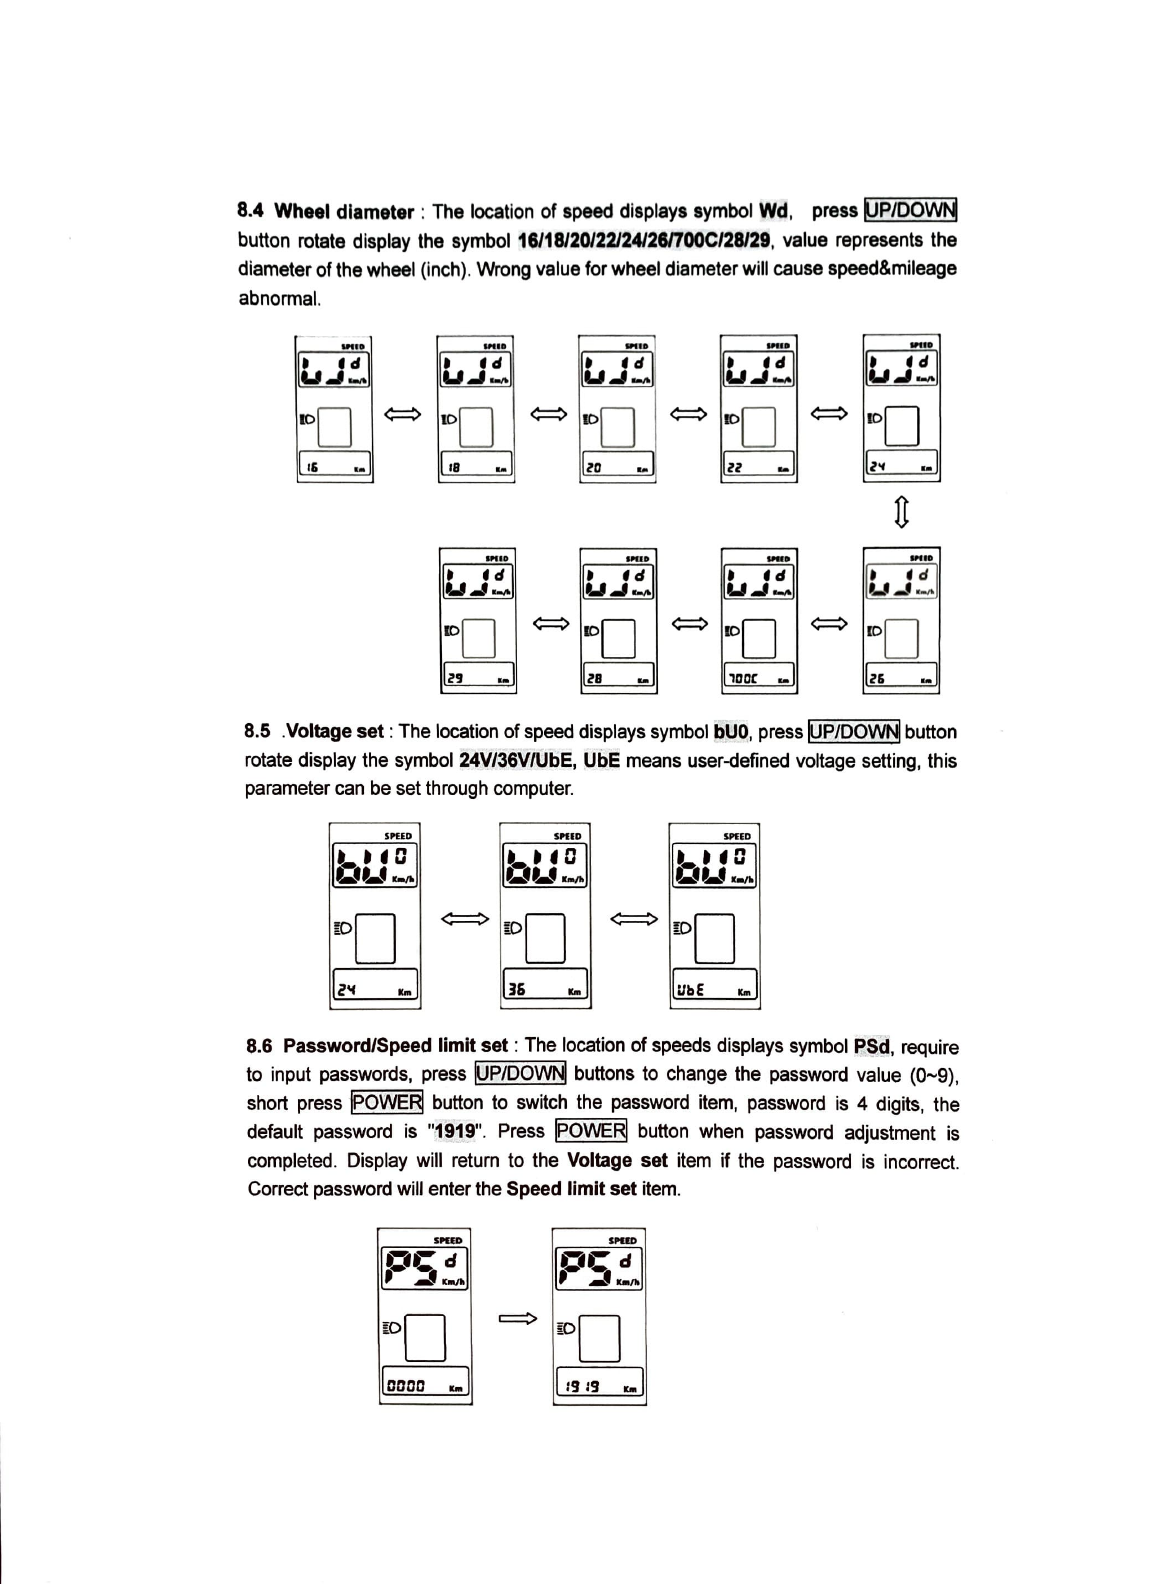
8.4 Wheel
diameter
: The location of speed displays symbol
Wd,
press
k,JP/OOWN
button rotate display the symbol
16/18/20/22/241261700C/28/29,
value represents the
diameter
of
thewheel (inch). Wrong value forwheel diameterwill cause speed&mileage
abnormal.
....
lt,J!I
....
~
-
¢=::>
ID
□
'°
D
IO
□
I,,
..
1
lza
..
1
lz
..
..
1
u
'"'"
1"H
-·
.....
~
-
~
...,.
~
-
~
....,.
ID
□
<:=:>
ro
□
<:=:>
ID
□
<:=:>
ID
□
lz,
..
1
lza
..
1
l,aac
-1
lz,
..
1
8.5
.Voltage
set :The location
of
speed displays symbol
bUO
, press
K)P/DOWN!
button
rotate display the symbol
24V/36V/UbE,
UbE
means user-defined voltage setting, this
parameter can be set through computer.
SPUD
5'110
5'11D
a • • C
Du..,.
••
• • C
uu
.
.,.
~.
,c
uu
.
.,.
tO
□
ID
□
ID
□
lz'f
..
,
13&
..
1
lubE
..
1
8.6
Password/Speed limit
set
: The location
of
speeds displays symbol
PSd,
require
to input passwords, press
RPIDOwij
buttons to change the password value (0~9),
short press
!POWER!
button to switch the password item, password is 4 digits, the
default password is
"1919".
Press
!POWER!
button when password adjustment is
completed. Display will return
to
the
Voltage
set item
if
the password is incorrect.
Correct password will enterthe
Speed
limit set item.
......
......
nrd
,-
.:...,.
OC'd
'
~
..
,.
I
O
□
iO
□
loaao
..
,
I,,:,
..
1
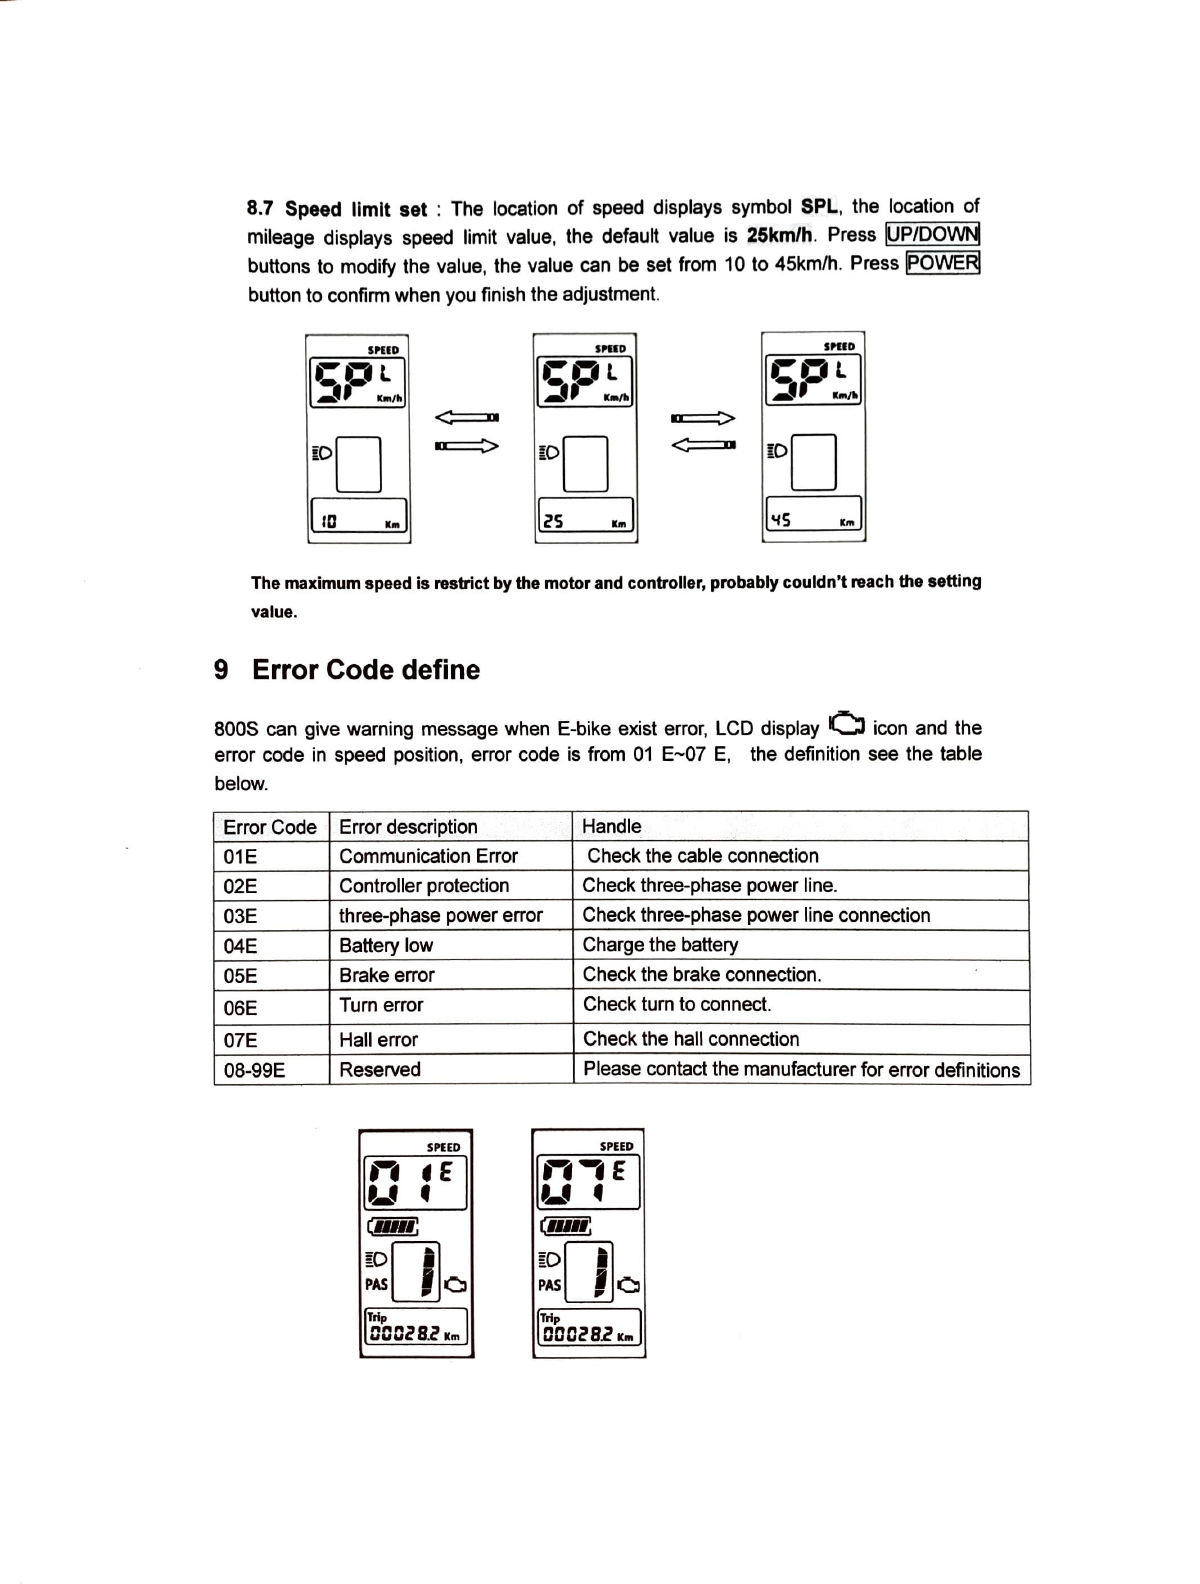
8.7 Speed
llmlt
set
: The location
of
speed displays symbol SPL, the location
of
mileage displays speed limit value, the default value is
25km/h
.
Press
!JP/DOwij
buttons to modify the value, the value can be set from 10 to 45km/h. Press POWERj
button to confirm when you finish the adjustment.
SNID
SPUD
SNID
SP~,~
ISP~I
Cpl
,.J
..
,.
iD
□
mo
I
D
□
I
,a
••
I
l2s
••
I
l"s
IM
I
The
maximum
speed
is
restrict
by
the
motor
and
controller, probably couldn't
reach
the setting
value.
9 Error Code define
SOOS
can give warning message when E-bike exist error, LCD display
O
icon and the
error code in speed position, error code is from
01
E~07
E,
the definition see the table
below.
ErrorCode Error description Handle
01E Communication Error Check the cable connection
02E Controllerprotection Check three-phase power line.
03E three-phase power error Check three-phase power line connection
04E Battery low Charge the battery
05E Brake error Checkthe brake connection.
06E Turn error Check turn to connect.
07E Hall error Checkthe hall connection
08-99E Reserved Please contact the manufacturerfor errordefinitions
SPEED SPEED
I"
,e
u C
,,,._E
UC
c
....
:
(11111:
;~[Ile
!~I
Ila
lccczs.z
Im
I
ITcoczs.cb
I
Table of contents
Other Merkava Scooter manuals


Popular Scooter manuals by other brands

ewheels
ewheels EW-12 owner's manual

SUPER 73
SUPER 73 Z Series OWNER HANDBOOK ASSEMBLY & MAINTENANCE

foc.us
foc.us Shimano STEPS E8000 user guide

Active Care Medical
Active Care Medical Spitfire EX 1420 owner's manual

KID Trax
KID Trax KT1024WM Princess Scooter user guide

SXT Scooters
SXT Scooters BUDDY manual


