merten MEG6260-0410 User manual
U.motion
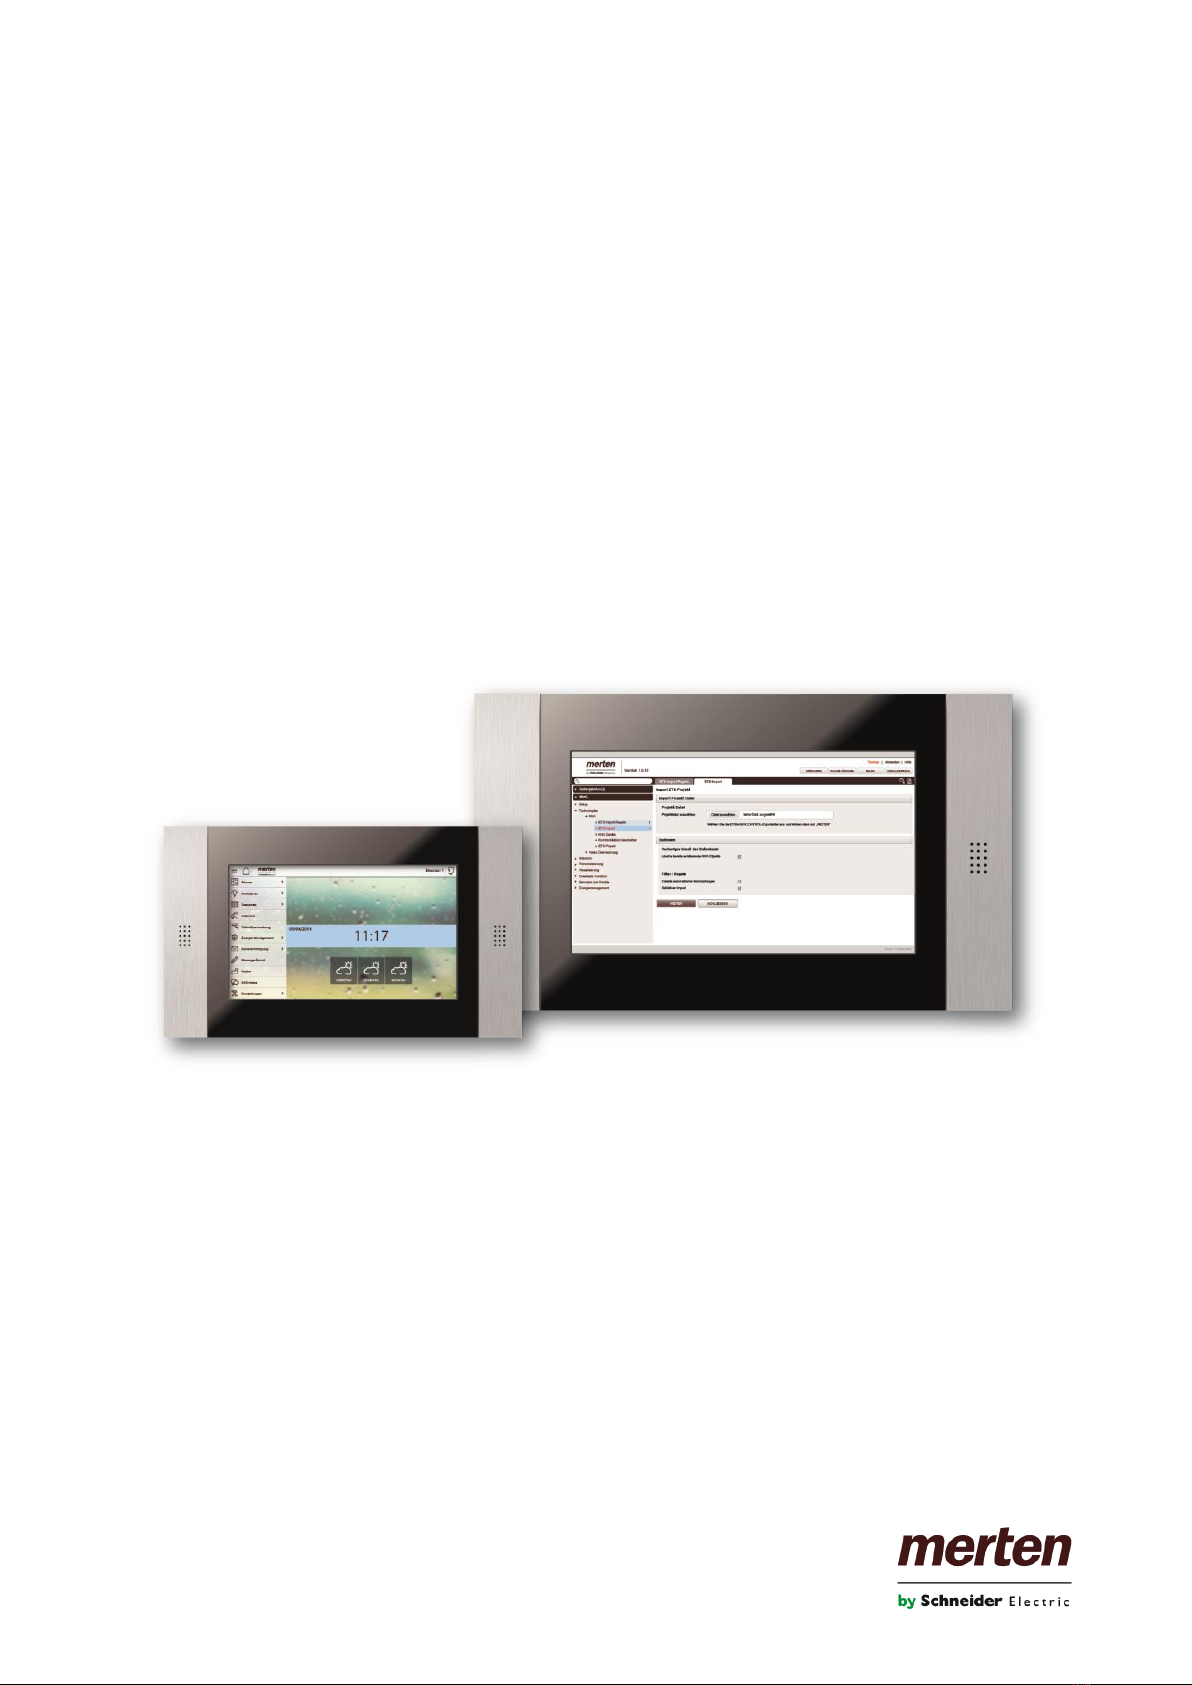
U.motion KNX Server Plus, Touch 10
U.motion KNX Server Plus, Touch 15
Installation Manual
Art. no. MEG6260-0410 | MEG6260-0415
04/2014 VERSION 1.0.1
www.merten.com

- 2 -
U.motion KNX Server Plus, Touch
Installation Manual
GENERAL INFORMATION
Schneider Electric GmbH c/o Merten
Gothaer Straße 29, 40880 Ratingen
www.merten.com
www.merten-austria.at
Customer care centre:
Phone: +49 2102 - 404 6000
Operating instructions, manuals and software are protected by copyright. All rights are reserved. Copying, multiplication,
translation and conversion, either partially or as a whole, is not permitted. You are allowed to make a single copy for
backup purposes.
Note: please read the manual before beginning and keep the manual for later use.
Audience: the manual has been conceived and written for users who are experienced in the use of PCs and automation
technology.
CONVENTIONS
[KEY]
Keys that are to be pressed by the user are given in square brackets, e.g. [CTRL] or [DEL]
Courier
On-screen messages are given in the Courier font, e.g. C:\>
Courier bold
input to be made by the user are given in Courier bold, e.g. C:\>DIR).
„…“ (double quotes)
Names of buttons to be pressed, menus or other onscreen elements and product names are
given within double quotes. (e.g. “Configuration”).
Symbolic
In this manual the following symbolic are used to indicate particular text blocs.
Caution!
A dangerous situation may arise that may cause damage to material.
Note.
Hint and additional notes
- 3 -
U.motion KNX Server Plus, Touch
Installation Manual
SAFETY INSTRUCTIONS
The present operating instructions contain those safety instructions that are required to safely operate the machine.
All persons working with the machine must heed the present operating instructions, especially the safety instructions.
In addition, all local stipulations governing the prevention of accidents must be heeded.
Only trained and authorized personnel may install and operate the machine.
Proper application: The machine has been designed for application in a building environment.
The machine meets the requirements of the EMC guidelines and of the harmonized European standards. Modifications to
the machine hardware may affect the system’s EMC compatibility.
Without special protection measures, the machine must not be used in EX areas and in plants that require special moni-
toring.
Danger of explosion. Do not expose the buffer batteries to heat. Serious injury may be the result.
The operating voltage of the machine must be within the specified range! The product label provides the required infor-
mation.
- 4 -
U.motion KNX Server Plus, Touch
Installation Manual
INDEX:
1First Commissioning________________________________________ - 9 -
1.1 Introduction ___________________________________________________________________- 9 -
1.2 Content of the Packaging _____________________________________________________- 9 -
1.3 Installation, Connection and Commissioning ______________________________ - 10 -
1.3.1 Installation and Connection_________________________________________________ - 10 -
1.3.2 Environmental Conditions __________________________________________________ - 10 -
1.3.3 Commissioning _____________________________________________________________ - 10 -
1.4 Network Connection ________________________________________________________ - 10 -
1.5 Access ________________________________________________________________________ - 12 -
1.6 Administration and Visualisation Area _____________________________________ - 13 -
2General overview __________________________________________ - 15 -
2.1 Introduction _________________________________________________________________ - 15 -
2.2 Administration Area - Interface ____________________________________________ - 15 -
2.3 Toolbar_______________________________________________________________________ - 16 -
2.4 Navigation Menu ____________________________________________________________ - 17 -
2.4.1 Usage _______________________________________________________________________ - 17 -
2.4.2 Menu Structure _____________________________________________________________ - 20 -
2.4.3 Setup _______________________________________________________________________ - 20 -
2.4.4 Technologies - KNX _________________________________________________________ - 20 -
2.4.5 Technologies –Video Surveillance __________________________________________ - 21 -
2.4.6 Technologies - Intercom ____________________________________________________ - 21 -
2.4.7 Technologies –Energy ______________________________________________________ - 21 -
2.4.8 Customization ______________________________________________________________ - 21 -
2.4.9 Customization –Navigation Menu__________________________________________ - 21 -
2.4.10 Visualisation - Rooms _____________________________________________________ - 22 -
2.4.11 Visualisation - Functions __________________________________________________ - 22 -
2.4.12 Visualisation –Links _______________________________________________________ - 23 -
2.4.13 Visualisation - Scenarios __________________________________________________ - 23 -
2.4.14 Visualisation –Complex objects___________________________________________ - 23 -
2.4.15 Advanced Functions_______________________________________________________ - 23 -
2.5 Search Function _____________________________________________________________ - 24 -
2.6 Workspace ___________________________________________________________________ - 25 -
2.6.1 Overview ____________________________________________________________________ - 25 -
2.6.2 Usage of the Tabs___________________________________________________________ - 26 -
2.6.3 Help_________________________________________________________________________ - 26 -
- 5 -
U.motion KNX Server Plus, Touch
Installation Manual
3Setup _______________________________________________________ - 27 -
3.1 Introduction _________________________________________________________________ - 27 -
3.2 Language ____________________________________________________________________ - 27 -
3.3 Network______________________________________________________________________ - 28 -
3.4 Update _______________________________________________________________________ - 29 -
3.5 Backup/Restore______________________________________________________________ - 29 -
3.6 Date/Time ___________________________________________________________________ - 30 -
3.6.1 Date/Time Configuration ___________________________________________________ - 30 -
3.6.2 Timezone Settings __________________________________________________________ - 30 -
3.6.3 Online Update ______________________________________________________________ - 30 -
3.6.4 Scheduled Services Reboot _________________________________________________ - 30 -
3.7 Display _______________________________________________________________________ - 31 -
3.7.1 Power-Management and Screensaver ______________________________________ - 31 -
3.7.2 Images ______________________________________________________________________ - 31 -
3.7.3 Touchscreen ________________________________________________________________ - 32 -
4Customization _____________________________________________ - 33 -
4.1 Themes_______________________________________________________________________ - 33 -
4.2 Navigation Menu ____________________________________________________________ - 34 -
4.3 Favourites____________________________________________________________________ - 34 -
4.4 Options_______________________________________________________________________ - 35 -
4.4.1 Home _______________________________________________________________________ - 35 -
4.4.2 Mail _________________________________________________________________________ - 36 -
4.4.3 Notifications ________________________________________________________________ - 36 -
4.4.4 Weather_____________________________________________________________________ - 36 -
4.4.5 RSS Feeds ___________________________________________________________________ - 36 -
4.4.6 Internet Bookmark __________________________________________________________ - 37 -
4.4.7 Display-Interaction__________________________________________________________ - 38 -
4.4.8 Advanced ___________________________________________________________________ - 38 -
5KNX_________________________________________________________ - 39 -
5.1 Introduction _________________________________________________________________ - 39 -
5.2 Requirements and Export of the ETS Project ______________________________ - 39 -
5.2.1 OPC-Import _________________________________________________________________ - 39 -
5.3 ETS Import Rules ____________________________________________________________ - 40 -
5.4 ETS Import ___________________________________________________________________ - 41 -
5.5 Selective Import of an ETS Project _________________________________________ - 46 -
5.6 Import of a CSV File _________________________________________________________ - 47 -
- 6 -
U.motion KNX Server Plus, Touch
Installation Manual
5.7 KNX Object Properties ______________________________________________________ - 50 -
5.7.1 KNX Object Details__________________________________________________________ - 50 -
5.7.2 KNX Group Addresses ______________________________________________________ - 52 -
5.7.3 Rooms and Connected Scenarios ___________________________________________ - 53 -
5.7.4 Active and Passive Events ___________________________________________________ - 53 -
5.8 KNX Scenarios _______________________________________________________________ - 54 -
5.9 Physical Address of U.motion KNX Server Plus Touch ____________________ - 55 -
5.10 ETS Gateway _________________________________________________________________ - 56 -
6Rooms ______________________________________________________ - 59 -
6.1 Introduction _________________________________________________________________ - 59 -
6.2 Create new Rooms __________________________________________________________ - 59 -
6.3 Insert Objects into Rooms __________________________________________________ - 64 -
6.4 Deleting Rooms _____________________________________________________________ - 65 -
6.5 Customizing the BACKGROUND View______________________________________ - 65 -
7Functions ___________________________________________________ - 66 -
7.1 Introduction _________________________________________________________________ - 66 -
7.2 Administration of the Functions____________________________________________ - 66 -
7.3 Functions in the Visualisation_______________________________________________ - 67 -
8Complex Objects ___________________________________________ - 69 -
8.1 Introduction _________________________________________________________________ - 69 -
8.2 Create Complex Objects_____________________________________________________ - 69 -
8.3 Object Assignment __________________________________________________________ - 73 -
8.4Generic Complex Object ____________________________________________________ - 74 -
8.5 RGB LED Control_____________________________________________________________ - 76 -
8.6 Audio (Loudspeaker & Microphone) _______________________________________ - 77 -
8.6.1 System Volume _____________________________________________________________ - 77 -
8.6.2 Intercom Volume ___________________________________________________________ - 77 -
9Scenarios ___________________________________________________ - 79 -
9.1 Introduction _________________________________________________________________ - 79 -
9.2 Create Scenarios _____________________________________________________________ - 79 -
9.3 Add Actions to a Scenario __________________________________________________ - 81 -
9.4 Scenarios with Wait Commands ____________________________________________ - 82 -
9.5 Customization of the Wait Commands_____________________________________ - 84 -
- 7 -
U.motion KNX Server Plus, Touch
Installation Manual
10 Links_______________________________________________________ - 85 -
10.1 Introduction _________________________________________________________________ - 85 -
10.2 Creation of Links ____________________________________________________________ - 85 -
10.3 Integration into the Visualisation __________________________________________ - 87 -
10.4 Handling inside the Visualisation___________________________________________ - 87 -
11 Advanced Functions______________________________________ - 88 -
11.1 Introduction _________________________________________________________________ - 88 -
11.2 Logics ________________________________________________________________________ - 88 -
11.3 Conditions ___________________________________________________________________ - 90 -
11.4 Virtual Objects_______________________________________________________________ - 92 -
11.5 Integrators ___________________________________________________________________ - 93 -
11.6 Notifications _________________________________________________________________ - 94 -
11.6.1 Log notifications __________________________________________________________ - 96 -
11.7 Clients and Page Jumps _____________________________________________________ - 97 -
12 IP Cameras________________________________________________ - 99 -
12.1 Introduction _________________________________________________________________ - 99 -
12.2 Visualisation in Local Network_____________________________________________ - 100 -
12.3 Axis Cameras and Videoserver_____________________________________________ - 101 -
12.4 Mobotix Cameras___________________________________________________________ - 102 -
12.5 Generic Video Format (JPG) _______________________________________________ - 103 -
12.6 Visualisation ________________________________________________________________ - 104 -
13 Energy Management ____________________________________- 107 -
13.1 Introduction ________________________________________________________________ - 107 -
13.2 Sections _____________________________________________________________________ - 107 -
13.3 Consumption _______________________________________________________________ - 108 -
13.3.1 Creation of a new Energy Counter _______________________________________ - 108 -
13.3.2 Representation in the Visualisation ______________________________________ - 111 -
13.3.3 Power Calculation ________________________________________________________ - 115 -
13.4 Load Control ________________________________________________________________ - 115 -
13.4.1 General Settings__________________________________________________________ - 115 -
13.4.2 Connection of an Energy Counter________________________________________ - 117 -
13.4.3 Connection of one or more Loads _______________________________________ - 118 -
13.4.4 Representation in the Visualisation ______________________________________ - 119 -

- 8 -
U.motion KNX Server Plus, Touch
Installation Manual
14 Users _____________________________________________________- 122 -
14.1 Introduction ________________________________________________________________ - 122 -
14.2 Users and User Groups _____________________________________________________ - 122 -
14.3 Create new Users ___________________________________________________________ - 122 -
14.4 User Groups and Permissions ______________________________________________ - 124 -
15 Remote Access ___________________________________________- 126 -
15.1 Introduction ________________________________________________________________ - 126 -
15.2 Remote Access through Internet __________________________________________ - 126 -
Notes _____________________________________________________- 127 -
- 9 -
U.motion KNX Server Plus, Touch
Installation Manual
1FIRST COMMISSIONING
1.1 INTRODUCTION
U.motion KNX Server Plus Touch is a Touch-PC for monitoring and visualising home & building Automation systems,
which have been realized on the base of the worldwide KNX standard. The configuration and use of U.motion KNX Server
Plus Touch takes place directly through its web interface, which can be accessed through a conventional browser (from
any device / operating system).
This chapter describes how to connect and configure U.motion KNX Server Plus Touch, so that a successful integration
into the own system can occur.
1.2 CONTENT OF THE PACKAGING
The U.motion KNX Server Plus Touch packaging contains the following material:
U.motion KNX Server Plus, Touch
U.motion Touch Design elements
Connector for power supply and KNX bus
Safety notes/General notes
Quick Start Guide
U.motion USB Stick: documentation and software
RJ45 network cable
RJ45 network adapter

- 10 -
U.motion KNX Server Plus, Touch
Installation Manual
1.3 INSTALLATION,CONNECTION AND COMMISSIONING
1.3.1 INSTALLATION AND CONNECTION
U.motion KNX Server Plus Touch fits into the available mounting units. For a correct function, the following connections
must be guaranteed:
•Power supply 230V AC
•KNX bus connection via supplied connector
•Network connection via CAT5 network cable
Hint: the connection to the KNX bus is not really needed for the configuration of U.motion KNX Server Plus
Touch, but it allows a more efficient programming, since direct tests on the system can be performed.
When commissioning U.motion KNX Server Plus Touch, the following steps must be followed:
Power off the system/installation
Mount U.motion KNX Server Plus Touch into the installed mounting unit
Connect power supply and KNX bus to U.motion KNX Server Plus Touch
Power on the system/installation
Wait until U.motion KNX Server Plus Touch has booted up
ATTENTION!
If the U.motion KNX Server Plus Touch hardware is changed, irreversible damage can occur. Any intervention on
the equipment should be performed only by authorized personnel.
1.3.2 ENVIRONMENTAL CONDITIONS
The correct function of U.motion KNX Server Plus Touch can be granted only if the following requests are met:
OPERATION
Ambient temperature 0°C - 30°C
1.3.3 COMMISSIONING
U.motion KNX Server Plus Touch is power supplied by 230V AC.
1.4 NETWORK CONNECTION
For the usage/configuration of U.motion KNX Server Plus Touch a working network connection is required. In order to
make the first access to U.motion KNX Server Plus Touch, or if a compatible network is not available, follow these steps:
•Connect U.motion KNX Server Plus Touch through a crossed network cable (“crossover-cable”) with your PC
•Open the network configuration of your PC
•Change the settings of the TCP/IP –Protocol (Version 4) of the network interface, on which you connected the
network cable and enter the following values:
•IP address: 192.168.0.100
•Subnet mask: 255.255.255.0
•Gateway: 192.168.0.110
•Save the new settings; depending on the installed OS a restart can be necessary.
ATTENTION! Before commissioning U.motion KNX Server Plus Touch all connections must be checked!
Verify that the voltage of the connected power supply doesn’t exceed the supported voltage range, in order
to avoid damage on the device!

- 11 -
U.motion KNX Server Plus, Touch
Installation Manual
The following screenshots show how to change the network settings on Windows XP:
Once the network settings have been changed, open a browser on your PC (Google Chrome preferred) and enter the
following URL into the address bar of the browser:
http://192.168.0.110/umotion/modules/system/externalframe.php?context=configuration
This link will open directly the configuration menu of U.motion KNX Server Plus Touch; if the network connection is
working properly you will see the following screen:
Alternatively, you can also just enter the IP address of U.motion KNX Server Plus Touch in the browser address bar. In this
case, the login window of the visualisation is displayed. After login (see next section), the configuration menu can be
reached by clicking on the ADMIN button in the toolbar (more details in the "User manual" or in chapter 1.6 of this
manual).

- 12 -
U.motion KNX Server Plus, Touch
Installation Manual
Note: U.motion KNX Server Plus Touch is limited to only one remote access from another PC (Desktop,
Laptop), which is meant for programming the device. The access from mobile devices or U.motion Client
Touch 7 through the U.motion Control-App is not limited!
The maximum comfort for using/programming U.motion KNX Server Plus Touch can be achieved with the
following browsers:
•Google Chrome
•Apple Safari
However, it is not recommended to use the following browsers, because they can’t represent all the functions
of U.motion KNX Server Plus Touch correctly:
•Microsoft Internet Explorer
•Opera
•Mozilla Firefox
The browser compatibility is continuously under development, it is recommended to check out the list of the
compatible browsers in the documentation of newly released product versions.
1.5 ACCESS
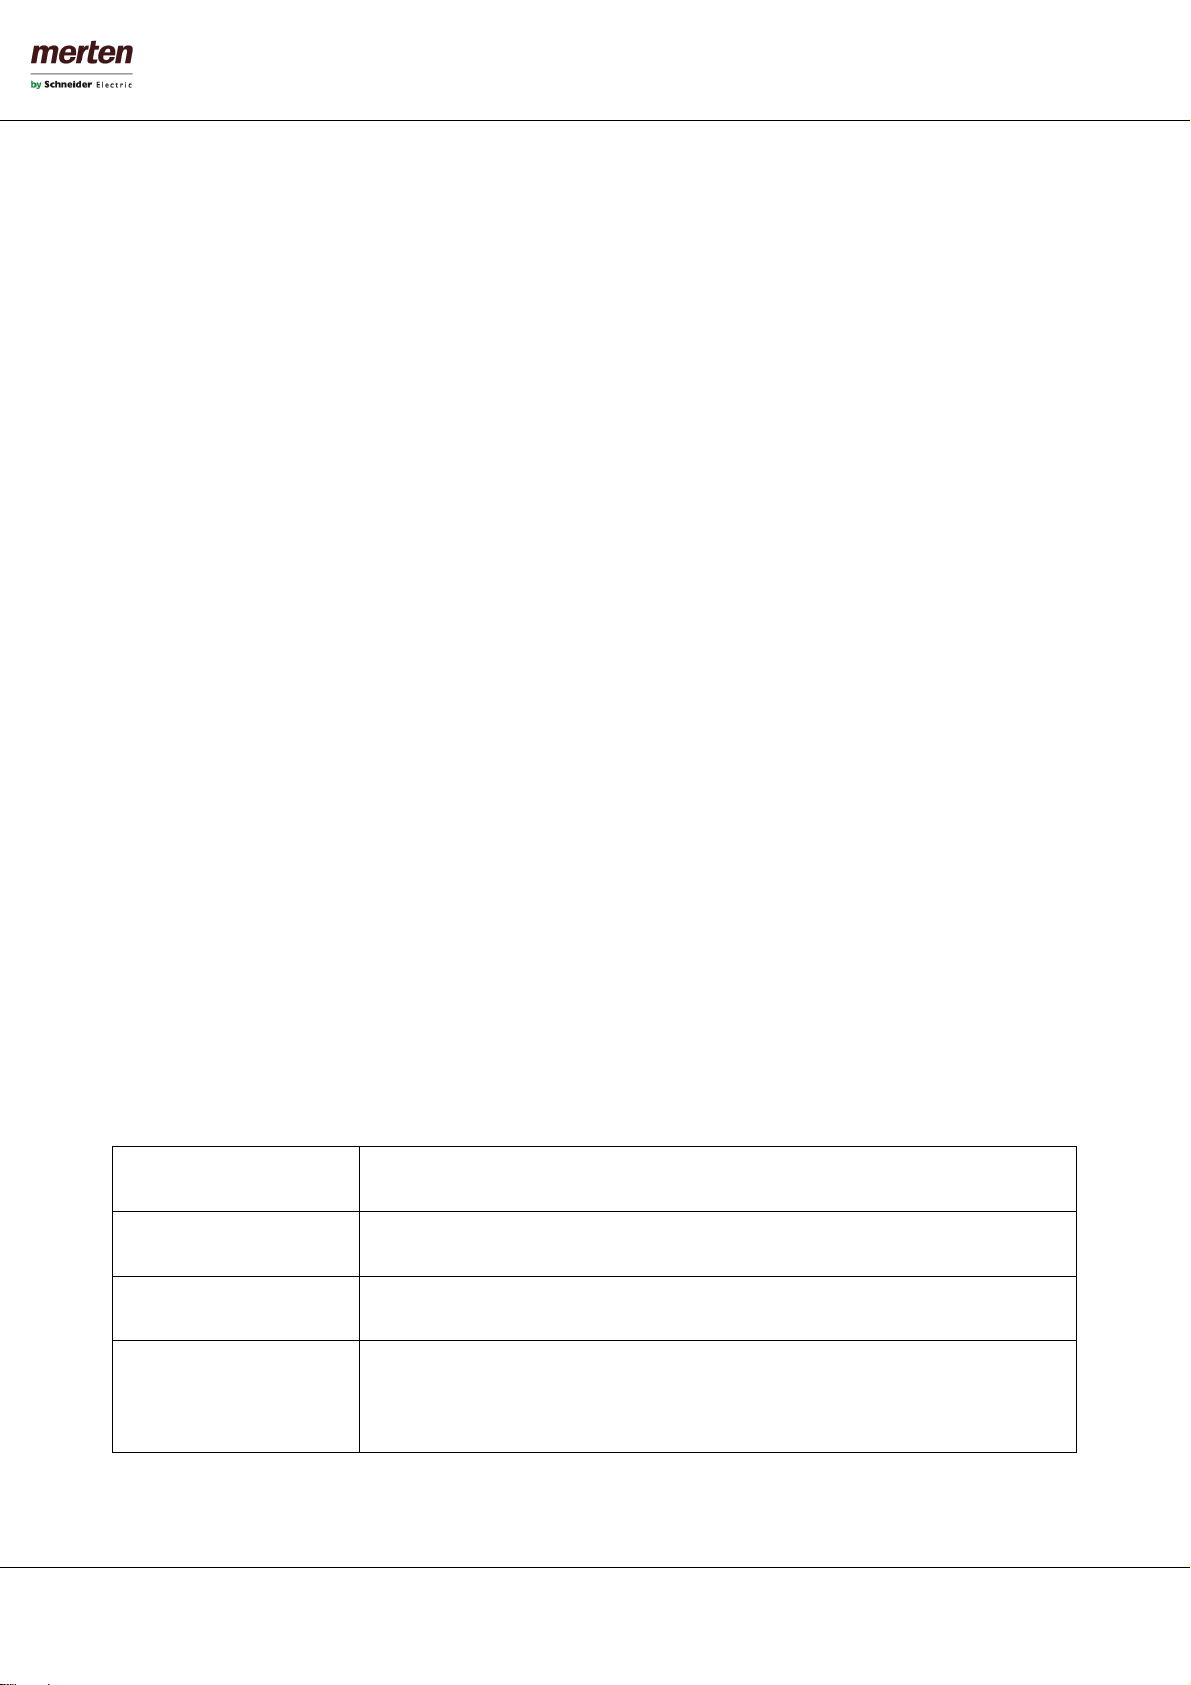
On delivery U.motion KNX Server Plus Touch has preconfigured the following users:
Username
Password
Description
admin
admin
System Administrator. Can edit the visualisation, create users and change their
access rights / permissions
manager
manager
User for the installation / configuration of the system. It can change all
settings regarding the visualisation, but has no access to system settings.
user
user
Basic user for client-access. It can navigate through the whole visualisation,
but has no or very limited access to the administration of U.motion KNX
Server Plus Touch.
On the first configuration of U.motion KNX Server Plus Touch you must login with the “admin” user. Do this by entering
the appropriate data into the login screen; once logged in you will see the following screen:

- 13 -
U.motion KNX Server Plus, Touch
Installation Manual
1.6 ADMINISTRATION AND VISUALISATION AREA
The interface of U.motion KNX Server Plus Touch is split into two areas:
•“ADMINISTRATION”or “BACKEND”: Configuration area, in which (depending on the users permissions) each
aspect of the web server and visualisation can be modified
•“VISUALISATION”: Visualisation area, designed for being used by the final user. It allows to navigate inside the
single rooms/pages of the visualisation, which were configured in the ADMINISTRATION before, and controlling
KNX objects in real-time
Both areas are based on web technology and can therefore be controlled from within a browser window. The main
difference between the two levels is the graphical design:
•The ADMINISTRATION is kept in a simple graphic
style and was optimized to represent the maximum
amount of information and option windows in a
clear form.
•The VISUALISATION was designed to allow the
inexperienced users the most intuitive and easy
navigation. The high-end design of the
VISUALISATION makes it very comfortable for the
final customer to use the visualisation.
To switch between the two areas the appropriate button in the current areas can be used:
•From within the ADMINISTRATION it is possible to reach the VISUALISATION by clicking on the respective
button in the upper right corner
•From within the VISUALISATION it is possible to reach the ADMINISTRATION by clicking the entry “ADMIN” in
the upper right menu (only accessible if the toolbar is extended); of course the user must have the permissions
to access the ADMINISTRATION (further information can be found in the „User manual”).
Alternatively the two areas can be accessed directly by entering the following links inside the browsers address bar:
LEVEL
EXAMPLE
ADMINISTRATION
http://192.168.0.110/umotion/modules/system/externalframe.php?context=configuration
VISUALISATION
http://192.168.0.110/umotion/modules/system/externalframe.php?context=runtime
- 14 -
U.motion KNX Server Plus, Touch
Installation Manual
Hint: On U.motion KNX Server Plus Touch itself only the VISUALISATION is accessible, the ADMINISTRATION
cannot be accessed directly on the display of U.motion KNX Server Plus Touch.
To save time during configuration, both areas can be displayed simultaneously in different tabs of the browser,
which makes it faster to switch between the areas.
- 15 -
U.motion KNX Server Plus, Touch
Installation Manual
2GENERAL OVERVIEW
2.1 INTRODUCTION
This chapter gives an overview of the ADMINISTRATION area of U.motion KNX Server Plus Touch and explains different
tools and menus, which can be used to configure the web server.
2.2 ADMINISTRATION AREA -INTERFACE
The ADMINISTRATION is divided into the following sections:
SEARCH-FUNCTION
The search function can be found in the upper left corner in form of an input filed, which
allows to find objects quickly by entering keywords related to the searched objects.
MENU
Main menu of the software, shown as a tree-view. Through this menu all sections of the
software are accessible and objects can be created / modified / deleted.
TOOLBAR
The toolbar in the upper side of the ADMINISTRATION is always shown and allows
switching quickly to the mostly used functions through the related buttons.
WORKSPACE
Main area for showing the chosen configuration options; the single menus and
configuration windows of the objects are shown in here. It is possible to open more
menus / windows in the main area at the same time; the different menus / windows will
be accessible through different tabs in this case.

- 16 -
U.motion KNX Server Plus, Touch
Installation Manual
The following screenshot shows the single sections of the ADMINISTRATION area:
2.3 TOOLBAR
Following functions are always present in the toolbar:
SAVE
Allows saving all changes into the flash memory of U.motion KNX Server Plus Touch, what
will preserve the data even if the web server is powered off. The button turns red whenever
changes are made, but not saved yet. In addition, every 5 minutes an automatic saving of all
changes takes place, so pressing the “SAVE”-button is only necessary if the system should be
shut down/restarted immediately after making the changes.
CLEAR CACHE
Allows to delete the HTML SERVER CACHE. This is especially necessary if changes made in
the ADMINISTRATION are not displayed correctly in the VISUALISATION, despite the HTML
CLIENT CACHE was already deleted.
BASE / EXPERT
Changes the visibility of various options / parameters within the configuration pages. The
BASE mode displays only the necessary settings and visible objects; the EXPERT mode,
however, shows even more advanced options as well as hidden objects.
LOGOUT
Ends the current session and allows you to log onto the web server as a different user.
VISUALISATION
Allows switching to the VISUALISATION area and therefore accessing the visualisation, now
showing all modifications made in the configuration.
Search function
Menu
Toolbar
Workspace

- 17 -
U.motion KNX Server Plus, Touch
Installation Manual
2.4 NAVIGATION MENU
2.4.1 USAGE
The navigation menu is a typical tree-view-menu. After accessing the ADMINISTRATION area all the main entries are
shown; the sub-menus are accessed by extending the corresponding main menu. The navigation in this menu is done
entirely with a mouse.
Clicking on an entry in the navigation menu turns the clicked entry into grey; if the entry has additional submenus, the
entry will be extended and the sub-menus are displayed. Another click on the selected entry will close the section and
hide the submenus again.
If actions can be performed for the selected entry, they will be displayed in the TOOLBAR at the bottom left corner of the
navigation menu in form of different buttons. The following actions may be displayed:
NEW / ADD
Allows the creation of a new object within the selected entry. Depending on the selected
item different types of objects are created; if a menu allows the creation of multiple types
of objects, then a context menu will be displayed in order to select the object type to
create.
DELETE
Deletes the selected entry from the project
EDIT
Allows editing of the selected entry though the appropriate configuration window, which
will be opened automatically by clicking this button.
CLONE
Creates an identical copy of the object

- 18 -
U.motion KNX Server Plus, Touch
Installation Manual
When an object is cloned, not only the objects itself is duplicated, but also all of its connections / relations
with other objects. This means that the cloned object will be contained in the same rooms, logics, scenarios
etc. as the original object is. Therefore, after the creation of a cloned object, all relations and connections
should be checked and if necessary corrected.
Note: if the original object was present in a room with BACKGROUND view, the cloned object will be
positioned AT THE SAME PLACE in the room and will cover the original object. In this case, please edit the
BACKGROUND view and place the cloned object in a different position.
If the selected entry supports the EDIT-action, 3 points (“…”) will be displayed on the right side of the entry. Clicking on
these points has the same effect as clicking on the EDIT button in the TOOLBAR.
If the configuration window of an entry is opened through the EDIT-action, the entry will show an arrow-icon instead of 3
points (“…”) on the right side. This icon will be displayed until the configuration window of the entry is closed and shall
facilitate the navigation if multiple tabs are opened in the workspace.

- 19 -
U.motion KNX Server Plus, Touch
Installation Manual
As mentioned before, some of the entries of the navigation menu permit to create submenus or to insert new objects.
This is done using the NEW button in the TOOLBAR: by pressing this button a new object (the object type depends on
the selected entry) will be created and selected automatically. If the EDIT button (or the 3 points in the entry itself) is
clicked, the configuration window of the newly created object will be opened.
Example: To create a new room, just select the entry "ROOMS" (in the main menu "VISUALISATION") and click on the
NEW button. The new room will be created and - if other rooms have already been created before - shown at the end of
the sub-menu:

- 20 -
U.motion KNX Server Plus, Touch
Installation Manual
For rooms it’s also possible to create further sub-menus following the same procedure (as in the further course of this
manual will be explained); the resulting tree-structure can so also be used in the visualisation.
The DELETE button removes the selected entries from the project. This action is blocked for the system menus and
indispensable objects, for preventing the user to remove them by accident.
2.4.2 MENU STRUCTURE
The navigation menu permits to access every setting of the web server and has the following structure:
2.4.3 SETUP
The menu SETUP contains the following entries:
LANGUAGE
Permits to change the language of the GUI
NETWORK
Permits to configure the network parameters of U.motion KNX Server Plus Touch
UPDATE
Permits to update the web server through specific update-packages
BACKUP/RESTORE
Permits to create a backup of the current database, to import an already created backup
or to reset the database to factory settings
DATE/TIME
Permits to configure date/time of the web server and all date/time related settings
DISPLAY
Allows the configuration of the screensaver and display power-off settings of the device.
Additionally the calibration of the touchscreen can be started from within this settings
page.
Further information can be found in the appropriate section of this manual.
2.4.4 TECHNOLOGIES -KNX
This section contains all settings for establishing a communication with the KNX bus:
ETS-IMPORT-RULES
Permits to configure import-rules, through which the imported group addresses will
automatically be configured and connected to the desired icon/function, in dependence
of the defined keywords
ETS IMPORT
Allows the import of a ETS-project into U.motion KNX Server Plus Touch
CONFIGURE
COMMUNICATION
Permits to change the parameters of the used KNX communication interface
ETS PROJECT
Permits to navigate through the single group addresses and to edit them; the navigation
structure will be the same as the one in ETS.
SETUP
Contains generic settings and parameters of the web server
TECHNOLOGIES
Contains the configuration pages of all technologies supported by the web server (KNX.
Video surveillance, intercom etc.)
CUSTOMIZATION
Contains the configuration pages for customizing the graphical design of the
visualisation and the web server plugins
VISUALISATION
Allows the configuration of the visualisation itself (rooms, functions, scenarios etc.)
ADVANCED FUNCTIONS
Allows the configuration of additional functions (e.g. logics, notifications etc.)
USERS AND PERMISSIONS
Allows the configuration of new users and their access permissions
This manual suits for next models
1
Table of contents
Other merten Touch Panel manuals


 Integration guide")


