meyland-smith Meywalk 4 User manual

Handleiding
Model Micro, Mini, Small, Medium and Large

2
Inhoud
Introduce 3
CE goedkeuring en labels 3
Veiligheidsmaatregelen 3
Belangrijk bij het eerste gebruik 4
Meywalk® 4 onderdelen 4
In elkaar plaatsen van bovenste en onderste framedeel 5
Veren 5
Aanpassingen / stap voor stap 6
Buizen 6
Stuur 6
Zing 7
Rompsteun hoogte 7
Rompsteun vervanging 7
Kantelfunce 8
In-en uitstappen 8
Zitvergrendeling 8
Rompsteun 9
Remmen 9
Sleepremmen 9
Teruglooprem 9
Draaisloten voorwielen 9
Accessoires 10
An-kantelsteunen 10
Beenverdeler 10
Beengeleiding 10
Romponderlegger 11
Heuppads 11
Reiniging, desinfece en onderhoud 11
Recycling 11
Beschikking 11
Garane 12

Introduce
De Meywalk 4 Mini, Small, Medium en
Large zijn ontworpen voor
wandelgehandicapte kinderen,
jongeren en volwassenen die moeite
hebben met staan en lopen zonder
ondersteuning. De gebruiksvriendelijke
Meywalk 4 is gemaakt voor het
gebruik binnenshuis. Het maximale
gebruikersgewicht van de Mini is 50
kg, van Small is 100 kg en van de
Medium en Large is 130 kg.
Met de Meywalk 4 hee u één van de
beste loophulpen aangescha. Een
hoge standaard die wordt bereikt door
het unieke ontwerp van hoogwaardige
materialen met meerdere funces:
- de Meywalk 4 volgt individuele
lichaamsbewegingen en looppatronen.
- helpt de gebruiker het lichaam
rechtop te houden en zorgt voor een
veilig gevoel.
- de handgreep ondersteunt de armen
van de gebruiker en vermindert de
druk.
- de zing kan worden verlaagd bij het
in- en uitstappen.
- de zitvergrendeling zorgt ervoor dat
de gebruiker comfortabel zit.
- de geïntegreerde veren en
dynamische stoel ondersteunen het
lopen.
CE markering en labels
Het model en het fabrikantlabel is
geplaatst aan de onderkant van het
frame. Deze labels moeten aljd
leesbaar zijn. Vervang de onleesbare
of ontbrekende labels zo spoedig
mogelijk. Het model en fabrikantlabel
zijn belangrijk voor de idencae van
het product en mogen niet verwijderd
worden.
De Meywalk 4 is CE-gekeurd. Dit
garandeert dat de Meywalk 4 voldoet
aan alle relevante veiligheidseisen
gespeciceerd in de Council Direcve
93/42/EEC voor medische
hulpmiddelen. De Meywalk 4 is getest
door Berlijn Cert (testen/cerceren
van medische hulpmiddelen) aan de
Technische Universiteit in Berlijn.
Veiligheidsmaatregelen
Laat de gebruiker nooit zonder
toezicht achter in de Meywalk 4. De
Meywalk 4 is een therapeusch
hulpmiddel en moet ook als zodanig
worden gebruikt.
Het veersysteem van de Meywalk 4
kan bij een zeer onrusge gebruiker
leiden tot het kantelen van het
loophulpmiddel.
De Meywalk 4 rolt soepel en
gemakkelijk. Houd er dan ook aljd
rekening mee dat het gevaar bestaat
dat de gebruiker ook omver kan rollen.
Houd de kantelbeugel aljd zeer goed
vast wanneer de gebruiker omhoog of
omlaag gebracht wordt.. Wanneer de
kantelbeugel ontgrendeld wordt om
de gebruiker omlaag te brengen, houd
dan rekening met een opwaartse
kracht die geleidelijk toeneemt
naarmate de kantelbeugel hoger komt
(zie guur 25). Laat de kantelbeugel
nooit los jdens het omhoog of
omlaag brengen van de gebruiker,
zelfs niet wanneer u wordt verrast
door het gewicht van de gebruiker.
Wanneer er onderdelen verwijderd
worden kunnen open einden van de
buizen vrijkomen. Deze buizen kunnen
scherpe binnenkanten hebben en dit
kan gevaarlijk zijn voor onderzoekende
vingers. De Meywalk® 4 is zo
ontworpen dat er geen open
buiseinden zijn. Wanneer zich echter
toch een situae voordoet waarbij
open buiseinden voorkomen dan
raden wij u aan deze met plasc
afdekdopjes af te dichten.
Het schuim aan de buizen mag niet
geconsumeerd worden. Houd er
rekening mee dat de bekleding
verwarmt als de Meywalk 4 in zonlicht
is geplaatst. Dit kan huidschade
veroorzaken als de bekleding wordt
aangeraakt. Bedek daarom de
bekleding in het zonlicht of verplaats
de Meywalk 4.
De loophulp mag alleen worden
gebruikt op een vlakke en stevige
ondervloer. Vermijd losse
oppervlaktes zoals grind, zand of
bladeren. Wees bewust van
oneenheden en gaten in de vloer
want er bestaat aljd een risico van
kantelen of vast komen te zien.
Wees vooral voorzichg op een nae
of ijzige ondergrond waar het risico
van uitglijden hoog is. Controleer of
alle onderdelen stevig zijn bevesgd
voordat u de loophulp gebruikt. Maak
bij het reinigen van de Meywalk 4
geen gebruik van hoge druk reiniging
en/of bijtende chemicaliën.
In tegenstelling tot eerdere generaes
van de Meywalk is de Meywalk 4 nu
uitgerust met de sleepremmen,
teruglooprem en draaisloten op de
voorwielen.
Dit product is niet gemaakt van natural
rubber latex.

Belangrijk bij het eerste gebruik:
De Meywalk 4 wordt bijna volledig
gemonteerd geleverd. Controleer of de
verpakking de volgende onderdelen bevat:
- Onderframe met wielen en remmen;
- Bovendeel met zit- en rompsteun;
- Een set veren gerelateerd aan het ge-
bruikersgewicht;
- Accessoires zoals besteld
Meywalk® 4 onderdelen
- Rompbeugel
- Handgreep
- Sterknop voor instellen hoogte rompsteun
- Sterknop voor instellen van kantelfunce
- Draaivergrendeling voor handgreep
- Sterknop voor instellen zithoogte
- Zing met vergrendeling
- Draaiverstelling van bovenste buis
- Rem
- Kantelbeugel
- Stootwiel
- Achterwiel
- Voorwiel

5
Joining the top part
and bottom frame:
Place the top part in the tubes on the
bottom frame. Remember to position
the top part so that the handlebar
points in the direction of the
swivelling front wheels.
Spring loading
The two springs inside the tubes can
be changed to obtain harder or softer
suspension. As a guideline, the
springs should be fully compressed
by the body weight of the user. There
are seven different spring hardness
levels corresponding to the following
body weight:
Mini:
: : Orange springs for 10 -15 kg.
: : Purple springs for 15 - 20 kg.
Mini and Small:
: : White springs for 20 - 50 kg.
Small, Medium and Large:
: : Yellow springs for 45 - 65 kg.
: : Blue springs for 65 - 80 kg.
Medium and Large:
: : Red springs for 80 - 100 kg.
: : Silver springs for 100 - 130 kg.
The springs can easily be
interchanged. Grab and open the
swing bar so that the frame is
lowered. The tube ends are closed
with a lid - open the lids to remove
the springs. To open the lid push up
and turn clockwise before pulling the
lid down and off. After removal of the
old springs the new ones can be
inserted into the tubes. Now the lid
can be fastened again by repeating
the steps above in reverse order.
On the Model Mini, you have to lift
the top part, then you can easily
change the springs.

6
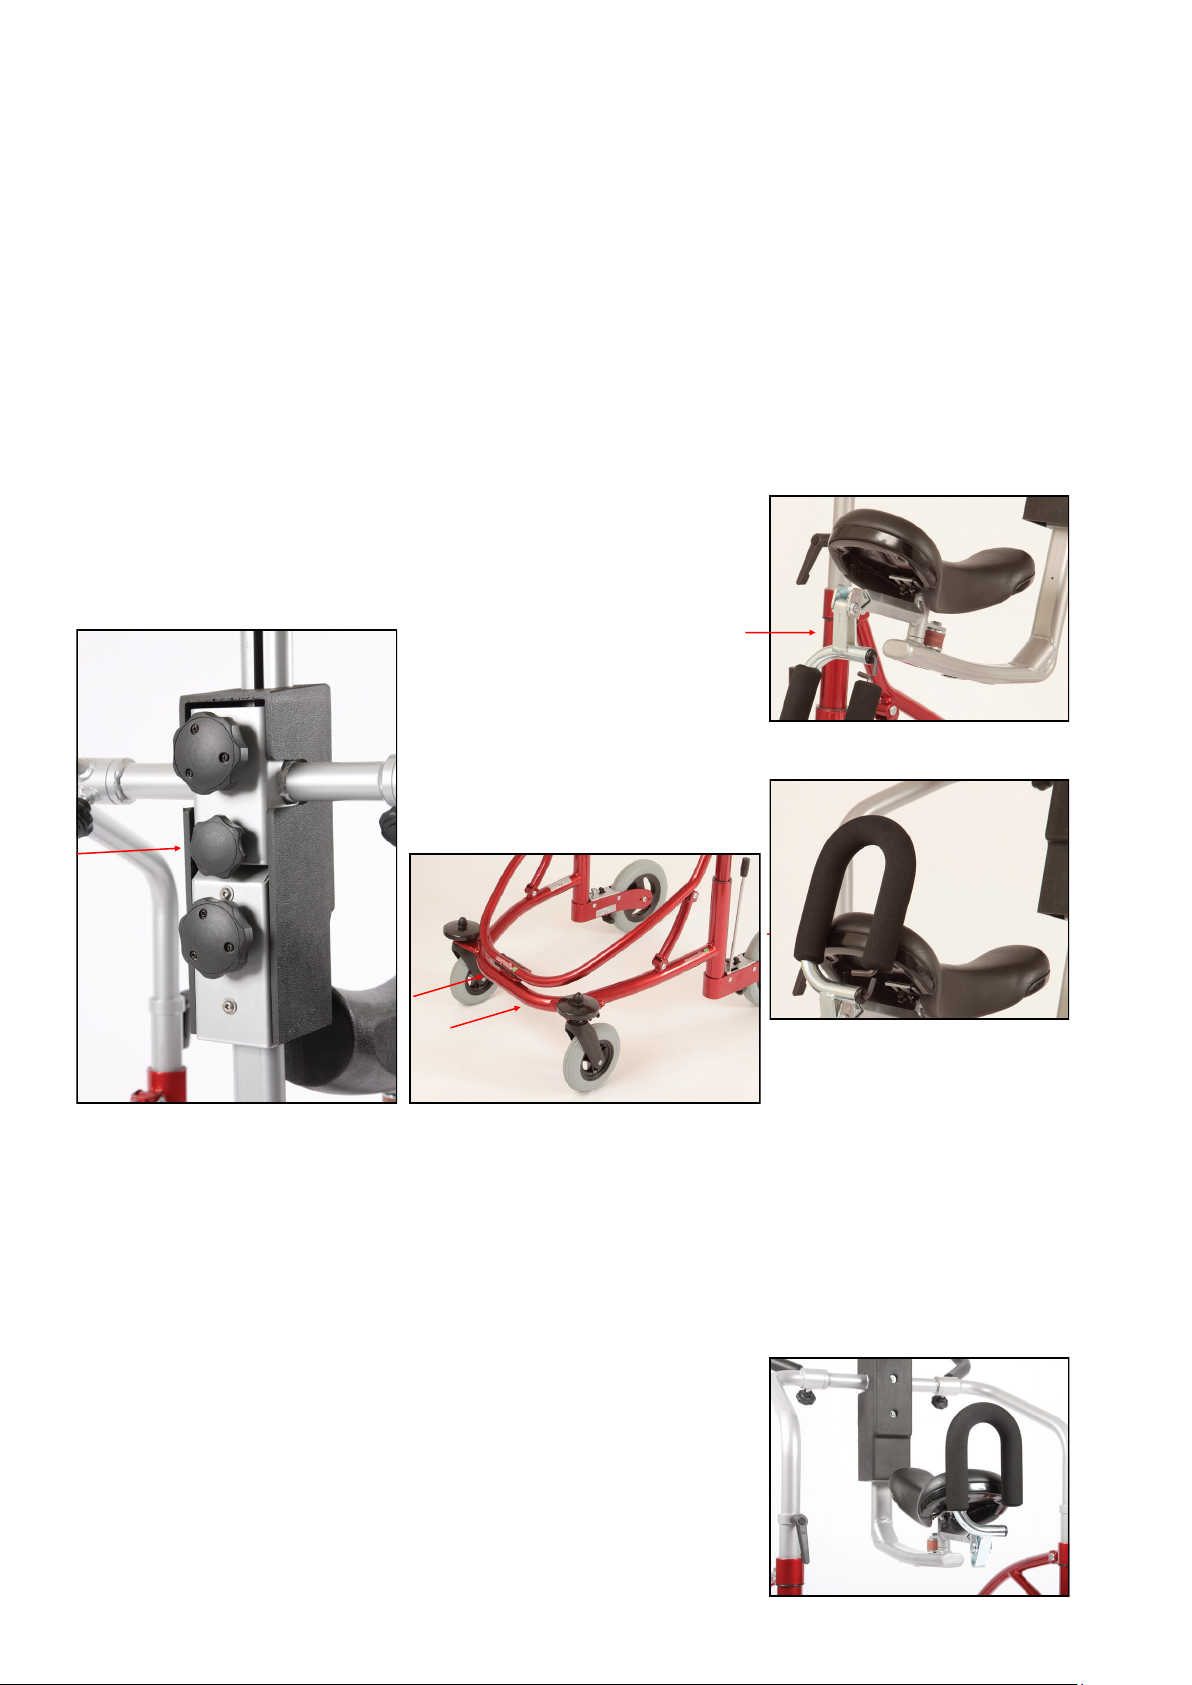
Adjustments — step by step
It is always a good idea to consult
one of our professionals before
adjustment of Meywalk® 4.
Stanchions
Warning! Do not carry out this
adjustment while a user is placed in
Meywalk® 4.
The height of Meywalk® 4 is adjusted
by way of the black spanner grips.
Loosen the spanner grips on both
sides and adjust the frame to the
desired height. Fasten the spanner
grips firmly. It is important that both
sides are adjusted to an equal height.
You can check this by way of the
indentations on the tubes.
Handlebar
The angle of the handlebar can be
adjusted in three steps. Loosen the
two thumb screws and turn the
handlebar to the desired position.
Fasten the thumb screws lightly. If
the handlebar is seated correctly it
should not be possible to turn it with
the thumb screws lightly fastened.
When you have made sure that the
handlebar is placed correctly you
may tightly fasten the thumb screws.

7
Seat
Warning! Do not carry out this
adjustment while a user is placed in
Meywalk® 4.
Adjust the seat height according to the
length of the user’s legs. Turn the
lower thumb screw located at the front
of Meywalk® 4. The thumb screw
features a “child lock” which is
released by simultaneously pressing
and turning. When released, the seat
can e adjusted up or down. Position
the seat at the correct height. Hold
your hand under the seat bar bottom to
make the seat slide easily up and
down.
Re-tighten the thumb screw when the
desired height has been found.
Trunk support height
Adjust the trunk support according to
the individual user’s height. Turn the
upper thumb screw located at the front
of Meywalk® 4. The thumb screw
features a “child lock” which is
released by simultaneously pressing
and turning. When released, the trunk
support can be adjusted up or down
until the correct height has been found.
Re-tighten the thumb screw.
Trunk support replacement
Warning! Do not carry out this
adjustment while a user is placed in
Meywalk® 4.
For trunk support replacement, loosen
the two Allen screws in front of the
support. The two screws fit all trunk
supports.
The trunk support is available in five
variants:
Circumference 70, 90, 105, 120 and
130 cm.
8
Tilt function
Warning! Do not carry out this
adjustment while a user is placed in
Meywalk® 4.
By means of the tilt function the
user’s posture can be changed. Turn
the middle thumb screw to tilt the
support. The thumb screw is located
at the front of Meywalk® 4. While
turning the screw, you can change
the angle of the trunk support and
seat up to 15°. The tilt function is
continuously adjustable.
Getting in and out
Featuring a unique lifting and
lowering system Meywalk® 4 has
made it easier for the user to get in
and out. Grab the front of the swing
bar with both hands and tip it up.
This way the seat will be lowered
approx. 11 cm for Small, 13 cm for
Medium and 22 cm for Large. When
the user has been seated, close the
trunk support and pull up the rear
stop. The seat is lifted by pushing
down the swing bar until it locks with
an audible click. The integrated
gearing in the lifting and lowering
system means that the downward
pressure need only be about one
third of the user’s weight
Rear stop
The rear stop should always be
closed in the upright position when
there is a user in Meywalk® 4. Pull
the rear stop backwards out of the
seat and turn it upwards. Now you
can push it down into the locked
position. Repeat the procedure in
reverse order to open the rear stop
again.
The rear stop behind the seat can be
adjusted in depth. First lift up the rear
stop and tilt it backwards. This
reveals an Allen screw inside the U-
profile When the Allen screw is
loosened, the rear stop can be slid
forwards or backwards in the external
tube. After adjustment, re-tighten the
Allen screw.

9
Trunk support:
Turn up the trunk support push the
two padded tube pieces inwards and
turn down. Turn down the trunk
support push the tube pieces
inwards and turn up to the locked
position.
Brakes
The brakes are parking brakes that
work by directly blocking the rear
wheels with a braking pulley
pressing against the tire.
To brake the walking aid, pull the
brake levers all the way backwards
until they come to a definite stop. In
this position the brakes
are self-locking. The brakes are
released by pushing the brake
levers forward again.
Drag brakes:
The drag brakes work by the roller
at the back pressing against the tire.
First loosen the nut on the Allen
screw. Then turn the Allen screw to
press the roller against the tire.
Tighten the nut in the opposite
direction. Use a method of trial and
error to find the correct pressure
against the tire. Test the drag brake
function.
Front wheel swivel/locks
To activate or de-activate the swivel-
locks pull and turn the pin locks 90º.
Non-reverse brakes:
The non-reverse brake works by the
grooved side pressing against the
tire preventing the wheel from going
backwards. The non-reverse brake
can be engaged/disengaged through
the snap lock on the upper side of
the brake housing. Finally test the
function of the non-reverse brake.
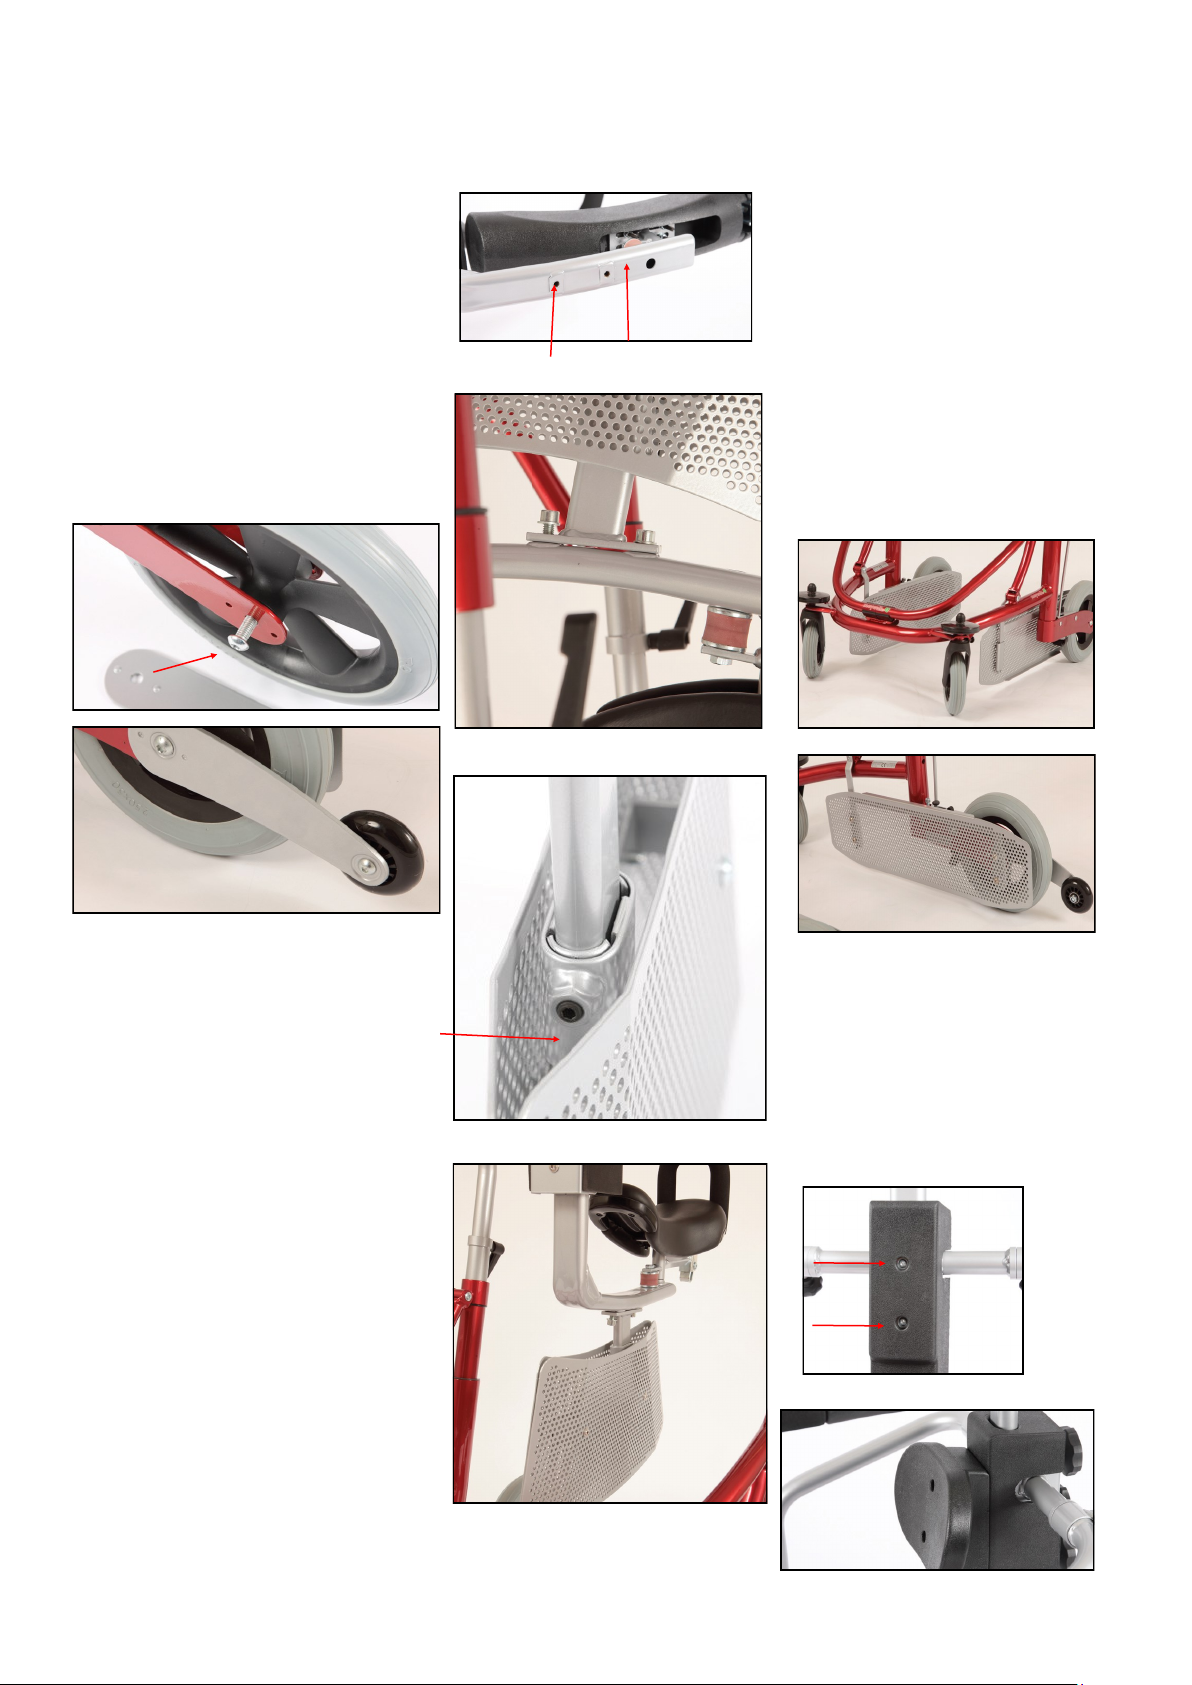
10
Anti-tip support
Anti-tip supports are mounted on
each side by first removing the
bolts fixing the wheels. Use a 6
mm Allen key. Place the anti-tip
support against the outside of the
rear fork of Meywalk® 4 so that
they fall into place in the two rear
fork recesses. Screw bolts on
both sides back on. Re-tighten
firmly.
Leg divider
Fasten the leg divider under the
seat bar with the two screws.
The leg divider is height-adjustable.
Loosen the screw at the
front of the central tube. Adjust
the leg divider to the desired
height and re-tighten the screw
firmly.
Leg guides
The leg guides are mounted on
the inside of the wheel frame on
either side. They are fastened at
the rear fork and at the point
where the connection tube is
connected to the wheel frame.
Fasten the leg guides with the
screws, threaded rods and Allen
screw heads that came with the
leg guides.
Trunk pad
The trunk pad is mounted on
the black polyurethane shell of
the center box. First remove the
screws and washers from the
shell. Then mount the trunk pad
using the screws that came with
the trunk pad.
Accessories

11
Hip pads
The hip-/side pads are to be
mounted on the uprights. Fit the
two pipe sections around the
stanchion, tighten them together
using the two screws.
The hip-/side pads can be
adjusted in or out of the seat
by loosening the thumbscrew.
Tighten the thumbscrew again
after adjustment.
Height reductions set
Each reduction set consist of 1 pair of
4 units – as per below picture(1 set (1
pcs each));
2 pcs special fittings
2 pcs Threaded rod
2 pcs bushing
2 pcs Allen screw head
Loosen
the tilt bar from lower frame.
The existing threaded rod, the
bushing and the allen screw head
shall be used to mount the special
fitting on the tilt bar.
The
new threaded rod, the bushing
and the allen screw head shall be
used to mount the special fitting on
the lower frame and the wide
open part of the new fitting
The
new threaded rod is somewhat longer
than
the red holder to give free access to
the special fitting
NOTE
There is no Height reductions set for
Mini.
Cleaning, disinfection and
maintenance
Meywalk® 4 can be washed in
warm water with detergent but
take care not to wash the foam
padding on the rear of the trunk
support, handlebar and rearstop.
With time the painted frame may
take on a matt appearance if
washed with detergent repeatedly.
If so, the frame can be
polished with car polish. Follow
the instructions of the polish
manufacturer.
The frame and plastic parts can
be disinfected with standard,
alcohol-based disinfectants.
The foam padding may not be
disinfected.
It is recommended to regularly
check the tightness of all
thumbscrews,
nuts, bolts and screws.
Re-tighten if necessary. Check
the parking brake function. When
the brakes are on it should not
be possible to push the walker.
When the brakes are off it should
be easy to push the walker.
Furthermore, all moving parts
should function easily and at a
low level of noise. Should you
experience any friction noise or
squeaking, then have the walker
checked by a professional.
Recycling
When handing over or recycling
the walker all necessary
technical documentation must
be delivered to the new user to
ensure safe handling.
The walker must be cleaned,
disinfected and checked for
damages by a professional
before handing over.
Disposal
When your walker is no longer
in use and you wish to dispose
of it please check the rules and
regulations with your local waste
management company.

*Heights are measured with half compression of springs.
Warranty
Warranty is granted on all defects that are proven to be caused by material or manufacturer
fault. The warranty period is 24 months from the time of dispatch readiness alternatively time
of delivery. The warranty does not cover any damage due to normal wear and tear, intentional,
negligent or inexpedient handling or use. This also applies if using unsuitable detergents and
lubricants.
Tekniske data Micro Mini Small Medium Large
Length: 77 cm 80 cm 85 cm 86 cm 100 cm
Outer width: 51 cm 56 cm 62 cm 62 cm 68 cm
Inner width: 42 cm 44 cm 49 cm 50 cm 57 cm
Seat height/inner leg length* 25-45 cm 28-46cm 44-67 cm 60-84 cm 80- 104 cm
Trunk support height* 52-65 cm 55-77 cm 74-99 cm 101-133 cm 120-152 cm
Trunk support 70 - 85 cm 70 - 85 cm 80 - 105 cm 80 -105 cm 105 - 135 cm
Weight: (without 13 kg 20 kg 25 kg 32 kg 34 kg
Springs: Purple Purple Yellow Red Red
Max load 60 kg 80 kg 100 kg 130 kg 130 kg
Colours: Black Yellow Green Red Black
Materiale:
Frame: Aluminium Steel tubing, powder-coated
Fittings: Steel powder-coated
Upholstery: Polyurethane
Saddle: Imitation leather
Wheels: Soft solid rubber tyres on plastic rims with service-free ball bearings
Other manuals for Meywalk 4
2
This manual suits for next models
5
Other meyland-smith Mobility Aid manuals


