Meyra-Ortopedia 9.050 User manual
GB
We move people.
OPERATING MANUAL
FOLDING WHEELCHAIR
Model 9.050
Model 3.940

2
Contents
Introduction .................................................................................................. 4
List of models ...............................................................................................5
Indications ..................................................................................................... 5
Acceptance .................................................................................................... 5
Specifications ................................................................................................6
Use ................................................................................................................. 6
Adjustment ...................................................................................................7
Life span ........................................................................................................7
Overview .......................................................................................................8
Brake ..............................................................................................................9
Pressure brake - user ..........................................................................................10
Locking the brakes ........................................................................................10
Releasing the brakes .....................................................................................10
Operating brake ............................................................................................10
Drum brake for accompanying persons ...........................................................11
Leg supports ............................................................................................... 12
Calf belt ...............................................................................................................12
Removing the calf belt .................................................................................12
Attaching the calf belt ..................................................................................13
Length adjustment of the calf belt..............................................................13
Leg support lower part ......................................................................................13
Footplates ......................................................................................................13
Leg support upper part ......................................................................................14
Turning the leg supports to the side ..........................................................14
Swivelling in the leg supports ......................................................................15
Removing the leg supports ..........................................................................15
Attaching the leg supports ..........................................................................15
Arm support ................................................................................................16
Swivelling up the arm support ..........................................................................17
Swivelling the arm support inward ..................................................................17
Swivelling down the arm support .....................................................................17
Removing the arm support ...............................................................................18
Inserting the arm support ..................................................................................19

3
Wheels .........................................................................................................20
Drive wheels........................................................................................................20
Quick release axle .........................................................................................20
Drive wheels with pneumatic tyres ...................................................................20
Tyre damage on pneumatic tyres ................................................................20
Back support ...............................................................................................21
Back support belt ...............................................................................................21
Fitting the back belt .....................................................................................21
Support castors........................................................................................... 22
Stick-in support castors ......................................................................................22
Removing/inserting the support castors .....................................................22
Retaining strap ...........................................................................................23
Person transport inside a motor vehicle ................................................. 24
Securing the wheelchair ....................................................................................24
Maintenance ............................................................................................... 24
Maintenance .......................................................................................................24
Maintenance schedule ..................................................................................25
Technical data .............................................................................................28
Meaning of the labels on the wheelchair ........................................................33
Meaning of the symbols on the type plate ......................................................34
Inspection certificate .................................................................................35
Notes ............................................................................................................ 36
Warranty / Guarantee ................................................................................. 38
Warrantee / Guarantee section .........................................................................39
Inspection certificate for transfer .....................................................................39

4
INTRODUCTION
We thank you for the confidence you
have placed in our company by choos-
ing a wheelchair from this series.
With all equipment and their accesso-
ries the wheelchair offers die respec-
tive adaptation to your disability.
Like any other vehicle, a wheelchair is
a technical aid. It is subject to expla-
nations, requires regular care and can
cause danger when used improperly.
The correct handling must therefore
be learned. This operating manual
is to help you get accustomed to the
handling of the wheelchair as well as
to prevent accidents.
☞ Note:
Please note that the illustrated
equipment variants can deviate
from your model.
We have therefore also listed chapters
with options that might not be appli-
cable for your individual wheelchair.
!
Attention:
Read and observe the following
documentation belonging to the
wheelchair before first operation:
– this operating manual,
– Safety and general handling in-
structions < Mechanical and mus-
cle powered wheelchairs >.
☞ Note:
Children and juveniles should read
the documentation belonging to
the wheelchair together with their
parents respectively a supervisor or
an accompanying person before
first use.
For users with visual impairments the
PDF-files of the above mentioned doc-
uments can be accessed on our web-
site < www.meyra-ortopedia.com >.
☞ Contact your specialist dealer
when required.
Alternatively users with visual impair-
ments can have the documentation
read out by a helper.

5
LIST OF MODELS
This operating manual applies to the
following model:
Model 9.050
Model 3.940
INDICATIONS
If the following indications occur we
recommend the application of this
mobility product:
☞ Walking disability resp. extremely
limited walking ability as part of
the basic need to move around in
your own home.
☞ The need to be able to leave home
for a short walk in fresh air or in or-
der to reach the places, commonly
in the perimeter of the home, re-
quired to fulfil basic needs.
ACCEPTANCE
All products are checked for faults
in the factory and packed in special
boxes.
☞ Note:
However, we request that you
check the vehicle for possible
transport damage immediately on
receipt – preferably in the pres-
ence of the carrier.
☞ Note:
The packaging of the wheelchair
should be stored for a further
transport that might become nec-
essary.

6
USE
The wheelchair is universally applica-
ble on level, firm surfaces and can be
used as follows:
– for indoors (e.g. apartment, day
care),
– outdoors (e.g. in parks),
– as a companion on tours (e.g. in a
bus or train).
The wheelchair offers manifold ad-
justment possibilities to individual vi-
tal statistics.
The wheelchair should be adapted
to your needs by a specialist dealer
before the first use. The adaptation
will take into account the driving ex-
perience, the physical limits of the
user and the main place of use of the
wheelchair.
!
Attention:
Always have adaptation and ad-
justment work carried out by a
specialist dealer.
• Do not insert fingers into open
frame tubes (for example after re-
moving the arm supports, leg sup-
ports or support castors).
☞ Danger of injury!
SPECIFICATIONS
The wheelchair of the standard-fold-
ing-wheelchair-family, was developed
for adults and adolescents.
The wheelchair solely serves to trans-
port one person in the seat and not
as a hauling aid, transporter or similar.
☞ Note:
The wheelchair of the standard-
folding wheelchair family is mainly
suited for loan or short term use.

7
ADJUSTMENT
The specialist workshop will hand out
the wheelchair to you under consid-
eration of all relevant safety instruc-
tions, ready for operation and adjust-
ed to your needs.
☞ Note:
☞ We recommend a regular control
if the wheelchair adjustment in
order to ensure a long-term opti-
mal provision even with changing
illness/handicap patterns of the
user. Especially for children and
juveniles an adjustment every 6
months is recommendable.
☞ We recommend regular medical
exams in order to ensure safety for
active participation in traffic.
☞ Retrospective adjustments should
be carried out solely by the special-
ist dealer!
LIFE SPAN
We expect an average lifespan of
about 4 years for this product, as far
as the product is applied for its des-
ignated purpose and all maintenance
and service guidelines.
The life span of your product depends
upon the frequency of use, the appli-
cation environment and care.
The implementation of spare parts
can prolong the life span of the prod-
uct. As a rule spare parts are available
up to 5 years after production is dis-
continued.
☞ The indicated life span does not
constitute additional guarantee.
21
5
3
4
7
8
10
11
9
12
13
6
8
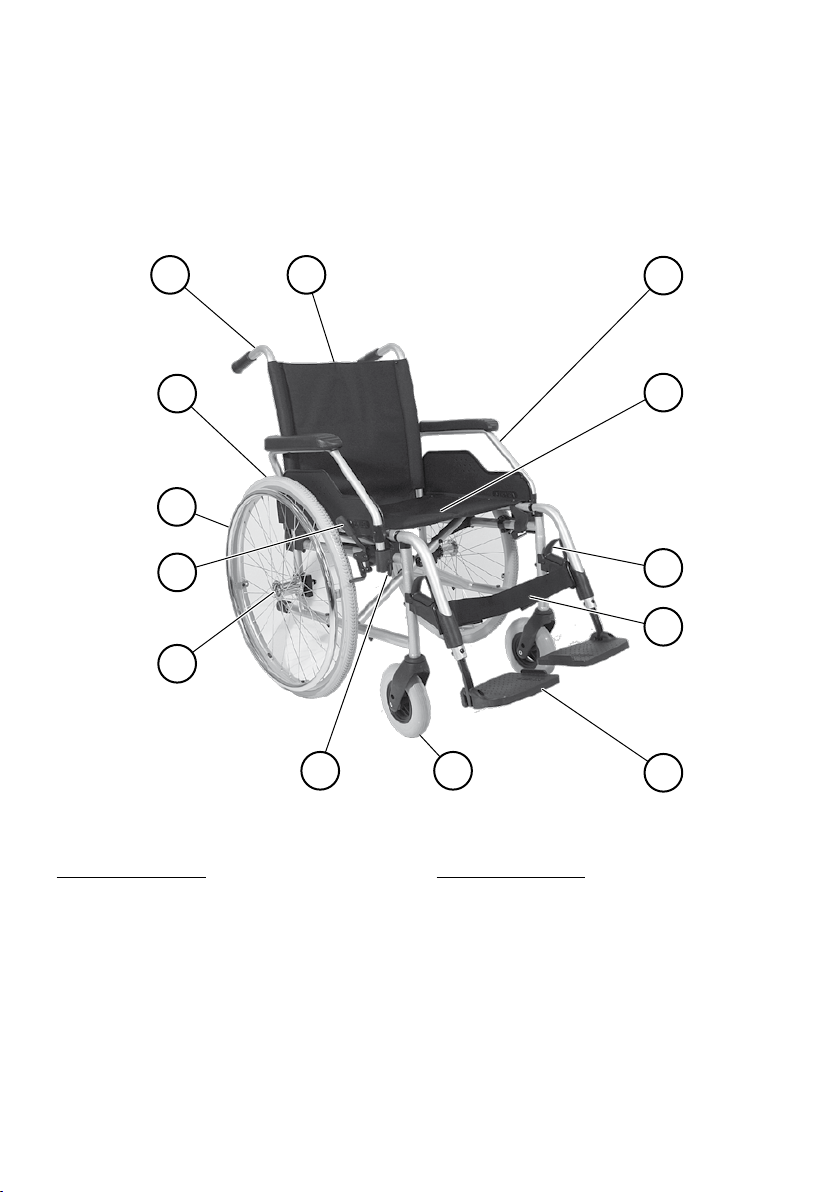
Pos. Description
1 Push handle
2 Back support
3 Arm support
4 Seat belt/seat cushion
5 Locking lever, leg support
6 Calf belt
7 Footplate
OVERVIEW
The overview shows, representative for all models, the most important compo-
nents of the standard-folding-wheelchair.
Pos. Description
8 Steering wheel
9 Locking lever– Arm support
10 Locking knob – Quick release
axle
11 Brake lever – pressure brake
12 Handrim
13 Drive wheel
1
2
3
9
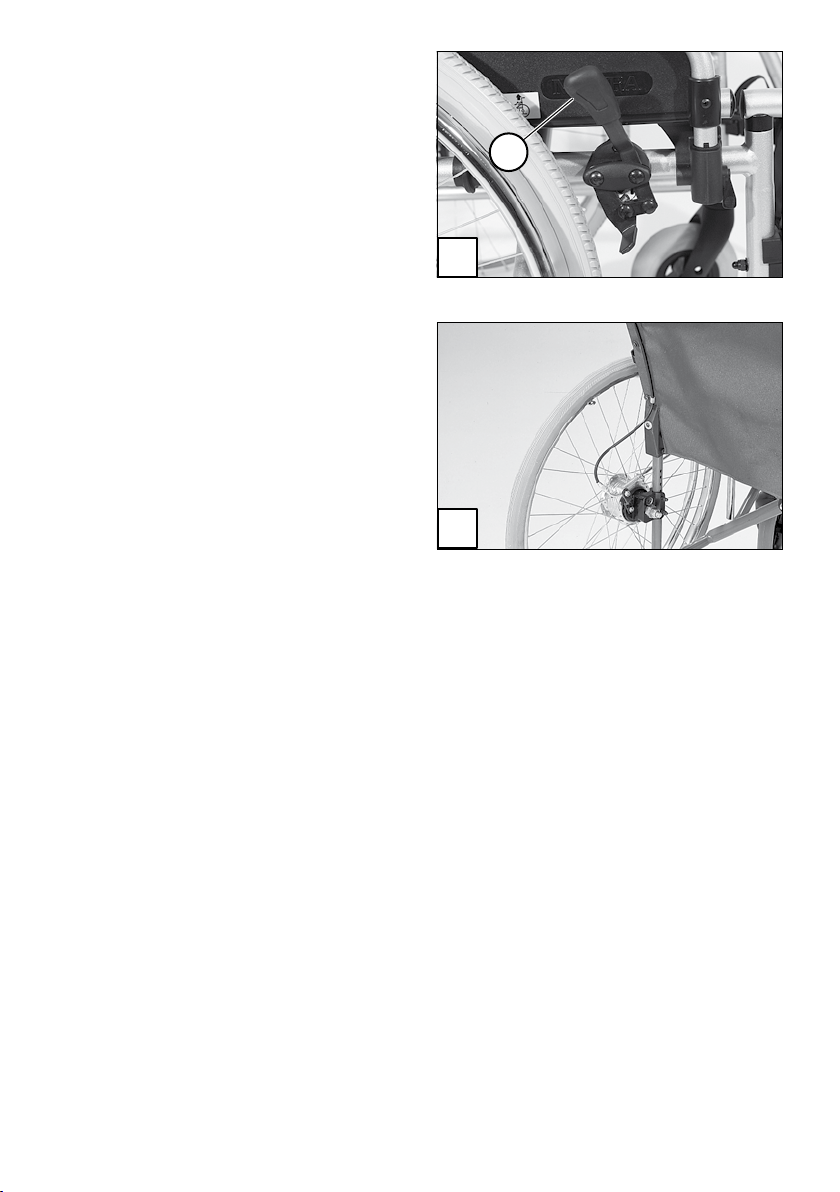
BRAKE
By locking the brakes with the brake
lever (1), the wheelchair is secured
against rolling away unintentionally
(parking brake).
Depending on the version, the wheel-
chair can be equipped with pressure
brakes (2) or with drum brakes (3).
☞ Note:
Therefore observe the mainte-
nance instructions as well as safety
and general handling instructions
< Mechanical and muscle powered
wheelchairs > chapters < Gen-
eral safety information > and
< Brakes >.
!
Attention:
Arrange an immediate repair of
the brakes by your specialist work-
shop if the braking performance
reduces.
1
2
10
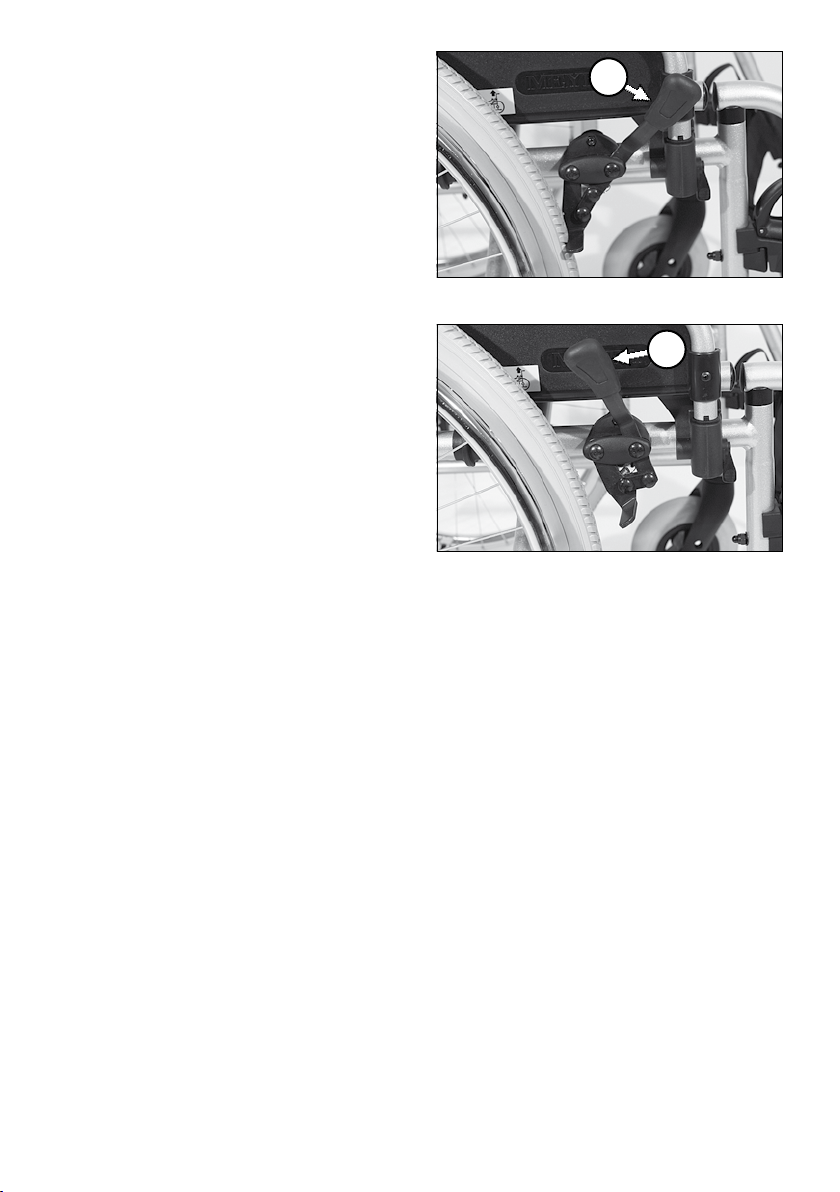
Pressure brake - user
Locking the brakes
To secure the wheelchair against
any unintentional rolling, press both
brake levers forward all the way (1).
☞ Note:
It should not be possible to push
the wheelchair forward when both
brakes are locked.
Releasing the brakes
Pull both brake levers back all the way
(2).
Operating brake
The wheelchair is braked down with
help of the handrims.
☞ Note:
If needed use suitable gloves in or-
der to brake down the wheelchair.
1
23A
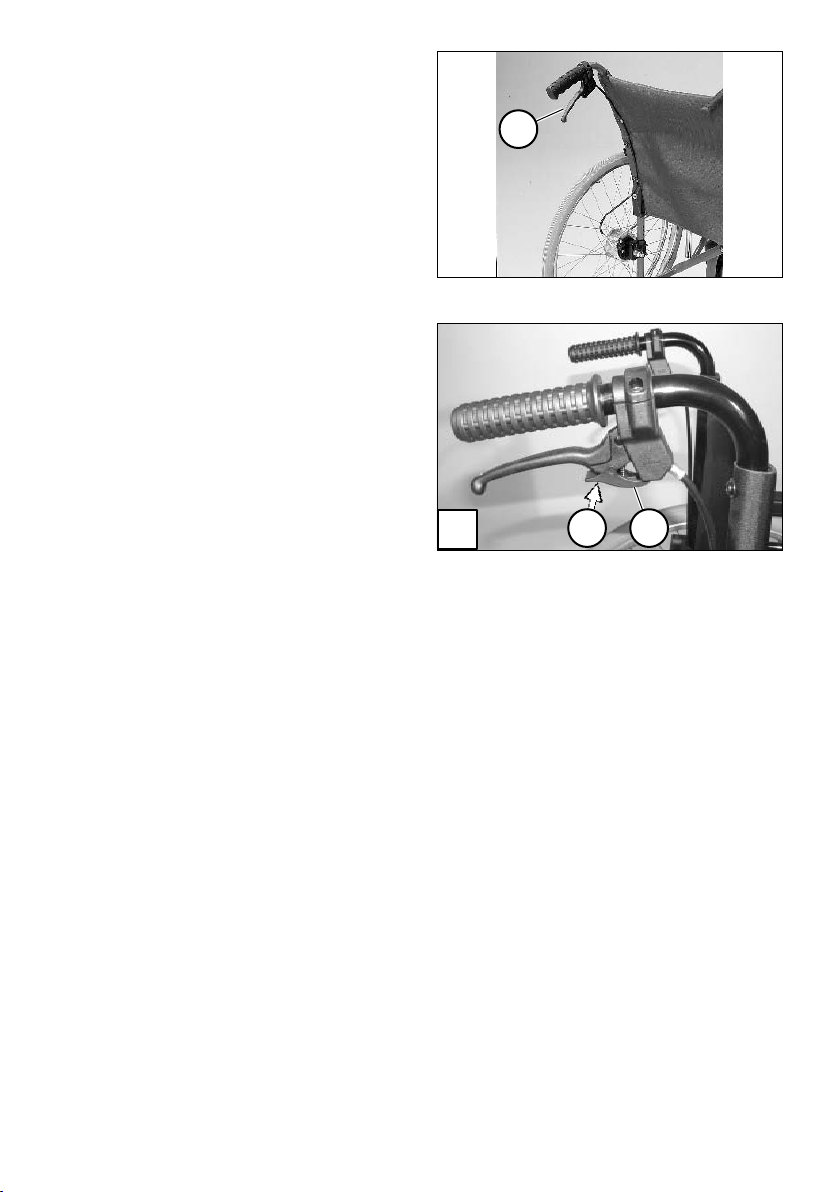
11
Drum brake for accompany-
ing persons
The drum brake is operated by the
accompanying person by way of the
brake levers (1) on the extended push
handles or the pushing rod.
!
Attention:
With the drum brakes version, the
accompanying person must not lift
the wheelchair on the extended
push handles. – This may lead to
bending in the subsequently ex-
tended push handles to bend.
Function as operating brakes
Pull both brake levers evenly and only
lightly in order to achieve a controlled
deceleration of the wheelchair.
Locking the drum brakes
– Pull both brake levers evenly in
order to secure the wheelchair
against unintentional motion [2].
– Press the surface (A) of the locking
latch down with one finger and let
it snap into place.
– Release both brake levers. – De-
pending on the setting, the respec-
tive locking latch will click into the
first or second latching position
and lock the brake.
☞ Note:
☞ It should not be possible to push
the wheelchair forward when both
brakes are locked.
☞ If the third locking position (C) is
required to activate the brake, it
must be readjusted by a specialist
workshop.
Releasing the drum brakes
Pull both brake levers until the lock-
ing latches (3) automatically jump out
of the lock.
Let go of both brake levers. – The
parking brakes are released and the
wheelchair ready for use.
1
2
3
12
LEG SUPPORTS
!
Attention:
Before any actions on the leg sup-
ports the wheelchair is to be se-
cured against unintentional rolling
motions.
☞ Therefore observe chapter
< Brakes >.
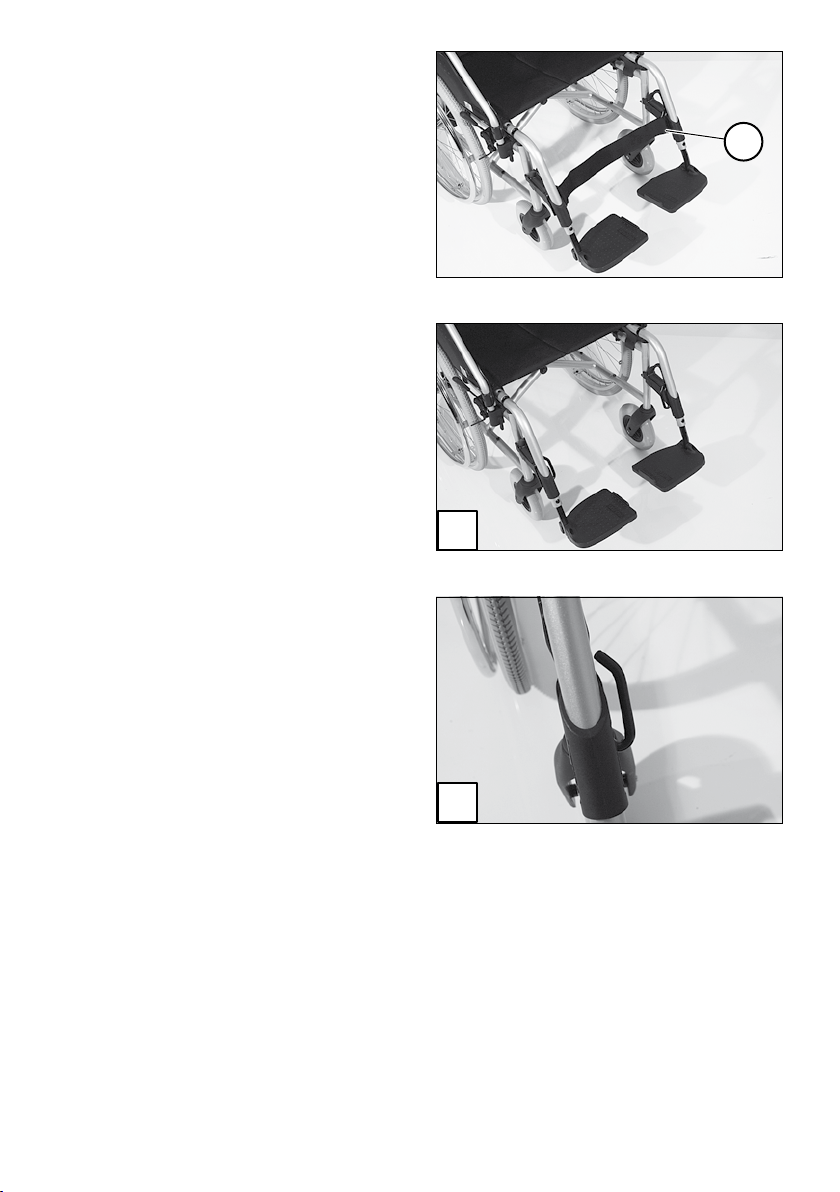
Calf belt
The removable calf belt (1) prevents
the feet from sliding off the back of
the footplates.
!
Attention:
Never drive without calf belt (ex-
cept when scuttling)! – Danger of
accidents!
☞ Note:
The calf belt must be removed in
order to swivel away the leg sup-
ports [2].
Removing the calf belt
For removal the calf belt is to be
pulled from the attachment pins (3).
2
3
1
13
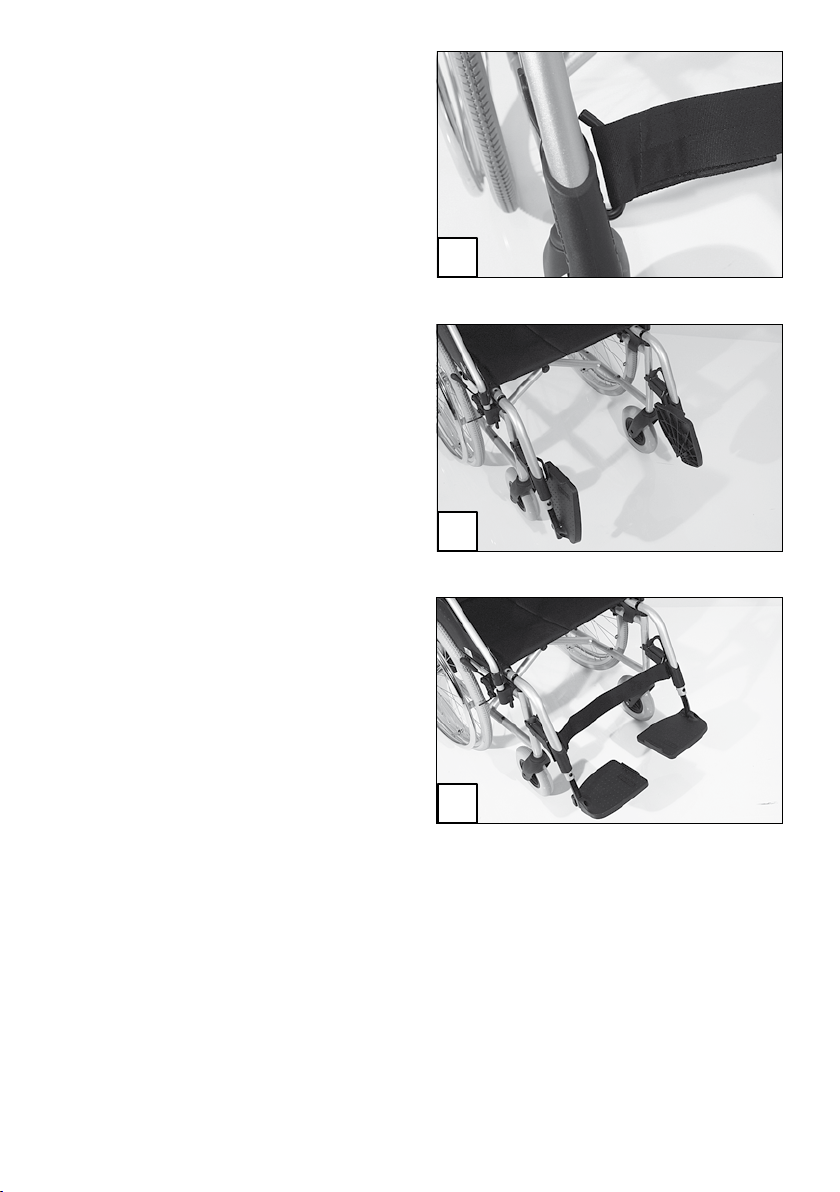
Attaching the calf belt
For attachment both loops of the calf
belt are to be slid over the attachment
pins [1].
Length adjustment of the calf belt
For length adjustment the calf belt is
to be adjusted in length with help of
the velcro fastener at the back.
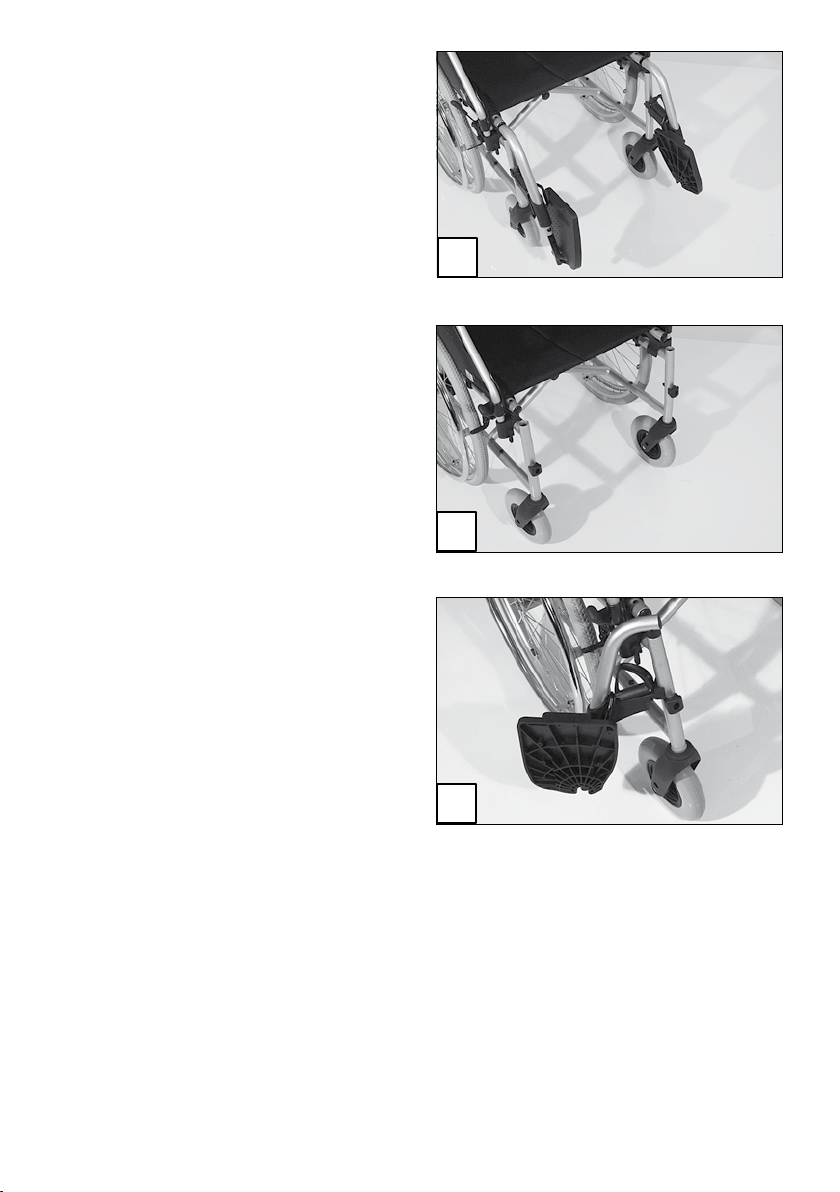
Leg support lower part
The footplates are to be folded up for
entry into, exiting the wheelchair or
scuttling (moving the wheelchair with
help of the feet) [2].
☞ Check the locking points!
– Remove both feet from the foot-
plates.
– Remove lower calf belt, if present.
☞ Hereto observe chapter < Calf
belt >.
☞ Note:
Before starting to drive the foot-
plates are to be folded down again
[3] and the calf belt attached.
Footplates
The footplates can be folded outward
and up [2] resp. inward and down [3].
2
3
1
14
Leg support upper part
The upper leg support with an in-
serted lower leg support is termed leg
support.
Turning the leg supports to the
side
For easy transfer out of/into the
wheelchair as well as driving closer to
a closet, bed or bathtub the leg sup-
ports can be swivelled away toward
the in-/outside [1] and [2].
☞ Note:
Before removing the leg supports
remove the calf belt and fold the
footplates up.
☞ View chapter < Calf belt > and
chapter < Lower leg support >.
!
Attention:
Leg supports turned to the side
are released automatically and can
easily come off. Note this when
handling (e.g. transport).
– In order to swivel away the leg
supports pull or press the respec-
tive locking lever – leg support (3)
and swivel the corresponding leg
support outward [1]+[2].
1
2
3
15
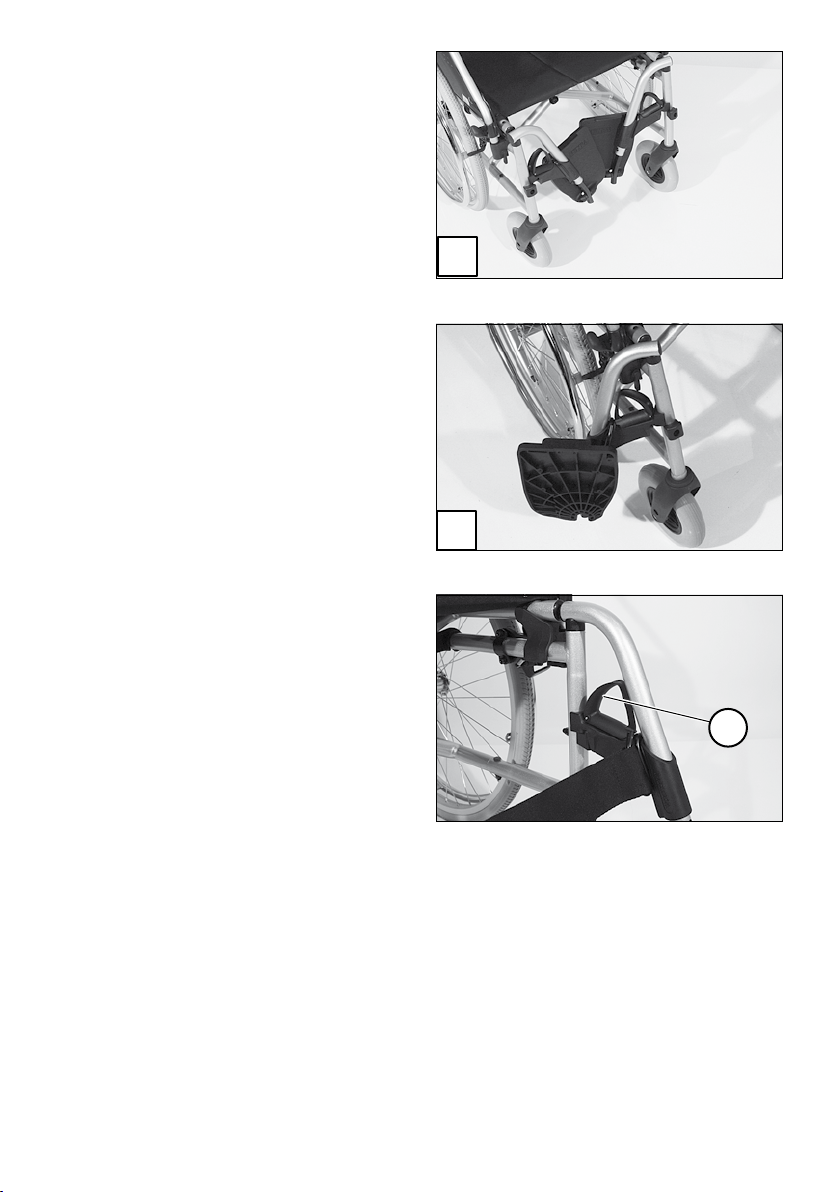
Swivelling in the leg supports
☞ Note:
After audibly swivelling the leg
supports inward check the locking
device of the respective leg sup-
port.
☞ Afterwards observe chapter < Low-
er leg support >.
– For inward swivelling, let the leg
supports swivel forward until the
locking device audibly engages [1].
Removing the leg supports
For easy transfer into and out of the
wheelchair as well as a reduced wheel-
chair length (important for transport)
the leg supports can be removed [2].
☞ Note:
Before removing the leg supports
loosen or remove the calf belt on
one side.
☞ View chapter < Calf belt >.
– First swivel the leg support side-
ways [3] and then remove them
toward the top [2].
☞ Therefore observe chapter < Swiv-
elling away leg supports >.
Attaching the leg supports
☞ Note:
After attachment swivel the leg
supports inward.
☞ Therefore observe chapter < Swiv-
elling in the leg supports >.
– Press the leg supports, swivelled
to the side, parallel to the front
frame tube and lower it into place
[3]. – In doing so the holding pin
must slide into the frame tube.
1
2
16
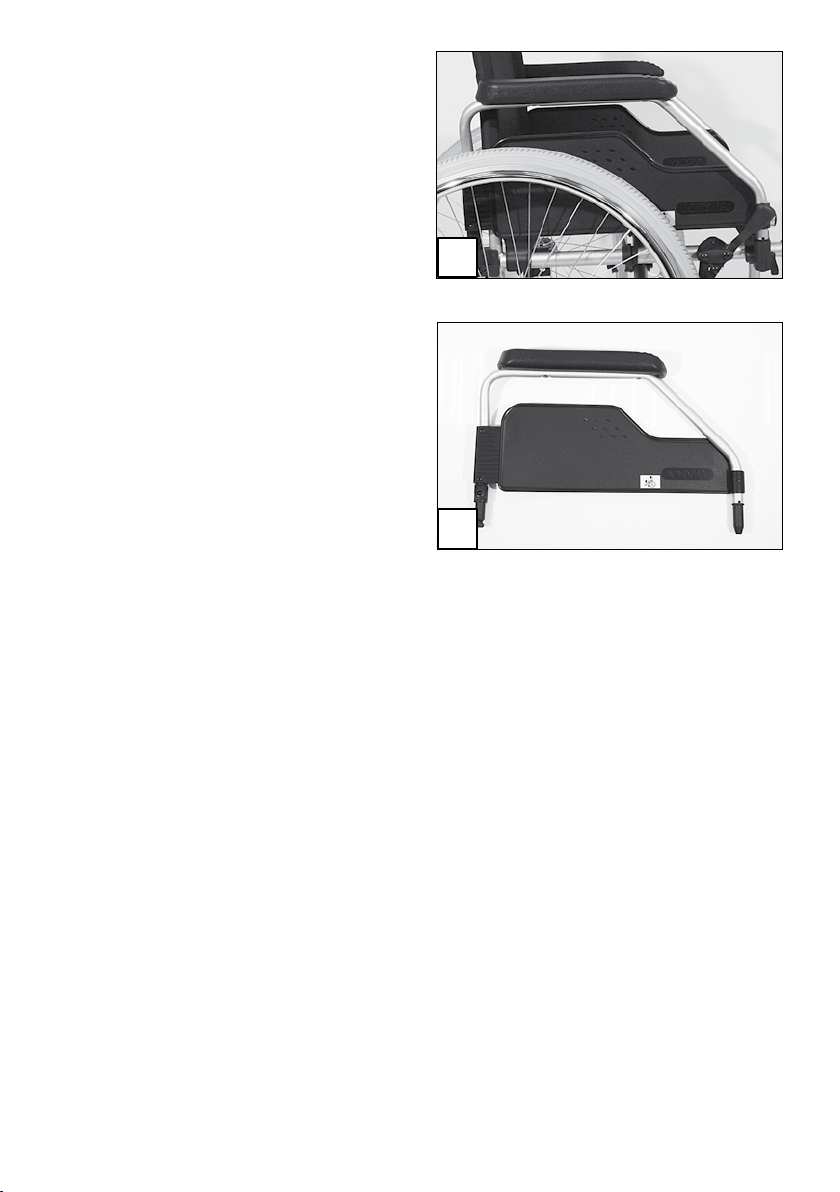
ARM SUPPORT
The arm supports [1] are removable
[2] and simultaneously serve as pad-
ded arm support, clothes guard and
wind protector.
!
Attention:
No not grab between the frame
and arm support. – Danger of jam-
ming!
• Do not lift the wheelchair using
the arm supports.
• The wheelchair should only be
used with the arm supports assem-
bled!
• When the wheelchair is being
pushed by an accompanying per-
son the user is to place his hands
onto the arm cushions or in his lap
and not at the sides between body
and arm support.
– Danger of squashing the fingers!
2
1
3
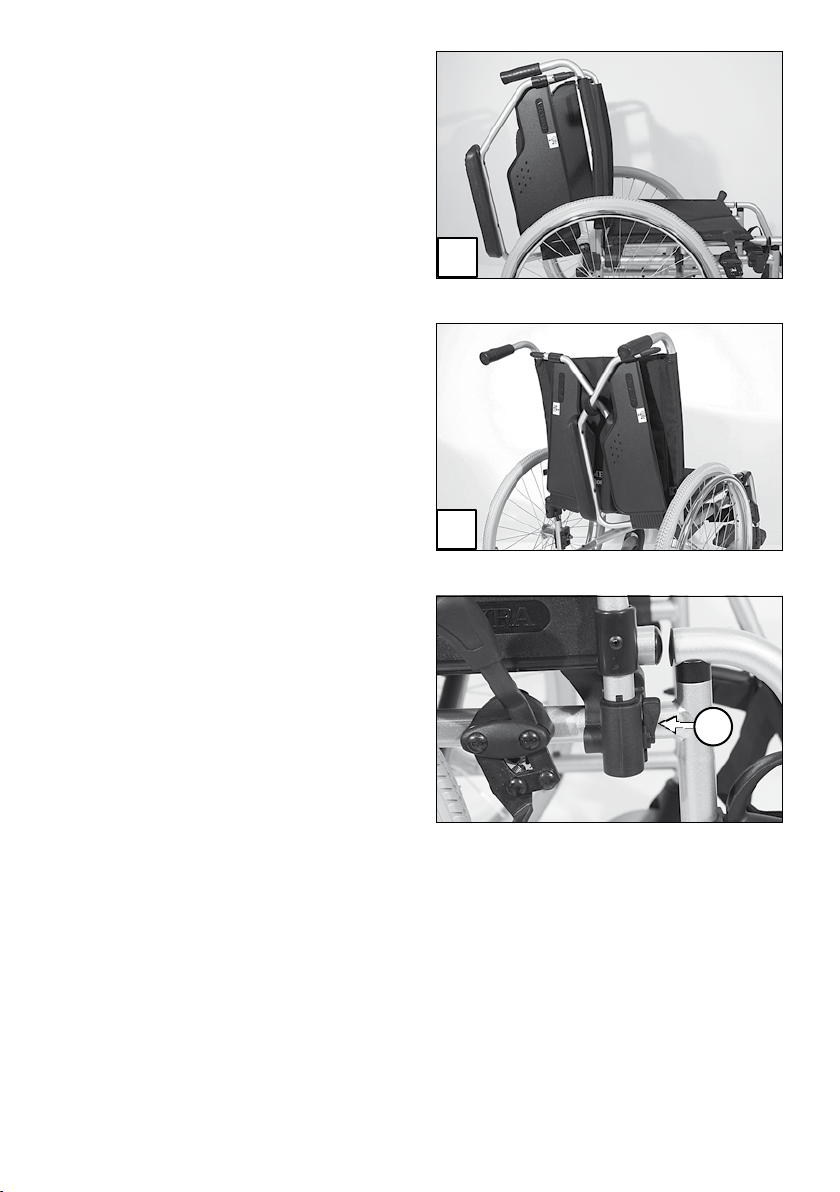
17
Swivelling up the arm sup-
port
For transfer out of/into the wheelchair
the arm support can be swivelled up-
ward [1] as well as turned behind the
back support [2].
– Fold the locking lever - arm sup-
port up (3) in order to swivel up
the arm support.
– Afterwards swivel the arm support
toward the back and up [1].
Swivelling the arm support
inward
– For inward swivelling, first turn the
arm support upward [1] and then
turn it toward the rear behind the
back support [2].
☞ View chapter < Swivelling up the
arm support >.
☞ Note:
On smaller back belt heights the
arm support cannot be turned be-
hind the back support.
Swivelling down the arm
support
In order to swivel down the arm sup-
port, carry out the sequence of chap-
ters < Swivelling in the arm support >
and < Swivelling up the arm support >
in reverse order.
☞ Afterwards check the locking de-Afterwards check the locking de-
vice of the arm support and secure
it!
1
2
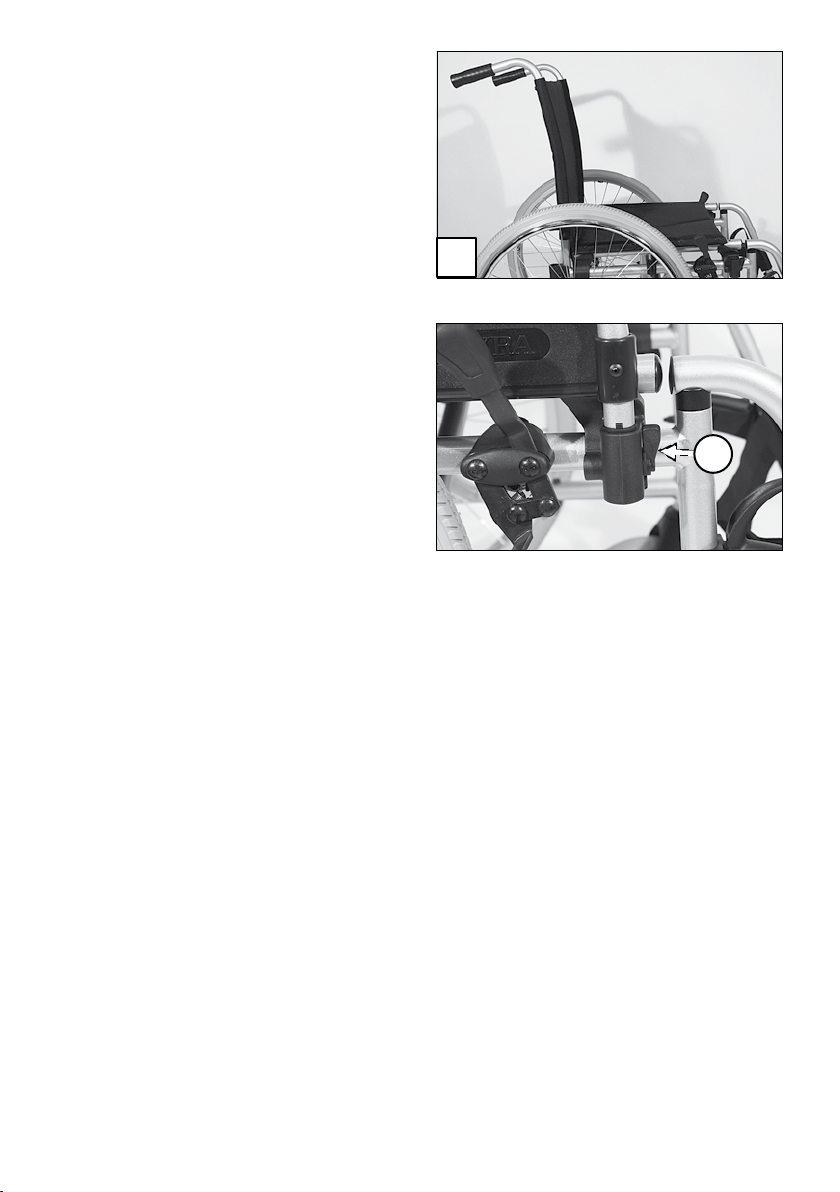
18
Removing the arm support
For removal of the arm support [1]:
1. fold the locking lever up on the
front and back (2).
1. first fold the front locking lever up
(2), then swivel the arm support up
and inward.
☞ View chapter < Swivelling in the
arm support >.
2. Remove the arm support in an up- Remove the arm support in an up-Remove the arm support in an up-
wards direction [1].
6
1
3
2
19
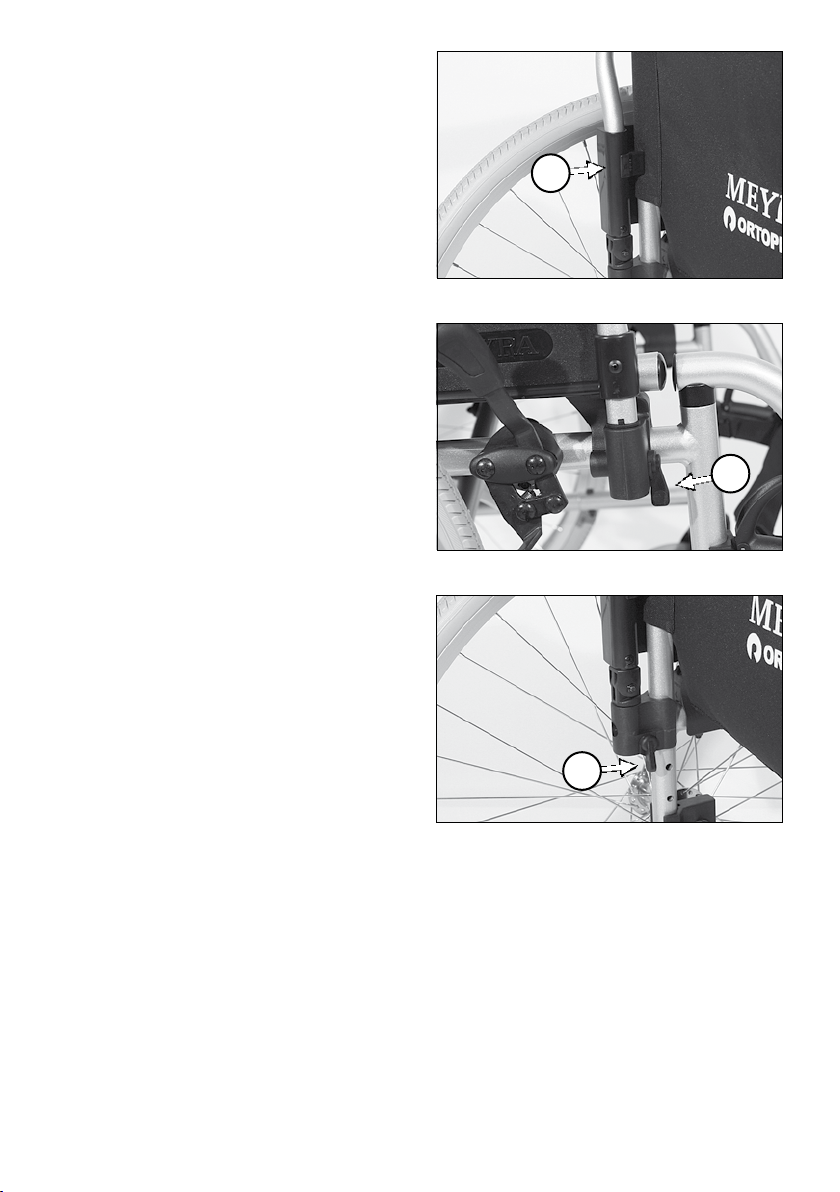
Inserting the arm support
☞ Note:
The tube of the arm support must
lie in the guide groove on the back
tube (1).
1. For attachment, insert the arm sup-
port from the top into the respec-
tive bracket and swivel it down.
☞ View chapter < Swivelling down
the arm support >.
2. fold the locking lever down in the
front and back (2)+(3).
3. Check the locking device of the
arm support and secure it!

1
2
20
WHEELS
Drive wheels
The drive wheels are on a quick re-
lease axle [1].
☞ If the drive wheels has too much
sideward lag or the quick release
axle does not engage, contact your
specialist dealer immediately for
repair.
☞ No person may be seated in the
wheelchair during assembly or
removal. The wheelchair should
stand on a level and firm surface.
Before starting the disassembly of
a wheel, support the frame to pre-
vent the wheelchair from tipping
over and secure it to prevent an
unwanted movement or tipping
over.
Quick release axle
The drive wheels can be removed and
reassembled without any tools.
– First press the locking knob (2) of
the quick release axle in the center
of the hub.
– Afterwards remove or attach the
drive wheel.
!
Attention:
After inserting the drive wheel the
locking knob (2) must stick a cou-
ple of millimetres out of the wheel
nut.
Drive wheels with pneu-
matic tyres
☞ Note:
The air pressure value for the tyres
of the wheelchair can be read in
the < Technical data > or details on
both sides of the tyre cover.
Tyre damage on pneumatic tyres
☞ For repairing tyre damage we rec-
ommend the use of a foam car-
tridge that is available in special-
ity shops. – Afterwards look up a
specialist workshop as soon as pos-
sible.
This manual suits for next models
1
Table of contents
Other Meyra-Ortopedia Wheelchair manuals

Meyra-Ortopedia
Meyra-Ortopedia XR 1.911 User manual

Meyra-Ortopedia
Meyra-Ortopedia VR2 User manual

Meyra-Ortopedia
Meyra-Ortopedia McWET 8013039 User manual

Meyra-Ortopedia
Meyra-Ortopedia 1.360 User manual

Meyra-Ortopedia
Meyra-Ortopedia 1.360 User manual

Meyra-Ortopedia
Meyra-Ortopedia McWET 8013039 User manual


