Midea KJ500G-TA32 User manual

KJ500G-TA32
USER MANU
Warning notices:Before using this product, please read this manual carefully and keep it for future reference.
The design and specifications are subject to change without prior notice for product improvement. Consult
with your dealer or manufacturer for details.
The diagram above is just for reference. Please take the appearance of the actual product as the standard.
AL
AIR PURIFIER


English
Polish
EN
HU
PL
Hungarian
CZ Czech
SK Slovak
LANGUAGES

THANK YOU LETTER
Thank you for choosing Midea! Before using your new Midea product, please read
this manual thoroughly to ensure that you know how to operate the features and
functions that your new appliance oers in a safe way.
CONTENTS
01
0 1
06
0 8
1 0
1 3
1 1
1 7
1 9
20
0 5
0 2
2 1
THANK YOU LETTER
SAFETY INSTRUCTIONS
SPECIFICATIONS
PRODUCT OVERVIEW
PRODUCT INSTALLATION
OPERATION INSTRUCTIONS
APP SETUP AND OPERATION
CLEANING AND MAINTENANCE
TROUBLESHOOTING
TRADEMARKS, COPYRIGHTS AND LEGAL STATEMENT
DISPOSAL AND RECYCLING
DATA PROTECTION NOTICE
EN

02
Danger
This symbol indicates that there are dangers to the life and health of
persons due to extremely flammable gas.
Warning of electrical voltage
This symbol indicates that there is a danger to life and health of
persons due to voltage.
Warning
The signal word indicates a hazard with a medium level of risk which, if
not avoided, may result in death or serious injury.
Caution
The signal word indicates a hazard with a low degree of risk which, if
not avoided, may result in minor or moderate injury.
Attention
The signal word indicates important information (e.g. damage to
property), but not danger.
Observe instructions
This symbol indicates that a service technician should only operate and
maintain this appliance in accordance with the operating instructions.
The following safety guidelines are intended to prevent unforeseen risks or damage from
unsafe or incorrect operation of the appliance. Please check the packaging and appliance
on arrival to make sure everything is intact to ensure safe operation. If you find any
damage, please contact the retailer or dealer. Please note modifications or alterations to
the appliance are not allowed for your safety concern. Unintended use may cause
hazards and loss of warranty claims.
Read these operating instructions carefully and attentively before using/commissioning the
unit and keep them intheimmediate vicinity of theinstallation site or unit for later use!
Intended Use
Explanation of Symbols
SAFETY INSTRUCTIONS
EN

03
• If the supply cord is damaged, it must be replaced by
manufacturer, its service agent or a similarly qualified
person in order to avoid a hazard.
• To protect against the risk of electrical shock, do not
immerse the unit, cord or plug in water or other liquid.
• This appliance is not intended for use by persons
(including children) with reduced physical, sensory or
mental capabilities, or lack of experience and
knowledge, unless they have been given supervision or
instruction concerning use of the appliance by a person
responsible for their safety. Children should be
supervised to ensure that they do not play with the
appliance.
• When the appliance is not in use and before cleaning,
unplug the appliance from the outlet.
• Indoor and household use only.
• Do not place other items on top of the appliance, and
forbid sitting or standing on this appliance.
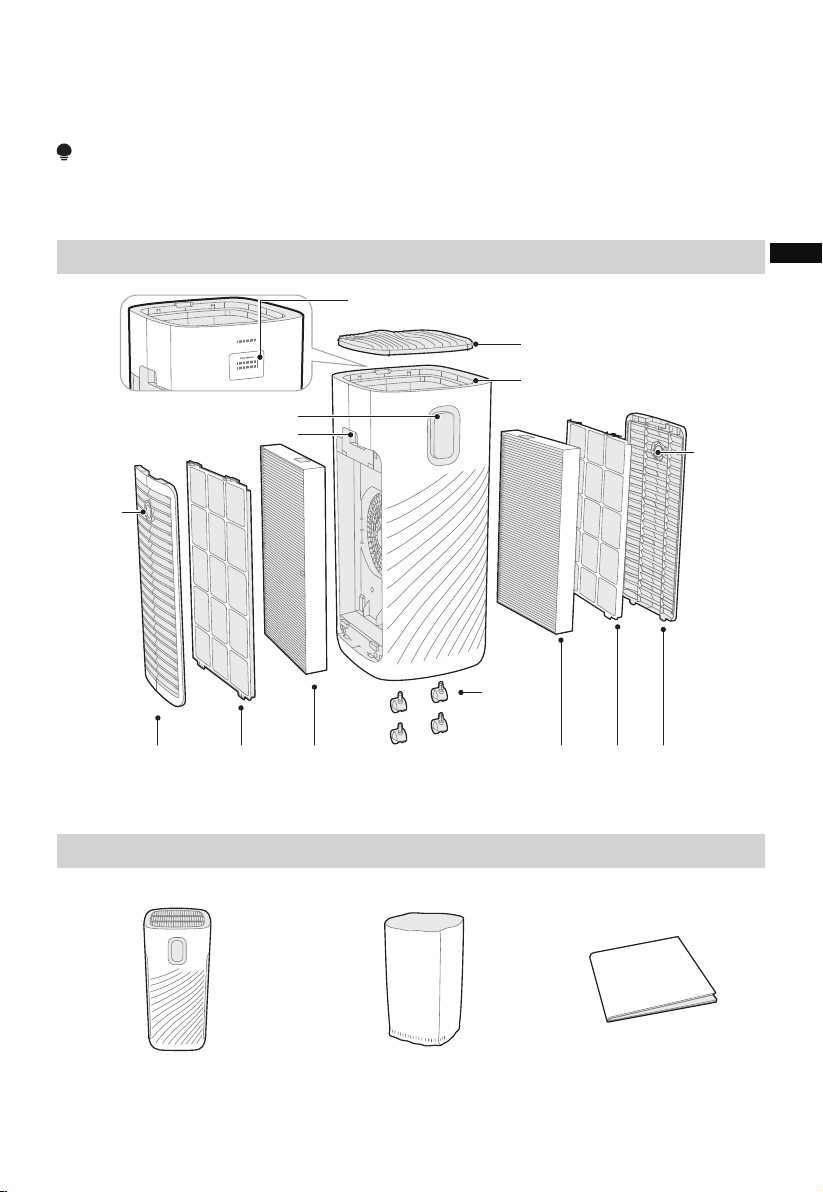
• Please use the original filter provided by the factory. In
case of other filters, the best results cannot be achieved.
• Do not insert the fingers or objects into the air inlets or
air outlets to prevent the product from physical
damages or malfunction.
• Please unplug the power cord immediately and contact
the service center in time when the appliance suers
abnormal sound or burnt smell or smoke.
• Do not spray flammable substances near the appliance;
Do not spray water directly on the appliance or use
chemical cleaners like alcohol or hydrochloric acid, etc.;
Do not place water containers, medicines, or flammable
materials on the appliance.
WARNING
CAUTION
• Read Rules for Safe Operation and Instructions Carefully.
EN

04
• Do not block the air inlets/outlets of the appliance with
any item.
• This appliance cannot replace natural ventilation and
other appliances like the vacuum cleaner, kitchen
ventilator, etc.
• This appliance cannot replace natural ventilation and
other appliances like the vacuum cleaner, kitchen
ventilator, etc.
• When the appliance is working, it must be placed on a
dry, flat and stable floor, with at least 30cm space
reserved around it.
• Do not put it in a place with direct sunlight.
• To prevent electromagnetic disturbance, the appliance
must keep a certain distance from the TV, radio,
microwave oven and others.
• The mist produced by the ultrasonic humidifier may
aect the PM2.5 detection of this appliance, and both
should maintain a certain distance.
• Do not disassemble or modify this appliance without
authorization to avoid accidents.
• Do not pull the power cord to move the appliance.
• The antenna of device shall keep 20cm away from
human body when in use.
EN

05
SPECIFICATIONS
KJ500G-TA32Model
Rated Power Supply
Rated Power
Cadr (Particulate Matters)
220-240V~ 50/60Hz
40W
Energy Eciency Rating Of Particulate
Matters Purification Ecient level
500m3/h
Noise
Usable Area 35-60m2
35-62dB (A)
• The various performance parameters in the table are measured in the factory and for
reference only.
• If the product is modified, the parameters may be changed, and please be subject to
the parameters on the nameplate.
• The theoretical value of the applicable area is inferred based on the
(0.07 - 0.12)XCADR particles; Due to dierent environments or indoor pollution level
and other various factors, the applicable area will also be changed.
• Purification principle: The fan of the air purifier draws air into the body for filtrating
through the built-in filter element, which plays a main role in filtering the dust (like
PM2.5), formaldehyde, odor, sterilization and so on.
EN

06
PRODUCT OVERVIEW
Parts Name
NOTE
Pictures in the manual are for reference only, and real objects within the packaging box
will prevail in the end.
Product List
PM2.5 sensor
Handle
Display screen
Air outlet grille
Operation panel
Pre-
Filter
HEPA
Filter
Air
Window
Air
Window
Air inlet
grille
Caster
HEPA
Filter
Air inlet
grille
Pre-Filter
Main machine x1 Protective bag x1 Manual x1
EN

07
Control Panel
Display Panel
Light
sensation
function
PM2.5 detection
switch display Sterilization
display Speed
display
Mode
display
Child Lock
Combination Button
Long press the mode
button and speed
button for 3 seconds
simultaneously, and it is
available in case of
power-on state or
standby state (pow-
er-o state with
electricity).
Mode Button
Automatic
mode, sleep
mode and
high-speed
mode are
available. ON/OFF
Button
Press to turn
on/o the
air purifier.
Speed Button
Low, medium
and high
gears are
available.
Sterilization Button
• Press to turn on or
turn o pure ion
• Long press for 3
seconds to reset
the HEPA Filter.
PM2.5 Detection Button
In case of standby state
(power-o state with
electricity), press to
detect PM2.5
PM2.5 numerical display
Wireless Network light
Cleaning prompt of Pre-Filter
HEPA Filter replacement prompt
Child lock
Life progress bar of Pre-Filter
Life progress bar of
HEPA Filter
EN

08
Installation Steps
PRODUCT INSTALLATION
1. Remove the air inlet grille.
Grasp and pull the clasping position
outward, and remove the air inlet
grille.
2. Take out the Pre-Filter.
Press the U-shaped buckle to pull
outward, and take out the
Pre-Filter.
3. Take out the HEPA Filter.
Hold both sides of the HEPA Filter
with both hands, and take it out.
4. Remove the protective film of the
filter.
EN

09
5. Install the HEPA Filter. 6. Install the Pre-Filter. Align the slot
position at the bottom, and buckle
up the upper U-shaped buckle.
7. Install the air inlet grille.
Align the slot position at the
bottom, press both sides of the
upper part of the air inlet grille, and
buckle up the air inlet grille.
8. Install the filter on the other side.
Repeat steps mentioned in Figure
1-7, to complete installation of the
filter on the other side, and plug in
the power to operate the machine.
EN

10
Test Run
OPERATION INSTRUCTIONS
NOTE
• This machine is provided with a disassembly protection function. The machine can only
operate normally after the air inlet grille and air outlet grille are installed properly.
• In case of continuous electricity, it enters the working mode before the standby state
after each time of power on.
• The machine is connected to the power again after unexpected power outage (when
the power is o or the power cord is unplugged during normal operation), and then
restores to the working state before the power outage.
1. Preparations
Power on for the first time, the
display panel flashes for 1s, and then
the screen is turned o. The whole
machine is in the standby state;
2. Switch
On/O button can be pressed.
3. Warm up
When the particulate matter sensor
enters the warm up state, PM2.5
numeri-cal display shows “ ---”, and
displaying is normal after 10
seconds.
4. Operating
The purifier is powered on for the
first time and then enters the
automatic mode.
Flash for 1s.
EN

11
APP SETUP AND OPERATION
Download the MSmartHome app
Connect your devices to MSmartHome
Open MSmartHome app on your phone.
Please power on your devices.
Register and log in
NOTE
Download the app
& activate product
MSmartHome
XXXXXXXXX
Enter email
Enter password
Login
Login
Login
Washing machine
Add device
Connect your device to Wireless Network
according to the instructions on app. If the
connection fails, please follow the instructions
provided by the app to continue with the
operation.
Open the MSmartHome app, and create a new
account to start (you can also register through a
third-party account). If you already had an existing
account, use the account to log in.
If a message of “Smart devices discovered nearby”
appears, click to add.
If no message appears, select “ + ” on the page and
select your device in the list of nearby devices
available. If your device is not listed, please add
your device manually by the device category and
device model.
Please make sure your mobile phone is connected
to Wireless Network. If not, go to Settings and turn
on the wireless connection, select and connect to a
Wireless Network. Also please turn on the
Bluetooth on your phone. If not,
go to Settings and turn it on.
On an app market (Google Play Store, Apple App
Store), search for "MSmartHome" and find the
MSmartHome app. Download and install it on your
phone. You can also download the app by
scanning the QR code below.
• Make sure your devices are powered on.
• Keep your mobile phone close enough to your device when you are connecting network to your device.
• Connect your mobile phone to the wireless network at home, and make sure you know the password of the
Wireless Network.
• Check if your router supports 2.4 GHz Wireless Network band and turn it on. If you are not sure whether the
router supports 2.4 GHz band, please contact the router manufacturer.
• The device cannot connect to the Wireless Network that requires authentication, and it usually appears in public
area such as hotels, restaurants, etc. Please connect to a Wireless Network that does not require authentication.
• It is recommended to use a Wireless Network name that only contains letters and numbers. If your Wireless
Network name contains special characters, please modify it in the router.
• Turn o the WLAN+ (Android) or WLAN Assistant (iOS) function of your mobile phone when connecting network
to your devices.
• In the case that your device connected to Wireless Network before but it needs to reconnect, please click "+" on
app Home page, and add your device again by the device category and model according to the instructions on
app.
EN

12
• Wireless Network Information
Operating Frequency
Maximum transmitting power
802.11a /n-HT20/ac-VHT20:
5180~5240 MHz<20dbm; 5260~5320 MHz<20dbm;
5500~5700 MHz<20dbm; 5725~5825 MHz<14dbm;
802.11b, 802.11g, 802.11n:
2412~2472 MHz<20dbm;
802.11a /n:
5180~5240 MHz, 5260~5320 MHz, 5500~5700 MHz;
5725~5825 MHz
802.11b, 802.11g, 802.11n:
2412~2472 MHz;
NOTE
• Radio Frequency Interface Requirements – Related to European installation.
• Note: This equipment has been tested and found to comply with the limits for a EN 300 440 v2.1.1 receiver
Category 3.
• These limits are designed to provide reasonable protection against harmful interference in a residential installation.
• This equipment is sensitive to other equipment that intentionally generates, radio frequency energy in the
5725~5875MHz that may.
• Conduce to the instability to use the Remote Control on it. However, there is no guarantee that interference will not
occur in a particular.
• Installation. If this equipment suered from the harmful interference from another radio device to radio this can be
determined by turning.
• The respective equipment o and on, the user is encouraged to try to correct the interference by one or more of the
following measures.
• Turn o the disturbance equipment.
• Increase the separation between the disturbance equipment.
• Consult the dealer or an experienced radio / TV technician for help.
EN

Main machine
Wipe the machine body with a soft towel.
13
CLEANING AND MAINTENANCE
Machine Body Cleaning
NOTICE
Be sure to turn it o before any maintenance, and cut o power.
Air inlet grille
Open the air inlet grille, vacuum up dust with a vacuum cleaner, and wipe it with a cloth.
Air outlet grille
Open the air outlet grill, vacuum up dust with a vacuum cleaner, and wipe it with a cloth.
EN

14
Cleaning Of The Filter Components
1. When the last bar of the progress
bar turns red and the cleaning
indicator light is on, it prompts that
the Pre-Filter needs to be cleaned.
2. Unplug the power plug, and take out the
Pre-Filter.
3. Vacuum up dust with a vacuum
cleaner or wipe it with a cloth.
4. If there is a lot of dirt, the common diluted
kitchen detergent is used to soak it, and
then clean it.
5. Dry the Pre-Filter. 6. Install the Pre-Filter.
Soaking time is
about 10 minutes.
EN

15
7. Plug in the power, and turn on the
machine for operating.
8. Long press pure ion button for 3 seconds,
then the cleaning indicator light is o, and
the Pre-Filter is reset.
1. Filter model: FC-50TA
(includes 2 pieces)
2. When the last bar of the progress bar
turns red and the replacement indicator
light is on, it prompts that the HEPA Filter
needs to be replaced.
3. Take out the HEPA Filter. 4. Remove the protective film of the filter.
Replacement Of The Filter Components
EN

16
Long press for 3 seconds
5. Install the HEPA Filter. 6. Hold the pure ion button for 3 seconds to
reset the HEPA Filter under other
conditions.
EN

17
TROUBLESHOOTING
ProcessingFaults
• Disassembly protection tips; Please install the air inlet
grille and air outlet grille properly.
The display screen
shows “P3”
• Hardware fault; Please contact the after-sales oce.
The display screen
shows “F6”
• Sensor fault; Please contact the after-sales oce.
The display screen
shows “Fu”
• The fan speed is beyond control; Please contact the
after-sales oce.
The display screen
shows “F5”
• Firstly, check whether the power cord is plugged into
the power socket; the loose plug caused by the
movement of the purifier may aect the energizing;
Secondly, check whether the air inlet grille and air
outlet grille of the purifier are installed properly. This
product is provided with a disassembly protection
function. If the air inlet grille and air outlet grille are not
installed properly, the product cannot work.
The purifier does not
work
• Firstly, check whether the foreign bodies block the air
inlet grille and air outlet grille; if any, remove those
foreign bodies; Then, check whether the Pre-Filter
becomes dirty or reaches the end of its service life; if
any, clean the Pre-Filter; Finally, check whether the
HEPA Filter is full of dust or reaches the end of its
service life; if any, the replacement of the HEPA Filter is
required.
The purifier has a small
amount of air and is
noisy
• When the product is operated for the first time, it
smells slightly plastic, which is normal; If this product
works in places (like smoking area or rotisserie, etc.)
with strong smell for a long time, the filter element
needs to be changed frequently and reset; Check
whether the air inlet/outlet grille and Pre-Filter are full
of dust or dirt; if any, maintain the machine and clean
the dust and dirt on the air inlet/outlet grille and
Pre-Filter.
The air outlet smells
odor
• If wheels can be pulled out, tilt the machine at a small
angle and pull them out with a little eort. If not, try to
pull the wheels out while rotating them.
Whether the wheels are
pulled out after
inserted
Operation of your appliance can lead to errors and malfunctions. The following tables
contain possible causes and notes for resolving an error message or malfunction. It is
recommended to read the tables carefully below in order to save your time and money
that may cost for calling to the service center.
EN
Table of contents
Languages:
Other Midea Air Cleaner manuals

Midea
Midea FBS15023R User manual

Midea
Midea US-KJ200G-D41 User manual

Midea
Midea KJ250G-Z42 User manual

Midea
Midea AMS150-PB User manual

Midea
Midea KJ500G-TB32 User manual

Midea
Midea MBF2733PC User manual

Midea
Midea MSF15AH6LB User manual

Midea
Midea FP-71APA040WETH-W User manual

Midea
Midea MP3.360 User manual

Midea
Midea AMS150-PBW User manual
Popular Air Cleaner manuals by other brands

IQAir
IQAir Dental series user manual

Abatement Technologies
Abatement Technologies PREDATOR 1200 instruction manual

Vornado
Vornado CYLO51 owner's guide

Sunbeam
Sunbeam HEALTH AT HOME 2589 user manual

Honeywell
Honeywell QuietClean HHT-215 series Important safety instructions

Blueair
Blueair Blue Pure Mini Max user manual