Midea MDWMINIPLUS User manual
USER MANUAL
Warning notices: Before using this product,please read this manual carefully and keep it for future reference.
The design and specifications are subject to change without prior notice for product improvement.
Consult with your dealer or manufacturer for details.
The diagram aboveis just for reference. Please take the appearance of the actual product as the standard.
Dish Washer
MDWMINIPLUS

THANK YOU LETTER 01
02
16
13
11
08
10
SAFETY INSTRUCTIONS
SPECIFICATIONS
PRODUCT OVERVIEW
QUICK START GUIDE
PRODUCT INSTALLATION
OPERATION INSTRUCTIONS
24
27
31
32
33
CLEANING AND MAINTENANCE
TROUBLESHOOTING
TRADEMARKS,COPYRIGHTS AND LEGAL STATEMENT
DISPOSAL AND RECYCLING
DATA PROTECTION NOTICE
CONTENTS
THANK YOU LETTER
Thank you for choosing Midea! Before using your new Midea product, please read
this manual thoroughly to ensure that you know how to operate the features and

Intended Use
Explanation of Symbols
SAFETY INSTRUCTIONS
02
The following safety guidelines are intended to
prevent unforeseen risks or damage from unsafe
or incorrect operation of the appliance. Please
check the packaging and appliance on arrival to
make sure everything is intact to ensure safe
operation. If you find any damage, please contact
the retailer or dealer.
Please note modifications or alterations to the
appliance are not allowed for your safety concern.
Unintended use may cause hazards and loss of
warranty claims.
●
●
Danger
This symbol indicates that there are dangers
to the life and health of persons due to
extremely flammable gas.
Warning of electrical voltage
This symbol indicates that there is a danger
to life and health of persons due to voltage.
Warning
The signal word indicates a hazard with a
medium level of risk which, if not avoided,
may result in death or serious injury.

Read these operating instructions carefully and
attentively before using/commissioning the unit and
keep them in the immediate vicinity of the installation
site or unit for later use!
03
Caution
The signal word indicates a hazard with a
low degree of risk which, if not avoided,
may result in minor or moderate injury.
Attention
The signal word indicates important
information (e.g. damage to property),
but not danger.
Observe instructions
This symbol indicates that a service
technician should only operate and maintain
this appliance in accordance with the
operating instructions.

04
DANGER: Risk of Fire/Flammable materials
●●
●
●
●
●
●
●
●
When using your dishwasher, follow the precautions
listed below:
Installation and repair can only be carried out by a
qualified technician.
This appliance is intended to be used in household
and similar applications such as:
-staff kitchen areas in shops, offices and other
working environments;
-farm houses;
-by clients in hotels, motels and other residential
type environments;
-bed and breakfast type environments.
This appliance can be used by children aged from 8
years and above and persons with reduced physical,
sensory or mental capabilities or lack of experience
and knowledge if they have been given supervision
or instruction concerning use of the appliance in a
safe way and understand the hazards involved.
Children shall not play with the appliance. Cleaning
and user maintenance shall not be done by children
without supervision. (For EN60335-1)
This appliance is not intended for use by persons
(including children) with reduced physical, sensory
or mental capabilities, or lack of experience and
knowledge, unless they have been given supervision
or instruction concerning use of the appliance by a
person responsible for their safety. (For IEC60335-1)
Packaging material could be dangerous for children!
Children should be supervised to ensure that they do
not play with the appliance.
This appliance is for indoor household use only.

Earthing Instructions
05
●
●
●
●
●
●
●
●
●
●
●
To protect against the risk of electrical shock, do not
immerse the unit, cord or plug in water or other liquid.
Please unplug before cleaning and maintenance the
appliance. Use a soft cloth moisten with mild soap,
and then use a dry cloth to wipe it again.
If the supply cord is damaged, it must be replaced by
the manufacturer or its service agent or a similarly
qualified person in order to avoid a hazard.
If you use the dishwasher in your RV, please use it
after the RV stops stably.
This appliance must be earthed. In the event of a
malfunction or breakdown, earthing will reduce the
risk of an electric shock by providing a path of least
resistance of electric current. This appliance is
equipped with an earthing conductor plug.
The plug must be plugged into an appropriate outlet
that is installed and earthed in accordance with all
local codes and ordinances.
Improper connection of the equipment-earthing
conductor can result in the risk of an electric shock.
Check with a qualified electrician or service
representative if you are in doubt whether the
appliance is properly grounded.
Do not modify the plug provided with the appliance
if it does not fit the outlet.
Have a proper outlet installed by a qualified
electrician.
Do not abuse, sit on, or stand on the door or dish
rack of the dishwasher.
Do not operate your dishwasher unless all enclosure
panels are properly in place.

06
●
●
●
●
●
●
●
●
●
●
●
●
Open the door very carefully if the dishwasher is
operating, there is a risk of water squirting out.
Do not place any heavy objects on or stand on the
door when it is open. The appliance could tip
forward.
When loading items to be washed:
1) Locate sharp items so that they are not likely to
damage the door seal;
2) Warning: Knives and other utensils with sharp
points must be loaded in the basket with their points
facing down or placed in a horizontal position.
Some dishwasher detergents are strongly alkaline.
They can be extremely dangerous if swallowed.
Avoid contact with the skin and eyes and keep
children away from the dishwasher when the door is
open.
Check that there are no detergent residues after
completion of the wash cycle.
Do not wash plastic items unless they are marked
“dishwasher safe” or the equivalent.
For unmarked plastic items not so marked, check the
manufacturer's recommendations.
Use only detergent and rinse agents recommended
for use in an automatic dishwasher.
Never use soap, laundry detergent, or hand washing
detergent in your dishwasher.
The door should not be left open, since this could
increase the risk of tripping.
During installation, the power supply must not be
excessively or dangerously bent or flattened.
Do not tamper with controls.

Disposal
07
●
●
●
●
●
●
●
●
●
●
The appliance needs to be connected to the main
water valve using new hose sets. Old sets should not
be reused.
To save energy, in stand by mode, the appliance will
switch of automatically after 15 minutes without any
user interaction.
The maximum number of place settings to be
washed is 3.
The maximum permissible inlet water pressure is
1MPa.
The minimum permissible inlet water pressure is
0.04MPa.
For disposing of package and the appliance please
go to a recycling center.
Therefore cut off the power supply cable and make
the door closing device unusable.
Cardboard packaging is manufactured from recycled
paper and should be disposed in the waste paper
collection for recycling.
By ensuring this product is disposed of correctly, you
will help prevent potential negative consequences for
the environment and human health, which could
otherwise be caused by inappropriate waste handling
of this product.
For more detailed information about recycling of this
product, please contact your local city office and
your household waste disposal service.
DISPOSAL: Do not dispose this product as unsorted
municipal waste. Collection of such waste separately
for special treatment is necessary.
08
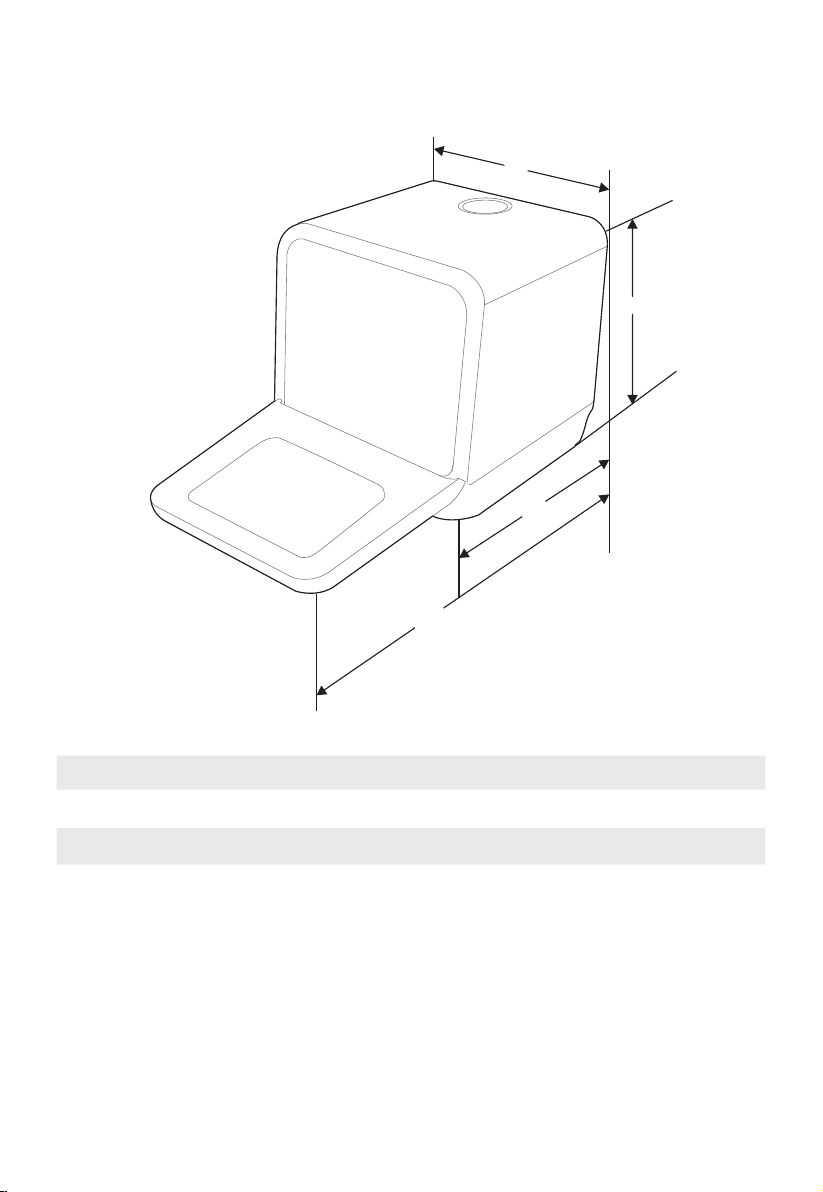
SPECIFICATIONS
465 mmHeight (H)
Width (W)
Depth (D1)
Depth (D2)
420 mm
435 mm (with the door closed)
780 mm (with the door opened 90°)
D1
H
D2
W

Product information sheet
Manufacturer
Type/Description
Standard place settings
Energy efficiency class
Water consumption class
Standard cleaning cycle
Energy consumption of the standard cleaning cycle
Water consumption of the standard cleaning cycle
Program duration of the standard cleaning cycle
Noise level
Mounting
Could be built-in
Power consumption
Rated voltage/frequency
Water pressure (flow pressure)
MIDEA
3
ECO
0.43 kWh
4.9 liter
200 min
58 dB(A) re 1 pW
Table Top
NO
730-860W
AC 220-240V/50Hz
0.04-1.0MPa=0.4-10 bar
1
3
09
MDWMINIPLUS
Table of contents
Other Midea Dishwasher manuals

Midea
Midea WQP6-3607 User manual

Midea
Midea WQP4-2605 User manual

Midea
Midea WQP6-3208-US User manual

Midea
Midea UP2-HK User manual

Midea
Midea CD400 User manual

Midea
Midea MDW15SSS User manual

Midea
Midea MDW45FSS User manual

Midea
Midea MDF24P1B Series User manual

Midea
Midea M18DB9339WW3A User manual

Midea
Midea WQP6-3207A How to use

Midea
Midea MFD60S300W.2-ES User manual

Midea
Midea MDW15KSS User manual

Midea
Midea MDW15GSS User manual

Midea
Midea WQP12-5201 User manual

Midea
Midea MFD45S200W.2-ES User manual

Midea
Midea 340950 Wiring diagram

Midea
Midea WQP8-B9252 User manual

Midea
Midea MDT24H3AST User manual

Midea
Midea WQP6-3705 How to use

Midea
Midea MDF24P1BST User manual


