Midland ER200 Manual
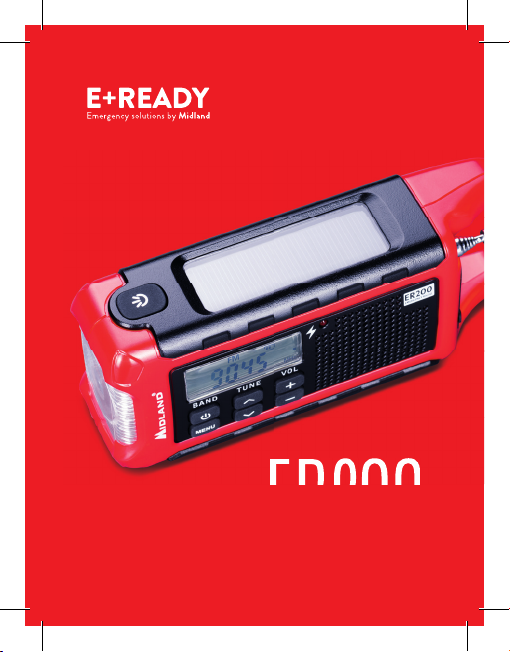
EMERGENCY POWER BANK
WITH DYNAMO
ER20O
ER20O
Guida all’uso
Instruction guide
Bedienungsanleitung
Manual de usuario

ITALIANO .......................................................1
ENGLISH........................................................8
DEUTSCH.................................................... 15
ESPAÑOL.....................................................22
RADIAZIONE LED
Non fissare il fascio
Apparecchio Led
di Classe 2
LED RADIATION
Do not stare into beam
Class 2 Led Product

Midland ER200 | 1
ER200
Power bank d’emergenza con dinamo
Contenuto della confezione
• Power bank
• Pacco batteria Li-Ion 2200mAh
• Cavo USB
Principali funzioni
• Ricaricabile con dinamo, panello solare o cavo USB
• Batteria ricaricabile Li-Ion
• Torcia a led Cree®*
• Funzione SOS codice Morse
• Carica dispositivi elettronici esterni
• Radio AM/FM
• Orologio digitale
• Presa per auricolare
• Antenna telescopica
• Display LCD
* Cree® è un marchio registrato di Cree Inc.
2 | Midland ER200
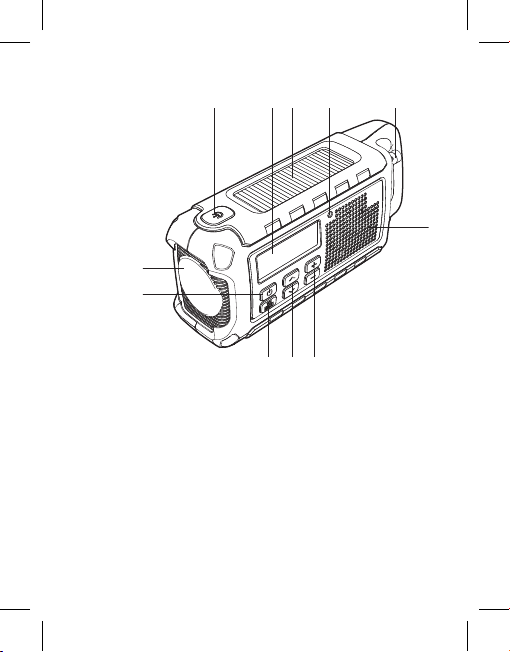
Tasti e funzioni
1. Torcia /Tasto SOS
2. Display LCD
3. Pannello solare
4. Antenna
5. Altoparlante
6. TUNE - Tasti regolazione sintonizzazione
7. VOL - Tasti regolazione volume
8. Tasto MENU
9. Tasto di accensione / Banda di utilizzo
10. Indicatore di carica
11. Torcia led
1 2 3 10 4
5
768
9
11
Midland ER200 | 3
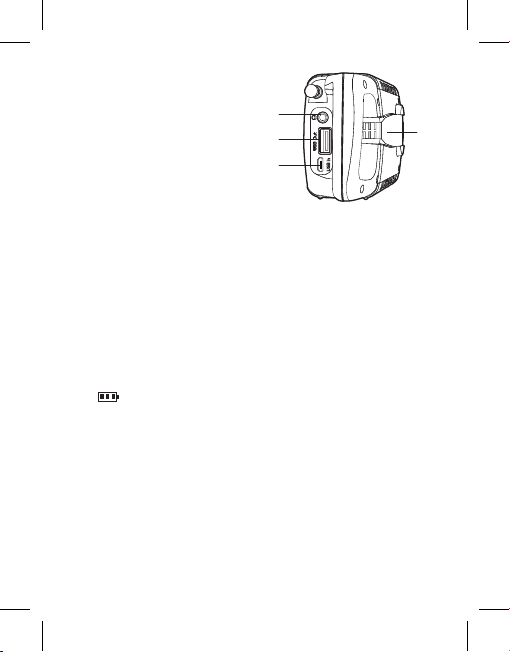
12. Presa per auricolari
13. Porta USB Output
14. Porta USB Input
15. Manovella dinamo
Ricaricare ER200
Cavo di ricarica USB
Prima dell’utilizzo, controllare che ER200 sia carico.
Il pacco batteria Li-Ion interno é ricaricato con il cavo USB;
quando la carica è completa, l’icona della batteria visualizzerà 3
barre .
Inserite il cavo USB in dotazione nella presa micro USB (“USB
In”) dell’ER200 e l’altra estremità del cavo alla sorgente di
alimentazione.
Durante la fase di carica l’icona della batteria sul display LCD
lampeggia.
Quando la carica è completa, l’icona della batteria smetterà di
lampeggiare e avrà 3 barre.
Per una ricarica completa tramite cavo USB ci vogliono
approssimativamente 5.30 ore.
12
13
14
15
4 | Midland ER200
Pacco batteria ricaricabile
Il pacco batteria in dotazione è di tipo Li-Ion 2200 mAh 3,7V e si
trova nel vano batteria. Si ricarica tramite:
• manovella
• pannello solare esponendo ER200 alla luce del sole
• cavo USB
Attenzione:
• Utilizzate solo pacchi batteria originali Midland.
• Non cercate di utilizzare batterie alcaline o pacchi batteria
non originali: potrebbe fuoriuscire liquido e quindi danneggiare
ER200.
Ricarica con dinamo
Girando la dinamo sul retro, il pacco batteria Li-ion si ricarica. L’in-
dicatore rimarrà acceso durante la carica. La carica che otterre-
te dipende dalla velocità con cui girate la manovella e per quanto
tempo lo fate. L’icona della batteria lampeggerà sul display, e una
volta completata la carica, smetterà di lampeggiare e l’icona della
batteria mostrerà 3 barre .
Se girate la dinamo per un minuto, otterrete circa 9 minuti di cari-
ca per utilizzare ER200.
Ricarica con pannello solare
Collocate ER200 in modo che il pannello solare sia esposto alla
luce diretta del sole. Un’ora di esposizione diretta al sole in con-
dizioni ottimali dà fino a 30 minuti di ricarica del dispositivo.
L’icona della batteria lampeggerà sul display, e una vol-
ta completata la carica, smetterà di lampeggiare e mostrerà
3 barre . L’indicatore rimarrà acceso durante la carica.

Midland ER200 | 5
Ricaricare dispositivi esterni
Telefoni cellulari e dispositivi alimentati tramite USB possono es-
sere ricaricati con il cavo di ricarica fornito con ER200. Collegate
il cavo alla presa “USB OUT” posta sul lato di ER200. Se il dispo-
sitivo è acceso, si spegnerà automaticamente ed inizierà a caricare.
Funzionamento
Accensione/spegnimento e selezione banda
1. Per accendere ER200, premete il tasto BAND. Premetelo
di nuovo per scorrere tra AM/FM.
2. Premetelo per 2 secondi per spegnere ER200.
Regolazione del volume
Utilizzate i tasti UP/DOWN/VOLUME per regolare il volume.
Sintonizzare la radio
Premete il tasto BAND per scorrere tra AM e FM.
Una volta selezionata la banda desiderata, potete sintonizzare la
stazione radio tramite i tasti UP/DOWN/VOLUME. Per una ri-
cezione ottimale dell’FM, dovete estendere l’antenna telescopica
e ruotarla finchè ottenete una buona ricezione.
Impostare l’ora
Tenete premuto il tasto MENU e selezionate le 24 o le 12 ore con
UP/DOWN/VOLUME.
Premete MENU per regolare l’ora, premetelo di nuovo per re-
golare i minuti.
6 | Midland ER200
Retroilluminazione
ER200 ha 3 diversi tipi di retroilluminazione:
• OFF: retroilluminazione sempre spenta.
• ON: retroilluminazione sempre accesa.
• 5: ogni volta che si preme un tasto, la retroilluminazione si ac-
cende per 5 secondi.
Torcia LED
Si possono impostare 2 tipi di luminosità della torcia:
• Debole: alla prima pressione del tasto la luce della torcia è
lieve.
• Luminosa: alla seconda pressione del tasto la luminosità è
più potente.
Funzione SOS con codice Morse
Per abilitare la funzione SOS, premete il tasto icona 3 volte.
Il codice Morse SOS é: 3 lampeggi brevi, 3 lampeggi lunghi e 3
lampeggi brevi.
Per disabilitare la funzione, premete il tasto .
Jack per auricolari
Potete collegare auricolari opzionali con presa 3,5mm stereo (an-
che auricolare per smartphone).

Midland ER200 | 7
Specifiche tecniche
Frequenza .................... 531-1629KHz (AM)/87.5-108MHz (FM)
Alimentazione............................. batteria 3.7Vdc Li-Ion 2200mAh
Temperatura operativa............................................da -20° a +55°C
Ciclo di funzionamento (% su 1 ora)..................................RX 100%
Presa jack ext audio.....................................................3,5mm stereo
Peso (batteria esclusa)...............................................................254g
Dimensioni..................................................163x45x69mm (LxAxP)
Le specifiche sono soggette a modifiche senza preavviso.
ATTENZIONE: L’adattatore di alimentazione è il dispositivo di disconnessione dell’apparato; la
base di carica della corrente deve restare vicino all’apparato e facilmente accessibile.
Per informazioni sulla garanzia consultate il sito www.midlandeurope.com

8 | Midland ER200
ER200
Power bank with dynamo
What’s in the box
• ER200 power bank
• Li-Ion battery pack 2200mAh
• USB cable
Features
• Rechargeable through hand crank, solar panel or USB
• Rechargeable Lithium-ion battery
• Powerful flashlight uses Cree®* LEDs
• SOS Morse code flashlight beacon
• Charge external electronic devices
• AM/FM radio
• Digital clock
• Headphone jack
• Rotatable telescopic antenna
• Backlit LCD
*Cree® is a registered trademark of Cree Inc.
Other manuals for ER200
1
This manual suits for next models
1
Table of contents
Languages:
Other Midland Accessories manuals


