Miele W 6071 User manual

Operating instructions
Washer-Extractor
W 6071
It is essential to read these
operating instructions before G
installing, commissioning or using the machine,
to avoid the risk of accident
or damage to the machine. M.-Nr. 06 006 850

2 M.-Nr. 06 006 850

Warning and Safety Instructions . . . . . . . . . . . . . . . . . . . . . . . . . . . . . . . . . . . . . . . . . . . . . . . 4
Caring for the environment . . . . . . . . . . . . . . . . . . . . . . . . . . . . . . . . . . . . . . . . . . . . . . . . . . . . 7
Guide to the machine. . . . . . . . . . . . . . . . . . . . . . . . . . . . . . . . . . . . . . . . . . . . . . . . . . . . . . . . . 8
Operation . . . . . . . . . . . . . . . . . . . . . . . . . . . . . . . . . . . . . . . . . . . . . . . . . . . . . . . . . . . . . . . . .13
Setting the local language (if necessary). . . . . . . . . . . . . . . . . . . . . . . . . . . . . . . . . . . . . . . . . . 13
Setting current time and date. . . . . . . . . . . . . . . . . . . . . . . . . . . . . . . . . . . . . . . . . . . . . . . . . . . 13
Washing. . . . . . . . . . . . . . . . . . . . . . . . . . . . . . . . . . . . . . . . . . . . . . . . . . . . . . . . . . . . . . . . . . . 14
Before using for the first time . . . . . . . . . . . . . . . . . . . . . . . . . . . . . . . . . . . . . . . . . . . . . . . . . . . 14
Preparing the wash load . . . . . . . . . . . . . . . . . . . . . . . . . . . . . . . . . . . . . . . . . . . . . . . . . . . . . . 14
Programme end - to open the drum door . . . . . . . . . . . . . . . . . . . . . . . . . . . . . . . . . . . . . . . . . 17
Maximum load / Detergent. . . . . . . . . . . . . . . . . . . . . . . . . . . . . . . . . . . . . . . . . . . . . . . . . . . . 18
Detergent dispensing . . . . . . . . . . . . . . . . . . . . . . . . . . . . . . . . . . . . . . . . . . . . . . . . . . . . . . . . 18
Additional functions. . . . . . . . . . . . . . . . . . . . . . . . . . . . . . . . . . . . . . . . . . . . . . . . . . . . . . . . . 19
With Pre-wash. . . . . . . . . . . . . . . . . . . . . . . . . . . . . . . . . . . . . . . . . . . . . . . . . . . . . . . . . . . . . . . 19
Starch . . . . . . . . . . . . . . . . . . . . . . . . . . . . . . . . . . . . . . . . . . . . . . . . . . . . . . . . . . . . . . . . . . . . . 19
Without spin . . . . . . . . . . . . . . . . . . . . . . . . . . . . . . . . . . . . . . . . . . . . . . . . . . . . . . . . . . . . . . . 19
Skipping programme stages . . . . . . . . . . . . . . . . . . . . . . . . . . . . . . . . . . . . . . . . . . . . . . . . . . . 20
Programme interruption . . . . . . . . . . . . . . . . . . . . . . . . . . . . . . . . . . . . . . . . . . . . . . . . . . . . . . . 20
Programme cancellation . . . . . . . . . . . . . . . . . . . . . . . . . . . . . . . . . . . . . . . . . . . . . . . . . . . . . .20
Delayed Start . . . . . . . . . . . . . . . . . . . . . . . . . . . . . . . . . . . . . . . . . . . . . . . . . . . . . . . . . . . . . . . 21
otes . . . . . . . . . . . . . . . . . . . . . . . . . . . . . . . . . . . . . . . . . . . . . . . . . . . . . . . . . . . . . . . . . . . . . 22
PC- Printer connection: . . . . . . . . . . . . . . . . . . . . . . . . . . . . . . . . . . . . . . . . . . . . . . . . . . . . . . . 22
Liquid dispensing. . . . . . . . . . . . . . . . . . . . . . . . . . . . . . . . . . . . . . . . . . . . . . . . . . . . . . . . . . . 23
Amount to be dispensed . . . . . . . . . . . . . . . . . . . . . . . . . . . . . . . . . . . . . . . . . . . . . . . . . . . . . .23
Commissioning the dispensing pumps . . . . . . . . . . . . . . . . . . . . . . . . . . . . . . . . . . . . . . . . . . . 24
Cleaning and Care . . . . . . . . . . . . . . . . . . . . . . . . . . . . . . . . . . . . . . . . . . . . . . . . . . . . . . . . . . 25
Problem solving guide. . . . . . . . . . . . . . . . . . . . . . . . . . . . . . . . . . . . . . . . . . . . . . . . . . . . . . . 28
Power cut during a wash programme Emergency door release . . . . . . . . . . . . . . . . . . . . . . . . 28
Fault messages . . . . . . . . . . . . . . . . . . . . . . . . . . . . . . . . . . . . . . . . . . . . . . . . . . . . . . . . . . . . . 29
Possible reasons for increased levels of foaming . . . . . . . . . . . . . . . . . . . . . . . . . . . . . . . . . . . 31
After sales service . . . . . . . . . . . . . . . . . . . . . . . . . . . . . . . . . . . . . . . . . . . . . . . . . . . . . . . . . . . 31
Explanation of symbols on the data plate . . . . . . . . . . . . . . . . . . . . . . . . . . . . . . . . . . . . . . . 32
otes for the installer. . . . . . . . . . . . . . . . . . . . . . . . . . . . . . . . . . . . . . . . . . . . . . . . . . . . . . . . 33
Transit fittings . . . . . . . . . . . . . . . . . . . . . . . . . . . . . . . . . . . . . . . . . . . . . . . . . . . . . . . . . . . . . . . 33
Connection to water supply . . . . . . . . . . . . . . . . . . . . . . . . . . . . . . . . . . . . . . . . . . . . . . . . . . . .34
Electrical connection . . . . . . . . . . . . . . . . . . . . . . . . . . . . . . . . . . . . . . . . . . . . . . . . . . . . . . . . . 35
Contents
M.-Nr. 06 006 850 3
The washer-extractor must be installed and
commissioned by an approved Customer
Service technician or authorised Service

Please read the operating instructions be-
fore using this machine for the first time.
They contain important information about
the safety, use and maintenance of the
machine. This will avoid the risk of acci-
dents and damage to the machine.
Appropriate use of the machine
This washer extractor is only intended for
items of laundry which have not been im-
pregnated with dangerous or inflammable
substances.
Only machine wash articles which pos-
sess a care label stating they are suit-
able for machine washing.
It is the operator’s responsibility to en-
sure that the standard of disinfection in
thermal as well as chemo thermal proce-
dures is maintained (in accordance with §
18 IFSG) by carrying out suitable validation
tests. These procedures should be checked
on a regular basis, either thermo-electrically
using loggers, or bacteriologically with bio
indicators. The operator must pay particular
attention to maintaining the correct parame-
ters in the procedure, including temperature
and with chemo thermal programmes the
chemical concentration used. Disinfection
programmes must not be interrupted, as this
can have a limiting effect on the disinfection
result.
On no account must solvents of the kind
used for dry cleaning be used in this ma-
chine. There may be the danger of fire or ex-
plosion.
Never use or store petrol or petroleum
based substances or any easily inflam-
mable substances near the machine. Do not
use the machine lid as a resting place.
Danger of fire or explosion
Technical and electrical safety
The electrical safety of this appliance
can only be guaranteed when continuity
is complete between the appliance and an
effective earthing system which complies
with local and national regulations.
It is most important that this basic safety re-
quirement is regularly tested by a qualified
electrician. The manufacturer cannot be held
responsible for the consequences of an in-
adequate earthing system.
Do not damage, remove or bypass the
safety features and controls on the ma-
chine.
Where there is any damage to the ma-
chine or to the cable insulation the ma-
chine must not be used until it has been re-
paired.
Any removable outer panels must be in
place, and all moving or electrical parts
shielded before the machine is operated.
The machine is only completely isolated
from the electricity supply either when
switched off at the wall isolator, or the mains
fuse is withdrawn from the socket.
Repairs to machines operating with elec-
tricity, gas or steam should only be un-
dertaken by a suitably qualified service en-
gineer to ensure safety. Unauthorized repairs
could be dangerous.
Faulty components should only be ex-
changed for Miele original spare parts.
Only when these parts are fitted can the
safety standards of the machine be guaran-
teed.
The very best materials are used in the
manufacture of this machine, and every
care is taken in its manufacture. However,
with time, deterioration of parts can occur,
especially with rubber components such as
hoses. This should be borne in mind if oper-
ating the machine without supervision.
Check the inlet hoses regularly for signs of
deterioration and replace in good time, to
avoid leaks and subsequent damage.
Warning and Safety Instructions
4 M.-Nr. 06 006 850

Local regulations regarding regular in-
spection and maintenance of this ma-
chine must be observed. (In Germany this
machine is subject to laundry regulations
UVV (VBG7y), Sections 36 and 37, which
stipulate that washer extractors with a kinetic
energy of more than 1500 Nm must be
checked once a year by a competent per-
son for their operational safety and the re-
sults entered in a test log (book) supplied
with the machine for the German market,
and which must be kept at the place of oper-
ation and be available for inspection.)
Use of the machine
Never allow children to play in, on or
near the washer extractor, or to operate it
themselves. Please supervise its use by the
elderly or infirm.
Remember that the door porthole glass
can become hot during the operation of
the machine. Do not let children touch it.
When washing with high temperatures
steam can be emitted from the venting
slot behind the machine.
Do not grip between the suspended
drum unit and the seal of the front panel
cut-out during spin.
Always make sure the drum is stationary
before reaching in to remove washing.
Reaching into a moving drum is extremely
dangerous.
Water used for washing and rinsing must
not be used as drinking water. It must be
discharged into a proper sewerage system.
The machine should only be operated
unsupervised when there is a floor drain
(gully) in the direct vicinity of the machine.
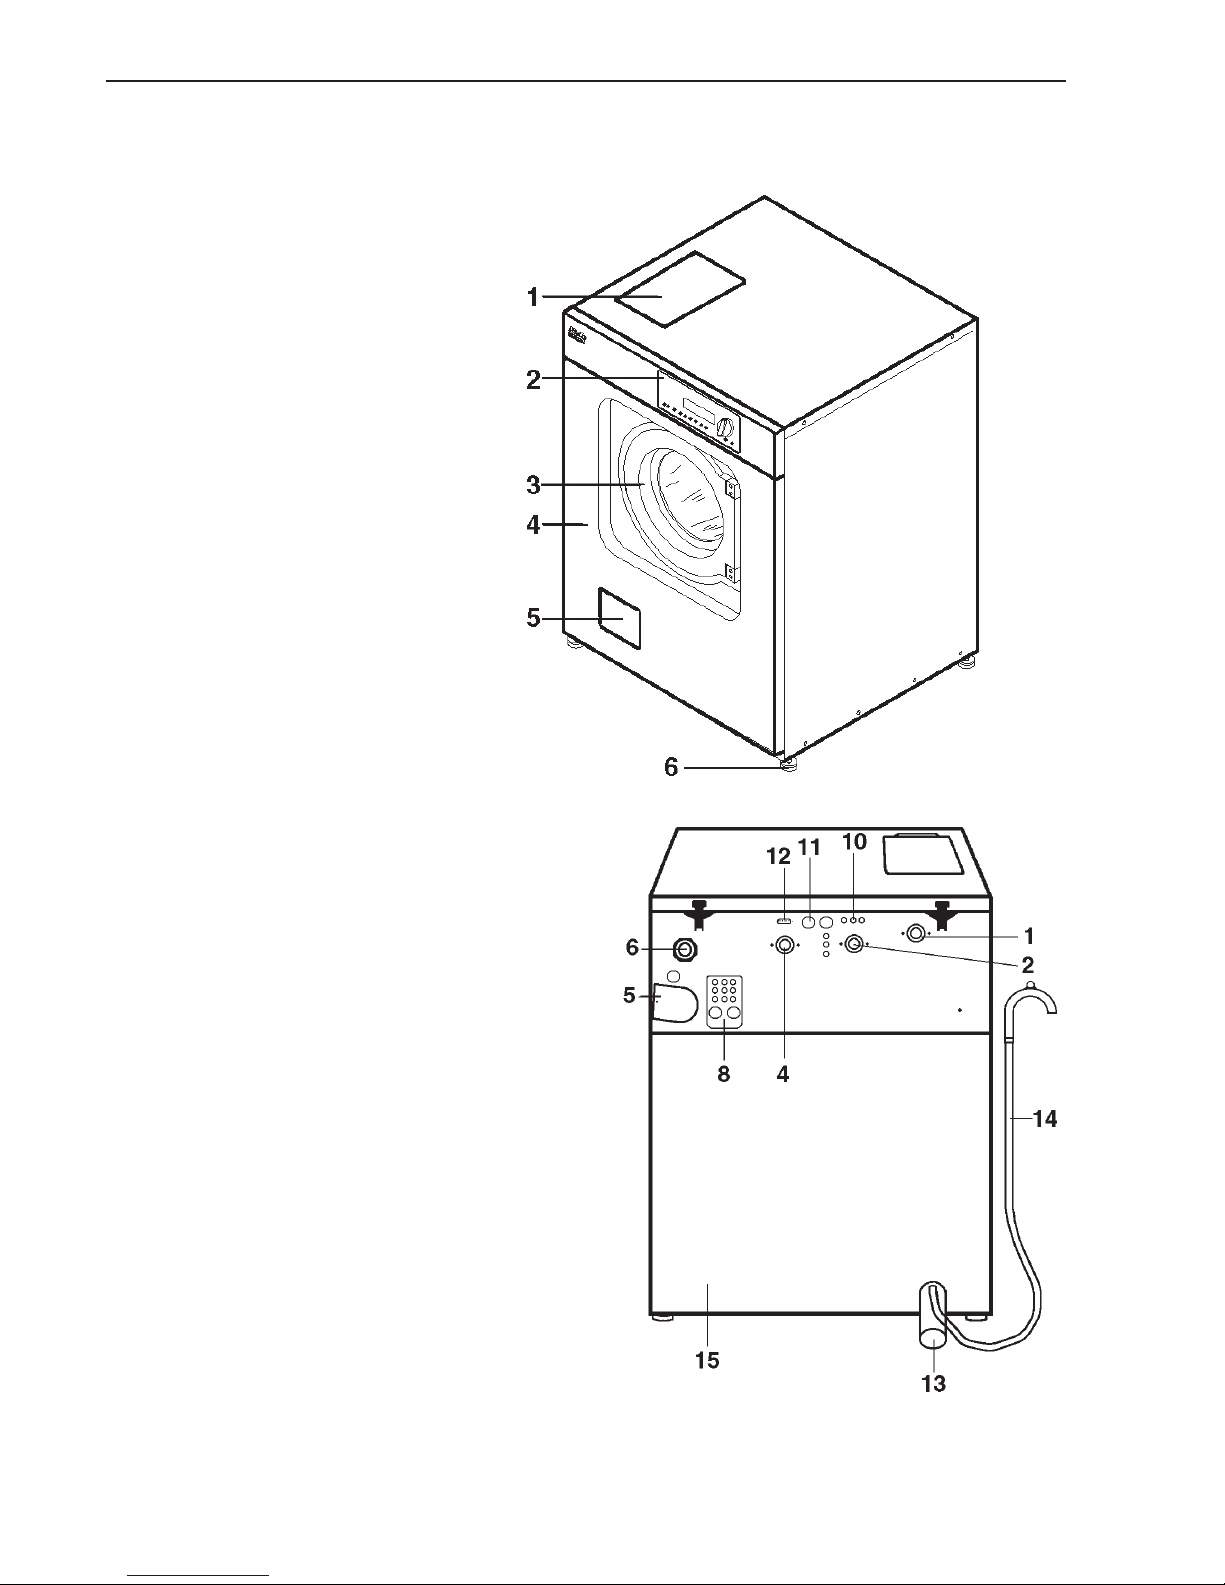
To avoid flooding:
If hooking the hose into a sink make sure
that the water can flow away freely to avoid
flooding.
Secure the hose against slipping. The pres-
sure of the water flowing out can push an
unsecured hose out of the sink.
Chlorine or agents containing chlorine
are corrosive, and can under certain
conditions lead to irreperable damage to
components.
Disinfecting and cleaning agents often
have compounds containing chlorides in
them. If these agents dry on to stainless
steel surfaces, the residual chlorides will at-
tack the steel and can cause rusting.
To protect your machine from rust damage,
we recommend only using chloride free dis-
infecting and cleaning agents for washing
and disinfecting programmes and for clean-
ing stainless steel surfaces of the machine
itself.
If you are not sure about a particular agent,
contact the manufacturer of that agent for
advice.
If you accidentally spill an agent containing
chlorides on the machine it should be rinsed
off with water and dried using a soft cloth.
Proprietary dyes, dye removers and
descaling agents may only be used in
this machine if the manufacturer expressly
states that they are suitable for use in a
washing machine. There may be the danger
of fire or explosion.
Always follow the instructions of the
chemical manufacturer when using
cleaning agents and special application
chemicals. Only use such chemicals for the
purpose and in the situation specified by the
manufacturer in order to avoid the danger of
adverse
chemical reactions and material damage.
If in doubt check the suitability of the prod-
uct for use in this machine with the manufac-
turer before using it.
Where a chemical cleaning agent is rec-
ommended on technical application
grounds, this does not imply that the manu-
facturer of the machine takes responsibility
for the effect of the chemical on the material
of the items being cleaned or on the ma-
chine.
Please be aware that changes in formula-
tion, storage conditions etc., which may not
be publicised by the chemical producer, can
have a negative effect on the cleaning result.
Warning and Safety Instructions
M.-Nr. 06 006 850 5

On no account use high pressure
cleaners or hose down the machine.
Use of accessories
Accessory parts may only be fitted when
expressly approved by Miele. If other
parts are used, guarantee, performance and
product liability claims may be invalidated.
Disposal of old machines or appliances
When disposing of an old washer extrac-
tor first make it unusable. Disconnect
from all services, cut off the cable and the
plug from the cable.
Make the door lock inoperative, so that chil-
dren cannot accidentally shut themselves in.
Make appropriate arrangements for the safe
disposal of the appliance.
All personnel working with this machine
must be fully trained in all aspects of its
use and safety.
Keep these instructions in a safe place
Warning and Safety Instructions
6 M.-Nr. 06 006 850

Disposal of the packing material
The transport and protective packing has
been selected from materials which are envi-
ronmentally friendly for disposal and can
normally be recycled.
Ensure that any plastic wrappings, bags etc.
are disposed of safely and kept out of the
reach of babies and young children.
Danger of suffocation!
Rather than just throwing these materials
away, please ensure they are offered for re-
cycling.
Disposal of your old machine
Old machines contain materials which can
be recycled. Please contact your local au-
thorities or scrap merchant about potential
recycling schemes, before disposing of the
machine.
See also the section under "Warning and
Safety instructions".
Caring for the environment
M.-Nr. 06 006 850 7

W 6071 washer extractor with drain valve or drain pump option
aDetergent dispenser box
bControl panel
cDrum door
dFront wall panel
eFlap for suds filter/drainage
system and emergency door
release
fFour adjustable screw feet
aCold water connection
bHot water connection
dCold water connection for liquid
dispensing
eVenting socket
fCable entry for power supply
hLiquid dispenser box
jCable entry for dispenser pumps
kCable entry for 3 dispenser pumps
lSerial interface for printer
mDrainage (for drain valve version)
nDrainage hose (for drain pump version)
oBack wall
Guide to the machine
8 M.-Nr. 06 006 850

Control panel
ab c
aKey switch
bDisplay
cProgramme selector
9Optical interface
Switches
YMains on
ZMains off
Buttons
5Door
TBlock + / (pre-wash)
UStarch hold
VSpin-stop
1 2 Cursor
3Minus
4Plus
WDelay start
XStart
7End
PROGRAMME 1 COTTONS
>90° C< Main wash 1
Rinses 3 1200 RPM ->
Display
The Display content shows after the machine
is switched on. It has up to four lines, each
40 digits long, showing which programme
has been selected.
After the Programme start:
aPROGRAMME 1 COTTONS
b60 °C Pre-wash 25 °C
c95 °C Main wash
d-->
aProgramme number / Prog.name
bPlanned temperature of the current
prog.block. / Name of the current prog.
block. / Actual temperature / Time line for
the current Prog. block
cPlanned temperature of the following
prog. block. / Name of the following
Programme block
dPoints to a further display line
Guide to the machine
M.-Nr. 06 006 850 9

Mains on YSwitch
Mains off ZSwitch
Door 5button
Key switch
Position A- Free access
At this operating level only those
programmes can be started which have
been allocated free access.
See Programming Instructions for allocation
of free access.
Position B- Operation
All programmes can be started at this oper-
ating level. The display field will show the
programme which selector has been turned
to.
Position C- Programming
In this position programming can be carried
out, e.g. copying, deleting, printing out, al-
tering, giving or barring free access and cre-
ating new programme sequences. See Pro-
gramming Instructions.
Position D- Unlocking
At this operating level barred programmes
can be unlocked. Locked Programmes (e.g.
Disinfection programmes) can not be can-
celled 1 minute after they have been started.
If the key switch is turned to position Din
such a programme, the programme running
is unlocked and can be cancelled.
See Programming Instructions.
Keys for the key switch
Key 1(2 supplied) for operating levels
Aand B.
Key 2for operating levels
A,B,C.
Key 3for operating levels
A,B,C,D.
Guide to the machine
10 M.-Nr. 06 006 850

Programme selector switch
Programme numbers 1 - 24 can be selected
directly.
Programme numbers 25 - 99 can be se-
lected using selector position 24 together
with the 4Plus button.
The name of the selected programme and
its corresponding number appear in the dis-
play. Programme positions 1 - 10 are filled
with standard programmes.
The subsequent programme positions vary
according to the version of the model, and
are set out in the Programme Survey. If the
programme selector switch is turned to an-
other position after the start of the
programme, the first line of the display
flashes. The programme does not however
change.
Standard programmes:
1Cottons 90°C
2Cottons 60°C
3Cottons 40°C
4Short programme
5Minimum iron
6Delicates / Synthetics
7Woollens
8Separate rinse and spin
9Separate spin
10 Separate drain
Block + button Twith display light
When the button is pressed the light above it
comes on. The corresponding programme
block (e.g. Pre-wash) is added to the
programme. Pressing on the button a sec-
ond time de-selects the function.
Starch hold button Uwith display light
Press this button if the washing is to be
starched. The light comes on.
Spin-stop button Vwith display light
Press this button if a final spin is not required
after the final rinse. The light comes on.
Start button X
Press on this to start the selected
programme.
End button 7
Pressing on this button halts a programme
(Stop mode). Pressing once again on the
button immediately terminates a programme.
A halted programme can be continued in the
relevant programme stage by pressing on
the Start button.
Guide to the machine
M.-Nr. 06 006 850 11

Cursor buttons 1 2
The cursor buttons are used to pass back-
wards or forwards into the input fields or into
the next display, (this appears as > < flash-
ing in the display). After the start of the
programme it is possible in Stop mode to
scroll block by block backwards or forward
in the programme. Pressing continuously on
the button scrolls quickly through the blocks.
Plus-/-Minus buttons 4 3
Once an input field has been selected it is
possible to make a modification. Pressing
continuously on the button scrolls quickly
through the blocks.
Delay start button W
If this button is pressed before the start of a
programme, the display indicates that a start
time should be selected. If the button is
pressed again the Delay start option is can-
celled.
If the button is pressed after the start of a
programme the current time of day and date
are shown.
Optical interface
Data transfer to and from the machine’s con-
trols and a PC can take place using the rele-
vant software. The optical interface on the
machine’s control panel provides the con-
nection point.
Guide to the machine
12 M.-Nr. 06 006 850

Pauses between programming steps must
not last longer than 25 seconds, otherwise
the display returns to the basic stage,
(such as On) and the changes are not
stored in memory
Setting the local language (if
necessary)
To set the local language the programming
mode must be accessed by pressing simul-
taneously on the Mains on switch Yand the
Start button X. Normally German and one
other language are available.
^Switch on the on-site mains switch.
^Turn the key switch to position "B" (Opera-
tion).
^Press the OFF button Zto switch off the
machine.
^Press the Start button Xand the ON but-
ton Yat the same time and hold pressed
in, until the Display shows the following:
SETTING LOCAL LANGUAGE
DEUTSCH >ENGLISH<
After selection press Start button.
^Select the required language with the Cur-
sor buttons 1 2 .
The display content being shown is imme-
diately converted into the language se-
lected .
^Confirm with the Start button X.
The complete display contents are con-
verted into the language selected.
Setting current time and date
^Switch the machine off with the Mains off
switch Z.
^Turn the key switch to position "B".
^Press the Delay start button Wand the ON
button Yat the same time, and hold
pressed in, until the Display shows the fol-
lowing:
SETTING TIME AND DATE
Time of day >14< : 30 hrs
Date 23. 03. 2000
After selection press Start button.
^Use the Cursor button 2to position the cur-
sor on the input field for hours and set the
hours with the Plus or Minus button 43.
^Use the Cursor button 2to position the
cursor on the input field for minutes and
set the minutes with the Plus or Minus but-
ton 4 3.
^Position the Cursor on Day and set the day
with the Plus or Minus button 4 3.
^Position the Cursor on Month and set the
month.
^Position the Cursor on Year and set the
year.
^Store in memory with the Start button X.
If the Delay start button Wis pressed dur-
ing a running programme the current time
of day and date are shown.
Operation
M.-Nr. 06 006 850 13

Before using for the first time
The first commissioning of the machine
should be carried out only by a Miele ser-
vice technician or an authorised Miele
Service Dealer.
It is essential that the machine is installed
and connected to power, water and drain-
age correctly.
Flushing out the machine
Any residual lubricants and water from test-
ing still in the machine should be flushed out
as follows:
^Open the on-site stopcock.
^Switch on the on-site mains switch.
^Turn the key switch to position "B" (Opera-
tion).
^Do not load any laundry in the machine.
^Add a little detergent to compartment j.
^Turn the programme selector switch to the
2COTTONS 60°C programme.
^Press the Start button X.
Preparing the wash load
^Empty all pockets
Foreign objects, (eg nails, coins, paper
clips etc) can cause damage to textiles
and components in the machine.
Sort the laundry
Most garments have a textile care label in
the collar or side seam. Sort the laundry by
care label symbols.
Only wash items in this machine which are
stated by the manufacturer to be machine
washable on the textile care label.
Dark textiles often contain excess dye, and
should be washed separately several times
before being included in a mixed load.
Delicate textiles should be washed sepa-
rately in a delicates programme.
Loading the drum
Unfold laundry and load loosely in the drum.
For best results make up mixed loads of
large and small items. This improves the
washing effect and distributes the load
better for spinning.
Overloading reduces the wash result and
causes more creasing.
Washing
14 M.-Nr. 06 006 850

^Shut the drum door
^Grasp the door in the open position and
slam it shut, (mind your fingers).
At first the door may shut with difficulty. This
eases in due course.
Make sure no items of washing are caught
when the door is closed, or they could be
damaged.
^Turn the key switch to position " B" (Opera-
tion).
^Press the Mains on switch Y.
^Select a programme (e.g. Programme 1
COTTONS).
The display shows the following (example):
PROGRAMME 1 COTTONS
>90° C< Main wash 1
Rinses 3 1200 RPM
^Use the Block + button Tto additionally
select the programme block "Pre-wash" if
required. The light above the button lights
up.
When the Block + button Thas been
pressed the following shows in the display:
PROGRAMME 1 COTTONS
>40° C< Pre-wash 1
90° C Main wash 1
Rinses 3 1200 RPM
^Add detergent for the main wash to com-
partment j- and if required detergent for
the pre-wash to compartment i, fabric
conditioner to compartment pand liquid
bleach to compartment y.
Washing
M.-Nr. 06 006 850 15
?
?

The following parameters can be changed
before the start of a programme if re-
quired:
The temperature in 1 °C steps from cold, 15
to max. 95 °C.
The spin speed in steps of 100 rpm from 0,
300 to max. 1200 rpm.
PROGRAMME 1 COTTONS
>40° C< Pre-wash 1
90° C Main wash 1
Rinses 3 1200 rpm
^Use the Cursor button 2to position the
cursor on the input field for the Pre-wash
temperature, and set the temperature re-
quired (here 40 °C) with the Plus or Minus
button 4 3 .
^Position the Cursor on the input field for
the Main wash temperature, and set the
temperature required with the Plus or Mi-
nus button 4 3 .
^Position the Cursor on the input field for
the Spin speed, and set the spin speed re-
quired with the Plus or Minus button 4 3 .
^Press the Start button X.
- The wash programme proceeds -.
The programme sequence is shown in the
display after the start of the programme.
PROGRAMME 1 COTTONS
40° C Pre-wash 20 °C
90° C Main wash
->
In the 2nd Display line, here Pre-wash, the
actual suds temperature is shown, and the
time line extending off to the right, under-
neath the following programme block is
shown, here Main wash.
PROGRAMME 1 COTTONS
90 °C Main wash 20 °C
Rinse 1
->
When the Pre-wash programme block has
finished, the Main wash programme block
appears in the 2nd line of the display, with
the actual suds temperature, and the time
line extending off to the right.
The following programme block is shown un-
derneath, here Rinse 1.
When an arrow appears at the right of the
last line ( -> ), this indicates that there is a
following display line.
Press the Cursor button 2, and further in-
formation on the programme appears in the
lower lines.
Programme end display
After water from the last heating phase has
drained away, or after the last "Cool Down"
the programme end time is shown in hours
and minutes.
PROGRAMME 1 COTTONS
Rinse 1
Rinse 2
Programme end 11 : 25 hrs ->
Washing
16 M.-Nr. 06 006 850
?

Programme end - to open the drum
door
At the end of the Programme, with a station-
ary drum and no more water in the machine
the following display is shown (for example):
PROGRAMME 1 COTTONS
PROGRAMME END
DOOR IS UNLOCKED
^Press the door button 5to open the door.
^Remove the laundry.
If the programme is interrupted when there is
water in the machine, or during the spin, the
following display messages might appear:
PROGRAMME 1 COTTONS
PROGRAMME END
DOOR IS LOCKED
THERE IS WATER IN THE MACHINE
or:
PROGRAMME 1 COTTONS
PROGRAMME END
DOOR IS LOCKED
DRUM NOT YET STATIONARY
The door is locked. Never try to force open
the door.
^Select the SEPARATE DRAIN or SEPARATE
SPIN programme and start it. At the end of
the programme open the door.
If this was the last wash load of the day, or
for a longer period:
^Leave the drum door open.
^Switch off the machine.
^Switch off the electricity mains supply (at
the wall switch).
^Turn off the stopcocks on site for water.
Washing
M.-Nr. 06 006 850 17

Load weight (dry laundry) max. 7.5 kg
Load weights for individual programmes
are quoted in the Programme Survey.
Adding detergent
Add detergent for the:
– Main wash to compartment j
– Pre-wash to compartment i
– Fabric conditioner to compartment p
–Liquid bleach to compartment y
Bleaching agents
Only use bleaching agents on textiles which
have the symbol yon the wash care label.
Liquid bleaching agents must only be dis-
pensed through designated dispenser com-
partment (4). The agent will then be dis-
pensed automatically during the 2nd rinse
(cold bleaching). Liquid bleaching agents
should only be used on coloured textiles
which have a wash care label stating that
they are colour fast and suitable for bleach-
ing.
For cold bleaching the 4th rinse must be
programmed into the machine (see the
Profitronic programming manual for fur-
ther details on how to do this).
Liquid detergent must not be filled higher
than the level marker, as otherwise it will get
through the siphon and into the detergent
dispenser drawer before it is needed.
Detergent dispensing
Avoid dispensing more than the required
amount as this can cause excessive foam-
ing.
–Only use low lather detergents.
–Dispense according to the detergent man-
ufacturer’s recommendations.
The amount to dispense will depend on:
–the amount of laundry
–the water hardness level in your area
–the type and amount of soiling
Water hardness levels
Hardness
range Water
quality Hardness
level in
mmol/l
German
hardness
level °d
I soft 0 – 1.3 0 - 7
II medium 1.3 – 2.5 7 - 14
III hard 2.5 – 3.8 14 - 21
IV very hard over 3.8 over 21
If you do not know the hardness level of the
water in your area you should contact your
local water authority for information.
Maximum load / Detergent
18 M.-Nr. 06 006 850

With Pre-wash
A Pre-wash can be selected when the load
is heavily soiled.
The Pre-wash programme block can be se-
lected before the start by pressing the Block
+ button T.The indicator light above the
button lights up.
Starch
Starching can be selected additionally in all
programmes by pressing the button U(ex-
cept "Separate spin" and "Separate drain").
The indicator light above the button lights
up.
PROGRAMME 1 COTTONS
Rinse 3
STARCH HOLD
Press the Starch and Starch hold button.
When the "Starch" point has been reached in
the programme sequence, "Starch hold"
flashes in the Display.
The programme is continued by pressing the
Starch hold button U, (the display light
goes out). Add starch prepared according to
manufacturer’s instructions into compart-
ment (I). The wash time is automatically ex-
tended by 4 minutes.
Without spin
Without spin can be selected additionally in
all programmes by pressing the spin-stop
button V(except "Separate spin"). The indi-
cator light above the button lights up.
PROGRAMME 2 COTTONS
Rinse 3
WITHOUT SPIN
Press the without spin or End button.
When the "Spin" programme point is
reached, "Spin stop" flashes in the Display.
Either press the Spin-stop button Vagain to
continue the programme with a spin, or
press the End button 7, for the programme
to finish with water in the machine.
When you are ready to remove the laundry
select the SEPARATE DRAIN programme
and press the Start button X. The door can
be opened once the water has been drained
away.
Rinsing with hot water
Rinsing with hot water is a benefit for ma-
chines connected to a hot water supply.
Standard programmes
1Cottons 95°C and
2Cottons 60°C
are programmed to rinse with hot water.
If a hot water supply is available it is an ad-
vantage to run the final rinse with hot water.
This reduces the residual moisture content of
the laundry after spinning and the laundry
retains heat.
If the laundry is then tumble dried or ironed
straight after the wash programme savings
will be made in the time it takes to process it
and in the amount of energy required.
Additional functions
M.-Nr. 06 006 850 19
?
?
?

Skipping programme stages
Stages in the programme in progress can be
skipped or blocks repeated.
Press the End button 7and the programme
is stopped.
PROGRAMME 2 COTTONS
Main wash
PROGRAMME STOP
Programme stop flashes in the Display.
Use the Cursor button 2to skip the
programme by blocks to the end.
Use the Cursor button 1to move the
programme back by blocks to the begin-
ning.
At the position required press the Start but-
ton Xto continue the programme again.
Programme interruption
To interrupt a programme press the End but-
ton 7(stop-mode).
Press the Start button Xto continue.
Programme cancellation
Should you wish to cancel a programme,
press the End button 7twice in succession.
If the programme was cancelled while there
was water in the machine, or during a spin,
the following shows in the display (example):
PROGRAMME 2 COTTONS
PROGRAMME END
DOOR IS LOCKED
WATER IS IN THE MACHINE
or:
PROGRAMME 2 COTTONS
PROGRAMME END
DOOR IS LOCKED
DRUM NOT YET STATIONARY
^Select the programme SEPARATE DRAIN
or SEPARATE SPIN and start it. On com-
pletion the door can be opened.
Additional functions
20 M.-Nr. 06 006 850
?
?
?
Other manuals for W 6071
2
Table of contents
Other Miele Washer manuals

Miele
Miele G 7836 CD User manual

Miele
Miele WWE 320 User manual

Miele
Miele WSI 863 User manual

Miele
Miele WWH860 WCS User manual

Miele
Miele PWM 508 Mop Star 80 User manual

Miele
Miele W 827 User manual

Miele
Miele W 989i wps User manual

Miele
Miele W 2659 WPM User manual

Miele
Miele G 7883 User manual

Miele
Miele WKG 120 WCS User manual