Minco TT269 User manual

MINCO
TT269
3-wire Temperature Transmitter
Installation and Operating Instructions
Description
Model TT269 is a 3-wire temperature transmitter for RTD (resistance temperature detector)
thermometers. The TemptranTM converts the RTD's signal into a 0 to 1 mA current. The
current changes according to the range marked on the Temptran: 0 mA at the lowest
temperature of the range, rising to 1 mA at the top of the range.
Installation
Locate the Temptran near the RTD, in an area where the ambient temperature stays between -
40 and 85 °C (-40 and 185 °F). Mount with #8 machine screws using the two mounting holes
provided in the Temptran case.
Connect the Temptran as shown below, observing the +/- polarity of the power supply
connections. Maximum DC supply voltage = 35 VDC. The maximum load resistance for the 0
to 1 mA output is 1000 Ω. The RTD connections for the Temptran in the wiring diagram below
must be connected as shown or the transmitter will not function properly.
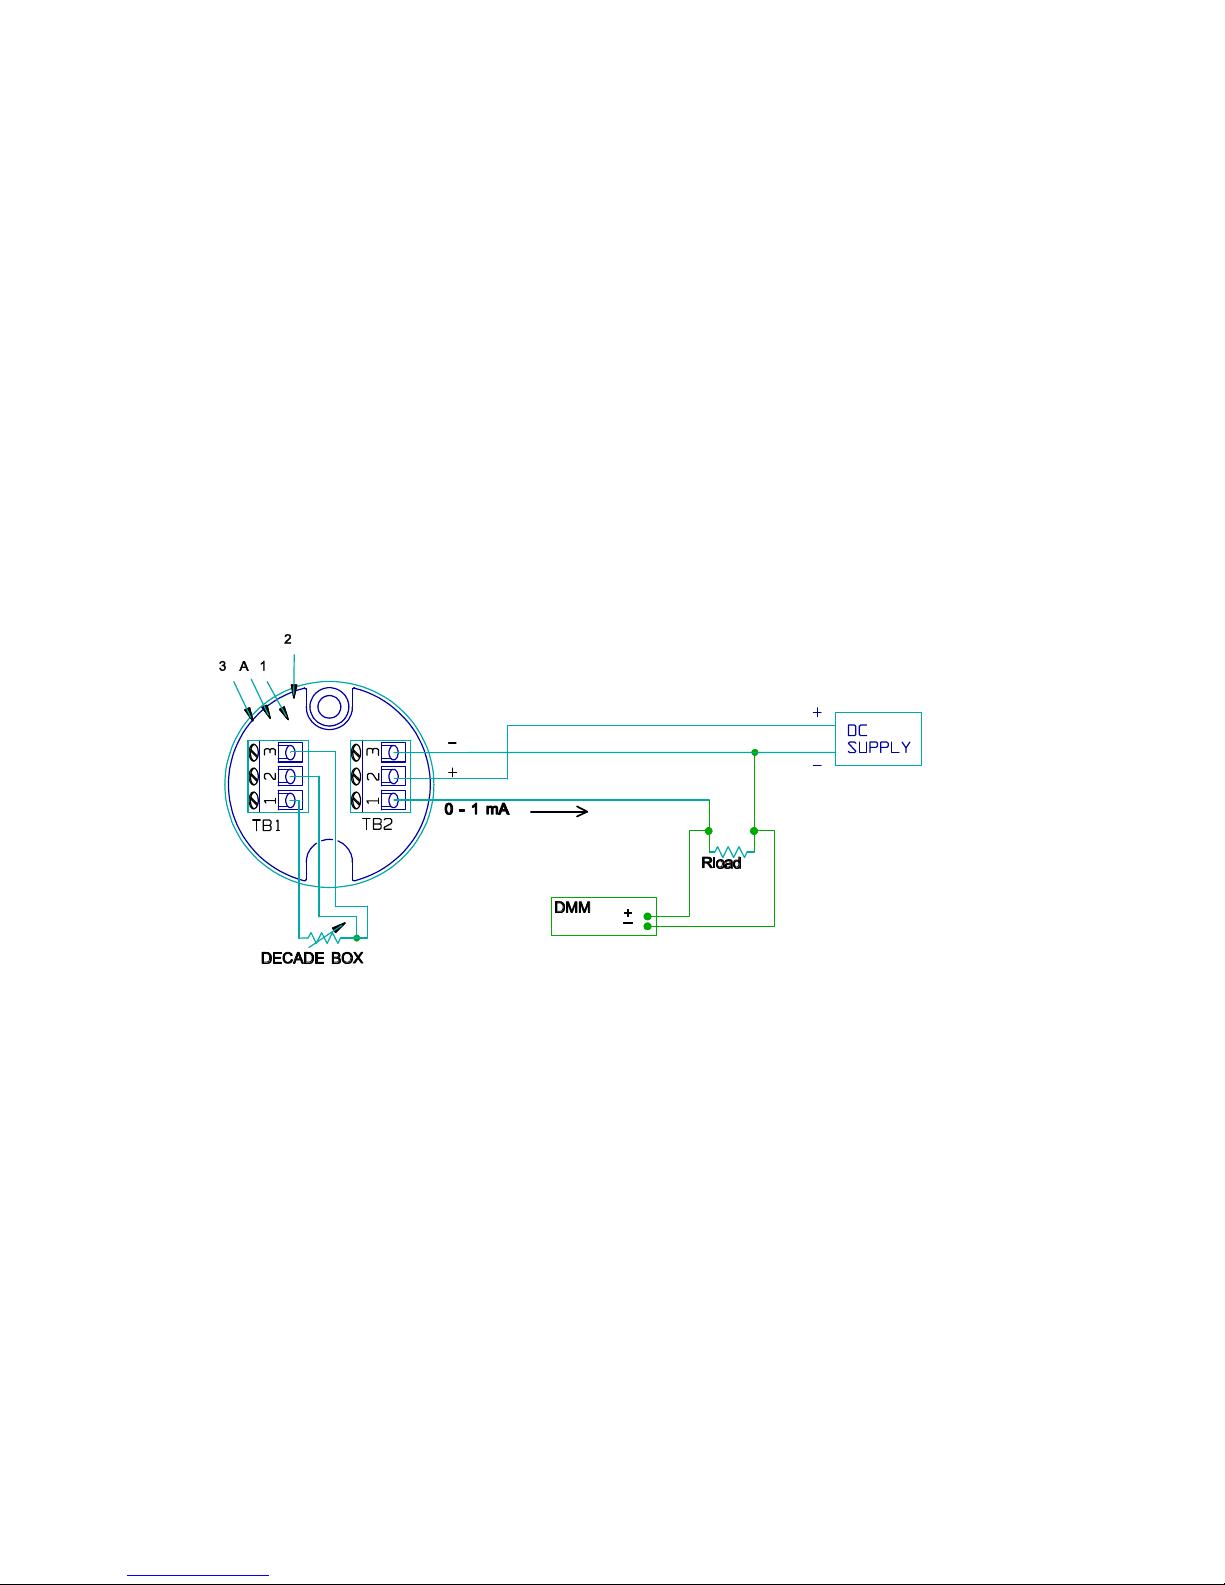
Wiring Diagram
PRODUCTS, INC.
7300 Commerce Lane, Minneapolis, MN 55432-3177 U.S.A.
Telephone: (763)571-3121 / FAX: (763)571-0927
2
Calibration
NOTE: Because the transmitter cannot output a negative current, the calibration of the zero
cannot be performed at 0 °C (0 mA). The zero calibration should be performed at 6 °C (.05 mA)
to ensure proper calibration of the transmitter. If the transmitter is calibrated at 0 °C, the output of
the transmitter may not be linear.
1. Select the desired temperature range by soldering the two designated pins together.
For 0 to 120 °C Solder jumper 1 to A
For 0 to 160 °C Solder jumper 2 to A
For 0 to 180 °C Solder jumper 3 to A
2. Connect a power supply of 24 VDC, a 1000Ωload resistor (decade box), and a digital
multimeter (4-½ digit minimum) as shown below. The load resistor should have an accuracy of
1000Ω+/- .1 Ω. If unsure of the decade box's accuracy, measure using the DMM. Other load
resistances can be used as long as the maximum of 1000Ωis not exceeded. The required
calibration voltage measured on the DMM is dependent on the value of Rload according to the
following formula: V(DMM) = Rload x Current (Ohm's Law)
3. Connect a resistance decade box with a resolution of at least .01 ohms to the input of the
transmitter. If unsure or concerned about the decade box's accuracy, measure the zero and span
resistance settings using a known-accurate ohmmeter and record decade box settings before
connecting decade box to the transmitter.
4. Set decade box resistance to simulate 6 °C (102.34 Ω).
5. Adjust ZERO potentiometer until the meter reads .05 volts (.05 volts x 1000 Ω= .05 mA).
6. Set decade box resistance to simulate the desired span temperature.
For 120 °C R = 146.061 Ω
For 160 °C R = 161.043 Ω
For 180 °C R = 168.478 Ω
7. Adjust SPAN potentiometer until the meter reads 1 volt (1 volt x 1000 Ω= 1 mA).
8. Repeat steps 4 - 7 until no further adjustment is necessary. The zero and span pots are non-
interacting so further adjustment should be minimal.

3
TT269 RTD Temperature Transmitter
Specifications
Input: 2- or 3-wire 100 ohm platinum RTD's.
Output: 0 to 1 mA DC over specified range.
Accuracy: +/- 0.1% of span when factory calibrated.
Linearity: +/- 0.1% of span.
Adjustments: 3 field selectable temperatures ranges,
Ambient Temperature:
Operating: -40 to 85 °C ( -40 to 185 °F ).
Storage: -55 to 100 °C ( -67 to 212 °F ).
Ambient Temperature Effects:
+/- 0.01% of span/°C.
(+/- 0.006% of span/°F).
Supply Voltage:10 to 35 volts DC.
Reverse polarity protected.
Voltage effect: +/- 0.001% of span per volt.
Lead Wire Compensation (3-wire RTD): +/- 0.05% of
span per ohm, up to 25 ohms in each leg.
Maximum Load Resistance:The maximum allowable
resistance is 1000 Ω.
Connections: Terminal blocks accept wires from AWG
22 to AWG 14.
Physical: Epoxy potted for moisture resistance.
Weight: 2.0 oz. (56.8 grams).
How to Order:
TT269 PD 1 MQ . . . Sample part number
Temperature Range:Choose a code corresponding to the desired temperature range.
RX = Uncalibrated
MQ = 0 to 120 °C
TZ = 0 to 160 °C
UA = 0 to 180 °C
Output: 1 = 0 to 1 mA DC.
RTD Element Code:
PD = 100 Ωplatinum at 0 °C ( .00385 TCR )
Model Number:TT269, RTD Temptran.
Dimensions: All dimensions are in inches ( millimeters )
When quality and performance are as important as price, call...
PRODUCTS, INC.
7300 Commerce Lane/Minneapolis, Minnesota 55432-3177 U.S.A.
Telephone:(763)571-3121 / FAX:(763)571-0927
Table of contents
Other Minco Transmitter manuals


