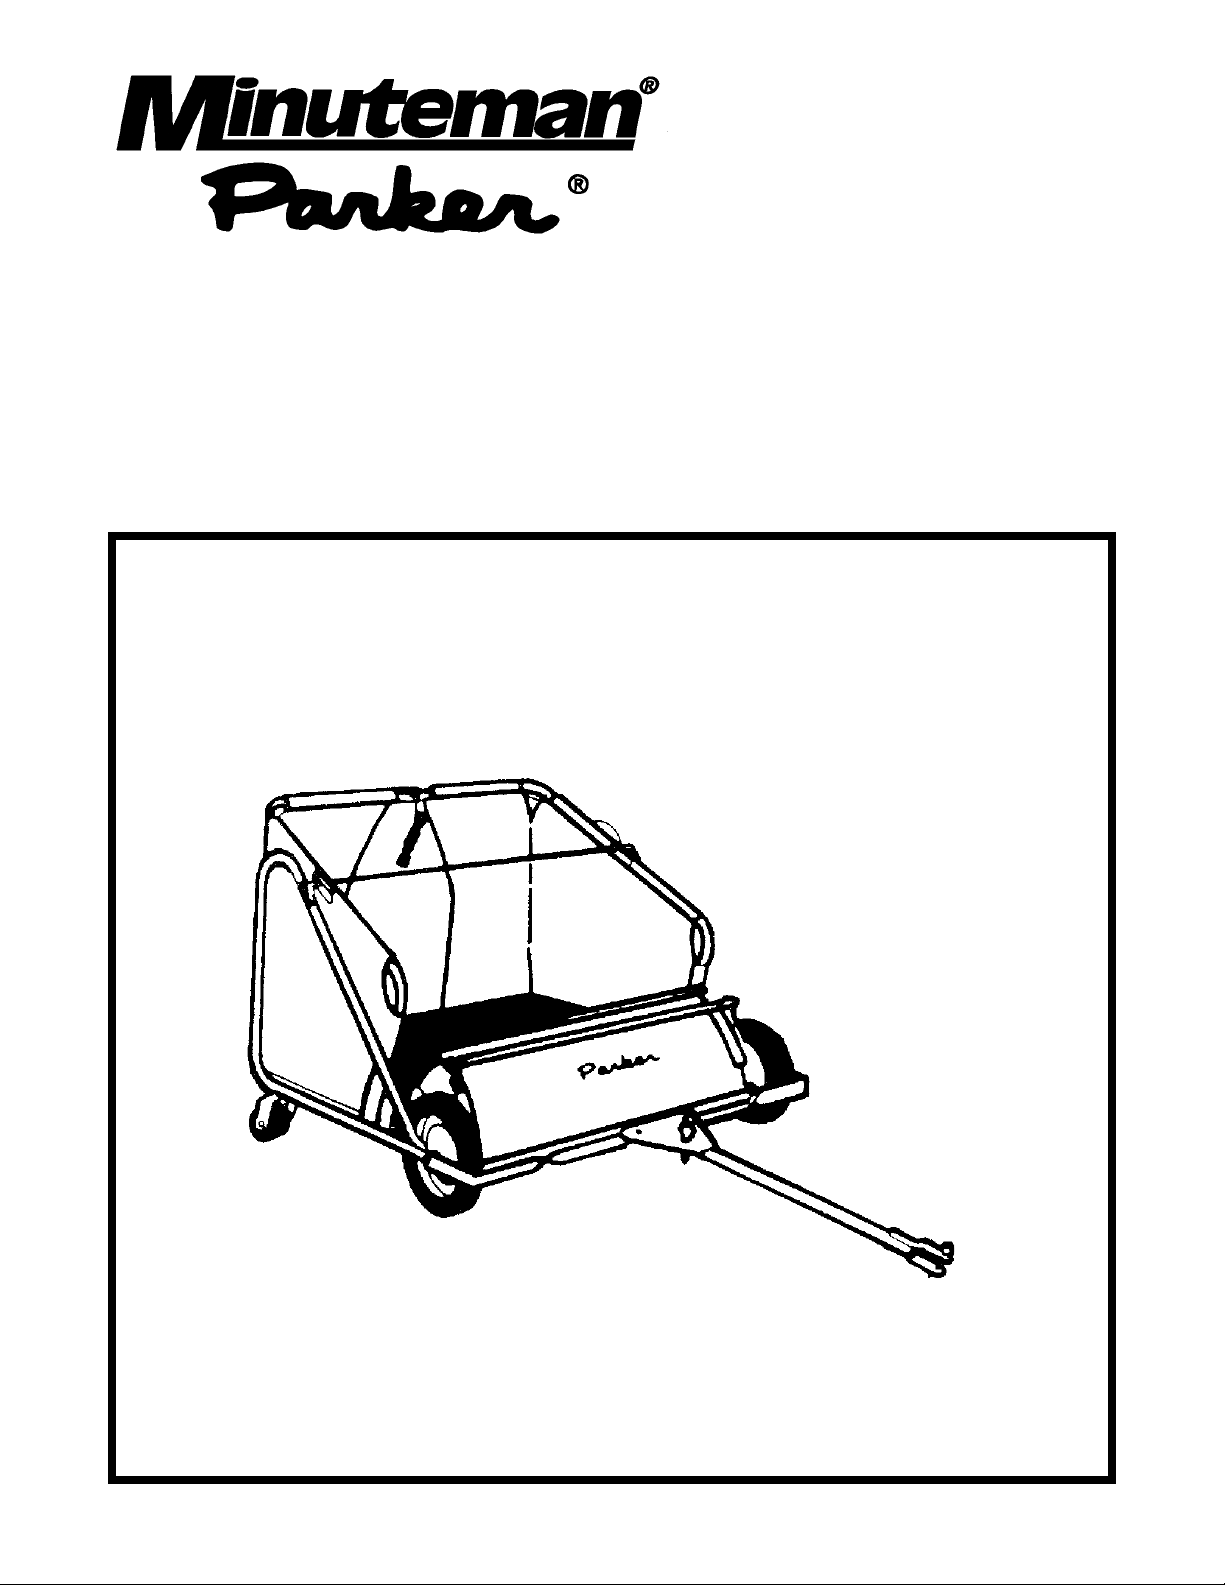
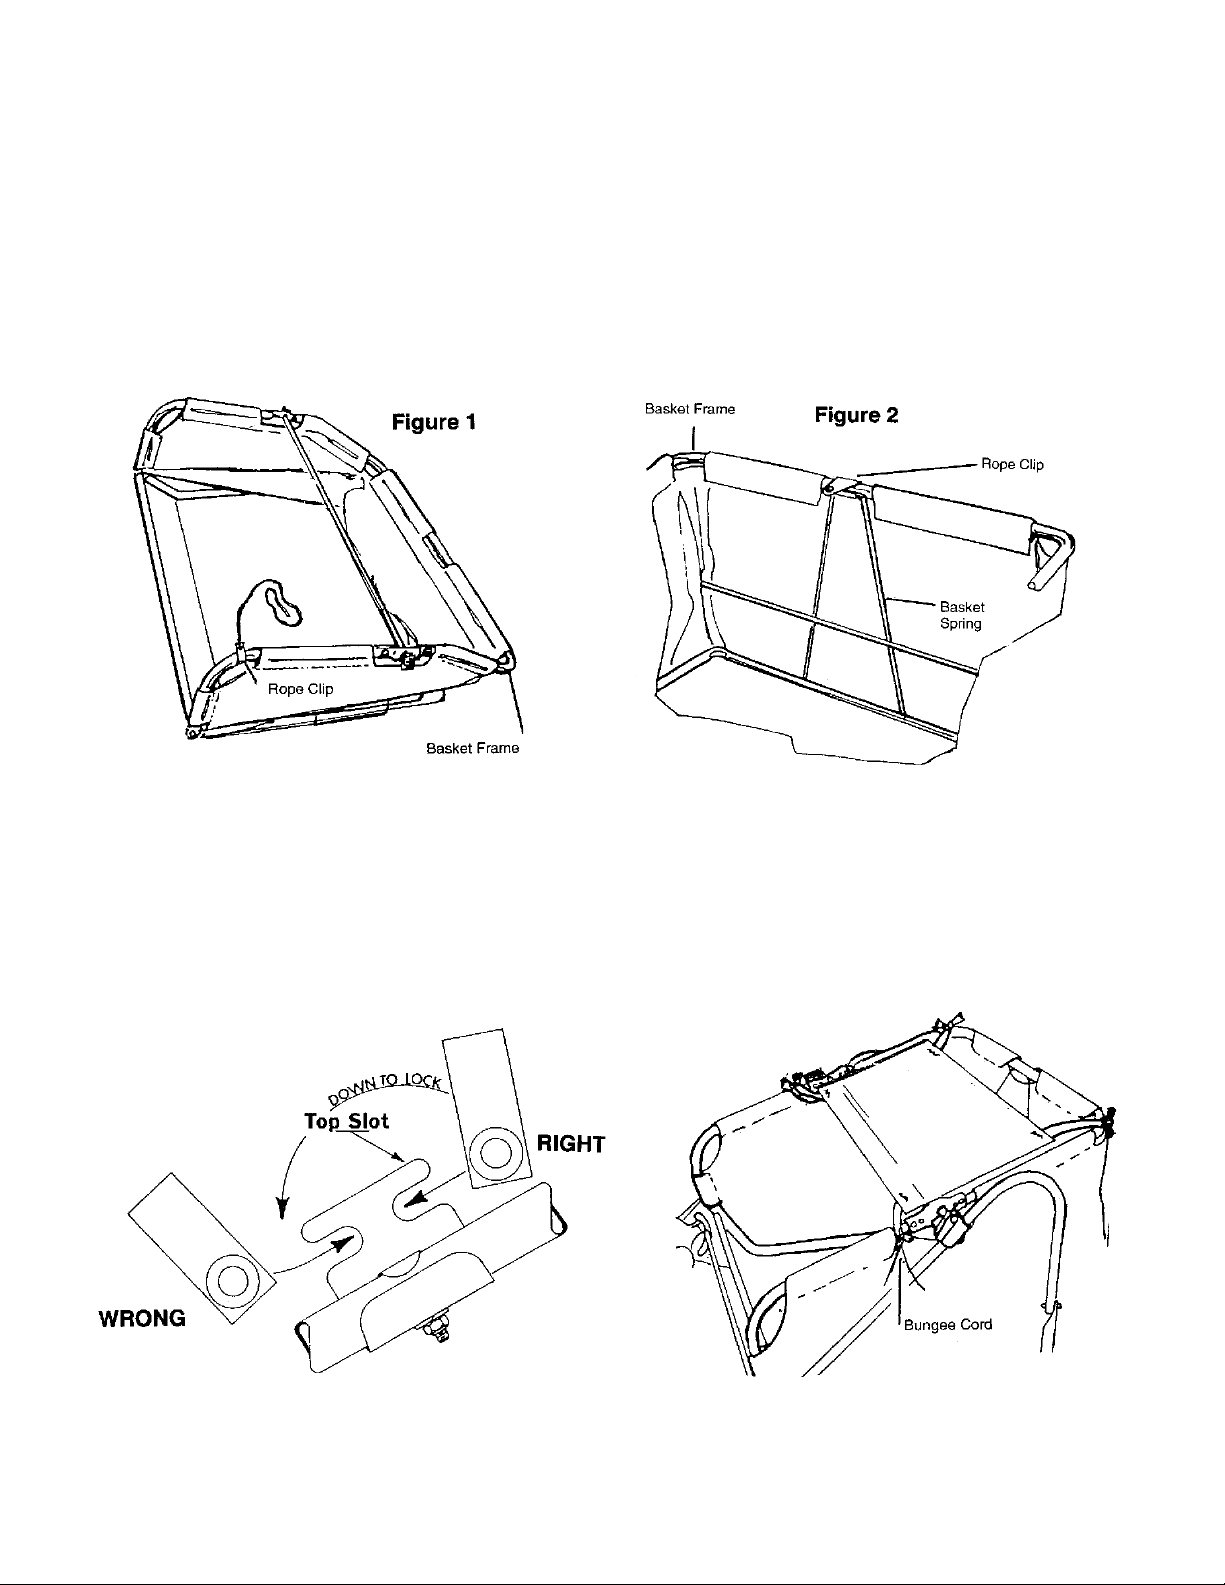
Minuteman Parker TE9036 Guide

Trailette
Model: TE9036
OPERATION SERVICE PARTS CARE

TABLE OF CONTENTS
CAUTION 1
ASSEMBLY 2-3
OPERATING INSTRUCTIONS 4-7
PINION REINSTALLATION 8
(MANUAL SWEEPER)
SWEEPER UNIT ASSEMBLY 9
FRAME ASSEMBLY 10
BASKET ASSEMBLY 11
WARRANTY BACK COVER

1
CAUTION
•This sweeper is not designed to haul people, animals or equipment.
Severe damage to the sweeper and possible injury to people or animals
may result if this warning is ignored.
•The basket has been designed for holding a large capacity of dry grass
clippings. When grass clippings are wet or freshly cut, caution must be
exercised on the amount picked up. If the basket is overloaded it will
make dumping difficult.
•When basket is empty caution must be taken on rough (uneven) terrain.
Travel slowly to prevent possible upsetting of the sweeper (tipping for-
ward) when moving over gravel driveways, rutted turf, cirb areas, bits of
broken tree limbs, twigs, mole runs or other interference. Traveling too
fast over rough areas may cause the sweeper wheels to be blocked
causing the sweeper to upset.
DANGER
•Do not hold dumping rope in hand while towing. Secure loose end to
tractor behind operator. Do not allow rope to contact brushes, as it may
become tangled in the reel shaft causing damage to the unit and pos-
sible injury to the operator.

2
FRAME ASSEMBLY
Your sweeper was inspected and packaged at
the factory and will require a minimum of time to
complete the assembly. Remove the two cast-
ers from the hitch yoke. You will need these bolts
and nuts to assemble the hitch plate on the yoke.
Remove the hitch plate from the right rear caster
plate. You will need the tube clamp, nut and bolt
that was used (to secure the hitch plate during
shipment) for installing the right caster assembly.
Install the casters using the parts sequence as
shown above.
Install the hitch plate as shown using the nuts and
bolts that were originally used to hold the casters
in place during shipment.
The tongue for the hitch plate is taped to the pivot
rod of the basket assembly. The hitch pins are in
each end of the tongue. Remove the hitch pins
and install on the hitch plate shown in preceding
picture.
Lift the upper frame and assemble to the lower
frame on both sides with the contour bolt,
lockwasher and nut, by matching the holes near
the end of each piece of tubing as shown bellow.
Assemble the upper frame to the brush adjusting
bracket on both sides with the contour bolt,
lockwasher and nut.
ASSEMBLY INSTRUCTIONS
CAUTION: FAILURE TO OBSERVE SAFETY INSTRUCTIONS MAY RESULT IN
SERIOUS INJURY

3
BASKET ASSEMBLY
1. Figure 1 below shows the basket assembly as removed from the carton.
2. Remove the rope clip from original shipping position and place in the center of the upper basket
frame, as shown.
3. Raise the upper basket frame until the sides are taut (figure 2).
4. Place the basket under the rope clip. Push the rope clip down until the basket spring snaps into
the notch on the under side of the basket frame.
5. Turn the rope clip until vertical (pointing down). The basket is now ready to be placed into the
frame assembly.
BASKET FRAME ASSEMBLY
1. Lower the basket into the frame assembly.
2. Hold the pivot latch on the basket in the up position while placing the pivot rod into the top slot of
the pivot bracket. The pivot latch should straddle the pivot bracket as shown.
3. Move the pivot latch forward over the pivot bracket to lock into position.
4. Basket is now secured.
NOTE: The wind apron furnished with the unit is used to keep the sweepings in the basket on windy
days or when sweeping at a high speed. The wind apron stretched across the basket and tied on
the basket frame at the top corners as shown above it with supplied bungee cords.

4
OPERATING INSTRUCTIONS
TOWING THE SWEEPER
Trailing type sweeper should not be towed while mowing. The mowing speed is generally too slow
for the sweeper to pick up grass, leaves or debris and throw them into the back of the basket.
OPERATING SPEED
Moving the sweeper forward rotates the brushes, propelling the leaves, clippings, etc. into
the basket.
SWEEPING TIPS
•Use sweeper in early Spring to give your lawn a beautiful cleaning.
•Use your sweeper before mowing to pick up stones, sticks and other debris. This
couldsave damage to the mower and prevent personal injury. Sweeping will also
stand turf on end for a clean, even mowing.
•Use sweeper after mowing to remove turf clippings and give the lawn a blanket-like effect.
•Sweep often in Fall as leaves are dropping. Don’t wait until all the leaves are all off trees.
•For best sweeping results keep lawn cut short. When sweeping turf clippings, do not overload
basket. Turf clippings are heavy and overloading will put unnecessary stress on the basket.
DUMPING BASKET
The load is dumped from the basket by pulling the basket forward with the rope, causing the basket
to pivot into a semi-inverted position. When the load is discharged, allow the rope and basket to
return to their normal position.
BASKET CARE
The basket should always be emptied immediately after each time the sweeper is used, especially
when the grass or leaves are wet or damp. Keeping the basket dry will lengthen its service life.

5
HOOD CARE
Wet grass clippings have a tendency to dry and adhere to the inner face of the hood; it is important
to keep this face clean for a good sweeping action.
NOTE: If this unit is to be used on hard surfaces such as blacktop driveways or concrete walks, it is
advisable to order caster roller 81-79-A to replace the supplied 76-58-A. Warranty on the 76-58-A
caster roller is limited to lawn use only.
HOOD ADJUSTMENT
•The hood can be adjusted to change the deflection of the material being handled, by loosening
the wing nuts in the lower corners of the hood and sliding the hood up or down.
•If sweeping at a high rate of speed the hood should be raised to deflect the material to the back of
the basket. If set too low the material could be thrown over the back of the basket.
•If sweeping at a low speed the hood should be set until the material goes to the back of
the basket.
LUBRICATION
Frequent lubrication of the sweeper will lengthen the service life of the machine.
Place a few drops of oil in the oil holes located in the hub of each wheel. Also, place a few drops of
oil in the swivel bearings and axle of the casters every time the machine is used.
Before using the sweeper for the first time each season, remove both wheels and put a good grade
of grease on the pinion gear and the gear of the wheel.

6
BRUSH CARE
BRUSH REMOVAL
Turn the sweeper upside down on the ground. Notice the stud has a collar against the brush bracket
holding it against the reel shaft.
Remove the hex nuts and clamps from the stud on the end having the collar. Remove the brushes
from the brush bracket slots (4 places). Now remove the hex nuts from the opposite ends of the
studs. Do not remove the speed nuts or the studs will fall away from the reel shaft (4 places).
BRUSH REPLACMENT
Turn the reel shaft to position in the brush strips in the slots on the brush bracket that are held on the
stud and shaft by the speed nuts. Position the clamps and hex nuts, center the brush strips between
the side plates, then tighten the hex nuts.
Turn the reel so that the brushes are on the bottom side. Now place the brush strips on the brush
brackets on the top side. Position with clamps and hex nuts. Center the brush strips between the
side plates, then tighten the hex nuts.
BRUSH HEIGHT ADJUSTMENT
•To raise brushes to extreme height, loosen the large wing nut, pull the sweeping unit forward
as far as slots in brush will permit. To lower brushes to lowest position push sweeping unit
backwards as far as slots in brush will permit. Secure wing nut when desired brush height
is obtained.
•For grass clippings or leaves, adjust brushes to the highest position. After trial run on lawn,
should the setting be too high, lower slightly and try again until correct setting is found. Brush
life may be prolonged by adjusting so contact with ground is light. The lighter the contact, the
longer the wear and ease in pulling.
•The most efficient operating height is when brushes just contact the top of the grass or make
light contact with paved surfaces. When brushes are set too low, the sweeper will pull hard.
This will lead to excessive brush wear and require premature brush replacement. Always
have brushes in the raised position when transporting sweeper.
NOTE: If the brushes do not rotate and the wheels slide when the sweeper is being pulled,
the brushes are set too low.

7
STORAGE
Clean the basket to remove clippings and debris
Wipe dirt and grease from the chassis. Repaint scratched areas and coat metal parts with oil to
prevent rust.
Check sweeper parts for wear. Replace parts as necessary.
Remove the basket assembly from the sweeper, release the basket spring and fold as shown.
Remove the bolts, washer and nuts holding the upper and lower frames together and fold as shown.
Store sweeper in a dry area out of direct sunlight.
The illustration shows the head assembly flat against the wall with the tongue tied to an anchor screw
or a nail in the wall. Tie a cord through the upper basket frame near the rope clip and hang it flat
against the wall.

8
If for some reason you have found it necessary to
remove the pinions, you should carefully follow
these instructions. All parts must be clean before
assembling.
1. To assist you, we suggest using a piece of
wood doweling or plastic material 5/8”
diameter, 2” long as shown. Each pinion is
different as indicated by the part number and
must be returned to the correct side of
the shaft.
2. Insert the wooden dowel into the pinion.
3. Identify your pinion part number and insert the
metal rollers. Place the plastic tubing in the
cavity between the metal roller and the wall of
the cavity. You may have to force the plastic
tubing into this space but it is resilient and is
suppose to fit tightly.
4. Pinion with part number 74-79 LB is to be
replaced on the left side of the shaft. Part
number 74-78 RB is for the right side. Line
up the pinion (leaving the dowel in place) with
the shaft as shown.
5. Push the pinion onto the shaft which will force
the dowel to back out of the pinion. This will
leave the rollers and plastic tubes in their
proper position.
6. Apply a coating of grease on the outside of
the wheel gear teeth. Do not grease inside
pinions, this will cause pawl springs to be
ineffective.
NOTE: The right and left sides are determined
from the operators position.
HOW TO RE-INSTALL PINIONS IN MANUAL
OR TRAILING SWEEPERS

9
Item Part No. Qty. Description
1 68-58PTD 1 Hood Parker, Burgundy
2 351-516-20 2 Wing Nut
3 76-37-A 4 Pawl Spring
4 49-11-A 2 Hood Clamp TE SU
5 713027 4 BLT-H/H 5/16-18 x 1, #5
7 560C516-10 6 Square Head Set Screw
8 76-339-LF 1 Side Plate LH
9 80-01-B 2 Cover Pinion
10 946-816-16 2 Fibre Washer
11 58-05-A 4 Washer Special
12 58-14PTD 2 Wheel Hub
13 75-88-C 2 Tire Only
13A SA-609-C 1 Tire Assy. Includes 12 & 13
14 711509 4 WSR-Flat ½ ST PL
16 68-44-A 2 Spacer Axle
17 326-816 2 Hex Nut
17A 368-816 2 Half Nut Nyloc ½-20
18 58-06-A 2 Sleeve
19 506-416-10 4 SCR-FH ¼-20 x 5/8
21 74-79-LB 1 Pinion Left
Item Part No. Qty. Description
21A SA-1580-B 1 Pinion Kit Incl: #3,21,22,42
22 74-78-RB 1 Pinion Right
23 50-33-A 2 WSR-Special
24 53-35-A 2 Axle Bolt
25 68-60-A 2 Bearing
27 74-13-C 8 Bracket
28 74-16PLT 4 Stud
29 69-04-A 8 Clamp Brush Strip
30 711425 8 Nut-Flanged Wizz 1/4-20
31 68-33PLT 1 Tie Rod Zinc Plated
32 76-338-RF 1 Side Plate RH
33 75-89-A 4 Speed Nut
34 68-34PLT 1 Tie Rod
35 1200-17-B 8 Brush Assembly TE
35A BK-11 1 Brush Kit, TE & SU
36 79-103-B 1 Reel Shaft
37 74-166PLT 2 Dust Cover Zinc Plated
39 76-341PLT 1 Adj. Tube Zinc Plated
42 74-80-A 4 Pawl
PARTS LIST
SWEEPER UNIT ASSEMBLY

10
Item Part No. Qty. Description
1 76-283-LC 1 Frame Upper LH TE
2 69-416-20 12 BLT Cont. HD ¼-20 x 1.25
3 711316 16 Nut-Hex ¼-20 ST PL
4 76-342-C 2 Plate Ad. TE
5 711508 2 WSR-Flat .44 x 1.00 x .08
7 76-240-A 2 Bracket Pivot
8 711544 16 WSR-Helical ¼
10 76-284-RC 1 Frame Upper RH TE
14 76-280-RC 1 Lower Support Frame RH
15 76-136-B 2 Caster Fork
15A SA-578-B 2 Caster Assembly
16 711373 6 Nut-Nloc ¼-20
17 76-58-A 2 Roller
18 76-202-A 2 Axle 3/8 D x 2.06
19 76-81-B 2 Plate Caster
20 76-272-B 1 Frame Support TE
21 76-255-A 2 Basket Stop
22 711505 2 WSR-Flat 1/4
Item Part No. Qty. Description
23 76-271-A 2 Spring
24 75-89-A 2 Speed Nut
25 76-281-LC 1 Lower Support Left Hand
27 713004 4 BLT-HH ¼-20 x 1 ¼ #5
29 59-77-A 2 Clamp
30 713031 2 BLT-HH 5/16-18 x 2 #5
31 711374 4 Nut-Nyloc 5/16-18
32 69-416-28 4 BLT Cont. Hd ¼-20 x .1.75
35 711506 3 WSR-Flat 5/16 ST PL
36 69-111-A 1 Bolt Adj. TE
37 73-71-A 1 Wing Nut
39 55-160-A 1 Spacer Adj. BLT
40 75-32-B 1 Tongue Weldment
41 81-14-A 2 Clinch Pin
44 75-40-B 1 Hitch Plate Weldment
45 75-134-B 1 Yoke
46 78-130-A 2 Bearing
47 82-138-B-1 2 Special Washer
FRAME ASSEMBLY
PARTS LIST

11
BASKET ASSEMBLY
Item Part No. Qty. Description
1 76-326-B 1 Frame Basket Rear
2 76-252-A 1 Rope Clip
2A SA-969-A 1 Rope and Clip Assembly
3 60-09-A 1 Rope Cut Assembly HS TE
4 83-33-B 1 Basket Spring
5 SA-1211-C 1 Basket Replacement
6 69-416-24 2 BLT Cont. HD. 1/4-20 x 1.5
7 711554 4 Internal Lockwasher 1/4
8 711316 4 Nut-Hex 1/4-20 ST PL
9 73-414-A 2 Spacer Back Cover
10 76-242-A 2 Latch Pivot
Item Part No. Qty. Description
11 76-254-A 2 End Cap
12 79-112-B 4 Pivot Bearing
13 83-82-C 1 Frame Basket Lower
14 76-285-B 2 Frame Basket Front TE
15 711545 2 WSR-Helical 5/16
16 713027 2 BLT-HH 5/16-18 x 1 #5
18 83-160-B 1 Clamp
20 66-96-A 5 U-Type Speed Nut
21 526-1024-8 5 Truss Head Screw
22 76-275-A 1 Rod Pivot
23 SA-1709 1 Wind Apron TE
PARTS LIST

LIMITED WARRANTY
The Parker Sweeper Company warrants to the original purchaser/user that this product is free from defects in workmanship
and materials under normal use and service for a period of two years from date of purchase. In addition, Parker Sweeper
Company will, at its option, honor labor warranty claims for the first 12 months from date of sale, provided such claims are
submitted through and approved by factory authorized repair stations. Parker Sweeper Company will, at its option, repair or
replace without charge, except for transportation costs, parts that fail under normal use and service when operated and
maintained in accordance with the applicable operation and instruction manuals.
This warranty does not apply to normal wear, or to items whose life is dependent on their use and care, such as belts, cords,
switches, hoses, rubber parts, electrical motor components or adjustments. Parts not manufactured by Parker Sweeper
Company such as engines, batteries, battery chargers, hydraulic pumps, and tires are covered by and subject to the warranties
and/or guarantees of their manufacturers. Please contact Parker Sweeper Company for procedures in warranty claims against
these manufacturers.
Special warning to purchaser — Use of replacement filters and/or prefilters not manufactured by Parker Sweeper Company
or its designated licensees, will void all warranties expressed or implied.
A potential health hazard exists without exact original equipment replacement.
All warranteed items become the sole property of Parker Sweeper Company or its original manufacturer, whichever the case
may be.
Parker Sweeper Company disclaims any implied warranty, including the warranty of merchantability and the warranty of fitness
for a particular purpose. Parker Sweeper Company assumes no responsibility for any special, incidental or consequential
damages.
This limited warranty is applicable only in the U.S.A. and Canada, and is extended only to the original user/purchaser of this
product. Customers outside the U.S.A. and Canada should contact their local distributor for export warranty policies. Parker
Sweeper Company is not responsible for costs or repairs performed by persons other than those specifically authorized by
Parker Sweeper Company. This warranty does not apply to damage from transportation, alterations by unauthorized persons,
misuse or abuse of the equipment, use of non-compatible chemicals, or damage to property, or loss of income due to
malfunctions of the product.
If a difficulty develops with this machine, you should contact the dealer from whom it was purchased.
This warranty gives you specific legal rights, and you may have other rights which vary from state to state. Some states do not
allow the exclusion or limitation of special, incidental or consequential damages, or limitations on how long an implied warranty
lasts, so the above exclusions and limitations may not apply to you.
A Minuteman International Company
World Headquarters Minuteman Canada, Inc.
Minuteman International, Inc. 2210 Drew Road
111 South Rohlwing Road Mississauga, Ontario
Addison, Illinois 60101 L5S 1B1
(630) 627-6900 (905) 673-3222
FAX (630) 627-1130 FAX (905) 673-5161
988385
Printed in U.S.A.
Table of contents
Other Minuteman Blower manuals

Minuteman
Minuteman PowerBoss 36 Guide

Minuteman
Minuteman Kleen Sweep 25W User manual

Minuteman
Minuteman C44000-01 Guide

Minuteman
Minuteman HT9605H Guide

Minuteman
Minuteman AD100 User manual

Minuteman
Minuteman C43000-002H User manual

Minuteman
Minuteman Kleen Sweep 35 User manual

Minuteman
Minuteman Kleen Sweep 35W HM35BQP User manual

Minuteman
Minuteman Kleen Sweep 40 User manual

Minuteman
Minuteman Kleen Sweep 27 C89000-00 Guide