Mio N548 User manual

Driving Recorder
Mio
N548

1
Revision: R00
(11/2019)
Disclaimer
The screenshots in this manual may differ between different operating systems and
software versions. You are recommended to download the latest User Manual of
your product from Mio website (www.mio.com).
Specications and documents are subject to change without notice. MiTAC does not
warrant this document is error-free. MiTAC assumes no liability for damage incurred
directly or indirectly from errors, omissions or discrepancies between the device and
the documents.
Notes
Not all models are available in all regions.
Depending upon the specic model purchased, the colour and look of your device
and accessories may not exactly match the graphics shown in this document.

2
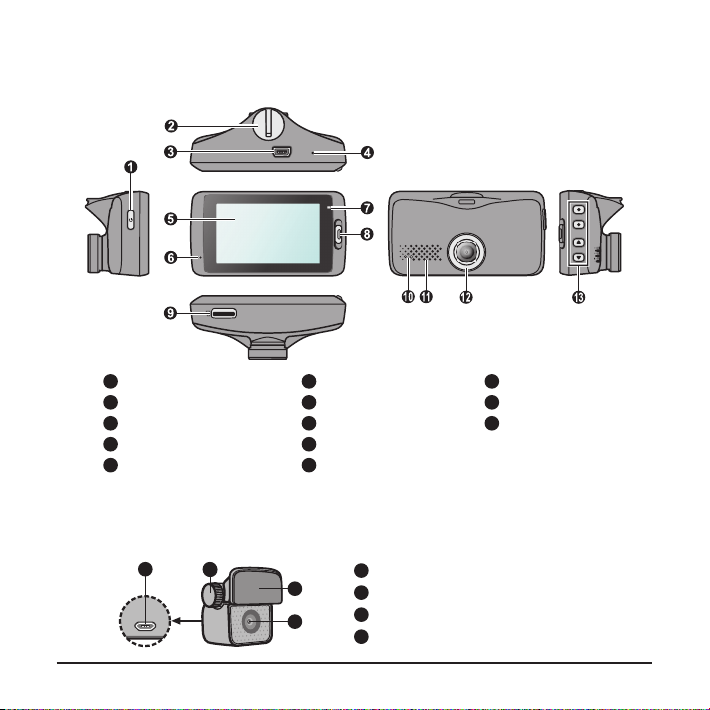
Getting to know your dash cam............................................................................ 4
Rear camera.................................................................................................... 4
Power button ................................................................................................... 5
Event button .................................................................................................... 5
LED indicators................................................................................................. 5
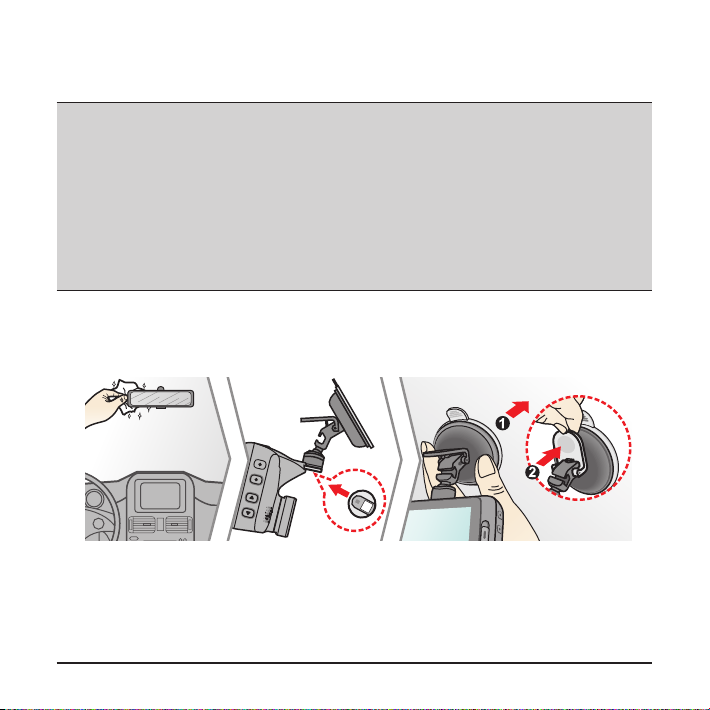
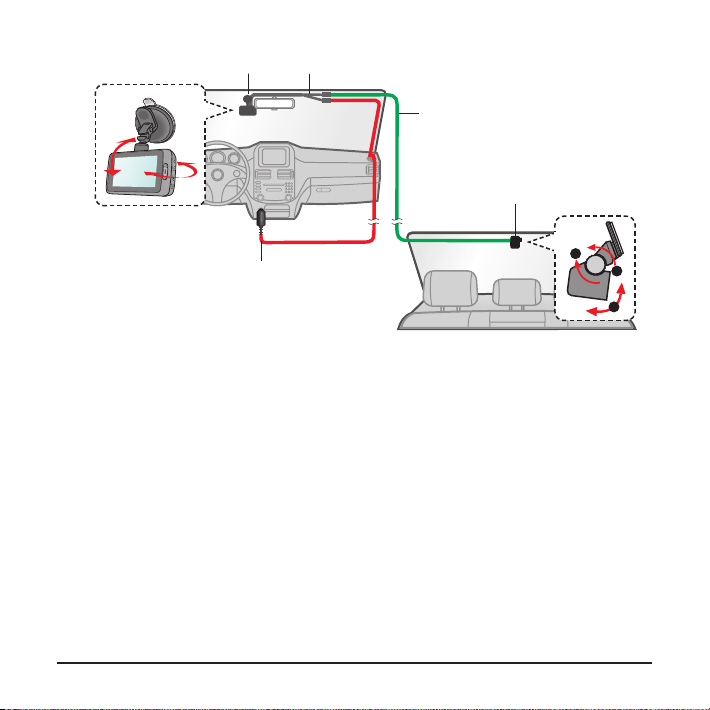
Using your dash cam in a vehicle......................................................................... 6
Inserting a memory card....................................................................................... 9
Formatting a card ............................................................................................ 9
Connecting to your computer ............................................................................. 10
Operating basics .................................................................................................11
Turning the dash cam on................................................................................11
Restarting the dash cam ...........................................................................11
System icons..................................................................................................11
Function keys ................................................................................................ 12
Switching screens .................................................................................... 12
Setting the date and time .............................................................................. 13
Setting up a WIFI connection ........................................................................ 13
Recording in driving mode............................................................................. 14
Continuous recording ............................................................................... 14
Event recording ........................................................................................ 15
Recording in Parking mode........................................................................... 15
Camera mode................................................................................................ 16
Playback mode.............................................................................................. 16
Safety camera alerts .......................................................................................... 18
Adding a safety camera................................................................................. 19
Updating safety camera data ........................................................................ 19
Table of Contents

3
System settings .................................................................................................. 20
MiVue Manager .................................................................................................. 25
Installing MiVue Manager.............................................................................. 25
Playing the recording les ............................................................................. 25
For more information .......................................................................................... 28
Precautions and notices................................................................................ 28
Caring for your device ................................................................................... 28
Safety precautions......................................................................................... 29
About charging ......................................................................................... 29
About the charger..................................................................................... 29
About the battery...................................................................................... 30
About WIFI ............................................................................................... 30
About GPS .................................................................................................... 30
Federal Communication Commission Interference Statement...................... 31
FCC Caution ............................................................................................ 31
FCC RF Radiation Exposure Statement .................................................. 32
WEEE............................................................................................................ 32

4
Getting to know your dash cam
1Power button
2 Device mount socket
3Mini-USB connector
4Shutdown button
5 LCD screen
6Microphone
7System indicator
8Event button
9Memory card slot
10
Parking indicator
11
Speaker
12
Camera lens
13
Function keys
Rear camera
Depending on your model, your device may support a rear camera (may be sold
separately).
1Mounting pad
2Camera lens
3Fixing bolt
4Micro-USB connector
16
1
2
34

5
Power button
lPress and hold for 2 seconds to manually turn
the dash cam on and off.
lWhen the dash cam is turned on, press to switch
the LCD screen on and off.
Event button
Press to manually start an event recording.
LED indicators
lSystem indicator
Glows in green when the dash cam is charging. During charging, the LED
ashes in green and amber alternately while the recording is in progress.
lParking indicator
Flashes in red when Parking recording is in progress.

6
Using your dash cam in a vehicle
Note:
lTo ensure the highest quality recordings, you are advised to place the dash cam near the rear
view mirror.
lSelect an appropriate location for mounting the device in a vehicle. Never place the device where
the driver’s eld of vision is blocked.
l If the car’s windscreen is tinted with a reective coating, it may be athermic and impact the GPS
reception. In this instance, please mount your device where there is a “clear area.”
l The system will automatically calibrate the G sensor of the device during start-up. To avoid G
sensor malfunction, always turn the device on AFTER you mount it in the vehicle properly.
Make sure that your car is parked on level ground. Follow the instructions to mount
your dash cam in a vehicle securely.
1. Mount the dash cam.

7
2. Mount the rear camera (optional).
Note:
l Before sticking the mounting pad, you are recommended to clean the windscreen with rubbing
alcohol.
lIf the adhesion of the adhesive tape does not perform well, replace the tape with a new one.
3. Adjust the lens angle.
When adjusting the angle of mounting, make sure that the camera’s view is
parallel with the level ground and the ground/sky ratio is close to 6/4.
4. Connect the cables.
Route the cables through the top ceiling and the A-pillar so that it does not
interfere with driving. Make sure that the cable installation does not interfere with
the vehicle's airbags or other safety features.
If you only use the dash cam (without connecting the rear camera) in your
vehicle, simply connect the car charger to the dash cam and then plug it to the
cigarette lighter.
The installation illustrations are for your reference only. The placement of the
devices and cables may vary depending on the vehicle model. If you encounter
any problems during installation, contact a skilled installer (such as the service
personnel of the vehicle) for assistance.

8
MiVue dash cam Y cable
Rear camera cable
Car charger
MiVue rear camera
1
2
3

9
Inserting a memory card
You must insert a memory card (not supplied) before you can start recording. The
dash cam supports the Class 10 memory cards with 8 GB – 128 GB capacity.
Hold the card by the edges and gently insert it into the slot as shown in the
illustration. To remove a card, gently push the top edge of the card inwards to
release it and pull it out of the slot.
Note:
lDO NOT apply pressure to the centre of the memory card.
l MiTAC does not guarantee the product’s compatibility with memory cards from all manufacturers.
l Before you start recording, please format the memory card to avoid malfunction caused by les
not created by the dash cam.
l You are recommended to turn the device off before removing the memory card.
Formatting a card
To format a memory card (all data will be erased), press and select Format.

10
Connecting to your computer
You can connect the dash cam to your computer to access data on the memory
card. Follow the instruction below to connect the dash cam to the computer via the
USB cable (not supplied).

11
Operating basics
Turning the dash cam on
Complete the installation according to the instructions in the “Using your dash cam
in a vehicle” section. Once the vehicle engine is started, the dash cam automatically
turns on.
Restarting the dash cam
Occasionally, you may need to perform a hardware reset when the dash cam stops
responding or if it appears to be “frozen” or unresponsive. To restart the dash cam,
press and hold the Power button until the system is shut down; press the Power
button again to turn the dash cam on.
If the system does not shut down by keeping
the Power button pressed, you can force it to
shut down by inserting a small rod (such as
a straightened paperclip) into the Shutdown
button on the top of the device.
System icons
Various system icons on the status bar at the top of the screen provide the status
information of your device. The icons displayed will vary depending on your device
model and state.
1Recording indicator
2WIFI status
3Time display
4Microphone status
5GPS signal
6Battery status
7Your current speed
1 32 5 64
7

12
Function keys
The device provides four function keys to control the corresponding icons displayed
on the LCD screen. The keys' functions may vary on different screens.
Takes a photo
Enters Parking mode
Adds a custom safety (speed) camera
Opens the Menu screen
(Recording screen)
Moves to the next option
Acts as the ENTER button
Moves to the previous option
Acts as the BACK button
(Menu screen)
Switching screens
Once you connect the rear camera and start recording, the screen displays the
PIP (picture-in-picture) mode. You can switch the front and rear camera images by
pressing .

13
Setting the date and time
To make sure that the date and time of your recordings are correct, check the
settings before you begin recording.
1. Press to access the Settings Menu.
2. Select System > Date/Time.
3. Select Use GPS time or Manual:
lWhen you select Use GPS time, press / to select the time zone
of your location. The system will set date and time according to the GPS
location.
lWhen you select Manual, the system will display the date and time setting
screen. Use / to adjust the value of the selected eld; press
and repeat the step until all elds have been changed.
4. When done, press .
Setting up a WIFI connection
The WIFI function allows you to connect the dash cam to your smartphone. The
WIFI function is disabled by default. You can manually enable WIFI by selecting
> WIFI > On. Once enabled, the WIFI setting screen displays the SSID and
password of the dash cam.
Follow the steps below to build the wireless connection between the dash cam and
your smartphone:
1. Enable the wireless function of the smartphone.
2. The smartphone will automatically scan for available wireless devices. Tap the
wireless setting to display the detected devices.
3. From the list, select the dash cam's SSID (MiVue-xxxx) and enter the password
(xxxxxxxxxx). When done, tap Connect.

14
The next time you use your smartphone to connect to the dash cam, you will not
be prompted to enter the password again unless you reset your phone to the
factory default settings.
Note: The instructions about operating the smartphone are for reference only. The actual setting
options and methods may vary depending on your phone type/model.
4. You can check the WIFI connection status by the WIFI icon on the dash cam.
The dash cam is connected to the smartphone and paired with the MiVue
app.
The dash cam is not connected to the smartphone.
The dash cam is connected to the smartphone but not paired with the MiVue
app yet.
5. To transfer les from the dash cam to your smartphone, you will need to install
the MiVue app onto your smartphone. Download and install the MiVue app by
searching for "MiVue" in Apple App Store or in Google Play Store.
6. By starting the MiVue app on your smartphone, the dash cam will be ready to
transfer video and photo les by simply pressing the Event button.
Recording in driving mode
Continuous recording
By default, the system will automatically begin with continuous recording in a few
seconds after start-up. The recording may be divided into several video clips;
recording will not stop between video clips.
When continuous recording is in progress, you can manually stop recording by
pressing . Press to return to the recording screen; the system will start
continuous recording automatically.
The continuous recordings can be found in the “Video” category for le playback.

15
Event recording
By default, if an event happens such as a sudden impact, high speed driving, an
aggressive turn or an accidental crash during continuous recording, the G sensor will
prompt the dash cam to start recording the event.
Note: You can change the sensitivity level of the G sensor by selecting > Video Recording >
G-Sensor Sensitivity.
If you want to manually start an event recording while continuous recording is in
progress, press the Event button on the device.
The event recordings can be found in the “Event” category for le playback.
Recording in Parking mode
Your dash cam supports the parking recording function. Depending on how long
the car is parked, you may need an additional power source (for example, an
uninterruptible power cable like Mio Smart Box which is sold separately) to record
the video during Parking mode.
The Parking mode function is disabled by default. You can enable the function by
selecting > Parking Mode > Detection > On.
Before enabling Parking mode, please check the memory storage allocation of your
device. Select > System > Storage Allocation to set a proper allocation for
parking recording. Changing the allocation will erase the memory card, so save any
videos or photos to your computer rst.
When the Parking mode detection is enabled, the system will enter Parking mode
when you:
lDisconnect the device's power (for example, when the vehicle engine is stopped
or the power cable is disconnected) or when the car stops moving for about 5
minutes.

16
Note: The feature is triggered by the G sensor of the device. You can change the conguration
by selecting > Parking Mode > Auto Entry.
lPress to manually start Parking mode while continuous recording is in
progress.
To stop Parking mode and resume continuous recording, press . If movements
are detected and recorded during Parking mode, you will be asked to playback the
video when you stop Parking mode.
The parking recordings can be found in the “Parking” category for le playback.
Camera mode
The dash cam allows you to take a photo.
lIf the recording is in progress, press to take a photo. This function is not
available when the rear camera is connected.
lPress > Camera > .
The photos can be found in the “Photo” category for le playback.
Playback mode
To select a video or photo for playback:
1. Press > File Playback.
2. Select the desired type: Video, Event, Parking and Photo.
3. Press / to select the desired le from the list and then press to
start playback.
4. During playback, you can:
lWhile playing videos, press / to play the previous/next video; while

17
viewing photos, press / to display the previous/next photo.
lPress to return to the list.
lPress to display the pop-up menu to select:
lPlay/Pause: Starts or pauses the playback.
lPlay rear video: The "D" icon displayed on the thumbnail on the playlist
indicates that the video comes with a corresponding rear video. While
playing the front video, you can use this option to switch to the rear video.
lMove to Event: Moves the le to the “Event” category.
lTransfer video/Transfer photo: Uploads the selected video/photo to your
smartphone.
lDelete: Deletes the le.
Note: If you move or delete a front video, its corresponding rear video will be processed
synchronously.

18
Safety camera alerts
Caution: For legal reasons, the safety camera function is not available in all countries.
You can receive alerts to warn you about the locations of safety (speed) cameras
which will enable you to monitor your speed through these areas.
When a safety camera appears and is positioned in the detectable direction, you will
receive alerts. The screen will display the visual alert and you will also receive audio
warnings.
When the alert sound setting is set to Beep:
lWhen your car approaches a safety camera, you will receive a normal beep alert.
lWhen your car approaches a safety camera at a speed over the set threshold,
you will receive a persistent beep alert until your car speed drops lower than the
appropriate speed limit.
lWhen your car passes through a safety camera, you will be notied by a different
beep alert.
You can change the settings about how you want to receive the safety camera alerts.
See the “System settings” section for information.

19
Adding a safety camera
Note: You can add a custom safety camera only when a GPS x is established.
Your dash cam allows you to customise the safety camera database. You can add
up to 100 custom safety cameras in your dash cam.
Follow the steps to congure a custom safety camera:
1. To add a custom safety camera in the current location, press on the
recording screen.
2. The next time when you pass by the location, you will receive alerts by the dash
cam.
3. To view the information of the user-added safety camera, select >
SafetyCam > Custom SafetyCam and then select the safety camera that you
want to check.
4. Press to remove the custom safety camera from the dash cam.
Updating safety camera data
MiTAC does not warrant that all types and locations of safety camera data are
available as cameras may be removed, relocated or new cameras installed.
Occasionally, MiTAC may offer you updates of safety camera data. Visit the MiTAC
website for available downloads and follow the instructions to complete update.
Table of contents
Other Mio Dashcam manuals

Mio
Mio MiVue 5 series User manual

Mio
Mio MiVue M760D User manual

Mio
Mio MiVue 388 User manual

Mio
Mio MiVue M760D User manual

Mio
Mio MiVue 730 Series User manual

Mio
Mio MiVue 338 User manual

Mio
Mio MiVue J60 Series User manual

Mio
Mio MiVue C380D Series User manual

Mio
Mio MiVue C312 User manual

Mio
Mio MiVue M760D User manual

Mio
Mio MiVue 388 User manual

Mio
Mio MiVue M350 User manual

Mio
Mio MiVue M760D User manual

Mio
Mio MiVue 5 series User manual

Mio
Mio MiVue C310 User manual

Mio
Mio MiVue C312 User manual

Mio
Mio MiVue C300 User manual

Mio
Mio mivue drive 60 series User manual

Mio
Mio MiVue 82 Series User manual

Mio
Mio MiVue 795 Series User manual