manuals.online logo
Brands
  1. Home
  2. •
  3. Brands
  4. •
  5. Mirabelle
  6. •
  7. Plumbing Product
  8. •
  9. Mirabelle MIRPTFS1000CP User manual

Mirabelle MIRPTFS1000CP User manual

TUB FILLER FAUCET
Model MIRPTFS1000CP, MIRPTFS1000BN,
MIRPTFS1000PN, MIRPTFS1000ORB
GRIFO PARA BAÑERA
Modelos MIRPTFS1000CP, MIRPTFS1000BN,
MIRPTFS1000PN, MIRPTFS1000ORB
ROBINET DÉVERSEUR DE BAIGNOIRE
Modèles MIRPTFS1000CP, MIRPTFS1000BN,
MIRPTFS1000PN, MIRPTFS1000ORB
1
English Español
Français
CAUTION-TIPS FOR REMOVAL
OF OLD FAUCET:
PRECAUCIÓN-CONSEJOS PARA
CAMBIAR LA LLAVE
MEZCLADORA:
ATTENTION-SUGGESTIONS
POUR ENLEVER L'ANCIEN
ROBIENT:
Always turn off water supply
before removing existing faucet
or replacing any part of the
faucet. Open the faucet handle
to relieve water pressure and
ensure that water is completely
shut off.
Siempre corte el suministro de
agua antes de retirar el grifo actual
o remplazar cualquier pieza del
mismo. Abra la llave del grifo para
liberar la presión de agua y
asegurar que ya no corre agua.
Toujours couper l'alimentation en
eau avant d'enlever ou de
démonter le robinet. Ouvrir le
robinet pour libérer la pression
d'eau et pour s'assurer que
l'alimentation en eau a bien été
coupée.
CARE INSTRUCTIONS: INSTRUCCIONES DE CUIDADO:
DIRECTIVES D'ENTRETINE:
To preserve the finish of your
faucet, apply non-abrasive wax.
Any cleaners should be rinsed
off immediately. Do not use
abrasive cleaners on the faucet.
Para conservar el acabado que cubre
las partes metálicas de su llave
mezcladora, aplique cera que no sea
abrasive, como una cera para autos.
Si usa algún tipo de limpiador,
deberá enjuagarlo inmediatamente.
Los abrasivos suaves son aceptables
en acabados platinum y LifeShine.
Pour préserver le fini des pièces
métalliques du robinet, appliquer
une cire non abrasive comme une
cire à votiure. Rincer
immédiatement le robinet aprés
l'avoir nettoyé avec un agent
nettoyant. Les finis platinum et
LifeShine peuvent être nettoyés à
l'aide de produits abrasifs doux.
You may need/Usted puede necesitar/
Aticles dont vous pouvez avoir besion
Goggles
Anteojos Protectores
Lunettes de sécurité
Wrench
Llave
Clé ajustable
12/13/16 REV.C www.mirabelleproducts.com
Pencil
Lápiz
Crayon
Electric drill
Taladro eléctrico
Perceuse électrique
Phillips Head Screwdrivers
Destornillador Phillips
Tournevis cruciforme
212/13/16 REV.C
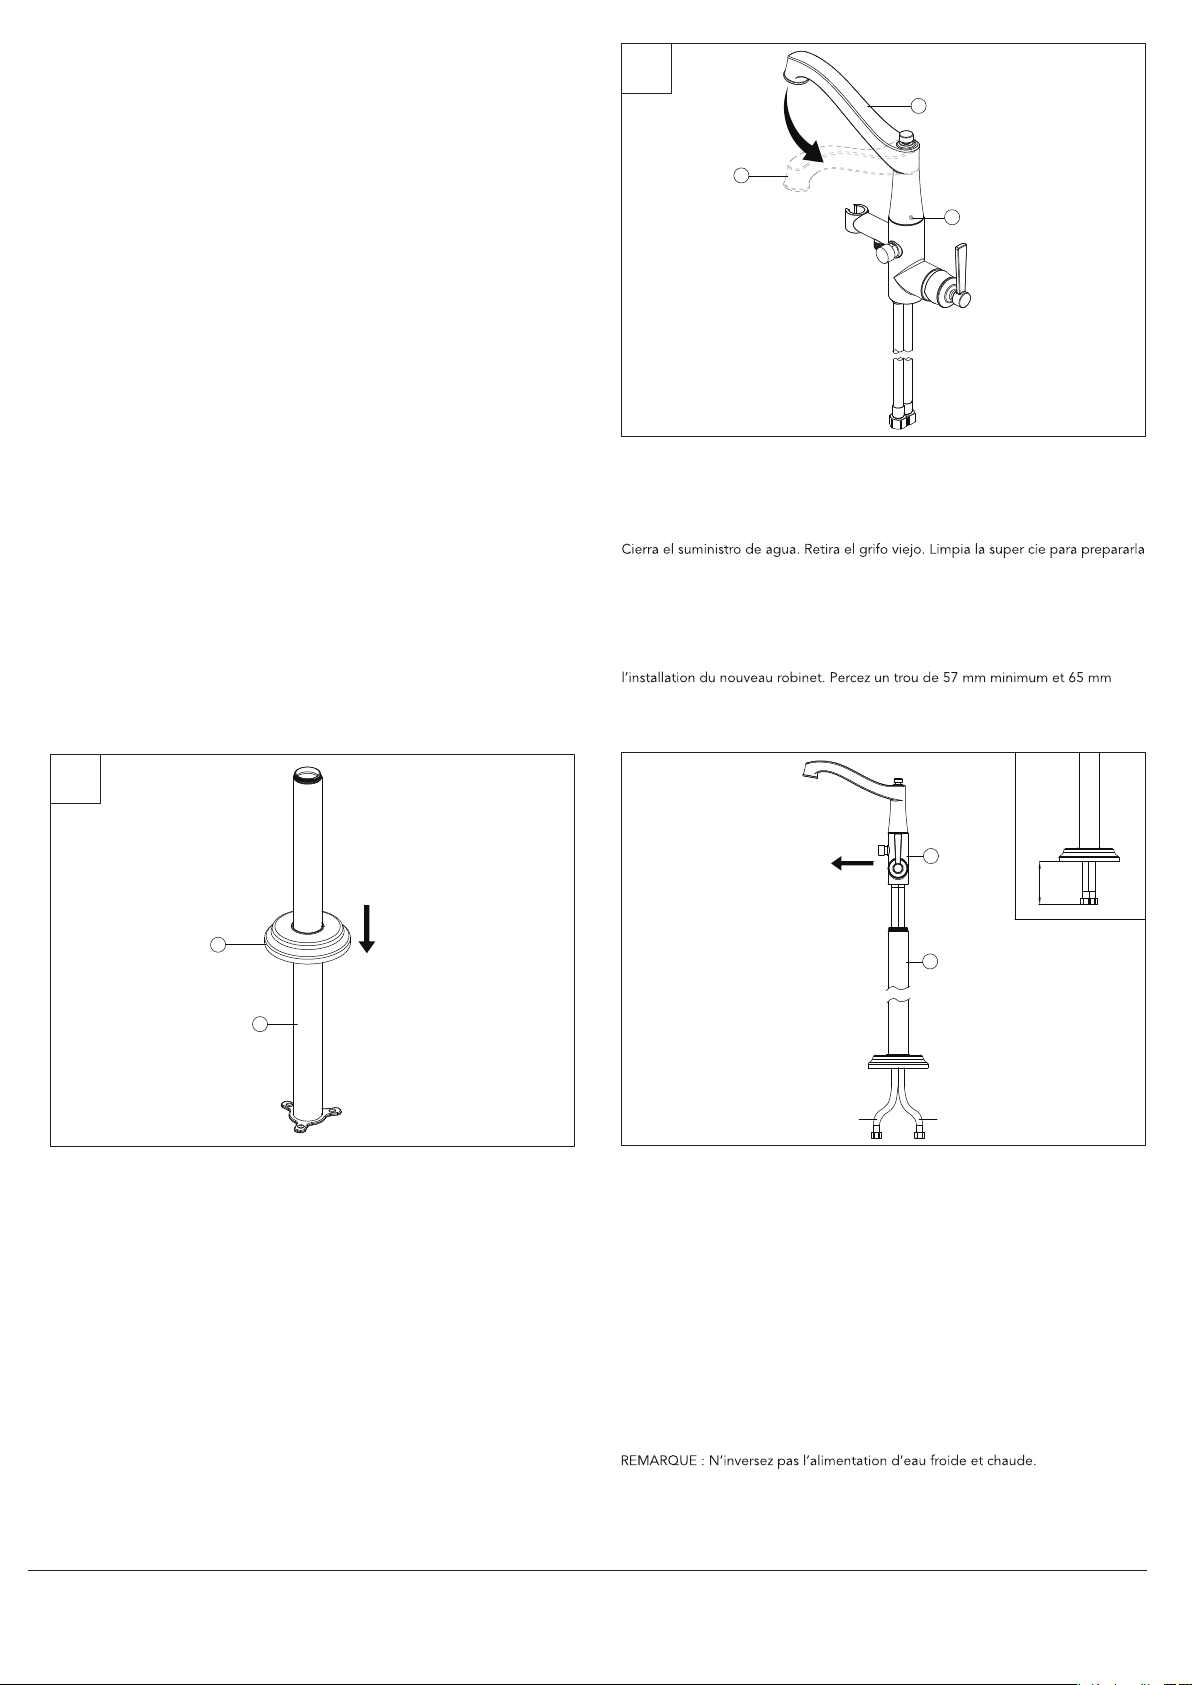
Shut off the water supply. Remove the old faucet. Clean the surface in preparation
for the new faucet. Drill a hole min 57mm diameter-max 65mm diameter in the
floor. Loosen the set screw (1) pre-assembled to the spout (2), rotate the spout (2)
about 90° to make the spout (2) towards the front, then tighten the screw (1).
para el grifo nuevo. Taladra un orificio en el suelo con un diámetro de 57 mm como
mínimo y 65 mm como máximo. Afloja el tornillo de fijación (1) pre-instalado en
el caño (2), rota el caño (2) alrededor de 90° para situarlo hacia el frente y luego
aprieta el tornillo (1).
Fermez l’alimentation en eau. Retirez l’ancien robinet. Nettoyez la surface avant
maximum de diamètre dans le sol. Desserrez la vis de pression (1) pré-assemblée
sur le bec (2), tournez le bec (2) d’environ 90° pour orienter le bec (2) vers l’avant, puis
serrez la vis (1).
1
Place the escutcheon (1) over the standpipe (2) and then push it to the base.
Coloca la placa protectora (1) sobre el caño vertical (2) y empújala hasta la base.
Placez la rosace (1) par-dessus le tuyau autoportant (2), puis poussez-la dans la
base.
2
Screw the standpipe (1) onto the mixer (2) by hand. Turn in a clockwise direction
until it is tight.
NOTE: Do not to reverse the cold and hot supply.
3
1
2
www.mirabelleproducts.com
2
2
1
1
2
Front
Parte frontal
Devant
Cold inlet supply line
Línea de suministro
de agua fría
Conduite d’arrivée
d’eau froide
Hot inlet supply line
Línea de suministro
de agua caliente
Conduite d’arrivée
d’eau chaude
[152.6mm]
6"
Important: After installing the standpipe (1),the inlet supply lines exposed 6 in.
Please be sure to take note of supply line length before installation and ensure
ample space is available.
IMPORTANT NOTE BEFORE INSTALLING:
The following instructions are designed for floors with wood joist supports. Different
types of sub-flooring, such as a concrete slab, will require:
1. A cavity made in the floor at the point of installation
2. An on-site fabricated mounting bridge over the cavity to allow for proper
mounting of the faucet base
It is critical that the cavity and mounting bridge allow access to the supply connections
as well as space for any excess length of the hot and cold inlet hoses.
NOTA IMPORTANTE ANTES DE INSTALAR:
Las siguientes instrucciones están concebidas para pisos con soportes de vigas de
madera. Diferentes tipos de contrapiso, como de placa de concreto, necesitarán:
1. Una cavidad en el piso justo en el lugar de instalación
2. Un puente de montaje sobre la cavidad, hecho a pie de obra, para permitir la
instalación adecuada de la base del grifo
Resulta esencial que la cavidad y el puente de montaje permitan el acceso a las
conexiones de suministro y den espacio para cualquier exceso en el largo de las
mangueras de entrada de agua fría y caliente.
REMARQUE IMPORTANTE AVANT L’INSTALLATION:
Les instructions suivantes concernent les planchers avec supports de solives en bois.
Des types différents de sous-plancher, tels que les dalles de béton requièrent :
1. Une cavité dans le plancher au point d’installation
2. Un pont de montage fabriqué sur place par-dessus la cavité pour permettre
une installation correcte de la base du robinet
Il est essentiel que la cavité et le pont de montage permettent l’accès aux raccords
d’alimentation et offrent un espace pour toute longueur supplémentaire de tuyaux
d’arrivée d’eau chaude et froide.
Enrosca con la mano el caño vertical (1) en la mezcladora (2). Hazlo girándolo en el
sentido de las manecillas del reloj hasta que esté ajustado.
NOTA: No inviertas el suministro de agua fría y caliente.
Vissez le tuyau autoportant (1) sur le mitigeur (2) à la main. Tournez dans le sens des
aiguilles d’une montre jusqu’à ce qu’il soit serré.
Importante: Luego de instalar el caño vertical (1), las líneas de entrada del suministro
sobresalen 15.2 cm Asegúrate de medir el largo de la línea de suministro antes de
instalar y garantizar la disponibilidad de suficiente espacio.
Important : Après avoir installé la colonne montante (1), les conduites d’arrivée d’eau
sont exposées sur 15,24 cm (6 po).Veillez à noter la longueur de la conduite
d’alimentation avant l’installation et d’assurer que vous disposez largement de
l’espace nécessaire.
***Remote thermostatic valve may be needed; verify local code requirements.
***Un robinet à télécommande thermostatique peut s’avérer nécessaire; vérifiez
les exigences des codes locaux.
***Puede que se necesite una válvula termostática de control remoto; verifica
los requerimientos de código locales.
312/13/16 REV.C
Connect one end of the shower hose (1) to the mixer (2) and the other end to the
shower head (3). Ensure the washer (4) is into each end for seal.
Conecta un extremo de la manguera de la ducha (1) a la mezcladora (2) y el otro
extremo al cabezal de la ducha (3). Asegúrate de que haya una arandela (4) en
cada extremo para un buen sellado.
Raccordez une extrémité du tuyau de douche (1) au mitigeur (2) et l’autre extrémité à
la pomme de douche (3). Assurez-vous que la rondelle (4) est présente à chaque
extrémité pour assurer l’étanchéité du joint.
5
Connect the flexible supply lines (1) to the water supplies (2).
Conecta las líneas de suministro flexibles (1) a las líneas de suministro de agua (2).
Raccordez les conduites d’alimentation flexibles (1) aux conduites d’alimentation
en eau (2).
6
IMPORTANT: After installation is completed, turn on the hot and cold water supplies.
Check for leaks. Flush the water lines for one minute. Press the pin (1) to the bottom
position, and flush water lines for one minute. This flushes away any debris that could cause
damage to internal parts. Check for leaks. After flushing, turn the handle all the way off to
shut off the water and reinstall the aerator. The pin should now be in its normal position.
Re-tighten any connections if necessary, but do not overtighten.
IMPORTANTE: Luego de terminar la instalación, abre los suministros de agua caliente y fría.
Revisa si hay filtraciones. Deja que corra el agua por un minuto. Presiona el pasador (1) hasta
la posición inferior y deja que el agua corra por las líneas de suministro durante un minuto.
Esto enjuagará cualquier suciedad que podría dañar las piezas internas. Verifica que no haya
filtraciones. Después de dejar correr el agua, gira la manija completamente para cerrar el
suministro del agua y vuelve a instalar el aireador. El pasador debe estar entonces en su posición
normal. De ser necesario, vuelve a ajustar cualquier conexión pero no aprietes demasiado.
IMPORTANT : Une fois l'installation terminée, ouvrez l’alimentation en eau chaude et en eau
froide. Vérifiez s’il y a des fuites. Faites couler l'eau pendant une minute. Poussez la tige (1) en
position basse, puis purgez les conduites d’alimentation en eau pendant une minute. Ceci purge
tous les débris qui pourraient endommager les pièces internes. Vérifiez s'il y a des fuites. Après
la purge, tournez complètement la manette pour fermer l’eau et remettez l’aérateur. La tige
devrait maintenant être dans sa position normale. Resserrez tous les raccords au besoin mais ne
serrez pas trop.
7
www.mirabelleproducts.com
3
2
1
1
2
4
4
1
4
Locate the assembly on the desired location with the flexible tails (1) through the
prepared hole and then holding the escutcheon (2), secure the standpipe (3). If
mounting into wooden floor, secure the standpipe (3) using screws (4) only (wall
plugs are not needed). If mounting into solid floor, mark the position of holes first
and then secure the standpipe (3) using anchors (5) and screws (4). Where required
ensure correct anchors for your floor type are used.
Coloca el ensamblaje en el lugar deseado con los extremos flexibles (1) insertados
en el orificio preparado; después, sosteniendo la placa protectora (2), asegura el
caño vertical (3). Si se está instalando en un piso de madera, asegura el caño
vertical (3) sólo con tornillos (4) (no se necesitan tapones de pared). Si se está
instalando en un piso sólido, marca la posición de los orificios primero y luego
asegura el caño vertical (3) con anclajes (5) y tornillos (4). En caso de ser necesarios,
asegúrate de que los anclajes que uses sean los adecuados para tu
tipo de piso.
Placez l’ensemble à l’emplacement souhaité avec les embouts flexibles (1) à travers
le trou préparé, puis, en tenant la rosace (2), fixez solidement le tuyau autoportant
(3). Si vous installez dans un plancher, fixez solidement le tuyau autoportant (3) au
moyen de vis (4) seulement (les prises murales ne sont pas requises). Si vous
installez dans un sol plein, marquez tout d’abord la position des trous, puis fixez
solidement le tuyau autoportant (3) en utilisant des chevilles d’ancrage (5) et les vis
(4). Selon les besoins, assurez-vous d’utiliser les chevilles d’ancrage correctes pour
votre type de sol.
1
2
3
4
5
4
* Specify Finish
Especifíque el Acabado
Précisez le Fini
Maintenance:
If faucet leaks underneath handle or water does not completely shut off: Replace
cartridge.
Mantenimiento:
Si hay una filtración debajo de la llave o el agua no se corta por completo:
Reemplace el cartucho.
Entretien:
S'il y a une fuite sous la poignée ou si le robinet ne se ferme pas complètement:
Remplacez la cartouche.
12/13/16 REV.C
RP70553
Bonnet
Capuchón
Chapeau
MIR20074
Cartridge
Cartucho
Cartouche
RP50015
Screw
Tornillo
Vis
RP13457*
Handle
Llave
Poignée
RP50187
Set Screw
Tornillo de Fijación
Vis de calage
RP60107
O-ring
Junta en Forma de Aro Tórico
Joint torique
www.mirabelleproducts.com
MIRHS4070E*
Shower head
Cabezal de la ducha
Pomme de douche
MIR38288*
Shower hose
Manguera de la ducha
Tuyau flexible de douche
RP50002
Set Screw
Tornillo de Fijación
Vis de calage
RP80008*
Cap
Tapa
Capuchon
RP50036
Anchor
Anclaje
Cheville
RP50037
Screw
Tornillo
Vis

This manual suits for next models

3

Other Mirabelle Plumbing Product manuals

Mirabelle RIGI MIRWSCRI100CP User manual

Mirabelle

Mirabelle RIGI MIRWSCRI100CP User manual

Mirabelle sophistispa M1RSH2040CP User manual

Mirabelle

Mirabelle sophistispa M1RSH2040CP User manual

Mirabelle MIRWSCVL105LCP User manual

Mirabelle

Mirabelle MIRWSCVL105LCP User manual

Mirabelle sophistispa MIRVL9009CP User manual

Mirabelle

Mirabelle sophistispa MIRVL9009CP User manual

Mirabelle MIRWSCED100CP User manual

Mirabelle

Mirabelle MIRWSCED100CP User manual

Mirabelle MIRPR350WH User manual

Mirabelle

Mirabelle MIRPR350WH User manual

Mirabelle MIRXCWL100MCP Installation instructions manual

Mirabelle

Mirabelle MIRXCWL100MCP Installation instructions manual

Mirabelle MIRWSPT800CP User manual

Mirabelle

Mirabelle MIRWSPT800CP User manual

Mirabelle PROVINCETOWN Series User manual

Mirabelle

Mirabelle PROVINCETOWN Series User manual

Mirabelle PENDLETON MIRWSCPT100CP User manual

Mirabelle

Mirabelle PENDLETON MIRWSCPT100CP User manual

Mirabelle MIRWSVL800CP User manual

Mirabelle

Mirabelle MIRWSVL800CP User manual

Mirabelle BEASLEY MIRWSCBE800CP User manual

Mirabelle

Mirabelle BEASLEY MIRWSCBE800CP User manual

Mirabelle MIRKW3RT2CP User manual

Mirabelle

Mirabelle MIRKW3RT2CP User manual

Mirabelle MIRWSPR800CP User manual

Mirabelle

Mirabelle MIRWSPR800CP User manual

Mirabelle MIRWSCVL800CP User manual

Mirabelle

Mirabelle MIRWSCVL800CP User manual

Mirabelle PROVINCETOWN User manual

Mirabelle

Mirabelle PROVINCETOWN User manual

Mirabelle VILAMONTE MIRVL4RTGCP User manual

Mirabelle

Mirabelle VILAMONTE MIRVL4RTGCP User manual

Mirabelle MIRWSVL105ORB User manual

Mirabelle

Mirabelle MIRWSVL105ORB User manual

Mirabelle MIRBEFS2000GCP User manual

Mirabelle

Mirabelle MIRBEFS2000GCP User manual

Mirabelle PROVINCETOWN MIRPR8010CP User manual

Mirabelle

Mirabelle PROVINCETOWN MIRPR8010CP User manual

Mirabelle PROVINCETOWN MIRPR3RTCP User manual

Mirabelle

Mirabelle PROVINCETOWN MIRPR3RTCP User manual

Mirabelle MIRWSCPT800CP User manual

Mirabelle

Mirabelle MIRWSCPT800CP User manual

Mirabelle MIRML9009CP User manual

Mirabelle

Mirabelle MIRML9009CP User manual

Mirabelle MIRED9009BN User manual

Mirabelle

Mirabelle MIRED9009BN User manual

Popular Plumbing Product manuals by other brands

Toto TTSH301M Installation and owner's manual

Toto

Toto TTSH301M Installation and owner's manual

Spectrum Brands Pfister Weller LG48-WRP Quick installation guide

Spectrum Brands

Spectrum Brands Pfister Weller LG48-WRP Quick installation guide

Price Pfister Serrano R89 Series manual

Price Pfister

Price Pfister Serrano R89 Series manual

Hans Grohe MySelect S 1jet Set 65 Instructions for use/assembly instructions

Hans Grohe

Hans Grohe MySelect S 1jet Set 65 Instructions for use/assembly instructions

Gessi cono 45003 Bath Mixing Program

Gessi

Gessi cono 45003 Bath Mixing Program

Danze D497440 installation instructions

Danze

Danze D497440 installation instructions

Sanit INEO BRIGHT Assembly & operating instructions

Sanit

Sanit INEO BRIGHT Assembly & operating instructions

Hans Grohe Metris 31471000 Instructions for use/assembly instructions

Hans Grohe

Hans Grohe Metris 31471000 Instructions for use/assembly instructions

Blanco Precision Microedge Sink 516196 Specifications

Blanco

Blanco Precision Microedge Sink 516196 Specifications

Hans Grohe Vivenis 95 75033 1 Series Installation/User Instructions/Warranty

Hans Grohe

Hans Grohe Vivenis 95 75033 1 Series Installation/User Instructions/Warranty

Watts LFN45B-EZ-M1 Series installation instructions

Watts

Watts LFN45B-EZ-M1 Series installation instructions

Dietsche BRAVAT Oslo Instruction & Guarantee Card

Dietsche

Dietsche BRAVAT Oslo Instruction & Guarantee Card

Grohe Eurodisc 33 772 manual

Grohe

Grohe Eurodisc 33 772 manual

fine fixtures GRAND GD18 installation instructions

fine fixtures

fine fixtures GRAND GD18 installation instructions

Sanela SLU 35B Mounting instructions

Sanela

Sanela SLU 35B Mounting instructions

Signature Hardware COOPER 940967 quick start guide

Signature Hardware

Signature Hardware COOPER 940967 quick start guide

Moen Muirfield 84000 series instruction manual

Moen

Moen Muirfield 84000 series instruction manual

Kohler K-352 installation guide

Kohler

Kohler K-352 installation guide

manuals.online logo
manuals.online logoBrands
  • About & Mission
  • Contact us
  • Privacy Policy
  • Terms and Conditions

Copyright 2025 Manuals.Online. All Rights Reserved.