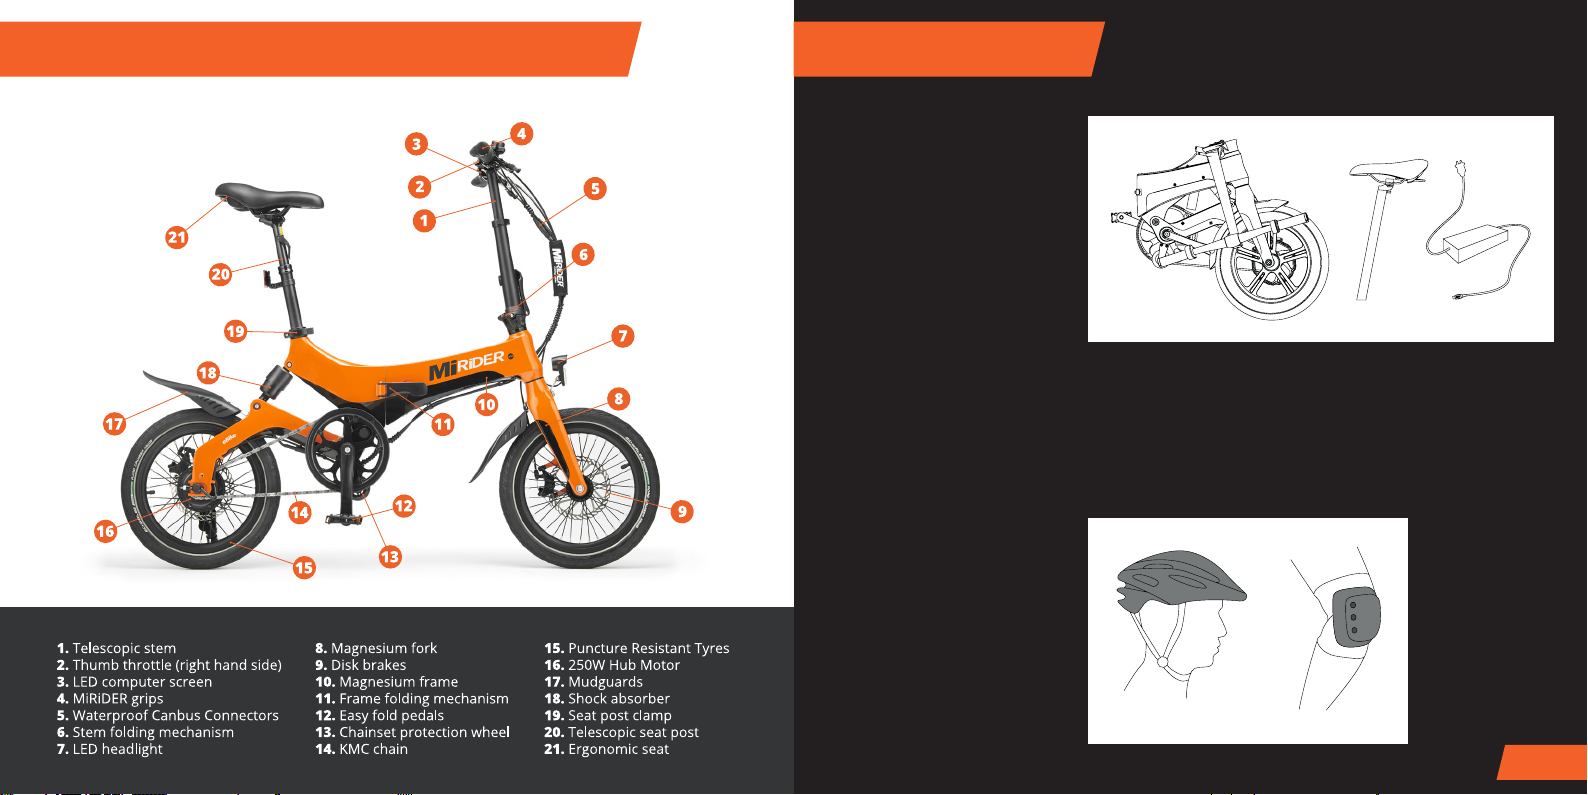
miRider One User manual

mirider.co.uk
INSTRUCTION MANUAL

About us
www.mirider.co.uk
+44 (0)1257 228242
Disklok House
Preston Road
Chorley
Lancashire
PR7 5HH
Welcome to the fold
Thank you for choosing to join the growing MiRiDER
community. We’re sure riding your MiRiDER One will create
some amazing new experiences and memories to last
a lifetime.
Our detailed User Manual follows. Please take some
time to read the Manual, as it will ensure you enjoy
your brand new bike and its many features.
However, should you have any unanswered questions
or queries, please don’t hesitate to contact us by
phone, email, or via the website.
Your enquiry will be handled by the Lancashire based
team who have developed the MiRiDER One from
day one.
We’re a passionate bunch for both cycling and
producing the very best products we can.
Constantly testing and developing new ideas for
the bike itself and riding accessories, we aim to
become the UK’s leading folding eBike brand.
Enjoy your MiRiDER One.

Bike structure and functions
Packing list
Instructions for use
LCD display instructions
Other operations
Maintenance and storage
Charging the battery
Battery charging precautions
Safety advice
Warnings and precautions
Troubleshooting
Warranty
Please read this manual carefully before using the MiRiDER one eBike. This manual
will help you understand the bike’s:
1. Basic operational process
2. Safety principles
3. Product structure, its care & use
Contents
Page 6
Page 7
Page 8 - 12
Page 13
Page 16
Page 17
Page 18
Page 19
Page 20
Page 21
Page 22 - 23
Page 24
Page 25

7
Bike structure and functions
Items included:
1. 1 x MiRiDER one eBike
2. 1 x Seat saddle
3. Quick Start Guide
4. 1 x Charger
5. 1 x Battery
6. 2 x Mudguards
7. 2 x Battery locking keys
Before use
It is recommended that you wear protective clothing and appropriate accessories when riding
the MiRiDER one eBike.
Packing list

89
Lift the handlebar stem upwards until
position.
1. 2.
On the lever opposite the folding hinge,
press down the red lever then pull the main
black handle outwards to release the frame
locking mechanism.
Connect the 2 halves of the frame together
and secure by pushing the black locking
handle into position firmly until you feel it
click into its locked position.
Instructions for use
3.Folding the eBike frame To secure the eBike frame Securing the stem
Secure the hinge by pressing the black
snap shut.

4. Adjusting handlebar height 5. How to insert the seat
Adjust the seat post height by lifting the
lever on the post and adjusting the height
to the required level. Then close the lever
securing the seat post at this height.
10 11
6. Adjust saddle height
Open the clamp to raise and lower the
handlebar height. Make sure the clamp is
closed fully before riding. Do not extend
higher than the grooved lines
Open the seat clamp, as shown in the
image above.
Push the seat into the frame to the
minimum insertion mark on the seat post
then secure the seat post by closing the
seat post clamp.

12 13
7. Folding the pedals
To unfold simply pull down the pedal until
it clicks into place.
To fold, push the pedal inwards, then lift
upwards.
Press & hold the power button, on the LCD
screen for 3 seconds to turn the power on.
Connect the charger into the port if the
LCD screen does not activate.
LCD display instructions
UP button
SW button
DOWN button
Brake status mark Headlights status mark
Trip distance or real-time
battery voltage display
Walk assist
mode indicator
Vehicle speed display
Running counter
Throttle turned on mark
Power-assist
startup mark
Power assist level indicator
Battery capacity indicator
The display content is shown as follows.
There are 3 keys on the LCD display, the icons for these keys are:
SW or POWER button UP button DOWN button
8. Power On

14 15
Push and hold the power ON/OFF button to activate
the display. The same button is to be pushed and
Holding the up arrow on the display turns on
the display bikes headlight. Push and hold the
same button again to switch this lighting off.
Use the up and down arrows in the display to
increase or decrease the power assist level.
When pushing the bike, if you push and hold the
down arrow button on the display, walk assist
mode will be engaged providing 6km/h (4mph)
power assist to aid pushing the bike. As soon as you
release the down arrow this assistance will stop.
The thumb throttle can provide a boost from a
standing start up to 6km/h (4mph). When continually
pedalling the thumb throttle can be used to
provide a power maximum power boost, taking the
bike up to the maximum speed limit of
25km/h (15.5MPH). If the rider stops pedalling, the
throttle boost drops off to 6km/h (4MPH) only.
To retain throttle boost, the rider must continuously
pedal the bike at the same time as applying the
thumb throttle.
ON/OFF Headlight
Assistance Level Thumb Throttle Assist

16 17
Uninstalling/Installing the battery
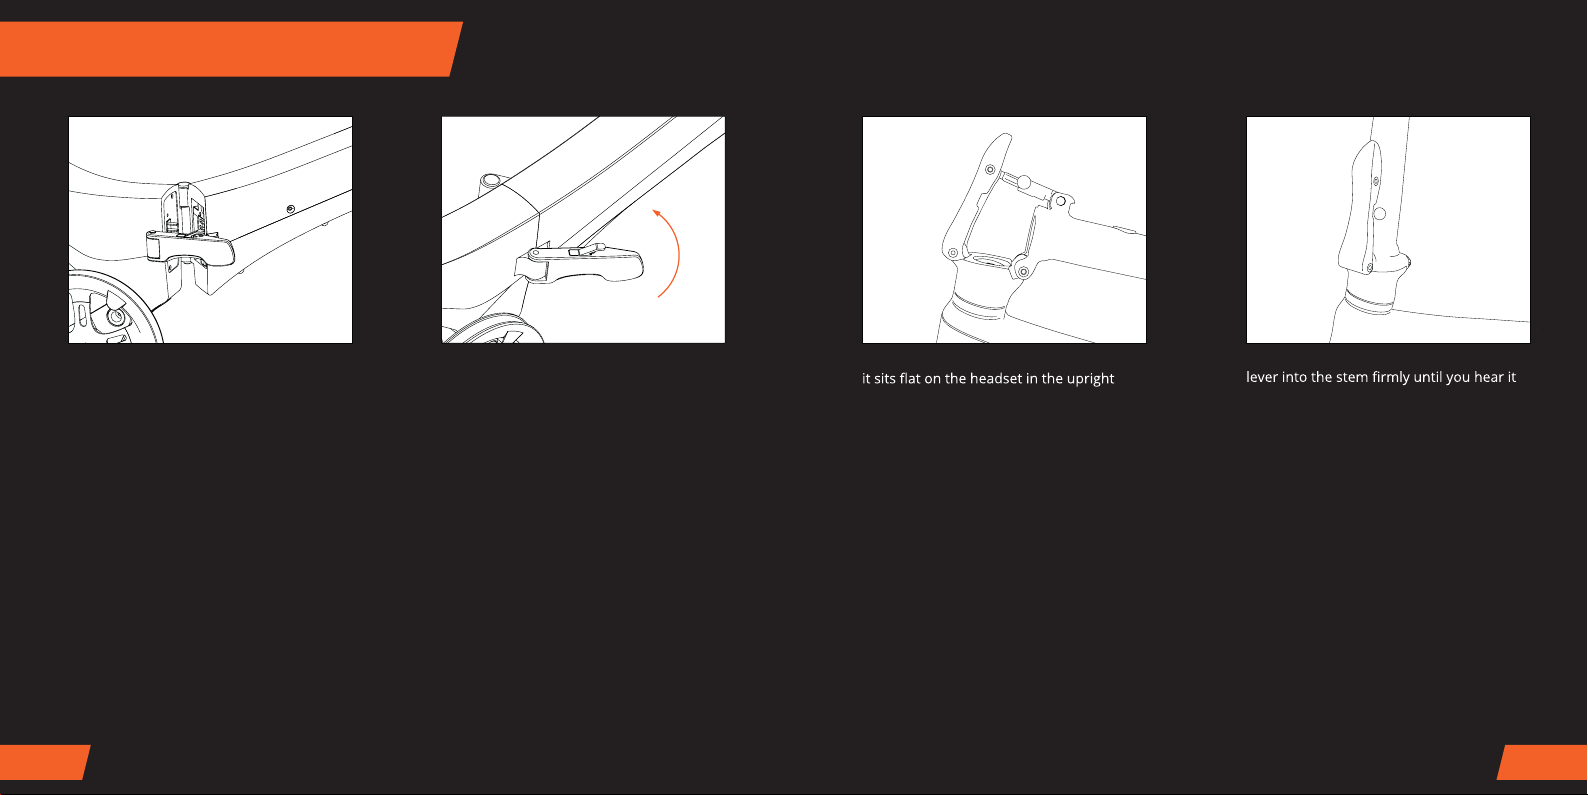
Fold the eBike frame and unlock the
battery lock using the battery locking key.
Pull out the battery from inside the frame,
using the handle, as shown in the image
above.
To re-insert the battery, push the battery
into position and lock it in place using the
locking key.
Other operations Maintenance and storage
1. Ensure the bike is stored in a secure, cool and dry place when not in use.
2. Do not use any chemical solvents to clean the bike, as this may corrode the surface.
3.
Suggested regular maintenance checks:
We recommend getting the bike serviced periodically by a qualified bike mechanic or
bike retailer and the below checks are followed.
Parts Maintenance checks
Brakes Ensure the front and back brakes offer sufficient
stopping power before use
Tyres Ensure the tyres have no damage, enough tread
and the pressure is sufficient (up to 60 psi)
Shock absorber Check the shock absorber is free moving with no
knocking noise
Throttle Check the throttle deactivates when released and
moves freely
Screws/bolts Check for any loose fastenings and tighten as required
Wheels Check there is no damage and lateral movement
Battery Ensure after a full charge the LCD screen shows the
battery indicator being full
Charger Check that the red light appears when charging and
turns to green once fully charged
Chain and
Sprocket
Clean regularly and apply bike chain lubricant.
Check chain isn’t too slack
eBike Regularly clean the eBike with a clean, damp cloth
Wires/cables Ensure there is no visible damage

Ensure the battery is charged between temperatures of 10-45°C
Always store the battery in a safe and dry place, at close to room temperature
Keep the battery away from all water, fire and heat
Do not modify, damage or try to disassemble the battery
Always charge the battery with the supplied charger
Please read the ‘charging the battery’ section before charging the battery
Unplug the charger from the battery once the light shows green
If the charger indicator light stops working, or the charger overheats then
unplug the charger immediately and do not use
Ensure the charger does not come into contact with water
Ensure the charger is stored in a safe and dry place, close to room temperature
Do not allow battery level to be completely exhausted
Do not attempt to disassemble or replace any parts of the charger
Do not put the battery or charger in places where it may fall to the ground.
This may cause damage
If the battery or charger become damaged please stop using immediately
Only dispose of batteries according to the local laws and regulations of
your region
1.
2.
3.
4.
5.
6.
7.
8.
9.
10.
11.
12.
14.
15.
16.
19
Option 1: Open the rubber charging port
grommet and insert the charging cable.
Then plug the charger into the mains and
switch on.
Option 2: Fold the bike, remove the battery
and plug the charger into the port. Then plug
the charger into the mains and switch on.
How to manoeuvre the portable eBike
Charging the battery How to carry and manoeuvre
the bike
18

20 21
Avoid riding the eBike close to all vehicles Throttle is limited to a maximum speed of 6
km/h (4 mph) for safety in public areas
Always ride with both hands holding the
handlebar
Do not ride the bike on stairs or escalators
Safety advice
X
or the speed assistance is set to “0” on the LCD display.
Warnings and precautions
1.
2.
3.
4.
5.
6.
7.
8.
9.
10.
11.
12.
13.
14.
15.
Ensure all protective clothing including a helmet is worn to prevent any injuries
In public areas, it is advised to dismount from the bike
The throttle will deactivate if the rider stops pedalling or the brakes are applied
All safety checks must be undertaken before use
Do not ride in icy conditions
The bike is not a toy and not suitable for children under the age of 14
Do not store the bike in wet, freezing or hot conditions
Ensure all regulations for riding your bike on a public highway are understood
before riding
Try to avoid riding in close proximity to other riders or vehicles
Ensure a safe distance is kept with pedestrians, other riders and vehicles at
all times
Do not ride backwards
Do not lend the bike to those who have not read the instruction manual
Do not use whilst under the influence of drugs or alcohol
Ensure all brakes are fully functioning before use
Do not clean with a pressure washer. This may damage the bike’s
electrical components

22 23
Mechanical
Colour options White, Orange, Grey
Unfolded size 1340x550x1100mm
Folded size 770x430x640mm
Seat height (from ground) 760-920mm adjustable
Wheelbase 950mm
Net weight (without battery) 17.6kg
Brake system Front and rear disc brake
Tyre dimension 16x1.95 inch
Frame material Diecast magnesium frame
Suspension Rear spring shock absorber
Battery
Battery installment Built-in/anti-theft lock/detachable
Battery capacity 36V/5.2Ah
Battery type LG Li-ion battery
Battery weight 1.3kg
Charging current 2.0A
Charging time Approx 3 hours
Power consumption 0.2Wh per charge
Rated input 10-240V 50/60Hz 2.0A
Rated output 42V 2.0A
Charging temperature 0°C-45°C
Function
parameters
Maximum motor speed 25km/h (15.5 mph)
Maximum range 56km (35 miles) - dependant on rider weight
and terrain
Maximum weight 120kg (265 lbs)
Climbing angle >15°
Lighting Front LED lights
Throttle Assistance Throttle max: 6 km/h (4mph) without
pedalling or 25km/h (15.5mph) max
with constant pedalling and throttle
boost
Stopping distance (dry conditions) 5m (speed at 20km/h)
Stopping distance (wet conditions) 10m (speed at 15km/h)
Motor drive system Electric/pedal assistance (optional)
Working temperature -10°C-50°C
Meter
Display LCD display
Remaining power Yes
Speed Yes
Total mileage Yes
Power assistance levels 5 levels
Motor
Rated Voltage/Wattage 36V / 250W
Torque 40 N•m
IP rating IP54
Note:
1. The total miles is subject to weight, road conditions, temperature and wind speed. The mileage on the eBike is tested
2. Do not use any other charger to charge the battery, other than the charger supplied with the eBike
3. Any amendments to the product will void all warranty

24 25
Problem Reason Solution
No power assistance
when the eBike is
turned on
No power 1. Check if the battery is installed
correctly
2. Charge the battery
eBike is not providing
enough miles
1. Battery is not fully
charged
2. Tyre pressure is low
3. Battery is aged or
decreasing after long use
4. Power mode is set too
high
1. Ensure the battery is fully
charged
2. Always check the tyre pressure
before use
3. Reduce the power level whilst
riding
Battery cannot be
charged
Charger may not be
plugged in correctly
Ensure the charger is correctly
plugged in to the socket and
the jack is plugged in to the port
correctly
Display is not working No power Ensure the battery has been fully
charged
The motor does not
work when power is on
The eBike is at a standstill Ensure the pedals are moving for
the motor to power
Troubleshooting Warranty
We’re delighted you chose us for your electric cycle, and we’re sure you won’t be disappointed!
To access the full 2 year warranty, you must register your bike by visiting the link below within 30
days of delivery. If the bike is not registered within this time, the warranty will be limited to 1 year.
Please visit www.mirider.co.uk/warranty
MiRiDER eBikes come with a 2 year warranty covering the frame, motor and battery. The 2 year
warranty also covers electronic components such as electronic cabling, LCD display, throttle and
mechanical parts.
WHAT IS NOT INCLUDED IN THE WARRANTY?
Warranty claims will not be upheld if any damage or defects are caused by abnormal use, lack of
maintenance, accidental damage, prolonged exposure to moisture or liquid, such as the following:
• Damage caused by incorrect maintenance
• External factors such as shocks, lightning storms, current surges, short circuit, etc
• Damage caused by excess exposure to the elements (e.g. rust caused by not storing bike indoors)
(e.g. additions not included when purchased)
• Paint, varnish and bike graphics
• Wearing parts such as tyres, brake pads, brake cables, handlebar grips, freewheels etc.
WARRANTIES ARE NON TRANSFERABLE. THE WARRANTY COULD BE VOID IF MAINTENANCE
GUIDELINES IN THE MANUAL ARE NOT FOLLOWED.

EPAC according to EN15194
RoHS
COMPLIANT
mirider.co.uk
This product was imported by MiRiDER LTD,
Disklok House, Preston Road, Charnock Richard,
Chorley, Lancashire, PR7 5HH.
Assembled in the UK.
Other manuals for One
2
Table of contents
Other miRider Bicycle manuals