12 13MIR-E007 MIR-E007PL / EN / CZ PL / EN / CZ
6
Before First Use:
Read all instructions and safety information carefully before first use. Please retain this information
for future reference.
1. Remove the parts from the packaging and lay out on an even surface.
2. Assemble as per the assembly instructions using a flat head screwdriver.
3. Wash the grill plate, grease pan and cover thoroughly. The grill plate and the grease pan are
both dishwasher safe.
IMPORTANT: Dry all the different parts thoroughly. This applies especially to the appliance socket
Never immerse the temperature controller in water.
4. Your appliance is now ready for normal use.
5. Dispose of the packaging in a responsible manner.
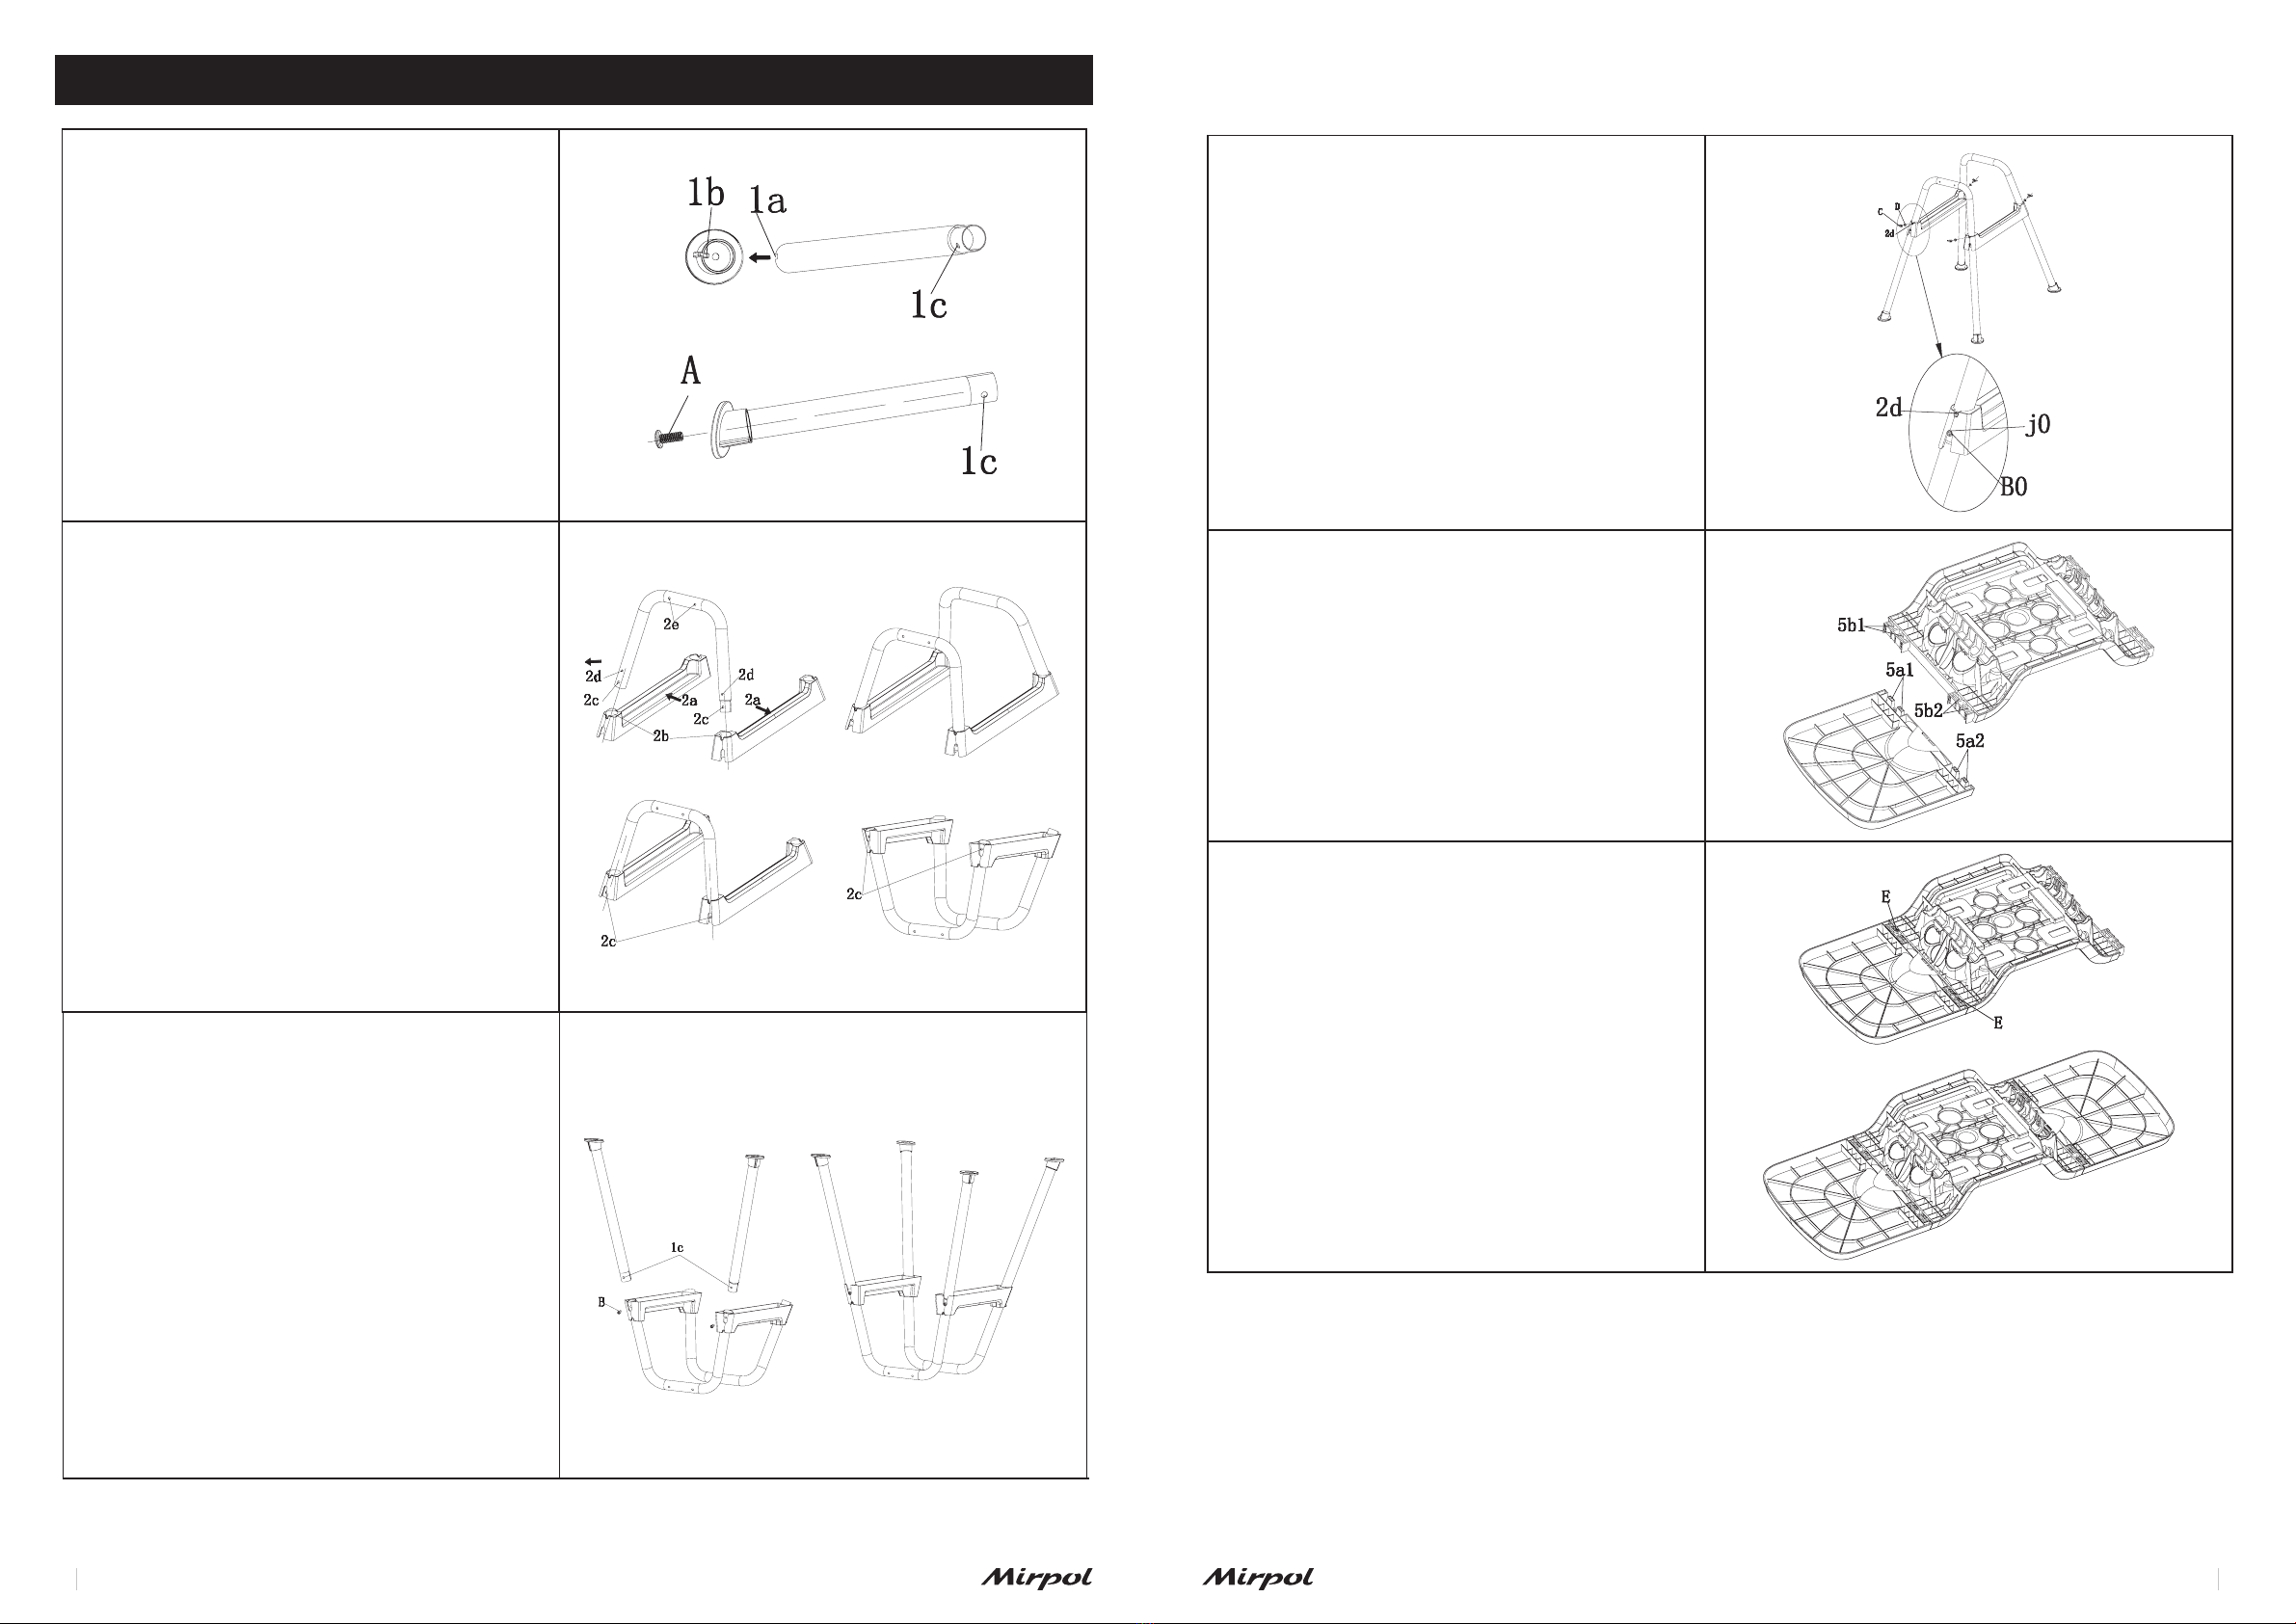
Assembly:
Install the plastic pad (14)
Take a straight tube (11) one of the feet pads
(14). Align the position of the notch (1a) of the
straight tube (11) with the stopper (1b) of the
foot (14) to prevent it from turning
Then tighten with the screw ‘A’ from the
bottom of the foot (14)
Install the other three sets in this same way.
(Note: There are two straight tubes (11) with
shrink tubes (1c) at the other end, and the
other two straight tubes (11) with no shrink
tubes (1c), they should be placed separately).
Place the two plastic rack holders (13) on a
flat surface (The inner sides (2a) face to face).
Take a U-shaped tube (10) and position with
the screw holes “2c”, “2d”, and “2e” facing
outward. Insert into holes (2b) of two brackets.
Then insert another U-shaped tube (10) into
the bracket holes on the other side.
(Hint: Take the U-shaped tube (10) and make
sure the side with the screw holes is facing
outward.)
Set up two U-shaped tubes (10) and turn over.
Make sure that the screw holes (2c) at the
bottom of the U-shaped tubes (10) from the
mouth of the tubes expose the gap in the
plastic bracket (13) to facilitate subsequent
installation and screws position.
ASSEMBLY
Insert the straight tube (11) with shrinkage
side into the hole of the U-shaped tube (10)
without shrinkage side.
Align the screw holes (1c) and (2c), tighten the
holes with screw (B).
Then insert the straight tube(11)without
shrinkage side into the hole of the U-shaped
tube (10) with shrinkage side.
Align the screw holes (1c) and (2c), tighten the
holes with screw (B).
According to this method, install the four
straight tubes (11) on the U-shaped tube (10).
After installing the straight tube (11), turn the
frame back over so it is now standing upright.
Press the plastic rack holder (13) down so
that the notch limit semicircular arc (j0) on
the plastic rack holder (13) is firmly pressed
against the round head (B0) of the screw B,
exposing the screw hole (2d) on the U-shaped
tube (10)
Take a Butterfly screw (C) and insert it into
the washer (D) to align the screw holes (2d)
and tighten. Tighten the other three parts in
the same way.
Turn over the Side table (9) and the centre
base (8); place them on a flat surface.
Matching hole (5b1) of the centre base (8)
align hole (5a1) of the Side table (9).
Matching hole (5b2) of the centre base (8)
align hole (5a2) of the Side table (9).
Then press down firmly.
(You can use a rubber hammer to lightly
hammer home.)
Use screw (E) to align the screw holes and
tighten.
Install the side table (9) on the other side in
the same way.
7
Insert the straight tube (11) with shrinkage
side into the hole of the U-shaped tube (10)
without shrinkage side.
Align the screw holes (1c) and (2c), tighten the
holes with screw (B).
Then insert the straight tube(11)without
shrinkage side into the hole of the U-shaped
tube (10) with shrinkage side.
Align the screw holes (1c) and (2c), tighten the
holes with screw (B).
According to this method, install the four
straight tubes (11) on the U-shaped tube (10).
After installing the straight tube (11), turn the
frame back over so it is now standing upright.
Press the plastic rack holder (13) down so
that the notch limit semicircular arc (j0) on
the plastic rack holder (13) is firmly pressed
against the round head (B0) of the screw B,
exposing the screw hole (2d) on the U-shaped
tube (10)
Take a Butterfly screw (C) and insert it into
the washer (D) to align the screw holes (2d)
and tighten. Tighten the other three parts in
the same way.
Turn over the Side table (9) and the centre
base (8); place them on a flat surface.
Matching hole (5b1) of the centre base (8)
align hole (5a1) of the Side table (9).
Matching hole (5b2) of the centre base (8)
align hole (5a2) of the Side table (9).
Then press down firmly.
(You can use a rubber hammer to lightly
hammer home.)
Use screw (E) to align the screw holes and
tighten.
Install the side table (9) on the other side in
the same way.
Install the plasc pad (14).
Take a straight tube (11) one of the feet pads (14). Align
the posion of the notch (1a) of the straight tube (11)
with the stopper (1b) of the foot (14) to prevent it from
turning.
Then ghten with the screw ‘A’ from the boom of the
foot (14).
Install the other three sets in this same way.
(Note: There are two straight tubes (11) with shrink
tubes (1c) at the other end, and the other two straight
tubes (11) with no shrink tubes (1c), they should be
placed separately).
Place the two plasc rack holders (13) on a at surface
(The inner sides (2a) face to face).
Take a U-shaped tube (10) and posion with the screw
holes “2c”, “2d”, and “2e” facing outward. Insert into
holes (2b) of two brackets.
Then insert another U-shaped tube (10) into the bracket
holes on the other side.
(Hint: Take the U-shaped tube (10) and make sure the
side with the screw holes is facing outward.)
Set up two U-shaped tubes (10) and turn over.
Make sure that the screw holes (2c) at the boom of
the U-shaped tubes (10) from the mouth of the tubes
expose the gap in the plasc bracket (13) to facilitate
subsequent installaon and screws posion.
Insert the straight tube (11) with shrinkage
side into the hole of the U-shaped tube (10)
without shrinkage side.
Align the screw holes (1c) and (2c), ghten the
holes with screw (B).
Then insert the straight tube(11)without
shrinkage side into the hole of the U-shaped
tube (10) with shrinkage side.
Align the screw holes (1c) and (2c), ghten the
holes with screw (B).
According to this method, install the four
straight tubes (11) on the U-shaped tube (10).
(Hint: The two diagonal straight tubes (11) are universal).
Aer installing the straight tube (11), turn the
frame back over so it is now standing upright.
Press the plasc rack holder (13) down so
that the notch limit semicircular arc (j0) on
the plasc rack holder (13) is rmly pressed
against the round head (B0) of the screw B,
exposing the screw hole (2d) on the U-shaped
tube (10).
Take a Buery screw (C) and insert it into
the washer (D) to align the screw holes (2d)
and ghten. Tighten the other three parts in
the same way.
Turn over the Side table (9) and the centre
base (8); place them on a at surface.
Matching hole (5b1) of the centre base (8)
align hole (5a1) of the Side table (9).
Matching hole (5b2) of the centre base (8)
align hole (5a2) of the Side table (9).
Then press down rmly.
(You can use a rubber hammer to lightly
hammer home.)
Use screw (E) to align the screw holes and
ghten.
Install the side table (9) on the other side in
the same way.