Mitsubishi MZ360236EX(KDC336AXAM4) User manual

MZ360236EX (KDC336AXAM4)
CD-RECEIVER
INSTRUCTION MANUAL
© B64-3948-00/00 (MW)
B64-3948-0000English.indd1B64-3948-0000English.indd1 07.7.134:24:48PM07.7.134:24:48PM

2|English
Contents
Safety precautions 3
Notes 4
General features 6
Power
Selecting the Source
Volume
Attenuator
Audio Control
Audio Setup
Bass Boost
Speaker Setting
Switching Display
Subwoofer Output
Theft Deterrent Faceplate
TEL Mute
Tuner features 10
Tuning
Tuning Mode
Station Preset Memory
Auto Memory Entry
Preset Tuning
Frequency Step Setting
CD/Audio file/External disc control
features 12
Playing CD & Audio file
Playing External Disc
Fast Forwarding and Reversing
Track/File Search
Disc Search/Folder Search
Direct Track/File Search
Direct Disc Search
Track/File/Disc/Folder Repeat
Scan Play
Random Play
Magazine Random Play
Folder Select
Text/Title Scroll
Menu system 15
Menu System
Security Code
Touch Sensor Tone
Manual Clock Adjustment
DSI (Disabled System Indicator)
Dimmer
Switching preout
Supreme Setting
CRSC (Clean Reception System Circuit)
Auxiliary Input Display Setting
Text Scroll
Built-in Auxiliary input Setting
CD Read Setting
Basic Operations of remote control
19
Accessories/
Installation Procedure 21
Connecting Wires to Terminals 22
Installation 23
Troubleshooting Guide 25
Specifications 27
B64-3948-0000English.indd2B64-3948-0000English.indd2 07.7.134:24:49PM07.7.134:24:49PM

English |3
Safety precautions
2WARNING
To prevent injury or fire, take the following
precautions:
• To prevent a short circuit, never put or leave any
metallic objects (such as coins or metal tools) inside
the unit.
• Mounting and wiring this product requires skills and
experience. For safety’s sake, leave the mounting
and wiring work to professionals.
2CAUTION
To prevent damage to the machine, take
the following precautions:
• Make sure to ground the unit to a negative 12V DC
power supply.
• Do not install the unit in a spot exposed to direct
sunlight or excessive heat or humidity. Also avoid
places with too much dust or the possibility of
water splashing.
• Do not place the faceplate (and the faceplate case)
in areas exposed to direct sunlight, excessive heat or
humidity. Also avoid places with too much dust or
the possibility of water splashing.
• To prevent deterioration, do not touch the terminals
of the unit or faceplate with your fingers.
• Do not subject the faceplate to excessive shock, as it
is a piece of precision equipment.
• When replacing a fuse, only use a new fuse with
the prescribed rating. Using a fuse with the wrong
rating may cause your unit to malfunction.
• Do not use your own screws. Use only the screws
provided. If you use the wrong screws, you could
damage the unit.
Do Not Load 8 cm (3 in.) CDs in the CD slot
If you try to load a 8 cm (3 in.) CD with its adapter into
the unit, the adapter might separate from the CD and
damage the unit.
About CD players/disc changers connected
to this unit
Kenwood disc changers/ CD players released in 1998
or later can be connected to this unit.
Refer to the catalog or consult your Kenwood dealer
for connectable models of disc changers/ CD players.
Note that any Kenwood disc changers/ CD players
released in 1997 or earlier and disc changers made by
other makers cannot be connected to this unit.
Connecting unsupported disc changers/CD players to
this unit may result in damage.
Set the "O-N" Switch to the "N" position for the
applicable Kenwood disc changers/ CD players.
The functions you can use and the information that
can be displayed may differ depending on the models
being connected.
¤
• You can damage both your unit and the CD changer if you
connect them incorrectly.
Lens Fogging
When you turn on the car heater in cold weather,
dew or condensation may form on the lens in the
CD player of the unit. Called lens fogging, this
condensation on the lens may not allow CDs to play.
In such a situation, remove the disc and wait for the
condensation to evaporate. If the unit still does not
operate normally after a while, consult your Kenwood
dealer.
B64-3948-0000English.indd3B64-3948-0000English.indd3 07.7.134:24:49PM07.7.134:24:49PM

4|English
• If you experience problems during installation,
consult your Kenwood dealer.
• When you purchase optional accessories, check with
your Kenwood dealer to make sure that they work
with your model and in your area.
• The characters which can be displayed by this unit
are A-Z 0-9 @ " ‘ ` % & * + – = , . / \ < > [ ] ( ) : ; ^ - { } |
~ .
• The illustrations of the display and the panel
appearing in this manual are examples used to
explain more clearly how the controls are used.
Therefore, what appears on the display in the
illustrations may differ from what appears on the
display on the actual equipment, and some of the
illustrations on the display may be inapplicable.
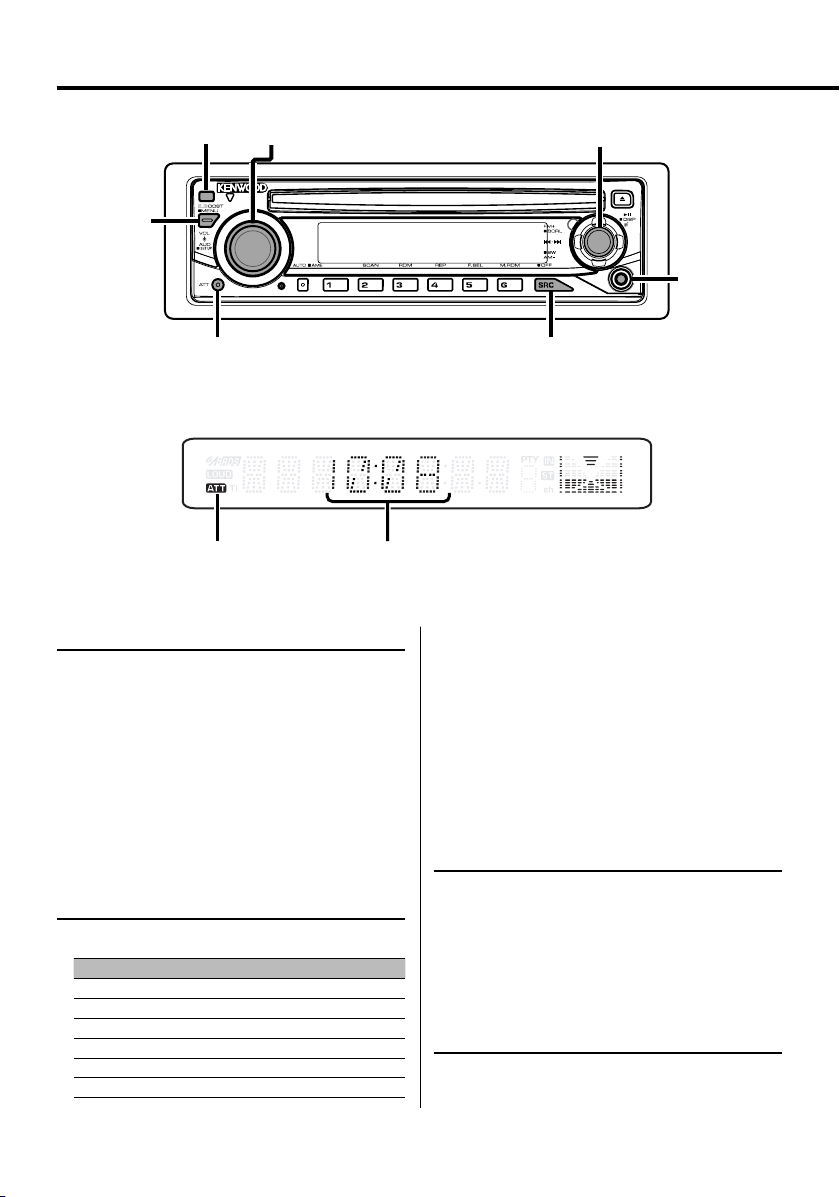
How to reset your unit
• If the unit fails to operate properly, press the Reset
button. The unit returns to factory settings when the
Reset button is pressed.
• Press the reset button if the disc auto changer fails
to operate correctly. Normal operation should be
restored.
Reset button
Cleaning the Unit
If the faceplate of this unit is stained, wipe it with a
dry soft cloth such as a silicon cloth.
If the faceplate is stained badly, wipe the stain off with
a cloth moistened with neutral cleaner, then wipe it
again with a clean soft dry cloth.
¤
• Applying spray cleaner directly to the unit may affect its
mechanical parts. Wiping the faceplate with a hard cloth or
using a volatile liquid such as thinner or alcohol may scratch
the surface or erases characters.
Cleaning the Faceplate Terminals
If the terminals on the unit or faceplate get dirty, wipe
them with a dry, soft cloth.
About DAB Tuner control (KDC-MP4036AX)
Refer to Agroup on the Instruction manual of DAB
Tuner KTC-9090DAB (optional accessory) for the
control method of DAB Tuner function.
However, the following control methods of the
function for this unit may be differed from the
Instruction manual; therefore, refer to the following
supplemental instruction.
<Auto Ensemble Memory Entry>
1. Select the preset band for Auto Ensemble Memory
Entry.
2. Press the [AME] button for at least 2 seconds.
Open Auto Ensemble Memory Entry.
After memory storage is finished, the number of
the pre-set buttons and the ensemble label are
displayed.
<Searching by programme type and language>
and <Languages to be displayed> in <Programme
Type (PTY) Function>
At the operation to press [DISP] button, use [AUTO]
button instead.
<Automatic Switching DAB priority>
This function cannot be used.
The marking of products using lasers
(Except for some areas)
CLASS 1
LASER PRODUCT
The label is attached to the chassis/case and says
that the component uses laser beams that have
been classified as Class 1. This means that the unit is
utilizing laser beams that are of a weaker class. There
is no danger of hazardous radiation outside the unit.
Notes
B64-3948-0000English.indd4B64-3948-0000English.indd4 07.7.134:24:49PM07.7.134:24:49PM

English |5
About Audio file
• Playable Audio file
MP3 (.mp3), WMA (.wma)
• Playable disc media
CD-R/RW/ROM
• Playable disc file format
ISO 9660 Level 1/2, Joliet, Romeo, Long file name.
Although the audio files are complied with the
standards listed above, the play maybe impossible
depending on the types or conditions of media or
device.
• Playing order of the Audio file
In the example of folder/file tree shown below, the
files are played in the order from ①to ⑩.
CD
v
()
<: Folder
v: Audio
v
v
v
v.
v
Folder
Audio file
An online manual about audio files is put on the
site, www.kenwood.com/audiofile/. On this online
manual, detailed information and notes which are not
written in this manual are provided. Make sure to read
through the online manual as well.
Handling CDs
• Do not touch the recording surface of the CD.
• Do not stick tape etc. on the CD, or use a CD with
tape stuck on it.
• Do not use disc type accessories.
• Clean from the center of the disc and move
outward.
• When removing CDs from this unit, pull them out
horizontally.
• If the CD center hole or outside rim has burrs,
use the CD only after removing the burrs with a
ballpoint pen etc.
CDs that cannot be used
• CDs that are not round cannot be used.
• CDs with coloring on the recording surface or CDs
that are dirty cannot be used.
• This unit can only play the CDs with .
This unit may not correctly play discs which do not
have the mark.
• You cannot play a CD-R or CD-RW that has not been
finalized. (For the finalization process refer to your
CD-R/CD-RW writing software, and your CD-R/CD-
RW recorder instruction manual.)
B64-3948-0000English.indd5B64-3948-0000English.indd5 07.7.134:24:50PM07.7.134:24:50PM

6|English
General features
Power
Turning ON the Power
Press the [SRC] button.
⁄
• When the power is ON, the <Security Code> (page 16)
is displayed as "CODE ON" or "CODE OFF". (Function of
KDC-MP4036AX)
Turning OFF the Power
Press the [SRC] button for at least 1 second.
Selecting the Source
Press the [SRC] button.
Source required Display
Tuner "TUNER"
CD "CD"
External disc (Optional accessory)** "CD CH"
Auxiliary input* "AUX"
Auxiliary input (Optional accessory)** "AUX EXT"
Standby (Illumination only mode) "STANDBY"
* An equipment such as a portable audio player can
be connected to the auxiliary input terminal using a
commercially available mini-plug (3.5ø). (Function of
KDC-MP4036AX/KDC-MP3036AX/KDC-MP336AX)
⁄
• ** Function of KDC-MP4036AX
• Use the mini-plug which is stereo type and does not
have any resistance.
Volume
Increasing Volume
Turn the [VOL] knob clockwise.
Decreasing Volume
Turn the [VOL] knob counterclockwise.
Attenuator
Turning the volume down quickly.
Press the [ATT] button.
ATT indicator Clock display
43$"55
70-
##0045
Release button Control knob
Auxiliary input
B64-3948-0000English.indd6B64-3948-0000English.indd6 07.7.134:24:51PM07.7.134:24:51PM

English |7
Each time you press the button, the Attenuator
turns ON and OFF.
When the Attenuator is ON, the "ATT" indicator
blinks.
Bass Boost
Bass sound can be enhanced by one-touch
operatin.
Press the [B.BOOST] button.
When you press the button once, the current Bass
Boost setting is displayed.
Each time you press the button, the Bass Boost
setting alternates.
Setting Display
Bass Boost 1 "BB-L L1"
Bass Boost 2 "BB-L L2"
Bass Boost off "BB-L OFF"
Audio Control
1Select the source to adjust
Press the [SRC] button.
2Enter Audio Control mode
Press the [VOL] knob.
3Select the Audio item to adjust
Press the [VOL] knob.
Each time you press the knob, the item to be
adjusted alternates between the items shown in
the table below.
4Adjust the Audio item
Turn the [VOL] knob.
Adjustment Item Display Range
Subwoofer level "SW L" –15 — +15
System Q "NATURAL"/"ROCK"/
"POPS"/"EASY"/
"TOP40"/"JAZZ"
Natural/Rock/Pops/Easy/
Top 40/Jazz
Bass level "BAS L" –8 — +8
Middle level "MID L" –8 — +8
Treble level "TRE L" –8 — +8
Balance "BAL" Left 15 — Right 15
Fader "FAD" Rear 15 — Front 15
Exit Audio Control mode (Volume control mode)
⁄ About System Q
• You can recall the best sound setting preset for different
types of music.
• Change each setting value with the <Speaker Setting>
(page 8). First, select the speaker type with the Speaker
setting.
• "USER": This appears when Bass level, Middle level,
and Treble level are adjusted. When "USER" is
selected, these levels are recalled.
5Exit Audio Control mode
Press any button.
Press a button other than the [VOL] knob and [ATT]
button.
Audio Setup
Setting the Sound system, such as Volume offset.
1Select the source to adjust
Press the [SRC] button.
2Enter Audio Setup mode
Press the [VOL] knob for at least 1 second.
3Select the Audio Setup item to adjust
Press the [VOL] knob.
Each time you press the knob, the item to be
adjusted alternates between the items shown in
the table below.
4Adjust the Audio setup item
Turn the [VOL] knob.
Adjustment Item Display Range
Low Pass Filter "LPF" 80/120/160/Through Hz
Volume offset "V-OFF" –8 — ±0 (AUX : –8 — +8)
⁄
• Volume offset: Sets each source’s volume as a difference
from the basic volume.
5Exit Audio Setup mode
Press the [VOL] knob for at least 1 second.
B64-3948-0000English.indd7B64-3948-0000English.indd7 07.7.134:24:53PM07.7.134:24:53PM

8|English
General features
Speaker Setting
Fine-tuning so that the System Q value is optimal
when setting the speaker type.
1Enter Standby
Press the [SRC] button.
Select the "STANDBY" display.
2Enter Speaker Setting mode
Press the [VOL] knob.
3Select the Speaker type
Turn the [VOL] knob.
Each time you turn the knob, the setting alternates
between the settings shown in the table below.
Speaker type Display
OFF "SP OFF"
For 5 & 4 in. speaker "SP 5/4"
For 6 & 6x9 in. speaker "SP 6*9/6"
For the OEM speaker "SP OEM"
4Exit Speaker Setting mode
Press the [VOL] knob.
Switching Display
Changing the information displayed.
1Enter Switching Display mode
Press the Control knob for at least 1 second.
"DISP SEL" is displayed.
2Select the Display item
Push the Control knob towards [4] or [¢].
In Tuner source
Information Display
Frequency "FREQ"
Clock "CLOCK"
In CD & External disc source
Information Display
Disc title "D-TITLE"
Track title "T-TITLE"
Play time &Track number "P-TIME"
Clock "CLOCK"
In Audio file source
Information Display
Song title & Artist name "TITLE"
Album name & Artist name "ALBUM"
Folder name "FOLDER"
File name "FILE"
Play time &Track number "P-TIME"
Clock "CLOCK"
In Standby/ Auxiliary input source
Information Display
Source name "SRC NAME"
Clock "CLOCK"
3Exit Switching Display mode
Press the Control knob.
⁄
• Album name cannot be displayed in WMA file.
• If the selected display item does not have any
information, alternative information is displayed.
Subwoofer Output
Turning the Subwoofer output ON or OFF.
Push the Control knob toward [AM] for at least
2 seconds.
Each time you push the knob, Subwoofer output
switches ON and OFF.
When it is ON, "SW ON" is displayed.
B64-3948-0000English.indd8B64-3948-0000English.indd8 07.7.134:24:53PM07.7.134:24:53PM

English |9
Theft Deterrent Faceplate
The faceplate of the unit can be detached and taken
with you, helping to deter theft.
Removing the Faceplate
Press the Release button.
The faceplate unlocks, allowing you to detach it.
¤
• The faceplate is a precision piece of equipment and can
be damaged by shocks or jolts.
• Keep the faceplate in its faceplate case while detached.
• Do not expose the faceplate (and the faceplate case) to
direct sunlight or excessive heat or humidity. Also avoid
places with too much dust or the possibility of water
splashing.
Reattaching the Faceplate
1Align the projections on the unit with the
grooves on the faceplate.
Projections
Grooves
2Push the faceplate in until it clicks.
The faceplate is locked in place, allowing you to use
the unit.
TEL Mute
The audio system automatically mutes when a call
comes in.
When a call comes in
"CALL" is displayed.
The audio system pauses.
Listening to the audio during a call
Press the [SRC] button.
The "CALL" display disappears and the audio system
comes back ON.
When the call ends
Hang up the phone.
The "CALL" display disappears and the audio system
comes back ON.
⁄
• To use the TEL Mute feature, you need to hook up
the MUTE wire to your telephone using a commercial
telephone accessory. Refer to <Connecting Wires to
Terminals> (page 22).
B64-3948-0000English.indd9B64-3948-0000English.indd9 07.7.134:24:54PM07.7.134:24:54PM

10 |English
Tuner features
Tuning
Selecting the station.
1Select tuner source
Press the [SRC] button.
Select the "TUNER" display.
2Select the band
Push the Control knob towards [FM] or [AM].
Each time you push the knob toward [FM], it
switches between the FM1, FM2, and FM3 bands.
3Tune up or down band
Push the Control knob towards [4] or [¢].
⁄
• During reception of stereo stations the "ST" indicator is
ON.
Tuning Mode
Choose the tuning mode.
Press the [AUTO] button.
Each time you press the button, the Tuning mode
alternates between the modes shown in the table
below.
Tuning mode Display Operation
Auto seek "AUTO1" Automatic search for a station.
Preset station seek "AUTO2" Search in order of the stations in
the Preset memory.
Manual "MANUAL" Normal manual tuning control.
Band display Frequency display Preset station number
ST indicator
43$
"650
".&
Control knob
B64-3948-0000English.indd10B64-3948-0000English.indd10 07.7.134:24:54PM07.7.134:24:54PM

English |11
Station Preset Memory
Putting a station in the memory.
1Select the band
Push the Control knob towards [FM] or [AM].
2Select the frequency to put in the memory
Push the Control knob towards [4] or [¢].
3Put the frequency in the memory
Press the desired [1] — [6] button for at least 2
seconds.
The preset number display blinks 1 time.
On each band, 1 station can be put in the memory
on each [1] — [6] button.
Auto Memory Entry
Putting stations with good reception in the memory
automatically.
1Select the band for Auto Memory Entry
Push the Control knob towards [FM] or [AM].
2Open Auto Memory Entry
Press the [AME] button for at least 2 seconds.
"A-MEMORY" is displayed.
When 6 stations that can be received are put in the
memory Auto Memory Entry closes.
Preset Tuning
Recalling the stations in the memory.
1Select the band
Push the Control knob towards [FM] or [AM].
2Recall the station
Press the desired [1] — [6] button.
Frequency Step Setting
Changing the tuning frequency step.
The original setting is FM band 50 kHz, and AM
band 9 kHz.
1Turn the power OFF
Press the [SRC] button for at least 1 second.
2Switch the frequency step
While pressing the [1] and [5] buttons, press the
[SRC] button.
Release your fingers from the button after the
display appears.
The frequency step changes to FM band 200 kHz,
and AM band 10 kHz.
⁄
• When the same operation is repeated, the frequency
step returns to the original setting.
• When the frequency step is changed, the frequencies in
the memory are deleted.
B64-3948-0000English.indd11B64-3948-0000English.indd11 07.7.134:24:56PM07.7.134:24:56PM

12 |English
CD/Audio file/External disc control features
Playing CD & Audio file
When a disc is inserted
Press the [SRC] button.
Select the "CD" display.
⁄
• When a CD is inserted, the "IN" indicator is ON.
Pause and play
Press the Control knob.
Each time you press the knob, the audio pauses or
plays.
Eject the CD
Press the [0] button.
⁄
• Refer to <About Audio file> (page 5) for the Audio file by
models you can play.
• You can eject the disc for 10 minutes after switching off
the engine.
Function of KDC-MP4036AX
Playing External Disc
Playing discs set in the optional accessory disc
player connected to this unit.
Press the [SRC] button.
Select the display for the disc player you want.
Display examples:
Display Disc player
"CD CH" CD changer
"MD CH" MD changer
Pause and play
Press the Control knob.
Each time you press the knob, the audio pauses or
plays.
⁄
• Disc 10 is displayed as "0".
• The functions that can be used and the information that
can be displayed will differ depending on the external
disc players being connected.
IN indicator
Disc number
Play timeTrack number
43$
4$"/ 3&1 '4&- .3%.
3%.
Control knob
B64-3948-0000English.indd12B64-3948-0000English.indd12 07.7.134:24:56PM07.7.134:24:56PM

English |13
Fast Forwarding and Reversing
Fast Forwarding
Hold down toward [¢] with the Control knob.
Release to resume the playback.
Reversing
Hold down toward [4] with the Control knob.
Release to resume the playback.
⁄
• There is no sound while the Audio file is being searched.
• The accurate track time is not displayed during fast
forwarding or reversing of the Audio file.
Track/File Search
Searching for a song on the disc or in the Audio file
folder.
Push the Control knob towards [4] or [¢].
Function of disc changer/ Audio file
Disc Search/Folder Search
Selecting the disc set in the Disc changer or the
folder recorded on the Audio file media.
Push the Control knob towards [FM] or [AM].
Accessory of KDC-MP4036AX/KDC-MP3036AX/
KDC-MP3036
Function of remote control
Direct Track/File Search
Doing Track/File Search by entering the track/file
number.
1Enter the track/file number
Press the number buttons on the remote
control.
2Do Track/File Search
Press the [4] or [¢] button.
Cancelling Direct Track/File Search
Press the [38] button.
Function of KDC-MP4036AX
Function of disc changers with remote control
Direct Disc Search
Doing Disc Search by entering the disc number.
1Enter the disc number
Press the number buttons on the remote
control.
2Do Disc Search
Press the [+] or [–] button.
Cancelling Direct Disc Search
Press the [38] button.
⁄
• Input "0" to select disc 10.
Track/File/Disc/Folder Repeat
Replaying the song, disc in the Disc changer or
Audio file folder you are listening to.
Press the [REP] button.
Each time you press the button, the Repeat Play
alternates between the modes shown in the tables
below.
In CD & External disc source
Repeat play Display
Track Repeat "TRAC REP"
Disc Repeat (In Disc Changer) "DISC REP"
OFF "REP OFF"
In Audio file source
Repeat play Display
File Repeat "FILE REP"
Folder Repeat "FOLD REP"
OFF "REP OFF"
B64-3948-0000English.indd13B64-3948-0000English.indd13 07.7.134:24:59PM07.7.134:24:59PM

14 |English
CD/Audio file/External disc control features
Scan Play
Playing the first part of each song on the disc or
Audio file folder you are listening to and searching
for the song you want to hear.
1Start Scan Play
Press the [SCAN] button.
"TRAC SCN"/"FILE SCN" is displayed.
2Release it when the song you want to listen to
is played
Press the [SCAN] button.
Random Play
Play all the songs on the disc or Audio file folder in
random order.
Press the [RDM] button.
Each time you press the button, Random Play turns
ON or OFF.
When the Random mode is ON, "DISC RDM"/"FOLD
RDM" is displayed.
⁄
• When you push the Control knob toward [¢], the next
random song starts.
Function of KDC-MP4036AX
Function of disc changer
Magazine Random Play
Play the songs on all the discs in the disc changer in
random order.
Press the [M.RDM] button.
Each time you press the button, the Magazine
Random Play turns ON or OFF.
When the Magazine Random mode is ON, "MGZN
RDM" is displayed.
⁄
• When you push the Control knob toward [¢], the next
random song starts.
Function of Audio file
Folder Select
Quickly selecting the folder you want to hear.
1Enter Folder Select mode
Press the [F.SEL] button.
"FLD SEL" is displayed.
During Select mode the folder information is
displayed as shown below.
Folder name display
Displays the current folder name.
2Select the folder level
Push the Control knob towards [FM] or [AM].
With the [FM] of the Control knob, you move 1
level down and with the [AM] of the Control knob,
1 level up.
Selecting a folder in the same level
Push the Control knob towards [4] or [¢].
With the [4] of the Control knob, you move
to the previous folder, and with the [¢] of the
Control knob, to the next folder.
Returning to the top level
Press the [3] button.
Scrolling the folder name display
Push the Control knob toward [FM] for at least
2 seconds.
3Decide the folder to play
Press the Control knob.
The Folder Select mode releases, and the Audio file
in the folder being displayed plays.
Cancelling the Folder Select mode
Press the [F.SEL] button.
Text/Title Scroll
Scrolling the displayed CD text, Audio file text, or
MD title.
Push the Control knob toward [FM] for at least
2 seconds.
B64-3948-0000English.indd14B64-3948-0000English.indd14 07.7.134:24:59PM07.7.134:24:59PM

English |15
Menu system
Menu System
Setting beep sound during operation, etc.
functions.
The Menu system basic operation method is
explained here. The reference for the Menu items
and their setting content is after this operation
explanation.
1Enter Menu mode
Press the [MENU] button for at least 1 second.
"MENU" is displayed.
2Select the menu item
Push the Control knob towards [FM] or [AM].
Example: When you want to set the beep sound
select the "BEEP" display.
3Set the menu item
Push the Control knob towards [4] or [¢].
Example: When you select "BEEP", each time you
push the knob it alternates between
"BEEP ON" or "BEEP OFF". Select 1 of them
as the setting.
You can continue by returning to step 2 and
setting other items.
4Exit Menu mode
Press the [MENU] button.
⁄
• When other items those applicable to the basic
operation method above are displayed, their setting
content chart is entered. (Normally the setting listed at
the top of the chart is the original setting.)
Also, the explanation for items that are not applicable
(<Manual Clock Adjustment> etc.) are entered step by
step.
Menu display
43$.&/6
Control knob
B64-3948-0000English.indd15B64-3948-0000English.indd15 07.7.134:25:00PM07.7.134:25:00PM

16 |English
Menu system
Function of KDC-MP4036AX
In Standby mode
Security Code
Activating the Security Code disables the usage
of audio unit by someone else. Once the Security
Code is activated, the entry of authorized Security
Code is required to turn on the audio unit when it is
removed from the vehicle. Indication of this Security
Code activation prevents your precious audio unit
from stealing.
⁄
• When you activate the Security Code function, it cannot be
released.
Note, your Security Code is the 4 digit number entered in
your "Car Audio Passport" in this package.
1Enter Standby
Press the [SRC] button.
Select the "STANDBY" display.
2Enter Menu mode
Press the [MENU] button for at least 1 second.
When "MENU" is displayed, "CODE SET" is displayed.
3Enter Security Code mode
Press the Control knob for at least 1 second.
When "ENTER" is displayed, "CODE" is also
displayed.
4Select the digits to enter
Push the Control knob towards [4] or [¢].
5Select the Security Code numbers
Push the Control knob towards [FM] or [AM].
6Repeat steps 4 and 5, and complete the
Security Code.
7Confirm the Security Code
Press the Control knob for at least 3 seconds.
When "RE-ENTER" is displayed, "CODE" is also
displayed.
8Do the step 4 through 7 step operation, and
reenter the security code.
"APPROVED" is displayed.
The Security Code function activates.
⁄
• If you enter a Code different from your Security Code,
you have to start over from step 4.
Resetting the Security Code function when the
audio unit is first used after removed from the
battery power source or the Reset button is
pressed
1Turn the power ON.
2Do the step 4 through 7 step operation, and
reenter the security code.
"APPROVED" is displayed.
Now, you can use the unit.
⁄
• If an incorrect code is entered, "WAITING" is displayed,
and the input prohibition periods shown in the table
below is generated.
After the input prohibition time lapses, "CODE" is
displayed, and you can reenter the code.
Number of times the
incorrect code was input
Input prohibited time
1—
2 5 minutes
3 1 hour
4 24 hours
In Standby mode
Touch Sensor Tone
Setting the operation check sound (beep sound)
ON/OFF.
Display Setting
"BEEP ON" Beep is heard.
"BEEP OFF" Beep canceled.
B64-3948-0000English.indd16B64-3948-0000English.indd16 07.7.134:25:01PM07.7.134:25:01PM

English |17
In Standby mode
Manual Clock Adjustment
1Select Clock Adjustment mode
Push the Control knob towards [FM] or [AM].
Select the "CLK ADJ" display.
2Enter Clock Adjust mode
Press the Control knob for at least 1 second.
The clock display blinks.
3Adjust the hours
Push the Control knob towards [FM] or [AM].
Adjust the minutes
Push the Control knob towards [4] or [¢].
4Exit Clock adjustment mode
Press the [MENU] button.
In Standby mode
DSI (Disabled System Indicator)
A red indicator will blink on the unit after the
faceplate is removed, warning potential thieves.
Display Setting
"DSI ON" LED flashes.
"DSI OFF" LED OFF.
Dimmer
You can lower the brightness of the display by using
the dimmer function.
Display Setting
"DIM ON" The display dims.
"DIM OFF" The display doesn’t dim.
In Standby mode
Switching preout
Alternating the preout between the rear and
subwoofer. (With the subwoofer the sound outputs
without being effected by fader control.)
Display Setting
"SWPRE R" Rear preout.
"SWPRE SW" Subwoofer preout.
In Audio file source
Supreme Setting
When MP3 or WMA files encoded at a low bit rate
(less than 96kbps (fs=32k, 44.1k, 48kHz)) are played,
this function restores their high frequency region
to approach the sound quality of equivalents of
these files encoded at a high bit rate. Processing is
optimized for the compression format used (MP3, or
WMA), and adjustment is made for the bit rate used.
Display Setting
"SPRM ON" Plays sound using the Supreme function.
"SPRM OFF" Plays the original sound stored in the audio file.
⁄
• The sound effect may be imperceptible depending
on the relationship between the audio file format and
setting.
In FM reception
CRSC (Clean Reception System Circuit)
Temporarily have reception alternate from stereo to
mono to reduce multi-path noise when listening to
the FM station.
Display Setting
"CRSC ON" The CRSC is ON.
"CRSC OFF" The CRSC is OFF.
⁄
• Strong electrical fields (such as from power lines) may
cause unstable sound quality when CRSC is turned ON.
In such a situation, turn it OFF.
B64-3948-0000English.indd17B64-3948-0000English.indd17 07.7.134:25:02PM07.7.134:25:02PM

18 |English
Menu system
Function of KDC-MP4036AX/KDC-MP3036AX/
KDC-MP336AX
Auxiliary Input Display Setting
Selecting the display when alternating to Auxiliary
input source.
1Select Auxiliary input source
Press the [SRC] button.
Select the "AUX"/"AUX EXT" display.
2Enter Menu mode
Press the [MENU] button for at least 1 second.
"MENU" is displayed.
3Select Auxiliary input display setting mode
Push the Control knob towards [FM] or [AM].
Select the "NAME SET" display.
4Enter Auxiliary input display setting mode
Press the Control knob for at least 1 second.
The selected Auxiliary input display is displayed.
5Select the Auxiliary input display
Push the Control knob towards [4] or [¢].
Each time you push the knob, the display alternates
as listed below.
• "AUX"/"AUX EXT"
• "DVD"
• "PORTABLE"
• "GAME"
• "VIDEO"
• "TV"
6Exit Auxiliary input display setting mode
Press the [MENU] button.
⁄
• When operation stops for 10 seconds, the name at that
time is registered, and the Auxiliary input display setting
mode closes.
• You can only set the Auxiliary input display when the
built-in auxiliary input or the auxiliary input of optional
KCA-S220A is used.
Text Scroll
Setting the displayed text scroll.
Display Setting
"SCL AUTO" Repeats scroll.
"SCL MANU" Scrolls when the display changes.
⁄
• The text scrolled is listed below.
- CD text
- Folder name/ File name/ Song title/ Artist name/
Album name
- MD title
Function of KDC-MP4036AX/KDC-MP3036AX/
KDC-MP336AX
In Standby mode
Built-in Auxiliary input Setting
Set the Built-in Auxiliary Input function.
Display Setting
"AUX OFF" When selecting the source there’s no Auxiliary Input.
"AUX ON1" When selecting the source there’s Auxiliary Input.
"AUX ON2" When the unit is turned on by AUX source, the attenuator
function is activated. Press [ATT] button to cancel the
attenuator function in order to listen to the external
equipment. there’s Auxiliary Input.
⁄
• Setting to "AUX ON2" will not output the noise which is
produced when an external equipment is not connected
to the AUX terminal.
In Standby mode
CD Read Setting
When there is a problem with playing a CD with
special format, this setting plays the CD by force.
Display Setting
"CD READ1" Play CD and Audio file.
"CD READ2" Play CD by force.
⁄
• Some music CDs may not play even in the "CD READ2"
mode.
B64-3948-0000English.indd18B64-3948-0000English.indd18 07.7.134:25:02PM07.7.134:25:02PM

English |19
Basic Operations of remote control
Accessory of KDC-MP4036AX/KDC-MP3036AX/KDC-MP3036
Loading and Replacing the battery
Use two "AA"/ "R6"-size batteries.
Slide the cover while pressing downwards to
remove it as illustrated.
Insert the batteries with the + and – poles aligned
properly, following the illustration inside the case.
2WARNING
• Store unused batteries out of the reach of children.
Contact a doctor immediately if the battery is
accidentally swallowed.
¤
• Do not set the remote control in hot places such as on
the dashboard.
Basic operations
[VOL] buttons
Adjusts the volume.
[SRC] button
Each time you press the button, the source
alternates.
For the source alternating order refer to <Selecting
the Source> (page 6).
[ATT] button
Turns the volume down quickly.
When the button is pressed again, the volume
returns to the previous level.
ATT
[0] — [9]
SRC
4/¢
38
FM/AM/
+
/–
VOL
AUD
SRC
DIRECT
/OK
ABC DEF
JKLGHI MNO
TUV
QZ
PRS WXY
VOL
AT T
AUD
FM
+
AM–
38
¢
4
ATT
[0] — [9]
SRC
4/¢
38
FM/AM/
+
/–
VOL
AUD
SRC
DIRECT
/OK
ABC DEF
JKLGHI MNO
TUV
QZ
PRS WXY
VOL
AT T
AUD
FM
+
AM–
38
¢
4
Not Used
KDC-MP4036AX KDC-MP3036AX/KDC-MP3036
:This button is used when Bluetooth
HANDS FREE BOX is connected.
For more information, refer to the
instruction manual of Bluetooth HANDS
FREE BOX.
Not Used Not Used
B64-3948-0000English.indd19B64-3948-0000English.indd19 07.7.134:25:03PM07.7.134:25:03PM

20 |English
Basic Operations of remote control
Accessory of KDC-MP4036AX/KDC-MP3036AX/KDC-MP3036
Audio Control
[AUD] button
Selects the Audio item to be adjusted.
[VOL] buttons
Adjusts the Audio item.
⁄
• Refer to <Audio Control> (page 7) for the operation
method, such as the procedures for Audio control and
others operations.
In Tuner source
[FM]/ [AM] buttons
Selects the band.
Each time you press the [FM] button, the band
alternates between the FM1, FM2, and FM3 bands.
[4]/ [¢] buttons
Tune up or down band.
[0] — [9] buttons
Press buttons [1] — [6] to recall preset stations.
In Disc source
[4]/ [¢] buttons
Going forwards and backwards between track/files.
[+]/ [–] buttons
Going forwards and backwards between disc/
folders.
[38] button
Each time you press the button, the song pauses
or plays.
[0] — [9] buttons
When in <Direct Track/File Search> (page 13) and
<Direct Disc Search> (page 13), enters the track/
file/disc number.
B64-3948-0000English.indd20B64-3948-0000English.indd20 07.7.134:25:04PM07.7.134:25:04PM
This manual suits for next models
2
Table of contents
Other Mitsubishi Car Receiver manuals

Mitsubishi
Mitsubishi MMES User manual

Mitsubishi
Mitsubishi CQ-EB6260L User manual

Mitsubishi
Mitsubishi DY-6MW7U53-2 User manual

Mitsubishi
Mitsubishi MZ360119EX(DPXMP2090SM4) User manual

Mitsubishi
Mitsubishi DY-1MU3E21-T User manual

Mitsubishi
Mitsubishi DY-1MU3R45-T User manual

Mitsubishi
Mitsubishi CQ-JB3160AA User manual

Mitsubishi
Mitsubishi MZ360216EX User manual

Mitsubishi
Mitsubishi DY-5MU4R69-T-3 User manual

Mitsubishi
Mitsubishi DY-2X64WT-2-TH User manual