Mo-vis Hand Warmer IDM-HW User manual

OWNERS MANUAL
Hand Warmer
Stealth’s mo-Vis Series Adjustable Heating Device
Alternative Drive Controls

Customer Satisfaction 1.0
Stealth Products strives for 100% customer satisfaction. Your complete
satisfaction is important. Please contact us with feedback or suggested changes
that will help improve the quality and usability of our products. You may reach
us at:
General
Read and understand all instructions prior to the use of the product. Failure
to adhere to instructions and warnings in this document may result in prop-
erty damage, injury, or death. Product misuse due to failure of the following
instructions will void the warranty.
Immediately discontinue use if any function is compromised, parts are missing,
loose, or shows signs of excessive wear. Consult with your supplier for repair,
adjustment, or replacement.
Stealth Products, LLC
104 John Kelly Drive, Burnet, TX 78611
Phone: (512) 715-9995 Toll Free: 1(800) 965-9229
Fax: (512) 715-9954 Toll Free: 1(800) 806-1225
info@stealthproducts.com www.stealthproducts.com
i

Important Information 2.0
Important Information!
All persons responsible for tting, adjustment, and daily use of the devices
discussed in these instructions must be familiar with and understand all
safety aspects of the devices mentioned. In order for our products to be used
succesfully, you must:
• Read and understand all instrucons and warnings.
• Maintain our prodcuts according to our instrucons on care and maintenance.
• Devices should be installed and adjusted by a trained technician.
Supplier Reference
Supplier:
Telephone:
Address:
Purchase Date:
Model:
ii

Introduction 3.0
Before you install or begin using this product, it is important that you read and
understand the content of these installation and operating instructions.
The installation instructions will guide you as an installer through the options
and possibilities with the mo-Vis product. The mo-Vis product should be
adjusted with the mo-Vis Congurator Software.
Instructions are written with the expressed intent of use with standard
congurations. They also contain important safety and maintenance
information, as well as describe possible problems that can arise during use. For
further assistance, or more advanced applications, please contact your supplier
or Stealth Products (512) 715-9995 or toll free at 1-800-965-9229.
Always keep the operating instructions in a safe place so they may be
referenced as necessary.
All information, pictures, illustrations and specications are based on the
product information that was available at the time of printing. Pictures and
illustrations shown in these instructions are representative examples and are not
intended to be exact depictions of the various parts of the product.
Ordering Documentation
You can download additional copies of this user manual on the Stealth website:
www.stealthproducts.com
Or search:
mo-Vis Hand Warmer Owner’s Manual in the search bar at the top of the page.
iii

Warranty 4.0
Our products are designed, manufactured, and produced to the highest of
standards. If any defect in material or workmanship is found, Stealth Products
will repair or replace the product at our discretion. Any implied warranty,
including the implied warranties of merchantability and fitness for a
particular purpose, shall not extend beyond the duration of this warranty.
Stealth Products, LLC does not warrant damage due to, but not limited to:
•Misuse, abuse, or misapplicaon of products.
•Modicaon of product without wrien approval from Stealth Products, LLC.
•Any alteraon or lack of serial number, where applicable, will automacally void this
warranty.
•Stealth Products, LLC is liable for replacement parts only.
•Stealth Products, LLC is not liable for any incurred labor costs.
No person is authorized to alter, extend, or waive the warranties of
Stealth Products, LLC.
Stealth Products warrants against failure due to defective materials or
workmanship:
Covers: 180 days
Hardware: 5 years
Electronics: 3 years
In Case of Product Failure
In the event of product failure covered by our warranty, please follow the
procedures outlined below:
1. Call Stealth Products at +1 (512) 715-9995 or toll free at +1 (800) 965-9229.
2. Request the Returns Department or obtain a Return Authorizaon (RA) from the Returns
Department and follow department documentaon instrucons.
iv

Table of Contents 5.0
v
1.0 Customer Satisfaction ................................................................................. i
2.0 Important Information............................................................................... ii
3.0 Introduction ............................................................................................... iii
4.0 Warranty ..................................................................................................... iv
5.0 Table of Contents........................................................................................ v
6.0 Warning Labels......................................................................................... viii
6.1 Warning Labels........................................................................................................viii
6.2 Limited Liability.......................................................................................................viii
6.3 Testing.........................................................................................................................viii
7.0 Safety Precautions ..................................................................................... ix
8.0 Design and Function................................................................................... 1
8.1 Intended Use...............................................................................................................1
8.2 Features.........................................................................................................................1
8.3 Mounting......................................................................................................................1
9.0 Parts and Accessories ................................................................................. 2
9.1 Hand Warmer Set......................................................................................................2
9.2 Hand Warmer Accessory........................................................................................3
10.0 Installation Instructions ........................................................................... 4
10.1 Preparations..............................................................................................................4
10.2 Tools.............................................................................................................................4
10.3 Installation Plan .......................................................................................................4
11.0 Hand Warmer Installation ....................................................................... 5
11.1 Installation .................................................................................................................5
11.2 Connection ................................................................................................................5

Table of Contents 5.0
vi
12.0 Functioning ............................................................................................... 6
12.1 Operation and Level Selection........................................................................6
12.2 Parameter Conguration...................................................................................6
12.3 Automatic Error Detection................................................................................6
13.0 Conguration Software ........................................................................... 7
13.1 Software Capabilities...........................................................................................7
13.2 Software Download .............................................................................................7
14.0 Testing...................................................................................................... 12
14.1 Check that the Hand Warmer....................................................................... 12
14.2 Operational Test.................................................................................................12
14.3 Test Drive ..............................................................................................................12
15.0 Adjustments ............................................................................................13
15.1 User Adjustments.............................................................................................. 13
16.0 Troubleshooting...................................................................................... 14
17.0 Error Codes .............................................................................................. 15
18.0 Settings ....................................................................................................17
18.1 Parameter Settings............................................................................................17
19.0 First Time Use.......................................................................................... 18
19.1 Dealer Assistance...............................................................................................18
19.2 User Testing .........................................................................................................18
19.3 Conditions of Use.............................................................................................. 18
20.0 Maintenance............................................................................................ 19
20.1 Cleaning ................................................................................................................19
20.2 Monthly Check ................................................................................................... 19
20.3 Hand Warmer Maintenance ..........................................................................19

Table of Contents 5.0
vii
21.0 Technical Data ......................................................................................... 20
21.1 Product Description and Code ....................................................................... 20
21.2 Dimensions............................................................................................................. 20
21.3 Voltage Supply...................................................................................................... 20
21.4 Current Supply...................................................................................................... 21
21.5 Power Consumption ........................................................................................... 21
21.6 Cable Length..........................................................................................................21
21.7 XLR Connector ......................................................................................................21
21.8 Weight......................................................................................................................21
21.9 Heater Temperature Shutdown ...................................................................... 21
21.1.0 EMC Requirements ..........................................................................................22
22.0 Notes........................................................................................................23

Warning Labels 6.0
Warning Labels 6.1
Warnings are included for the safety of the user, client, operator and property.
Please read and understand what the signal words SAFETY, NOTICE, CAUTION,
WARNING and DANGER mean, how they could affect the user, those around the
user, and property.
Limited Liability 6.2
Stealth Products, LLC accepts no liability for personal injury or damage to
property that may arise from the failure of the user or other persons to follow
the recommendations, warnings, and instructions in this manual.
Stealth Products does not hold responsibility for nal integration of nal
assembly of product to end user. Stealth Products is not liable for user death or
injury.
Testing 6.3
Initial setup and driving should be done in an open area free of obstacles until
the user is fully capable of driving safely.
DANGER Identies an imminent situation which (if not avoided) will
result in severe injury, death, and property damage.
WARNING Identies an potential situation which (if not avoided) will
result in severe injury, death, and property damage.
CAUTION Identies an potential situation which (if not avoided) will
result in minor to moderate injury, and property damage.
NOTICE
Identies important information not related to injury, but
possible property damage.
SAFETY
Indicates steps or instructions for safe practices, reminders
of safe procedures, or important safety equipment that may
be neccesary.
viii

Safety Precautions 7.0
•The Hand Warmer is intended to be ed on any power wheelchair with 24V connecon.
•Incorrect use or installaon may lead to risk of injury to the user and damage to the
wheelchair or other property.
•In order to reduce these risks, you should carefully read this manual, paying aenon to the
safety instrucons and warnings.
•Any unauthorized use of the product may lead to increased risk of accident. Carefully follow
the recommendaons in this manual in order to prevent accidents from use.
•The Hand Warmer unit is a non-serviceable part.
•Always contact your dealer or service technician for quesons concerning the operaon or
adjustment of the Hand Warmer.
•The Hand Warmer connuously measures the temperature and supply voltage. When a
fault is detected the device will switch itself o. If there is an undetected fault, the interface
contains an addional internal fast blow fuse of 4A and a PTC fuse of 3A.
CAUTION
At full power the Hand Warmer will produce warm air (up to 70°C/158°F),
it is advised to leave a minimum distance between the hand and the
warmer of 100mm (4in).
CAUTION
The Hand Warmer’s air inlet and outlet are both at the front. Leave at least
a distance of minimal 50mm (2in) between the front of the Hand Warmer
and any object.
WARNING
The Hand Warmer has an open structure at the front. Mount the Hand
Warmer in a way that water cannot enter into the interface. Some drops of
water will not cause problems, however excess water must be avoided.
WARNING
The XLR connector is internally fused with a fuse of 5A. This is necessary
because the wire gauge cannot carry more current. The XLR connector
should not be cut in order to make a connection directly to the wheelchair
batteries unless a fuse of 5A is added.
ix

Intended Use 8.1
The mo-Vis hand warmer improves flexibility of cold body parts. The hand
warmers main functionality is to keep the area around a wheelchairs input device
warm. This increases the comfort of the user and their ability to control the input
device .
Design and Function 8.0
Features 8.2
The Hand Warmer is:
•An air heater powered by the wheelchair baery power (24V).
•Contains its own control electronics.
•Air is drawn at the front, heated, and forced out again at the front using an internal fan.
• The air inlet and outlet are at the same side, therefore warm air is recycled instead of using
air from the cold environment.
•Easily adjustable with the mo-Vis Congurator Soware.
•Temperatures can be adjusted, with a minimum temperature of 104°F (40°C) and a maximum
temperature of 122°F (50°C).
Mounting 8.3
The Hand Warmer can be mounted at any location on the wheelchair.
•Use the included rod, clamp, and bolt.
•On a at surface.
•The oponal dome (IDM-DOME) can be mounted with the provided Velcro to a at surface.
1

Hand Warmer Set 9.1
The Hand Warmer Set consists of the following parts:
Parts and Accessories 9.0
Product Description Product Code
Hand Warmer Set IDM-HW
Hand Warmer Unit
Hand Warmer
Extenstion Lead 180cm
Hand Warmer Mounting Set:
• Quick-to-Mount Half
Clamp 6mm in Diame-
ter, 14mm long
• Quick-to-Mount Rod
6mm in Diameter,
50mm long
• Hand Warmer Dual Lock
(22mm x 9mm x 3.5mm)
2 Pieces
2

Hand Warmer Accessory 9.2
Parts and Accessories 9.0
Product Description Product Code
2-Hands Dome IDM-DOME
To enclose the area around the hands, and to better maintain the air
temperature, a dome-shaped hood is available as an option.
•This dome reduces heat loss, resulting in a decreased power consumption, without
compromising comfort.
•The dome can be ordered as an optional accessory.
•The dome is delivered with four sets of hook and loop tape strips to attach the dome to
any flat surface (ex. Tray).
•The dome openings can be easily adjusted by cutting or shaving in order to meet the users
needs.
CAUTION
Use the proper tools to adjust the dome openings. The warranty will be
voided for any fault as a result of adjusting the dome.
3

Installation Instructions 10.0
CAUTION
Use the proper tools to install and adjust the Hand Warmer. The use of
improper tools may cause damage to the device.
CAUTION
Any connection must always be secured with all delivered screws. Only
use the screws provided in the package.
WARNING
An incorrect programming of the Hand Warmer or chair electronics may
cause damage to the devices or injury to the user.
Preparations 10.1
Only a qualied service technician may install the Hand Warmer.
Tools 10.2
Use the proper tools to install and adjust the Hand Warmer set to the chair.
Installation Plan 10.3
Set up an installation plan before starting the installation of the Hand Warmer.
This plan should be based on the users’ needs:
• Where the Hand Warmer should be placed.
• How the Hand Warmer will be operated.
•The Hand Warmer parameter sengs.
4

Hand Warmer Installation 11.0
CAUTION
Tighten screws rmly, but not excessively. Excessive force may damage the unit.
WARNING
Make sure that cabling is mounted in such a way that excessive wear and
tear is avoided.
Installation 11.1
1. Dene the place and posion of the Hand Warmer on the wheelchair. The Hand Warmer
can be mounted on any locaon of the chair.
2. Secure the Quick-to-Mount half clamp and bolt on the boom of the Hand Warmer
housing. (2 posions is 90° steps are possible)
3. Slide the unit over a Quick-to-Mount rod to posion the Hand Warmer on the wheelchair.
(The rod and bolt are included)
Connecting 11.2
Place and connect the Hand Warmer Extension Lead (included) with the Hand
Warmer connector and lead the XLR power cable to the wheelchair joystick or
battery. Secure the power cable to the wheelchair.
WARNING
The XLR power cable connector contains a fuse. Use an adapter to con-
nect to non-XLR power connections.
5

Functioning 12.0
Operation and Level Selection 12.1
At the back of the device, a push button and jack connection are available.
A button connected to the jack connection has the same functionality as the
on-board push button.
The functionality of the button is to cycle through the levels (powers settings) of
the device. You can adjust the number of levels using the mo-Vis Congurator
Software to alter the parameters.
The green LED at the front of the hand warmer interface indicates the status of
the device:
Parameter Conguration 12.2
The device is equally equipped with an isolated mini USB connection at the
back. Use this connection to connect the device to a PC to connect with the
mo-Vis Software.
Automatic Error Detection 12.3
The Hand Warmer contains a controller that continuously checks the integrity
of the device. Whenever a problem is detected, the device will be switched off
automatically. Check the fault ash code or use the congurator to check why the
device has stopped.
Mode LED Indicator
Sleep Mode Off
Stand-by Short on, very long off
Active Level 1 Short on, long off
Active Level 2 Short on, medium off
Active Level 3 Short on, short off
Fault Number of ashes, long off
6
7
Conguration Software 13.0
Software Capablities 13.1
It is possible to adjust the working of the Hand Warmer according to the users’
needs. The following are fully adjustable:
•Auto O me
•Number of Power Sengs (Maximum of 3)
•Minimum/Maximum temperature of the heater
•Minimum/Maximum speed of the fan (airow)
Software Download 13.2
1. You can download the soware on the Stealth website: www.stealthproducts.com.
2. Connect the Hand Warmer to the PC using a mini USB cable.
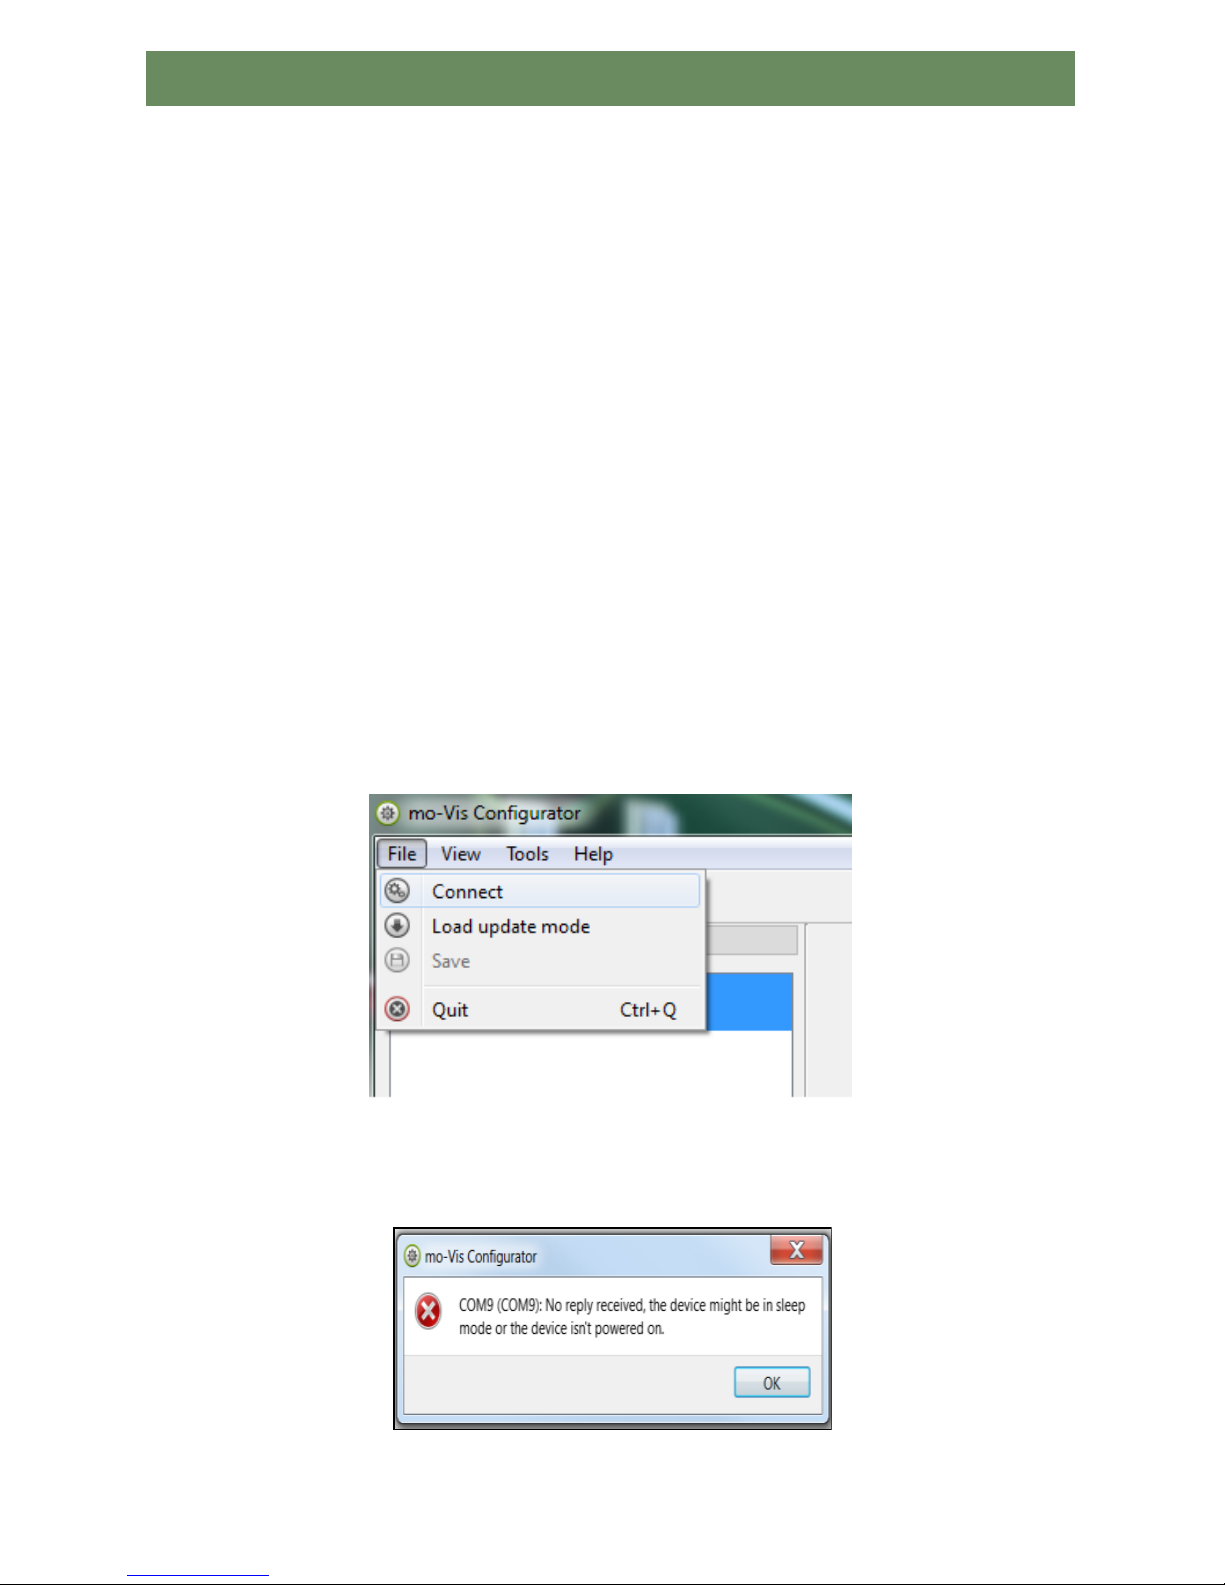
3. Open the mo-Vis Congurator Soware. You computer will choose a COM port and recognize
the product that is linked to the PC, but will sll show the status “Disconnected”.
4. Click on the Connect icon to make the connecon between the Congurator Soware and
the Hand Warmer, or choose in the menu bar, File-Connect.
5. When the device is in sleep mode or not powered on, you will receive this message:

Conguration Software 13.0
8
6. Once the connecon is made, the soware will receive all the details and informaon out of
the mo-Vis device and will display them on the right hand side of the window.
7. The soware program always starts at the lowest Access Level. In order to receive more
informaon or see and change more parameters, you can upgrade your Access Level from
User to Aendant or Dealer.
•To change levels, click on Tools. In the drop down menu, select the Access Level you
would like to use. For a User prole, no password is required.
•You will be asked to enter your password. This password will need to be requested.
Contact Stealth Products to obtain passwords for Dealer and/ or User Access Levels.
8. Aer the password has been correctly entered, you will be asked to restart the applicaon.
Any unsaved changes will be lost. If you did make changes and want to save them, choose
NO and rst save your changes. If it is okay to restart the applicaon, click Yes. The device
will now be disconnected.
•Repeat Step 4 to connect the device back to the computer.
•Depending on the Access Level, you will see General Informaon, Parameters, Log, and
Diagnoscs.

9
Conguration Software 13.0
9. When Parameters is selected, a list of parameters will be shown.
•By selecng the specic parameter you wish to adjust, the view on the right will display
the stored Default, Minimum and Maximum values of the specic parameter.
•The parameter can now be changed by entering a new value in the textbox, by clicking
the arrows next to the box, or by selecng a new value from the drop down box.
•Values that are being changed will be shown in green.
•Click Apply to write the temporary value in the device. You can immediately test it, but
the new value is not stored yet.
•If you lose connecon, any changes you made will be lost. IF you would like to store
the parameter values into the device, click on the Save icon or click in the menu bar,
File-Save. The new parameter values will now be stored permanently in the device.

Conguration Software 13.0
10
Aenon: When a parameter is changed without clicking the Apply buon, the new values are
not remembered. Once another parameter seng is selected, the previous parameter will go
back to the original seng.
Clicking on the Reset buon will set the parameter value back to the default value. Click Apply
to store locally and Save to make the change to the device.
10. When your Access Level is set to Dealer, the categories Log and Diagnoscs will be displayed
as well.
•When Log is selected, an overview of all occurred errors and/or acons will be displayed
with a number of mes that they occurred, and a Reset buon to set the counter back
to zero.
•When Diagnoscs is selected, you will be able to run a Field Diagnosc Test. Click on
Field Diagnosc Test and then Run Test to start the Field Test.
Table of contents
Other Mo-vis Wheelchair manuals

Mo-vis
Mo-vis Manual Swing 2G User manual

Mo-vis
Mo-vis Foot Control Omni User manual

Mo-vis
Mo-vis Multi Swing 2G Arm User manual

Mo-vis
Mo-vis P002-61 User manual

Mo-vis
Mo-vis Multi Swing 2G Arm User manual

Mo-vis
Mo-vis All-round Joystick Omni User manual

Mo-vis
Mo-vis P002-33 Guide

Mo-vis
Mo-vis Multi Swing 2G Arm User manual
Popular Wheelchair manuals by other brands


Drive
Drive DuoMotion operating instructions

max mobility
max mobility SmartDrive MX1 user manual

Sunrise Medical
Sunrise Medical SOPUR Xenon2 FF Directions for use

Breezy
Breezy BasiX2 Directions for use

Invacare
Invacare Pronto M71 Base Owner's operator and maintenance manual

CareCo
CareCo Avigo Compact user manual