MobiBlu DAH-1000 User manual

User Manual
www.mobiblu.com
P/N : SAF100M0B3

Safety Warnings and Cautions
Please be aware of these safety instructions and use the product properly in
order to prevent risks of injury or damages.
Avoid exposing the product to direct
sunlight (High temperatures applied
to the product may cause damage.)
Avoid placing the product under high
moisture or dust level (It cause damage
to the product.)
Avoid dropping or causing impact the
product. (It may cause serious damage
to the product.)
Do not touch or connect the product
with wet hands or if you are in contact
with water.. (This may cause electric
shocks when the power is connected.)

Special Features of the Product
Polished Simple Design
The World Best Multi-Codec Player
Quality enhancements have been made including an upgraded
Graphic LCD with Negative Graphic display.
Mass Storage: You don’t need the software CD anymore. Take the
convenience of direct recognition by the PC using Mass Storage
function by connecting only.
Firmware Upgrade: Enjoy the advantage of advanced product with the
firmware upgrade function.
FM Radio: You can also listen to the FM radio anywhere in the world.
Functions include auto-search and user defined pre-set frequencies.
Preset EQ & User EQ 1.2: Feel the differences using the five stages of
preset sound qualities and two user-defined sound qualities: Normal
Rock JazzClassic PopUser EQ1User EQ2
Use the convenient study-support function of the product with the
advanced Linguistic-Repeat system.
Safety Warnings and Cautions
Do not use any chemical or detergent
for cleaning the products as it may
discolour or strip the product surface.
Never disassemble, repair or rebuild.
Contact the support department if
there are faults with the product.
Do not press on the LCD panel with
any sharp objects. (This may scratch
or damage the product and may void
the product warranty)
Keep the product away from areas
where extreme vibrations or
magnets exist.

Contents
1
My Multiformat Digital Audio Player
Thank you for purchasing our portable digital audio player.
The product is a Multi Purpose Digital Audio Player that is easy to us and stylish
in design and is complemented by a built-in FM Radio and a voice recording
function. The player is equipped with ‘solid state’ internal memory and a display
system with negative graphic LCD for even better on screen clarity. Benefiting
from Plug & Play technology installation CD’s are not required for most PC
Users*, combined with this the unit can also be used as a mass storage device
for all those ‘important or not so important’ files. (*Provided drivers will be required
for Win98/SE users, also all users will need to use CD for future OS updates.)
Now we invite you to the new Digital Audio World!
1
2
3
4
5
6
8
11
12
14
17
21
32
33
34
35
36
38
39
40
44
45
46
49
59
60
62
64
65
66
My Multiformat Digital Audio Player
What is a Digital Audio Player?
Product Specifications
PC System Requirements and Accessories
Hardware Descriptions
About Power Supply
Software Installation
Connecting the Player to a PC using a USB Cable
Separating the USB cable from the Player
File Download/Upload
OS Update & Format
Lyrics
LCD DISPLAY Illustration
Power On /OFF
Music Listening
Volume Control
Music Selection
HOLD (Lock Function)
MODE Changing
Voice Recording
FM RADIO MODE
Searching FM Frequencies
Storing the Selected Frequency
MENU Setting(Setting, Display, Timer, Play Mode, EQ, Erase. About)
Setting for Ranged Repeat
How to select a folder
Remote Controller Instruction
It May Not be a Trouble!
Warranty Services
FCC RF INTERFERENCE STATEMENT

3
Product Specifications
1
2
What is a Digital Audio Player?
MP3 stands for MPEG1-Layer3 and it uses a compression technology that converts
conventional CD music data into an MP3 file format that is used on a PC, at 1/12
compression ratio. It provides near CD-quality music at 128kbps.
CD Data MP3 Data
1/12
Internet PC
Communication
Digital Audio
File
Digital Audio
File
Digital Audio Player
1/2
WMA Data
What is a MP3 file?
It is a multimedia compression method from Microsoft. The technology specifically
compresses music data from the window Media Technologies”. As it provides
sound quality equivalent to 128Kbps using only 64Kbps format, it takes only half as
much space as MP3 file format for compressing music data.
What is a WMA file?
It is a portable device that stores and plays digital audio files, which once were only
playable on a PC.
What is a Portable Digital Audio Player?
FM
TUNER
Category Item Specification
Audio
File Support
Recording time
Max. play time
Battery
Dimensions(WxHxD) 804017.2mm (3.15”1.58”0.7”)
35g ( without battery )
Weight(without battery)
LCD
Negative Graphic LCD
Operating temp. range
USB
File type MP3, WMA, ADPCM
MP3: 8Kbps or higher WMA: 32Kbps or higher
Bit Rate
Download speed 4Mbps(USB Version 1.1)
Voice recording 1040 min. (based on 256MB,
when the recording MODE is 32kbps)
-5~70
alkaline 1.5V AAAx1
Approximately 12 hours (using 1 AAA alkaline)
FM Frequency Range
87.5MHz~108.0MHz
20Hz ~ 20KHz
Max. 10mW(16) at max. volume
50
90
Headphone/earphone cord antenna
Headphone output
S/N
Antenna
Frequency Characteristics
Headphone output
S/N

Hardware Descriptions
5
1
4
PC System Requirements and Accessories
Included Accessories
PC system requirements for the product are as follows:
Microsoft OS (Windows 98, ME, 2000, XP)
CD-ROM Drive
Pentium 200MHz or higher CPU
32MB (64MB for Windows ME or 2000) or higher RAM
Available hard disk space of more than 128 MB
(Additional hard disk space is required for storing music files)
USB port available (Rear port highly recommended)
Software CD
Neck Strap Remote Control
(Optional Item)
AAA battery
The optional items may not be included depending on areas and markets.
Carrying Case
Stereo
Earphones
User Manual USB cable
Connection Port for
Earphones/Remote controller
Volume Up/Down
LED for Play
Play /Pause / FF / REW
Microphone
MENU button
REC button/ Repeat A-B
button
LCD window
Connection port for USB
cable
Neckband crook
Battery Case Cover
HOLD (LOCK) Switch
Adjustable
Armband
(Optional Item)
Digital Audio Player
Front Side
Rear Side

7
About Power Supply
1
6
About Power Supply
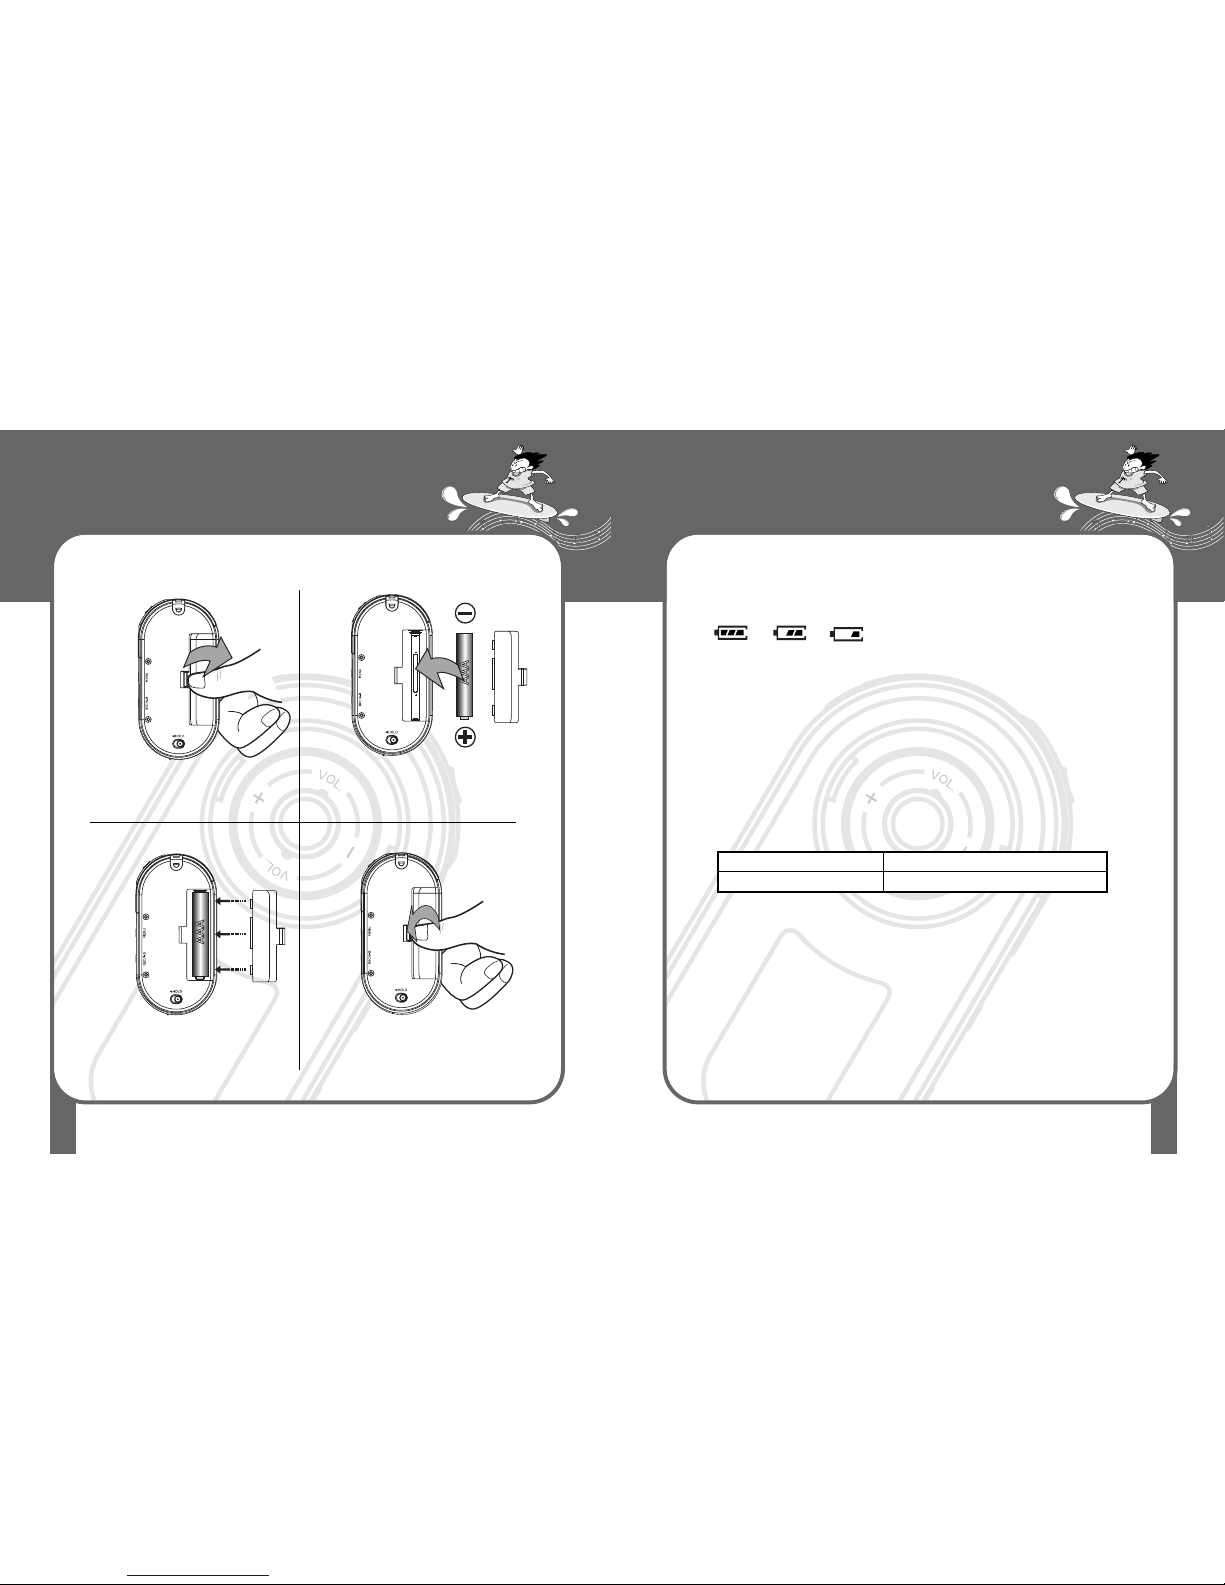
Using cylindrical AAA type batteries Battery Power Indicator
Open the battery case cover on the
back by pushing the tip in the direction
of arrow using a finger / fingernail.
After fitting the cover to the groove,
match the cover with the case grooves
Insert an AAA battery with correct polarity
positions as shown in the picture
After matching them, push the cover in the
direction of the arrow to close until you hear a
small ‘click’.
At its initial start-up, the remaining battery indicator may fluctuate. After 5 or 6
seconds, the display will show the actual reading.
(Based on the inserted battery )
(Full) (Medium) (Low)
Due to the characteristics of regular batteries, there can be situations when the
product does not operate even when the battery level indicator shows above
medium level. When this happens, please exchange the batteries with new
ones.
(Alkaline batteries last longer than manganese batteries)
Exchange batteries when the following happens:
The indicator displays “Low battery” sign.
The player stops or does not respond to pushing buttons.
LCD light does not turn on when buttons on the main body are pushed.
1. Continuous play time
- Using One Battery: 12hours (AAA alkaline dry cell)
- MP3 128kbps - Based on Vol. User EQ Max.
2. Conditions for elapsing time
- Output: Max. 7mV(R)
- Above values were measured using commercially available alkaline batteries, and
actual elapsing time depends on the type of batteries, manufacturer and its usage
conditions.
Type MP3 Play
Alkaline battery 12 hours(alkaline 1.5V AAA1)

9
Software Installation
1
8
Software Installation
The installation will start automatically as soon as the
CD is inserted, showing a pop-up screen asking you to
choose languages to use. Select a language, and click
[OK].
Please Note!
11
※For Windows 98SE users: install the software first before using the player. (Otherwise,
the player cannot be recognized as a mass storage device on your PC.)
Reboot the system when requested by Windows.
If the Setup file does not auto run, browse the setup.exe file from the CD-ROM.
Continue the installation in accordance with the
following diagrams.
22
- Recognized as a mass storage, the player can upload and download files
without a separate software installation.
- To mark your lyrics, follow the installation instructions.
Click!
Click!
Click!
Click!
Click!
Click!
Click!
Click!
Click!
Click!
Click!
Click!
Click!
Click!
Click!
Click!
Click!
Click!
Click!
Click!
Click!
Click!
Click!
Click!
Click!
Click!
Click!
Click!
Click!
Click!
Click!
Click!
Click!
Click!
Click!
Click!
Click!
Click!
Click!
Click!
Click!
Click!
Click!
Click!
Click!
Click!
Click!
Click!
Click!
Click!
Click!
Click!
Click!
Click!
Click!
Click!
Click!
Click!
Click!
Click!
Click!
Click!
Click!
Click!
Click!
Click!
Click!
Click!
Click!
Click!
Click!
Click!
Click!
Click!
Click!
Click!
Click!
Click!
Click!
Click!
Click!
Click!
Click!
Click!
Click!
Click!
Click!
Click!
Click!
Click!
Click!
Click!
Click!
Click!
Click!
Click!
Click!
Click!
Click!
Click!
Click!
Click!

11
Connecting the Player to a PC using a USB Cable
1
10
Software Installation
Verify if the Menu “Start Program HYUNWON
DAH-1000 MP3 Player” has been created as in the
following diagram.
33Connect one end of the ‘supplied’ USB cable to one of
the USB ports on the back of the PC, and connect the
other end to the player.
11
After the USB connection has been successfully
completed a green arrow icon will appear on the
toolbar located at the bottom-right of the screen.
22
Note : Connection Error may occur when connecting the player into
the USB port or USB hub at the front of the PC.
Note: Connect the
USB Port after
opening the cover
USB Cable
Attention to the direction!
DATA In/Out
Port (USB Port)
Player
USB Port on the
back of the PC

13
Disconnecting the USB cable from the Player
1
12
Disconnecting the USB cable from the Player
Before disconnecting the USB cable from the PC,
double click on the green arrow icon on the toolbar
located at the bottom right of the screen.
11
Select the ‘USB High Capacity Storage Device’ to
be disconnected, then click on the [Stop] and [OK]
buttons subsequently.
22
When the dialogue box “Safe Removal of the Hardware”
appears, click on the [OK] button to remove the USB Cable.
33
Please Note!
Fatal errors may occur in the PC or the product if you
do not follow the above procedures when removing
the USB cable.
Fatal errors may occur in the PC or the product if the
USB cable was removed during download/ upload/
format/ OS Update.
Click!
Click!
Click!
Click!
Click!
Click!
Click!
Click!
Click!
Click!
Click!
Click!
Click!
Click!
Click!
Click!
Click!
Click!
Click!
Click!
Click!
Click!
Click!
Click!
Click!
Click!
Click!
Click!
Click!
Click!
Click!
Click!
Click!
Click! Click!
Click!
Click!
Click!
Click!
Click!
Click!
Click!
Click!
Click!
Click!
Click!
Click!
Click!
Click!
Click!
Click!
Click!
Click!
Click!
Click!
Click!
Click!
Click!
Click!
Click!
Click!
Click!
Click!
Click!
Click!
Click!
Click!
Click!
Click!
Click!
Click!
Click!
Click!
Click!
Click!
Click!
Click!
Click!
Click!
Click!
Click!
Click!
Click!
Click!
Click!
Click!
Click!
Click!
Click!
Click!
Click!
Click!
Click!
Click!
Click!
Click!
Click!
Click!
Click!
Click!
Click!
Click!
Double Click!
Double Click!
Double Click!
Double Click!
Double Click!
Double Click!
Double Click!
Double Click!
Double Click!
Double Click!
Double Click!
Double Click!
Double Click!
Double Click!
Double Click!
Double Click!
Double Click!
Double Click!
Double Click!
Double Click!
Double Click!
Double Click!
Double Click!
Double Click!
Double Click!
Double Click!
Double Click!
Double Click!
Double Click!
Double Click!
Double Click!
Double Click!
Double Click!
Double Click!

15
File Download/Upload
1
14
File Download/Upload
Connect the product to the PC using the USB cable and
select the files you would like to transfer to the unit then click
the right button on your mouse and select ‘Copy’ from the list
of options.
11
Please Note!
Note!
As well as playing music, you may also use the
product to upload/download any other data files (*.jpg,
*.xls, *.doc,….) to/from the PC as a portable disk.
Now select the device as your new directory and then
using the right button of the mouse click on the ‘Paste’ to
paste the file(s) to the portable disk as depicted below.
The product is recognized as a portable disk and is
located in “My Computer” window.
DO NOT remove the USB Cable during file transfer If so,
fatal errors may occur with your PC or the player.
22
Click!
Click!
Click!
Click!
Click!
Click!
Click!
Click!
Click!
Click!
Click!
Click!
Click!
Click!
Click!
Click!
Click!
Click!
Click!
Click!
Click!
Click!
Click!
Click!
Click!
Click!
Click!
Click!
Click!
Click!
Click!
Click!
Click!
Click!
Click!
Click!
Click!
Click!
Click!
Click!
Click!
Click!
Click!
Click!
Click!
Click!
Click!
Click!
Click!
Click!
Click!
Click!
Click!
Click!
Click!
Click!
Click!
Click!
Click!
Click!
Click!
Click!
Click!
Click!
Click!
Click!
Click!
Click!

17
OS Update & Format
Download the OS for the player from the CD to the PC.
Recovery Mode
The system will enter into the Recovery Mode 5 seconds after connecting the
USB cable to the player while pressing and holding the Play button on the player.
When running the Recovery Mode for the first time in Windows XP,
install the Player Recovery Device” as instructed by the PC.
Note!
Update the OS when the product is malfunctioning.
Contact our service office if the product is still malfunctioning
after the OS update.
11
Please Note!
Install the program on the PC before updating the
OS. (See page 8)
1
16
File Download/Upload
File copy has now been completed as shown below.
33
Please Note!
To upload and save the file to the PC the same method is
used, just select the player as the source drive.
Drag & drop the file using a mouse when
downloading/uploading a file.

1
18
OS Update & Format
Click on “Start
Programs
Lyrics Manager Software
DAH-1000
DAH-1000 Update” subsequently.
22
What is OS?
OS is an internal operating system to drive the product.
Please Note!
19
OS Update & Format
Click on “Start” button from the OS update window
which appears about 10 seconds later to complete the
OS Update and “Close”.
33
The OS Update has been completed. Now use the
product by turning the power on.
44
Check in the
blank when
only formatting.
Note!
Do not remove the USB Cable during the OS Update of Format.
If so, fatal errors may occur in the PC or the product.
Click!
Click!
Click!
Click!
Click!
Click!
Click!
Click!
Click!
Click!
Click!
Click!
Click!
Click!
Click!
Click!
Click!
Click!
Click!
Click!
Click!
Click!
Click!
Click!
Click!
Click!
Click!
Click!
Click!
Click!
Click!
Click!
Click!
Click!
Click!
Click!
Click!
Click!
Click!
Click!
Click!
Click!
Click!
Click!
Click!
Click!
Click!
Click!
Click!
Click!
Click!
Click!
Click!
Click!
Click!
Click!
Click!
Click!
Click!
Click!
Click!
Click!
Click!
Click!
Click!
Click!
Click!
Click! Click!
Click!
Click!
Click!
Click!
Click!
Click!
Click!
Click!
Click!
Click!
Click!
Click!
Click!
Click!
Click!
Click!
Click!
Click!
Click!
Click!
Click!
Click!
Click!
Click!
Click!
Click!
Click!
Click!
Click!
Click!
Click!
Click!
Click!

21
Lyrics MarkingOS Update & Format
1
20
11
Refer to OS Update on page 18~19.
Check in the blank of “Format Data
Area”
22
Click the “Start” button to format
the product and update the OS at
the same time.
Format with OS Update
About the Format
Be Careful before formatting the product, ALL files will
be deleted.
Click!
Click!
Click!
Click!
Click!
Click!
Click!
Click!
Click!
Click!
Click!
Click!
Click!
Click!
Click!
Click!
Click!
Click!
Click!
Click!
Click!
Click!
Click!
Click!
Click!
Click!
Click!
Click!
Click!
Click!
Click!
Click!
Click!
Click!
◉
Names and Functions of the Parts
1) Function Buttons
1) Function Buttons
2) Preview Windows
4) File Lists
3) Folder Lists
This button removes lyrics from the music files having
lyrics.
This button enables you to input lyrics to the music file
selected from the file list.

1
22
Lyrics Marking
2) Preview Window
This button shows lyrics on the LCD screen when playing
music files from the manager.
This button renews a file list.
This shows the lyrics by playing the file with lyrics marked.
3) Folder List
This shows a folder list.
4) File List
This shows music files in a folder selected from the folder list.
23
Lyrics Marking
This function marks your own lyrics directly to music files.
1
Click on “Start
Programs
Lyrics Manager Software
DAH-1000
Lyrics Manager” subsequently.
2
Select the model before you mark the lyrics.
◉
Marking My Own Lyrics
Click!
Click!
Click!
Click!
Click!
Click!
Click!
Click!
Click!
Click!
Click!
Click!
Click!
Click!
Click!
Click!
Click!
Click!
Click!
Click!
Click!
Click!
Click!
Click!
Click!
Click!
Click!
Click!
Click!
Click!
Click!
Click!
Click!
Click!
Click!
Click!
Click!
Click!
Click!
Click!
Click!
Click!
Click!
Click!
Click!
Click!
Click!
Click!
Click!
Click!
Click!
Click!
Click!
Click!
Click!
Click!
Click!
Click!
Click!
Click!
Click!
Click!
Click!
Click!
Click!
Click!
Click!
Click!

1
24
Lyrics Marking
3
Find a folder that has music files from the folder list.
4
Select the files you want to mark, and click [EDITOR] button.
Click!
Click!
Click!
Click!
Click!
Click!
Click!
Click!
Click!
Click!
Click!
Click!
Click!
Click!
Click!
Click!
Click!
Click!
Click!
Click!
Click!
Click!
Click!
Click!
Click!
Click!
Click!
Click!
Click!
Click!
Click!
Click!
Click!
Click!
25
Lyrics Marking
5
Either input the lyrics on the pop-up
screen directly or import the LRC files
by clicking the [IMPORT] button.
Once the input is finished, click [OK].
6
Play the music file by
clicking the [Play] button on
the preview screen.
What is an LRC file?
This file includes Time table information and Lyric
information. And could make *.LRC files with
Nullsoft's WINAMP player, WINAMP program is
available to download from below website.
www.winamp.com
Reference!!
Click!
Click!
Click!
Click!
Click!
Click!
Click!
Click!
Click!
Click!
Click!
Click!
Click!
Click!
Click!
Click!
Click!
Click!
Click!
Click!
Click!
Click!
Click!
Click!
Click!
Click!
Click!
Click!
Click!
Click!
Click!
Click!
Click!
Click!
Click!
Click!
Click!
Click!
Click!
Click!
Click!
Click!
Click!
Click!
Click!
Click!
Click!
Click!
Click!
Click!
Click!
Click!
Click!
Click!
Click!
Click!
Click!
Click!
Click!
Click!
Click!
Click!
Click!
Click!
Click!
Click!
Click!
Click!

1
26
Lyrics Marking
7
Set up the time by
pressing the space bar
on the keyboard or
clicking the [SET
SYNC] button.
8
When the SYNC
Setting is completed,
click the “Marking”
button to finish it.
Click!
Click!
Click!
Click!
Click!
Click!
Click!
Click!
Click!
Click!
Click!
Click!
Click!
Click!
Click!
Click!
Click!
Click!
Click!
Click!
Click!
Click!
Click!
Click!
Click!
Click!
Click!
Click!
Click!
Click!
Click!
Click!
Click!
Click!
Click!
Click!
Click!
Click!
Click!
Click!
Click!
Click!
Click!
Click!
Click!
Click!
Click!
Click!
Click!
Click!
Click!
Click!
Click!
Click!
Click!
Click!
Click!
Click!
Click!
Click!
Click!
Click!
Click!
Click!
Click!
Click!
Click!
Click!
Click!
Click!
Click!
Click!
Click!
Click!
Click!
Click!
Click!
Click!
Click!
Click!
Click!
Click!
Click!
Click!
Click!
Click!
Click!
Click!
Click!
Click!
Click!
Click!
Click!
Click!
Click!
Click!
Click!
Click!
Click!
Click!
Click!
Click!
27
Lyrics Marking
9
After the lyrics marking
is completed, the music
files will be displayed
as “Marking” on the
item [Lyrics Marking]
from the file list.
10
Download the completed files that are marked, play the
files, and the lyrics will be displayed on the LCD screen.
◆MP3 with VBR encoding can occur mismatch of playing time due to file's
characteristic
"LOVE LETTER"
Send music letter to your lover and friends with lyric function.
Receiver can read your letter with Music file.
Reference!!

1
28
Lyrics Marking
◉
Modifying Lyrics and Time
This function modifies the time and lyrics of the files that are
marked.
2
Double-click the part of the lyrics that needs to be
modified, and adjust the corrections.
1
Select the music files from the file list and click the [EDITOR]
button.
DoubleClick!
DoubleClick!
DoubleClick!
DoubleClick!
DoubleClick!
DoubleClick!
DoubleClick!
DoubleClick!
DoubleClick!
DoubleClick!
DoubleClick!
DoubleClick!
DoubleClick!
DoubleClick!
DoubleClick!
DoubleClick!
DoubleClick!
DoubleClick!
DoubleClick!
DoubleClick!
DoubleClick!
DoubleClick!
DoubleClick!
DoubleClick!
DoubleClick!
DoubleClick!
DoubleClick!
DoubleClick!
DoubleClick!
DoubleClick!
DoubleClick!
DoubleClick!
DoubleClick!
DoubleClick!
29
Lyrics Marking
3
Select one of the listed time to be modify, and click the time
again to modify it.
Setting the time of the interval to
modify.
Click “OPTION” on the Editor window and
enter the time that you want on the “Sync +, -
interval.” (Unit: milliseconds – 50 = 0.5
second)
Reference!!
Click!
Click!
Click!
Click!
Click!
Click!
Click!
Click!
Click!
Click!
Click!
Click!
Click!
Click!
Click!
Click!
Click!
Click!
Click!
Click!
Click!
Click!
Click!
Click!
Click!
Click!
Click!
Click!
Click!
Click!
Click!
Click!
Click!
Click!
Click!
Click!
Click!
Click!
Click!
Click!
Click!
Click!
Click!
Click!
Click!
Click!
Click!
Click!
Click!
Click!
Click!
Click!
Click!
Click!
Click!
Click!
Click!
Click!
Click!
Click!
Click!
Click!
Click!
Click!
Click!
Click!
Click!
Click!

1
30
Lyrics Marking
4
After the modification
is completed, click the
“Marking” and finish
the marking.
You can adjust the entire time of the lyrics both backward and
forward with a regular interval.
Modifying Entire Time
1
Select music files from the file list and click [EDITOR].
Click!
Click!
Click!
Click!
Click!
Click!
Click!
Click!
Click!
Click!
Click!
Click!
Click!
Click!
Click!
Click!
Click!
Click!
Click!
Click!
Click!
Click!
Click!
Click!
Click!
Click!
Click!
Click!
Click!
Click!
Click!
Click!
Click!
Click!
Click!
Click!
Click!
Click!
Click!
Click!
Click!
Click!
Click!
Click!
Click!
Click!
Click!
Click!
Click!
Click!
Click!
Click!
Click!
Click!
Click!
Click!
Click!
Click!
Click!
Click!
Click!
Click!
Click!
Click!
Click!
Click!
Click!
Click!
31
Lyrics Marking
2
Enter a time interval you want from the Preview window
and modify it with [-, +] button.
3
When finished, click the [Marking] button to finish the job.
Click!
Click!
Click!
Click!
Click!
Click!
Click!
Click!
Click!
Click!
Click!
Click!
Click!
Click!
Click!
Click!
Click!
Click!
Click!
Click!
Click!
Click!
Click!
Click!
Click!
Click!
Click!
Click!
Click!
Click!
Click!
Click!
Click!
Click!

12132
LCD DISPLAY Illustration
a. Displays music titles and the sequence
b. Displays the current music status
(Play Pause Stop )
c. Displays the current play time of the music
d. Displays the file format
e. Displays the total number of tracks
f. Displays the remaining battery life
g. Displays the file compression rate (Bit rate)
h. Displays the Playback Mode
i. Displays the current volume level
j. Displays the A-B Range
k. Displays the Repeat / Play Mode
l. Displays the Equalizer
m. Displays the Hold Status
abc ef
hi
a. Displays the current frequency tuned
b. Displays the remaining battery life
c. Displays the Stereo/Mono
d. Displays the Playback Mode
e. Displays the current Volume
f. MUTE(no antenna shown)/ MUTE OFF
(antenna shown)
g. Displays the HOLD status
jk l m
ab
cefgd
g
d
MUSIC MODE
FM MODE
22 33
Power On /OFF
MUSIC MODE
Power on
Push the Play button( ) to turn on the power an intro screen will be displayed.
Providing there is remaining battery life.
In the Pause/Stop mode the power turns off automatically if there are no keys
pressed as per the time setting for Auto Power OFF and Sleep Mode. (See 43
pages)
11
Power off
Power off: Press and hold the Play button( ) for 5 second to turn off the
power.
22
Other manuals for DAH-1000
1
Table of contents
Other MobiBlu MP3 Player manuals

MobiBlu
MobiBlu DAH-1400 User manual

MobiBlu
MobiBlu DHH-200 User manual

MobiBlu
MobiBlu DAH-220 User manual

MobiBlu
MobiBlu DAH-1200T User manual

MobiBlu
MobiBlu CUBE 3 User manual

MobiBlu
MobiBlu DAH-1200 User manual

MobiBlu
MobiBlu DAH-1900 User manual

MobiBlu
MobiBlu CUBE-2 User manual

MobiBlu
MobiBlu DAH-1200 User manual

MobiBlu
MobiBlu DAH-1500i User manual

MobiBlu
MobiBlu DAH-1500S User manual

MobiBlu
MobiBlu Cubisto User manual

MobiBlu
MobiBlu DAH-1500 User manual

MobiBlu
MobiBlu DAH-1400 User manual

MobiBlu
MobiBlu DHH-100-5 User manual

MobiBlu
MobiBlu B153 User manual

MobiBlu
MobiBlu DHH-100-5 User manual

MobiBlu
MobiBlu DAH-900 User manual

MobiBlu
MobiBlu DAH-1000 User manual