manuals.online logo
Brands
  1. Home
  2. •
  3. Brands
  4. •
  5. Modena
  6. •
  7. Chiller
  8. •
  9. Modena CG 3180 Owner's manual

Modena CG 3180 Owner's manual

User
Manual Book
Counter Chiller
CG 3160, CG 2130
2
Thank you for your trust in choosing MODENA products for your household needs. With your
satisfaction as our priority, we constantly aim to deliver stylishly designed products equipped
with state-of-the-art technology to assist you in your daily activities.
This is your guidebook containing everything you need to know about our product. Please reach
out to us if you need further assistance or other information via our Customer Care or our
official website www.modena.com.
3
CONTENTS
Page
INTRODUCTION
2
-
Part 1
: Name of Parts
4
-
Part 2
: Installation
4
-
Part 3
: How to Use
5
-
Part 4
: Cleaning & Maintenance
6
-
Part 5
: Specification
6
4
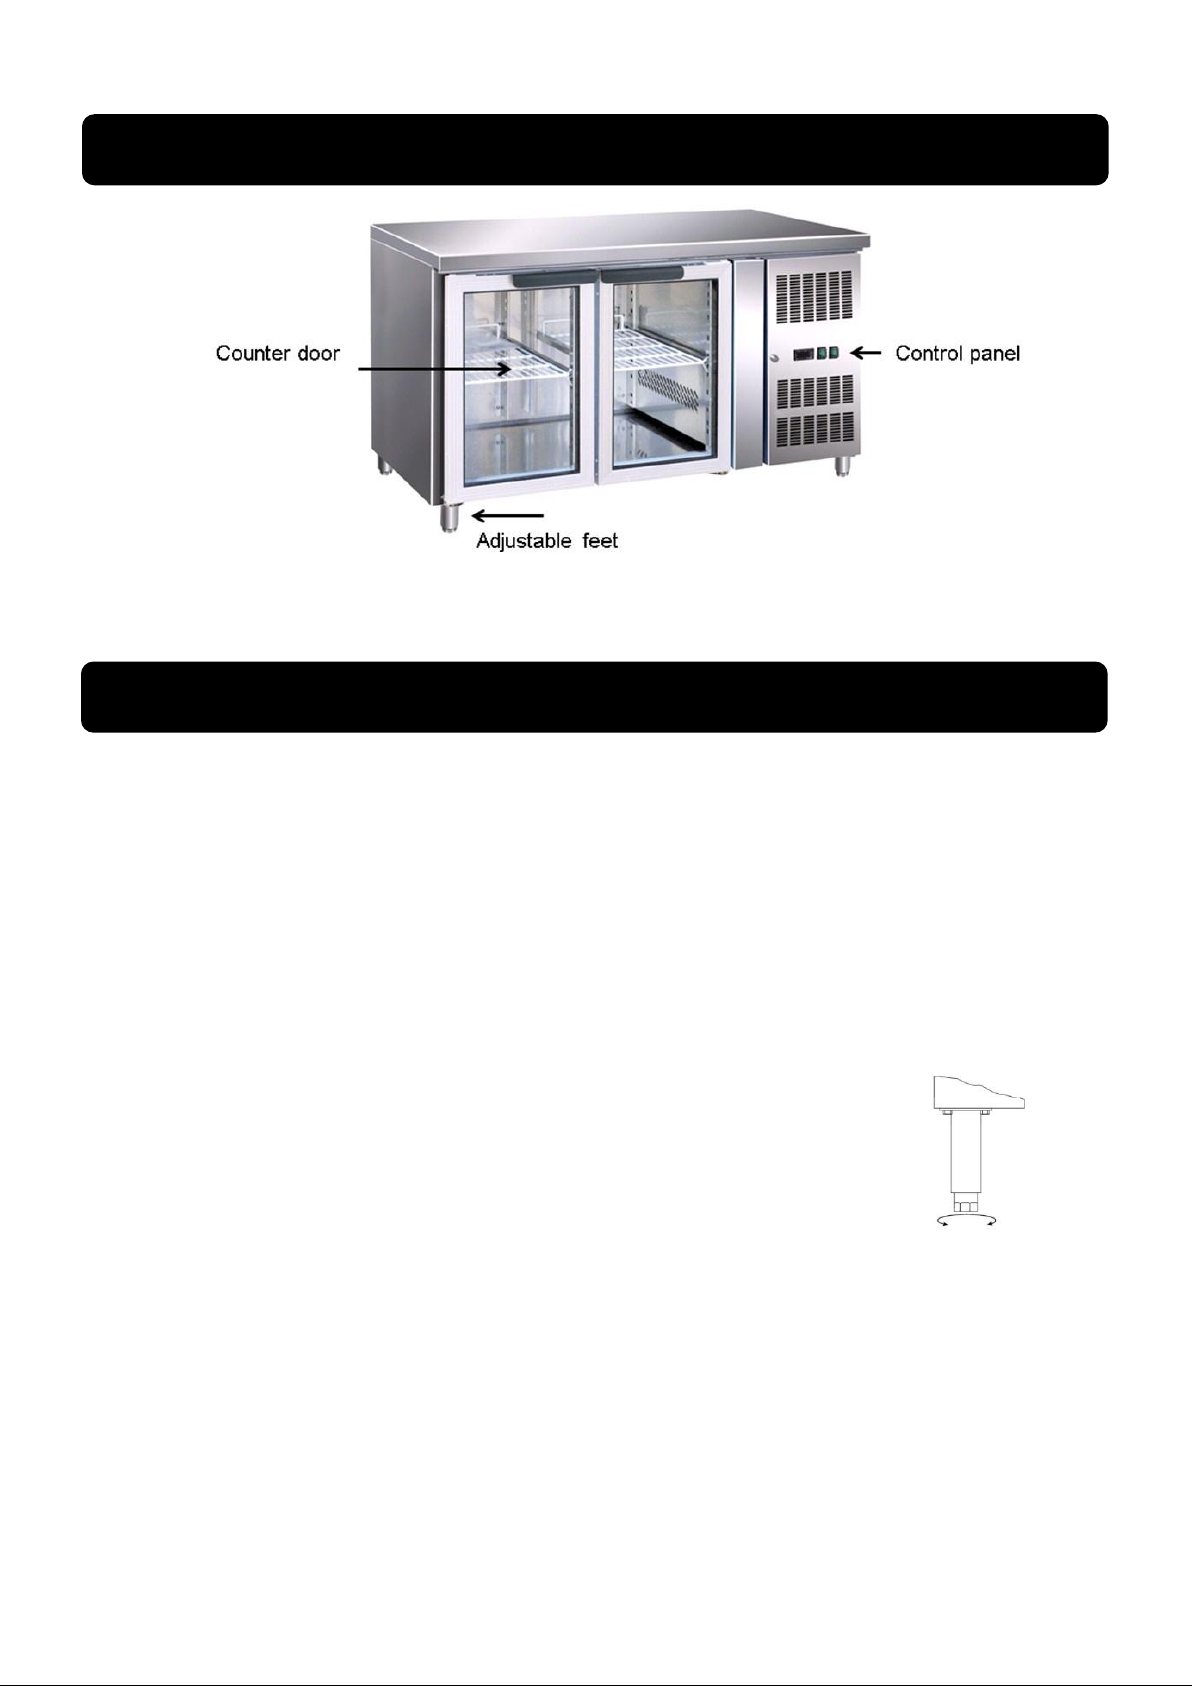
The image is a general overview and is not necessarily the same as the product you receive.
Geatures and completeness depend on the type of the products.
Important safety information
1.
To obtain full utilize of the cabinet, please read this manual book carefully.
2.
It is the user’s responsibility to operate the appliance in accordance with the provided instructions.
3.
Contact MODENA Call Center immediately in case of any malfunctions.
4.
Place the cabinet in a dry and ventilated place.
5.
Keep the cabinet away from strongly heat-emitting sources and do not expose it to direct sunlight.
6.
Always keep in mind that all electrical appliances are sources of potential danger.
7.
Do not store inflammable material such as thinner, gasoline etc. in the cabinet.
8.
We declare that no asbestos nor any CFC are used in the construction.
9.
The oil in the compressor does not contain PCB.
Unpacking and installation
Remove the wooden pallet and the packing. External surfaces are supplied
with a protection foil, which must be removed before installation.
To ensure correct function it is important that the cabinet is level. The cabinet is
supplied with legs, these can be adjusted. See Picture 1.1.
Electrical connection
The cabinet operates on rated voltage of 230 V/50 Hz. The power socket should be accessible.
All grounding requirements stipulated by the local electricity authorities must be observed. The cabinet plug and
power socket should then give correct grounding. If you have any doubt, contact your local supplier or authorized
electrician.
The flexible cord fitted to this appliance has three cores for use with a 3-pin 13-Amp or 3-pin 15- Amp plug. If a B.S.
1363 (13-Amp) fused plug is used, it should be fitted with a 13-Amp fuse.
The wires inside the main cord are colored in accordance with the following code:
Green/Yellow: Earth,
Blue: Neutral,
Brown: Live
The main electrical connections must be done by authorized technicians.
Part 1: Name of Parts
Part 2: Installation
Picture 1.1
5
Start-up of the cabinet
Before use, we recommend that the cabinet is cleaned, see the section on maintenance and cleaning.
Important!
If the cabinet has been vertically placed during transport, please wait for 2 hours
before starting up the cabinet.
Connect the cabinet to a socket and turn on the switch on the control panel, see
Picture 1.9.
Thermostat
The thermostat is placed in the control panel, see Picture 2.0.
The thermostat has been pre-set and in most cases it is not necessary to adjust the settings. When turning on the
cabinet the display will show the current temperature in the cabinet.
Display set temperature:
Press this button and the display will show the set temperature. Press the button again to return to
normal reading.
Set new temperature:
Press this button continuously for more than 3 seconds and the display shows the set temperature.
Press this button to increase the set temperature.
Press this button to lower the set temperature.
Press this button to save the new settings. The display will flash with the new value and will
then return to normal reading.
Alarm codes:
‘P1’ Flashing in the display: indicates that the cabinet sensor is defective.
The cabinet will strive to keep the set temperature until it has been repaired.
‘P2’ Flashing in the display: indicates that the evaporator sensor is defective.
This does not influence the operation of the cabinet, but should be repaired as soon as possible.
Defrosting
The cabinet defrosts automatically with pre-set intervals. If the door to the cabinet is opened or the contents of the
cabinet are changed frequently it may become necessary to defrost the cabinet manually.
Pressing this key continuously for more than 3 seconds will start a manual defrosting and then
return to normal operation.
Defrosted water runs to a container placed in the compressor compartment and evaporates.
Part 3: How to Use
Picture 1.9
Picture 2.0
6
Cleaning & Maintenance
Switch the cooler off at the socket.
The cabinet must be periodically cleaned. Clean the external and internal surfaces of the cabinet with a light soap
solution and subsequently wipe dry. External surfaces can be maintained using steel oil.
DO NOT use cleansers containing chlorine or other harsh cleansers, as these can damage the stainless steel
surfaces and the internal cooling system.
Clean the condenser and the compressor compartment using a vacuum cleaner and a stiff brush.
DO NOT hose the compressor compartment with water as this can cause short circuits and damage on the
electrical parts
Service
The cooling system is a tightly sealed system and needs to be cleaned. It does not require supervision. If the
cabinet fails to cool, check if the reason is a power outage.
If you cannot locate the reason to the malfunction, please contact your supplier. Please inform model and serial
number of the cabinet. You can find this information on the rating label which is placed inside the cabinet on the top
right hand side.
Disposal
Disposal of the cabinet must take place in an environmentally correct way. Please note existing regulation on
disposal. There may be special requirements and conditions which must be followed.
CHILLER
CG 3180
CG 2130
Type
Glass Door Counter Chiller
Door Color
Stainless
Stainless
Main Features
Interior and exterior structure
Stainless steel 304
Stainless steel 304
Door
3
2
Shelves
Yes
Yes
Lamp
No
No
Cooling system
Ventilated
Ventilated
Control panel
Yes (Digital)
Yes (Digital)
Adjustable Thermostat
Yes (Digital)
Yes (Digital)
Outlet for Defrost Water
Yes
Yes
Self door closing
Yes
Yes
Feet
Yes (stainless)
Yes (stainless)
Accessories
Shelves
3
2
Door lock
2
2
Technical Features
Total capacity (litres)
465
314
Power (Watt)
350
350
Voltage (V; Hz)
230;50
230;50
Temperature (celcius)
-2° ~ +10°
-2° ~ +10°
CFC Free Compressor
Yes (1 Pc)
Yes (1 Pc)
Insulation Thickness (mm)
60
60
Internal Dimension
Length (mm)
1230
795
Width (mm)
580
580
Height (mm)
560
560
Part 4: Cleaning & Maintenance
Part 5: Specification
7
Product Dimension
Length (mm)
1795
1360
Width (mm)
700
700
Height (mm)
860
860
Specifications of this appliance may change without notice to improve the quality of the product. Figures in this
manual are schematic and may not match your product exactly. Values stated on the machine labels or in the
documentation accompanying it are obtained in laboratory in accordance with the relevant standards. Depending
on operational and environmental conditions of the appliance, values may vary
11/20

This manual suits for next models

1

Other Modena Chiller manuals

Modena BZ 1014 Owner's manual

Modena

Modena BZ 1014 Owner's manual

Modena CC 3180 Owner's manual

Modena

Modena CC 3180 Owner's manual

Modena CC Series User manual

Modena

Modena CC Series User manual

Modena UC Series User manual

Modena

Modena UC Series User manual

Modena BZ 1050 DASS Owner's manual

Modena

Modena BZ 1050 DASS Owner's manual

Popular Chiller manuals by other brands

Multiaqua CWA2 Series Installation and operation manual

Multiaqua

Multiaqua CWA2 Series Installation and operation manual

Water Furnace TruClimate 300 installation manual

Water Furnace

Water Furnace TruClimate 300 installation manual

Hydro Tek Active Aqua Chiller, 1/10 HP instructions

Hydro Tek

Hydro Tek Active Aqua Chiller, 1/10 HP instructions

Fryka Hei-CHILL 400 Pro operating instructions

Fryka

Fryka Hei-CHILL 400 Pro operating instructions

York YK Service instructions

York

York YK Service instructions

Lennox EMEA MONOTOP R290 Installation, user and maintenance manual

Lennox EMEA

Lennox EMEA MONOTOP R290 Installation, user and maintenance manual

S&A CW-6300 user manual

S&A

S&A CW-6300 user manual

Full Spectrum Laser CW-3000 user manual

Full Spectrum Laser

Full Spectrum Laser CW-3000 user manual

Data Aire DAC Series Operation and maintenance manual

Data Aire

Data Aire DAC Series Operation and maintenance manual

Server CCP manual

Server

Server CCP manual

Daikin EWLQ014KCW1N Installation, operation and maintenance manual

Daikin

Daikin EWLQ014KCW1N Installation, operation and maintenance manual

McQuay WHR Series Installation and maintenance data

McQuay

McQuay WHR Series Installation and maintenance data

York YCAV1039 Installation operation & maintenance

York

York YCAV1039 Installation operation & maintenance

Daikin EWWD320DZXSA1 Installation, operation, maintenance guide

Daikin

Daikin EWWD320DZXSA1 Installation, operation, maintenance guide

Stulz WSA Explorer Series Original instructions

Stulz

Stulz WSA Explorer Series Original instructions

Castel MAC T3 user guide

Castel MAC

Castel MAC T3 user guide

Daikin EWAP/EWYP 060-260 Installation operation & maintenance

Daikin

Daikin EWAP/EWYP 060-260 Installation operation & maintenance

SMC Networks HRS200 Series Information

SMC Networks

SMC Networks HRS200 Series Information

manuals.online logo
manuals.online logoBrands
  • About & Mission
  • Contact us
  • Privacy Policy
  • Terms and Conditions

Copyright 2025 Manuals.Online. All Rights Reserved.